How to find digital TV. What do you need to receive digital terrestrial television? How to receive a signal and watch T2
Digital broadcast channels. DVB-T2 in Moscow.
Channels of digital terrestrial television.
DVB-T2 channel list. Frequencies of DVB-T2 digital terrestrial channels in Moscow.
Broadcasting of digital terrestrial channels of the first and second multiplexes is free of charge!!! This is a replacement for broadcast channels. They will not be paid. It is planned to increase the number of channels to one hundred. Among them will be commercial paid packages.
Digital terrestrial channel number |
List of digital terrestrial channels |
The frequency of the digital terrestrial channel. (MHz) |
Broadcasting standard for digital terrestrial channels |
|
Channels of the second multiplex |
Home NTV+ Sport Plus |
Second multiplex frequency |
DVB-T2 |
|
Channels of the first multiplex |
First channel Petersburg 5 channel culture Carousel |
Frequency of the first multiplex |
DVB-T2 |
| 34 |
First channel culture Carousel |
578 | DVB-T |
Digital terrestrial television
The main difference between digital terrestrial channels and analog ones is the high quality of digital channels (the absence of noise, interference and repetitions) and a clearer picture - high noise immunity. I install antennas on the window in the houses, on the opposite side from the Ostankino tower. The data transmission protocol is designed so that the reflected signal is received without unnecessary data and you see an excellent quality picture.
DVB-T2 digital TV is ideal for large LCD and plasma TVs.
The list of digital terrestrial television channels in Moscow now includes 20 channels.
HOW TO WATCH DIGITAL TERRESTRIAL CHANNELS?
To receive digital terrestrial channels in Moscow and the region, it is necessary that the TV has a built-in digital tuner of the DVB-T2 standard (see the technical specifications of the TV). Otherwise, you will have to buy an additional DVB-T2 receiver that connects to any TV via HDMI or composite (tulips or scart) input.
Digital reception essential channels is carried out on an external antenna of the UHF range. In your apartment building cable home network (Akado, OnLime, etc.) most likely these digital channels TV will be on other (cable) TV frequencies that do not match the on-air frequencies listed in the table. It is required to start auto search for channels.
If the distance from the transmitter (Ostankino TV tower in Moscow and Moscow Region) to the TV is less than or about 20 km, then reception is possible on an indoor UHF antenna. Otherwise, you will have to use an external UHF antenna, possibly with an amplifier. It all depends on the height of your antenna and the distance to the TV tower. On a good outdoor UHF antenna with a low-noise amplifier, reception of digital terrestrial channels is possible at a distance of more than 80 km from the TV tower.
Digital TV coverage area in Moscow and the region (channel 30)
Digital terrestrial television network in Moscow and the Moscow region (stages of construction)
Analog terrestrial channels
Essential TV channels. TV channel frequencies in Moscow.
TV CHANNEL NUMBER |
LIST OF AIR CHANNELS |
FREQUENCIES OF AIR CHANNELS. (MHz) |
| 1 | First channel | 49.75 |
| 3 | TVC | 77.25 |
| 6 | Russia 2 | 175.25 |
| 8 | NTV | 191.25 |
| 11 | Russia 1 | 215.25 |
| 23 | Pepper | 487.25 |
| 25 | euronews | 503.25 |
| 27 | STS | 519.25 |
| 29 | Disney | 535.25 |
| 31 | Home | 551.25 |
| 33 | Russia K | 567.25 |
| 35 | TNT | 583.25 |
| 38 | Friday | 607.25 |
| 44 | Channel Five | 655.25 |
| 46 | TV3 | 671.25 |
| 49 | REN TV | 695.25 |
| 51 | Channel Yu | 711.25 |
| 57 | Star | 759.25 |
| 60 | 2X2 | 783.25 |
The rapid development of technological progress in the field of television broadcasting provides great opportunities for digital television for better reception of television programs in comparison with the outdated analog one. But in order to be able to watch digital TV broadcasts, you need to connect the receiver (special set-top box) to the TV. Before you connect a digital set-top box to a TV, you will need to decide on the choice of the receiving device - the antenna. So, in order to watch digital terrestrial television (CETV) without problems, you will need:
- antenna;
- receiver (prefix);
- channel setting.
The type of antenna is selected depending on the distance to the transmitting TV tower. Therefore, you should install an indoor antenna or an outdoor one. But, regardless of the type of location, it should work in the decimeter range, namely, to receive frequencies from 470 to 860 MHz. will work well within the city where the transmission tower is located.
If the distance from the TV receiver to the TV tower is more than 15 km, you need to use outdoor antenna.
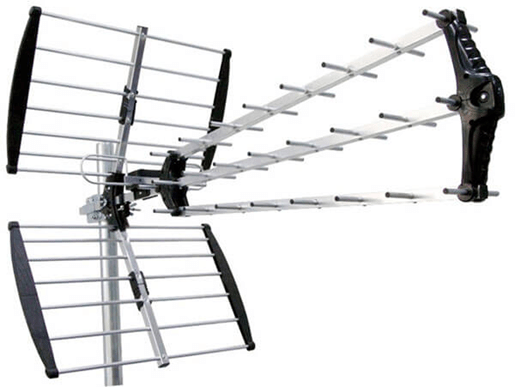
Antenna for set-top box dvb t2 can be bought at the same outlets where the tuners themselves are sold. In this case, high-quality TV signal reception is guaranteed, since the receiving device is designed specifically for the digital tuner.
If you are going to install a TV set and set up the TsETV, then before connecting the set-top box, it is recommended that you first consult with your neighbors. They can advise you on the best type of antenna for the area.
Prefix (receiver)
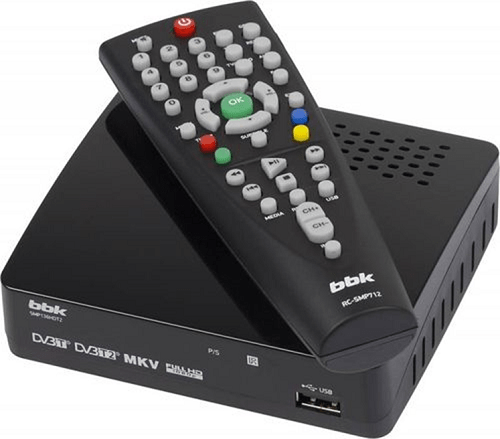
As already mentioned, in order to be able to view TsETV, you will need to buy a TV set-top box, which is also called a dvb tuner or receiver. There are so many such devices on the electronics market that it is easy to get confused and overpay extra money for functions you do not need in the device. It is recommended to choose a tuner model based on your needs, since they all catch a TV signal, in principle, the same way. The difference may be, perhaps, in the established additional options.
For example, if the set-top box will be used not only as a CETV receiver, but also as for watching video from a flash drive, then this model must be purchased. But if you don't need it, buy more simple model. The figure, for example, shows a model of an inexpensive bbk receiver.
More expensive models digital TV tuners have "on board" options "Scheduler" and TimeShift. These features allow you to be able to record any broadcast at the specified time, and your presence is not required. It is only required to set the start time for recording the transmission on the desired channel, and the time when the recording should stop.
Currently gaining popularity set-top boxes from Rostelecom, which have a modern filling: big size random access memory and powerful processor. The tuner from Rostelecom is connected to the TV in the same way as other similar devices. Included is, which can be configured to control both the set-top box and the TV itself.
If you are going to buy a TV, then look at technical specifications whether it supports DVB-T2. In most modern TV models, a DTV tuner is already built in, and you do not need to buy a set-top box.
Connection types
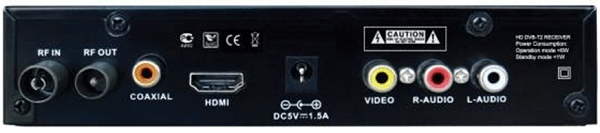
Connecting a dvb t2 set-top box to a TV receiver is not much different from connecting a satellite receiver or av receiver. There are several methods for connecting the t2, and they depend on the types of connectors found on the two paired devices. The tuner can be connected via:
- RCA cable (popularly, the interface is called “Tulip”);
- antenna cable.
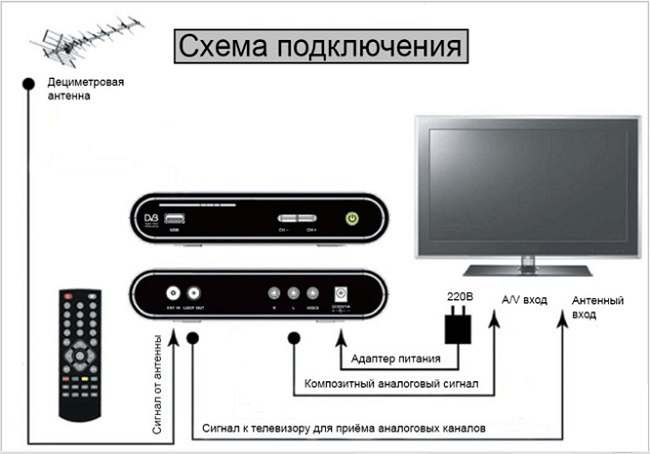
The figure shows the general scheme for connecting a tuner to a television receiver.
RCA cable
This is the easiest and most standard way to connect a digital tuner to a TV. The quality of the picture, of course, will differ from an HDMI connection, but the difference will not be noticeable on TV sets with small diagonals.
So, before connecting the cable, it is necessary to de-energize both devices. After de-energizing, insert the cable plugs into the sockets on the set-top box. Since each plug has its own color, they are inserted into the connectors of the corresponding color. The cable with the yellow plug receives a video signal, and the white and red plugs carry 2 channels of audio. Next, an external or indoor antenna is connected to the tuner in the appropriate socket (on the prefix it is designated as “RF IN”).
There are times when the TV does not have a Tulip interface, but there is scart connector, which is popularly called "Comb". The figure below shows how it looks (for example, a Samsung TV set is taken).

How to connect the receiver to the TV in this situation? In this case, you need to purchase a special adapter from RCA to SCART. In the same way, you can connect a satellite receiver.

HDMI interface is capable of transmitting a signal High Quality. For example, the quality of the transmitted video signal can be up to 1080p, and the audio signal - 192 kHz. Such opportunities correspond to the highest standards in the field of multimedia content.

If you have a modern TV receiver and it has an HDMI connector, then it would be more correct to connect the receiver to the TV through this interface. The same recommendations apply to satellite tuner to watch high definition TV.
Antenna cable
This type of connection is used to connect a digital receiver if there are no other connectors on the TV receiver other than the antenna input. For example, in this way you can connect the tuner to an old TV by plugging the cable into a socket called RF OUT.

Before connecting the t2 digital tuner to your TV, you will need to purchase the cable shown in the figure below.

This method of connecting to the receiver cannot give a picture good quality, and you should not compare it with the image transmitted via the connected HDMI interface. But given that the TV is old, the image can be considered acceptable for this situation.
Channel setup
After connecting the receiver to the TV, it's time to think about how to set up TV channels. Many users, when connecting the receiver to a TV, the question arises: how many channels can you watch if you set up a digital tuner? In reality, it all depends on whether you will use the paid package of services of a certain provider, or whether it will be enough for you on-air television. About 20 free TV channels are available for CETV. If this 20 TV programs is not enough for you, then to watch the encoded broadcasts you will need to purchase, which is inserted into the TV receiver.

And already in the CAM-module the card of the TsETV provider chosen by you is inserted. In this scenario, you get access to a huge number of television channels for a certain subscription fee.
So, in order to start tuning the DTT, you should turn on the TV (the set-top box must be connected), switch it to AV mode and go to the tuner menu.

Since the set-top box does not contain a list of TV channels in its memory by default, you will have to find them yourself. For this, it is recommended use "Auto Search".

After a while, you will see that the receiver has found from 10 to 20 TV channels.

When the search is completed, the tuner will offer to save the list of found broadcasts, after which you can start watching TsETV. The detailed configuration algorithm is similar for different manufacturers, however, there are certain nuances of settings and.
The Most Reliable TVs of 2018
TV LG 43UJ634V
TV Samsung UE50MU6100U
TV Hyundai H-LED24F402BS2
TV LG 22LH450V
TV Samsung UE22H5600
Instruction
Firstly, for all people who want to connect, the question arises: do you need some kind of special TV? Where to get it? And how much does it cost? The answer will please everyone. You don't need any special TVs. An ordinary modern “box” is suitable, which has a standard antenna input, scart input, low-frequency input (tulips), S-Video input, etc. With their help, a set-top box-decoder is connected to the TV.
The process of installing the set-top box is as simple as connecting the antenna to the TV and you can handle it yourself without overpaying for installation. Simply plug one end of the cable into the dedicated input on the set-top box and the other end into the appropriate input on your TV.
Second, people ask what optional equipment need to connect digital? It depends on your TV and the provider with which you will connect the service. As a rule, it is required to purchase a receiver of one of the types. This will depend on what type of DH you will be connecting and what will be the signal source. The receiver can be connected to a cable, satellite dish, computer networks (WiFi, Ethernet). The source can also be terrestrial digital. Based on the foregoing, we can conclude that in addition to the receiver, you may also need satellite dish, cable analog TV, Internet connection on one of the listed. There should also be a UHF antenna. Here, in fact, is all the equipment.
As for the payment, you will have to pay for the purchase necessary equipment one-time. This will be the biggest cost. You can also use the service of installation, connection and configuration of equipment. Or you can do it yourself. In addition, on a monthly basis, you will have to pay for the channel package you have chosen, which is generally not expensive at all.
Even before connecting, you need to select a service provider. Familiarize yourself with all DH operators in your city. Ask for a consultation. Ask for the opinion of your friends who already use this service. Watch their TV for yourself to get a more accurate picture. In addition, some suppliers may give you a presentation and show you the advantages of their equipment and demonstrate them. This, of course, must be agreed in advance. Now, knowing what you need, you can safely go to the store or to various Internet sites and choose exactly the digital TV that you need.
To watch digital channels, additional setting not required. It will be enough to select the AV input or HDMI input as the signal source, depending on which method of connecting the set-top box you have chosen. How to choose the right signal source will be written in your instructions for the TV. Most often, the selection is made by pressing the AV or SOURCE button on the remote remote control. Changing channels and adjusting the volume while watching can be done using the remote control and the TV. To be able to watch not only digital, but also analog programs, connect the antenna input of the TV to the Cable Out (or RF Out) connector on the digital set-top box and set up analog programs on the TV, as described in the instruction manual for your TV.
To customize, you can use a number of functions. Most often, the set-top box is already configured at purchase, but if desired and necessary, you can reconfigure it. To set the menu language, sound, subtitles, go to System Setting and click on the Ok button. In the System Setting menu, select the Language Setting line and press the Ok button. Use the arrow buttons to move through the menu and select the language you need. Confirm your choice by pressing the Ok button.
Before you start watching digital TV, you need to search for channels. To do this, select the appropriate line and click Ok. Set the desired parameters in the channel search menu. Search mode - Manual, frequency - 386000 kHz, bit rate - 6750 kB/s, QAM type - 256 QAM. Turn on network search. After setting all the settings, start the search by pressing the Ok button. If you enter all the parameters correctly, a color signal level indicator will appear. After finishing the channel search, press the OK button, and then the Exit button until you completely exit from all menus.
The development of digital television is a necessity faced all over the world. The analog signal, of course, extends over long distances compared to the digital signal, but the quality of the image and sound deteriorates with increasing distance to the broadcasting antenna. There was only one way out of the situation - to encrypt the signal so that it could be received and processed tens of kilometers from the translator without loss of quality. So the choice settled on the digital method of transmitting information.
History of digital television
For more than 60 years, analogue television has been the only means of delivering news, movies and entertainment to the homes of millions of viewers around the world. If the receiver, that is, the TV, is located near the repeater, then the signal and sound are of acceptable quality. When removed, it becomes necessary to amplify the signal various antennas. The farther the repeater, the larger the antenna should be. At a distance of 50 kilometers, these receiving antennas reach enormous sizes, like a multi-story building. All for the sake of several channels in mediocre quality.
Finally, in 2009, after many experiments with various formats, modern DVB-T2 digital television was launched on the air. A number of questions immediately arose. Nothing has changed for cable and satellite television users, but analogue signal recipients have experienced new problem. To decode a digital signal, you need a TV with a built-in digital signal reception module or a set-top box. The cost of the latter reaches $ 50, which is not affordable for everyone.
The issue is partially solved with the help of state subsidies, and, perhaps, in the next few years, digital television will completely replace analog television.
What you need for high-quality digital TV reception
The quality of a digital television signal, like an analog one, depends on the distance to the repeater. The difference is that an analog picture with poor signal reception will blur and the sound will hiss. In digital television, the image will either completely disappear, or will be displayed on the screen in rectangular blocks. That is, for high-quality reception of a digital television signal, an antenna is also needed, but not as bulky as in the case of an analog signal.
The television signal is distributed in two ranges - meter (English designation VHF) and decimeter (UHF). The first one does not allow the signal to propagate over long distances, its waves do not cope well with obstacles in the form of buildings, walls inside the apartment. Therefore, most channels broadcast in the decimeter range. Accordingly, for high-quality reception, you will need DVB-T2 for digital television.
Types of decimeter antennas
All antennas for receiving digital television are antennas of the decimeter range, as well as the meter range. Thus, they can be divided into enlarged groups - indoor and outdoor.

Both types of antennas can be either passive or active. The latter has a built-in amplifier, which allows you to capture weak signal. But it is more narrowly focused, it must be directed towards the signal source. The passive amplifier does not have, but receives a signal from all directions for its subsequent supply to the signal amplifier on the TV.

Which antenna to choose
Before you can tune the antenna, you need to pick it up. Professional approach installation involves measuring the signal level using a portable sensor. It will be very useful in areas with dense buildings, where the signal comes not only directly from the repeater, but also reflected from the terrain or comes from several repeaters at once. After obtaining the characteristics of the signal, it is necessary to study the instructions for the antenna so that the reception quality is guaranteed.
If it is not possible to use a portable sensor, then you can use general recommendations, pick up the antenna by trial method. The recommendations are simple. For an apartment in an area with sparse buildings, a regular, but high-quality indoor antenna for DVB-T2 is suitable. In a densely built-up area, a signal must be used. On the open area, that is, in cottage villages, in summer cottages, it is already necessary to use an external antenna. Using the free replacement of goods in the store, you can independently configure several models of antennas until you find the right one.
Setting up a decimeter antenna
Before installing a decimeter antenna for DVB-T2 digital television, you must configure it to receive a signal. By connecting the antenna output to a TV or set-top box to decode the signal, you need to point the antenna in the direction where the repeater is located. Then you need to execute automatic tuning channels from the device menu. The entire frequency range will be tested.
By turning on any channel, if its quality is insufficient, you can slowly rotate the antenna to find the ideal position in which the signal will be the best. Typically, receiving devices show the signal strength for each specific DVB-T2 channel. Do not think that in the ideal position for receiving one channel, all the others will be of sufficient quality. After setting up the reception of one channel, you need to move on to the next and so on until all channels are broadcast.
If the receiver did not find a single channel during automatic tuning or found less than half, in this case, how to tune the antenna? It must be rotated 180 degrees to receive the reflected signal. This is often found in residential areas, where a large number of houses interfere with the signal.

In open areas, the antenna should simply be directed towards the repeater and automatic tuning of DVB-T2 channels on the signal receiver should be performed.
Installing a decimeter antenna
After successful channel tuning, the result must be fixed, that is, fix the antenna in the position in which the signal reception turned out to be the best. Indoor antennas are usually installed on cabinets, cabinets, but this is not aesthetically pleasing. Stands of modern antennas provide places for fastening with screws and screws, which can be installed directly on the wall.

Outdoor decimeter antennas for DVB-T2 digital television are mounted on brackets or supports. An outdoor antenna is usually supplied with fasteners that will allow you to securely mount the outdoor antenna on a support. When outdoor antennas are used in apartments, they are usually mounted outside the home: on balconies or external walls. Then, as in the case of an indoor antenna, you will need to drill several holes in the wall for a secure fit.
The process of operating a decimeter antenna
A few more comments regarding the operation of decimeter antennas for DVB-T2 digital television. Depending on the weather conditions (even the time of day), the signal reception quality may vary. Therefore, the antenna mount should provide for the possibility of its rotation to adjust the better signal reception.

Choosing the right antenna will allow you to enjoy the digital quality of the television signal. The DVB-T2 network is constantly evolving, new channels appear. This great alternative cable and satellite television because it does not require a subscription fee.
The advent of digital television has caused a kind of excitement, as content in digital quality has become available to a wide range of users. V Lately it is this direction of television that is developing very actively, a large number of offices have appeared that, for a fee, will provide services for connecting and setting up digital television. Good news is that you can set up digital television on your TV yourself.
So in this article we will consider in detail all aspects of the setup, both in the general case and for TVs from specific manufacturers. It is worth noting that there are different types digital television. All proposed schemes relate to the cable "numbers".
General instruction
First consider general scheme digital TV reception settings. V various models TVs, the operation sequence and item names may differ slightly. Don't worry, next we will look at the customization features for specific brands, all points will be illustrated.
1. Use the remote control to enter the menu of your TV. In the window that appears, select "Options". In order to go directly to the configuration, you must select the "Auto-configuration" item. A window should appear on the screen prompting you to select one of the signal sources: cable or antenna. Select the first option, and then click the "Start" button.
2. After the performed operations, a window should appear in which you must select the “Digital” item as the signal source, and then press the “Start” button again.
3. We are at the final stage of setting up digital television. In the window that appears, we find the item "Search Mode", several options will appear, we need the item "Full". Click and fill in all the fields with the data below.
Frequency (kHz) - 314,000 (314 MHz).
Modulation - 256 QAM.
Transfer rate - 6875 kS / s.
Please note that some TV models support network search. This means that you do not need to manually specify the above parameters. Just after selecting the desired search mode, press the "Search" button. As you can see, setting up digital television on a TV is quite simple. For those who are confused, read the illustrated instructions below.
LG
It is logical to assume that different models of TVs from the manufacturer LG use their own firmware and their own menu. However, in general, the menu of all TVs has characteristic similarities. Find the “Menu” button on the remote control, press it and a window appears on the screen in which you need to select the “Options” item.

In the "Options" tab you will see several options available for change. In the "Country" item, you must specify either Germany or Finland.

After that, you need to go to the "Settings" menu, there select the "Auto search" item in which specify "Cable" as the connection method.

After the done manipulations, a window should open in which you need to select the “Settings” item and specify all the values \u200b\u200bas in the figure below.

If you have followed all the instructions correctly, then after searching, the TV will find all available channels, as well as radio stations.

Please note that LG TVs use an automatic channel update feature that periodically resets the existing channel list and starts new search. For convenience, it is desirable to disable this feature. To do this, go to the "Digital Cable Setup" tab and turn off automatic updates. Thus, setting up digital TV on LG TVs is quite simple. It just takes a little care.
Setting up digital TV on TVs Philips
So, find the “Menu” button on the remote control and use it to go to the menu of your TV. Next, you need to go to the "Configuration" section.

In the window that appears, click on the "Install" item, after which a secondary menu will appear on the TV screen, in which you must select the "Channel Setup" section. Another submenu will appear, in which we select the item “Automatic. Settings". If you have completed all the transitions correctly, a message should appear that warns about the upcoming update of the list of all channels. We press "Start".


Go to the section"The country " and choose from the list either Finland or Germany.

Select the connection method"Cable".

Before starting the channel search process, go to the “Settings” item and make the settings according to the images below.


You have now managed to set up digital TV on your Philips TV. You can start directly searching for channels, for this, click "Start".

Setting up digital TV on TVs Samsung
Press the "Menu" button on the remote control. Your TV menu should appear on the screen. We go to the "Channel" section (depicted as a satellite dish). Several tabs will appear on the right, select the "Antenna" item and select "Cable" as the connection type. Next, you need to go to the "Country" tab and select the "Other" parameter. In this case, the TV should request a pin code. If you have not changed it yourself, then enter 0000 (default value).

Go to the "Auto-tuning" tab, select "Cable" as the signal source.

Set all the parameters as in the image below, then click "Search".

After all operations, your TV will detect all available channels.

Setting up digital TV on TVs Toshiba
Using the "Menu" button, go to the TV menu and select the Russian menu language.

Locate the "DTV Manual Tuning" tab.

Manually enter all the parameters as in the image below.

After that, click "OK", the channel search will begin.

conclusions
We have analyzed in detail the scheme of how to properly set up digital television on a TV. All sequences are supported by images for better perception. If you have any questions, use the feedback form on our website or ask a question in the comments.
