We decorate the pond on the site with water lilies from plastic bottles. Step-by-step instruction
original pond for a summer residence can be made from plastic bottles. In the photo you can see how this idea was implemented. The color of the bottles was originally white, they are from under drinking water.
The owners of the site decided not to dig a pit for a pond, but used raw materials that are usually thrown into the trash. During the winter, plastic one and a half liter bottles of drinking water accumulated. Ordinary transparent. Then, when spring came, and with it the summer season began, the bottles were cut off by a third from the bottom, painted from the inside with blue spray paint.
Distributed on the site according to a pre-prepared perimeter template made of stones. The stones, by the way, are also painted in White color spray paint. Additionally, several artificial plants, flowers and herons were stuck into the "pond".
The result is always a beautiful pond, which in its originality is not inferior to natural analogues. The idea will be of interest primarily to those who do not like unnecessary trouble, but at the same time want to make their cottage attractive and interesting in their own way.
Bringing plastic to life

Who dreams of a water lily pond the way I dream of it? Here is a photo of a pond with these flowers. It's beautiful! Highly. I wish I could do something similar in my area.
O limitless possibilities, which gives needlewomen and just people with imagination junk material, a lot has been written. One of the most affordable, and therefore popular materials is plastic. It is malleable, easily dyed, takes any desired shape, and most importantly - there is a lot of it around. This, of course, is about plastic bottles that are in every home. The easiest way to use them is as vases and various coasters. To do this, the upper part is cut off, and the edges are processed as desired. But today we will offer you unusual decision- craft water lilies from plastic bottles, which will look especially impressive on small ponds or on the surface of country ponds, pools, lakes.
stock up necessary materials you don’t have to, because making a water lily with your own hands requires only what is at home.
We will need:
- white plastic bottles - 3 pcs;
- plastic bottle yellow color;
- plastic five-liter bottle;
- scissors;
- candle;
- glue;
- green paint.


To make your pond even more picturesque, do not limit yourself to one lily. Snow-white flowers on a bright green leaf will certainly please the eye. A small recommendation: tie a rope to the craft, fasten the other end to the shore. So your flowers will not migrate through the pond, carried away by the current or wind.
As a support sheet, you can also use a piece of linoleum cut out according to the appropriate template. In this case, it is necessary to attach a water lily to it with reverse side. Firstly, the fabric base is easier to dye in green color, and, secondly, not so quickly water will destroy its front side, covered with a waterproof film.
By the way, the presence of a reservoir for the manufacture of such crafts is an optional condition. Painting the linoleum Blue colour, and cutting it out in the shape of a lake, you can easily make decorative pond on your lawn. To prevent pets or your baby from destroying it, fix the edges of the “lake” with stones (they can even be cemented). By decorating the garden in this way, you can make beautiful crafts
Crafts from plastic bottles: Lake of beauty and moreEverything ingenious is simple! It's just so unbelievable!
I know a lot of people throw away bottles, but I'm not one of them! I've been collecting them diligently all summer! My soul felt - plastic bottles will come in handy for me. See what interesting crafts can be made from plastic. I assure you - there is a place for a flight of fantasy and skill! Photos, descriptions of works will perfectly help you in creating unique crafts.
THE FIVE BEST IDEAS
1. IDEA - BLUE LAKE (photo at the beginning of the message)
This wonderful lake from plastic bottles was created by Elena Ryzhova and Zinaida Tikhova, residents of the city of Uglich. At the competition dedicated to the anniversary of the city, they received 1st place for the presented project. And, you see, it's a good idea. Although such a lake is made elementary!
1. To create this craft from plastic bottles, you only need the bottoms of the containers. Although the bottoms are a conditional definition: it is better to cut the bottles in half in order to more reliably stick them into the ground or sand. The more bottoms - the more natural, the lake will turn out to be larger.
2. In the process of preparing the bottoms, you need to paint the color of the water (blue, blue, turquoise). It is better to paint from the inside so that the surface is protected: this will guarantee the durability of the garden crafts. You can paint with a brush or just pour a small amount of paint into each bottom, and then “shake” it so that it spreads along the walls.
3. It turns out very beautiful: the color of the water plus the corrugated wavy shape of the bottom. What you need for a decorative pond.
5. It remains to prepare the site: dig up so that the soil is soft. Now we just stick the bottoms with slices into the ground very tightly to each other, organizing the “water surface”.
6. It remains to arrange the coast. Here it is done with the help of stones painted white (emphasizes the blueness of the water).
7. And, of course, we populate the decorative lake with figurines (water lilies, frogs, herons), and also decorate with plants.
In the development of this idea for the garden: in this way you can make a stream, a river (it would be nice with a decorative boat), and even a waterfall.
2. IDEA - A LOCK FROM PLASTIC BOTTLES
The magic castle on the site looks interesting. It can decorate the playground or alpine slide, and, in general, any corner of the garden.
In addition, such a castle can not only be decorated in different ways, but also “build” it in such a shape as you like. Moreover, the shape of one castle can be changed from time to time.
The design of the castle includes single crafts from plastic bottles of different sizes and plastic bottles. How many separate containers - so many separate buildings.
You don't have to limit yourself to building a castle. It is better to resort to the development of ideas for a garden and build a street with colorful houses, a town, a village, etc. There is also no need to line up crafts from plastic bottles: if you make a town where you can walk between the buildings, it will be very original.
Children especially love such play towns. You can populate a castle or town with "inhabitants": toy figures of men. Or perhaps your child will discover the movement of toy cars through the streets of the town.
In the course of developing the idea for a garden, you can make “almost real” paths: from stones, bricks, tile remnants, etc., plant flower beds from miniature (undersized) plants.
The type of castle or town depends on what size and shape of plastic containers you choose (small, large, round, rectangular), as well as their painting. You can paint containers both inside and outside. Background coloring is easier to do by pouring a little bit of paint into each plastic bottle and turning it so that the paint "captures" the entire surface of the container. Draw the details of the turret houses with a brush (this, of course, will work better from the outside).
Be sure to secure crafts from plastic surfaces so that the town does not destroy the wind. You can pierce each bottom of the bottle-house with some kind of pin, rod, and then “plant” it in the ground. You can simply pour stones into containers to make them heavier.
By the way, a castle or a town can be decorated with various natural materials: make buildings lined with small pebbles (pebbles, crushed stone), pieces of tiles. For this, cement or special glue for facade work is used.
Ideas for a garden of such a plan are very multifaceted if you take up the construction decorative castle or a town, perhaps crafts from plastic bottles themselves will “tell” you the design.
3. IDEA - MAGIC LIGHTS OF WISHES
DIY garden ideas are so capacious that an ordinary plastic bottle can be turned into an “almost magical” object. And, quite simply.
For example, Chinese wishing lanterns are considered magical. Real Chinese wishing lanterns are flying (they are filled with hot air or gas). But they do not fly all the time: waiting for a special occasion, Chinese lanterns play the role of garden or house decorations (in a suspended state), as well as original lamps.
Crafts for the garden in the form of Chinese lanterns are a grateful thing. The material is free, available in unlimited quantities. The technique is the simplest. But it requires accuracy.
How to cut a plastic bottle straight?
In order for the strips of the Chinese lantern to turn out even, first of all, the bottle must be marked. It is better to do this with a felt-tip pen: the lines are clearly visible on the plastic, and it is washed off easily.
It seems that cutting a plastic bottle evenly is difficult: the plastic of the future garden craft will bend when cut. In fact, everything is simple. An empty bottle must be closed with a lid, and puncture holes should be made with a red-hot awl or carnation at the beginning of the lines (for example, at the neck). And from these holes, slowly, we cut with sharp scissors along the lines. Get perfectly even stripes.
How to make spherical crafts from plastic bottles
When you cut the bottle into strips, the bottle will still hold its shape. Therefore: in the bottom we make two holes with a red-hot awl and stretch the fishing line through them to the neck. The more we stretch, the more the shape of the craft from plastic bottles becomes like a ball. We fix the ends of the fishing line on the neck (tie, wrap, or make more holes).
blank for garden crafts from plastic bottles is ready. Let's start turning it into a Chinese lantern.
How to color a Chinese lantern
First of all, the blank must be painted with bright colors (acrylic, for example, but oil can also be used). Paint carefully, with a thin brush, so as not to stain adjacent strips. This is a simple coloring option, but bright and beautiful.
The second option: painting the craft in one color (red, for example), and applying hieroglyphs to the strips with contrasting paint. It turns out amazing, despite the fact that the strips diverge (or maybe because of this). In itself, decorating crafts from plastic bottles with hieroglyphs is interesting. But you can apply hieroglyphs with meaning. For example, the characters for “love”, “health”, “well-being”, etc. You can find many images of characters on the Internet, so this is not a problem. Painted crafts can be opened with varnish - they will look generally amazing.
Look at real Chinese lanterns, maybe you will come up with ideas for additional decorations. Do not try to repeat the decorations exactly the same: real Chinese lanterns and shapes are different and decorated in different ways.
How to hang a flashlight or make a lamp out of crafts
Hang Chinese lanterns on tree branches, attach to outdoor canopy, pergola, very simple. We insert a stick with a tied fishing line, twine, ribbon into the neck, and turn it so that it stands up. Can be hung.
It is also easy to make a lamp out of such crafts for the garden. Only first you need to insert a wire through the neck of the workpiece and fix it. It's simple, since the neck is narrow, you can use a washer, a plate with a hole, just seal it with some non-combustible material. Option: close the neck with a cork, make a small hole in it so that the wire is pulled through, but with difficulty. The light bulb can be screwed in by spreading the strips of the craft.
The embodiment of this idea for a garden with your own hands - an elegant and, no doubt, magical Chinese lantern (wish-fulfilling) - will bring you pleasure and decorate your site in an original way. And, of course, do not waste time on trifles: make not one, but several of these lanterns - after all, you have many desires. By the way, such crafts for the garden can be made from bottles of different sizes: 0.5 l, 1 l, 1.5 l, 2 l. Together, bright, elegant lanterns of different sizes look just great.
4. IDEA - MAGIC COW
A cute cow for a summer cottage can be made from a plastic bottle. It is desirable that the bottle be large enough in size and square in cross section.
In this case, the ease of making this garden craft is amazing. Some firms sell drinking water in square plastic bottles, but more often building and automotive liquids are packaged in such bottles. In principle, anyone will do to implement the idea for a garden in the form of a magic cow.
Why is the cow magical?
A cow on the site is a natural phenomenon. But the magic begins with the understanding that the cow is actually a symbol of prosperity. This animal gives not only milk, but also attracts material values, that is, wealth. Remember the definition of "cash cow". However, this applies not only to dairy products?
Agree, it is very interesting to implement symbolic ideas for the garden. Crafts from plastic bottles can play a role in this matter. After all, any animal, any flower, any symbol can be created from plastic bottles. Let them decorate the site and at the same time attract love, luck, money, success, etc. to us.
Magic cow: stages of transformation of crafts from plastic bottles
In principle, there is not much work to implement this idea for a garden - a magical cash cow.
You only need 1 bottle. Whole. And you don't even have to cut it.
It is advisable to immediately fill the bottle with sand - to give stability to crafts made from plastic bottles.
Paint the bottle brown / black, white, pinkish cow paint. In principle, the color of the paints may be different. Do not listen to advisers who say that cows of this color do not exist - your cow is magical.
The legs of crafts from plastic bottles - a magic cow - just make from segments plastic pipe. You can fix it by heating a section of a plastic pipe over a fire and quickly attaching it to a plastic bottle. In this case, the details will "weld". But you can use other methods of fastening: make slots, screw with wire, glue, etc.
Ears and horns crafts for the garden will definitely have to be inserted into the slots. You can make them from an ordinary plastic bottle of any capacity - just cut it out.
Here is such a cow turned out!
5. IDEA - BRIGHT SPACE BEES
Anyone who created crafts from plastic bottles knows that any animal, insect or flower can be made using this material.
Therefore, if ideas for a garden in this regard overwhelm your head, you should not limit yourself. Plastic bottles are beautifully painted ( acrylic paints, oil, aerosol - from cans, etc.), they are easy to cut with scissors or a knife, if necessary, you can shape the workpiece by heating it over a fire. The mount with which such crafts for the garden are assembled is also not a problem: as an option, holes are made in the plastic, after which the parts are connected with wire.
As an idea for a garden, we suggest considering bright wasps. Their appearance is quite interesting, even "cosmic". Probably, this effect was due to the shape of the eyes. If you want wasps-"earthlings", just make the eyes of a different shape, rounder.
Step-by-step production of crafts from plastic bottles -
space wasps
You will need 1.5-2 liters of plastic bottles with a narrow "waist" (middle part). For 1 wasp - 3 pieces. But the crafts will turn out to be large, clearly visible against the background of greenery in the garden.
The body of the wasp is quite simple to make: you will need to cut off the bottom of 1 bottle, and the top of the other (about 1/3 of the bottle). By connecting these parts, get a body with a bend.
It is also not difficult to make a wasp head: for this you need to cut off the upper part of the third bottle (neck to shoulders) and connect it to the bottom.
Thick wire is used as the paws of this wonderful garden craft.
Wings are easy to cut out of a clear plastic bottle.
It remains to paint your creations with yellow and black paints and find a "landing pad" in the garden for them.
What is the most pleasant: crafts from plastic bottles: whether it is wasps, bees, dogs and other living creatures - they do not bite!
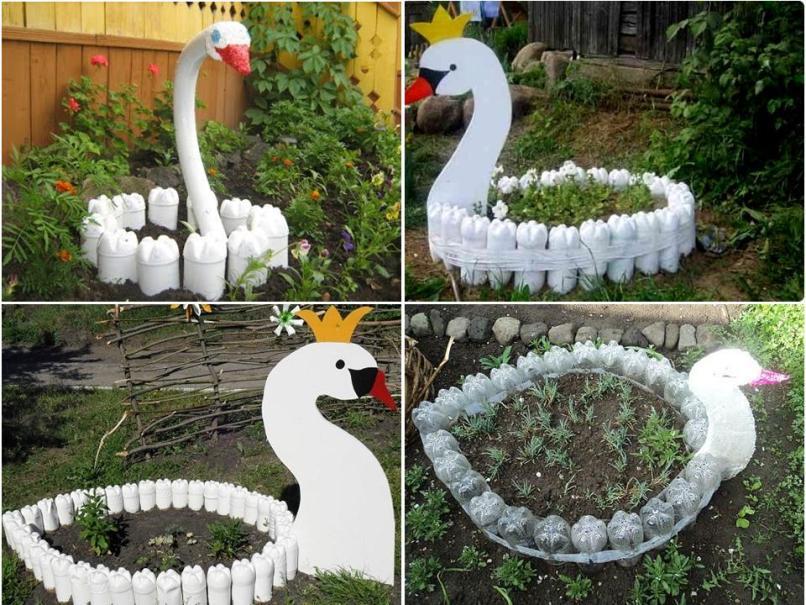
It would be nice, of course, to have a beautiful lake with white and black swans on your site. On a quiet warm evening, you can turn on the backlight, Tchaikovsky's music .... However, they say that it is better to have a tit in your hands than a crane in the sky. This also applies to the swan, so with some diligence with your own hands from plastic bottles you can create an almost living proud bird in your garden.
All sorts of different swans from plastic bottles
We will make a reservation that we have already touched on this topic.

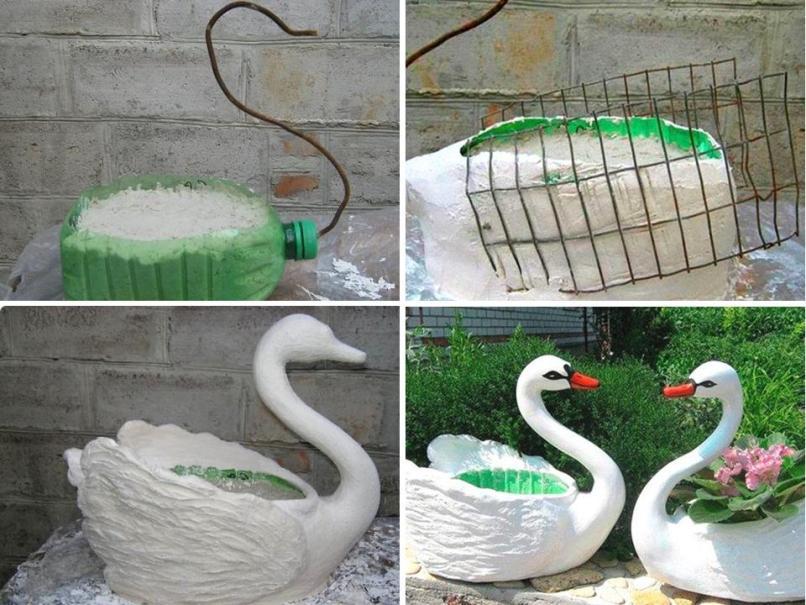
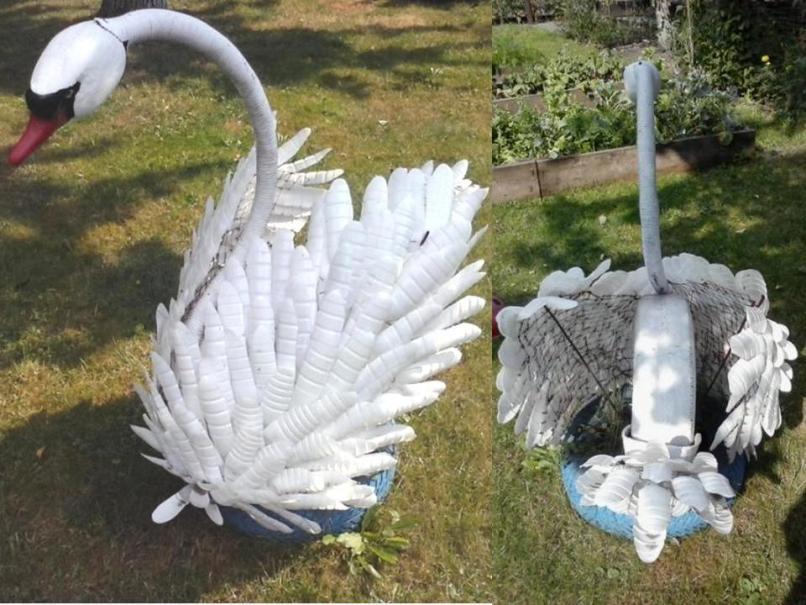
 In the photo below you see how a swan-pot is created from a five-liter container using gypsum.
 It must be admitted that there are many options for assembling a swan from plastic bottles. As soon as you set to work, you will do something in your own way, and you will get another performance. Below we consider four characteristic designs. There is no dispute about tastes, and you will choose what you like best. We will discuss the features of each proposal and give master classes for their manufacture.
Three variants of the snow-white bird
I liked the plywood version the best.
First of all, I want to tell you about the most interesting. The swan figurine in the photo below is made using plywood and white plastic bottles. It is convenient to fix the plumage of a plastic bird on a flat sheet. Little material is required. An elegant and thin neck is well reflected by a sheet of plywood. The body of the swan takes on a three-dimensional shape.

 In general, an elegant craft is created quickly and easily. Step-by-step instruction next:


 Light and airy bird using polyethylene film
A proud bird for the garden can be collected from a five-liter eggplant and polyethylene film. The appearance of such crafts, of course, attracts attention.
 Consider the master class step by step:
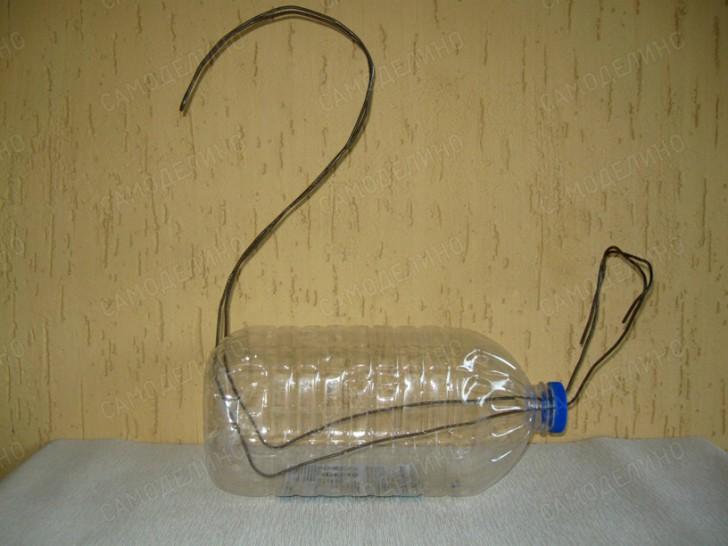
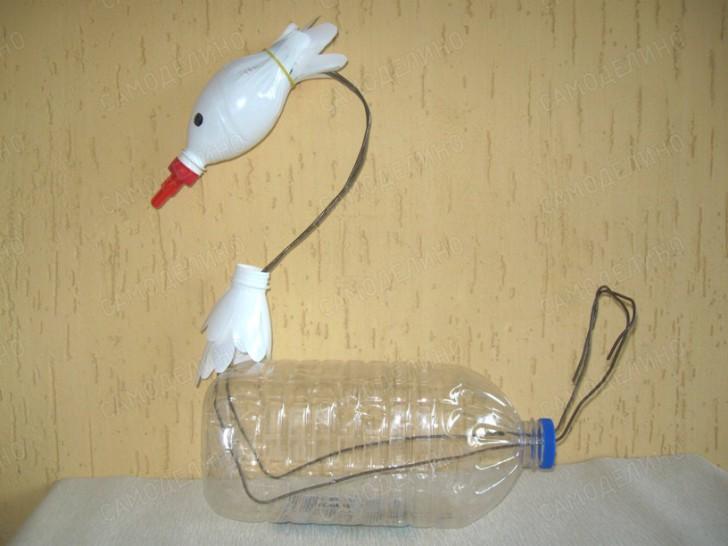
- Two holes are made in the bottom and cork of the container and a wire is threaded through, as seen in the image below. The wire will provide a frame for the neck and tail of the craft. In the bottle, you can cut a window through which you can manually guide the wire inside the case.
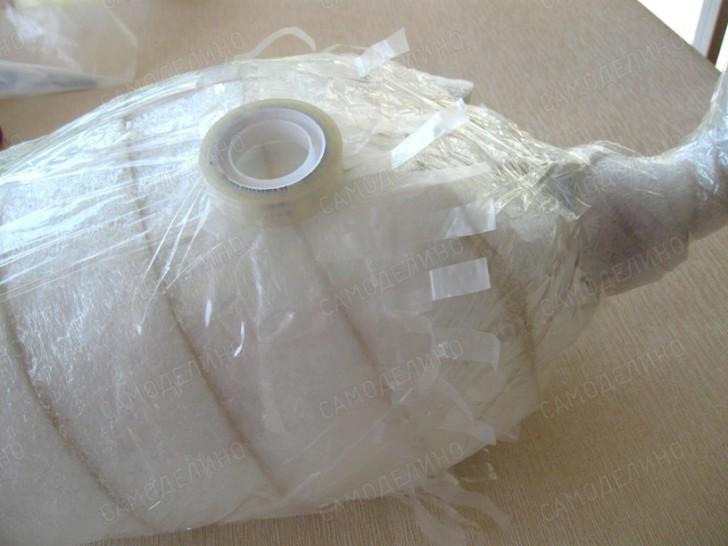
- The container is folded in front and behind to give a smooth outline to the bird. The required form is fixed with adhesive tape.

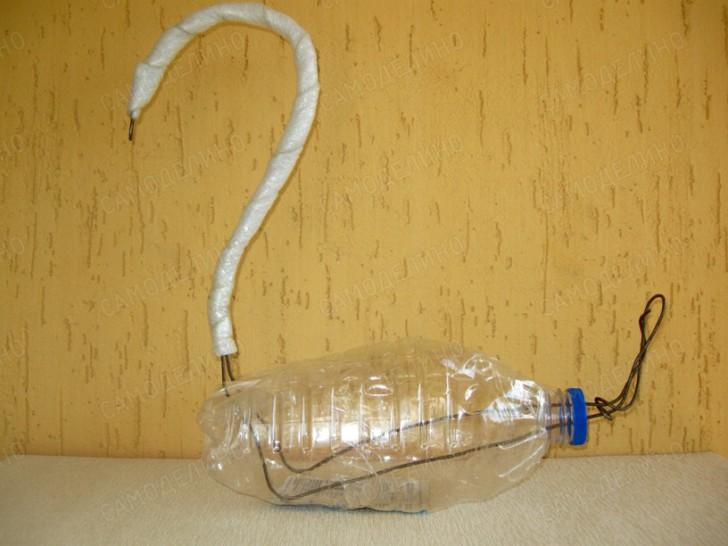
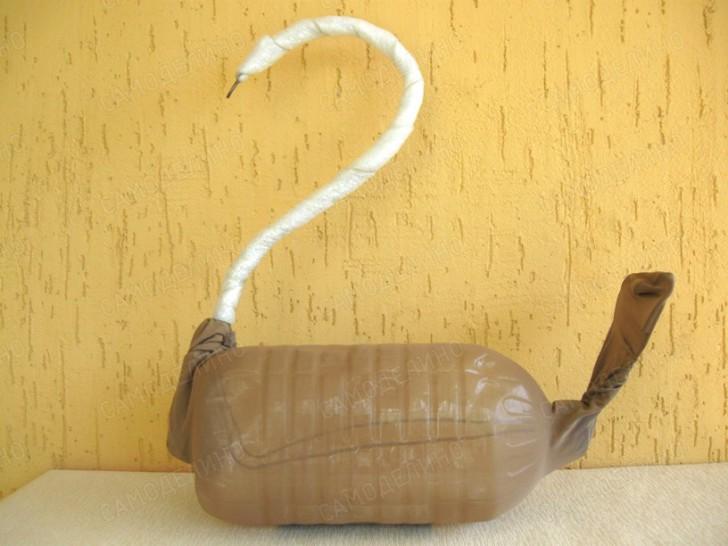
- Next, we need isolon. If there is no finished strip, you can cut tapes with a width of about 7 cm from a material with a thickness of 3-10 mm.
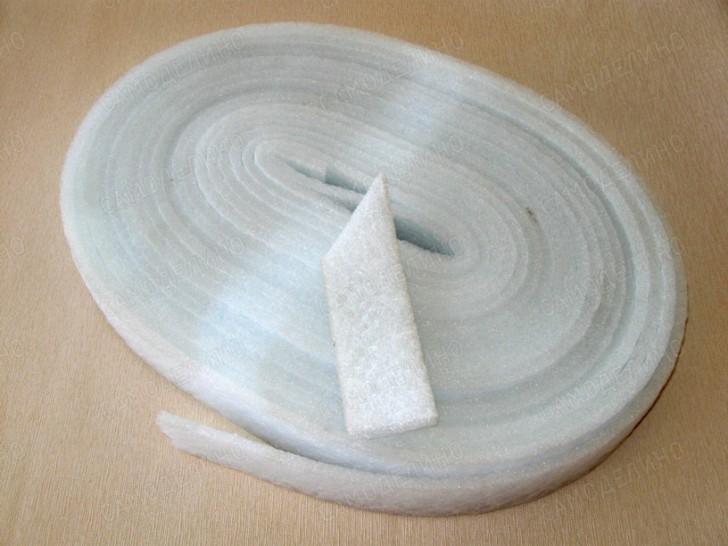 The entire workpiece is wrapped with isolon tape. The material is fixed with adhesive tape. The latter helps to smooth out the irregularities of the isolon. To form the head of a bird, several layers of isolon are required.
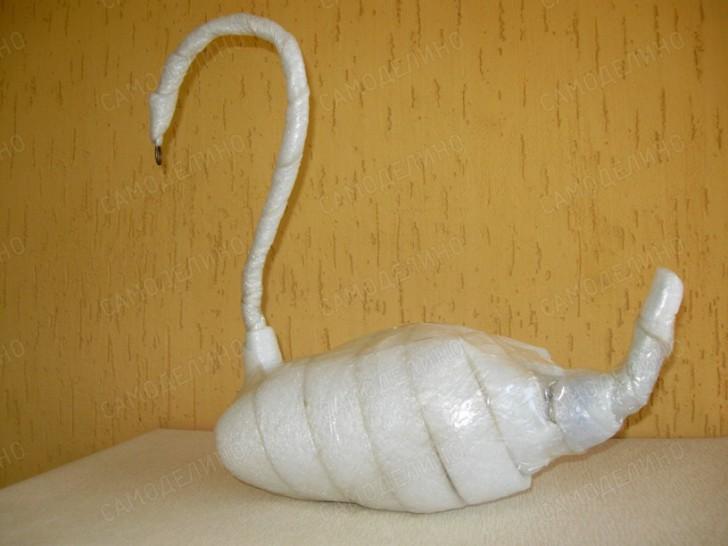
- Now you need to prepare a plastic tape to simulate the plumage of a bird. To do this, cut from a film 100-150 microns thick tapes 70 mm wide. The strips are cut across to a depth of 50mm in increments of 5-10mm. It is convenient to fold the film in several layers to speed up the work.
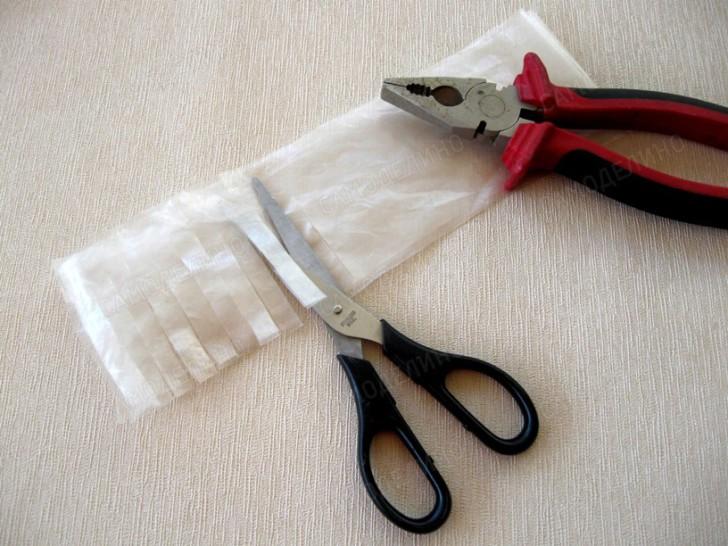

- The tail, body and neck of the bird are wrapped with a prepared tape. Each turn of the film is fixed with a narrow adhesive tape. The next layer is shifted by 20 mm relative to the previous one.
- It is convenient to make the eyes of a bird from black buttons. They are sewn to the head in the right place.
- A good beak will come from a red marker. Several short longitudinal cuts are made on the body of the marker to form the wide part of the beak. The marker is placed on the frame wire. The swan is ready!

 Metal mesh and tire for a large swan
It will turn out a large bird if used as a load-bearing structure car tire and mesh. The tire can be half buried in the ground, or cut in half. In the latter case, the craft can change its location. You can hide it for the winter. The neck is made of wire, on which a corrugated hose is put on. The rubber of the wheel and the plastic of the hose must be primed in order for the paint to hold properly.
The bird's head is made of foam. The workpiece is sanded, puttied and painted. It is better to use putty and paint on water based that will not spoil the foam.

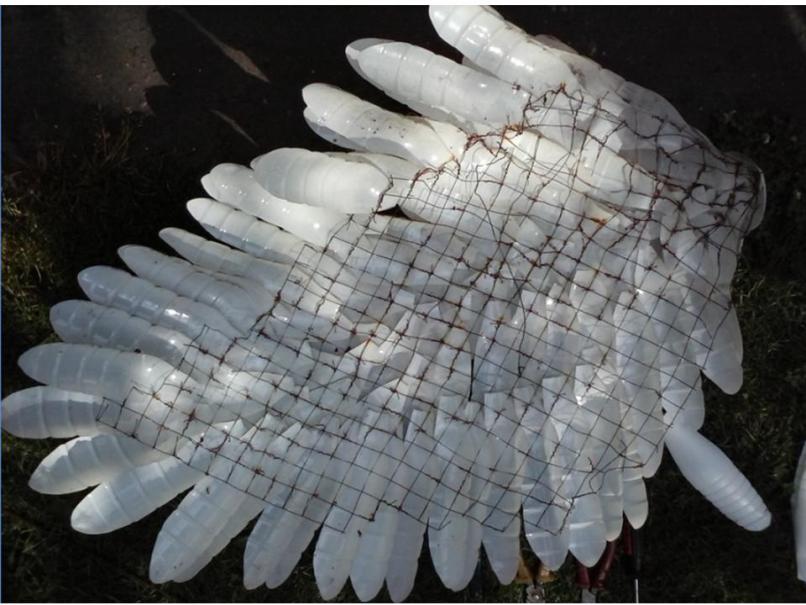
 Two bird wings are made of plastic feathers attached to a mesh frame. The feathers may be shaped as shown below. They are attached to the grid with pieces of thin copper wire through holes in the blanks. The wings are attached to the tire with wire.

 As follows from the picture below, the grid is cut out in the form of an oval with jagged edges. Well suited galvanized welded mesh with a cell of 20x20mm.
 The front side of the wing looks pretty decent. We make two wings.

 As you can see in the picture below, the fenders can be reinforced with thick wire supports at some distance from the tire. It will turn out a large and voluminous swan with spread wings. However, the craft is not the best appearance behind and will have to find an appropriate location for it in the garden.
 This scheme requires two car tires. In addition to the wings, it is necessary to make a tail using the same technology.
A lot of bottles, a lot of work - and you get an almost live bird
"Delicious for the third." In conclusion, consider the fourth option, which looks great. However, it will take a lot of containers and even more patience when making crafts.  Master class for making a swan from plastic bottles:
- We make a blank from a five-liter eggplant and a wire with a diameter of 3 mm. We pierce holes opposite each other in the bottom and cork of the bottle. The container can be cut through to adjust the wire from the inside.

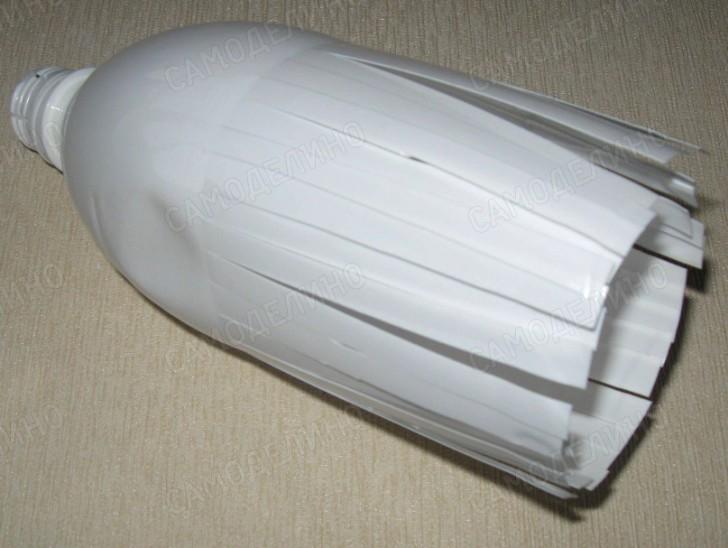
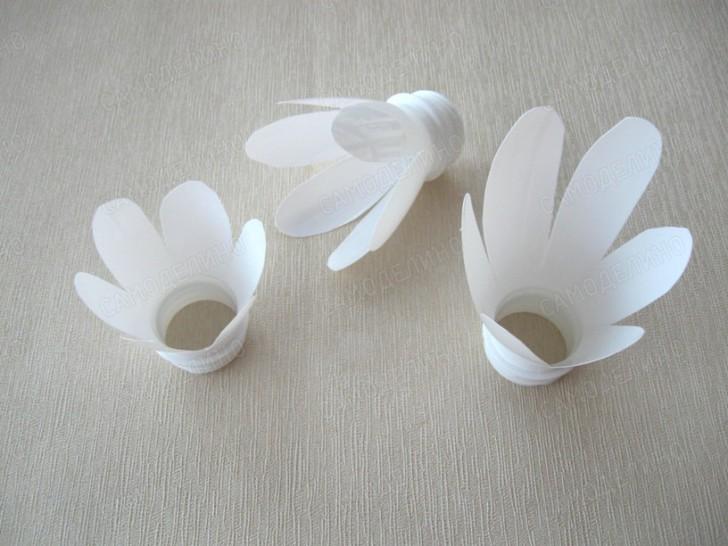
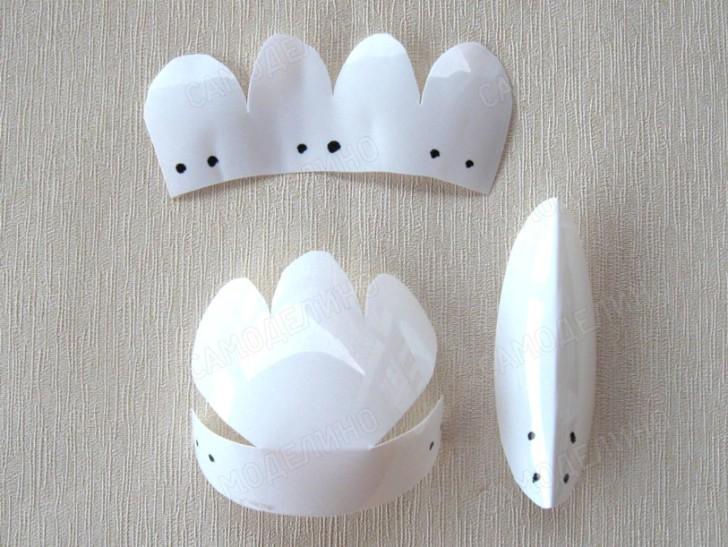
- To make a bird's head, take a white bottle with a narrow neck. cut off lower part and cut along in 5mm increments, as shown below.

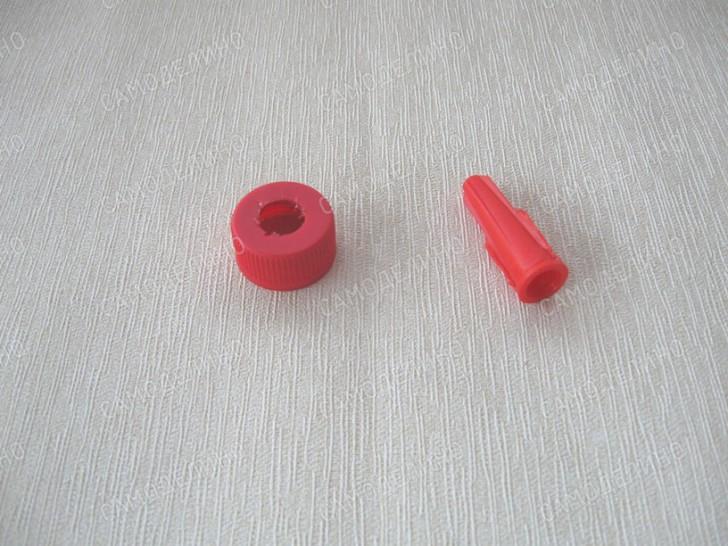
- We make a beak from a red cap and a cap from construction sealant. Cut a hole in the cork and insert the red cap into it.

- The eyes are depicted with a black marker. The narrowing of the head will be formed on the narrow part of the neck detail, which is shown separately. During assembly, an elastic band for money is first put on the neck, which is then changed to a fishing line. It is better to melt the edges of the fishing line with a match so that the knot does not come loose.
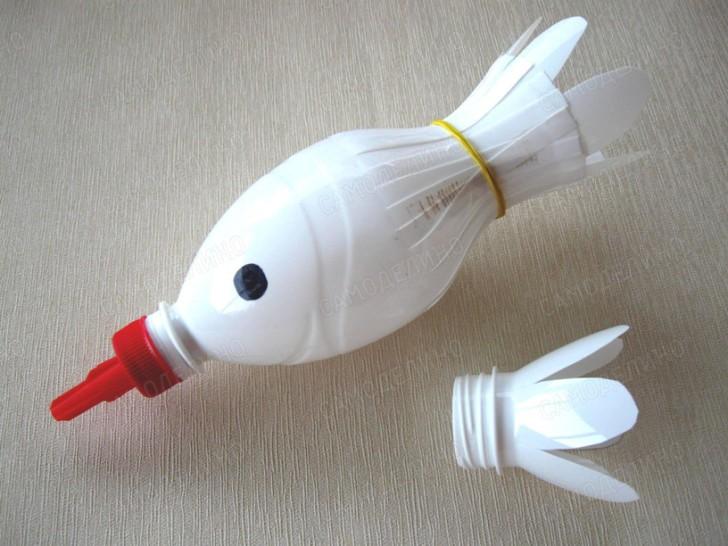

- We make the details of the neck, as in the photo. They may have a little different size, it's ok to install in different places.

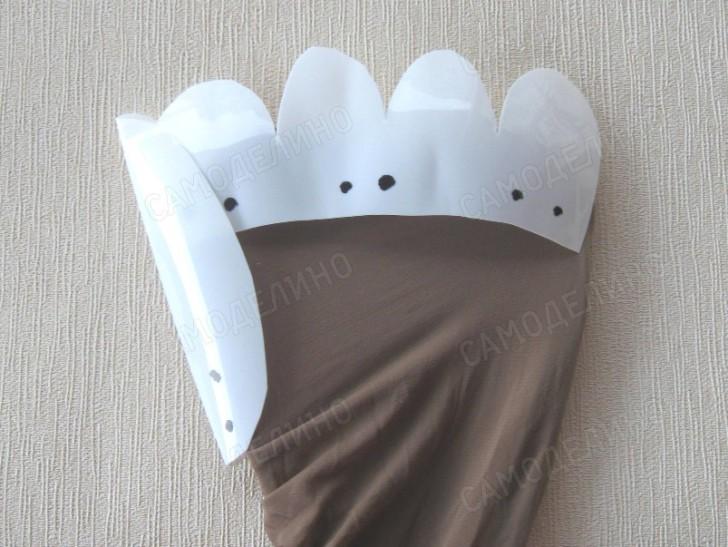
- The image below illustrates how the neck pieces and head will be installed. For the final fastening of the head, a copper wire bent in half clings to the upper part of the frame wire. Then the beak is unscrewed, and the copper wire is passed through the head. A thin wire is bent and wrapped around the threads of the neck of the bottle. The beak turns again.

- So that the details on the neck are evenly spaced and form smooth bend neck, it is necessary to wind the isolon on the wire. The latter is secured with tape. Instead of isolon, bottle caps with holes can be used.
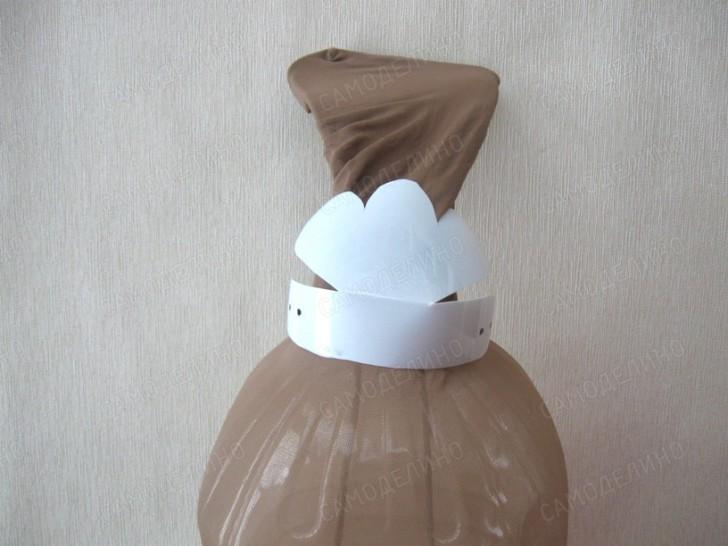
- To attach the "fur coat" of the swan to the body of the workpiece, we stretch the stocking. We put isolon on the chest of the bird to organize a convex shape. We tie the stocking with twine.
It shouldn't sag!
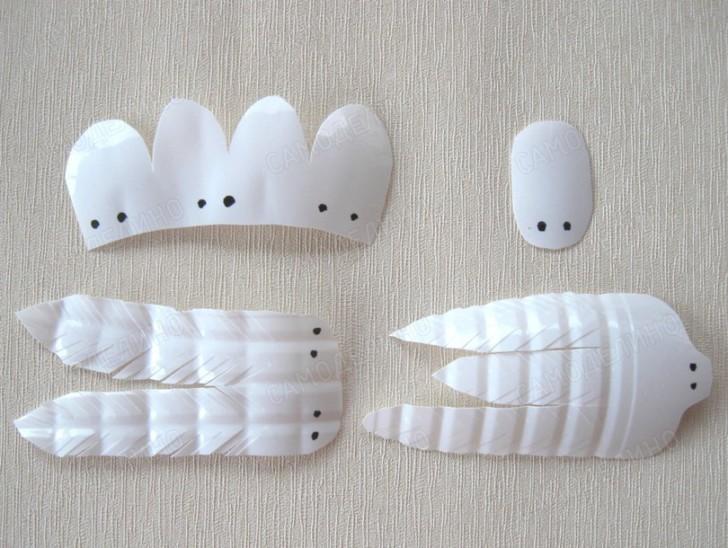
- To make the tail plumage, cut out the details shown below. We make holes through which we sew the details to the stocking.

- The image below shows how to mount the tail parts.

- The lower bend of the tail closes the element of a special shape.

- The body of the bird is sequentially sheathed with the details shown below. In places of bends it is convenient to use separate ovals. The wings located on the sides are cut from the side in increments of 3-5 mm. Accuracy of work determines the type of future crafts.
 We have completed the review various options manufacturing white swan for garden. If you do not limit your imagination, you can build both very simple and quite complex beautiful bird crafts.
Make graceful swans floating on a picturesque lake out of plastic bottles. A palm tree, also made by hand, is reflected in its smooth surface.
The content of the article:
It is not difficult to make a cottage extraordinarily attractive. To do this, it is not necessary to spend a lot of money, it is enough to put empty plastic bottles in bags, and then choose ideas from those proposed and bring them to life. Such work inspires, allows you to make the site well-groomed. Neighbors and guests will certainly pay attention to it, and the owners themselves are pleased to be in such an environment. Start the transformation with a simple job that will allow you to arrange a fabulous corner in your backyard.
Bottled lake or pond

To make the reservoir itself, no special skill is required, depending on its size, you will need 30-250 bottles. First, outline with a shovel the place of the future fabulous pond. Inside its outlines, select the turf. You can put it in a pile, cover it with a dark film, periodically sprinkle it with water and kitchen waste, and you will have a wonderful compost next year.
If you are using a non-virgin piece of land, then simply loosen it with a shovel and, starting from the middle to the edges, lay the blanks. To make them, cut off the neck of the plastic bottles to the shoulders, now press the blanks upside down into the ground so that the container peeks out 8 cm above the soil surface. You can use the lower halves of the bottles left over from creating other things for this type of site design. The main thing is that they should not be shorter than 10 cm.
If you are using only the bottom of plastic bottles, then fill it with soil, turn it upside down so that the blanks rise above the ground. Place containers close together to minimize gaps.
After completing several rows of inverted plastic bottles, paint them blue. It is better to do this immediately, because if the lake is large, it is difficult to get into its center. If you do not have numerous containers available, make the lake gradually. The border can be decorated with large stones. To make the pond look picturesque, plant a few plants around the edges.
Decorate the lake with water lilies. How to make such crafts with your own hands was described in one of the previous articles, and from this one you will learn how to make a swan from improvised material. Such a bird looks great not only near the lake, but also in any other corner of the garden.

For this type of creativity, you will need a tire from a car wheel. Paint it white, attach strong wire to the outside with iron staples. It should wrap around the bottom of the tire, then bring it up and bend it in the shape of a swan neck.
Now put a plastic water hose on the wire, if you don’t have one, a piece of watering rubber will do. Slightly cut its upper part on both sides, put the bird's head here. To make it, cut a soft bottle below the shoulders, making the cut curly. Put the blank on the wire, make a beak from a small ketchup bottle. If you do not have one, then cut a triangle out of plastic, glue its two opposite sides. After placing the beak in place, cover it with red paint. You can make a head out of synthetic foam rubber, and take a hose from an old vacuum cleaner for the neck.
Paint the head and neck white, and mark the junction of the beak and face with black, so that the suprafrontal part and the eyes of the bird are clearly visible.
If you have extra time, then before making the swan, modify the tire a little. As you can see in the photo, on the one hand there are small cuts on it, on the other - solid, it is made in such a way that the tail remains. The place of the cut is fastened with a bolt with a screw.
Bird with fluffy feathers from plastic bottles
Do-it-yourself swans are elegant if they are beautifully feathered. To do this, you will need white plastic milk bottles.

In the next photo you see how to make wings. To do this, cut out their base in the form of a triangle with beveled corners from a metal mesh. To make plumage, take white plastic milk bottles. Cut off the neck and bottom of each. Divide the resulting canvas into 6 parts, also round each of them with scissors. These are feathers. To attach them, use an awl and thin wire. Make punctures in the blanks and tie them to the wire mesh.
Cover it with feathers on both sides. Attach 2 fenders to the tire with self-tapping screws. You can do it differently by pulling the wings together with wire through the tire.
How are graceful birds made from plastic bottles?
Another graceful swan can be made from the following materials. For work you will need:
- large plastic bottle of rectangular shape;
- putty;
- thick wire;
- bandage;
- sand.

Now thickly grease the entire outer part of the canister with putty. Take the bandage, starting to wrap it around the wire from the bottom up, also generously coat it with this solution. As a result, you will get the neck of a graceful bird. Where the head will be, the bandage will need to be wound even more, layer it with putty. Finish this part of the workpiece.
Let's get to the wings. As in the first case, they will need a large-mesh iron mesh. To attach it, first coat the body of the bird with primer, let it dry, then attach the mesh and fasten it to the sides of the swan with putty.

You can leave the wings as they are or decorate them on the outside with feathers from plastic milk bottles and hide the mesh on the back under a layer of putty.
You just have to let the product dry, then paint the eyes and beak of the bird in desired colors. If you want to use the swan as an original flowerpot for giving, then fill the canister with sand only a quarter, and pour fertile soil on top and plant your favorite flower. Or make a second bird. As a result, you will get such beautiful do-it-yourself swans.

How to quickly make snow-white birds from bottles?
If you have some empty containers, and you want to decorate your site as soon as possible, then read how to make a swan quickly and from a small amount of materials. Also it can not only decorate country cottage area but also to become beautiful and original flowerbed. For this, transparent containers are quite suitable, they need to cut their necks on top of their shoulders.
Outline the shape of the future flower garden on the ground. Fill the bottles with sand or waste soil, such as clay, paint them white. When the paint is dry, dig the bottles about a quarter into the ground according to the marked markings, turning them upside down. To keep them well, fasten them in a circle with a wide adhesive tape in 2-3 layers. It also needs to be covered with white paint.
The head and neck of the swan are made of plywood. First draw this part of the bird on the workpiece, and then cut it out. As shown in the photo, decorate this part with the appropriate paints. Pour into a flower bed fertile soil, plant flowers and you can admire the original creation.

Plastic swans can be made without much hassle. To make the following, you only need:
- 5 liter canister;
- milk bottles;
- scissors;
- glue;
- paints;
- wire.

Lay the canister horizontally on most of it, cut off the upper sidewall from it, pour it on a third of the wet sand. Insert the wire into the hole made by the soldering iron in the cork, bend it in the form of the neck and head of a bird.
Cut one off the milk bottle. Cut it from the bottom to the shoulders into 6 parts, round the resulting feathers with scissors. Decorate the entire container in this way, and then put the blanks on the bird's neck in turn. Insert its beak into the neck of the last upper one. You can also make it out of plastic or polymer clay.
Now we need a few more milk bottles. Cut 4 feathers from each, stick them on the canister, starting from the bottom, so that the rounded part of the feathers looks up and slightly to the side. After the glue has dried, put the flower pot in the canister. The master class uploads a story on how to make graceful swans out of plastic bottles.
We decorate a country pond-lake with plastic bottles

If we imagine that the lake with swans swimming in it is located on an island, then why not install a palm tree on its shore? It is also made from plastic bottles. It is very interesting to make such products with your own hands. If you do this with your children, they will certainly grow up too. creative people able, looking at any materials, to find ideas for crafts.
For a palm tree you will need:
- metal fittings of the required length;
- brown and green plastic bottles;
- scissors;
- candle or lighter.
First, peel off the labels. If they are glued too high quality, then place them for 40 minutes in hot water, then remove, sometimes helping yourself with a knife.
Now cut off the bottom of the bottles, make the cut zigzag, slightly bend the resulting large notches outward. Stick the rebar in the intended place so that it holds tightly, start stringing the bottles neck down.
This creation technology is suitable if you do not have enough containers. If it is larger, then use only the bottom of the bottle. Drill a hole in each with a drill, and then string it on a metal rod, as shown in the photo. And in the next photo you see how you can make a trunk for a palm tree if you have an unnecessary log and bottoms from brown bottles. They are nailed or attached with screws to a wooden base, but the bottom is left free so that the tree can be dug into the ground.

How to make palm leaves from bottles?
When you decorate the trunk of the southern tree, proceed to its leaves. For them you will need plastic container Green colour. A master class on making palm trees from bottles will describe this process in detail.
There are also many options for obtaining this part of a tropical tree. If you like the wooden base idea, then you can make leaves. in a simple way. To do this, you need large plastic bottles with a pre-cut bottom. Cut them from the bottom to the shoulders, not reaching the neck, into many small ribbons.
Now drive metal rods into the upper part of the wooden palm tree, bend them slightly and string them neck down on each bottle. What you get is also visible in the photo.

And here is another way to make leaves from plastic bottles. For this, a container of any size is suitable, you need to cut off the bottom from it and make it on big bottles 4, and on small ones - 3 cuts to the shoulders, round them. These are leaf blanks.
Now make a thin fringe along the edges of each sheet. In the center, leave a gap of 1–2 cm - this is the vein of the leaf.

Put a bottle on top of the barrel Brown color no bottom upside down. On the cover, make 6 holes crosswise with a soldering iron or a drill. Insert one rod or wire through the two holes opposite, through the other two - another rod, and through the third pair of holes - the third wire. Now string the first leaf blank on each rod, then the second, and so on. You should have 6 leaf pieces, each consisting of six bottles. For reliability, fasten them together on the covers with wire.
To prevent the bottles from jumping off the rod, simply bend it on the reverse side. And here is what you get as a result.

If you want to visually see the process of making a palm tree, then watch the video: