I can not set up internet on android. Steps to set up
You can hardly imagine modern man that does not use the internet in Everyday life: It's not only about receiving email, finding information, and viewing media files. Often the Internet is associated with work and study, but also a trip to shopping center often impossible without using the World Wide Web, oddly enough it sounds. Everyone needs the Internet - from businessmen to old women and schoolchildren. Therefore, the question arises of how to connect the Internet on an Android phone.
How to connect Wi-Fi on your phone
The easiest way to connect to the Internet is via traditional Wi-Fi. Access points are everywhere; at home, too, many people use Wi-Fi connection, since it is fast, convenient and affordable.


How to connect Wi-Fi on Android
- Go to " Wi-Fi networks»
- Choose the right network
- Connect if the network is not password protected (there is no lock symbol next to the network signal strength). When using, do not forget that through such networks it is better not to pay for purchases and not to enter personal accounts, as traffic can be intercepted.
- To connect to a secure network, you need to know the password and enter it when connecting.
After connecting, you can use the network, but it is advisable to check if this network is distributing the Internet (for example, go to the browser and try to load some page or using the Speedtest program).
How to connect 3G on Android
- Go to " Settings»
- In the "Wireless networks" section, access to 3G can be found in the " More"Or" Additionally»
- Turn on 3G
- A list of available 3G networks will appear
How to set up the Internet on an Android phone
The days of Internet clubs have sunk into oblivion, and all thanks to new technologies. Today, the worldwide network is available to everyone. You will not surprise anyone with mobile internet, mobile operators offer a variety of tariff plans through network modes such as EDGE, 3G or 4G. The user only has to choose the best offer for himself. Operators usually send automatic settings after installing the SIM card in the phone. If this does not happen, call the support center and, using the tips of the informant, order the settings, or use the official website of the mobile operator.
How to set up APN. Parameters for connecting the Internet of Russian operators
If you have not connected to the Internet, you need to make the settings manually. To do this, you need to know which telecom operator provides you services (MTS, Beeline, Life ...), what type of 3G network is available to you (you can find out on the website or by calling technical support) and connection parameters, including the so-called APN ( Access Point Name) is the name of the access point.
- Go to " Settings»
- Find the line “ SIM cards and networks»
- Select " Access points (APN)»


- Select an internet access point (or APN)
- Click " Add APN»
- Enter the parameters for accessing the Internet, which should be obtained from your operator. You need a password, login, network name and APN.


After the performed operations, you should check whether the " Data transfer". Now select your preferred " Network mode"(2G, 3G or 4G) depending on the services provided by the operator.


Below on the page are the parameters for connecting popular operators in Russia, so that you understand how to set up the Internet on an Android phone:
MTS Internet settings
- APN Access Point - internet.mts.ru
- Username - mts
- Password - mts
For devices such as Huawei, Fly, Lenovo, in the " Authentication type"The default is" Not set". For proper functioning mobile internet we recommend using the parameter “ Not».
Setting up the Internet Beeline
- Name - Beeline Internet
- APN - internet.beeline.ru
- Username - beeline
- Password - beeline
Internet setup Megafon
- Name - Megafon
- APN - internet
- Username - gdata
- Password - gdata
Setting up the Internet Yota
- APN Access Point - internet.yota
- Username - yota
- Password - not entered
Tele2 Internet setup
- APN Access Point - internet.tele2.ru
- Username - Tele2 Internet
- Password - not entered
Parameters for connecting the Internet of Ukrainian operators:
Setting up the Internet MTS Ukraine
- Name - MTS-internet
- APN Access Point - internet
- Username - any
- Password - not entered
Setting up life internet on Android (setting up lifecell internet on Android)
- APN Access Point - internet
- Password - not entered
Setting up 3G Kyivstar on Android
- APN Access Point - www.ab.kyivstar.net(for contract subscribers: www.kyivstar.net)
- Username - not entered
- Password - not entered
Configuring TriMob Internet
- APN Access Point - 3g.utel.ua
- Username - Trimob
- Password - not entered
How to set up Internet Phoenix on your Android phone
- APN Access Point - internet
- Username - not entered
- Password - not entered
If you are in roaming and want to know how to set up the Internet on your Android phone, you need to enable the appropriate settings. Keep in mind that roaming charges are quite high.

How to remove Internet settings on Android
Sometimes there is no need to use this or that access point (APN) and the question arises of how to delete Internet settings on Android. We proceed as follows:
- We find " Settings", then " More»
- Go to " Mobile networks»
- We choose " Access points (APN)»
- Click in the upper right corner three dots
- Resetting the settings
Recently, an article was published on the site about Android Network Settings... We advise you to familiarize yourself with it if you have any problems with the network.
If I connected my smartphone to the Internet, can I use this connection at the same time on my tablet?
Yes, it is possible using a smartphone as a modem or access point. To do this, go to " Settings»And select the connection method for the access point (Wi-Fi, Bluetooth).
A modern smartphone can theoretically be used without an internet connection. But in this case, in terms of its functionality, it will not be far from the simplest push-button mobile phone. Therefore, we recommend that you connect the internet using our guide. And you don't have to put money into your account - in the article you will find instructions on how to connect to public Wi-Fi networks.
If you are just going to buy yourself a smartphone, then be sure to pay attention to its characteristics. The fact is that different models have different data transfer rates. It is rarely written in numbers - instead, the supported communication standards are indicated in the characteristics. Here is a list of them in ascending order of speed:
- GPRS;
- EDGE;
- 3G;
- 4G (LTE);
- LTE-Advance.
Focus on this point in the specifications if Internet access is very important to you. Also remember that not all operators have 4G equipment in absolutely every big city our country. And there is nothing to say about the villages and villages - a 3G smartphone will do quite well in them.
You can also pay attention to the supported Wi-Fi standard. In the vast majority of cases, we transfer data via Wi-Fi 802.11n... But in Lately routers with standard support are becoming more and more popular 802.11ac, providing a very high speed of receiving and transmitting information. If you plan to install such a router in the near future, then it is advisable to purchase a device that is capable of working with the above-mentioned Wi-Fi standard. However, this is not necessary at all.
Setting up a Wi-Fi wireless network
But enough talk about theory. It's time to talk about how to set up the Internet on Android. And you should start with Wi-Fi settings... Usually, this is exactly what novice users have problems with, since this process almost not automated. Note that the easiest way is to connect to your own router. It's a little harder to do this with friends, at work, and elsewhere. So, you should do the following:
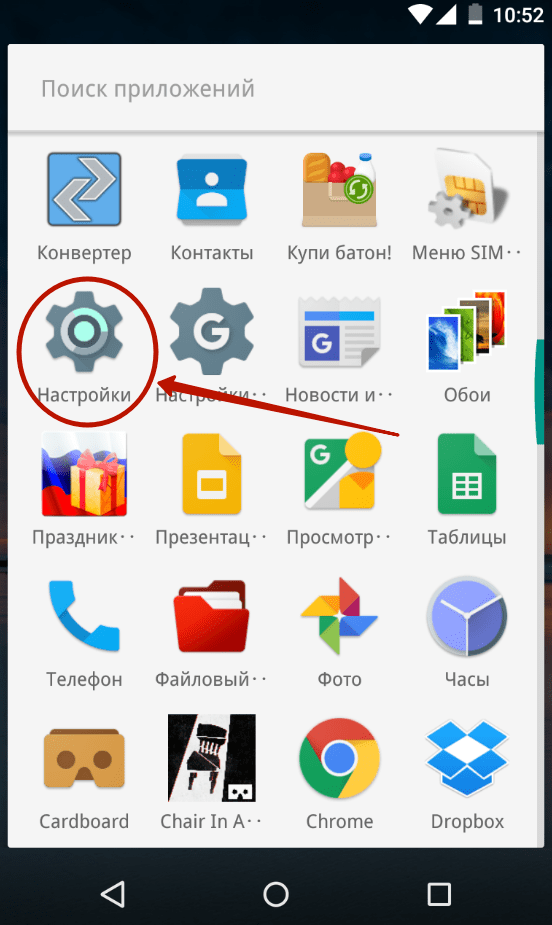
Step 1. Go to " Settings". If the corresponding icon is not in the notification panel, then find it in the menu.
Step 2. Go to the section " Wi-Fi". On some devices, there is a switch next to it. It must be turned on.

Step 3. If there is a checkbox in this section, then activate it.

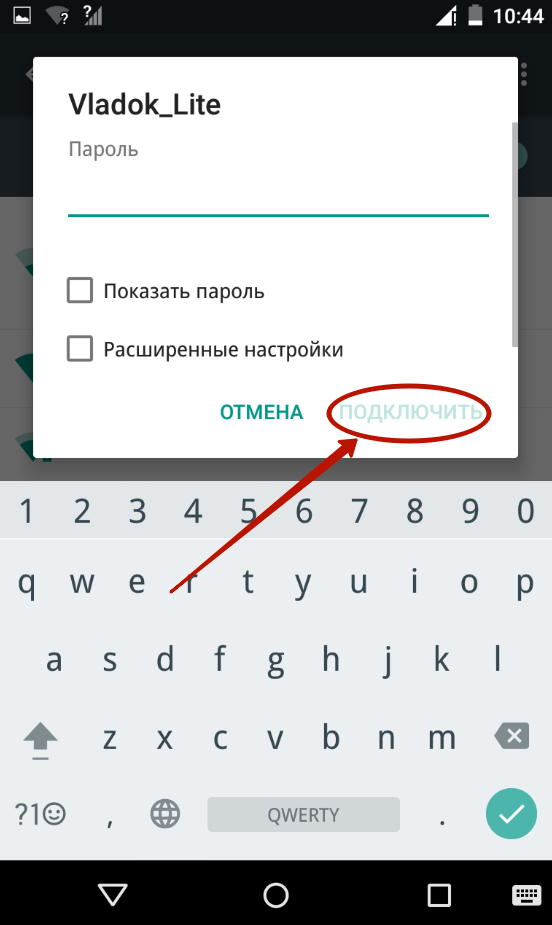
Step 4. Now click on the name of the Wi-Fi network with which you want to turn on the Internet on Android.

Step 5. If the network is protected, then enter the password for it. For more convenience, you can check the box next to “ Show password". When finished with entering the password, click on the button " To plug».
That's all. Now your smartphone has memorized this network and will connect to it automatically. It's the same with public networks - if you have already connected to one, then in the future in this place your device will independently connect to it. There are exceptions, though.
Using WPS
Friends can connect to Wi-Fi using another method. It consists in pressing the WPS button on the router. This allows you not to drive in the password and network name. But first, on a smartphone or tablet, you also need to press the WPS button - in this case, not physical, but virtual. This is done as follows:
Step 1. Go to " Settings».
Step 2. Go to the section already mentioned by us “ Wi-Fi».

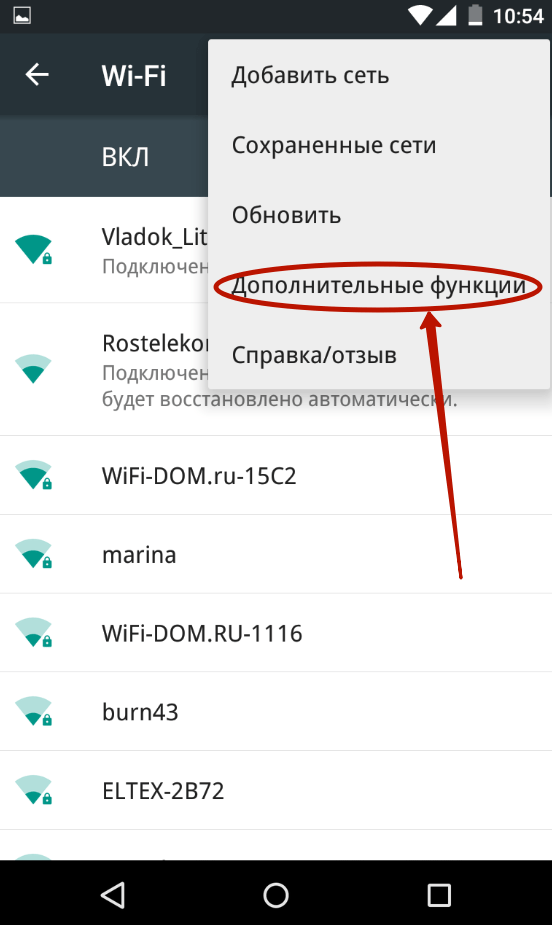
Step 3. Activate the switch if necessary. Then click on the " Options". On many devices, it is made in the form of a vertical ellipsis and is located in the upper right corner.

Step 4. Click on the item " Additional functions". On some gadgets, this step is skipped, since the item “ WPS»Is located directly in the context menu.
Step 5. Click on the item " WPS button».


After that, the smartphone will connect to the network distributed by the router, as a result of which you will be able to access the Internet.
GPRS, EDGE, 3G and 4G configuration
Setting up a mobile Internet is both easier and more complicated. Usually, the user does not need to delve into the settings at all - telecom operators send a special file that automatically prescribes all the parameters. This does not happen only in the most extreme cases - when your smartphone or tablet model is not in the operator's database. But believe me, these bases are so vast that you can not find there only all kinds of Chinese non-names. If you're unlucky, you'll have to manually configure your internet access. This is done on Android as follows:
Step 1. Go to " Settings"As you did earlier.
Step 2. Go to the section " Other networks". In some smartphones and tablets, it may be called “ Other networks" or " More"- it all depends on the translation.

Step 3. Here you need to click on the item " Mobile networks».

Step 4. Then it all depends on the specific implementation. software... On some devices, you will be taken to the menu shown in the screenshot below. In this case, you need to open the item " Access points (APN)". In other models, the corresponding settings may immediately open.

Step 5. Be that as it may, but you need to add an access point of your operator, if these parameters did not come after you inserted the SIM card. In our case, this is done by pressing the button with the plus sign.

Step 6. After clicking the corresponding button, you will see many fields. First of all, pay attention to the points " Authentication type"(May also be called" authentication type") and " APN type"(On old devices it is called" Access point type»).
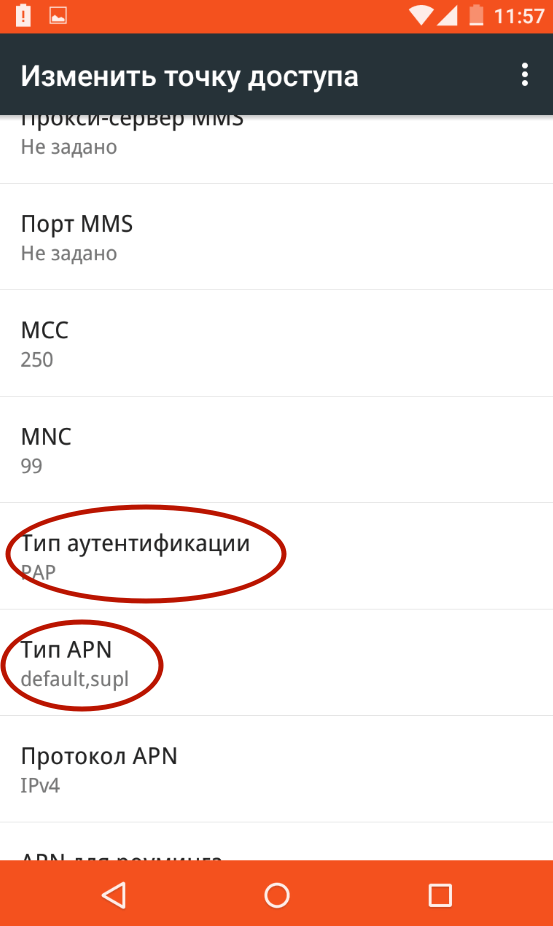
Step 7. In the first paragraph, you must select "PAP". This type of authentication is used by the vast majority of cellular operators around the world.

Step 8. In the second field, manually write “ default, supl"- without quotes and spaces, as in the following screenshot. Click the " OK».


Step 10. Finally, click on the item " APN" or " Access point". Enter your carrier's specific internet address here:
- MTS - internet.mts.ru
- MegaFon - internet
- Beeline - internet.beeline.ru
- TELE2 - internet.tele2.ru

- MTS - mts and mts
- MegaFon - gdata and gdata
- Beeline - beeline and beeline
- TELE2 - both fields are empty

If you use the services of some smaller telecom operator, then you can find out its settings by visiting the official website. You can also call the subscriber center - you will be surely dictated to the APN, username and password.
Summarizing
As you understand, you can set up the mobile Internet without any difficulty. This is done almost easier than on old push-button telephones. Fortunately, with current technology, you only need to bother with this on very rare occasions.
Nowadays, a person, for obvious reasons, cannot do without the Internet on his smartphone. After all, it is the presence of a connection to the World Wide Web that turns the phone from an ordinary "dialer" into the most functional device. Download the application, send a message in the messenger, scroll through the feed on social networks, view mail and even buy a movie ticket or book a table in a restaurant - the mobile Internet will allow you to perform any such task wherever you are.
But, as practice shows, not always when installing a SIM card in a new device, the Internet is automatically configured. Therefore, in today's article we will consider how to manually connect the Internet on a smartphone (or tablet) under Android, iOS and Windows Phone / Mobile. In addition, we will provide all the necessary data to fill in all key operators in Russia, Ukraine, Belarus and Kazakhstan.
How to connect the Internet on a smartphone or tablet
- Android
- Enter the "Settings" menu.
- Select "More".
- Then select "Access Points (APN)".
- Press the "+" button to add a new access point.
- Enter the data required for your telecom operator.
Operator settings
Russia
- Beeline
- APN: internet.beeline.ru
- Username: beeline
- Password: beeline
- MTS Russia
- APN: internet.mts.ru
- Username: mts
- Password: mts
- Tele 2 Russia
- APN: internet.tele2.ru
- Password: leave blank
- Yota
- APN: internet.yota.ru
- Username: leave blank
- Password: leave blank
Ukraine
- Kyivstar
- Username: leave blank
- Password: leave blank
- APN: internet
- Username: leave blank
- Password: leave blank
- Username: leave blank
- Password: leave blank
- Life :) Ukraine
- APN: internet
- Username: leave blank
- Password: leave blank
- Vodafone
- APN: internet
- Username: leave blank
- Password: leave blank
Belarus
- MTS Belarus
- APN: mts
- Username: mts
- Password: mts
- Velcom
- APN: vmi.velcom.by
- Username: leave blank
- Password: leave blank
- APN: wap.privet.by
- Username: leave blank
- Password: leave blank
- Life :) Belarus
- APN: internet.life.com.by
- Username: leave blank
- Password: leave blank
Kazakhstan
- Beeline
- APN: internet.beeline.kz
- Username: @ internet.beeline
- Password: beeline
- Tele 2 Kazakhstan
- APN: internet.tele2.kz
- Username: leave blank
- Password: leave blank
- Activ
- APN: internet
- Username: leave blank
- Password: leave blank
- Kcell
- APN: internet
- Username: leave blank
- Password: leave blank
After entering all the necessary data, you must save the changes by clicking the corresponding button and restart the device. After that, you may also need to enable data transfer via mobile network... Now the Internet on your smartphone should work properly. Let us know in the comments if this guide helped you.
When buying a smartphone, a modern user is primarily interested in the possibility of setting up the mobile Internet. After all, it is the function of connecting to the World Wide Web that turns the phone from an ordinary means of communication into the most functional device. Download the required application, process email, buy a movie ticket or book a table in a restaurant - mobile Internet will allow you to complete any such task in a matter of seconds.
In our article, we will tell you how to turn on the Internet on an Android phone through two main modules:
- Connecting to the Network using 3G or 4G
- Point setting Wi-Fi access
How to turn on mobile Internet on your phone
The first way to access the Internet through an Android smartphone is to provide cellular operator mobile internet services. Make sure your smartphone or tablet is operating in the main network bands. Then connect to a tariff that will provide you with an Internet connection. After that, you can start setting up your phone:
- Go to Smartphone Settings;
- Select the "More" tab;
- Click on the item "Mobile networks";
- Set the type of network (4G, 3G, 2G);
- Choose an access point and operator if your phone has 2 SIM cards;
- Exit to the main screen;
- At the top of the screen, pull the shutter with basic settings;
- Find the button with the name of your operator and click it.
After that, you will get access to the Network. Please note that in the settings on the Data Transfer tab, statistics of downloaded data are displayed, as well as information on the volume of traffic of applications that use an Internet connection, for example, Facebook or Instagram.
How to choose best phone 4G, you can read in our article.
How to turn on the Internet through your phone using Wi-Fi
It is equally easy to set up the Internet on your phone via a Wi-Fi hotspot. Make sure your smartphone has the correct communication module installed. Next, you need to go through the following steps:
- Go to Settings;
- Select the Wi-Fi item;
- Click on the "Enable" button;
- Select the access point to which you want to connect from the list;
- To access the closed point, you will need to enter a password.
If you repeatedly use the same access point, for example, through your home Wi-Fi router, it is no longer necessary to get into the settings. As in the case of the mobile Internet, just pull the shutter at the top of the screen and press the Wi-Fi button.
Please note that by setting up the Internet on your phone, you can use your gadget as a router and even connect to the Internet on a computer or laptop via a smartphone. Read more about this in the articles "How to connect the Internet through a computer to your phone" and "Using your phone as a Wi-Fi router".
If you have any difficulties in setting up your phone as a modem, the forum on the Fly official website will help you find a solution.
To go online and further work you need a powerful and high-quality smartphone, in which the following parameters must be observed:
- Large screen for full-fledged work with applications, documents, photos and videos;
- Powerful processor capable of instantly handling numerous requests;
- 4G LTE communication module for high-speed connection;
- A high-capacity battery that can withstand the loads from running communication modules.
This combination of characteristics is fully consistent with the high-quality and affordable Fly Cirrus 9 smartphone.
Why Fly?
The British company Fly has been producing mobile gadgets for 14 years, in which modern technologies are combined with a thoughtful design and an affordable price. Thus, the widest range of consumers get access to smartphones with the current version. operating system Android, a powerful processor, a capacious battery, a high-quality camera, and at the same time they spend no more than $ 150-180 from their budget.

Fly Cirrus 9 LTE smartphone will become a great solution for surfing the web. The large 5.5-inch IPS screen with vibrant, vibrant colors makes it easy to navigate applications, create and edit documents and watch videos. Powerful 1.25GHz 4-core processor ensures multitasking and smooth interface. Those who like to hang out on the Web may not count the percentage of the charge indicator, since a capacious 2800 mAh battery will keep a smartphone with a running network module in working order for up to 6 hours.
If you find an error, please select a piece of text and press Ctrl + Enter.
Modern gadgets seriously simplify our life, but what are they worth if they cannot be connected to the Internet? Yes, many users of mobile devices, smartphones. tablets and other devices, it is difficult to imagine life without admission to the World Wide Web. However, the question arises, what to do if you have purchased a brand new Android phone, but do not know how to set up internet on android?
Setting up the GPRS / EDGE / 3G / 4G Internet in the Android phone
This article will help you understand not only general outline, and will demonstrate all kinds of settings. Will be offered step by step actions, which will seriously simplify the task even for those who have never faced a similar task before.
Where to start
Initially, you should decide what exactly you need from access to the network. This will be the starting point.
It's one thing if you need network accessibility and mobility, but if it comes about connection speed, things are a little different. Regular surfing on web resources and primitive Android updates are absolutely different things and this must be taken into account.
If we talk about the first option, then everything can be done to make the Internet faster and more productive. As a rule, for this, all possible display elements on the resource are disabled through special settings.
The second option involves the so-called end-to-end connection via WiFi (that is, a wireless network). Using the second option, you significantly save not only traffic, but also money.
We'll look at both options.
How network access is turned on
This is the first practical step you need to take. Having mastered it, you can easily connect access to the network at any time and disconnect if necessary. Let's consider the most common options for connecting to the network:
Connecting using a wireless WiFi network.
Here you should select the settings menu on your gadget. To do this, turn on the phone and drag down the top menu with a finger, as shown in the following figure


Now you need to click on the gear, which will take you to the settings menu

Here, one should take into account the fact that in different versions Android icons may differ, but it won't be difficult to find it anyway.
Now we see almost at the very top the inscription WiFi and a kind of switch on it. We need to move the slider from Off to On. Some versions translate from 0 to I. This is the same thing.

That's it, now we have the Internet connected via wireless network... Tap now on the Wi-Fi icon, you will see a menu where you can enter the necessary data for setting or select the available network options

Of course, you are unlikely to get on the free network, and therefore you need to know the password. Then you select the required network name, for example "Megaline_1" and enter the code


That's it, now the Internet should work.
Here you should focus on the fact that there are cases when the machine cannot connect to the required network automatically and there is a need for manual data entry, as we showed above in the screenshots. This brings many into a real stupor, but there is nothing difficult here, especially since we will now analyze this moment as well.
Go to Settings->Net->Wi-Fi settings... How to get here, we showed in the images just above. You need to add new Point Access or available, but manually. To do this, you must at least know its SSID (in other words, the exact name), password and protection mode.
We will not consider the WPS key, which distributes the Internet for those who wish, in public places. If you want to give access to this network, then you do not have to press anything.
Actually, this is where the setup via WiFi ends.
Outcome: The option is generally good and often free, but its main problem is that as soon as you move away from the distribution point, you lose the ability to connect and you need to look for a new source of free Internet.
This option should be used when you are at home and you have a wireless Internet distribution device;
Customization 3G / 4G / GPRS / EDGE / and Internet through a communication provider for Android
Things are much more complicated here, especially for beginners. The task can be greatly facilitated if you have automatic network settings provided by the operator for your mobile device. If this function does not work or it is not possible to identify the device (which often happens in the case of Chinese copies of well-known phones or their own models), then you need to enter everything manually.
But there is one more problem - this is the need to enter the exact parameters for each operator. In this article, we will provide the settings for each type of popular providers.
We go to the network settings in the same way as we did it with WiFi, only now we select “ other networks»


And we find ourselves in such a menu, we scroll down

Apparently at the bottom of 2 points

We fill in the first paragraph

We fill in the second paragraph


That's all, now we see our Internet in the settings

There was also a very simple option for setting up using the most convenient Mobile.Yandex service. Now, for some reason, it either does not work, or works, but not correctly. What was its essence:
- We select the operator you are using in the list, after which the model of your smartphone or tablet is entered;
- The number is indicated in the international format;
- When you receive an SMS with the necessary settings, you immediately install them in your gadget.
- Having saved the settings, the Internet will work for you.
Agree that it was not very much convenient way but we were able to do it ourselves and learned how to set up the Internet on android. At the same time, there is no difference whether to set up the Internet on a tablet or on a phone, since the Android OS system is the same!
How to enter parameters for connecting to a mobile Internet operator
It is also easy to set up the Internet with Rostelecom on Android or set up the Internet on Android Tele2. You just need to visit the official website of the required operator and enter the parameters. It will be even easier to call the operator and he will dictate all the necessary data to you.
Outcome:setting up the Internet on Android nss is not that difficult. But its effectiveness is many times greater than in the case of the first option. Just keep in mind that the cost of such an Internet is quite expensive and not everyone can afford to constantly be on the Internet with very expensive tariffs.
How to choose an operator for mobile Internet
A frequently encountered question on the Internet, about the same as the question - how to set up an Internet motive on Android. Study all the offers from different operators, look at promotions, bonuses, profitable programs for the provision of mobile services, study all the packages and then make a choice.
Conclusion: I recommend that you use both options. WiFi will allow you to update the system, download applications, chat on Skype, even watch videos or listen to music online. And the second option is ideal for surfing the vastness of the global network. However, do not forget that everything depends not so much on money, but also on what you want to get from your Internet.
Thank you all if the article was useful to you. say Thank you!
Still have questions? Ask!
Was this news interesting to you?

