Seedlings in plastic cups. Cucumber seedling cups
Nowadays, it is not difficult to buy special containers for seedlings. But are modern plastic cassettes so good, peat pots or tablets for growing quality planting materialas their manufacturers claim? Isn't it better to use boxes, cups, kefir boxes or other handy containers in the old fashioned way?
Today we will try to find the pros and cons of the most popular containers for growing seedlings and choose the best option.
Perhaps the most ancient way of growing seedlings is planting seeds in a common box with subsequent picking. This is how our grandmothers grew seedlings. The box can be wooden, plastic, or foam. As a rule, the box is placed on a pallet, and the inside is lined with plastic wrap and filled with earth.
Pros: More seedlings can be grown in the box than in individual cups; it is convenient to turn it over; the box does not require additional devices during transportation; it is easy to put together yourself and save money.
Minuses: In the process of picking or planting seedlings in the beds, there is a high probability of damage to the roots (and this means a delay in growth and fruiting); a wooden box filled with earth is quite heavy.
Plastic cassettes

Plastic cassettes are small containers stuck together drainage holes various lengths and widths. If you wish, you will surely find a cassette for the full width of your windowsill.
In Russian stores, plastic cassettes are usually sold without pallets. In this case, the pallet will have to be made by yourself. Otherwise, they are very easy to use: you just need to fill each cell with soil mixture and boldly plant the seeds.
Pros: Easy to fit by cutting with scissors; are inexpensive, but serve for a long time; lightweight and compact cassettes; already have holes for good drainage; the seedlings are easily removed from the cells.
Minuses: "Large format" cassettes are inconvenient for transportation, because they are very flimsy and can crack under the weight of the earth and plants; due to the fact that the cells are fastened together, when removing one seedling, you can inadvertently break the earthen lump of another; not free; not every crop has enough space in a small cell (for example, the roots of peppers and eggplants may not have enough "depth" of the cassette).
Peat cups

Peat cups are very popular with gardeners, especially with supporters organic farmingas they are made from environmentally friendly materials and easily decompose in the ground. It is often recommended to use peat pots and glasses at the second stage - for transplanting (picking) seedlings, and not for sowing seeds.
Pros: Strong and safe, do not contain toxic substances; the walls of the cups are porous, allow air and water to pass through, not allowing the roots to “sour”; seedlings are planted on permanent place directly in the pot, which means the root system is not injured at all; seedlings take root almost 100%; decomposing peat serves as an additional fertilizer.
Minuses: Not all commercially available peat cups differ good quality; have a tendency to get wet; not cheap; can “bloom”, that is, become moldy; in peat containers, the soil loses moisture faster, which means that you need to closely monitor the seedlings and prevent drying out.
Peat tablets

IN last years special peat tablets - compressed fine peat with nutritious additives in a casing made of strong mesh. They are placed in a pallet and filled with water. The tablets swell and increase in height several times, after which seeds are planted on top of the grooves.
Pros: Picking without unnecessary body movements: the pill is simply buried in the ground; excellent air and moisture permeability, which is important for the development of a powerful root system; no need to prepare or buy seedlings, at least at the first stage of growing seedlings.
Minuses: Expensive pleasure; As in the case of peat pots, constant moisture control is necessary - it is very easy to dry out the roots of seedlings.

However, resourceful gardeners will always find a way out. For example, to solve a moisture problem, peat tablets with seedlings are placed in a plastic container from sushi, cakes or cake. The container is filled with water to the brim, and the tablets themselves take as much moisture as needed.
Plastic cups

One of the best options seedling containers are plastic cups of various capacities. They can be both specially "sharpened" for growing seedlings, and ordinary transparent from sets of disposable dishes. Moreover, you will need two sets of such glasses: one with a volume of 100-150 milliliters for the initial planting of seeds, and the second with a volume of 500 milliliters for the subsequent transplantation of young plants (picking).
Pros: Cups are cheap, but they will last more than one year; plants are easily removed without damaging the earthy coma.
Minuses: Still cost money; if you use transparent disposable cups, you must remember to make drainage holes (for example, with a hot nail); difficulties may arise during transportation (usually the cups are placed in shoe boxes so that they do not tip over).
Homemade containers for seedlings
And yet, the optimal containers for seedlings are those that you do not need to buy. Because they are always at hand! And instead of encouraging the production of excess plastic with your own money, you should pay attention to the recycling of all kinds of packaging materials. This practice flourishes abroad, and we, I must say, are not lagging behind.
Dairy cartons

By cutting off the bottom of the dairy box, it's easy to create a wonderful seedling container. It remains only to pierce the bottoms in several places for drainage, put the boxes in a pallet, fill with soil - and sow.
Pros: Free; lungs; may be different heights; ready-made seedlings perfectly removed with an earthen lump (just break the box).
Minuses: It is easy to forget and throw the box in the trash instead of cutting; a pallet is needed, because they let water through.
Cups of yoghurt, sour cream, instant noodles, etc.

Free replacement for special plastic cups. The yogurt packaging does an excellent job with the role of a 100 ml glass, and in large 500 ml sour cream glasses the seedlings will feel no worse than in purchased nurseries.
Pros: The same as purchased plastic cups, plus free and small contribution to the big cause of protecting the environment.
Minuses: The same as purchased plastic cups.
Buckets of sauerkraut, cucumbers, etc.

Liter plastic buckets will cope with the role of a container for seedlings no worse than others. They are especially suitable for large seedlings. They are good in that you can safely fill up half of the container with drainage, and only then with soil.
Pros: Free, large, easy to carry, because each bucket has a handle, durable.
Cons: transparent; need improvement (it is necessary to pierce the holes to drain excess water)
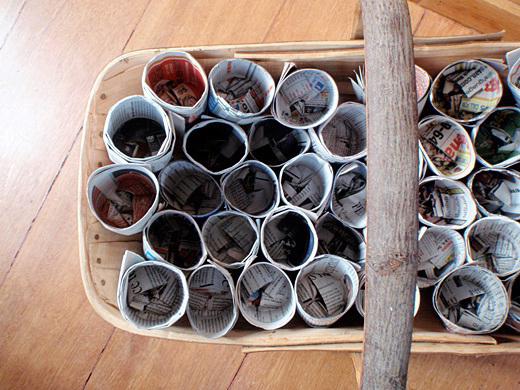
Paper cups from newspapers

For those who do not eat sour cream or drink milk, but read newspapers, this interesting and extremely fashionable method for making containers for seedlings may be useful in the West.
The old newspaper is folded in half lengthwise and wrapped around a 1.5 liter bottle or can in several layers. The main thing is not to forget to leave the bottom allowance at the bottom. The edges are held together with a stapler, the bottom just folds inward. Done! You can fill the cups with earth, lightly tamp it, and plant.
For tomatoes, peppers, eggplants and cucumbers, paper cups are made with a diameter of about 8 centimeters and a height of 10-14 centimeters. For cabbage seedlings, cups about 7 centimeters in height and 5 centimeters in diameter are suitable.
Pros: Free, lightweight, non-toxic; you do not have to remove the seedlings from the glass, it is enough to put it in the hole and cover it with earth.
Minuses: It is necessary to find time and work with your hands, which is not always possible; a pallet or box is required where to put these cups (tightly to each other).

What else can be adapted for growing seedlings? There are a lot of variations! For example, cardboard cores from rolls toilet paper can easily play the role of a glass.
Opaque clipping works great plastic bottles with drainage holes in a circle (2-3 centimeters from the bottom). Even “poltorashki”, cut into two or three parts, turn into breeding grounds without a bottom. But this “problem” is easily solved with a pallet or a low box, where you need to install homemade containers filled with soil. Some gardeners cut rectangles out of plastic bottles, roll them into cylinders of the desired diameter and fasten the edges with a regular paper clip. From such a container, the plant does not even have to be shaken out: I removed the paper clip, the cylinder disintegrated.
The use of special cups for seedlings makes it easy to sort young plants as they develop and not damage their delicate ones when transplanting. Every summer resident would like to make this first stage of growing vegetables as cheap as possible. The article will tell you how to make almost free individual seedling containers from materials such as film, laminate backing, and even newspaper. And to make the process of creating cups with your own hands absolutely clear, photos and videos are attached to the article.
The first dwelling for seedlings - what should it be?
The use of the seedling method is due to the peculiarities of the climate in the temperate zone. When the February snowstorms still howl through the city streets, the shoots of future gardeners are already touchingly green at the window. They will have to go through a long drive to the country and transplant into the ground, without breaking their fragile stems and keeping the root system intact. It is for this that the seedling cups were invented.

Seedling cups can be purchased ready-made or made by hand
The correct cup must meet the basic requirements:
- “Excellently” to protect the roots of seedlings during their growth and during transplantation;
- it is easy to release the earthen lump when you need to remove it;
- do not fall apart in hands when moving;
- ideally decompose, turning into humus;
- not to burden the vegetable grower budget, which is already thrown on the seed, covering film and plant protection products.
This last property is cheapness. homemade cups - and makes them so attractive to hobbyists and gardeners. They can be built from any waste materials: scraps of film, waste paper deposits, laminate backing.
Important! When working with transparent materials, you need to think about how to close the roots from light so that the plants do not lag behind in growth.
What to cook for work
To create cups for seedlings with our own hands, we will need absolutely simple materials and tools:
- The shape around which we will wrap the cup. This can be a stewed can, a wooden or metal bar of a suitable diameter, a glass cup from a set of dishes. It is very convenient to prepare a plastic bottle: it must be cut to the height of the future glass, and two holes must be punched in the bottom through which a rope loop is passed. By engaging this loop, you can effortlessly remove the shape from the finished product.
- Stapler or tape for securing seams and bottoms.
- Scissors.

A blank for a cup can be made from a plastic bottle
A glass of pieces of greenhouse film: two minutes and you're done
Since special beauty and even contours are not required here, the film can be cut by eye. It can be folded in half to increase rigidity. Each piece should be large enough to wrap a bar or jar with a margin and form a bottom.

The easiest option is to make seedling cups from greenhouse film
Slicing the right amount pieces, wrap the blanks around the mold and make a strong seam at the overlap with a stapler.
We fold the film that goes beyond the form into an "envelope" and also fix it with brackets. Since the edges of the film do not converge tightly, you do not need to make additional holes to drain excess water.
Tip: containers for seedlings of increased strength are obtained if the film is not chipped with a stapler, but sealed with an electric soldering iron. These cups can be used more than once.
Laminate backing cups: strong and stable
The substrate for the laminate is the same polyethylene, only foamed. Therefore, the method of making cups from it is the same: wrap around the mold, chop off a seam with a stapler, form a bottom and fix it. Laminate underlay is also used for growing.

Seedling cups made of laminate support - stable and robust
If the piece of backing is large enough, you can roll it all over with a cylinder and fasten it along its entire length. Cut the resulting tube into identical pieces and then tackle the bottoms.
A glass from a newspaper: minimum costs, maximum environmental friendliness
Using free newspapers extracted from mailbox, Is a way to wind up a battery of cups without spending a penny.
Option 1. Wrap a piece of newspaper folded in half around the form so that there is a margin of paper on both sides. We fold the bottom and glue it with tape. We take out the form and bend the top edge of the newspaper inward to strengthen the walls.

Newspaper seedling cups - an economical option
Option 2. You will need special form, but the process itself will go much faster and at the same time the issue of quickly filling a paper cup with soil mixture will be resolved.
- Preparing the form. To do this, take a block or cylinder and wrap a strip of tin around it, which can be cut, for example, from a large can. We solder. The bar should move easily, but with minimal clearance, inside the metal mold.
- We insert the block into the mold by about 1 cm and fill the resulting container with pre-prepared soil. Tamp with your fingers or a spoon.
- We wrap a piece of newspaper folded in half around the form and fold the bottom. Holding it firmly with one hand, we tamp the soil (you can also use it) in the form with the help of a bar.
- We take out the bar. We have in our hands an even glass, already filled with soil.
Important! Since the paper cup will quickly and without residue decompose in the ground, the seedlings from it during planting can not be removed. Such care will be appreciated by cucumbers and eggplants, which react extremely painfully to trauma to the root system.
Homeliness and frugality of a person working on their land has no boundaries. Cups so necessary in the early spring for young and future tight cabbage heads can be made from literally anything, including even sleeves from. This old peasant principle - everything is in the house, everything is in business - works to this day, significantly saving money for caring for the household farm.
DIY seedling cups - photo


For growing seedlings at home, containers are first needed. The seedlings feel best in cups, in which the roots of the plants do not intertwine like in plants planted together in one box. When planting seedlings from cups in the ground, the roots of the plants are not damaged, since the plant extracted from a separate container with a lump of earth is transferred into the hole without destruction, so the seedlings from the cups take root faster. Crops such as peppers, eggplants do not like transplants and get sick for a long time if the root system is damaged; their seedlings are recommended to be grown only in cups.
There are many cups on sale different sizes and from various materials... The most popular are dark plastic cassettes or cups. However, for the purchase of containers for seedlings, many do not have the opportunity to spend additional funds. Therefore, they collect tetra packets from juice, plastic bottles, and then cut them into the right height for planting plants.
The easiest and cheapest way to make paper cups with your own hands ... It is best to use glossy magazines. Newspapers can be used, but they need to be folded in several layers, since after heavy watering, newspaper cups will get wet and may break. Glossy magazines have thick glossy paper, besides, the size of the pages of magazines printed in A4 format is great for curling cups - this is an ordinary landscape sheet.

How to make seedling cups:
To work, you need a couple of magazines, a wide tape and a glass or tin the desired diameter. By the size of the glass, you will roll the cups, for example, for tomato seedlings we use containers up to 400 ml, for this we take a glass with a diameter of 8-10 cm, for pepper and eggplant seedlings, the diameter of the cups should be about 6 cm. The height of paper seedling cups can be adjusted in the process of rolling them.
From the center of the magazine, tear out the sheets in pairs, so you get paper in two folds.
Place a glass at the bottom edge and wrap it in paper.

Tape the edge with tape, in several sections, starting from the top.
Move the glass in the paper to the desired seedling cup height. Fold the remaining free edges of the paper tube along the bottom of the glass inward and seal with a piece of tape.

Place a paper cup and use a glass to press down on the bottom to make it stable.

The seedling cup is ready, place it in a box or box. It is better to put paper cups close to each other in a box or box with high sides so that they do not lose their balance.

Self-made cups are covered with earth, then you can start transplanting or sowing seedlings.
Cups for seedlings from magazines are well preserved before planting, do not get wet, do not break even when moved. In the bottom between the leaves there are holes through which excess water flows out after watering, to prevent overmoistening of seedlings and decay of roots.

As the new summer season approaches, gardeners are again beginning to think about what to use for seedling pots or how to make them with their own hands. There are indeed a huge variety of container options for temporary growing a small plant, you just have to choose.
Seedling container options
It so happened that a variety of containers are traditionally used as pots for seedlings that have already been used for food and other products. It is extremely rare for gardeners to turn to the assortment of stores for these purposes simply due to the fact that the opening of the summer season already carries with it considerable expenses, so if you can save money, then it is better to take advantage of this opportunity.
So, containers for seedlings can be:
- Tetra-pack boxes for dairy products, juices and other things.
Such a package with a volume of half a liter can be used as a pot for one plant, and if you put a two-liter box horizontally and cut off the side wall, then at least three plant roots will fit in it.
- Plastic cups for sour cream, ice cream.
They can be used without clipping. Cups of fruit yogurt and various curds of a small volume are still too small for growing seedlings.
- Disposable cups, both small and "beer".
Due to the different volume and low cost, plastic disposable dishes are chosen for seedlings, perhaps most often.
- Plastic bottles of any volume.
Plastic soda bottles with a volume of up to two liters can be cut at about a third of the height from the bottom. But big plastic canisters from under drinking water with a volume of 5 to 10 liters, it is more rational to cut lengthwise and plant in them large quantity seeds.
- Food and beer cans.
Using such a container for growing seedlings, the most important thing is not to hurt yourself on the sharp ends of the wall.
- Shoe boxes or similar boxes made of thick cardboard, lined with polyethylene from the inside.
In them, you can not only plant the plants themselves, but also use them as a box or pallet for several cups with seedlings.
Usually, from the whole variety of options, those containers are selected that are at hand at the time of planting seeds for seedlings.
How to make cups from scrap materials.
Of course, recycling food packaging does more than save money. The ecological component is no less important, when the garbage is not just thrown away, but it is perfectly used.
But if a person does not eat, say, store-bought dairy products, cups and boxes from under which they could become pots for seedlings, or he cannot save up over the winter required amount containers, that is, a simple way out is to make cups for seedlings with your own hands.
From paper (newspaper)
Cups of paper are made according to the same principle: a cylinder or a block is taken as a basis, which is wrapped with a strip of paper, preferably without traces of printing ink. Then the base is removed, and the resulting glass serves as a pot for seedlings.
This simple mechanism can be supplemented and improved with various small devices, for example, a loop at the bottom of a glass cut from a plastic bottle.
You need to fill the glass with earth for the future plant, and then wrap it with a strip of paper, and make a bag on top.
After that, turn the cup over onto the palm and pull the plastic cup out of the paper one by the loop. The soil will remain in the paper cup and the seeds of the plant can be planted in it.
Thus, you can use a plastic or other base indefinitely and make as many cups as you need.
The good thing about paper cups is that sometimes you can plant seedlings in the garden right in them without removing them. If this is not required, then they cannot be reused either, since during the time when seedlings grow in them from the ground and watering they become unusable.
From film
The principle of making cups for seedlings from polyethylene film the same as from paper, if not even easier, and they can serve for more than one year.
For such a cup, you will need a transparent film, which is used for greenhouses, as well as a stapler or paper clips. A cylinder should be made from a strip of polyethylene, and a bag should be made from the bottom part, the walls should be fixed with a stapler and used as a container for seedlings.
Thus, if it was not possible to accumulate the required number of boxes and cups for growing seedlings over the winter, you can always make them out of paper or polyethylene using a fairly simple fixtures and without spending a lot of time.
DIY seedling cups (video)
With the onset of the new calendar year, every fan of growing vegetables in their own garden is again preoccupied with finding containers for sowing. Almost all gardeners have given up the habit of growing seedlings on the windowsill in bulky wooden boxes - they are too inconvenient for transportation to the country. In addition, the tender young seedlings have time to grow into the roots of neighboring plants. The optimal solution in the choice of containers for sowing is a seedling cup.
Buy in the store or make your own?
Of course, production technologies do not stand still, and every hypermarket that respects its customers keeps in its assortment a convenient container for peat seedlings, which not only will not damage the root system young plant, but it will simply dissolve in the soil. Why build cups yourself when you can buy ready-made ones? The answer to this question is extremely simple. Seasoned gardeners are accustomed to planting more than a dozen or even hundreds of seeds of various vegetable and flower crops... Can you imagine how much you will need to invest in order to stock up on containers for all the seeds? Therefore, we will save and make peat cups for seedlings on our own. In the meantime, let's determine if there are any scrap materials that could become a container for seedlings.
Simple solutions from scrap materials

During the winter, gardeners collect plastic cylinders, juice boxes, milk bags, sour cream containers. Literally everything is used: from paper to thick greenhouse film. And the fantasy of gardeners knows no bounds. The film is stitched together with threads, cleaved with a stapler, wound in several layers. There is another simplest way to design containers. Two-liter beverage cans are cut at the desired height and converted into a planting container. Plastic cups for seedlings, made in this way in a simple way, have one small drawback. Nevertheless, when transplanting, the root system will have to be disturbed a little. Only the removal of those plants that, during the time spent on the windowsill, did not have time to acquire long and strong roots, is painless.
We make paper cups for seedlings
Some plants are so capricious that they cannot withstand transplanting, get sick for a long time and do not take root well. As a result, while the seedling is acclimatized in a new place, the precious time allotted for growth will be lost. Therefore, we will make paper cups for seedlings. During the winter, you can collect unnecessary newspapers. Pressed cellulose obtained from recycled raw materials is used for printing publications. It will easily rot in the garden, serving as food for omnivores
We cut newspapers into pieces of 10x30 cm. Newspaper sheets are thin enough, and in order to make the process go faster, you can fold them in half or three. We take an ordinary glass and wrap it with the resulting blanks in several layers. We leave a small ledge, which will later be needed to form the bottom. Now we dip the bottom edge of the paper in a small amount of glue and crush it well, forming the bottom and fixing it tightly at the bottom of the glass. Press down the newspaper blank with a glass and let the glue dry. We repeat this simple manipulation as many times as we plan to receive blanks. The seedling paper cups are ready! Now they can be stowed away in the pantry right before the sowing date.
Peat container for planting

If we are not sure about the density of newspaper sheets, then we can use a more complex technology for manufacturing a planting container. A peat cup will bring even more benefits to a painless transplanted plant. After all, he, dissolving in the soil, actually becomes good fertilizer... You can make peat containers under own order... We will define ourselves required sizes cups and fit a tapered steel blank for them. We take into account the fact that to obtain more early harvest it is necessary to sow seeds in a large, spacious container. Root system it will develop well in it, the transplant will be painless, and the plant will immediately be able to proceed to fruiting.
To make a peat cup for seedlings, we need:
- steel conical shape of the required size;
- blank for forming cups;
- circle with a rod.
Nutrient formula
Having found all the constituent forms for the design of future cups, we proceed to the manufacture of the peat base. We will need following proportions: 50% peat, 40% cow dung and 10% black soil. Instead of black soil, you can use any other fatty soil. Mix well and add azotobacterin, phosphorobacterin and water to the composition. The mixture should be quite thick in consistency.
Responsible manufacturing stage
To begin with, we lower a circle with a pin to the bottom of the steel glass and fill it with the prepared peat mixture to a thickness of 2 cm. We carefully tamp the future bottom with a blank. Now, without removing it, we will pour the solution along the edges, filling the entire gap formed between the steel glass and the blank. The seedling glass will not dry out if the mixture is carefully tamped when pouring. The blank can be removed immediately as soon as the peat composition fills the voids up to the very top. It is not scary if the liner is difficult to remove, you can swing it slightly from side to side. Now it remains to gently pull on the rod and remove the finished glass.
Time to experiment

Not all peat cups for seedlings are of perfect quality the first time. Sometimes homemade containers can disintegrate and dry out - perhaps the matter is in the insufficient density of the mixture. Sometimes too dense and hard products are obtained, which dissolve with difficulty in the ground during planting. The necessary skill and flair are bound to come, even if it takes multiple repetitions.
Polyethylene seedling cup

To make a container with a height of 10 cm and a diameter of 7 cm, you will need a piece of dense film measuring 33x15 cm.We find or cut out a rectangular block to fit the size of the future glass. In the two edges of the bar, which are responsible for the bottom, we make grooves so that the stapler fits in them. We cut the polyethylene blanks and start designing the landing container. Then we wrap the film blank around and fix it with a stapler and 5 staples. We fix the side edge with two of them from above and below, and with the remaining ones we form the bottom, folding the ends of the film with an envelope. It's okay if more staples go on the bottom. In this way, cups of various sizes can be modeled.
Conclusion

We learned a lot about how to make seedling cups. Of course, peat or paper containers are seen the best solution compared to homemade polyethylene glasses. The idea of \u200b\u200bplanting plants in the ground together with a natural glass that dissolves with water in the soil was revolutionary at one time. But only gardeners can decide which of the presented methods of making containers for seedlings is the most acceptable for them. After all, not everyone will be able to find steel blanks for peat glasses, and not everyone will have enough time and patience to hard work with glue and paper. Therefore, making cups for seedlings is a purely individual matter.
Maybe you can use a proven method and plant seeds in disposable plastic containers, in addition, they clearly show the state of the root system and the degree of soil spillage. Moreover, such containers can be used many times. Whichever container you choose for sowing seeds, we wish you a rich harvest!

