How to process a photo in Photoshop - first steps and simple tips. Basic photo processing techniques in Adobe Photoshop: noise removal
Hello everyone! Today I want to tell how to process photos in Photoshop for beginners or those who only recently began to study this wonderful editor. It's no secret that sometimes photos are obtained, to put it mildly, not as we expected to see them. Then they are too dull, then bright, a lot of acne, then sharpness better quality. Therefore, today I will try to tell you how to fix it.
First of all, I recommend to examine on people, if any in the photo. The first thing that is important during processing is the identification of defects. In this situation, I mean acne, scars, herpes (God forbid), from outbreak, scratches, crawling hair, bruises, etc.
I do not see much sense to write in detail about it, since for each case I have a separate article. I would only like to list several tools, thanks to which defects are usually eliminated.
- Patch. Choose this tool and highlight them a problem area of \u200b\u200bthe skin, then drag it to a healthy area, clinging the left mouse button.
- Restoring brush - Before using the tool, select the donor area by holding the Alt button. And then you will need to paint all acne, acne, etc.
- Accurate restoring brush. This tool is also designed to maltut the defects, but differs from the "brother" by the fact that it is not necessary to highlight the donor area. He takes information from the neighboring regions.
I described about all these methods in the article. You yourself make sure it is not difficult.

Application of Camera RAW filter: photo processing per minute
This method is simple to madness. Many photographers enjoy the filter. I would even say differently. They are initially removed in format CR2.which is essentially better. After that, going to Photoshop, this filter automatically turns on.
But in fact there is no trouble, since since the version of Photoshop CS5, the filters replenished with a new brother. I hope that everyone has long been enjoyed a more advanced version of the editor.
Main feature this method It is that absolutely any person can cope with him, even a newcomer and full zero, as everything happens only in one single filter, which only intuitively needs to be adjusted. Let's, for example, I will take the processing of this photo.


Looking at the beginning of the story, you yourself can make sure that wonderful changes have occurred with a photo. In my opinion, just excellent.
Using the Correction Menu on one layer
This method of processing a photo in Photoshop is rather rude, but for novice users will completely come down.

Now you can compare the changes. Maybe they are not particularly big, but the processed photo clearly looks better. Of course, the unconditional minus of this method is that it is impossible to return to the previous step and edit it. But there is a way to do it, and I will tell about it below. Well, in general, look at other functions yourself and turn the sliders. Perhaps you will find something interesting for yourself.

Processing photos with corrective layers
This method of processing photos in photoshop may seem difficult for beginners at first glance, but in fact it is very simple, and any user will cope with him.
Corrective layers
Excellent photo processing feature that does not require any special skills. The essence of this method is that we apply each function on a separate corrective layer, which we can have a great set. And in fact, it is much more convenient than the method we did higher.
For example, I took a photo with a girl, pretty faded shades. She herself suggests that she was brighter, saturated and just pleased the soul.

On this, work with corrective layers is finished, but we have to move on.
Allocation of the region
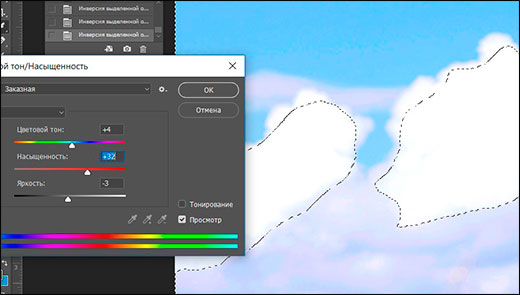
Now we have to work with some areas separately, since it is not good to use the effects of the entire image. For example, we need to make the sky brighter, saturated and blue, and if we apply everything to one photo, then our girl will also apply everything on themselves. Therefore, let's do the following.
- Highlight the girl any of. I will use, as I think that it will fit perfectly here. We start to allocate the girl. Not much chasing accuracy, but the main thing is that the whole body is captured, or rather its naked parts and face.

- Now, be sure to make sure that you are on the background layer with a girl, and then right-click inside the selection, and select item. "Copy to a new layer".

- After that, the carved girl will appear on the new layer, which is above the background. Your task is to put it above all so that the corrective layers did not act on it. To do this, clamp the button on the new layer and drag it above the rest.

- Now go to the background layer again, and begin to highlight the sky. In this case, I decided to use the function. Select a brush, and then click on the Fast Mask button itself, then start painting all the sky, not forgetting to change the size of the brush to fall into more hard-to-reach places.

- After that, click again on a quick mask to remove the selection. Next will need to invert the allocation so that we work with the sky, and not with what around it. To do this, click the key combination SHIFT + CTRL + I.

- Next, you will need to add some saturation. To do this, without removing the selection, click the key combination Ctrl + U.After that, move the slider "saturation" by a couple of dozen units to the right. You can also play with brightness until you reach the most interesting shade.
- Now back to the girl. No wonder we transferred it. Since we moved it from under the correction layers, she again became pale, as it looked initially. But if this is not done, then it will be overlooking it too dark. And now we can find the right balance. To do this, our copy of the girl needs to reduce the opacity before that time until you seem, which is enough. In my case, 33 percent is enough.

Outcome
After studying several different waysI came to the conclusion that if you want to make fast and high-quality processing, it will be enough to use the Camera Raw filter in Photoshop. He showed himself perfectly, and the time that is spent to handle a photo even to novice users, is actually 1-2 minutes.

The only thing I would not recommend is to create an action action for this and start a stream change of photos. Even if the pictures are made by one sief one day, for them there may not be the settings that you did for one picture. I know that many unscrupulous wedding photographers are exactly what they do in order to save time. They see reluctance to handle 300-400 photos one.
But if you really want to work with high-quality photo processing, as you pull you to this, I strongly recommend watching these cool video tutorialswhich is clearly explained how to use photoshop for awesome photo processing.
And if you are new in photoshop, then I recommend to study first this course. All worn literally to the smallest things and looks just in one breath. . And most importantly, everything is told by the human language, so I don't even want to be distracted.
As you can see, nothing is complicated. Therefore, no one should have questions, how to process photos in photoshop for beginners. At least I am sure that you are enough tools.
Well, on this I finish my article. I hope you liked you. Do not forget to subscribe to the updates of my blog, as well as follow the news in my public. Good luck to you. Bye Bye!
Sincerely, Dmitry Kostin.
Frequently practiced photos are obtained by dark and dull. This may happen for various reasons, for example, you photographed in poor cloudy weather, in dark time day or in poorly lit room. And of course browsing photos on the monitor or withdrawing them to print, you simply were upset and no matter how you try to pick up and your result left to desire the best. But do not be discouraged, because in this, you will learn how to improve your photos in just a few steps!
The charm of this lesson is also the fact that all these steps are very simple in understanding and universal for almost all photos. On the simple example We will analyze such stages of processing as: cropping and correction of the horizon, an increase in contrast and brightness using curves, creating a bokeh effect using texture overlapping and stripping. What let's get start!
For example, I chose this photo of the Snow Cat:
Photo shot on Pentax K-5, 50 mm lens with F / 1.6, 1.40C and ISO 800

The note: I will make a slight retreat. For processing this photo I used Photoshop CS2. Why? First, now Adobe officially allows you to download and use Photoshop CS2 absolutely free! I wrote about it. For beginners, it's just a fairy tale. Secondly, all tools are present here. required toolsFor example, in the CS6 version. So, let's finally begin to correct the photo.
Step 1 - Correction of the horizon and cropping
Some snapshots are obtained with a risen horizon, as well as with superfluous objects captured in the frame. To fix this, you need to use two tools:
- Transform Selection. (Selection Transform Tool)
- Crop. (Trim tool)
About these two tools, I wrote a separate lesson: where everything is described in detail and told. However, let's briefly consider their principle of work again.
To use the tool Transform Selection.First you need to make the selection of the canvas by pressing the keyboard Ctrl + a.
Remember: Without a selected object, you will not be able to activate the transformation tool.
You will notice how dotted lines appeared around the canvas. This is our allocation. Now you can activate the tool Transform Selection. By pressing a keyboard key Ctrl + T.:

Pay attention to the selected points. Thanks to these points you can stretch the image. However, now we need to simply turn the image and align the horizon. To do this, move the mouse over the canvas. The cursor must take the form of two arrows. Now hold down the left mouse button and turn the photo:

Now use the tool Crop. For cropping and trimming of all extra. This tool, you can activate both the palette and power hot key C:

Remove the selection of clicking Ctrl + D.and pulling out the point, paint the area as shown below:

After that press the key ENTER:

Step 2 - Raising brightness using levels
Now let's make our photo brighter and more contrast. To do this, we can use the correction layer. Curves. (Curves) or just a tool Curves. (Curves).
For this photo we will use the tool Curves. (Curves), but first make a duplicate of the main layer by pressing the keyboard key Ctrl + J:

After that click Ctrl + M. To activate the tool:

Experiment with the curve until the image becomes brighter and lighter. Raising the point of the curve up, you raise the brightness, lowering the point down, you make the tone darker. That's what I did:

Most often, you will have to create several points on the curve, as in this case. For more information about the curves you can know.
Step 3 - Create glare and shadows in the eyes and remove defects
At this step, we will give the eyes of a cat expressiveness. To do this, it is best to use two tools:
- Dodge Tool. (Tool Lighter)
- Burn Tool. (Dimmer Tool)
Choose Dodge Tool. (Lighter) and in its settings, set the Highlights parameter (Light). Thanks to this, the tool will only affect bright areas:

Now try making glare in your eyes:

After that, activate the tool Burn. (Dimmer), and set the value in its settings Shadow. (Shadows) so that the effect of shading affects only dark areas. Dimble some areas in the eyes:

In addition to the eye, I also darkened cat nostrils. Let's remove defects in the eye area. In this case, it is more convenient and easier to remove defects using a conventional tool. Stamp. (Stamp). But to make it as high quality, you need to lower the opacity of the effect of the tool in its settings.
Select a tool Stamp. (Stamp) and in its settings set the parameter Opacity (Opacity) value of 25%

This tool allows you to use the texture from anywhere on canvas. To select a texture clamp the ALT key and click on the area next to the eye:

All texture is selected, now let go of the key and several clicks of the mouse. Tighten the "dirty" area:

Do the same and with another eye:

Step 4 - Enhance sharpness
Now the photo looks not so clearly as I would like it. But Photoshop allows you to correct this disadvantage. The method that will be presented here in my opinion is one of the most successful and right, since it is more flexible and also does not "destroy" an image in contrast to filters.
To start, connect all the layers into one by pressing the key combination Ctrl + Shift + E.And then make a duplicate of this layer (Ctrl + J)

At the first layer, change the imposition mode on Overlay(Overlapping)

After that, apply the Hight Pass filter ... (Color Contrast)

In the filter settings, follow the contours. Adjust it so that the contours become slightly noticeable, but be careful, the main thing is not to rearrange. You will immediately see the result of the definition setting.

When you are satisfied with the result, press OK and connect all layers to one by pressing Ctrl + Shift + E.
More details about setting up a clarity, you can find out.
Step 5 - Creating Bokeh Effect
At the final step, we will give pictures of the mood by creating the bokeh effect. For this you can use diverse textureFor example, for this photo, I used the texture here from.
All you need is to add the necessary canvas texture:

Then change its overlay mode Soft Light (Soft light) and slightly lower the opacity:

You can use the eraser to erase part of the texture on the cat's body. Then you can slightly increase the brightness of the same Curves tool.
That's all. Remember that these steps are universal for almost all photos. Now you know the sequence of actions and the necessary tools. I hope you found something useful for yourself. Specify questions, subscribe to site updates, add to social network, Like and all the best to you.
Photoshop - the most famous graphic editor wide opportunities on photo processing. Almost everyone who has a computer is aware of his existence. Professional photographers and advanced lovers know how to process a photo in "Photoshop". But what to do a newcomer, who has never been doing this before?
It is believed that the interface of this program is complicated, and not every newcomer will be able to figure it out independently. In fact, "Photoshop" is good not only as a graphic editor, but also as an example of optimized usability. IN more than This applies to famous versions of CS5 and CS6. By the way, in any of the modern versions, the main set of tools has no big differences.
At the top of the program window, the main menu is located. With the help of it you can control the capabilities of "Photoshop". In the left side there is a toolbar required for photo processing. In the right - panel of layers, correction, masks, text, etc.. In the future it will be possible to set required set Panels optionally using the section in the top menu "Window" by setting ticks opposite the desired panels.
What can be found in the article?
In the section Wizard processing photos, the newcomer learns how materials software Adobe Photoshop. Help qualitatively change pictures: create a vintage effect, adjust appearance, delete problem places, work with the subject and background, turn the photo into the drawing with pencils or oil colors. The result resulting in beautiful frame and enjoy the result obtained. Here you will receive several valuable photo editing lessons. Learn how to work with the basic functions of retouching, masks, layers. Get acquakence S. useful tricks Applications of tools, accelerating the work Photoshop, the use of corrective layers to create black and white pictures, portrait photos, decoration Landscapes, movie effect.
Experts will tell about the main differences of the versions of Photoshop CS5 and CS6. You will learn which requirements for the hardware of the computer for quick and efficient work Programs, performance calculations.
The knowledge gained and useful secrets will help create work no worse than the professional designers of glossy magazines.
Beginning of work
For a beginner, it will mostly use a Russified version of the program. In this case independent study Its opportunities will be close to intuitive, the interface is so convenient. If "Photoshop" on english languageYou can download and apply a crack to it.
To start working with a photo, it must be opened through the "File", "open" menu or drag the program in the program window.
Removing imperfections with portrait
Many acquaintance with the "Photoshop" begins with the desire to embello the photo of a person - himself or her girl, a girlfriend or a guy. It is then as wondering how to treat a photo in Photoshop.
First of all, it is necessary to clean the photo of the human skin if there are pimples and other irregularities. To do this, use a set of tools from the left side of the "Stamp" program, "Restoring Brush" and "Patch".
For more accurate work, you need to increase the image using the Ctrl + key combination. Then choose the "stamp" tool, determine right size tool, reducing or increasing it with [and] keys. Next you need to click the left mouse button while holding Alt on the place next to the pimple. "Stamp" will acquire the gradient basis of the copied place, now you can click the mouse in a removable point. So you need to go with all the small imperfections of the skin.
If the imperfections are insignificant, you can remove them using a point reducing brush. By the way, she, the usual restoring bruster and the patch, are in the same toolbar cell, to do this or that tool is active by clicking on the location of the right mouse button.
You can correct the flare, larger skin irregularities using the "Patch" tool, highlight the desired object and move the contour to the photo located nearby, similar to the color of the photo. Error in the work of the stamp can also be corrected by this tool. By the way, the "patch" will help in the event that you need to remove unnecessary details Larger, for example, by chance in a person's frame.
It is important when processing not forget about other parts of open skin - neck and hands.
The beginner "Photoshopper" during processing is rather clean in terms of photography defects, it is enough to remove imperfections using a point reducing brush.
Leveling face in "Photoshop"
This processing phase is needed if you want to transform a little portrait, remove irregularities.
To align the face, you must copy the current layer with a combination of Ctrl + J keys. Next, you need to go to the "Filters" top menu section, choose "Blur", "Blur in Gauss". In the window that appears, set the pixel values \u200b\u200bof no more than 5 - 8. The photo "breaks out", this is what you need. The next action you need to convert this layer in black mask. To do this, you need to find the "Layer Mask" button below and keeping Alt to click on it with the left mouse button. The image will be clear again. Now, to lose all skin irregularities, smooth it, you need to select the "Brush" tool in the left pane of the program window, pick up convenient size Brushes and gently work out all the skin of the face, neck and hands. At the same time, it is important not to touch the lips and holes of the nose. Otherwise, the photo risks losing naturalness.
After a thorough study, the "opacity" runner in the upper right corner of the panel you need to set values \u200b\u200bfrom 30 to 50% depending on the desire. After this action, the photo will acquire a more natural look.
To make the processed face even closest to the natural, and so that no one would have guessed that I had to handle a photo in "Photoshop" , You need to add a little noise to the studded sections. To do this, you first need to combine 2 layers into one by right-clicking on the top layer and selecting the "Combine with the previous" item in the menu. Then, copy the layer, in the "Filters" menu, "noise" to find the option "Add noise", set the values \u200b\u200bof about 2-2.5. Further, create a black mask and work out all skin areas tool "Brush".
After that, the retouching portrait can be finished. If you want to fix the color of the photo, it is beautifully blurring the background, you can use the following tips.
Saturation
Professionals are trying not to use the automatic color correction features when they need to handle photography in "Photoshop". They have their own secrets. Here is one of them.
To photograph the juicy, saturated colors, you can do the following:
- Translate photos to the color space LAB ("Image", "Mode", "Lab");
- make a duplicate layer (combination of Ctrl and J keys);
- Go to the "Image" menu, "Correction", "Curves";
- In the window that appears in the channels A and B, in turn, change the position of the pointers: the bottom point is 1 division towards the center, without breaking away from the bottom line, the top point is 1 division towards the center, without breaking away from the top line.
As a result, the image is oversaturated with color. To smooth this ability, you need to select the overlapping mode in the layer panel, then put the layer transparency in the area of \u200b\u200b20 - 35% depending on the desire.
After that, you need to combine layers and translate the image back to RGB.
The skills described above are one of the main and able to help handle a photo in "Photoshop" quite efficiently.
How to process a photo in Photoshop CS6
Naturally, different versions Adobe Photoshop programs have some differences. In some cases, very noticeable. Professionals in photography processing say that, for example, the CS5 and CS6 versions differ significantly. However, the newbie of these differences will not be noticed, as they are in those areas to which he should have yet. Changes relate to work with 3D, tools for drawing, automatic functions, such as autocorrection, distortion correction and some other functions. In addition, the program interface changed the usual light gray color to dark.
For a beginner, process a photo in "Photoshop CS6" will also be just as in CS5. By the way, thanks to the updated "Frame" tool, the pruning of photography occurs easier. Yes, and autocorrection modes have become more "smart."
And the color correction in this version is more advanced, so to process a photo in "Photoshop CS6" may be more pleasant than in previous versions. Work in this application It makes requirements and hardware of the computer - work with graphics needs a large computing power. therefore comfortable work without "brakes" guaranteed on modern machines with a powerful processor and large volume random access memoryAnd even better - with a good video processor.
It happens that the snapshot needs a minimum processing, the opposite happens.
The amount of processing and the degree of intervention in the photo each determines for itself. This is a personal choice and taste, so I will not dwell on it. As on how what and why is being done, here as more convenient. As you know, the same thing can be obtained in different ways.
Perhaps someone will not agree - I do not pretend to absolute truth, just my personal approach. Is not step-by-step lesson, namely the algorithm. Therefore, the material is calculated primarily on those who already have experience of photocographic correction in Photoshop, and not for newcomers.

So, let's begin.
- Let's open a snapshot in Adobe Photoshop by exporting from RAW with settings at your discretion in a 16-bit mode, in order to reduce the quality reduction of the photo and "compression of the tones" during processing.
- Then cleaning the skin, background and removal of unnecessary elements. Usually I use Healing Brush Tool, Clone Tool and sometimes a little Patch Tool.
- If necessary, fight redness of the hands, ears, nose, legs and other parts of the body. IMHO, neatly applied Hue / Saturation (sometimes in combination with the mask) there are no equal.
- Leather leveling. I prefer the frequency decomposition method, as the fastest, high-quality, fully controlled manually and allows you to preserve the skin texture as much as possible.
- Correct the forms - Liquify the Great and Mighty Tool, in most cases I will, sometimes, sometimes, however, it may be useful Warp mode (in Free Transform).
- We correct makeup, working with details. We draw eyes, give the brightness and saturation of the iris, select proteins, work with lips, etc. There is a matter of taste and the main thing is not to overdo it.
- After that, when it can be seen, with which we work, proceed to the drawing of volumes. Draw shades and highlights / glare. Here who loves, I'm in lately I prefer to work in two layers: one in screen mode, the other in Multiply, and I use the color of the brush corresponding to the color of the processing area. Upon completion, you can blocked these two layers a little, for the softness of transitions, if the strokes seem rude or visible.
In fact, paragraphs 6-7 sometimes I change places, depending on the mood and on what is more annoying and whether it is necessary to correct a black and white pattern.
- Final color correction, contrast, brightness, brightness and tinting (initial settings and color correction are made before PhotoShop starts in the RAW converter). Here ways are at will. The taste and color of markers are different.
- The final stage. Work analysis, increasing sharpness and saving finished photo. We look at what you missed that I left the view, whether everything satisfies, correct. We increase the sharpness of the print option or for a reduced copy to publish on the network. Transfer photos to the SRGB color space, in the 8-bit mode and save.
In the photo on the example, for some reason I really wanted to draw something similar lights in the "bokeh". Photos with present lights for imposing, alas, there was no hand at hand, so I simply added 3 layers of multi-colored specks, and in varying degrees, Lens Blur blurred, adding noise droplet and setting the different transparency of these 3 layers. NORMAL and / or SCREEN modes.
At this stage, I have never claimed at this stage, but, in my opinion, it is better with them.
For those interested in the photo until / after a little more larger and crop with skin.


How far can you come?
In the first part, the retouching algorithm is described in the form in which I see him personally.
I would like to draw your attention that an example of up / after specially selected enough grotesque, just to show how far you can go.
There is a question about the degree of intervention in the appearance of the model, where the face that cannot be processed. It is clear that for each type / shooting genre, it is different.
Today there will be a simple example, on the same algorithm that I was proposed above me, but with a much more delicate approach.
As you can see, on the same algorithm you can get a much softer and natural photo.