A program to write a disk dump on p. Free programs for burning CD-DVD discs in Russian: List of the best
True Burner (TB) is a simple but very powerful burning software that allows you to create and burn standard, bootable, multi-session DVD, CD, Blu-ray discs from a variety of file systems, including UDF or ISO 9660. With this utility MP3 disk and DVD-Video can also be implemented.
ISO2Disc is a program for comfortable burning discs, which is considered the leading software in the software package. Windows software among similar applications. The utility does not contain any viruses and malware, as it is constantly checked by antiviruses.
winmount is an excellent utility, the purpose of which is to manage files and disks. It supports compression, decompression and viewing of various formats, including MOV RAR, ZIP, 7Z. Also, using this program, you can mount them on a virtual disk or a local folder...

Virtual Clone Drive- a program that is a virtual drive. By installing this utility, you can run disk images and perform various operations with them. Note that once the program is installed on the PC, an immediate system reboot is required for Virtual CloneDrive to work correctly.
If you need a simple application for editing music and audio tracks, Free Audio Editor complete the task as quickly and efficiently as possible. It recognizes almost all known extensions of music tracks, such as, for example, MP3, WAV, WMA, and there is also the possibility of recording and editing sounds from external sources.
 UltraBox is a comprehensive software that allows you to copy as well as burn DVD & Blu-ray discs with movies. The name of the program comes from the fact that it combines a set of six applications that allow you to perform multiple operations: Stream-Cloner, Blue-Cloner, DVD-Cloner, Blu-Ray Ripper, DVD Ripper, SmartBurner.
 AutoPlay Media Studio (APMS) is a great tool that is used to create autoplay CDs and DVDs containing videos, audios, images, presentations, etc. The interface is very user-friendly, immediately after launch, the welcome screen will offer three options - create a new one, open an existing one, or restore the last project.
Hanso Burner is an excellent multifunctional tool from Hanso Tools for burning data to CD/DVD discs. With Hanso Burner, you can also extract audio tracks from video files, erase information from drives, overwrite files, create images stored on optical drives.
Download programs for burning discs in Russian for free.
The best free programs for burning mp3 music and images to disk.
Download CD ripping and burning software for Windows XP, 7, 8,10.
CDBurnerXP is a disc burning program that can be installed and used by users of any version of Windows. And don't let its name mislead you, so to speak - it performs well not only on XP, but also on versions 7, 8 and Vista.

It works great with CD, HD-DVD, DVD, Blu-ray and popular Lately dual-layer media, and also involves the creation of ISO images.
version: 12.1 from 13 March 2019BurnAware Free Edition is a program for burning CD, DVD, Blu-Ray discs. You can also use it to create bootable and multi-session discs or ISO images.

We present you one of the best free disc burners - BurnAware Free. Its functionality serves one purpose - to quickly and accurately burn a disc. In this case, you will not encounter an overloaded interface with many additional options and settings, which is often found in popular counterparts.
version: 2.0.0.205 from 27 August 2018A program for burning data media and boot disks for reinstalling the operating system. This application features a "light" interface with skin support.  Astroburn can be used to burn all types of optical containers - CD, Blu-Ray, DVD. The initial data can be ordinary files or images in CCD, NRG, ISO, IMG and other formats. The program allows you to erase rewritable "blanks" and can check the integrity of the information after the transfer of objects to disk. The utility supports everything modern views media - DVD, Blu-Ray, as well as CD.
A free disc management application that strips away the bells and whistles, but instead contains all the important and basic features such as burning at different speeds, creating an Audio CD and backing up data on a disc.
Are you tired of convoluted and obscure disc burning applications? Download Ashampoo Burning Studio for free in Russian and forget about the problems of familiarization with the program forever. You do not need instructions for Ashampoo Burning Studio, since the interface is not only in Russian, but also intuitive. The application "leads" you to a successful burning, because the whole process is divided into successive steps: add files, set the burning speed, click "Start".
version: 9.4 from 18 April 2014Nero Free is a free version of the time-tested disk management software. Thanks to its lightweight functionality, it starts instantly and does not affect the operation of other applications.
The program allows you to burn any data to a disc, as well as copy information from CD, Blu-Ray or DVD. But creating a DVD-video or ISO image with it will no longer work. And if only standard features are enough for you, then the best option can not found.
version: 2.5.8.0 from 17 June 2013ImgBurn is a free disc burning program that supports a wide range of file images (BIN, CUE, DI, DVD, GI, IMG, ISO, MDS, NRG, PDI).

Can burn audio CDs from any file type supported by DirectShow / ACM (including AAC, APE, FLAC, M4A, MP3, MP4, MPC, OGG, PCM, WAV, WMA, WV). Also you can use ImgBurn to create DVD video discs (from VIDEO_TS folder), HD DVD video discs (from HVDVD_TS folder) and Blu-ray video discs (from BDAV/BDMV folder) with ease.
Greetings to all my regular readers and those who first came to my blog. I hope you will like it and you will become regular readers of this computer resource.
Recently, I had a need to write certain files to disk, literally in half an hour everything was done. After that, without thinking twice, I decided to write an article how to burn music to disc. Last time we talked about that.
You can record not only music, but also other video files, photos, documents, images, and so on. Today I will tell you and show you four ways to burn music to a disc and other information, we will also talk a little about three popular audio recording formats and what discs are. Also, especially for you, I recorded 4 video lessons for each program, which we will analyze today.
Music on round media
Basic moments:
- Audio formats
- Disc formats
- We write music - Nero program
Audio formats
Music is usually recorded in the three formats Audio CD, Mp3 and Flac. There are of course other formats, but in this issue we will consider only these three. So, how do these musical formats differ from each other.
Audio CD - its history began in the last century, back in 1969. The first Audio CD (compact disc) was released in 1980 by Philips and Sony. And two years later, the first CD player appeared.
It holds 15 to 20 songs per good quality(stereo), recording time up to 80 minutes. Most often, such discs are listened to in cars, stereos and other players. They were also often used in discos and recording studios.
Mp3 - the format itself appeared in 1994, it was developed at the Fraunhofer Institute. Literally a year later, the first MP3 player appeared. This format can store up to 10 times more songs than an Audio CD, depending on the sound quality and the codec being compressed.
An ordinary person probably does not distinguish the sound of Mp3 and Audio CD. The Mp3 format is widespread almost everywhere, it is supported by most players. It is divided into three versions: Mpeg-1, Mpeg2 and Mpeg-2.5. The Mp3 patent is owned by Alcatel-Lucent and expires in 2017.

Flac - appeared quite recently, not many people have heard and know about it. Personally, I stumbled upon it by accident about a year ago. For true connoisseurs of music, I can recommend listening to audio recordings in Flac format, also called Lossless. There is almost no loss and the sound quality is much higher than in Audio CD and Mp3. The average size of one such file is several times larger than Mp3.
Sound quality ranges from 700 to 1500 kbps on average. In the same Mp3, a maximum of 320 Kbps, most often 192 Kbps. Listen to the song in the first two regular formats, then in Flac format. I'm sure the difference will be obvious. If you like calm music, then check out my second Chillout music blog.
Something I got a little carried away with these audio formats. If you want to learn more about formats, you can always turn to the Internet or Wikipedia for help. Let's proceed directly to the process of burning music to disc.
To do this, you must have several CDs or DVDs ready, depending on the amount of information you want to burn on the disc. And a few so that if one disk goes bad (burning fails), you can use the second one - a spare.
Disc formats
I completely forgot to tell you what discs are. At the moment, the following disk formats are most often used:
- CD-R, CD-RW - the amount of information contained 700 MB
- DVD-R/+R, DVD-RW/+RW, DVD-R DL/ DVD+R DL - information volume 4.7 - 8.5 GB
- DVD-RAM - can be rewritten up to 100,000 times, unlike its counterpart DVD-RW / + RW, whose resource is up to 1000 rewrites. In most cases, it has a protective casing and holds 2.6 - 9.4 GB
- BD-R/-RE/-RE DL — blu ray discs, information volume 25 — 500 GB
- Also, all of the above discs have smaller brothers Mini-CD, Mini-DVD and Mini-BD, which contain a little less information than their older counterparts.
The abbreviation -R- means one-time use, -RW- reusable, and -DL- layered disc.
Recording music using Windows
In the first way, we will learn how to burn music to a disc using standard Windows tools.
We turn on our computer, insert a blank disk into the drive, it should be 100% free and go to my computer.

We go to this blank disk.

The How do you plan to burn this disc window appears.

We come up with a name for our disc (for example, My Music).

Choose how you plan to use this disk.

Personally, I rarely use this method and always choose With a CD / DVD player.

You can also click on blue text What format should be used?

If you have any questions or difficulties, you can use this hint and click Next.

We insert or drag the necessary files onto it - music, photos, videos, and so on.

The files we added will be transparent, which means that they are ready for recording, but not yet recorded.


We move the mouse to the free unallocated space and right-click on it, in the menu that appears, select Write to disk.

Here you can name our disk, if you have not given it any name before, or you can leave it unchanged.


There is an option to Close the wizard when files are written.

This function can be used if you want to close the burning wizard after the disc has been burned.


After the burning is completed, click the Finish button.

In the end, I got it the way you get it, I don’t know, everyone will have different files.

After finishing the recording, you can enjoy the new music. If the recording ended in failure, then you need to perform all the same steps, only with a new disk.
How to burn music to disc using Windows 7 | website
Recording Music with Windows Media
The second way I will demonstrate how to burn music to a disc is on Windows Media Player. It is present (built-in) in the standard, embedded software package of Microsoft operating systems.

The first step is to enable our Windows Media Player.

After it opens, you need to go to the Recording tab, which is located in the upper right corner between Playback and Synchronization.

The Audio CD should appear. I had 702 MB left out of 702 MB.

In order to add necessary elements they must be transferred to the Recording List.


After that, you can go to Recording Options.

Additional recording options ... set all the necessary settings, if, of course, you consider it necessary to do so.

I almost never go there, although no, you need to select the recording speed - the lower the better. You can set it to medium or low.

After all the settings are set, click Start recording and wait for the final result, but while you are waiting, expand your knowledge and read the article.

There is also the option to copy music from a CD. Enough handy tool if you need to rip music from Audio CD. Most programs will not be able to do this. I saw and used this option only in two programs - these are Windows Media and Winamp (my favorite music player).
How to Burn Music to Disc - Windows Media Player | website
We write music - Nero program
In most cases, when I need to burn any disc, I most often use the Nero disc burning program. Surely most of you are familiar with this program, if not, I recommend that you get acquainted with it. She has extensive opportunities for how to burn music to disk and a lot of additional chips (settings and bells and whistles).
With it, you can rip discs, create images, record your own clips and movies, make presentations, make your own slide shows, and much more. You can download this program on the Internet, on the official website of the program different versions cost differently, but not free, so look on the Internet.
Let's start recording music on a disc in the third way, using the Nero program.
We launch the Nero program, I use version 7, it is proven and the most reliable, at least for me. Perhaps someone has a different version, the interface will be slightly different, but the essence of the program does not change - burning discs and everything connected with it.

We go to Nero StartSmart, you may have a slightly different name. At the top center, you can immediately select the type of recording media CD, DVD, Blu-ray or two in one CD / DVD.

Go to the note - Sound tab.

We select the project we need and click on it Make Audio CD, Create JukeBox CD (Mp3, Mp4, WMA) and so on.

You can also go to the data tab and burn a regular data disc. If you need an Audio CD, then select Make Audio CD. Mp3 is needed - select Create JukeBox CD, or Create CD with data.

If you have a lot of information, you can burn discs to DVD, everything is the same.

After selecting a project, the Nero Express window appears in which we need to add our files.

You can click on the "green plus" Add button, or drag data into an empty window. You can also use the clipboard and hot buttons Ctrl+X, Ctrl+C, Ctrl+V.

The Add File(s) window will appear with two green bars.

After the information is added to the disk, you can double-check everything and click Next.

A Compatibility Warning appears (may not appear). We are being asked Disable multisession? If we don’t record anything on it anymore, then click yes. If you want to add data to it in the future, then click no, the Final Record Settings window appears in front of us.

Here you can write the name of the disk.

Select the current recording recorder (if you have multiple drives).

Set the number of copies to be written.

It is possible to check the Check data after writing to disk box - this function is useful if you are writing important information and want to make sure that it was written without any errors. It is also sometimes called Data Verification, that is, comparing a copy with the original.

You can also set Allow adding files (multi-session).

Then we press Record (a burning match near the disk) and wait. You can go smoke, drink tea or coffee, or do something else for 20 minutes, sometimes more, for example
- subscribe to receive new articles from my blog,
- read article

Upon completion of the burning process, the following window should appear. Burning completed successfully, click OK. The Save Project window will then appear. We will be asked - Do you want to save the project? I always click No, if you want to save the project, then click Yes.

You can also check the Don't show this message again checkbox if you don't want it to always appear after each disc burn. If the burn fails - it happens, you need to insert new disk and try again.
You can enjoy music or your other recorded data.
How to Burn Music to Disc - Nero 7 | website
Recording music - Ashampoo software
Ashampoo is subsidiary Microsoft Corporation, which was created in Germany specifically for the development of closed source software in 1999.
I rarely use Ashampoo, Nero is enough. Here is a calm dark blue interface with white waves, everything is in Russian, a convenient menu. You can download the Ashampoo program on the official website.
By downloading it from the official site, you can use it for free for 10 days without registration and 30 days if you request an activation code for a month.
If this does not suit you, then at any time you can go online and download the full version for yourself. I found one link of the program, I post it for someone who does not know how to search.
In order to download it, you must have 176 MB free space on disk.
Here we quietly come to the fourth and final method of how to burn music to disc in this article.
We find our program Ashampoo.

Turn on Ashamp.

Go to the Create + Record submenu.

Go to the Music tab.

From the pop-up menu, you can select Create Audio CD and Create Mp3 or WMA Disc.

There are also many functions here, in the same submenu you can select Copy music files to disc.

I chose to record Mp3 or WMA and we were presented with the Output Format Options.

Here you can select the output format - Mp3 or WMA (left Mp3, you can choose WMA).


Click the add button and select the desired music or other files. You can also transfer data with a simple mouse movement to a clean area or use the magic keys Ctrl + X, Ctrl + C, Ctrl + V.


The window Converting input files may appear - you need to wait a bit.

In the next window you can select burning options, CD/DVD drive if you have more than one.

You can also change the recording options.

Put desired speed records (the default is maximum), I recommend choosing 12x or 16x.

Check the boxes if necessary - simulate the recording first.

Check recorded files and folders.

Burning a CD using the Disc At Once method.

First, copy all data to an image on your hard drive.

Select the desired number of copies.

You can turn off the computer after recording is completed.

Also Play the audio file when recording is complete.

After setting all the settings, click OK.


After the recording is completed, you can listen to your music or view other files that have been burned to the disc. If errors occur and some files do not open, then you need to take a new disk and repeat the burning process.
How to burn music to disc - Ashampoo burning studio 12 | website
>
Results
In this article, how to burn music to disc, we learned what audio formats are, how they differ, we talked a little about disc formats.
We also recorded music on CDs with four different ways: using Windows tools, using Windows Media Player, using the Nero program and resorting to the help of Ashampoo. We consolidated all our knowledge by watching 4 video lessons for each of the programs.
If you want to use my article and publish it somewhere, I do not mind, you can do it, but for this you must put an active open link to my blog with the article! If you don't, I will punish you! I hope for your understanding.
Perhaps you still have or have any questions related to recording discs, you can ask them below in the comments to this article, as well as use the form with me.
Thank you for reading me
In this article, instructions on how to burn MP3 music to a CD for radio in the operating room Windows system 10. Windows 10 does not need a special program to burn mp3 discs. You can record mp3 music for the radio directly through Windows 10 Explorer.
In order to burn mp3 for the radio, you need to burn a CD (or DVD) with mp3 music. Technically, this is a CD-ROM (ISO9660) laser disc recording. According to the same instructions, you can record photos, movies, etc.
Burn mp3 to CD in others Windows versions:
The difference between recording MP3 music and recording ordinary files is to record mp3 files with short names and without using folders. This should be done for compatibility with the largest possible number of radio tape recorders and household players. Not all such players "understand" long filenames and the presence of folders (files in folders are invisible for such players). For the same compatibility reason, file names do not need to be written in Cyrillic because not all players "understand" it.
MP3 music filenames should be something like this:
Briefly again:
- Names without spaces.
- Names without Cyrillic.
- The names are as short as possible.
- Don't use folders.
There is another subtlety, in relation to radio tape recorders and home players, that not all players can read CD-RW or DVD-RW discs, so it is better to use CD-R and DVD + R discs for recording mp3 music.
But you can check your radio (or player) - it is quite possible that your radio (or player) understands any discs, any format.
How to Burn MP3 to CD for Radio
Insert a blank CD-R or DVD-R disc into the drive. Use a DVD disc only if your player supports such discs.
Next, you need to open Windows Explorer, find and select the mp3 files that you want to burn to disk. When you select mp3 files, the button " Music tools", you need to click on this button. A panel will open in which you need to click on the button " Recording to CD":


After that, an Explorer window will open, in which there will be a list of files ready for recording. In this window, you need to right-click and select the command " Burn to disc". Or you can click on the button " Disk Tools" in the window title:

In the next window, you need to specify the recording speed. If there is a choice of several speeds, it is better to specify the smallest one:

You can turn off the option Close wizard when recording is complete". In this case, after the recording is completed, the program window will remain open and you can make another copy (replacing the disk with a blank one).

If you need to write files that are in different folders, then you can copy them one by one:

and paste into the laser drive folder (in Explorer):

And when all the files you need are in the laser drive folder, execute the write command as described above in this article.
Note 1
Windows 10, like previous versions (8 and 7), creates a combined UDF / ISO 9660 (mode 2) file system on a laser disc. Perhaps some kind of radio (or household player) will not be able to read such a disc.
If you have this problem, then you will have to burn a CD using a third party program and make the disc in pure ISO 9660 format. There are many CD burning programs, such as ImgBurn, a free mp3 burning program.
Note 2
In exactly the same way, you can burn a CD or DVD disc with any files - photos, movies, programs, etc. In other versions of Windows (XP, Vista, 7, 8), the recording is exactly the same, only the windows will look different.
Try using the UDF disc format to record mp3 music. Check if your car radio (or your player) can understand UDF discs. When using the UDF file system, it will be much easier for you to update the mp3 songs on your disk. .
Ivan Sukhov, 2016 .
Although discs are being used less and less these days, free disc burning software is still as popular as it was a few years ago.
The fact is that not everyone uses flash drives today, it is more convenient for many to use proven DVDs and CDs.
Therefore, it would be useful to understand what programs are used to burn discs most often.
To do this, you can do a little research on the forums, social networks and just sites where they distribute all sorts of software.
Actually, this is what was done. The results of this study can be seen below.
Interestingly, most users of the same Windows 7 do not even know about the existence of such a program.
But this is not surprising, because such giants as Nero very easily press the small Small CD-Writer on the market.
By the way, it fully corresponds to its name.
There is absolutely nothing superfluous in this program, only the most basic functions are collected.
In addition, the Small CD-Writer is very lightweight and does not need the ability to write any temporary information to the cache.
Thanks to this, Small CD-Writer does not take up much space and does not require a lot of computer memory resources for its work.
Plus, Small CD-Writer is so easy to use that it's hard to imagine anything even simpler.

How to use
Using the Small CD-Writer, as mentioned above, is very simple. For novice users, this program is optimal.
So, the very process of writing files to a disk, DVD or CD, is simply to drag the necessary files from a folder into the space circled in Figure 1 with a green frame.
After that, you should click on the "Record" button in the area circled in red in the same figure. As you can see, there is absolutely nothing complicated about this. After pressing the button, it will appear small window, in which you will need to select a speed and click OK.
The process of erasing discs is also very simple.
After the disc itself is inserted into the drive, you need to click the "Eject / Insert Disc" button in the menu circled in red and select the desired disc in the "Computer" menu ("This PC" on Windows 10 and "My Computer" on Windows 7 and earlier versions).
After that, you need to select the “Clear” button in the same area, then a menu will appear in which you will need to select the erasing option - full or quick.
Advice: It is best to choose a complete erasure so that no data and, in particular, garbage, remain on the disk and do not interfere with its further use.
Summing up the description of the Small CD-Writer program, we can say that it is one of the easiest to use.
This is due to its huge popularity among users of the Runet and, in general, the entire worldwide network.
The site also contains articles on the following topics:
- Free programs for burning CD-DVD discs in Russian: List of the best
Here already we are talking about a full-fledged multifunctional package, which includes a huge number of various functions related to burning and erasing DVD, CD and Blu-ray.
But, despite the abundance of functions, the program is also quite easy to use.

The main functions that Ashampoo Burning Studio Free performs are as follows:
- Creating disk images (the most famous format for such a disk image is ISO, there are also CUE / BIN, ASHDISC and others);
- Creation backups data;
- Burning music, movies and other data to discs;
- Music conversion (for example, you can create Audio-CD, MP3, WMA and more);
- Erasing discs;
- Recording movies in Blu-ray format and other similar formats intended exclusively for watching movies;
- Preparation of covers for discs, as well as booklets and other publications for them.
The program has a full-fledged interface in Russian, which is a huge advantage over the same Small CD-Writer.
Of course, the most famous program that performs the same functions is Nero (full paid version) and Ashampoo Burning Studio Free does not even pretend to be the best in this area.
Usage
To burn a disc with Ashampoo Burning Studio Free, you need to do the following:
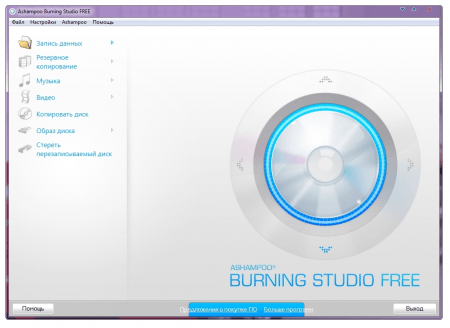
- Launch the program using a shortcut on the desktop or from the Start menu.
- In the program window we see a convenient menu on the left side, which indicates all possible actions related to recording and erasing discs. To simply dump some data onto a disc, you must select the "Burn files and folders" item.
To do this, just hover over it with the mouse cursor.

- After that, select the item "Create a new CD / DVD / Blu-ray disc" in the drop-down menu, consisting of two commands. The second is for updating an existing disk, that is, overwriting it.

- Next, a window appears, very similar to what we have already seen in the Small CD-Writer. Here, too, you just need to transfer the necessary files to the area circled in green in Figure 4.
When they are added, it remains to click on the "Next" button located in the lower right corner of the program window (circled in red).

- Now the drive selection window opens. If the user has already inserted a blank disc into his drive, the program will detect it in automatic mode. Here it remains only to click on the "Burn CD" button and wait for the end of the recording.

Note: Figure 5 shows perfect option when a disc is inserted into the drive that does not contain any data, damage, or anything else that could interfere with normal recording. Otherwise, the program will display a corresponding message and the "Burn CD" button will be unavailable.
By the way, it is best to download Ashampoo Burning Studio Free on the official page - www.ashampoo.com/ru/rub/fdl.
After installation, you will need to go through a short procedure for obtaining a free key.
This is a free and very light version of the real giant and heavyweight in the field of software for burning files to discs.

The possibilities of this program are very limited and are as follows:
- Writing data to CD and DVD;
- Copying discs;
- Blu-ray recording;
- Disk cleanup.
That's all. But this has its undeniable advantages. For example, Nero Free works many times faster than the full-fledged fellow.
If an ordinary Nero can hang heavily on weak computers, and the recording process itself can take a very long time, then in the simplified version everything is much faster.
Interestingly, most users choose Nero Free due to the fact that this program does its job well on weak computers.
In addition, it has an interface in Russian.
But I wonder what to download Nero Free on the official website at this moment it is forbidden. At least, users cannot find it there.
But on other sites, most often pirated, Nero Free is publicly available.
This is explained by the fact that, most likely, this product was distributed by some very a short time, and then the Nero team stopped doing it.
In any case, Nero Free works on all modern computers.
How to use
In many ways, using Nero Free is very similar to using the small Small CD-Writer. But there are a few more features here.
All of them are concentrated in two menus, one of which is located on top, and the second - on the left side of the program window.
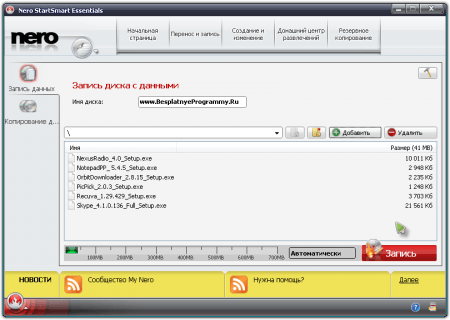
To simply write some data to disk, you must select the "Write data" item in the menu located on the left.

After that, the menu shown in Figure No. 7 will appear. Then everything is done as in other similar applications.
There is a field where you need to insert all files intended for writing to disk (in Figure 7 it is also highlighted in green).
To get started, just drag and drop files there. After that, click on the "Record" button (highlighted in red).

In that window, you can also click on the "Record" button, after which it will remain to wait for the end of the recording process. We also see that there is nothing complicated in its use.
But still, a little more functions are often required than just the ability to write information to a disc.
It is because of the lack of some features that Nero Free loses significantly to the same Ashampoo Burning Studio Free.
But we will sum up the results later, but for now we will consider another similar program, which is also quite popular in Runet.
Another program for burning discs, which is characterized by unprecedented ease of use.
But its difference from the previous ones is that it simply supports an unprecedented number of disk image formats.
No other program (even paid ones) supports so many formats.
Among them are ISO and DVD familiar to all of us, as well as BIN, UDI, CDI, FI, MDS, CDR, PDI and many others.
In general, ImgBurn can rightfully be called a real giant in terms of supported formats.

On the other hand, it often prevents the program from functioning normally. Some users write that often when working with some formats, recording takes too long.
In other cases, ImgBurn stops working altogether.
But such cases are extremely rare and may be due to the characteristics of the drive or the computer as a whole.
By by and large almost all the problems related to the work of ImgBurn, people immediately write to the forums when they arise.
Therefore, we can assume that almost all cases of ImgBurn incorrect operation are captured in posts on English-speaking and Russian-language forums (most often the first one).
In general, people are very satisfied with this program.
Not in vain on various sites dedicated to software users, the ImgBurn rating does not go below 4.5 out of 5.
The program interface is shown in Figure No. 8. To burn some files to disk, you need to select the appropriate item in the menu.
After that, almost the same recording menu will appear, as shown in Figures 4 and 7.
In it, the user will only need to drag the necessary files into the space specially designated for this and press the record button.

In addition to the ability to burn a wide variety of images to disk, users highlight the following advantages of ImgBurn over other similar programs:
- Burn music and movies to disc in the most different formats, among which there are even OGG and WV.
- Support for Unicode (after recording, there will be no problems with the names of files and folders).
- Ability to open and close the drive through the program window.
- Possibility to change the label of the image.
- Automatic search on the Internet for new firmware for a particular drive.
Other similar programs for burning discs do not have such features. True, to make the program Russian-speaking, you need to download desired file on the Internet, and then throw it into the language folder (Languages) of the installed program.

