Folding hammock with your own hands. Do-it-yourself hammock supports made of wood and metal: ideas from portal members
The history of the origin of hammocks dates back to the time of the Mayan tribe. It was they who came up with the idea to get off the ground and rest, swinging in the air. They made similar beds from tree bark and called them "hamak".
Sofas, deck chairs and armchairs are banal and boring pieces of furniture. Therefore, anyone who has a dacha or private house a must have hammock. After all, rest in it allows you to relax all the muscles of the body, and is also a great place for reading and drinking tea. Currently, there is a huge selection of ready-made hammocks. different kind, but agree that relaxing in a hammock made own hands doubly nice. Therefore, let's talk about how to create a hammock with your own hands.
Types of hammocks
Manufacturers of hammocks, competing with each other, constantly improve their product and produce more and more new types. Currently, the following types of hammocks are considered the most popular:
Hanging hammocks are the traditional look. Its popularity is due to the fact that it is lightweight, easy to assemble and dismantle.


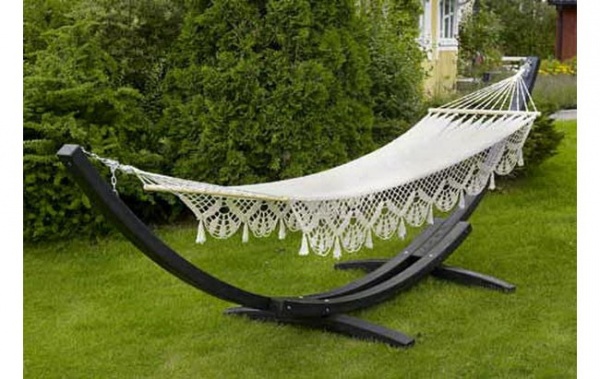
Frame hammocks - can have a wide variety of shapes. They differ in that they can be installed absolutely anywhere, for them you do not need to look for trees or poles. Their strength is also their strength.

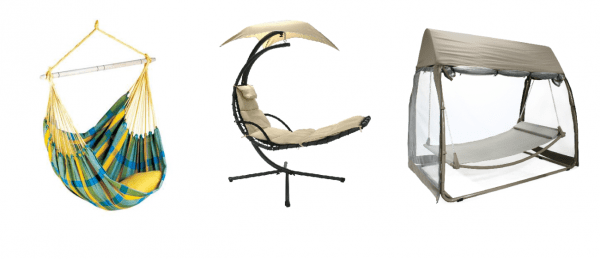
Non-standard hammocks - differ in their interesting design. The most popular models of non-standard hammocks are: a hammock chair, a hammock swing and a hammock with a canopy.


The technology of creating a hammock with a frame with your own hands
Making a frame
For the manufacture of the frame will require:
- two beams 245*10*5 cm;
- two beams 180*10*5 cm;
- two beams 120*10*5 cm;
- eight bolts М10*160mm;
- four bolts М10*140mm;
- 24 washers M10;
- 12 nuts M10.
The work on the manufacture of the frame consists of the following steps:

Making the foundation
First way
To make a hanging hammock, you do not need any special skills. You only need to have:
- sewing machine;
- a piece of dense fabric, suitable colors;
- strong rope (40 m.);
- needles for sewing machine №90-120;
- triangle;
- scissors;
- centimeter tape;
- knife.

Step 1. We prepare the base.
When choosing a fabric for the base, preference should be given to materials that have a width of 3.6 m. You can calculate the length of the hammock as follows: add 60 centimeters to the height of the tallest family member, which will go to allowances.

The first step is to align the edges using scissors. Further, on both narrow sides of the canvas, markings must be applied every 18 cm. According to the markings, the fabric is cut by 30 cm. These cuts are necessary for the subsequent creation of a drawstring (a folded edge into which the rope will be pulled). Then all the edges of the fabric are hemmed, making a 10 cm hem. Additional zigzag stitches should be made at the cut points for greater strength.

Step 2. Making the drawstring.
Drawstrings will be located on both narrow sides of the canvas. Pre-made incisions in 2 layers are folded over, and then stitched with double seams.
Step 3. Making loops and preparing the rope for installation.
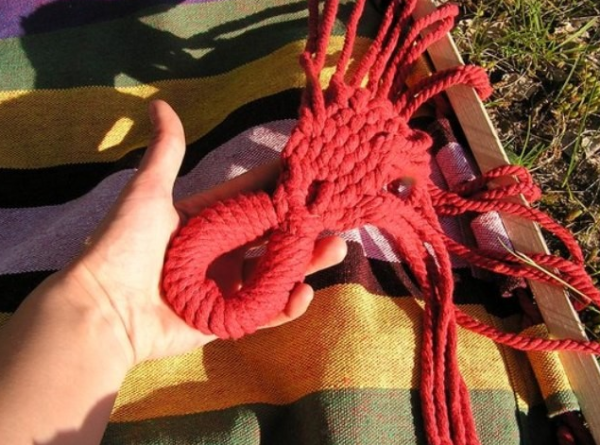
The rope is threaded into the drawstrings, so that a margin of 180 centimeters remains. And from all the slots, one meter is pulled out. The two ends of the rope on one side are tied with a “bayonet with two hoses” knot. At the same time, 4 loops that are in the middle are pulled forward a little, straightened, and tied at the top of the bend, then brought together and wrapped with a rope. It will take about 10 meters of rope to wind these loops.

The transverse winding begins after laying all the loops and fixing the rope. It is better to make a longitudinal loop from a thinner rope, the length of this loop should be about 0.5 meters. The longitudinal loop provides reliable fastening of the ends of the winding. The final turns should be pressed against each other as much as possible and should not overlap.
Before starting the winding of the longitudinal part of the fixing loop, a rope is pulled into it. When the fixing loop is completely wrapped, both ends of the rope are combined and wrapped together. After two turns are made, the ends of the rope are tied into a strong knot.
Step 4. Fastening.
The hammock can be attached to two standing nearby trees. Same reliable fasteners poles dug in nearby or a do-it-yourself stand can become.


Step 5. Design.
To make rest in a hammock even more pleasant for him, you can sew pillows. Pillows that have a contrasting color to the hammock look beautiful. As a filler for pillows, you can use holofiber, synthetic winterizer or fluff.


Second way
You will need:
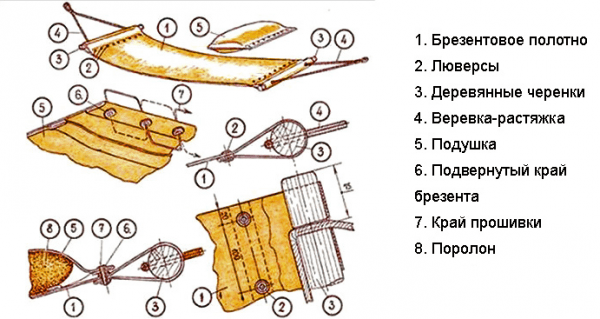
- about 3 meters of tarpaulin (you can use other durable matter);
- 22 eyelets;
- tools for installing eyelets;
- 35 meters of rope having a diameter of 6 mm;
- 2 metal rings;
- drill with a 12 mm drill;
- hardwood bars (2 pcs.) 30 * 50mm in size, the length of the bars should be equal to the width of the hammock;
- sewing machine.
Step 1. Create the base.
If the hammock will be in the open air, then when choosing a fabric, it is better to prefer a material that is resistant to getting wet, for example, a tarp. If there is a roof over the hammock, then any dense fabric can be used.
The edges of the selected material are tucked 6 cm and hemmed. To make it easier to hem, the hem is ironed with an iron. A hemmed collar is best placed on the underside, so it will be invisible.

If the fabric is thick enough, then the side edges can not be hemmed.
Step 2. Installing eyelets.
Before starting the installation of the eyelets, the places of their attachment are marked with chalk or a pencil.

Eyelets should be located on the narrow side of the fabric at the same distance from each other. On each side, you need to install 11 elements.

In the places indicated for the eyelets, round holes are cut out.


They don't have to be perfectly round, just the right size. When the holes are cut out, you can begin to install the eyelets themselves, using special tools.


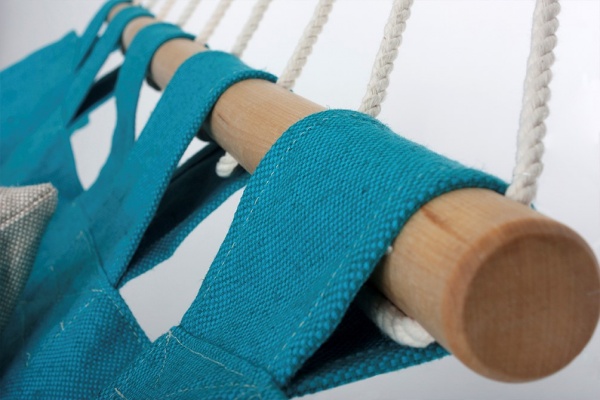
Step 3. Making a wooden spacer.
Spacers are bars with holes for pulling the rope. Struts are designed to keep the hammock from collapsing under load.
The length of the bars, as already mentioned, should match the width of the hammock, and the holes should be exactly opposite the eyelets. The beam must have a thickness of at least 25 mm and a width of 50 to 120 mm. Finished bars must be sanded and varnished.

Step 4 Attach
The first step is to install the slings, for this you can make special frame, but you can do without it. A metal ring is installed on the hook fixed in the frame. The base material of the hammock is laid out on the floor and fixed with something heavy. Next, the spacer is installed.

Each sling is threaded into a separate grommet, then into a hole in the spacer, and then into a ring, after which the sling is returned back. After the slings are threaded through all the holes, the ends of the rope are tied.

To create a small decorative effect you can braid the ring with the ends of the rope. The same operations are performed with the opposite end of the hammock. Ready product mounted on any suitable support.

Advice ! If you use supports for a hammock that you dig in yourself, then the distance between them should be more length hammock so that over time, when it sags, you don’t have to reinstall them, because pulling the hammock itself is much easier.
Americans believe that people who buy a hammock save a lot on visits to a psychotherapist. Surprisingly, it's true. After all, in it people relax, rest, relieve stress and get a boost of energy. In addition, hammocks with a frame for giving can be placed anywhere. After all, they do not need to be attached to trees. This design can be taken to the beach or to rest in the forest. And if you want - even placed in the apartment. Consider how to make a hammock for a summer residence with a frame with your own hands.
Varieties of hammocks
It is a big mistake to think that this design is just a piece of fabric tied to trees. Modern hammocks are real masterpieces. Any of them can be purchased at the store. However, it is much more pleasant to create such a structure with your own hands. But before considering the manufacturing process, you need to decide: what kind of hammock do you want to make.
To do this, consider the most popular models:
- Suspension. This is the simplest type. They call it classic. It will require a couple of trees. The latter can be replaced with supports.
- Hammock with frame. This perfect option for those who spend only weekends in the country. Such designs are very popular because they do not need additional supports. A hammock can be prefabricated or stationary. Of course, the first type is more practical. After all, the prefabricated structure is easy to transport to any place of rest. A stationary structure can be placed in the country. But, of course, you can’t take him to the beach anymore.
- Hammock chair with frame. This modern variety designs. The building allows you to comfortably spend time reading books. This design makes it possible not only to lie down, but also to sit comfortably.
- Hammock swing. This structure differs from the above counterparts in one fixation point. A hammock can have a frame or be made without it. The most common option is a design made in the form of a chair.

Material selection
Initially, you should consider what the hammock will be made of.
To make a model, you may need:
- Textile. It is best to choose a natural and dense material. A canvas hammock with a frame can not only withstand the weight of the owners, but will also please with durability. An excellent fabric for the design can be: canvas, tarpaulin, jeans. Despite the fact that such material is heavier than synthetics and does not differ in durability, it perfectly passes air, and it is much more pleasant to the touch.
- Ropes. When choosing such material, you need to pay attention to: what weight they are designed for. For the manufacture of a hammock, you should take ropes that can withstand a load of 200 kg. This material can be either natural or synthetic. However, know that the first one is much more convenient to work with. It ties more easily and slips less.
- frame material. It could be wooden bars. Such blanks are easy to purchase at a specialized or hardware store. The frame can also be made of metal. In this case, the design will be stronger and more durable.
- Additional details. They depend on the complexity of your model and design of the hammock. It can be various elements decor. If you plan to make a soft hammock (for example, a chair), then you will need a synthetic winterizer or other filler. Consider how the sunbed will be attached to the structure. You may need slats, large rings, or eyelets (plastic or metal cylinders that allow you to create a hole in the fabric).
Hammock construction
This building is a simple product. Hammocks with a frame for giving do not require special skills in sewing.

The lounger is a regular rectangle of fabric, equipped with rope fasteners that allow it to be hung.
But in order for such a design to be convenient, it is necessary to correctly calculate the dimensions:
- You can calculate the length using the following formula: the height of the tallest household plus 60 cm. In addition, you should not forget about the hem of the fabric. Therefore, seam allowances are added to the resulting size. Standard hammocks are made 2.5 meters long.
- The width of the model varies from 140 to 160 cm.
Hammock without bar
The design is called "cocoon". These are very simple hammocks with a frame for giving. They allow you to relax perfectly. In addition, it is impossible to fall out of them when swinging or in a dream.
But the building also has disadvantages. It's hard to get out of it. And quite uncomfortable to turn around.
Consider how to make such a hammock:
- At the prepared canvas for the sunbed, it is necessary to process the edges. They are wrapped and stitched around the entire perimeter.
- On the smaller side of the lounger make markings for the loops. The distance between them should not exceed 20 cm.
- For loops, you can use a luggage strap or a dense braid. In this case, they will turn out to be quite strong and very neat. It is necessary to fasten the loops qualitatively. To do this, they are stitched several times. The size of the loops should allow you to easily thread the rope through them.
- A wide and dense braid will allow you to hide the fasteners and seal the edge of the hammock. It must be sewn along the entire length.
- Now you need to thread the rope into the resulting loops. Leave the end of the cord at least 70 cm. Then thread the rope through the first loop. Leave 70 cm. Pass the cord through the second loop. If your hammock will be attached with metal rings, then do not forget to thread the rope through it each time. The ends of the cord must be carefully secured.

Hammock with plank
This model is no more complicated than the previous one. But in this case, the width of the lounger can be 90 cm.
So, if you want to make a hammock with a frame with your own hands, then fastening to the bar can be done in two ways:
- The smaller edges of the lounger are bent by 15 centimeters. Carefully fixed with a double line. It must be laid along the top and bottom of the resulting border. Eyelets are inserted into such a dense area. They should be stirred every 10-15 cm. Markings are made on the planks corresponding to the placed eyelets. Then you need to drill holes in the bars. The rope is threaded into the eyelet. After that - into the hole in the bar. Be sure to take into account the allowance of the cord for the free sagging of the lounger.
- You can do without eyelets. To do this, it will be necessary to make loops in the same way as described above. But their size should allow you to pass a bar through them. To firmly fix the rope that will hold the sunbed, it is recommended to make holes in the bar. And stretch the cord through them, leaving 70 cm after each step.
Varieties of frames
Such a hammock is chosen by people who value comfort and convenience.
Making a frame that will become a support for your bed is not at all difficult. The most important thing is to decide on the scheme. And for this you need to analyze what kind of hammock you want to get for giving with a frame. Photos will greatly help you make a choice.

In addition, it is necessary to choose the material from which the frame will be made. It can be made from wood. In this case, the breed must be taken into account. After all, it must be strong enough. Most often used pine or oak.
However, the most popular hammock with metal frame. After all, such a base is not only durable, but also able to withstand heavy loads.
The simplest framework
Its technology resembles classic version. However, this model does not imply the use of a tree.
It is made as follows:
- The lounger is attached to specially installed bases. To do this, two bars are dug into the ground, approximately 0.5 m.
- The length of such rails depends on the height at which the hammock will be fixed.
- If you plan to create a canopy over the sunbed, then the length of the bars should be much higher.
How to make a portable frame?
Let's figure out how to independently make the model placed in the figure. It is best to make it from metal. However, if the technology for welding parts is unknown to you, then you can use wood.
To make a model, you need to stock up:
- 5 bars,
- bolts,
- nuts,
- wood screws,
- 2 hooks.

Working process:
- At the bar, which will become the basis, it is necessary to cut the ends at an angle of 45 degrees.
- They are attached with bolts. vertical racks. Thanks to the cuts, they take the necessary position. If you use wood, it is recommended to strengthen the resulting structure. To do this, another bar is screwed between the vertical and horizontal beams. He must thoroughly fix both slats.
- Now it remains to attach two bars to the base, which will give strength to the structure. They are placed perpendicular to the base and carefully fixed with bolts. For greater stability, you can attach, not 2, but 3-4 such bars.
- Hooks are mounted on vertical rails.
It remains only to hang the sunbed. As you can see, hammocks with a frame for giving are not at all difficult to make on your own.
Canopy over the structure
You can think over and build such a detail. After all, a hammock for a summer residence with a frame and a canopy can be placed anywhere, without even choosing a shaded area.
Such an element can be performed by different ways. Let's analyze the simplest:
- A large beach umbrella must be attached to the vertical rail. This is the easiest canopy that does not require much effort. However, the fastening must be done thoroughly.
- Vertical bars should be approximately 2-2.5 meters in height. On them it is necessary to carefully fix a rectangular frame with a canopy.

Conclusion
Now you can place your design in the most beautiful part of the garden: near the pool or on the terrace. The main thing is to choose a picturesque area. Relax in a hammock while enjoying relaxation and beautiful views of nature.
A good rest is, first of all, an opportunity to feel comfortable, well, at least for a while, not to think about the essentials and the little things that distract you everywhere, everywhere and all the time. And this means that all these little things should be immediately foreseen and eliminated, even before they manifest themselves. Let's say you decide to relax on your suburban area, in a hammock, what could be easier and more pleasant!? So no, then the distance between the trees is not something to tie up a hammock, then the sun beats in the face, or vice versa, it is not enough. In general, a trifle, but so boring and annoying that it may well ruin your day off. That is why we want to offer you one of the options that will become universal - this is a stand or you can say a stand for a hammock. Its benefits are obvious. It is mobile, quite light, will keep the bark of your trees from damage, in fact, a worthwhile device. It is about this option, about making a stand for a hammock with our own hands, that we will talk about in our article.
In total, 3 options will be given, all of them are similar and akin to each other in their own way. Which one to stop is up to you. We will only say that all of them do not require significant effort during assembly, are made from affordable materials and are quite practical.
Do-it-yourself hammock stand 1 option
So, the first option from you will require wooden bars, studs, nuts, washers, grinder, hacksaw or circular saw, stain, drill, hooks and your skillful hands. Take a look at the drawing, it will be the starting point.

Actually all the dimensions for the bars can be seen in the drawing. Bar section 80*80. You will also need a board, 100 * 30.
Now we proceed directly to the manufacture of the rack. We measure, cut, drill, assemble, twist.


The last operations will be grinding, it’s good if you have a machine for this, and painting with stain and varnish.


All that is left now is to put on a hammock and enjoy the rest under the bosoms of nature.

Do-it-yourself hammock stand Option 2
The second option will require approximately the same belongings and materials from you. The same beam, the same studs, except perhaps general design the hammock will be somewhat different. Also take a look at the drawing...

All sizes can be taken from him. We also process parts and fasten together. Fundamentally, of the differences, only a different design, that's all.

This is how the main parts fit together...


The finished hammock can also be stained and varnished.

A leg is made on one jib to make it more convenient to lie down in a hammock.
Do-it-yourself hammock stand option 3
The third option is nothing more than a special case of the previous two. The main difference is that it uses braces to prevent the hammock from swinging to the sides, which will make it somewhat more stable. For these jibs, a board 50 * 100 is used. But you can find out all the other sizes of the parts used from the table.

And here is the drawing itself - a sketch

As a result, a hammock stand is assembled from the parts using fasteners (studs, nuts, self-tapping screws).

Summarizing the manufacture of a hammock stand with your own hands ...
In the manufacture of racks for a hammock, the most important thing is to decide which option you will like. In principle, they are all functional and vital, except that they differ somewhat in appearance. In addition, I would like to say about the studs. Their use here is fully justified. The thing is that the tree can dry out over time, or push through. So you can always twist the studs, and thereby rehabilitate the rigidity of your hammock stand.
Well, let alone the fact that such a stand made by yourself will cost you much cheaper than store options, which are also found by the way, you can not mention this.
A hammock as an interior item for sleeping and relaxing has been known for a very long time. It was invented by the Indians South America long before the discovery of the New World. Today, hammocks are very popular as country furniture because it's hard to imagine something more soothing and energizing life force than sleeping outdoors.

Creating a hammock with your own hands is not difficult, especially if you are well prepared for work. Before you get started, you need to determine what type of hammock you need.
Choose a product


The following types of hammocks are found on the market today:
- Hanging hammock. Attached with ropes to two high points of support. Its fastening is not complicated. It is enough to find two nearby trees and tie a hammock with carabiners or ropes. You can use special poles previously fixed in the soil. The photo shows such hammocks.
- Frame hammock. On this moment is more popular than hanging, as it can be installed everywhere - both in the steppe and near the lake shore. There is also no chance that the hammock will fall apart under your weight and you will end up on the ground. There are options for stationary frame hammocks and prefabricated. The latter are more convenient when traveling, and stationary ones will be useful to you at your summer cottage.
- Hammock chair. It is less popular, especially in Russia, due to the complexity of installation, but very practical.
- Hammock swings. They are a kind of frame hammock with one attachment point.
Consider making your own hands the most popular option for today, namely a wicker frame hammock.
Making the base
The frame for a hammock is best made from natural materials, in particular wooden beam. To make a hammock frame for one adult, you will need standard timber made of wood 50x100, bolts, nuts, screws, loops and stretching cord.
Before starting work, it is necessary to prepare drawings. The frame drawings represent the bottom, as well as connecting and thrust rods for a hammock at an angle of 60 degrees from the ground.
Sequence of work
Blanks: 2 tie rods and support rods 6" long and standard section, 2 beams 4" long. At a distance of 1.5 inches from the edge, a bolt hole must be drilled at each beam. So let's get started:
- Place the blanks for the bottom of the frame on the cross supports for alignment.
- Drawings will help you to make and combine drilled holes support rods and spacers at a distance of 1.5 inches from the end of the beam.
- Connect the frame blanks with bolts.
- Connect and bolt the holes between the flocks and the stop, located closer to the center of the beam.
- Check that the angle between the support rods and the ground should not exceed 60 degrees.
- Make a mark at the intersection of the tie rod and the support rod, and cut off the angle of the rod to fit snugly against the support rod.
- Cut out the overlays from the timber. Using self-tapping screws, fix them on both sides of the connecting rod, looking at the drawings as you work.
- Screws with loops must be screwed in at the point of attachment to the frame.
- For the stability of the structure, support crossbars should be attached to bottom rails. You can do this with self-tapping screws.
You can also find a complete photo briefing on each of these items.
Making a woven mesh or woven base
Until recently, the hammock was made only from natural materials. Today, thanks to technological progress, without effort, you can make a hammock from both natural fabric, so from synthetic fibers.


It is easier and faster to make a hammock from a solid canvas. A suitable fabric is then cut in the shape of a rectangle and fixed to the frame. You can see this moment in more detail in the video.
You can also make a mesh hammock, more compact and durable. To make it yourself, you need a strong synthetic thread.
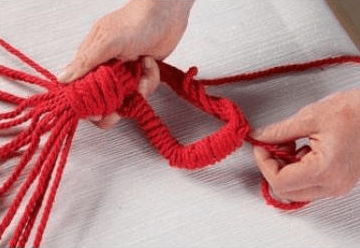
For beginners, making such a hammock does not take more than 5-6 hours. Mesh-type hammocks are made using the macrame technique (the hammock looks like an openwork fabric) or the nodular version (fishermen's net).


The node option is simpler and does not require additional knowledge. Just after a certain distance, knots are tied in a checkerboard pattern, weaving goes in rows (see photo). A macrame hammock canvas will require you to have a lot of knowledge and skill, as well as time.
The hammock is a great place to summer holidays. A hand-made hammock will give you not only a pleasant feeling of outdoor recreation, but also pride in the work done.
Hammock stand

