How to open a cube. The impossible is possible, or how to solve the main models of the Rubik's cube
So, you got acquainted with the Rubik's Cube 3x3x3 puzzle and you liked it. But how to learn how to collect a cube, and even better how to collect it faster, you don’t know yet. Especially for you, novice puzzle lovers, I am making this instruction, which will not only help you learn how to solve the Rubik's Cube, but also do it faster than 1 minute (in the future, we plan to create instructions for those who want to solve the cube faster than 30 seconds).
Let's start with the fact that here you can, this is especially true for those who want to collect the cube quickly, and the old cube does not allow this for technical reasons =)..
The most common 3x3x3 cube assembly technique is Jessica Friedrich's technique. This technique breaks the assembly of the Rubik's Cube into 4 stages. And at the initial assembly level (at a speed of up to 1 minute), you need to learn not so many formulas. I will try to make instructions that will be understandable and will contain all the necessary information.
First, briefly about the assembly steps.
Steps to assemble a Rubik's Cube
1. We collect the cross. The task of this stage is to place 4 cubes in their places around the white center (many people use exactly White color as the main one during assembly, you can use any).
2. In the method of Jessica Friedrich, at the second stage, the first 2 layers are immediately collected ( F2L – first two layers). But for a beginner puzzle builder, this will be quite difficult, so we will look at how to do this step in 2 steps, simplifying the task a bit.

3. Assembly of the yellow side of the cube ( OLL – orientation of the Last Layer). At this stage, we collect the yellow side of the cube. The assembly of this stage, even by advanced speedcubers, is not always performed using a single formula. We will look at how to assemble the yellow side in a few steps.

4. The last stage of the cube assembly is called Permutation of the Last Layer (PLL). At this stage, it is necessary to place the corner and edge cubes correctly in the last third layer of the puzzle.
Now let's move from theory to practice.
So, let's start assembling the cube. For the convenience of learning, please remember that the cube must be kept with the white center down and the yellow up!
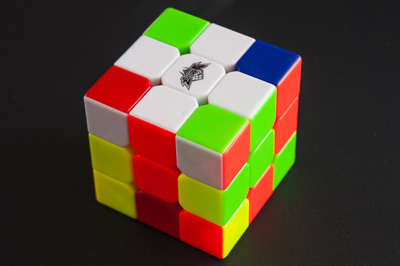
The assembly of the die begins with a cross on the main side, usually white. In this manual, white will be the main. This stage is carried out completely intuitively, there are no formulas, but there are typical situations that should be remembered to speed up the assembly.
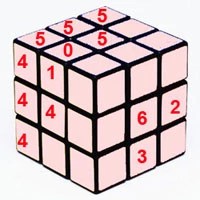
Important! Collecting is not just a white cross on the white side. Each edge cube has two colors, and it must match two centers, white and one of the other four colors (you can see in the photo how the orange-white and green-white edges match the orange and green centers).
1. Check the side with the white center for white edges. If they are, then simply by rotating the bottom layer of the cube, you can match this edge with the second center. See how to do it in the video below. Let me remind you that you need to collect the cube with the white center down!
2. If you have already completed the first step of this step, turn your eyes to the top of the die (the side with the yellow center). If there are white rib cubes near the yellow center, then it is easy enough to install them in the right place on the main side (with a white center). To do this, rotate only the top layer to match this edge with the second center (orange, red, green or blue), while turning the side on which the center and the edge coincided to face you. After the edge coincides with the additional center, you need to rotate the front face two times so that the white color is not at the top of the cube, but at the bottom (where the white center is). Watch a visual application in the video below.
3. All other situations are solved by raising the die with the white side up (the side with the yellow center) and turning down to the white center as in point 2. Below is a video with illustrative examples.
I propose to assemble the first two layers in two steps. After assembling the white cross, our task is to install four corner cubes in their places, after which four more edge ones.
Like the assembly of the cross, this can all be done purely intuitively.
Installing corner cubes in the first (bottom) layer
For ease of perception of information, I will demonstrate how to install corner cubes.
To put the corner cubes in place, you need to learn one trick, which among the speedcubers is called “bang bang”. The formula for this looks like this R U R'U'. read here.
In the video, I looked at 4 situations that arise during the installation of corner cubes.
 The corner cube faces the white side to the right (we hold the cube with the white center down). Doing the U'F'UF form
  The corner cube faces the white side to the left (we hold the cube with the white center down). We carry out the form URU'R'.
  The corner cube looks up with the white side (we hold the cube with the white center down). We perform the form R U R’ U’ R U R’ U’ R U R’ U’ (three bang-bang) The corner cube is in its place, but turned upside down (we hold the cube with the white center down). We perform the form R U R’ U’ (one bang-bang), after which the corner cube will be on top (on the side with the yellow center). From this position, we perform one of the formulas described above.
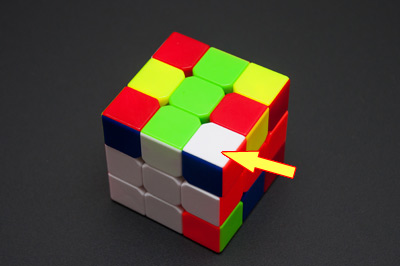
 After setting all the corners in place, the cube should look like this:

Installation of rib cubes
After you have placed all the corner cubes in the bottom layer, our task is to put the edge cubes in their places. After that, the F2L stage will be completed.
The installation of rib cubes is carried out using one formula and its mirror execution. Before executing the formula, the main thing is to set the edge cube in the right place, this is done by turning the top layer.
The edge cube must be set so that the color of the side face matches the color of the central cube of the middle layer.
1. If after that the rib cube is to the left of its place, we execute the formula URUR 'U'F'U'F.

2. If the edge cube is to the right of its place, then we perform the mirror formula U'L'U'L UFUF'.

3. There are cases when the rib cubes are not in their places, or in their places, but at the same time turned upside down. The above formulas will help lift the rib cube to the top layer, after which you can easily install it in the right place.

After assembling the first two layers, it is necessary to assemble the side with the yellow center, this stage is called OLL. At the same time, our task is simply to collect the yellow side, at this stage it is not at all necessary that all the cubes be in their places.
We look at the video how to install rib cubes when assembling the first two layers
1. Corner
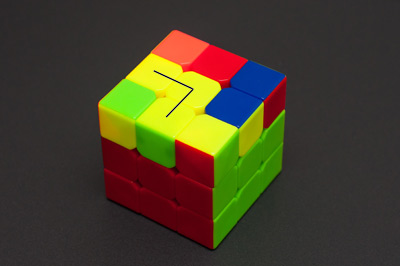
After you have collected the first two layers, the yellow side of the cube may look like this:


But in practice, during the assembly process, other combinations may fall out. Consider how to get out of all these situations using universal formulas.
Our task is to make a corner of the yellow cubes. After assembling the first two layers, you can see at the top completely different combinations from yellow cubes, but most often we get either a corner or nothing. Nothing means that neither a corner nor a cross nor a fish fell out. There are several possible combinations in the images that can be before the corner is assembled.
The corner is very easy to assemble. We execute the formula: F RUR'U' F. After executing the formula, you will get one of the many combinations that are possible with an OLL assembly that contains a corner. Let's move on to the next step.
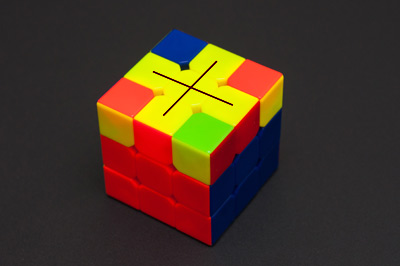
2. Cross
The cross can be assembled using one formula, but only at the stage assembled corner. There can be many combinations based on the corner, but to assemble the cross you need to know only one formula. So, before assembling, you need to take the cube so that the corner vectors look: one at you, the other to the left (in fact, as in the picture above). Next, we execute the formula: RU BU’B’ R’. As a result, you will get one of the combinations based on the cross:

 After that, you can proceed to the assembly of the fish.
3. Fish
We need a combination of fish in order to use one formula to collect the entire yellow side. In fact, after assembling the cross, the same formula will help you make a fish, and after a fish, and completely OLL.
For this operation, there is a universal formula that will help us - RU'-RU-RU-RU'-R'U'-R2 (mirror version on the left: L'U-L'U'-L'U'-L'U- LU-L2). In the video, I tell you in which cases which formula to use.
2. Placement of corner cubes
In the video, I show you how to arrange corner cubes in two of the most common cases.
The formula for case one (the formula follows from the position shown in the video): R'U2RDR'U2RDR'U2RDDR'U2R
Formula for case 2 (the formula follows from the position shown in the video): R'U2RD2R'U2RD'R'U2RD'R'U2R
These formulas are easier to learn intuitively than just memorize.
How to entertain yourself when there is a free minute, but nothing to do? Solving all sorts of puzzles is a great option!
The most popular puzzle in the history of mankind is considered to be the famous Rubik's Cube, invented back in 1975 and named after its inventor. After his birth, he instantly "captured the whole world." At least everyone tried to solve the Rubik's cube, but not everyone managed to do it.
How to solve a Rubik's Cube? Without outside help, it is quite difficult to do this on your own, this is far from a child's task. You need to know the algorithm for solving the Rubik's cube.
By the way, it has been proven that for any initial situation, a 3x3x3 cube can be completely assembled in no more than 20 moves (turns). The number 20, therefore, is also called the number of God, and the algorithm that collects the cube in the minimum number of moves is the algorithm of God.
If you have long wanted to learn how to solve the Rubik's Cube, then this post is for you. Let's end this task once and for all and have a little holiday for ourselves. Having done this, you can safely put a plus sign in the list of your achievements and then trump in front of friends who do not know how to do this. So, we present to your attention the algorithm for solving the Rubik's cube.
The pictures show the schemes of actions, following which we, in the end, will be able to arrange the colors on the sides of the cube.
First, let's deal with the notation that is used in the diagrams, and with which we will operate in the process of studying the Rubik's cube assembly algorithm classic size 3x3x3.

Side symbols:
- F - frontal (front)
- Z - rear
- L - left
- P - right
- IN - upper
- H - lower
Now let's deal with turn names, which will be applied to the sides described above.
The letter without any prefixes indicates the rotation of the indicated side by a quarter of a full turn (90 degrees) clockwise(for example, " F" means that we turn the front side a quarter of a turn clockwise, i.e. one shift).
letter with " ’ " means turning the specified side a quarter of a full turn (90 degrees) counterclock-wise. Thus, the inscription F'" means that we must turn the front side a quarter of a full turn counterclock-wise.
letter with " ’ ’ " means what the specified party turn in any direction for half a turn(180 degrees)
Fix: inscription L ’ ’ PF' means that first we rotate the left side half a turn, then we make a quarter turn of the right side clockwise and complete the combination with a quarter turn of the front side counterclockwise.
Flowers arrangement.
Choose the bottom color, it will stay on the bottom throughout the cube building process. Instead of gray color, which is shown in the diagrams of the Rubik's cube assembly algorithm, can be any color, it does not matter. The place where we moved the part we need will be shown in black. Let's look at the first picture.
We proceed directly to the assembly and the answer to the question "How to assemble a Rubik's cube?"

Step #1.
You need to assemble a cross on the bottom side of the cube so that all the middle side squares correspond to the middle of the side faces (look at the diagram). Unfortunately, there is no ready-made algorithm here. We'll have to tinker a bit and move our brains.
Step #2.
The second step is to finish the bottom layer. We need to put the bottom corner cubes in their places. Everything is much simpler here than in step 1 - there are ready-made turn patterns.
If the corner is in the lower layer, but is incorrectly oriented, then it must first be lifted up, rotated as we need and put in its rightful place. Look at the picture and apply the techniques given there. Each turn corresponds to the formula, which we dealt with a little higher.

Step #3.
The bottom layer is assembled. Let's move on to the second, middle layer. We place 4 side cubes of the second layer in their rightful places. If the side cube is in its place, but not rotated correctly, then you can turn it over by doing the following - look at the diagram.
Two layers are assembled. There remains the final push, but do not relax ahead of time.
Step number 4.
The task is to turn the middle cubes of the upper layer upside down with the color we need. At the same time, it does not matter if they are in their place or not, at this step it is not so important. Applying one of the proposed schemes of actions, we turn over the sides of the upper side desired color up.

Step number 5.
A cross of the desired color turned out on the top face, however, as you could understand from the previous paragraph, the side cubes of the top face may not be in their places. The task of the 5th step is to put them in their places.
There are 4 options, each of which has its own effective algorithm of actions. We apply them and install the sidewalls in place. The cross of the upper face can be considered fully assembled.
Step number 6.
We continue to figure out how to solve the Rubik's cube? And we are almost at the finish line.
We set the corners of the upper face in their places, but at the same time they can be turned upside down.
In this case " in place» means that the corner contains the colors of all the central squares of those faces at the junction of which it is located.
Here are three rotation formulas that correspond to three options for moving the corner cubes. We remind you that the corners may be incorrectly oriented, but they must fall into place.

Step number 7.
Friends, we have reached the finish line! The last step in the assembly of the Rubik's cube remains.
The corner cubes are in place, but some may be oriented incorrectly. They need to be turned over. To do this, perform in pairs the operations prescribed in the scheme of step No. 7 (look at the figure above).
Happened? Well, of course it did! In just 7 steps, we have solved the puzzle that kept millions of people awake and doesn't let them sleep.

Naturally, at one time you did not memorize all the steps and formulas for turns and movement. Here you just need to practice and fill your hand.
The main thing is that you now know for sure the answer to the question " How to solve a Rubik's Cube»?
Probably everyone at least once tried to solve the Rubik's Cube 3x3 - a simple-looking, but actually tricky puzzle. The Land of the Soviets will tell you how to fold it using special schemes and assembly algorithms that will be understandable even to beginners.
The Rubik's Cube (other names - Rubik's Cube, Magic Cube) is a well-known mechanical puzzle. In 1974, it was invented by the Hungarian sculptor and architecture teacher Erno Rubik, and in 1975 he patented his invention.

The classic puzzle consists of 26 smaller multi-colored cubes (size - 3x3x3). They can be rotated around axes invisible from the outside. The task is to assemble the “toy” so that each of its faces consists of squares of the same color.

Rubik's Cube: Assembly of the first puzzle belt

Assembling a 3x3 Rubik's Cube for beginners seems difficult, but quite amenable to mastering.
To begin with, let's define the terminology and give each cube a name. The central cube (center) in the figure is indicated by number 1, the side cube (side) - by number 2, the corner cube (corner) - by number three.
Important! The main assembly rule is that the front side (front) should not change!

Try to assemble the first belt yourself - the first side is assembled as you like, you can show your imagination. After that, by exchanging the dice of the first side, the first belt is collected.
Here are a couple of tips for collecting the first side:
- The central squares are always located equally relative to each other.
- The white side cannot physically coexist with the yellow side, the green side with the blue side, and the red side with the orange side.
First, make sure that the first side has the correct cross from the sides, then collect the corners.
Rubik's Cube: formulas for the second puzzle belt
To assemble the second belt, you may need two formulas.
Rubik's Cube Scheme - Formula 1 Rubik's Cube Scheme - Formula 2
These formulas are easy to understand. For example, rotation 1 of formula 1 is a clockwise rotation of the top side. And rotation 7 of formula 1 is the rotation of the front side counterclockwise. The turn is always 90°.

In the scheme for assembling the second belt of the Rubik's Cube 3x3, the fully assembled side with the first belt is the invisible part to your left. Remember: the central cube is always one color, the side is two, and the corner is three. Front side - 4.
First, change side 2 to die 0-1. In this case, the color of planes 2 and 4 must match. The invisible color of the sidewall 2 when assembled according to the first formula is 5.
Squares 2 and 3 are on the third belt, not yet assembled. That is, you need to find on the side opposite to the one already assembled, the sides without color 6, and by rotating the 3rd belt, the color visible on side 6 is opposite the corresponding color of the first belt.
If the color of square 3 matches the color of square 5, assemble according to formula 2: side 3 is placed in place of 0-1.

Rubik's Cube: assembly of the last, third puzzle belt
To assemble the third belt (last side), you will need three formulas.
How to put together a puzzle: formula 3 How to put together a puzzle: formula 4 How to put together a puzzle: formula 5 
First you need to assemble the correct cross on the last side - so the sides will take the desired position. The cube must be oriented relative to the sides indicated in blue in the figure. In this diagram, the front side is underlined in blue, fully assembled - the lower invisible side. In order to collect the correct cross, repeat formula 3 several times. The cross will turn out when the far cube is located correctly, and the near one is not.
After that, only the corner squares should remain unassembled. If they are in their places, but oriented incorrectly, do not follow the next formula. The blue cube in the picture is in its place. If you do not have any, the front side can be any. After 2-3 repetitions of formula 4, the corners should fall into place.

To correctly orient the corners, use formula 5. In order for the blue-colored corner to stand correctly, it must be rotated several times. The most important thing is not to change the front side until the cube is completely completed - even if it seems to you that nothing comes out. If the corner did not fit correctly the first time, run the formula again. For substitution next corner the first step would be:

Video tutorial: how to solve a 3x3 Rubik's cube for beginners
To better understand the presented schemes and visualize the process of assembling the Rubik's Cube, take the cube in your hands and watch the video tutorial. Try to repeat what you have learned. We are sure that now you will be able to easily assemble this puzzle!
You have mastered the scheme of how to correctly and quickly assemble this most famous puzzle. Of course, there are many more formulas for assembling it in a 3x3 format, we have described only a few, but after a little practice you can quickly figure it out without an assembly diagram.

The scheme, how to solve the Rubik's cube 3x3, with pictures for beginners. The lightest and simple circuit, in my opinion, but, nevertheless, will require you to be willing to participate in this process personally.
Stage 1 - Top side and belt
You must collect one side of the Rubik's Cube and the upper belt yourself, this does not require any formulas, you only need desire and attentiveness.
Taking into account the colors of the central squares (Fig. 1), assemble the "volumetric" cross (Fig. 2), and then completely the upper face so that the colors of the upper belt coincide with the colors of the central squares (Fig. 3).
If the colors of the belt do not match the colors of the center squares (Figure 4), you will not be able to continue. To fix this you will have to rebuild the entire top face.
Stage 2 - Second Belt
The second belt is easily assembled using two formulas. Find a matching die in the third belt so that both colors match (twist the third belt if necessary) and move it diagonally into the second belt using the formulas.
Formula: (N'P'NP) (NFN'F')

Formula: (NLN'L')(N'F'NF)

If there are no suitable cubes, using the same formulas, move any cube from the third zone to the second - the desired cube will appear.
Stage 3 - Cross on the opposite side
Now you need to collect the cross on the opposite side of the Rubik's cube. The cross is assembled without taking into account the colors of the third belt (Fig. 1). In other words, only the cross is assembled at this stage, and the cross is coordinated with the colors of the third belt already at the next stage.

Your Rubik's Cube now has one of four combinations: a, b, c, d - see fig. 2. The transition from one combination to another occurs with a single formula: F P V P "V" F ". You need to repeat this formula 1-3 times, depending on what combination you have.
If the cross is already assembled (Fig. 2-d), skip this step. If you have only one central square (Fig. 2-a), then you need to repeat the formula 3 times. If the angle (Fig. 2-b), then 2 times. If the line (Fig. 2-c), then 1 time.

Formula: F P V P "V" F"

Please note that before each execution of the formula, the Rubik's cube must be placed exactly as shown in the figures.
Stage 4 - Agreed Cross
As a result of this stage, we will get a cross consistent with the colors of the belt (Fig. 4 - Result).
Rotate the top band until the 2 colors of the cross match the middle squares of the top band (Fig. 1). Only two combinations are possible: colors line up(Fig. 2) or the colors matched(Fig. 3).

Line matching formula: P V P "V P VV P"
Move the incorrectly placed cross cubes located opposite each other (two opposite ends of the cross).

After executing this formula, the ends of the cross will not fall into place, but the combination will change to “colors matched at an angle” (Fig. 3).
Formula when the angle coincides: P V P "V P VV P" V
Swap the wrongly placed cross cubes diagonally relative to each other (two adjacent cross cubes).

After executing this formula, the cross will be assembled and its side colors will match the colors of the upper belt (Fig. 4 - Result). If the result is not achieved, then repeat this formula again, after correctly orienting the cube.
Stage 5 - Placement of corner cubes
Corner cubes are placed by two formulas. After applying these formulas, the corner cubes will stay in their places (in their corners), but may not be rotated correctly. On Fig. 1 black dot marks a cube that is placed in its place (in its corner), but is not deployed correctly. The cubes are unrolled already at the next stage.

Right turn formula: (P’F’L’F)(PF’LF)

Left turn formula: (F’L’FP’)(F’LFP)

Stage 6 - Turning the Corner Dice
The rotation of the corner cubes is performed by a simple P'N'PN formula, performed many times.
Once the formula has started, the Rubik's Cube will "collapse" and finally reassemble only after all the corner cubes have been deployed correctly. In other words, all corner cubes are unfolded in one operation, which will require you to be attentive and patient.
Let's find the corner cube that needs to be turned (against or clockwise does not matter), see Fig. 1.

Take the Rubik's Cube as shown in the picture and follow the formula.
Note:
1) The formula (of 8 moves) must be performed 1 or 2 times until the corner cube is turned over to the correct position (Fig. 2).
2) When the corner cube turns to the correct position, the Rubik's cube will "shatter", don't worry, the Rubik's cube will only come together when you are done with all the corners.
3) Do not change the position (do not turn over) the Rubik's Cube in your hands until the end of this step.

When the first corner cube is already correctly positioned (Fig. 2), rotate the top layer (Fig. 3) so that another corner cube moves to the upper right corner (Fig. 4), if the next corner cube is rotated correctly, rotate the top layer again .

Repeat the 8-move formula (1 or 2 times) and follow all the above recommendations. These steps must be repeated until all the corners are deployed correctly - until the Rubik's cube is assembled entirely.
I wish you patience and success!
This article provides a step-by-step instruction for beginners, with which you can solve the Rubik's cube using the layer-by-layer method. Compared to other methods this method quite simple, because you will not need to remember a lot of sequential actions. Mastering the layering method will help you later on smoothly transition to Jessica Friedrich's quick assembly method, which allows you to solve a cube in less than 20 seconds in competition. In order to conquer this insidious Erno Rubik's puzzle, you will need patience and diligence. Good luck!
Steps
Part 1
TerminologyFamiliarize yourself with the three types of elements. There are three main types of elements in the Rubik's Cube, the definition of which depends on their location in the cube.
- Central the elements are located in the center of the cube on each of its sides, surrounded by the other eight elements. Each such element cannot be moved, and it has only one color.
- corner elements are located at the corners of the cube. Each element has three different colors.
- Side the elements are located between the corner elements. Each such element has two different colors.
- Note. Elements of one type cannot become elements of another. The corner element will always be in the corner of the cube.
Learn to distinguish the six sides of the cube. Each side of the Rubik's cube has its own color, which is determined by its central element. So, for example, the side that has a red element in the center will be the "red side" even if there are no other red elements nearby. However, sometimes it's better to name the sides based on their position relative to the side you're looking at. this moment. Here are some terms that will be used in this guide:
- F(Front) - Raise the cube to eye level. Directly in front of you will be the front side.
- Z(Back) is the opposite side that is not visible when you hold the cube in your hands.
- IN(Upper) - the side facing up.
- H(Lower) - the side facing down.
- P(Right) - The side to your right.
- L(Left) - The side to your left.
Master the rotation of the cube clockwise and counterclockwise. When determining the rotation side of a face, it is assumed that the work face is currently in front of you. Thus, a one-letter instruction (for example, L) means you need to rotate the side 90 degrees clockwise (a quarter of a turn). If there is an apostrophe next to the letter (for example, L"), then the side must be rotated 90 degrees counterclockwise. Here are some examples for you:
- F" indicates that the front side must be rotated counterclockwise.
- P indicates that the right side should be rotated clockwise. That is, the right side must be rotated away from you. To understand the reason, turn the front side clockwise, and then turn the cube so that this side is right.
- L says that the left side should be rotated clockwise. That is, the left side must be rotated towards you.
- IN" indicates that the top side must be rotated counterclockwise when viewed from top to bottom. That is, rotate on itself.
- Z says that the back side must be rotated clockwise when looking at the cube with reverse side. Look, do not confuse anything, as this rotation is similar to turning the front side counterclockwise.
Add a two to repeat the command. The number "2" after the side designation means that you need to rotate the side not 90 degrees, but 180. For example, H2 means that the bottom side needs to be rotated 180 degrees (half a turn).
- In this case, you can not specify in which direction to turn. The result will be the same.
Learn to identify a specific element in a cube. Sometimes the instructions will talk about a particular element in the cube. This will list all the sides that the element is a part of. Here are some examples of the arrangement of elements:
- NZ= side element that is part of the Back and Bottom sides.
- WFTU= corner element located between the Top, Front and Right sides.
- Note. If the instructions say square(one-color sticker), the first letter will indicate which side the square is on. For example:
- LFN square → find the corner element that is part of the Left, Front and Bottom sides. The square of the required element is on the Left side (according to the first letter).
Part 2
Top side assembly-
Rotate the cube so that the white center is on side B and let it stay in that position for now. The task of the step is to arrange the side white elements around the center so that they form a cross on the white side.
- It is assumed that you are holding a standard Rubik's cube in which the white side is opposite the yellow one. If you have more old version cube, further instructions are unlikely to help you.
- Do not remove the white center from the Top side. Do not make the most common mistake in this step.
-
Move the white side elements up so they form a cross. The Rubik's Cube has many initial configurations, and to describe step by step instructions for each of them is simply impossible, but we will give you some tips:
- If the white side square is on the bottom layer of the R or L sides, rotate that side once so that the white square is on the middle layer. Proceed to the next step.
- If the white side square is in the middle layer of the R or L sides, rotate the side that is next to that white square (F or W). Keep turning the side until the white square is on the Underside. Proceed to the next step.
- If the white side square is on the Bottom side, start rotating that side until the white square is directly opposite the empty (not white) side of the Top side. Rotate the die so that this empty element is on the HF (Upper side next to the Frontal). Perform an F2 rotation (half a turn clockwise) so that the white square is in place of the WF.
- Repeat the same steps for each white side square until they are all on the Top side.
-
Extend the cross down to the corner pieces. Take a look at the top side elements of the F, R, W, and L sides. You need to make sure that next to each of these elements is a central element of the same color. Here, for example, if the side square of the PV (Front side next to the Top) has Orange color, then the central square Ф must also be orange. Here's how to achieve this for all four sides:
- Rotate B until at least two of the center elements of the top layer are the same color as the center elements of the middle layer. If all four elements match, you can skip the rest of the step.
- Rotate the die so that one of the incorrect side elements is on the F side (and the white cross is still on the B side).
- Do F2 and make sure one of the white side elements is now on side H. Remember the color of the other square of this white edge (element on FN). Let's say the square is red.
- Rotate side H until the red square is under the red center.
- Rotate the red side 180 degrees. The side white element should return to side B.
- Examine side H for a new white side square. Look again at the color of another square of the same element. Let's assume it's green.
- Rotate side H until the green square is directly below the green center.
- Rotate the green side 180 degrees. After all the manipulations, the white cross had to return to side B, and the side elements on the sides F, P, Z and L should be located exactly above the center of the color corresponding to them.
-
Move the white corner piece to the white side. It's easy to get confused when following this step, so read these instructions carefully. The following actions will result in a white corner element appearing on the white side next to the white center and edges.
- Find the white corner piece on the H side. The corner piece will have three different colors: white, X, and Y (the white side may not be on the H side by this point).
- Rotate the H side until the white/X/Y corner element is between the X and Y sides (remember that the X side is the side with the X element in the center).
- Rotate the cube so that the white/X/Y corner element is in the NFP position. Pay no attention to what position they are in. various colors this element. The center squares F and R should match the colors X and Y. By the way, the top side is still white.
- From now on, there are three options:
- If the white square is on the F side (in the FPN position), apply F N F".
- If the white square is on the P side (in the PFS position), apply P "N" P.
- If the white square is on the H side (at the NFP position), apply F N2 F "N" F N F ".
-
Repeat the process for the rest of the corners. Follow the same steps to move the other three white corners to the white side. As a result of this step, you should have a completely white top side. Upper layer, consisting of three squares, must match the color of the central element on the sides F, P, Z and L.
- Sometimes a white corner element accidentally hits the B (white) side, but ends up in the wrong position, causing the color of the other two squares to not match the center of that side. In this case, turn the die so that this element is in the WFP position, and then apply F N F. Now the white square will be on the H side, and you can move it to the desired position using the combinations described above.
-
Find a side element on side H that does not have yellow color. The white side is still in the Top position, and the incomplete yellow side is in the Bottom position. Look at side H and find the side element on it that does not have yellow on it. Mark two squares of this element as follows:
- Let the square on side H be the color X.
- And the other square is Y colors.
- It should be a side element. Do not try to move the corner.
-
Rotate the whole cube so that the center of the color X is on the Front side. Rotate the cube along its vertical axis (as when rotating a globe). Stop when the side with the center of the X color is on the Front side.
- In this case, the sides B and H must remain unchanged.
-
Turn side N. Rotate the H side to either side until the X/Y side piece is in the NC position. The X square should go to the H side, and the Y square to the Z side.
Spin the cube based on the Y color position. The necessary moves will depend on where the center with the Y color is located:
- If the Y color matches the center of the R side, apply F N F "N" P "N" P.
- If the Y color matches the center of the L side, apply F "N" F N L N L ".
-
Repeat these steps until you have completely collected the top two layers. Find another side piece on side H that doesn't have a yellow square (if there aren't any more, skip to the next step). Follow the same steps as above to move the element to the correct position. As a result, on the sides F, P, Z and L, the upper and middle layers will match in color.
-
Make adjustments if all H-side laterals have a yellow square. Be sure to check all four side elements on side H. Each of them has two colored squares, none of which should be yellow, otherwise all your actions in this section will go down the drain. If none of the side elements fit this description (and the top two layers are not finished yet), make the following changes:
- Find the side element containing the yellow square.
- Rotate the cube so that this element is in the FP position. The white side should remain on side B (move the whole cube, not the sides).
- Apply F N F "N" P "N" P.
- Now on side H there should be no side elements with a yellow square. Return to the beginning of the section and repeat all the steps for this side element.
-
Collect the cross on the yellow side. Pay attention to the number of yellow side elements on side B (do not confuse corner elements with side elements). You have four options:
- If side B has two opposing yellow side pieces, rotate side B until both pieces are in the TL and VP positions. Apply Z L V L "V" Z".
- If there are two adjacent yellow elements on the B side, move them to the positions VB and VP (forming an arrow when one is facing back and the other is facing left). Apply Z V L V "L" Z".
- If there are no yellow elements on side B, apply one of the algorithms described above to move the two yellow side elements to the top. Then again use the algorithm that matches their location.
- If there are four elements on the side, you have successfully collected a yellow cross. Proceed to the next step.
Part 3
Assembly of the middle layerPart 4
Assembly of the yellow sideRotate the cube so that the yellow side is up. The cube will remain in this position until it is completed.

