Internet access via mobile phone. The Deep or Dark Internet: how to get there
You often see questions like this: "how to enter the settings of the router if there is no Internet connection", or "how to configure the router without the Internet". In this short article, I will try to answer these questions in detail. Let's figure out what to do if there is no Internet connection, and because of this, it is impossible to go into the settings of the router, well, and configure it.
If you are interested, I advise you to read it right away. In short and simple, it is a device that unites different devices connected via Wi-Fi and cable into one network, with Internet access (if connected)... We connect the Internet to the router, and it distributes it to many devices. If it were not for the router, then at home we could only connect one device to the Internet. True, depending on the connection method.
A router is a stand-alone device. It can work without connecting to a computer, and without an Internet connection. And the most important, to enter the settings of the router, you do not need an Internet connection... Indeed, in most cases, we go to the web-interface of the router in order to configure the connection to the provider on it. Therefore, when you first connect to the router (before setting up), of course, you may not have access to the Internet, but we can go into the settings.
Login to the web interface and configure the router without connecting to the Internet
Most likely, you are having problems with entering the router settings. Since if you have already entered the control panel, you can configure it without any problems. I can say with confidence that the absence of the Internet on the computer can in no way prevent access to the settings page. After all, we go to the IP address of the router, and the computer (or other device) directly connected to the router via cable, or via Wi-Fi network.
Therefore, we connect to the router, look at the device itself, the address at which you can go to the web interface (192.168.1.1, or 192.168.0.1 should definitely work), enter this address in any browser, and go to it. Most likely, an authorization page will appear. Enter username and password (factory ones are also indicated on the device itself), and get into the settings.
Moreover, it does not matter which company you have a router: TP-LINK, ASUS, D-LINK, ZyXEL, etc.
If you are the Internet (cable from provider) and the computer is connected to the router, and you are worried about the lack of an Internet connection, then most likely it should be so. Because, you need to go to the control panel of the router, and configure the connection to the provider there. I already wrote about this in the article:.
This is fine. The Internet can work immediately only if the router is already configured, or your Internet provider uses the "Dynamic IP" connection technology. In all other cases, you will have to configure. You can see the instructions for your router on our website. Use the site search.
conclusions
In order to enter the router settings, you do not need an Internet connection. In most cases, we go to the control panel to configure the Internet. You don't have to connect the internet to your router at all. Then all devices will simply be in local network without Internet access.
I think I was able to fully answer the question posed, and this information was useful to you. Best wishes!
In this article we will try to figure out for what reason and why the browser stops loading pages and visiting different sites. Despite the fact that the Internet continues to work normally, judging by the connection status on the notification panel. In this case, it doesn't matter at all whether you have a PC or a laptop. Windows 10, Windows 8, or Windows 7 is installed on it. And it doesn't even matter how you connect to the Internet: by cable directly, or through a Wi-Fi router.
If there is a red cross or yellow exclamation mark near the icon, then the browser does not load the pages due to the lack of an Internet connection. And we need to solve this problem. First of all, we restart the computer and the router. (if you have a connection through it)... You may also find these articles useful:
When the internet connected and working, then the icon should be like this:

Usually, when the Internet is there but the sites are not loading, then programs such as Skype do not lose their connection to the Internet. Pay attention to this. And if your internet works (connection status as in the screenshot above), but does not go to sites through different browsers, then try to apply the recommendations, which I will write about below in this article. And further:
- If you have a connection through a router, then check if the sites are loaded on other devices. If not, reboot your router. You can also connect the Internet directly to your computer and try to go to some site. Perhaps this problem appeared due to the fault of the provider.
- In the event that the problem is only on one computer, then it is important to remember when and after which it appeared. For example, after installing a program.
- Restart your computer and run Windows Network Diagnostics. You need to click on the connection icon with the right mouse button and select "Troubleshoot". You can write about the results in the comments.
- Try to go to different pages. Perhaps the problem is in one specific site. Also try different browsers.
The problem is clear, let's move on to solutions.
If the browser does not load pages, the first thing to do is change the DNS
This is the most popular and most working solution to this problem. Almost always, it is because of DNS problems that sites do not load when the Internet is working. And in such cases, I recommend registering DNS from Google. This is not at all difficult to do.
You need to go to network connections. Do it in a way convenient for you. You can press the keyboard shortcut Win + R, enter the command ncpa.cpl and click Ok.
Right-click on the connection through which you are connected to the Internet and select "Properties".
In the new window, select "IP version 4 (TCP / IPv4)" and click on the "Properties" button.
Like the screenshot below.

Everything should work right away. If not, try restarting your computer again.
More information on this topic in the article:.
ipconfig / flushdns - flush DNS cache
Run Command Prompt as Administrator and run the ipconfig / flushdns command. The DNS cache will be flushed and the issue may be resolved.
It should look something like this:

After that, it is advisable to reboot.
How proxy settings can affect the loading of pages in the browser
If some program, perhaps even malicious, or we change the proxy server settings ourselves, this may cause this problem. You need to check that there are no unnecessary settings in the proxy server parameters.
In Control Panel, find and open "Educator Properties". If you have Windows 10 installed, then this item will be called "Browser Options". You can type this phrase in the search, it will be faster.
On the "Connections" tab, click on the "Network Settings" button. Check that the settings are like mine in the screenshot below.

If everything is fine with you, then move on to the next solution.
Reset network settings
In Windows 7, Windows 8 (and in the top ten), you can reset the network parameters with separate commands, which must be executed in turn in command line running as administrator.
ipconfig / flushdns
ipconfig / registerdns
ipconfig / release
We execute the commands in turn.

Remember to restart your computer.
Installed Avast?
If Avast antivirus is installed on your computer, then there is a high probability that the browser cannot load sites precisely because of it. There are comments in the comments that reinstalling the antivirus solves this problem.
Try uninstalling Avast first. If the internet works, you can install it back.
Nothing helped, are there any more options?
Check your computer for viruses. There are many good, free antivirus utilities out there. If you have an antivirus installed, then run a computer scan.
You can also try to temporarily disable the antivirus. Maybe he changed some network settings, and the pages in the browser stopped opening.
Think, maybe the problem appeared after installing or uninstalling a program. Or changing some parameters. So you can find out at least an approximate cause of these problems.
If I remember something else, or learn something new about this problem, then I will definitely update the article. You also share your experience in the comments, write about working solutions. You can leave your questions.
The Internet is an integral part of life modern man... We go to work - we look at the phone, in the office we sit at the computer, and even at home with a glass of beer we watch TV - more and more often also via the Internet, and not the central antenna. But let's talk about TV and strong drinks another time, but today I would like to focus on mobility - how to connect to the Internet via a phone, because today almost no one can do without it. Actually, connect a modern phone, smartphone or tablet to the internet not that difficult. There are even several ways, which we have already talked about in some articles, and today we will put all of them together in order to get a complete picture.
The simplest and affordable way connect internet on mobile phone- this is the so-called service " Mobile Internet», Which is provided by absolutely all cellular operators. In all modern tariffs, it is already tied to the number by default, but it is worth considering that an additional fee is taken from the subscriber for accessing the Internet - each operator has its own.
It should be noted that in last years all leading operators have tariffs with included volume package mobile internet traffic, which is very convenient and profitable. For example, I use Tele2, which has a cool option - the exchange of minutes for gigabytes, addressed specifically for those who speak little, but go online a lot via the phone - I wrote a separate article about it, read it!
To activate the mobile Internet, you will have to do a few simple steps on your phone. On a standard "bare" Android, you need to enter the "Settings> Additional settings> Mobile networks "and activate the" Mobile data "mode.
Since I now use a Xiaomi smartphone that runs on the MIUI proprietary shell, I can show you how to turn on the Internet on Xiaomi. You need to go to "Settings" and open the section "SIM cards and mobile networks", Where to activate the" Mobile Internet "toggle switch.

By the way, there is also a traffic setting - if you know that the limit free internet is limited, then by entering the value of the volume provided to you according to the terms of the tariff, the phone will track its overspending and report it using notifications.

In order to turn off the mobile Internet, respectively, you need to turn off the "Mobile data" mode.
What to do if the Internet on your phone is not working?
There may be several reasons why the Internet does not work on the phone. Most often, for some reason, Megafon subscribers ask about this, but this also happens with Beeline, MTS and Tele2. I would recommend checking your mobile hotspot settings. It happens that the settings of cellular operators get confused - for example, if you bought your device over the hill and it contains configurations for another provider by default, or you often change SIM cards and the phone does not have time to adapt to them.
To fix the error, you will have to manually enter the parameters for the correct connection of the phone to the Internet. This is done in the same section "Settings - SIM cards and mobile networks", where you need to click on the name of the SIM card of your phone


On this page, one by one, you can change the settings for connecting your phone to the Internet.

Below is the data to enter for each cellular operator:
Internet settings for MTS:
- APN: internet.mts.ru
- Login: mts
- Password: mts
For Megaphone:
- APN: internet
- Login: gdata
- Password: gdata
For Beeline:
- APN: internet.beeline.ru
- Login: beeline
- Password: beeline
Internet to phone via WiFi
Another easy way to access the Internet from a smartphone is great if you are at home, in the subway or in a cafe - this is WiFi. There are two options for configuring the distribution of the wireless signal.
- If you have already read the articles on this blog, then you probably know how the phone connects to the Internet via a wifi router. No? Then it will help you - screw it up to the end to the subsection about accessing the network from a mobile.
- The second one is also not difficult enough. If you do not have a router, then we can use a personal computer or laptop as an access point. In order to do this, read about how to share a computer connection and allow other devices to exit through it.
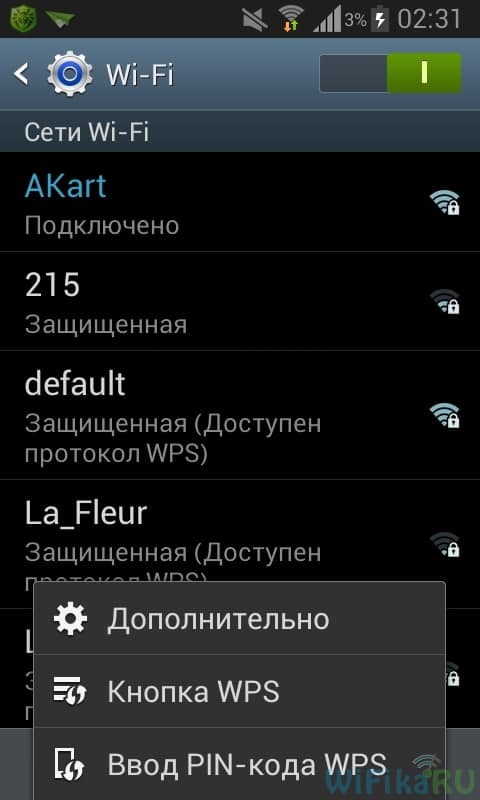
When we talk about these two methods, we mean connecting the phone to the Internet via Wi-Fi. To enable it on the phone Android versions above 4.0, just go to "Settings" and move the slider to the active state.

After that, a list with networks available for connection will open in front of you. You choose either a network with a known password, or an open public network.
The same happens with the iPhone - the "Settings" section, the Wi-Fi slider in the active position.
Internet connection via Bluetooth
Finally, the last option for connecting the Internet to the phone is via Bluetooth, connecting it and a computer that has Internet. The method is a little specific, since you will need additional software, a lot of settings and super-user rights (root access) on the mobile - it's easier to do it with one of the above. However, for those who wish, it will be discussed in a separate post. Wait!
Data for connecting the phone to the Internet of other operators
MTS
APN: internet.mts.ru
Login: mts
Password: mts
AT + CGDCONT = 1, "IP", "internet.mts.ru"
Megaphone
APN: internet
Login: gdata or Login: megafon
Password: gdata or Password: megafon
AT + CGDCONT = 1, "IP", "internet"
Motiv
APN: inet.ycc.ru
Login: motiv
Password: motiv
AT + CGDCONT = 1, "IP", "inet.ycc.ru" or
AT + CGDCONT = 1, "IP", "town.ycc.ru"
Beeline
APN: internet.beeline.ru
Login: beeline
arol: beeline
AT + CGDCONT = 1, "IP", "internet.beeline.ru"
Tele2
APN: internet.TELE2.ru
Login: -empty-
Password: -empty-
AT + CGDCONT = 1, "IP", "internet.TELE2.ru"
Beeline
APN: home.beeline.ru
Login: beeline
Password: beeline
AT + CGDCONT = 1, "IP", "home.beeline.ru"
for numbers from beeline that go
together with the modem.
Your question:
How to access the Internet from your phone for free?
The master's answer:
Mobile Internet allows you to always stay connected, even if you are very far from your computer. This function is convenient, but in most cases you don't want to spend extra money. Completely free Internet, of course, does not exist, but for a while you can use Wi-Fi network, for which no fee is charged or connect additional option which will allow you to use the Internet for free.
There are several options for how to use the free internet. One of them is to enable the Wi-Fi function in the mobile phone settings. Next, you need to search for devices and then connect to any nearby Wi-Fi access point. If necessary, find out and enter the password from this point. Now you can surf the internet. At the same time, you should not download files from the Internet, and also, you should not view those pages that consume a lot of Internet traffic. If possible, you should use the pda version of the sites you are interested in.
Also, you can register in the bonus system of your mobile operator. This system is relatively well developed for two operators: MTS and MegaFon. In order to activate the bonus program from MegaFon, you should send a free message with the text “5010” to the short number 5010. You can also send a command from your mobile * 105 # or simply call 0510. For all these manipulations from your account cash will not be written off.
After you activate this program, 15 bonus points will be credited to your bonus account. Points will be accumulated through calls, the use of the "Mood" service, or for the purchase of goods with the company logo. It is very easy to find out about the number of points you have accumulated: send an SMS message with the text “0” to the short number 5010. Go to the MegaFon website and go to the “MegaFon - Bonus” tab and select the “How to spend points” section. Find and select the item related to mobile internet bonuses.
Next, find in the table the amount of traffic you want to use (from 30 to 60 days) and send an SMS code to 5010, which corresponds to the reward you have chosen. For some regions, USSD request is still available. When the service will be activated, you will be notified in a text message from your operator. The use of the Internet will be free of charge for you for the period set by MegaFon.
If you are a subscriber of the MTS company, then the MTS Bonus program will be available to you. In order to activate the program, you need to go to the operator's website and fill out the participant's questionnaire. For registration. Confirmation of your e-mail and for filling out the questionnaire you will be credited with 160 points. Log into your personal account and enter your number without the prefix +7, 7 or 8, as well as the password you received on your phone.
You can also save points when making calls, for inviting a friend or for purchasing with some cards. In your personal account, you can see how the number of points you have accumulated changes. Go to the item "How to spend points", and in the "Catalog of Rewards" select "Internet". Think and choose the amount of traffic that will be enough for you for 30 days.
It is worth paying attention to the following: by participating in the "Mts - Bonus" program, you can order a reward only after 7 days after the day of registration.
It is necessary to spend MegaFon-Bonus points within 12 months. After this period, they will be reset.
Corporate and legal entities cannot participate in the "Megafon - Bonus" program.
In order to check the remaining packages in the MTS Bonus program, it is sometimes necessary to send a USSD request * 100 * 2 #.
So, you have finally concluded an agreement with a new provider, and a cable with a plug has been brought into your apartment - a real window into the world. All that remains is to connect it to your computer - and the Internet is at your service. However, if it was enough to insert the plug into the jack, you would not need to read this article.
Let's consider how to connect the Internet to a computer via a cable, in the simplest case. Let's say you have only one computer, and you will use it as a router (if you suddenly need a tablet). Or (as an option) you are going afterwards, so turn off the router to facilitate remote access.
Let's say you have a network card on your computer (it doesn't matter whether it is separate or built into the motherboard), and you just connected an Ethernet cable to its input. We assume you are using the most up-to-date Windows 10. Although correct settings Windows 8 / 8.1 or even 7, these instructions will also work: the principle is the same.
Of course, you can always call the master to do everything the right job for you. But specialists are not always free. In addition, on your own, you will not only save money on the call, but also learn how to set up the Internet on your computer via a cable. In our world, such knowledge can come in handy at any time.
Dynamics vs. Statics
Now check with the provider what kind of connection he offers on your tariff plan: dynamic or static.
With a dynamic connection your IP address may change depending on the settings of the provider (and if you intend to subsequently connect to your workplace remotely, this may interfere with you). But manipulations with entering parameters are reduced to a minimum: the provider sets the IP address, subnet mask and default gateway independently. In this case, it is enough to insert the cable into the computer and that's it, access to the Internet will appear.
Static connection provides a static IP address assigned to your computer (or router, if you choose to connect through one). In this case, you will have to manually register the IP address itself, the subnet mask and the default gateway in the connection settings. Usually, all these incomprehensible numbers and letters fit into the agreement on the provision of access or in the annex to it. If necessary, you can clarify them in the technical support service, naming your data.
In some cases, access also requires a username and password (do not confuse Internet access as such with access to a personal account on the provider's website - for personal account data is required).
How the connection is made
Let's consider the procedure step by step.
- Plug the Ethernet cable into the apartment into the corresponding port on the computer. Even if you have never done this before, you will not be able to confuse this type of connector and plug with something.

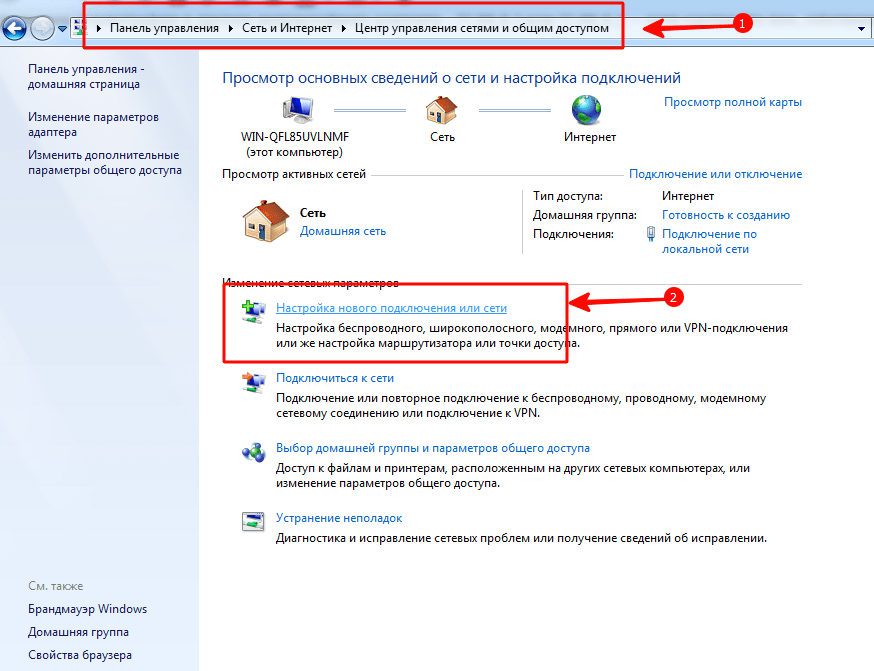
- Right click on the "Start" button and find the section "Control Panel - Network and Internet - Network and Sharing Center". In the left column, select the "Change adapter settings" tab. The main window will display a list of your adapters (more precisely, in our case, one adapter "Local Area Connection"). Apply the crown technique again "right click" and select the item "Properties".

- The small pop-up window contains a whole column of different rows with properties. Select the line "IP version 4 (TCP / IPv4)" in them. While it is selected, click the Properties button below the combo box.

Now our instruction is branching out. Have you checked with the provider what IP you are provided with? If not, check right now.
- If it is dynamic, then trust the automatic selection in the IP address and DNS server settings.
- If it is static, then you have to enter the values manually. As a rule, you need to specify "IP address", "Subnet mask", "Default gateway" and "DNS server". When you have finished entering your data, press the OK button to save your selection.
Important points:
- If the connection requires a modem, enter its default address as the IP address; usually 192.168.1.1. If the modem has a different IP (which is rare), it is indicated on the bottom of the modem itself or in its instructions.
- Usually the ISP provides the DNS server details, but sometimes it is omitted. Then you can use the universal ones:
1) Public DNS from Google: 8.8.8.8 or 8.8.4.4 - one-stop solution generally suitable for all computers
2) OpenDNS - 208.67.220.220 and 208.67.222.222
3) Yandex DNS with its own antivirus filter - 77.88.88.88 or 77.88.8.2 - if you trust Yandex's antivirus policy (although sometimes it may find it unreliable and quite a decent site)
4) Yandex DNS with a filter for pornography and other obscene content - 77.88.8.7 or 77.88.8.3 - although depending on what you actually need from the Internet, hehe.
- We repeat: if remote access is important to you, make sure that the provider supports that your IP will not change.
If your ISP offers L2TP access, this may require some additional steps on your part. Usually, the provider provides instructions for setting up such a specific type of connection, but from our side it also does not hurt to duplicate.
So, to set up L2TP, you need:
- Go to the already known to us section "Network and Sharing Center" and choose to create a new connection
- Unlike previous options, here you should go to "Connect to the workplace"
- When the system prompts you to create a new connection, select this item
- Select "Use my connection"
- Enter the server address provided by the provider. The immediate connection option should not be selected. You can assign a name to your liking.
- In the next window, enter the username and password provided to you. Do not forget to tick the box "Remember password"
- Connect now when the system prompts you
- Return to "Adapter Properties" (as discussed above) and select the "Security" section
- Select "L2TP IPsec VPN" from the drop-down options "VPN Type". Below is the line "Data encryption", here you need to select "Optional",
- Under the line "TypeVPN" click the "Advanced options"
- Enter this same key in the "Key" field. You should have it from your provider.
- Everything, you can click "OK" with peace of mind and use the connection.
This instruction works for Windows 7 and newer versions.
Why all these complications? - you ask. This solution has advantages: for you - increased security of the connection (compared to a regular LAN), for the provider - simplification of the billing system.
PPPoE setup
Before setting up the Internet on your computer, check with your provider for the type of access they offer. PPPoE access requires not only correct settings, but also authorization using a username and password. You will need this method of connection if you do not use a modem or router, but insert the cable from the provider directly into the connector on the computer, without intermediaries.
To do this, you again go to the "Network Control Center" and select there, create a new connection with it.
In the launched wizard, you select the first item - "Internet connection" - and click "Next". Then in the window that appears, you must select "High Speed (with PPPoE)".
The final step remains. In the final window, you need to come up with a name for the connection and enter the login and password issued by the provider. If your computer is used by more than one person (for example, family members), each with their own account, and you want to give them all access, then check the box "Allow other accounts to use this connection."
Now make sure your internet connection is working. And if so, hello world!