How to change camera settings on iphone. Setting up the iPhone camera and using its features
The camera in the Apple iPhone 6 is good enough to replace an entry-level camera, but it can always be improved. There are several settings in the camera and in the Photos program that will improve the quality of your photos and videos, as well as make your life easier.
Here are 10 key things to know. And by the way, most of them work in all more or less modern iPhones, and not just in the iPhone 6.
1. Record video at 60fps
By default, video on the iPhone 6 is recorded at 30 fps, but the camera is capable of 60 fps. To enable 60 fps, go to Settings -> Photos & Camera -> Record Video at 60 FPS. If, when recording a video, 60 fps is visible in the upper right corner, then you did everything right. Why record video at 60 fps? If only because the human eye does not have any "frames per second" and for him the more of these frames in the video, the better. Someday we will live to see YouTube videos with 150 fps…
2. Recover previously deleted photos
 If you (or someone else) mistakenly delete photos and videos in the Photos app, they haven't actually been deleted - the iPhone waits a full 30 days before actually deleting the frames. Click on the Albums option at the bottom right of the screen and scroll down to Recently Deleted - this is where all the frames that have been "deleted" are hidden. They can either be restored, or actually deleted - now "meet".
3. Use the headphone volume buttons as a shutter button
 You can release the virtual shutter in the iPhone camera by pressing the button on the screen, as well as the volume buttons. And for this purpose, you can use the buttons in Apple EarPods branded headphones. Ideal when you want to take a photo discreetly or just want to minimize the shake of your smartphone in your hands at the time of shooting.
4. Search in Photos
 In the Photos application, you can search - by date, by name if you have enabled face recognition and by shooting location if you have enabled the option to save shooting coordinates. Just in the album view mode, click on the search icon in the upper right corner - and search.
5. Turn on the grate
 In the settings of the camera itself there is a very important function - the grid. You can find it in Settings -> Photos & Camera -> Grid. Turning it on splits the screen into six areas that will help you take photos according to the "rule of thirds". Its essence, in a nutshell, is that the main subject of the picture should be either strictly in the center, or at one of the intersections of the lines - then the compositional picture looks much better.
6. Turn on Bulb
 The iPhone 6 camera allows you to adjust the shutter speed with "knobs". Just click on the screen, a yellow square with a sun icon will appear. If you move the sun slider up or down, the photo will become lighter or darker. Useful when shooting in extremely low/high light conditions.
7. Share all the "Moments"
8. Choose the best photos in Burst mode
 The iPhone 6 has a Burst mode option that allows the camera to shoot at 10 frames per second. After that, the camera analyzes each shot and selects the best one. Usually she does it well, but you will do it better. To personally view all the footage captured, click on "Select…." at the bottom of the screen and, in fact, look at the shots yourself. The one that the iPhone chose itself will be marked with a gray dot, but no one bothers you to make your choice by simply marking the desired photo. Or "necessary photos" - you can save at least everything.
 If you need to quickly find the right photo that you only remember taking this year, switch to the "Years" view in the Photos app. After that, just see the thumbnails with your finger, and they will amusingly increase. This allows you to quickly view a large number of photos - and find the right one.
This guide describes the features of iOS 7 for iPhone 4/4S/5/5c/5s.
Getting started with the Camera app
Quicker! Where is the camera? On the lock screen, swipe up. You can also swipe up from the bottom of the screen to show Control Center, then tap.
Note. If the camera is launched from the lock screen, you can view (and even edit) photos and videos by simply tapping the thumbnail in the lower left corner of the screen. You must unlock your iPhone to send photos and videos.
On iPhone, you can take both photos and videos in HD quality. In addition to the iSight camera on the back, the device has a front FaceTime camera for video calls and self-portraits. The LED flash additionally illuminates the subject. It can also be a flashlight - just swipe it in Control Center. See Control Center.

Taking photos and videos
The Camera app has several photo and video modes that let you take photos, square shots, panoramas (iPhone 4S and later), videos, and time-lapse videos (iPhone 5s).
Mode selection. Swipe the screen left or right to select Slow, Video, Photo, 1 ? 1" or "Panorama".
Photograph. Select Photo mode, then tap the shutter button or press any volume button.
A rectangular box appears briefly to define the exposure adjustment area. When photographing people, face detection (iPhone 4S and later) is turned on to equalize the exposure for multiple faces (up to ten). A rectangular frame is displayed around each recognized face.
Exposure is set automatically, but you can set it manually for the next shot by touching the subject or area on the screen. The iSight camera, when touching the screen, also determines the focal length, in addition to the exposure. Face recognition is temporarily disabled. To lock focus and exposure until you touch the screen again, touch the screen and hold your finger until a pulsating rectangle appears.

Panoramic photography. (iSight camera on iPhone 4S and later) Select Panorama mode, press the shutter button, and slowly slide your phone in the direction of the arrow. To take a panoramic photo from the other side, tap the arrow. To pan vertically, first rotate your iPhone to landscape orientation. You can shoot a vertical panorama in the opposite direction.
Video filming. Select Video mode, then press the shutter button to start or stop video recording.
- Taking a photo during video recording. (iPhone 5 and later) Press the shutter button in the lower left corner.
- Slow motion. (iPhone 5s) Select Slow mode to capture video at a high frame rate. When editing a video, you can choose which part to play in slow motion.
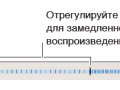
Video slowdown selection. Tap a thumbnail, then use the vertical bars below the preview frame to select the part of the video you want to view in slow motion.
Zoom in and out. (iSight camera) Spread or pinch your fingers on the screen image. For iPhone 4S and newer models, zoom is also available in movie mode.
When location services are enabled, photos and videos are tagged with location data. This data can be used in other programs and on websites designed to publish photos. See Privacy.
Screenshot. Press the Sleep/Wake and Home buttons at the same time. The screenshot is added to the Camera Roll album.
You can edit photos and trim videos directly on iPhone. See Editing photos and trimming videos.
Extended dynamic range
HDR (“high dynamic range”) mode allows you to take beautiful pictures in high-contrast environments. The best parts from three different shots taken at different exposures (long, normal, and short) are combined into one photo.
Using HDR mode. (iSight Camera) Click HDR. The flash is temporarily disabled. For the shot to work, neither the camera nor the subject must move.
Saving a photo with normal exposure in addition to the HDR version. Select Settings > Photos & Camera.
HDR versions of photos in the Camera Roll album are identified by "HDR" in the corner of the photo.
View, export and print
Photos and videos are stored in the Camera Roll album. When Photo Stream is turned on, new photos also appear in the Photo Stream album on iPhone and all your other iOS devices and computers. See my photo stream.
Viewing the Camera Roll album. Tap a thumbnail and swipe right or left. The Camera Roll album can also be viewed in Photos.
Tap the screen to show or hide controls. Access to print and export options. Click . See AirDrop, iCloud, and more sharing methods.
Transfer photos and videos to your computer. Connect your iPhone to your computer to transfer your photos to iPhoto or another supported app on your Mac or Windows PC. If you delete photos and videos during transfer, they will be removed from the Camera Roll album.
Transfer photos and videos to iPhone from a computer. Use the Photos panel in iTunes Preferences. See Sync with iTunes.
Camera settings
In Settings > Photos & Camera, you can adjust the following settings:
- photostreams;
- slide show;
- grid.
The volume of the shutter sound is controlled by the Ringer & Reminders volume setting in Settings > Sounds. Use the Ring/Silent switch to turn off the sound. (In some countries, the shutter sound cannot be turned off.)
Engineers Apple told what settings to make so that the iPhone camera takes great photos. This manual will help owners of American products to improve their photography skills and they will be able to take not only selfies, but also something more. The material presented below is, of course, familiar to experienced users, and it is simply necessary for beginners to read the further presentation of the material.
How to take a good photo on iPhone
- Keep the camera still
- Use HDR mode
- Choosing good lighting
- Correct focus
- Burst shooting
Most smartphone owners still do not know how to set up dynamic extended range, exposure control. They cannot record video while shooting objects at the same time, nor can they select best time to connect to the flash, so below are some tips from the developers to help you properly set up your iphone camera for the best shooting.
To take a photo of a subject that is backlit, the HDR function should be selected and activated for optimal focus on more pronounced highlights and shadows. Next, you need to collect the rays into the focus of the camera by holding your finger on the selected area of the screen. Then you need to touch the screen again and balance to lower the shutter speed. Now everything is ready for shooting.

Advice! If you want to get a great shot that both you and other people will like, then do continuous shooting, so you get more options for one photo and there will definitely be one that will be the best!
For large vertical images, you need to switch the camera. After that, turn on the "landscape" mode, and switch to panoramic mode. And the last thing to do is to smoothly move the photo tool from bottom to top.

To capture the outer outline of an object (silhouette) with a sunset for the background, you need to lung care touching the screen to focus the device for taking pictures. Next, you need to slide your finger across the display to reduce the exposure time.
If there is enough light to shoot, turn off the flash and focus the lens in the above way and adjust the shutter speed. For getting black and white image very good quality you will need to set the initial contrast of the background, as well as the selected subject.
But it, unfortunately, is not without flaws: you could not manually change the shutter speed, ISO and exposure. Everything has changed in iOS 8 and now third-party applications can manually control camera settings, which in turn opens up new opportunities for creativity.
This article will show you how to use your iPhone's camera to take photos and videos with manual settings.
iPhone as a camera
I think everyone has heard of the old, hackneyed saying that best camera, this is the one that was at your fingertips in right moment. This is true, and in relation to the iPhone, it explains the huge number of photos taken on it. Apple is now the most popular camera manufacturer on Flickr. The iPhone 4s, iPhone 5, and iPhone 5s take more pictures than any other camera.
Now on sale there are four models of iPhones: iPhone 6, 6 Plus, 5S and 5c. On paper they all have the same specifications, but the latest models are able to produce a better picture. All iPhones have an 8-megapixel camera, however modern models have larger sensors. They all also have fixed apertures (f/2.4 on the iPhone 5c and f/2.2 on the iPhone 5s, 6, and 6 Plus). Considering the crop factor, their lenses are equivalent to 30-35mm lenses in Full Frame cameras.
iPhones have a shutter speed of 1/200-1/2 second. The ISO sensitivity range is 34-2000 for the iPhone 5s/5c and slightly different for the iPhone 6 and 6 Plus - 32-2000.
In terms of video recording, the iPhone 6 and 6 Plus can record videos in 1080p up to 60 frames per second and slo-mo in 720p at 240 frames. The iPhone 5s can do the same but at half the frame rate, while the iPhone 5c can only shoot 1080p at 30fps, slo-mo is not available in it.
Taking a photo with Manual
To fully take advantage of the new iOS features - you will need manual settings cameras. Many third-party photo apps have been updated to include all features manual control, there are also many new ones. One of the best alternative cameras with manual settings is Manual. The application costs 66 rubles and is installed only on iOS 8 devices.
As the name suggests, Manual's developers focused on being able to take full control of your iPhone's camera. While most other apps focus on adding various filters and effects, Manual stays pretty simple and aims to get the best possible image from your camera.
Manual can fully adjust shutter speed, ISO, white balance, focus and exposure. There are also several tools here to help you get better shots: the rule of thirds for framing, live histogram. I use Manual whenever a photo needs a creative touch.
Thanks to a competent interface, everything you need is available on one screen. At the top of the screen are controls for flash, focus, white balance. The flash can not only be turned on, but its level can be adjusted. Focus is adjusted manually and automatically. The white balance, in addition to automatic adjustment, has several presets (sunny, overcast, incandescent, fluorescent, etc.) or can be manually adjusted to any value in kelvins from 1000 to 8000.
At the bottom of the screen are controls for ISO, shutter speed and exposure. At first, the abundance of settings can confuse you a little, but over time you get used to it and can quickly change any of them.
Management is implemented through pop-up sliders that appear when holding the icon of a particular parameter. The value scales are quite sensitive, to switch between adjacent divisions it is enough to move your finger just a couple of millimeters. The set of settings available for change, as well as their range, depends on the model of your device.
Just above the shutter button is a refreshing histogram to help you make sure your shot is balanced between light and shadow.
When using automatic ISO and shutter settings, you can enable exposure compensation. It is located above the shutter speed icon and has 8 gradations. In addition, you can use autofocus by simply tapping on the screen.
Taking photos in Manual is much more troublesome than in the standard Camera app, but you will have much more settings and, if used wisely, you can get better pictures. If this is exactly what you need - with Manual you are on the right track.
Shooting video with FiLMiC Pro
Functions required for shooting good photos different from those required for good videos. On the this moment, FiLMiC Pro is considered the best of all and offers all the features you need. The application costs 269 rubles and works on devices with iOS 8.0 and higher.
FiLMiC Pro gives you almost complete control over how you record video from your iPhone's camera. Without the Manual, you can't take good photos, and likewise, you can't do without FiLMiC Pro if you want to record cool video. Unlike Manual, here you will not be able to fine-tune shutter speed and exposure, but you will get great opportunities to customize the shooting and encoding process.
With FiLMiC Pro, focus and exposure can be adjusted separately. At the bottom of the screen are the controls for white balance, focus and exposure - tapping on the icon of any of them will lock the selected option. Next are the media library and settings icons.

The application has a smooth zoom, which can be used using the "+" and "-" buttons, its speed can also be set. Next to the scale there are buttons that allow you to quickly switch between three zoom levels (you can bind certain zoom levels to them).
The real power of FiLMiC Pro is hidden in the settings screen. You can choose from over 20 presets with a wide variety of settings, or if that's not enough, create one with all the settings from scratch. There are ready-made settings for regular videos, slo-mo and accelerated ones.

The settings also allow you to select the bitrate. The higher the bitrate, the more disk space the video takes up. There are four quality options, from economical at 12 Mbps to extreme at 50 Mbps, which is in line with the broadcast television standard. To get the best quality, choose the highest bitrate, but keep in mind that a 16GB iPhone can hold only 10 minutes of video shot at 50Mbps at 30fps.
FiLMiC Pro allows you to select audio settings and recordings. If you have an external microphone, you can even record in stereo, if not, the built-in microphones will be used.
For the first time in FiLMiC Pro, the standard recording settings will be enough for you. Later, with an understanding of what is happening, you can change them if necessary to make cool videos. There are people who shoot even small movies exclusively on their iPhone with FiLMiC Pro.
Conclusion
The first step towards success in photography perfect photos and video on your iPhone is that you have to do a lot of work before you even start filming. With apps like Manual and FiLMiC Pro, you'll have a lot more control over your shot than with standard application. If you take care of exposure, focus and other parameters in advance, then you will not need to worry about them when the picture is already taken. If you do not do this, then no filters will help your photos and videos look professional.
I gave only two applications as examples, but if you know others worthy alternatives or you have something to add to me - be sure to express your opinion in the comments!
Phones and tablets from Apple have always been distinguished by a great camera with which you can do fantastic shots. On older devices, photos may not come out sharp by today's standards, but knowing how to properly set up the camera, enable or disable functions can save the day and greatly improve the quality of the photo.
How to set up the camera on iPhone, iPad, iPod touch
This section will describe in turn the settings that can be changed on the camera and the functions that can help you take better pictures.
What is HDR mode in iPhone and how to enable it
HDR mode allows you to increase the range of colors available to the camera when shooting. You can see the difference between a normal shot and a shot taken in HDR mode in the example below.
You can activate the mode in the Camera application itself. In the top panel, click on the HDR button and wait for the mode to activate.
But turning on the mode does not guarantee that the picture will be better, in some conditions it is not, so it is recommended to save not only the photo in HDR mode, but also without it. In order not to photograph everything twice, you can follow these steps:
How to turn on the grid
The grid is a grid that activates when shooting video and photos. It will not be visible in the picture taken, it is needed in order to align the photo: the main object should be in the central rectangle. It looks like this:
You can enable the Grid feature in the Photos & Camera section of your phone settings.
Interval setting
The interval options are set to change the frequency between the creation of a new snapshot. For example, you can set three seconds, so that during automatic shooting, photos are created every three seconds. You can set the interval in the Camera app itself by clicking on the clock icon and selecting the desired time option.
How to use manual exposure
except auto focus camera, you can use bulb exposure to sharpen your shots. Press and hold your finger on the area that is the center for focusing. At the same time, you can increase or decrease the brightness by moving your finger up or down, respectively.
How to turn the flash on and off
The flash has three modes: automatic, manual and one in which it is turned off. The first allows the phone to decide on its own whether to turn on the flash or not. In the second option, the flash will be used in any case, and in the third, vice versa. By clicking on the lightning bolt in the Camera application, you can select one of the above modes of operation.
Applying filters
A large selection of filters allows you to make your photo more unique and picturesque. Choose the filter that best suits you by clicking on the three circles icon.
How to make a quality video
By going to the "Photos and Camera" section in the device settings, you can choose the resolution in which the videos will be recorded, as well as the number of frames per second. The higher the resolution, the better quality shooting.
live photo
Live Photos is a technology that allows you to create three-second live photos. live photo is a combination of a .jpeg and .MOV file, consisting of 45 frames produced at 15 frames per second. You can activate this mode in the Camera application itself by pressing the Live Off button. If the function is enabled, then the button will simply turn into Live.
How to turn off the sound (click) of the camera shutter
If you often take pictures, the shutter sound can become very annoying. Also, this click can give you away when you try to take a picture of something inconspicuously. But there are two ways that will allow you to get rid of this annoying sound.
Silent mode
It is enough to lower the volume on the device to zero or put the phone on silent mode so that the shutter sound disappears. The disadvantage of this method is that you have to do manipulations with sound every time before taking a photo. To get rid of the shutter sound completely, use the second method.
Editing the file system
It is important that this method is only suitable for devices whose firmware has been jailbroken using Jailbreak. If this condition is met, then you can perform the following steps:

The camera on the iPhone is one of its main advantages. With proper skill, you can make very high quality pictures. To achieve high results, you need to understand the camera settings and set the ones that suit you best. If you often take pictures, and you are tired of the shutter sound, then you can turn it off temporarily by switching the device to silent mode, or by changing the system files if Jailbreak is installed.
