Do-it-yourself snow engine on wheels. Do-it-yourself snowplow: a worthy alternative to factory models
Snow season is the favorite time for kids: skiing and sledding, fun snowball fights and building ice castles... But the owners of country houses are not very happy with the abundance of snow, because they have to take up the shovel again and clear the territory. It's good when you have the opportunity to purchase a snow blower and turn a seasonal duty into a pleasant job. But if there is no extra money to buy a useful "assistant", you can always make a snow blower with your own hands from materials that have been gathering dust for a long time idle in the corner of a workshop or barn.
Construction #1 - Snow Blower Model
We suggest that you first consider the option of how to make a snow blower with your own hands based on an old engine from a walk-behind tractor. For this you need to prepare:
- Sheet (roofing) iron for assembling the screw body;
- Steel angle 50x50 mm for the construction frame;
- 10 mm plywood for side pieces;
- Half inch pipe for arranging the handle of the machine.
When planning to equip a homemade snow blower with an air-cooled engine, it is imperative to provide additional protection for the air intake opening from fine snow particles emitted during operation.
The engine power of this device is 6.5 hp. It is quite enough for cleaning fresh snow from the backyard.
Thanks to the machine's working width of 50 cm, it will be convenient to move the structure and clear winding paths on the site. The machine has compact dimensions, its width does not exceed 65 cm. This allows you to hide the snow blower in the barn at any time as unnecessary, it easily passes through a regular doorway.
A ¾ inch pipe can be used to make the auger shaft. A through cut is made in the pipe, which is necessary for fixing a metal blade with dimensions of 120x270 mm. In the process of operation, the captured snow mass from the conveyor belt will be moved by the auger to the blade. This blade, in turn, under the action of the rotation of the shaft, will throw the snow to the sides.

The snow blower frame can be welded from steel corners 50x50 mm, and closer to the edges of the structure in the pipe to the transverse corners, it remains only to weld two corners on each side, the dimensions of which are 25x25 mm
In the future, the engine platform will be attached to these corners. You can fasten the transverse corners with the longitudinal ones and fix the control handles on them using bolts (M8).
The auger pipe is equipped with a metal spatula and four rubber rings d = 28 cm, the material for the manufacture of which can be the sidewall of a tire or a 1.5-meter conveyor belt 1.5 mm thick.
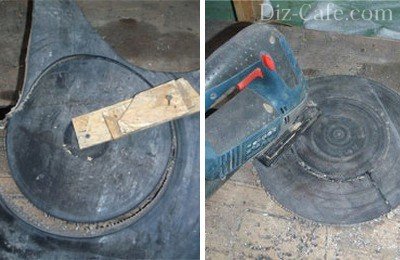
You can cut out rings from the rubber base using a simple device: drive two screws into the plank, and then fasten this design tightly to the tape and rotate it in a circle. You can greatly simplify the cutting procedure using a jigsaw
Since the snowblower's auger will rotate in self-centering bearings 205, they must be placed on the tube. In order to make a snow blower yourself, you can use any bearings, the main thing is that they must be closed. In the role of a protective cover for bearings, a support from the cardan of old Zhiguli models can act.
Advice. In order for the design to fit well into the bearings, you need to make a couple of cuts in it and lightly tap it. Such manipulations allow you to slightly reduce the diameter of the shaft.
To insure a homemade auger from ice, it is advisable to provide a safety pin. In addition to its direct purpose - cutting when the auger is jammed, it will serve as a belt fuse (if a belt transmission system is equipped). The auger can also be driven by a chain. Its idle speed is about 800 rpm. All the necessary accessories for a snow blower can be purchased at any specialized store.

A piece of plastic sewer pipe d = 160 mm is well suited for snow removal. It is fixed on a pipe of the same diameter, placed on the screw body itself.
The continuation of this pipe section will be a chute for ejection of snow, the diameter of which should be greater than the width of the metal blade of the auger.
Construction assembly
Before assembling the structure, it is necessary to pay attention to the fact that the dimensions of the machine body must exceed the dimensions of the screw itself by a couple of centimeters. This will prevent the mechanism from touching the walls of the case during operation.
Since the snow blower engine can also be used for other purposes during snowless periods, it is desirable to provide a quick-detachable convenient platform in the design of the unit, thanks to which the engine can be removed at any time without using any tools.
A significant advantage of such a constructive solution is the ease of cleaning the body and movable parts of the machine from compacted snow. And it’s much easier to store such a snow blower: just remove the engine and the car will become twice as light.

The basis for the skis are wooden bars, which are additionally equipped with plastic lining. You can make such linings from a box from electrical wiring
The snow blower is ready for operation. It remains only to paint a home-made device and start working on clearing the snow.
Design # 2 - rotary snowplow "Vyuga"
This rather simple device can be made in any workshop equipped with a lathe and a welding machine. The snow blower designed by Penza craftsmen showed itself well even in rather difficult snow conditions.
The basis of the design of the device is: an engine with a built-in silencer, a gas tank and a cable for controlling the throttle.

All components of the device can be purchased at the store or taken from the same motorbike
First you need to make a rotor on a lathe based on an appropriate workpiece from an electric motor part. Outwardly, it looks like a steel disk d = 290 mm and 2 mm thick. The disk, connected by means of bolts to the hub, forms a structure to which 5 blades are already attached by welding. To increase the efficiency of the mechanism, the blades are additionally reinforced on the reverse side with stiffeners.

The motor cooling system works on the principle of a fan, the blades of which are made of duralumin and are fixed on a pulley to start the motor
The fan is protected by a soldered casing located on the crankcase cover. To improve the quality of cooling, the cylinder head is placed at an angle of 90 degrees.
A shaft is mounted on the rotor housing on four ball bearings placed in pairs. It is fixed to the body with a steel clamping ring and bolts. The rotor housing itself is pressed against the frame using a special bracket, which partially captures the clamping ring.
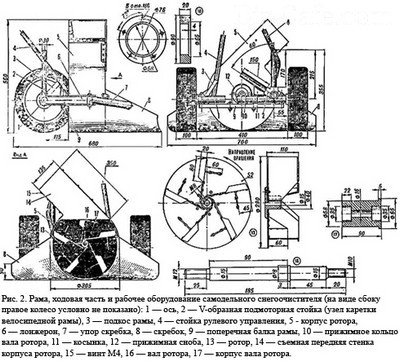
Schemes of assembly of the main elements of the snowplow "Vyuga"
The removable elements of the machine are the aluminum wall of the rotor housing and the scrapers placed along the frame.
A significant advantage of a homemade snowplow is the ability to adjust the width of the grip by changing the scrapers. At the height and quality characteristics of the unit. The weight of the structure does not exceed 18 kg, which makes it possible for women to use it, and the snow throwing distance is about 8 meters.
Ecology of knowledge. Homestead: Let's talk about how to make an ordinary shovel or scraper for cleaning the local area after the next snowfall.
Let's talk about how to make an ordinary shovel or scraper for cleaning the local area after the next snowfall. They will definitely come in handy if you live in a private house, because you have to clear the area from snow on your own, without relying on utilities.
Of course, it is very convenient to have your own snowplow on the farm. The snow melting and anti-icing systems also cope with the problem perfectly. However, such devices are far from affordable for every homeowner; many are forced to continue to work with their hands.
How to make your own shovel
Let's start with the simplest and most affordable option - plywood snow shovels. All you need:
- A piece of ordinary “four” plywood about 50 by 50 cm in size. It will be difficult to work with a larger shovel even for an adult and physically strong person;
- A piece of board with a length of a piece of plywood, that is, 50 cm for the back wall, the end of the working part of the shovel;
- A ready-made handle from an old garden tool, a wooden lath of suitable length and strength, an aluminum pipe - everything that can serve as a convenient handle for a shovel;
- A strip of galvanized metal, with which we will protect the edge of the plywood and significantly extend the life of our shovel;
- Nails. The most common. You can also use wood screws or wood screws. And for fastening the handle, it is better to take a furniture bolt;
- From the tool you will need a jigsaw or a wood saw, a hammer or a screwdriver (depending on what type of fasteners you use), a measuring tape, pliers to bend a metal strip, a grinder to cut it out, sandpaper.
First of all, mark the middle on the cut out square of plywood - the handle will be attached to this place. In the middle of the board, cut a hole for the shovel handle. The edges of the plywood and the wooden rail-handle are cleaned with sandpaper. At the edge of the holder, a wedge is sawn off obliquely so that it fits snugly against the plywood. If your handle is an aluminum pipe, flatten its end. The galvanized strip must be bent along the edge of the plywood. In principle, everything - you can assemble a shovel using self-tapping screws or nails. For fidelity, the handle can be additionally fixed with a galvanized strip, which is also attached to plywood.
If desired, the shovel can be painted. As for the purchase options, the simplest snow shovel will cost 250 rubles. And there is no guarantee that it will last long.
Using the same technology, a snow shovel is made from aluminum sheet. In this case, the back of the sheet should be bent so that a rim with a height of about five centimeters is obtained. They also make side skirts. Since aluminum is a fairly soft metal, a galvanized strip along the front edge of the work surface is also necessary, as is the case with plywood.
A purchased version of an aluminum snow shovel can cost 400–500 rubles.
A scraper, an engine, a snow scraper can be the simplest plate of the same lightweight plywood, only in this case, experts advise taking the “six”. Leaf dimensions are approximately 1–1.2 m long and 50–60 cm wide. The handle will be not just a handle, but a structure that is attached to the edges of the scraper sheet, so that it is convenient to work with two hands, removing snow.
Along the edges, plywood must be reinforced with metal strips, otherwise the scraper will not last very long. The handle can be welded from metal, as well as fastened from three wooden slats. Craftsmen advise taking a handle from an old folding bed as a handle for a scraper - it is round, comfortable, durable, and will perfectly attach to plywood.
A purchased simple version of a scraper, a snow removal engine will cost from 500 to 1200 rubles, depending on the material used and the manufacturer.
The disadvantage of an ordinary scraper is that it allows you to clear snow from the paths and the yard, push it, but it will not help to throw it away, take it out, take it out of the territory. In this regard, bucket-shaped scrapers are much more convenient, where you can load snow and move it outside the site.
It is already more difficult to make such scrapers with your own hands, you will need a stainless steel sheet, which will have to be bent, if necessary, welded to give it the shape of a bucket. It is not for nothing that such scrapers, scrapers are often called drags - they allow you to quickly drag snow out of the yard, they operate on the principle of a bulldozer.
Scrapers on wheels or skids are even more convenient. The bucket can be made from half a metal pipe or barrel, and the wheels can be taken, for example, from an old baby carriage. The skids will have to be welded on their own, but on the snow they ride very easily. published
If you have any questions on this topic, ask them to specialists and readers of our project.
Clearing the road from snow in winter is an important undertaking, and it is also good for health if you resort to manual labor. But labor intensive! And the greater the distance, the more you have to spend time and effort to bring the road in order. And if a tractor is a rare guest in your area, then a snow removal device that greatly simplifies and speeds up the harvesting process becomes vital.
So it is in this case. There is a section of the road about 250m, which is not cleared by the city administration, because. lane belongs to the dacha cooperative. Those. technology does not come here. Calling a tractor all the time is expensive. There are times when clearing the road of snow is required several times a week. Accordingly, cleaning driveways with a shovel with your own hands is, at a minimum, laborious and time-consuming. Hence the desire arose to make a homemade device for removing snow from the road.
The photo below shows last year's version.
This homemade snow removal device is attached to the towbar of the car with a towing cable and rolled along the road. This "grader" (as we called it), of course, greatly simplified life last year. After all, it took only 20 minutes to clear the road instead of 1.5-2 hours of intense physical work. But, unfortunately, this option has its drawbacks.
So, about what does not suit this “grader” model. Weight and shape are the two parameters that together reduce its performance parameters. He shovels snow - that's a fact. But due to its small mass and its design, when a certain amount of snow is collected, it begins to rise, as a result of which the snow is partially collected and partially rolled. As a result, the level of the road is rising, which in the spring with warming can become a certain problem. Such clearing of the road from snow is not the best option! To eliminate such a problem, someone weighty has to stand on it (I usually acted in this role with a child, and my wife was driving the car) and, when a certain amount of snow is accumulated, constantly stop and throw back the collected pile with a shovel.
This year it was decided to improve the device for snow removal. Those. try to make sure that snow removal from the road is carried out without unnecessary stops and without additional involvement of manual labor in the form of discarding the collected piles. And for this, based on a little thought, our snow clearing device must satisfy several requirements:
- Snow should be thrown to the side, not piled up. To achieve this effect, the "grader version 2.0" must be made in the form of a wedge.
- The mass of the "grader version 2.0" must be sufficient so that when moving it does not lift it above the snow. To do this, again, you can provide a place for a weighty person.
- Try to save money and spend as little money on production as possible.
Let's start with the choice of materials. Initially, it was planned to buy wooden bars 50x50, from which to make a frame. Next, sheathe this frame with plywood and begin operation. But one day, looking at my site, I saw that there were several euro pallets from building blocks and a bunch of pieces of wood from a dismantled barn. And the thought came to me that a wooden pallet is a frame ready for sheathing. In addition, renting them out at 50 rubles apiece is not profitable, because. for gasoline to take them to the reception point, it will take more. In the case of a purchase, you will have to spend only 100 rubles apiece on them. We need only 4 pieces. Those. 400 rubles. This is the same money that will be needed to buy the bars, only a frame will still need to be made from them. Summarizing all of the above, I note that I did not have to buy anything. Those. the savings are enormous.
 Now directly about the manufacture of a device with which the removal of snow from the road should be as simple and fast as possible. First of all, we sew euro pallets in pairs.

 Pallets have the following dimensions: 1.2m by 1m and 1.2m by 0.8m. I have a pair of each type. The height of the side of the future grader is 0.8 m and 1 m - this is a bit too much, and the mass of the entire structure will be too large. So I shortened them a bit.
 Next, we prepare a bar or board with a length equal to the width of the road clearing. Those. snow removal from the road will be carried out for a certain width of the carriageway. For me it is 2.1m. It was this length that the board was chosen for. After that, we install shields from pallets in the form of a wedge, trying to combine in front of the future grader. So that they do not disperse, they can be grabbed to each other with a self-tapping screw or a nail. Now we take the prepared board and fix it to both shields at the back of the grader.
 Next, we mount a few more connecting bars in the middle. This is where euro pallet trimmings come in handy. They can be sewn together to strengthen the position of the shields relative to each other and at the same time get a good seat for the weighting agent.
 So we got a rigid structure that can withstand good loads. Now we need to stitch it up. Plywood or stainless steel sheets are suitable for this. But, again, in order to save money, you can look around in search of suitable, but already unnecessary materials. I have those turned out to be scrap metal. They sheathed the frame

 The last step remains - this is to make "ears" to which the cable will cling. For this, I used Soviet-made handles from some old door. By the way, they were on the previous version of the grader. As for the level of installation of "ears". They should be mounted at the same height as the towbar of your car. If they are lower, then when driving, the front will ride up. If it is higher, then the back of the grader will lift up. In any of these two cases, high-quality clearing of the road from snow will not work.
 Here, in fact, the snow removal device is ready. It certainly doesn't look the best, but it does its job well. You can hitch the grader to the car and get to work. Clearing snow off the road with a grader like this is an economical, quick and easy solution.

 Below is a video in which you can look at the process of cleaning the road from snow with such a device and the result of the work done.
In the cold season, it often happens that all roads are swept with snow, you need to get rid of it for the comfort of movement. Clearing snow is not the easiest task, it is often tiring, but it is worth doing it regularly to avoid the appearance of large snowdrifts. But if you build a scraper, then it becomes easier to remove the snow. How to build such an inventory, today we will consider it on ...

- First you need to purchase a pipe, the diameter of which should be about two hundred and seventy millimeters, it will serve as a cleaning blade.

- Next, we find old metal pipes that will serve as a stop. Wheels and a blade should be attached to the pipes.
- To make the inventory as convenient as possible, you should take care of adjusting the height of the handles.

- We mount a little transport tape to the bottom of the blade.
This inventory is quite easy to use, well, you don’t need so many materials to create it.
Varieties of scrapers
One of the most relevant types of scraper is scraper brush. The brush is often made from pile. Such equipment should not be particularly heavy, since with a lot of weight it is much harder to work with them.

The plastic scraper surpasses the previous version with its light weight and ease of use. Also, snow does not stick to it. Since it will be light, it can be made very wide to capture most of the territory.
How to make a metal scraper
1. First you need a metal sheet, its size should be one hundred and fifty centimeters in height and eighty centimeters in width. Also a metal pipe up to three meters long, which will serve as a handle, and two corners one meter long for skids.

3. We fix the upper part of the scraper with clamps, which will help in adjusting the required height.
Useful video: DIY hand scraper
Snow clearing equipment create in such a way that later it can be folded compactly, in case it needs to be transported, well, or so that it does not take up much space. It is very easy to remove snow with it, it is also easy to do it yourself.

