Yandex visual bookmarks for Google Chrome. How to make visual tabs in Google Chrome
Created on 03/09/2013 13:26 / Google Chrome - Add, change Dear readers! Who has it installed browser Google Chrome /Google Chrome? Or you haven't installed the extension yet visual bookmarks? Today we have a lesson on the topic "How customize visual bookmarks in Google Chrome browser/Google Chrome". Of course, after installing the Google Chrome browser, there are no fun tools to permanent use. For this, there are additional extensions for every taste and at your discretion..
Before starting the tutorial, I want to warn you that in the Google Chrome browser, the structure is slightly different from the Mozilla Firefox browser. In this lesson I will try to tell in detail and show bright pictures (screenshots). But that's not all. If you really want change or paste background/picture in visual bookmarks, then you need to prepare the picture you want in advance. After all, we will change the background.
And about how add blog/website link to bookmark- It's not a problem. Everything is extremely simple. You'll like it. Do not worry! While working with settings I'll show you everything, as promised, because the setup process will take place in real time. And now let's move on to the lesson, otherwise I chatted about something.
So the lesson is:
How to increase or decrease number of visual bookmarks in Google Chrome browser?

As change or add background/image in Google Chrome visual bookmarks?

As add or remove the blog/website link in google chrome visual bookmarks?

Set up? OK! I am finishing my lesson for today. See you soon!
Sincerely, Alexander Sinyashin!
When visiting sites hosted on the Internet, many of us use Google Chrome's visual bookmarks. Useful and interesting sites are added to visual bookmarks.
You add a site to bookmarks so that you can easily and quickly visit the desired site by simply clicking on its name from the list of bookmarked sites. Bookmarks are usually placed on the bookmarks bar, but more convenient solution will use the express panel for this, or the visual bookmarks panel.
Express panel, being home page, when the browser starts, opens a page with visual bookmarks. Visual bookmarks- these are images of thumbnails of pages of sites added to bookmarks. When you click on such a bookmark thumbnail, you immediately get to the desired site, without entering its address in the address bar of your browser.
Google Chrome browser also has an express panel, which consists of thumbnails of the most frequently visited sites. Such a solution is not very convenient to use, and it is impossible to permanently pin the necessary sites to such a panel.
For the Google Chrome browser, many extensions have been created to create an express visual bookmarks panel, the so-called visual bookmarks for Google Chrome.
This article will discuss extensions that allow you to create an express panel for the Google Chrome browser: Visual Bookmarks from Yandex, Mail.ru "Visual Bookmarks" and Speed Dial 2 (ru).
Yandex Visual Bookmarks for Google Chrome
To install the "Visual Bookmarks" extension from Yandex in the Google Chrome browser, you will need to click on the "Configure and manage Google Chrome" button ( Wrench)" => "Tools" => "Extensions".
In the "Chrome Web Store" window, in the "Store Search" field, enter the expression: "Visual bookmarks", and then press the "Enter" key on the keyboard.
In the window with the search results, select the "Visual Bookmarks" extension from Yandex, and then click on the "Install" button. In the New Extension Confirmation window, click the Add button. After that, the Yandex Visual Bookmarks extension will be installed in the Google Chrome browser.
When you launch the Google Chrome browser, the Visual Bookmarks page will open. In the lower right corner of the page window there is a "Configure" button, which is designed to configure this extension. After clicking on the "Settings" button, the "Settings of visual bookmarks" window will open.
In this window, you can select the number of bookmarks to display by clicking on the bookmark at the bottom right (48 visual bookmarks are supported).
You can choose a "Background Image" from the options offered to you, or upload your own background image from your computer. In order to upload your background image, you will need to click on the "Add" button. In the Explorer window, select the image that you want to make the background and click on the "Open" button.
After that, the image you added will become the background image on the visual bookmarks page. You can add your other images and remove them if you click on the "Delete" button after you select an image to remove.
The default overlay method is fill. In this case, the background image fills the entire space of the browser window. You can select a different option to display the background image.
You can choose the “General Bookmark Refresh Interval” at your discretion.
The "Show bookmarks bar" item is responsible for displaying the bookmarks bar, you can uncheck this item to remove the extra bar from the "Visual bookmarks" page. After making the settings, click on the "Save" button and proceed to adding your pages to the thumbnail windows of Visual Bookmarks.

In the upper part of the window with a visual tab there are controls for this tab: "Hide", "Edit", "Update", "Delete".

In order to add your own visual bookmark to the page with visual bookmarks, you will need to click on a free window. In the "Edit Visual Bookmark" window, you will need to enter the address of the site to be added, in the example I entered the name of my site. If you wish, you can enter a name for this visual bookmark. Next, click on the "Save" button.

The Visual Bookmarks page has a new bookmark thumbnail. Visual bookmarks you can move, swap, hide, add new and delete.

To disable the "Visual Bookmarks" extension from Yandex in the Google Chrome browser, you will need to click on the "Settings and Management (Wrench)" => "Tools" => "Extensions" button in the browser window. In the list of extensions you have installed, you will need to uncheck the box opposite the “Enabled” item in the “Visual Bookmarks” line from Yandex. After that, the extension will be disabled.
If you want to remove this extension, then you will need to click on the "Delete (Trash)" button. After confirming your consent to deletion, the Yandex Visual Bookmarks extension will be removed from the Google Chrome browser.
Yandex has updated its visual bookmarks and now they look a little different than the old visual bookmarks.
Visual bookmarks from Yandex for Google Chrome (video)
To install another extension of visual bookmarks - the Mail.ru "Visual Bookmarks" extension for the Google Chrome browser, you will need to click on the button "Configure and manage Google Chrome (Wrench)" => "Tools" => "Extensions". In this window, click on the link "More extensions".
In the "Chrome Web Store" window, in the "Store Search" field, you will need to enter the expression - "Visual Bookmarks", and then press the "Enter" key on the keyboard.
In the window with the search results, select the Mail.ru extension "Visual bookmarks", and then click on the "Install" button. In the New Extension Confirmation window, click the Add button.
Now, when you open the Google Chrome browser, the Mail.ru Visual Bookmarks extension window will open. To add your own visual bookmark, you will need to click in the empty bookmark window. After that, the "Site Address" window appears, for adding the address of the desired site.

A new visual bookmark has been added to the Visual Bookmarks page. By clicking on the links at the top of the bookmark thumbnail, you can edit or delete that bookmark.

This add-on has 9 windows for adding visual bookmarks.
To disable the Mail.ru "Visual Bookmarks" extension, you will need to click on the "Settings and Management (Wrench)" => "Tools" => "Extensions" button. In the "Extensions" window, in the Mail.ru "Visual bookmarks" field, you will need to uncheck the box opposite the "Enabled" item.
To remove this extension, you need to click on the "Delete (Trash)" button, and after confirmation, the extension will be removed from your browser.
Several extensions for visual bookmarks have been developed for the Google Chrome browser. similar names. Of these extensions, perhaps one of the best will be the extension Speed Dial 2 (ru).
To install this extension, click on the button "Settings and management (Wrench)" => "Tools" => "Extensions". In the "Chrome Web Store" window, in the "Search by store" field, enter the expression "Speed Dial", and then press the "Enter" button.
Choose among the list of extensions that were found, the extension Speed Dial 2 (ru), and then click on the "Install" button. In the New Extension Confirmation window, click the Add button.
After launching the browser, the settings window for this extension opens.

After that, click successively in the windows that open on the "Continue" button, reading information about the settings of this extension. If you do not want to read this information, then click on the link "Skip the study tour".
In the next "Import Most Visited Websites" window, you will be prompted to "Import Selected Sites" or "Skip". You can uncheck the boxes next to the sites that you do not want to add to the express panel.
In the next window, click on the "Start" button.
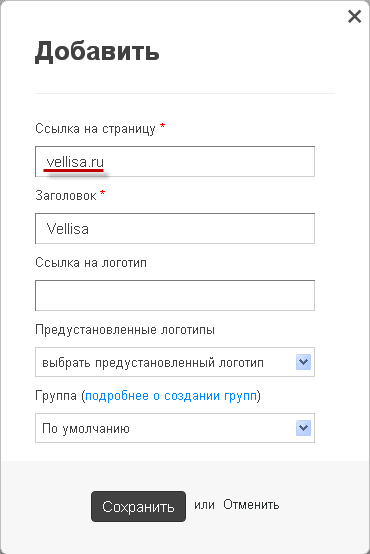
To add a site to the page of the Speed Dial 2 (ru) extension, you will need to click on the page, and then in the "Add" window you will need to fill in two fields: "Page Link" and "Title". After entering the link, you can copy it into the "Title" field. Next, click on the "Save" button.
A window with a site thumbnail appeared on the quick access page. In order for the image of the site to appear (Create Thumbnail), you will need to click on the thumbnail of the added site.

After adding the thumbnail, the added site became easily recognizable by its image. At the bottom of the image thumbnail, you can see the number of times you have visited this site.
When you right-click on the site thumbnail window, you can make the necessary settings or remove the site from the visual bookmarks panel.

If you move the mouse to the right edge of the visual bookmarks page, the "Sidebar" will open, where you can see "Bookmarks" and "Recently Closed Tabs".
To configure the Speed Dial 2 (ru) extension, click on the button "Customize and manage Google Chrome (Wrench)" => "Tools" => "Extensions". In this window, in the Speed Dial 2 (ru) extension field, you will need to click on the "Settings" link.
In the "Settings" window, you can make the necessary settings as you wish. There are quite a few settings in this window to customize this extension as you wish.

To disable the Speed Dial 2 (ru) extension, you will need to click on the "Settings and Management (Wrench)" => "Tools" => "Extensions" button. In the Extensions window, in the "Speed Dial 2 (ru)" field, you will need to uncheck the box opposite the "Enabled" item.
To remove the Speed Dial 2 (ru) extension, you need to click on the "Delete (Trash)" button and after confirmation, the extension will be removed from the Google Chrome browser.
How to restore old visual bookmarks
After updating the extension from Yandex for the Google Chrome browser, the display of thumbnails of visual bookmarks has changed in the browser. Drawn thumbnails are now displayed, there are no images of site pages that are added to visual bookmarks.
To solve this problem, in new version extension Visual bookmarks for Google Chrome, in the settings you will need to enable the display of screenshots of site pages.
For those. For those who prefer to use the old version of the visual bookmarks extension for Google Chrome, I wrote about how it will be possible to use the old version of the extension again.
After new installation old version extensions to the Google Chrome browser, the old visual bookmarks for Google Chrome will be restored.
Article Conclusions
In the Google Chrome browser, you can install extensions with visual bookmarks that make it easier for the user to navigate to the desired sites.
Speed Dial 2 extension (ru) for Google Chrome (video)
Web browsers have evolved over the years. Therefore, today it is extremely difficult to cope with a large stream of data without the proper means to organize your favorite web pages.
Visual bookmarks are bookmarks with thumbnails of the web page they point to. These extensions allow you to capture part of a web page as an image and then add labels/tags to create a visual bookmark. You can then view them in a gallery that can be organized by keywords.
One of the most popular extensions for visual storage and synchronization of your bookmarks. In addition to the search bar, all frequently visited sites on home page are present:
- weather information;
- exchange rates;
- information about traffic jams in the vicinity;
- links to closed tabs, downloads, other bookmarks and browsing history.

Step 1. Find it in the Google Extensions Store. Click on the "+ Install" button. Confirm your intention to install the extension in the browser dialog that appears.

Step 2 The extension will be automatically installed, and now instead of the usual start window, you will see a new one - along with all the bookmarks. You can customize them as you wish. To delete a bookmark, hover over it until a cross appears in the upper right corner. Click on it and the bookmark will disappear. To add a new bookmark, click on "Add Bookmark" and follow the instructions that you will see on the screen.

To add a new bookmark, click on "Add Bookmark"
Step 3 Setting up the start page. To make changes, click on the "Settings" button.

Step 4 A settings panel will open on the left. You can change the background of the page by choosing one of the options provided, or by uploading your own. It is also possible to increase the number of visual bookmarks up to 25 and change their appearance.

Best Bookmark Managers
On a note! In addition to extensions for visualization, there are more advanced tools for organizing bookmarks. Organizers that go beyond browser extensions offer users effective method bookmark processing.
There are a lot of them, this article will consider 7 unique tools that allow you to organize them by visualizing them.
| Name | Image | Main characteristics | Supported Platforms |
|---|---|---|---|
 | Saving bookmarks via web browser extension, mobile applications, email, desktop app, web-based bookmark access and management, and more | Web interface, Google Chrome and Mozilla Firefox extension, Android/iOS/BlackBerry/mobile apps Windows phone, Windows and Mac OS X desktop applications | |
 | Easy sync between Windows and Apple bookmarks, Mozilla Firefox/Google Chrome/Internet Explorer sync with Safari bookmarks | Mozilla Firefox, Google Chrome Extensions, Internet Explorer |
|
 | Sync across all major web browsers, import from Delicious, export/restore bookmarks, password sync and more | Internet Explorer, Mozilla Firefox, Google Chrome, Safari web browser extensions, web interface; Apps for iPhone/Android/BlackBerry/Windows Phone (Xmarks Premium only) |
|
 | Easily save links, share them on Facebook and Twitter, follow different users, discover new trending topics and more | Google Chrome, Mozilla Firefox and web interface |
|
| Diigo |  | Annotating bookmarks, screenshots, various mobile apps and browser extensions, sending links via e-mail, import/export bookmarks | Google Chrome, Mozilla Firefox, Safari, Internet Explorer browser extensions; Android, iOS and Mac |
 | All bookmarks are fully saved in the cloud | Google Chrome and Mozilla Firefox, web interface for accessing saved bookmarks |
|
 | Powerful search mechanism, beautiful organization, editing, viewing or deleting bookmarks | Google Chrome Web Bookmark Manager |

By far the most complete tool for managing your bookmarks, no matter what device you use. Pocket bookmarks are available for Google Chrome and Mozilla Firefox. When you click the "Tick" Pocket icon in your browser, the link will automatically be saved to your profile. You can also add tags to individual links to make them easier to find later.
Step 1. Find this extension in the Google Chrome store.

Step 2 Along with this, register on the official website of this extension. This is necessary to store and sync your bookmarks across all connected devices.

Step 3 As soon as the extension is installed, the corresponding icon will appear in the extension bar. In order to save a bookmark you will only need to click on this button and the page will be saved automatically.


Apple's iCloud Bookmarks is a tool that allows users to seamlessly switch between all Apple devices, including iPhone, iPad, and Mac. It also allows Apple users to seamlessly sync saved bookmarks across all registered devices. With the iCloud Bookmarkss extension, your saved bookmarks will be seamlessly integrated into all your registered Apple devices.
As in the previous case, you will need to install the extension in your browser. You can find it in the extension store.

xmarks- reliable tool to synchronize bookmarks across different web browsers
Xmarks is a reliable tool for syncing your bookmarks across different web browsers. With support for Internet Explorer, Google Chrome, Mozilla Firefox and Safari; Xmarks offers full bookmark sync across all of these web browsers.
Step 1. Install the appropriate web browser extension.

Step 2 Register on the official website. Click the "Xmarks" icon on the taskbar to sync all your passwords and bookmarks with account Xmarks and all other browsers in use.


Delicious is more than just a bookmark manager. You can also subscribe to different topics and groups to receive updates related to this area. Based on your interests, you can also view Top Trending topics in your chosen area of interest.
Step 1. Install the extension from the extension store.

Step 2 Once the extension is installed, you will see its icon in the extensions panel. By clicking on it for the first time, you will be able to register for storing bookmarks on the network. Once you log in, this button will bookmark the page you are on.

Dewey Bookmarks

Dewey Bookmarks is a Google Chrome extension that helps you better organize and manage your bookmarks
Dewey Bookmarks is a Google Chrome extension that helps you better organize and manage your bookmarks. The extension collects all your Google Chrome bookmarks and includes them in a strikingly beautiful web card layout. You can add "tags" to bookmarks to make them easier to access at a later point in time.
Step 1. Install the extension from the online store.


Now, every time you click on this button, all your bookmarks will appear on your screen, with large pictures.

Video - How to make visual tabs in Google Chrome
Organizing bookmarks in your browser is a procedure that will increase your productivity. Visual bookmarks are one of the most popular ways to arrange web pages in such a way that you can quickly jump to them at any time.
Today we will take a closer look at how new visual bookmarks are added for three popular solutions: standard visual bookmarks, Yandex visual bookmarks, and Speed Dial.
In standard visual bookmarks
By default, the Google Chrome browser has some kind of visual bookmarks with very limited functionality.

The standard visual bookmarks display frequently visited pages, but, unfortunately, you won't be able to create your own visual bookmarks here.
The only way to customize visual bookmarks in this case is to remove unnecessary ones. To do this, move the mouse cursor over the visual bookmark and click on the displayed icon with a cross. After that, the visual bookmark will be deleted, and another web resource you frequently visit will take its place.
In visual bookmarks from Yandex
Yandex Visual Bookmarks is a great easy way to put all the web pages you need in the most visible place.
To create a new bookmark in the Yandex solution, click the button in the lower right corner of the visual bookmark window "Add Bookmark" .

A window will appear on the screen in which you will need to enter the URL of the page (site address), after which you will need to press the Enter key to make changes. After that, the bookmark you created will be displayed in the general list.

Please note that if there is an extra site in the list of visual bookmarks, then it can be reassigned. To do this, move the mouse cursor over the tab tile, after which a small additional menu will be displayed on the screen. Select the gear icon.

The already familiar window for adding a visual bookmark will appear on the screen, in which you will need to change the current site address and set a new one.

In Speed Dial
Speed Dial is a great functional visual bookmark for Google Chrome. This extension has the widest set of settings, allowing you to fine-tune each element.
When you decide to add a new visual bookmark to the Speed Dial, click on the plus sign tile to assign a page to the empty bookmark.

In the window that opens, you will be prompted to specify the page address, and, if necessary, set the bookmark thumbnail.

Also, if necessary, an already existing visual bookmark can be reassigned. To do this, right-click on the bookmark and in the menu that appears, click on the button "Change" .

In the window that opens, in the column URL enter a new visual bookmark address.

If all the bookmarks are taken, and you need to set a new one, then you will need to increase the number of bookmark tiles displayed or create new group bookmarks. To do this, click on the gear icon in the upper right corner of the window to go to the Speed Dial settings.

In the window that opens, open the tab "Settings" . Here you can change the number of displayed tiles (deals) in one group (default is 20 pieces).

In addition, here you can create separate groups of bookmarks for more convenient and productive use, for example, "Work", "Study", "Entertainment", etc. To create a new group, click the button "Group Management" .

Next click on the button "Add Group" .

Enter the name of the group and then click the button "Add Group" .

Now, returning again to the Speed Dial window, in the upper left corner you will see the appearance of a new tab (group) with the previously specified name. By clicking on it, you will be taken to a completely blank page in which you can start filling in your bookmarks again.

So, today we looked at the main ways to create visual bookmarks. We hope this article was useful to you.
Users browse a huge number of websites every day. For the convenience of visiting your favorite resources, many create bookmarks. Unfortunately, a browser like Google Chrome has one significant drawback. The web browser does not provide visual bookmarks.
When you create new tabs, the websites you visit most often appear instead of bookmarks. This is not very convenient, so you need to figure out how to set visual bookmarks for Google Chrome.
Adding visual tabs
Many beginners don't know, but adding visual bookmarks to Google Chrome is easy. Bookmarks are visualized by installing extensions. On this moment there are several different add-ons that can be installed in chrome, namely:
- From Yandex;
- From ru;
- speed dial.
Each extension is unique. The user himself needs to decide which virtual module is best for him to use. It should be noted that in each extension it is possible to create backup settings.
Bookmarks Yandex
Most users prefer to install Yandex visual bookmarks for Google Chrome. To add a plugin, you should open the menu in the web browser, and then select "Settings".

In the page that opens, you need to select the "Extensions" section, and then scrolling to the very bottom of the list, select "More extensions".

When the Google store opens, in the search bar you need to write "Visual bookmarks". After that, press Enter to start searching for the extension.

After 2 seconds, visual bookmarks available for the Chrome browser will appear on the screen. The first on the list will be the extension from Yandex. To install it, just click "Install".

It will take a few seconds to install Yandex bookmarks. After that, the user, having created a new tab, will see the bookmarks bar.
Panel setup
Having created a new tab, the user will see several buttons in addition to the graphical tabs:
- Closed tabs;
- downloads;
- bookmarks;
- History;
- Add bookmarks;
- Settings.
To customize the panel for yourself, you must click on the "Customize" button.

In the opened form, the user can change:
- Number of tabs (from 1 to 25);
- Type of bookmarks;
- The background under the tabs;
- Extra options.

Thanks to flexible customization, users will be able to customize the visual panel so that it is more convenient for them to use it.
Mail.ru bookmarks
In addition to the Yandex panel, users can integrate visual bookmarks from Mail.ru into the browser. To do this, it is recommended to enter the Google store, and then enter "Remote" in the search bar.

After pressing Enter, the results of the search query will be loaded. Visual bookmarks from Mail.ru for Google Chrome will be listed first. You must click on the "Install" button to download the extension.

If desired, the panel can be customized to your taste by adding an interesting design.
By creating a new tab, users will see the search bar, as well as any previously added bookmarks. The working panel can only fit 12 tabs, if there are more, another virtual panel is created. To go to it, just move the mouse cursor to the edge of the screen.

At the bottom of the screen there is a panel with several buttons:
If you click on the "Remote settings" button, a form will open in which the panel style is configured, you need to select the topic of interest.

You can upload your own image or photo if you wish. In fact, there is nothing complicated, even a beginner can handle the settings.
Speed Dial Plugin
The most beautiful visual tab bar for chrome is the Speed Dial add-on. This is a real masterpiece that creates a 3D panel. To start downloading the add-on, you need to open the Google store, and then enter "Speed Dial" in the search.

The extension will appear first in the search results. To install the add-on, as usual, click on the "Install" button.

Installation takes about 10 seconds because the extension is over 2MB in size. After integrating with the browser, you can start setting up the add-on.
Panel setup
By creating a new tab, the user will see a completely new navigation area, consisting of the following blocks:
- Settings;
- Tab areas;
- Tab group areas;
- The string to search.

When you click on the gear icon, the settings window opens, in which the visualization of the tabs changes.

In addition, you can see that there is a panel on the top that configures:
- Group "Popular";
- Group "Recently Closed";
- Font;
- Widgets.
Thanks to flexible settings, the panel is customized for each person, depending on his preferences.
Disabling an add-on
Many users know how to set visual bookmarks for google chrome but don't know how they are disabled or removed. First you need to go to "extensions". Then, among all the installed add-ons, find the one that needs to be disabled.
On the right side of the extension, there is a checkmark in the "Enabled" box. To disable it, just uncheck the box. If you want to remove the add-on, you need to click on the trash can icon. After that, the Visual Bookmarks extension will be removed.
Removing extensions is most often necessary if the browser has begun to “slow down” and load websites for a long time. Sometimes it is enough to reinstall the extension and the problem will disappear.
Visual tabs not showing
Sometimes beginners are faced with the lack of screenshots of websites in visual bookmarks from Yandex. Most often, this problem occurs after updating the extension. Instead of screenshots, users see only logos and names of Internet resources.
To fix the situation, you need to enter the bookmark settings, and then in the "Bookmark type" field, set "Screenshots". In addition, in order to quickly configure the extension in the future, you need to make a backup. A previously saved settings file can be loaded into the browser.
Conclusion
In practice, it is clear that even a beginner can install an extension with visual bookmarks. Sometimes it can be difficult to choose an addition. In this case, it is recommended to install the necessary extensions one by one.
After installation, you need to "play" with the settings. Only in this way, it is possible to customize the panel for yourself. If the extension does not work correctly or you just don't like it, you can uninstall it.
It should be noted that in addition to the above add-ons in the Google store, you can find about a dozen more extensions that allow you to create a virtual panel. Do not be afraid to experiment, as add-ons can always be disabled or removed.
How to set visual bookmarks

