Making your own projector from improvised materials. Making a projector using a mobile phone Homemade film projector
Today there is a huge variety of devices for playing video materials: TVs, smartphones, home theaters, etc. But organizing a broadcast for any wide audience, alas, is not so easy, since a home theater or projector costs a lot of money, and not everyone can afford such pleasure. Therefore, we will look at the theoretical aspects and several methods that will allow you to make a projector with your own hands.
Theory
The principle of transmitting an image from any medium to a vertical surface is based on the laws of optics. When various carriers interact with the light flux, the rays are refracted, the spectrum changes, and is subsequently displayed on the screen.
A homemade projector can be implemented in different ways. In practice, there are several image transmission technologies that are implemented in all kinds of filmoscopes, sliders and projectors. The most popular design solutions are:
where from the light source 2 the flow is directed by the reflector 1 to the slide 4 located in the focusing lens 3. The modified spectrum extends to the optical amplifier 6 and is transmitted to the screen 7.

The figure above shows the principle of operation of a reflective type projector, in which a light source 1 transmits a flux that is reflected by mirrors 2 and falls on an image 3. The modified light flux moves through the lens to a reflector, which transmits the image to the screen.

Today, digital multimedia projectors can easily compete in photo and video quality with the best HD TVs. Therefore, home projectors can be used as a personal cinema for family movie viewing or as a means of displaying visual materials at conferences and lectures. Alas, it is almost impossible to recreate a digital multimedia device with your own hands, since it is necessary to synchronize the operation of mechanical, optical and digital elements. But anyone can implement a classic projector using digital equipment.
Smartphone based
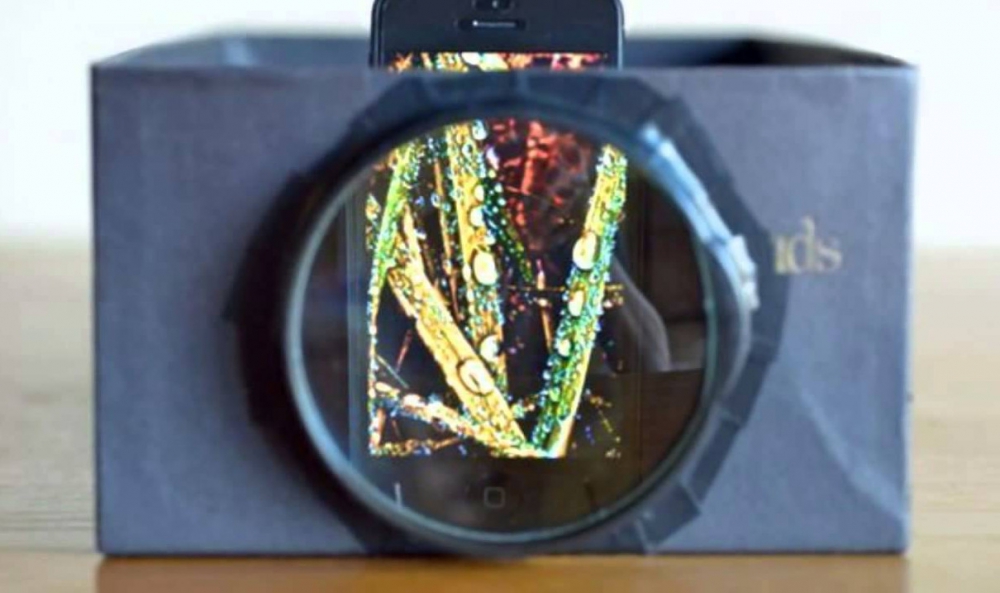
Mobile phones are used not only for long-distance communication, but also for exchanging video data. That is why the idea of making a projector from a pocket gadget arose. Theoretically, the process of obtaining an image consists of converting a graphic signal from the display through an optical lens to any surface. To do this, you need to make a case that completely darkens the surrounding space, and mounting devices for both the lens and the mobile device.
It's quite easy to pick up a magnifying glass or magnifying glass. The main thing is that its overall dimensions are commensurate with the size of the phone screen. You can use the front wall of the case to fix the magnifying glass. To secure the phone vertically, you can use a cardboard box or cardboard ribs in which the mobile phone will not wobble. The easiest way to make a housing is from a cardboard box, since it is easy to cut a hole in it with the required parameters without special equipment.
For work you will need tape, glue, a stationery knife, pencil, ruler and compass.
The process of making a projector from a smartphone is as follows:
- Choose one of the walls of the box so that the distance from it to the opposite one is greatest. This will provide a wider range for customizing display options.
- Mark the middle on the selected wall, around which cut a hole for a magnifying glass.
 Rice. 4: make a hole for the magnifying glass
 - Attach a magnifying glass to the side of the box. To do this, you can use either tape or good glue; it is important that they do not get into the lumen of the lens, otherwise it may ruin the image from the projector.
 Rice. 5: Attach the magnifying glass
 - Make a holder for your mobile phone; it is important that during installation it does not cover the display and fits inside the box.
 Rice. 6: Make a holder
 - To adjust the image experimentally, select the most optimal distance from the mobile to the magnifying glass.
 Rice. 7: choose the distance
 - Make a hole for the mobile charging cord to lead it out of the box.
The projector from your smartphone is ready, you can start broadcasting, but first install a special application that will rotate the image 180°. In some phone models, it is enough to disable auto-rotate screen and install the gadget upside down. It is better to organize viewing in a well-darkened room to increase the clarity and brightness of the picture.
In addition, a holographic projector can be made from a mobile phone and polymer plates (Fig. 8). But the cost of such a homemade product will amount to a considerable penny, with a relatively low image quality, so it can compete with the above-described sample only in the originality of the picture.
 Rice. 8: Example of a holographic projector
 Tablet or laptop based
This projector has higher image quality due to its larger screen. There are both more “humane” methods of execution, in which digital devices remain intact, and methods for which you need to remove the graphics matrix to broadcast the image.
To make a projector from a laptop, you will need a cardboard box large enough so that its end side is comparable to the monitor, and its length is at least 50cm. The magnifying glass should be quite large; a Fresnel lens will do the job well; it is also important to use a lens from a device for reading full-page books. To assemble the projector you will need to do the following:

Its dimensions are made slightly smaller than the lens so that it can be secured to the edges.

It is important to ensure a tight fit between the glass and the cardboard to prevent light from entering the projector from the outside.

When installing the latter, the edge of the cardboard should overlap so that light, again, does not penetrate inside the projector.

The simplest laptop projector is ready, just plug it into a power outlet and you can enjoy broadcasting your favorite movie. Using the same principle, you can use a tablet to assemble a projector.
Projector from slide viewer
Making a projector from a ready-made unit greatly simplifies the task, since you no longer need to make any adjustments in terms of optical effects. These settings are made at the factory and the slide viewer perfectly displays graphic objects from paper or other A4 format media. Your only task is to choose the most suitable photo-video signal translator. In this example, we will look at making a projector from a working tablet monitor that fits the size of the diascope.
To do this you will need to do the following:

When dismantling the matrix, be extremely careful not to damage the fragile element.

The distance is necessary for ventilation, since a powerful stream of light will also cause excessive heating of the surface.

Due to its low weight, it is attached using double-sided construction tape.
The projector is ready - just connect both devices to the network and launch the desired video material through the computer. With this projector you will get fairly high image quality, which, as a rule, depends little on the distance to the screen. It should be noted that smaller devices for viewing slides that will be comparable to the screen of a smartphone can be found on sale.
Ways to improve picture quality
To increase the image clarity from a homemade projector, you need to perform the following simple measures:

In addition, external factors also affect the quality of the projector’s broadcast. So, in order for the picture to be well perceived, the windows should be covered with curtains during daylight hours, and at night all lighting sources should simply be turned off. Remember, the shorter the distance to the screen, the higher the image quality on it. The screen itself also matters - it is preferable to have a smooth, monochromatic surface in calm colors.
Video instructions
Many people like to watch movies. Fortunately, nowadays there is a lot of suitable equipment: from smartphones and tablets to large plasma and LCD TVs. But what to do if there is no large plasma nearby, but there is a large group of people eager to watch another good movie? That's right, make a projector. You can read about how to make it yourself in our article.
All you need
If we are making a projector for a smartphone, then we will need: an ordinary cardboard box (for example, a shoe box), a large lens that can be safely pulled out of a magnifying glass, a small amount of cardboard, tape and glue.
The projector box will block light from outside, preventing refraction and scattering of the smartphone image. The lens in this project acts as a lens. When properly configured, it will begin to focus the light and transfer the image to the surface.
Of course, such a simple device will not turn out perfect, with a clear and high-quality image, but you will be able to study the primitive structure of the projector and enjoy watching a movie in the company of loved ones, and this is the most important thing.
Making a projector
First we need to ensure a good “cameraness” of the image. Using black paint or paper of the same color, we ensure that the inside surface of our box is matte black. Thus, we will significantly reduce the reflection of light from the walls of the box and improve image quality.
Then we make a slot in the end of the projector box that matches the diameter of the lens. This is necessary for good fixation of the lens and the absence of gaps, i.e. extraneous light that would definitely interfere with our viewing.
Next we move on to the lens and smartphone. There are at least two ways, which we will tell you about. They differ fundamentally based on the composition of the moving elements. In the first option, we will move the lens to focus correctly and increase image clarity. In the second option, we will move the smartphone for the same purpose.
- If you decide to make a movable lens, then you need to make a cardboard cylinder whose diameter matches the diameter of the lens, then use glue applied to the end of the lens to secure it to the base of the cardboard cylinder. The length of this design should not be very large; it is enough that it provides a lens travel of 5-7 centimeters. The smartphone is fixed in one place and does not move anywhere.
- Here the smartphone acts as a moving element. In this case, we need to make a stable platform for the phone (from foam, cardboard or even a paper clip), which we will move around the box, thereby achieving maximum image accuracy. The lens in this version is fixed at the end of the box and serves as a static element for focusing the smartphone’s light code.
Final preparations
After installing the entire structure, our preparations are almost complete. But it’s worth paying attention to a few nuances:
-
Inverted image
The image from the smartphone, passing through the lens, turns out upside down. Naturally, watching a video in this format will not suit anyone. The easiest way in this case would be to flip the original image 180 degrees. In this case, the output will be a normal picture. -
Image clarity
You need to achieve maximum image clarity. This is achieved by manipulating the lens in the first case, using a homemade lens, and moving the smartphone along the walls of the box in the second case. When maximum image clarity is achieved, you can consider the setup complete. -
Surface preparation
It is advisable to prepare a wall, table or other surface on which films and other images will be broadcast. Ideally, it should be white, smooth and matte. For our little experiment, you can hang a regular sheet or take large thick white paper. -
Preparing the room
The room should be dark. Then, and only then, your image will be as clearly visible as possible, and you will enjoy viewing. If your private viewing takes place in the evening, it will be enough to turn off the lights in the room. Well, if the action takes place during the day, you can close the curtains tightly and try to minimize the flow of light into the room with the projector. Don’t forget to increase the brightness of your broadcast smartphone to maximum - this will ensure the clearest and most colorful image.

Enjoy watching!
That's it, now the entire process of assembling and preparing the projector is completed. All that remains is to choose your favorite movie, get together with a friendly group and enjoy the movie. Let the movie show bring you a lot of joy, and let the assembly of a simple device from a shoe box go quickly and efficiently.
For additional information on assembling your own projector, we suggest you watch the following video:
Take it for yourself and tell your friends!
Read also on our website:
show more
Creating a projector with your own hands at home is not difficult: often all you need is a phone or tablet and a small amount of office supplies. A homemade device will allow you to view photos, movies or videos on a larger screen. When choosing how to build a projector, be guided by your goals: different options are suitable for different situations.
Mobile device based
A homemade projector can be made from a smartphone. You should collect the materials necessary to create an overhead projector in advance. You will need a cardboard shoe box, a lens or magnifying glass that magnifies the image 10 times, adhesive tape or blue tape, a pencil, a paper clip and a mobile phone.
This option is suitable for people who want to entertain children with cartoons. A picture shown on the wall is less harmful to children's vision than watching cartoons on a TV, laptop or tablet. In addition, this option allows parents to control what their children watch and exclude programs not intended for children.
You need to cut a window in the box for the lens. It should be installed exactly in the center of the box. Calculating the required distance is simple: you need to connect the corners with diagonal lines, at the intersection of which the desired point will be located. Once the center is found, make a hole of the desired size.
After this, you should attach the magnifying glass. Scotch tape or electrical tape is suitable for this. You can use other methods: glue gun, silicone.
Next, you need to install a stand in the cardboard smartphone projector so that the phone is fixed in one position. A specially curved paper clip will do. You can also make a stand from pieces of cardboard.
You should first test the operation of the resulting device and select a suitable location for the smartphone in the box. It's worth trying different positions of the gadget to find the best angle. It is also important to fix the picture on the phone in the desired position: the lens flips the image, so the picture (video) on the device must be upside down.
To make a projector out of your phone, you also need to make a small hole in the box for the charger. This will allow you to watch a movie without interrupting to recharge your gadget.
Tablet or laptop based
There are several ways to make a projector with your own hands. You can use laptops or tablets for this purpose. They have a higher screen resolution, and the picture quality will be better than when watching movies from a phone.
You'll have to make a projector out of a larger box. Its length should be at least 0.5 m. The back wall should be slightly larger in size than the tablet so that the gadget fits inside. A projector made from a monitor will require an even larger box.
The tablet should be secured inside the box. Remember that the lens will reverse the image. If the gadget automatically rotates the picture, you should download a special application in which you can fix the screen in the desired position.
If you use a laptop to create the projector, you should make 2 cuts in the box. The device is folded onto the top half with the keyboard down. In this case, the inverted screen should be located at the site of the cut. It is important to choose a box that will support the weight of the device placed on top of it.
How to improve image quality?
When you make a projector from your phone yourself, the image projected from the magnifying glass can be improved for more comfortable viewing. On the screen from which the picture will be projected, the settings should be set to maximum. You can adjust the quality by moving the smartphone in the box. The closer the phone is to the magnifying glass, the clearer the image, but its dimensions will be smaller.
The lens should also be prepared: cleaned of dust and dirt. If there are scratches on the lens, it is recommended to replace it with another one - this will improve the image quality.
There should be no light in the room in which the home theater projection room is located. Thick curtains should be used and all extraneous sources should be eliminated. Painting the inside surface of the box with black paint will also help: this will eliminate the “leakage” of light rays through the cracks and make the picture clearer.
The quality of the surface on which the film is projected is also important. There should be no defects, seams or dirt on the canvas. It is recommended to use a special screen or white surface.
Original solutions
You can also make a 3D projector with your own hands at home. It is more difficult to create such a device; it will also require financial costs.
It is necessary to create a truncated plastic pyramid. There are different sizes. An option is suitable, the larger base of which is 60x60 mm, the smaller - 10x10 mm, and the height - 45 mm. To show holograms from a tablet, you will need a larger pyramid, since the device's screen is larger than that of a phone.
It should be placed on the phone screen in the center. After this you can turn on the movie. This type of projector is well suited for entertaining children: holograms will strain the eyes less. In addition, this option looks unusual and attracts attention.
Content:
Modern TV screens have reached sizes measured in meters. But for some fans of watching movies on the big screen, this is either not enough or unaffordable. There are other possible reasons. The main thing is that there are people who want to make a cinema at home. Of course, this makes some sense. The twilight of an improvised home cinema immerses you more fully in the events on the screen. After all, vision is less distracted by the surroundings hidden in dim light.
This article is intended to help those wishing to acquire projection equipment by applying their own skill to it. Next, we’ll talk about three projector designs for watching videos on a large screen. Of course, you can search for something else on the Internet. But we recommend not to waste time on this. Our article contains the basics, which will only be confirmed by the designs you find. But in this case, time will most likely be wasted.
Important technical details
Now let's briefly look at the basics of projector theory. The image on the screen lights up. Therefore, it is visible worse or better. The surrounding space is permeated with light from the rays of the sun. It is weaker indoors due to windows. The screen creates its own luminous flux. The larger it is, the more contrast and clearer the image on it.
Most of the modern screens we look at work in a similar way to a film projector. It contains a moving film, illuminated by a lamp, the brightness of which determines the image on the projector screen. In monitors, phones and similar screens, the film with liquid crystals is motionless, but also translucent. Light is emitted either by analogs of energy-saving fluorescent lamps or by LEDs.
To obtain an image comparable, for example, to the Rus film projector, the electrical power of our backlight must be the same as the power of the lamp in it. This is evidenced by the image shown below:
Cinema projector "Rus"
We see that for a good home theater you need a source screen with backlighting, lamps or diodes with a power of 9–11 W. Moreover, its size will affect the distance to the lens. The smaller the dimensions, the more compact the projector.
Optimal matrix option
Now the main question: where can I get such a source screen? Phones and tablets are far from being powerful enough. Therefore, do not be fooled by projects from the Internet that claim a good projector from a phone or tablet. This will not turn out to be a home theater, but children's entertainment. Although such a projector will certainly be of interest to some readers. And since the review will be incomplete without the simplest projector, we will definitely talk about it later.
Each product is characterized by its price-quality ratio. In our case, instead of price there will be cost, that is, how much money and time will be spent on the projector. And, of course, what matters most is what happens as a result. The basis for the quality of the projection image will be the LCD matrix, bright lamp and lenses. At the same time, let us pay attention to the fact that the matrix does not tolerate overheating, which can result from the lamp. Consequently, the larger the matrix dimensions, the better it is cooled.
The best ratio of parameters
The matrix must be removed from a working device. But then restore all connections so that the device works. The best ratio of size and price is in monitors. There is very little left - a bright light, lenses and a body. Doing everything listed above from scratch with your own hands is time-consuming and difficult. To get an aesthetically pleasing device, you will have to experiment and order factory-made parts.
Therefore, for the best efficiency of time and money, we recommend buying a used one in good condition:
- 15-inch LCD monitor;
- overhead - A4 projector.
The matrix of this monitor is ideal instead of an A4 sheet for placement in a projector. You only need your own hands
- disassemble the monitor,
- extract the matrix,
- assemble the disassembled parts of the monitor so that the matrix works from the computer video signal,
- secure the monitor parts, including the matrix, to the projector body.
That's all there is to do. The only thing that needs to be created is to mount everything mentioned into a single device so that it can be moved from place to place without affecting its functionality. The rest of the work is disassembling the monitor. Let us further show with an example what such a projector design looks like.


The monitor has two blocks. One controls the matrix, the other controls the backlights. The purpose of the block is determined by the wires and cables


A little more - and the matrix can be separated


We try on the extracted matrix with the control unit to the projector


The projector is ready to use. What the image looks like is shown below:

A bookcase is visible to the right of the screen. By its size one can judge the height of the image - at least one and a half meters. Consequently, the screen diagonal is more than 2 meters. We can definitely say that the image quality in this projector is higher than that of its industrial multimedia counterpart. The latter uses the same principle, but the matrix dimensions are smaller and the optics are different.
Homemade multimedia projector
It is the dimensions of the matrix that mainly affect the clarity of the picture. As its size decreases, the picture quality deteriorates. Therefore, the only advantage of a multimedia projector is its small size. You can do it yourself, but it will take much more time. After all, you will need to implement the scheme shown below:

It is necessary not only to place everything in a homemade case, but also to ensure proper ventilation where it is needed, as well as the functionality of the gadget and its remote control. The costs of purchasing components will definitely be significantly higher in comparison with the design already considered. But, nevertheless, there are also homemade multimedia projectors. One of them is shown below:

It couldn't be simpler
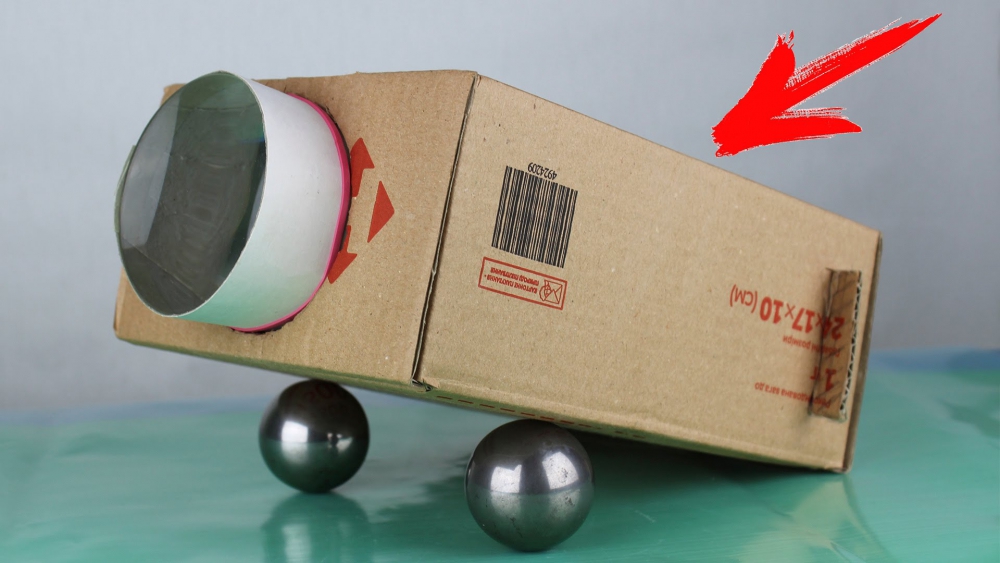
The more complex the design, the fewer people want to repeat it. For this reason, it’s better to talk about the simplest projector that anyone can make with their own hands. The manufacturing process will take a little time. In this case, nothing will need to be disassembled. The essence of the design is simple - a smartphone is installed in the box, which transmits the image to the screen through a rigidly fixed lens. It is simply inserted with tension into a hole cut in the wall of the box.
For reliable fixation, glue is applied around the perimeter of the hole. The focal length of the lens should be half the length of the box. It can be easily identified upon purchase by shining a flashlight onto the table through the lens. You can use light from a lamp on the ceiling or the sun. The distance to the table from the lens at the smallest projection of the light source will be the focal length. The smartphone moves in the box to adjust the image. It is mounted in an improvised carriage:


To ensure acceptable quality of the projected image, it is better to select a diagonal size of less than 30 inches.
We offered three basic designs to those wishing to make a projector with their own hands. The choice is yours, dear readers.
You can make a projector yourself using Android mobile devices or a laptop monitor. This device is perfect for viewing slides. Also, the homemade projection will make it possible to watch movies. Assembling a simple device is not difficult.
An option on how to make a projector from a phone with your own hands
You can make a projector at home using a regular cardboard box and a phone. This device is not difficult to make with your own hands. To begin with, they carry out the preparatory work and stock up on the necessary tools. The projector will require a cardboard box, a magnifying glass with 10x magnification, a sharp knife, a pencil and electrical tape.
The magnifying glass can be a regular magnifying glass or a Fresnel lens. This item can be purchased at any household store.
If desired, the lens can be made at home. This will require certain knowledge and skills. You can use any box as a base, for example a shoe box.
The sequence of creating a projector from a phone:
- First you need to make a hole for the lens. It is performed in the center of the box.
- Next you will need to secure the lens in the hole made. To do this, use electrical tape. In some cases, silicone or special glue is used.
- Next, you will need to install a stand for your smartphone. To do this, choose the right place. At the same time, the phone must hold tightly and not wobble, so that the image does not end up blurry.
- The resulting device should be tested. To do this, close the curtains in the room. After a trial time, the correct placement of the device becomes clear.
- On the smartphone itself you will need to install a special program that will flip the image, because the lamp bends the picture by 180 degrees.
- On the other side of the box you will need to take care of the hole for charging the phone.

At this point, the homemade cardboard mini projector is considered ready for use. This creates a home theater where you can watch movies with the whole family. In addition, this is a great option for viewing photos with a large group.
A way to make a projector at home from a laptop
A smartphone is a great option for creating a projector. But if you want to improve the quality, you can use another gadget. So it is advised to take into account a laptop or tablet. Due to the higher screen resolution, the video quality will be much better.
When using a laptop, you should understand that the screen resolution will be much better. But the design will be more cumbersome.
The box for building a home theater from a tablet must be large enough. So the length should be at least 50 cm, and the end part is slightly larger than the device screen. It is better to choose a large Soviet magnifying glass.
A hole should be made in the end using a knife. It should be slightly smaller than the magnifying glass itself. The lens is attached using double-sided adhesive tape. Then you should secure the tablet inside the box. It should be taken into account that the lens reverses the image.
Creating a projector from a laptop has its own characteristics. You will need to cut rectangular holes on both ends. The device is placed with the monitor facing down, while the keyboard is located at the top. This placement will help to get the correct image in the final result.
Original 3D projector with your own hands: features of creation
You can make an original 3D projector based on a smartphone. For such a design you will need a plastic pyramid. You can purchase such a device on the Internet, where you can also get acquainted with the dimensions. Then you just need to fix the pyramid on your smartphone strictly in the center and start the required video. The type of design is determined by the purpose of such a device. Therefore, it should be determined in advance.

Purposes of 3d projector:
- You can show a real fairy tale from a technologically progressive future. Such tricks will appeal to both the older and younger generations.
- This design will interest kids and you can show children cartoons.
- A laser slide projector creates the effect of a cinema and you don’t have to spend on unnecessary expenses, this will help you save on the costs of hobbies.
This design does not require special costs and materials. It is enough to show a little imagination. You will only have to spend money on a plastic pyramid, but this is not a significant expense.
Rules for making a projector with your own hands: main features
Before you start building the projector, you should study its design. Only then can you evaluate your chances of getting the right device. The right projector includes a lens and a lens. They affect the uniform distribution of light. Light must enter the lens at a certain angle.
The image source is usually a liquid crystal matrix. She works for the light. Each pixel increases by several sizes. Therefore, the original image should be of the highest possible quality. The brightness of the projection lamp determines the maximum screen size.
For good image quality, the source material must be FULL HD - this is 1920x1080 pixels.
The simplest video projector is made using a smartphone, a cardboard box and a lens. The box should be larger in size than the gadget, and the diameter of the lens should match the size of the screen. Its focal length determines the distance to the screen.
The principle of arranging a simple projector:
- A hole is made in the box for the lens;
- Any gadget can be secured inside.

The phone frame should be easy to move inside the box. Often, another box, which is smaller in size, is used for this. Reflection of light should be minimal. That is why the inside surface of the box is covered with black applique paper. You can also paint it with matte paint. In some cases, shoe polish may be noticeable. You can also take a thick artist’s canvas
A way to make a magnifying glass at home
The purpose of the lenses is clear. This is a magnifying glass that helps you magnify objects. To make your own lens you will need a plastic bottle, water, plasticine or window putty. When you fill the bottle with water, the magnifying device will be ready, but this is clearly not enough.
Sequential creation of a magnifying glass:
- 2 identical circles are cut out of a plastic bottle.
- Then the two circles will need to be connected using plasticine or window putty. You should not forget to roll out the plasticine before work.
- Next, you will need to cut the straw into two parts and attach it to the surface of the lens.
- One end of the straw is inserted into a slit in the lens, and the other is used to remove air. This will help force water inside the lens. But all connections must be tight.
- Then the lens is lowered into the water and liquid is drawn inside.
After all, the lens is removed and the gap is sealed with sealant. At this point, lens manufacturing is considered complete. For convenience, it is recommended to attach a lens to the structure.
DIY projector screen (video)
To make your own projector, you will need to take a magnifying glass, a gadget and a cardboard box. After simple manipulations, such a filmoscope will project films onto the wall if you make a special elevator. But you can purchase a ready-made Avon mobile projector. Reviews about it are positive.