How to make a homemade table for a circular table with your own hands according to the drawings. How to make a circular saw with your own hands Do-it-yourself cutting table for a circular saw
A hand-held circular saw is a powerful tool with high performance. One of the main advantages of a circular saw - maneuverability becomes a disadvantage when it is necessary to cut large volumes of wood. To simplify the process, you can easily assemble.
Table structure
The design of a table for a hand-held circular saw is so simple that most craftsmen make it without preliminary drawings and diagrams. This is a sturdy workbench that is made of wood and plywood. The most reliable table bases are made of metal. They are the heaviest and require welding skills. Therefore, stands are often made from waste lumber. A circular saw is attached under the tabletop, the blade protrudes above it through a specially made slot. The lumber is advanced along the tabletop and cut with a rotating disk. For convenience and precision of work, the table is equipped with additional devices: an angular and longitudinal stop.
The tabletop “eats” part of the working surface of the disk, the depth of cut will decrease by the thickness of the tabletop. Therefore, it is advisable to select a circular saw with a maximum disk diameter, and a table top that is thin but hard.
If you haven’t purchased a saw yet, choose models with high power (from 1200 W). They can handle cutting large volumes of wood. Holes will be drilled in the sole for mounting; the cast base may crack. Therefore, it is advisable to choose a tool with a stamped sole.
Selection of materials

To make a good stand for a hand-held circular saw, you should remember your carpentry skills, be patient and have a small amount of materials:
- laminated plywood 15 - 20 mm;
- timber 50 x 50;
- board;
- switch;
- external socket;
- a piece of electrical cable;
- PVA glue;
- wood varnish (if the plywood is not laminated);
- self-tapping screws
And tools:
- jigsaw;
- screwdriver;
- drill;
- ruler.
The size of the countertop will depend on the size of the workshop. At the same time, it will be inconvenient to saw long pieces on a table that is too small. If the part fits entirely on the working surface, the cut is smoother and more accurate. The height of the legs is selected depending on the height of the master.
For a small workshop, a tabletop design with approximate dimensions of 50 x 50 x 25 cm is convenient.
Table manufacturing process
- We cut out a tabletop of the required size from a sheet of laminated plywood. The markings are applied to the lower plane using a metal ruler and pencil. We cut the plywood with a jigsaw, milling the edges if necessary. If the plywood is not laminated, sand the surface of the table.
- We turn it over and make markings from the bottom for attaching a manual circular saw. To do this, remove the disc from the tool and place it with the sole in the required place. We make marks on the tabletop and on the sole for fasteners and a groove for the saw blade. Drill holes for the bolts. They will be screwed from above, through the tabletop and held in place with nuts from below. Therefore, we countersink the holes on the working surface side and grind the bolt heads so that they do not protrude.
- If you plan to cut material at different angles, the slot for the saw wheel is made in the shape of an inverted trapezoid. For smooth sawing, a regular groove is made. Before cutting the slot and holes for fasteners, apply a saw, adjust the marks and only then cut.
- Mark with a pencil the locations of the stiffeners. They are made from boards and installed from below, 8 - 9 cm from the edge of the tabletop. We will attach the table legs to the ribs. The ribs are fixed with self-tapping screws at intervals of 15 - 25 centimeters, and additionally glued with PVA. Self-tapping screws are screwed in from above, through the tabletop, and the heads are completely recessed. The ribs are fastened together with long self-tapping screws.
- The legs of the table are made of a block or board; their length will be from 100 to 113 cm. Legs that diverge slightly downwards will give greater stability. They are fixed with large bolts, tightened from the outside, and secured from the inside with nuts. The timber ties will further strengthen the frame.
- To adjust the height of the table, nuts are attached to the bottom into which M14 bolts are screwed.
- Now you can fix the saw from below by inserting the disc into the prepared slot.
- We attach an electrical outlet to the inside of the table, pass an electric wire from it and install the switch in a convenient place (on the outer part of the stiffener). Power to the outlet will be supplied from the switch. We stretch a wire from it to the nearest power source in the workshop. Using a construction tie, we fix the ON-OFF button on the body of the circular saw in a recessed position.
Let's start making auxiliary stops. For the longitudinal stop you will need #30 square aluminum pipe and two screws with wing nuts.
- We saw off a piece of pipe along the length of the tabletop, and cut holes for screws 3 cm from the edge.
- We cut out two clamps from pieces of plywood. The structure is ready.
- For sawing across the table, we make a plywood sled. We align them with the edges of the table, press them and move them along the toothed circle. We cut a groove where the circle passes through the slide. Small parts can be placed directly inside the slide and sawed.
Dust removal is organized from under the table, but most of the dust flies from above, so it’s a good idea to supplement the device with an upper dust extractor.
Working with a circular saw is very dangerous, so it is important to protect your fingers. Cut out a pusher from a piece of board or furniture panel.
Additions to the design

This design can be supplemented with a riving knife, which will be removed. Put a disk guard on it, which cuts off the flow of chips flying directly at the carpenter.
Some craftsmen, when assembling a table according to unique drawings, completely remove the factory protective casing and replace the factory platform with a homemade one. If you do not plan to cut at an angle, you can remove all the devices for adjusting the tilt of the disk. The saw is fixed directly on the new base, which allows you to gain a few millimeters of cutting depth.
The circular machine is a powerful mechanism that boasts good maneuverability and performance. There are also disadvantages that can be avoided by making the design.
How to make a table for a circular saw
- Creating a project plan. You need to measure the space and choose the appropriate size of the structure.
- Purchase of materials. In the same step, the required saw is selected.
- Step-by-step assembly of the structure. Everything is done according to the drawings made.
Materials and tools
We will need the following materials and tools:
- Sheet of particle board or plywood, 20 mm thick.
- Tool with disc-blade.
- 5x5 cm block for creating legs. The cross-section may be smaller if you plan to create a low-power saw.
- Varnish or primer.
- Solutions for protecting wood from water.
- Wood glue.
- Self-tapping screws.
- Drill and set of drills.
- Screwdriver.
- Jigsaw.
- Machine for milling work.
- Clamps.
- Tape measure and marker for marking.
- Plane.
- Sandpaper.
Reference! Also, we must not forget that a circular saw is equipment that runs on electricity. That is, we need a power source into which it will be connected.

Measurements and drawings
The work begins with the creation of design drawings. This step measures the width and length of the table that is being created. The average value is 120 cm wide and 120 cm long. The following materials are ideal for creating the base:
- Plywood.
- Chipboard.
We are not considering a metal base, since the material is more expensive and the weight of the structure will increase several times. Of all materials, plastic is considered the worst and is not recommended by experts.
Before starting assembly, all wooden elements must be treated with solutions that protect against moisture and rot. After the material has dried, you can begin work.
Attention! It often happens that due to improper installation of the saw, which is installed under the tabletop, the table is overhanging on one side. The blade must be installed in the center of the table.

Important points when working
There are some safety requirements. They will help you avoid injury in the workplace. The requirements are as follows:

DIY table for a circular saw: step by step
The creation process consists of the following stages:
- The material must be marked using a tape measure and a marker. We cut the templates with a jigsaw.
- Now we mill the edges.
- We take sandpaper and process the surface, making it as smooth as possible.
- Now you need to turn the tabletop over and mark the place where the saw blade will be installed. This is done as follows: place the tool and trace the sole. We remove the disk. Using a router, we make a hole from 0.5 to 1 cm (depending on the length of the sole).
- Now we need to measure the saw and the notch. We mark the clamps and slot locations for the cutting tool.
- The next step is to create stiffeners. They are made on the basis of 5x10 cm boards. They need to be positioned so that the distance to the edge of the tabletop is about 10 cm. The smaller side of the board is applied to the tabletop. On one side we make a stroke, and on the other we need to transfer the markings.
- Now you need to mark the positions where the screws will be mounted. We drill holes for them. We install fasteners every 100 – 150 mm. We make them relative to the length of the stiffener.
- Now you need to mark the longitudinal stiffeners and cut them out. We use glue to fix them, and also press them with clamps. After these stiffeners have dried, we install the side ones in a similar way.
- Now you need to install the clamps. Self-tapping screws are used for this. The clamps do not need to be removed. We tighten the structure using self-tapping screws around the entire perimeter. We made the holes for them in step 6.
- We set the tension for the stiffeners. We use self-tapping screws, the length of which will be greater than the length of those used to fix the ribs. After tightening the tabletop, you can remove the clamps. Now we have a finished tabletop.
- The next step is to make the legs. To do this, we take a wooden beam. The legs can be any length, the main thing is that they provide comfort during work. The average distance between the tabletop and the floor is 120 cm, and the length of the legs should be several centimeters shorter.
- We cut out the legs and attach them to the tabletop. Their location will be a little off-putting. We fix the bars with bolts (we install them on the outside of the stiffeners).
- You can increase the rigidity by making a few additional ties between the legs. For this we use timber.
- Now you need to mount the disk plate. We install it inside the hole that we prepared. It is important that the disc fits into the slot without obstructions. We fasten the sole with bolts.
- Cover the table with varnish or primer. This will reduce slipping.
- Additional elements can be installed. For example, a protective cover, a disc tilt adjuster or a carriage.
- If you have minimal knowledge of electronics, you can bypass the start and stop buttons of the saw. These buttons can be installed in a convenient place (most often on the outside of one of the stiffeners).

If you have minimal experience in creating such structures with your own hands, you can easily make a table for a circular stove. The most important thing is to securely fix the saw, regularly check all fastenings, and adhere to safety precautions.
Carpentry professionals always strive to increase the productivity of their own work. If you make a table for a circular saw with your own hands, you can make it easier for yourself to work with large quantities of lumber, while spending a minimum of money.
If you make a table for a circular saw with your own hands, you can make it easier for yourself to work with large quantities of lumber, while spending a minimum of money.
Requirements for the circular table
Before starting work, you need to understand that a table saw is a source of increased danger. Therefore, when making a table, you need to strictly adhere to technology, using only the highest quality materials. Industrial tables are made of metal. But homemade devices are made from available or readily available materials, the most popular of which is wood. It should be taken into account that the final structure must be rigid and stable, and the table surface must be smooth and varnished to increase durability and optimize the work process.
List of required materials and devices
In addition to a certain amount of time and woodworking skills, you will need the following tools and materials:

- sheet of plywood with a thickness of 20 mm;
- paints and varnishes for wood processing;
- a 50x50 mm block from which the legs will be made;
- hand-held table saw;
- drill, electric jigsaw, router;
- clamps;
- pencil and a simple ruler.
Once the glue is ready, you can fasten the structure with self-tapping screws so that their heads go entirely into the tabletop. To avoid distortions, it is better not to remove the clamps at this stage. Using 2 self-tapping screws, the stiffening ribs are pulled together, after which the clamps can be dismantled. Turn the legs from a 5x10 cm board at a height comfortable for work. Typically the height is about 1 meter. The legs are attached in such a way that they are slightly spaced from the center to the edges of the structure.
Mount the saw into the previously prepared groove from the bottom of the tabletop so that the blade fits into the slot. To minimize the influence of moisture and ensure good sliding of the workpiece, the circular sawing table is coated with several layers of varnish. Mark the locations of the longitudinal stiffeners, then saw them and glue them to the tabletop with wood glue, having previously pressed them with clamps. The side stiffeners are made and attached in the same way.
When designing a table for a circular saw, it is necessary to take into account the dimensions of the materials that will be processed on it, because the quality of the cut will be much higher if the workpiece rests completely on the table surface. At the same time, greatly exceeding the dimensions of the workpieces leads to irrational use of the working area. The height of the table is selected for each master individually based on his height.
Making your own table for a circular table
The technology for assembling a table for a hand-held circular saw is not difficult for an experienced carpenter. To make a table for a circular saw with your own hands, you need:
- Take a sheet of plywood with a thickness of at least 20 mm and make a tabletop blank from it. To do this, mark the sheet with a pencil according to predetermined dimensions and cut it with an electric jigsaw. The resulting workpiece is processed with a hand milling machine, and then sanded with coarse or medium sandpaper.
- Mark the underside of the tabletop for the circular saw. To do this, you can use a circular saw with the blade removed, installing it in the desired place and marking the dimensions of the sole. In this section of the workpiece, it is necessary to cut a recess 8-10 mm high with a router.
- Place the saw in the cut-out hole. If necessary, adjustments can be made at this stage so that the tool is stable on the tabletop. When everything is adjusted, you can mark the tool attachment points and the slot for the disk. If the material needs to be cut at different angles, this must be taken into account when marking. Then the cross-section of the slots must be made trapezoidal with the apex pointing downwards.
- Mark the bottom of the tabletop for stiffening ribs, which will be located along the entire perimeter of the table at a distance of 70-100 mm from its edge. After this, you need to attach the board to the tabletop and trace it. On the center line you need to mark places for self-tapping screws located 50 mm from the edges of the ribs every 150-200 mm. According to the completed markings, you need to drill through holes.
This way you will get a simple but reliable homemade table on which you can easily work with workpieces of certain dimensions.
A circular saw is used to cut wood.
Using a hand saw is not always comfortable; using a table allows you to make the sawing process smoother and more accurate.
The cutting base has a disc-like plane equipped with an outer edge with teeth. There are models not only of the manual type, but also with the ability to be fixed on the table.
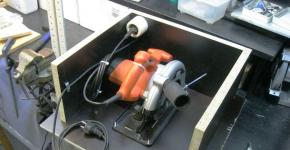
![]()
It is difficult to work with large volumes of wood with a regular circular saw, so it is better to place it on a table
There are several ways to acquire the latter for ease of manipulation. You can build a table for a circular saw yourself, strictly following a certain pattern.

Table arrangement for a circular saw

The table is made taking into account the fact that the hand tool will be installed and secured on the table, thereby turning into stationary equipment
Constructing the element with your own hands allows you to make the saw most suitable for individual conditions. There will be no difficulties in the process if you carefully study the issue. You can adjust the product to the desired size, distribute everything so that it is convenient for you.

Making a table for a circular saw is within the capabilities of every craftsman.
A handcrafted model will be one of a kind, which makes it unique.

Small table stand for circular saw
Deciding on design and construction

The simplest version of a table for a circular table is a design made of fairly thick plywood and boards
The base can be made of wood or metal. Leaf tree species are chosen for the tabletop. A special hole should be made in it for the disk. The key property of the created table should be convenience.

Circular machine bed
Care should be taken to ensure its stability. No loosening is allowed, otherwise it will negatively affect safety. The tabletop should have as smooth a surface as possible. This will reduce the likelihood of injury while working.

A table for a circular saw requires the presence of guides
The structure can be supplemented with a special riving knife. He can be removed. It is equipped with a special disk protection that allows you to get rid of chips flying at the worker.

Table guide carriage for circular saw
Some people remove the factory cover and replace the factory platform with a homemade one. If you are not going to cut at an angle, you can remove the parts that adjust the tilt of the blade.
Blueprints

Diagram for making a table for a circular saw
Before starting work, it is recommended to go through the preparatory stage. You should definitely make a drawing. This will make the design creation process easier. First, calculate the dimensions of the table, then transfer the data obtained to paper. The hole made in the structure must exactly match the dimensions of the saw. It all depends on the brand of equipment. Therefore, it is impossible to make a universal hole. The base must be stable and withstand mechanical loads well.

DIY table drawing for a circular table
It is unacceptable to overhang the structure to one side. The dimensions of the tabletop must be suitable for the sawing flow. The final option is determined based on individual desires. Some people work comfortably with a folding table or a product with small dimensions.

Drawing of a universal tabletop machine
An important point should be taken into account in the drawings. If you plan to leave tools or materials on the table while working, then the dimensions of the tabletop need to be increased to a square meter in area. A suitable size would be 120 by 120 cm. You should draw the drawing carefully and slowly in order to do everything correctly.

Table diagram for a circular table with a detailed description
Necessary materials

A homemade table can be made from wood
For such a table, wood, plywood or chipboard can be used. MDF and chipboard are also suitable. Some people prefer to choose steel or aluminum.

Steel plate table saw
It is not recommended to use plastic; it is completely unsuitable for a table of this purpose. If wood is chosen, then after completing the assembly the product should be treated with a special antiseptic composition. This will provide reliable protection from moisture and help avoid rotting.
To make a saw table yourself, you need to prepare the materials.
- Selected raw materials for the base. The thickness should be 21 mm.
- The timber required for the frame. An edged board 3 meters long with dimensions 50 by 150 mm is suitable. A total of 5 pieces are needed.
- Dowels made of wood with dimensions of 10 cm. At least 12 pieces.
- Wood glue.
- Metal fasteners in the amount of 4 pieces.
- Metal corners. 10 pieces are enough.
- Self-tapping screws.
These elements must be prepared in advance and placed near the workplace.
Required Tools
In addition to materials, you should prepare tools.
Among them:
- pencil and marker;
- measuring instruments including meter and tape measure;
- jigsaw;
- manual frezer;
- grinding machine;
- sandpaper (must have medium or fine grain);
- plane and drill;
- screwdriver
You need to prepare everything in advance and keep it on hand throughout the entire process.
Manufacturing process: step-by-step instructions

Marking the place where the saw is attached to the table

Marking and fastening of stiffeners

Tabletop for a circular saw in finished form
To make a quality structure, you need to follow some tips. The process consists of several steps presented in the table.
| Steps | Description |
| 1 | The block should be leveled on all sides using a plane. Then the frame of the future table is assembled from it. Several 5 mm holes need to be drilled in each side of the tabletop. Additionally, one through one is made for the legs of the product. |
| 2 | The drawers have several holes of the same diameter. In the legs one through one is made. The diameter remains the same, 5 mm. |
| 3 | Proceed to install the dowels into the tabletop. Before this, they are coated with wood glue. The legs and drawers are placed on top. If there are clamps with ties, the product should be secured using them. When the glue has completely dried, you need to fasten the drawers and legs using special metal fasteners. Additionally, it should be tightened with self-tapping screws. You can add reliability and strength to the structure by using corners. They will become an element of additional fastening and give the product stability. For the short side, 2 pieces are enough, and for the long side, 3 are suitable. |
| 4 | The next step involves securing the saw to the product from the inside. There are several methods to accomplish the task. M4 bolts or bars with self-tapping screws are suitable for fastening. The first case is fast and reliable. The second method does not require additional holes, eliminating the need for drilling. You need to make a cut in bars, the width of which is equal to the dimensions of the saw platform. Next, self-tapping screws and bars on both sides fasten the equipment and the tabletop |
| 5 | After installing the saw, you will need another larger block. It is secured to the base of the structure using self-tapping screws. Screwing is carried out on the marks made when setting the platform in a level position. These manipulations will help, when removing the saw, to return it usually quickly without searching for markings |
| 6 | The saw blade is installed in its proper place. The base is sawed to obtain a longitudinal hole. Then the product must be turned over |
| 7 | Then the production of the rip fence begins. Two strips are sawn off from the plywood. Their length should match the width of the table. On average, these dimensions are 10 cm. The corners should be rounded |
| 8 | The resulting strips are polished. They need to be fastened at an angle with self-tapping screws. A metal corner should be screwed inside |
| 9 | If you need to attach a stop to the base and the structure will be used frequently, you should attach the guide so that it is perpendicular to the disk. Attach the roller to the bottom. This will allow him to move. |

Attaching the legs to the table

Attaching the saw to the tabletop

Fixing the start button
The design is completed and ready for use. When performing the described manipulations, it is important to remember to follow safety precautions. This also applies to any manipulations with a circular saw.
Regularly check the position of the table and its strength. The structure must be stable, without loosening.

An example of a manufactured work table for a circular saw

Table version for hand-held circular saw with lifting mechanism
First make sure the saw is securely fastened, only then turn it on. Do not hold the cut material with your hands. This will help prevent wood from hitting your face when the knots start to bounce. Additionally, it is recommended to use special safety glasses when working.

For safety, be sure to wear safety glasses
These simple tips will help you avoid injuries in the workplace.
Video: Table for a circular table made from scrap materials
How to make your own round table with your own hands according to the drawings
Hand-held circular saw. it is a powerful tool with high performance. One of the main advantages of all-round maneuverability becomes a disadvantage when it is necessary to see large volumes of wood. To make the process easier, you can easily assemble a circular saw table.
Desktop device

The design of a table for a hand-held circular saw is so simple that most craftsmen make it without preliminary drawings or diagrams. This is a strong workbench consisting of wood and plywood. The most reliable table bases are made of metal. They are the heaviest and require skills as a welder. Therefore, most often the supports are made from waste lumber. A circular saw is attached under the tabletop, the blade protrudes through it through a specially made slot. The wood is moved across the tabletop and cut by a rotating disk. For convenience and precision of work, the table is equipped with additional devices: an angular and longitudinal stop.
The working surface “eats” part of work surface disc, the depth of the cut will decrease according to the thickness of the tabletop. Therefore, it is advisable to choose a round one with a maximum disk diameter, and the top of the table is thin but hard.
If you haven't purchased a saw yet, choose high-power models (from 1200 W). They can handle cutting large volumes of wood. Holes will be drilled in the base for installation: the cast base may crack. Therefore, it is advisable to choose a tool with a stamped sole.
Selection of materials
Read also

To make a good position for a hand-held circular saw, remember carpentry skills, just a little patience and a few materials:
- laminated plywood 15. 20 mm;
- beams 50 x 50;
- board;
- switch;
- external socket;
- a piece of electrical cable;
- PVA glue;
- varnish on wood (if the plywood is not laminated);
- self-tapping screws.
The size of the countertop will depend on the size of the workshop. However, on too small table It will be awkward to see long segments. If the part is completely nested, the cut is made more smoothly and precisely. The height of the legs is selected depending on the height of the master.
For a small workshop, it is convenient to use a tabletop design with approximate dimensions of 50 x 50 x 25 cm.
Table production process
- We cut the tabletop to the required size from a sheet of laminated plywood. Markings are applied to the bottom plane using a metal ruler and pencil. We cut the plywood with an electric jigsaw, and if necessary, the edges are milled. If the plywood is not laminated, we clean the table surface using sandpaper.
- We turn it and make a mark from the bottom to fix the hand circular. To do this, remove the disc from the tool and install its sole in the desired location. We make marks on the tabletop and on the sole for fasteners and a groove for the saw blade. Drill holes for bolts. They will be twisted at the top, across the top of the table and at the bottom to be held in place by the nuts. Therefore on the side work surface The countersinks of the holes and bolt caps are grounded so that they do not protrude.
- If you plan to cut the material at different angles, the gap under the saw blade is made in the form of an inverted trapezoid. For smooth sawing, a normal groove is made. Before you cut the slot and holes for the fasteners, attach the saw, adjust the marks, and then cut.
- Pencil. location of stiffeners. They are made of boards and installed at the bottom 8-9 cm from the edge of the tabletop. We will attach the table legs to the ribs. The ribs are fixed with screws at intervals of 15-25 cm, additionally glued with PVA. Screws screwed from above, through the tabletop, the heads are completely recessed. The fins are secured together with long self-tapping screws.
- The table legs are made of bar or board, their length will be from 100 to 113 cm. Greater stability will be provided by the legs, slightly diverging from the bottom. They are secured with large bolts twisted from the outside and secured with nuts from the inside. The rod ties will further strengthen the frame.
- To adjust the height of the table, nuts are attached to the bottom, into which M14 bolts are screwed.
- You can now secure the saw from below by sliding the blade into the prepared slot.
- We attach the electrical connector to the inside of the table, let the wire pass from it, and install the switch in a convenient location (on the outside of the stiffener). Power from the outlet will be supplied from the switch. From it we extend the wire to the nearest power source in the workshop. Using a tie, we will fix the ON-OFF button on the body circular saw in a recessed position.
Installing a manual circular saw and jigsaw into the table. Fast, simple, not expensive.). Part 1
Easy to do. Quick installation of the jigsaw and circulars. And reliable design. Part 2:.
Millionth table for manual circular saw
I present my work to the respected public. table for manual circular saw. I'll be happy to listen.
Let's start making auxiliary stops. For the rip fence you will need #30 square aluminum pipe and two screws with lamb nuts.
- Cut a piece of pipe to the length of the tabletop, cutting holes for screws 3 cm from the edge.
- We cut two clamps from pieces of plywood. The design is ready.
- For sawing through the table, we make a sled from plywood. They are aligned with the edges of the table, pressed and moved along the jagged circle. We cut a groove where the circle passes through the slide. Small parts can be placed directly in the slide and sawed.
Read also
Dust removal is carried out from under the table, but most of the dust in this case is scattered from above, so it is a good idea to supplement the device with an upper dust separator.
Working with a circular saw is very dangerous, so care must be taken to protect your fingers. Cut a pusher from a piece of board or furniture board.
Additions to construction

This design can be supplemented with a riving knife, which will be removed. A disc guard is put on it, which cuts off the flow of chips flying directly at the carpenter.
Some craftsmen, when assembling a table using unique designs, completely remove the factory protective cover, and replace the factory platform with a homemade one. If you don't plan to look at an angle, you can remove all the dial adjustment devices. The saw is fixed directly on the new base, which allows you to gain a few millimeters in cutting depth.
Without the inner housing it is easier to remove the blade, the saw is not so clogged with chips when working with damp boards. Disassembly requires additional time, but the engine life is preserved and overload is prevented.
First video about still table For circular saw, the second is about the small portable structure: How to make a circular saw by hand from a hand-held circular saw If a person lives in a private house or has a garden area, the presence of a stationary circular saw in the home owner’s arsenal is not only desirable, but sometimes necessary. Unfortunately, the cost of an industrial prototype of such a saw does not correspond to the frequency of its...
Post Views: 1