Self-leveling polymer floors with your own hands. Filling a polymer self-leveling floor with your own hands Filling floors with a polymer coating
In recent years, the demand for polymer floors has increased several times. Such popularity of the material is due to the good technical and decorative characteristics of the coating. It is quite simple to equip polymer floors with your own hands, if you strictly follow the recommendations of experienced specialists, which are presented below.
General information about polymer mixtures

Self-leveling coating is a polymer composition that is used as a finishing finish for a rough base. It can be laid on mineral, wood, ceramic and even metal surfaces. For residential premises, polyurethane mixtures are most often used, since they have good aesthetic characteristics, as well as excellent thermal insulation.
All types of finishing fillers are divided into two broad categories:
- Leveling - applied and leveled by hand using a spatula and a needle roller;
- Self-leveling- solutions liquid in consistency, which spread over the coating practically without auxiliary tools.
The thickness of the laid "liquid" coating can vary from 1 to 9 mm. According to many experienced craftsmen, a layer of 1.5-3 mm will be optimal for residential premises.
Preparatory stage

How to make a self-leveling polymer coating on the floor? Before proceeding with the direct pouring of the polyurethane mortar, it is necessary to prepare a rough base. The main requirement for coatings for the installation of a self-leveling floor is evenness. To check the "horizontal", use a fairly long ruler and a building level. If the difference in height per m2 exceeds 3-4 mm, you will have to think about additional leveling of the base.
How to prepare the foundation? Depending on the type of roughing, there are several ways to prepare the floor, namely:
- For concrete pavements
- The moisture content of the cement screed should not exceed 4%;
- Using Schmidt's hammer and Dean's apparatus, you need to find out the peel strength of the base - at least 1.5-2 MPa and the compressive strength of the material - at least 20-23 MPa;
- When arranging a new screed, it is desirable that its "age" be at least 27-30 days;
- When repairing an old floor, you need to free the base from paint, old topcoat, glue and stains;
- After that, potholes and chips are sealed in the screed, bumps and cracks are removed;
- Minor irregularities can be eliminated with a grinder, and cracks with glue solution;
- Then, with the help of the building level, it is necessary to check the “horizontalness” of the concrete screed again.
- For wood flooring
- In this case, the moisture content of wooden floors, logs and plywood is allowed at 10%;
- The sub-floor is cleaned of old coatings and baseboards, varnish, paint and oil stains;
- For high-quality cleaning, it is advisable to use a metal scraper, grinder and spatula;
- The cracks on the surface are cleaned with sandpaper, after which they are putty;
- If possible, the floor is leveled with a cement screed or plywood sheets of various thicknesses.
- For ceramic coatings
- It is possible to equip polymer self-leveling floors with your own hands on ceramic tiles, but, first of all, you need to check the coating for the presence of tearing elements;
- If in the process of tapping the tiles, a dull echo is heard, the tearing off tile must be removed and, having processed with glue, again fixed on the coating;
- The ceramics are degreased and treated with a primer, after which all inter-tile joints are putty.
Preparation of polymer solution

One of the most crucial stages of work is the preparation of the bulk mixture. The "spreading" of the solution during the pouring process will depend on the quality of the mix and the consistency. To properly prepare the mixture, it is advisable to be guided not by the recommendations of the "experienced", but by the instructions provided by the manufacturer on the packaging.
How to make a quality solution?
- Water is poured into the prepared container, according to the instructions;
- Then add the dry polymer mixture;
- Stir the liquid mass for at least 10 minutes using a construction mixer or a drill with a butterfly attachment;
- The prepared solution should be free of any lumps and irregularities.
How to check if the mixture was prepared correctly? For those who first encounter the process of pouring a polymer floor, the "spreadability" test will be useful. It will allow you to determine whether you have done the mixing correctly or not:
- Cut off the bottom from a small plastic cover;
- Install it on the floor and pour the polymer composition inside;
- Lift the cover gently;
- If the mixture spreads evenly and forms something like a glass surface, you have prepared the solution correctly.
How much mix is needed?
One of the main questions when arranging a self-leveling floor is the calculation of the required amount of solution. On average, no more than 500-600 g of the mixture will take to process m2 of a well-leveled base. In this case, the thickness of the "liquid" layer will be approximately 1 mm.
For a more accurate determination of the required amount of material, you can use the following expression: y + (y1-y2) / 2 = x, where:
- x is the thickness of the coating;
- у1 - distance from the highest point of the marking to the base;
- y2 - distance from the lowest marking point to the base;
- y is the permissible thickness of the polymer mixture indicated on the package.
Floor marking and wall pasting

How to make a polymer floor with your own hands? Before pouring the solution, it is necessary to mark the base. This is done in order to install pendulums that control the "horizontal" of the applied mixture. In addition, even in the case of using self-leveling compounds, they still have to be directed to the corners of the room.
How is markup done?
- Pendulums are installed on the surface of the subfloor at a distance of about 1 m from each other;
- When installing the pendulum close to a wall, the minimum distance should be at least 10-15 cm.
To prevent the finish coating from cracking during operation, it is advisable to glue a damper tape around the perimeter of the entire room. Even in the case of linear expansion, polymeric materials will not "push" against the wall, which will not lead to their deformation. The width of the tape should vary between 7 and 10 cm.
Application of polymer solution

Approximately one day after priming the subfloor, the polyurethane mortar is poured. How to fill?
- The finished solution is poured onto the coating from a bucket at a low height from the floor;
- A wide enough spatula is used to level the mixture, and the layer thickness is adjusted with a squeegee;
- The next step of pouring the mortar is done close to the treated area to result in a seamless monolithic coating;
- The remainder of the solution is poured in the same way;
- To prevent air bubbles from remaining in the coating, it is rolled with a needle roller;
- At the final stage, experts recommend covering the floor with polyethylene to avoid uneven drying of the solution and its cracking.
The process of applying a polyurethane compound to a prepared base is shown in more detail in the video material. To protect the coating from mechanical stress, an additional layer of varnish is applied over the solution.
Manufacturers overview
For the high-quality arrangement of polymer floors, professionals recommend using building mixtures only from trusted manufacturers. The best ones include:
- Litokol is an Italian company that produces dry polymer mixtures of high strength and wear resistance. They include modifying substances that improve the physical and mechanical properties of the coating;
- Ivsi - one of the best manufacturers of "liquid" floors, adds fractional sand and mineral components to the mixture, due to which the mortar consumption is significantly reduced;
- Bergauf - the company specializes in the production of coatings with improved adhesion rates (over 1.2 MPa). Acrylic and polymer additives, which are part of the raw materials, improve the spreading of the solution over the coating. Sufficiently liquid formulations penetrate into the smallest pores on the base and create a perfectly even polymer coating.
Currently, construction is an important branch of the national economy. A special place in this section is occupied by the work on the manufacture of the floor in a particular room. Today, for the construction of a floor, you can use a wide variety of materials: wooden boards, plywood, linoleum, concrete coating. In recent years, the so-called liquid polymer flooring is gaining more and more popularity. It is also called bulk. Unlike conventional materials, it has a number of advantages.
Polymer floors are divided into types such as: epoxy, polyurethane, methyl ethacrylate.
Polymer self-leveling floors are a synthetic coating. It is most often used in large retail spaces, garages, exhibition halls, etc. Very often, polymer self-leveling floors are used in production due to their strength and durability. It is not difficult to make such floors with your own hands. In addition, there are 3D floors. They differ from the previous coating by the presence of complex patterns, which not everyone can do with their own hands. Let's consider in more detail how to fill polymer floors, the main stages of work, the positive and negative aspects of this coating.
Read also:
: preparation, process and features.
About, how to glue non-woven meter wallpaper, read.
Advantages and disadvantages of self-leveling floor
Polymer self-leveling floors have a number of positive qualities, which makes them in great demand.
Firstly, polymer floors are of different types (epoxy, polyurethane, methyl ethacrylate), depending on this, they can withstand high temperatures and do not allow water to pass through.
Secondly, despite the use of a polymer base, they are hygienic, easy to handle and wash. Thirdly, this coating is resistant to various chemical agents.
Fourthly, polymer floors can be glossy or matte, so you can choose the desired design in accordance with the interior of the room. Fifth, polymer floors contain a liquid component that hardens quickly. This contributes to better adhesion of the liquid to any surface, be it wood or concrete. Unlike wood and concrete subfloors, this coating is done quickly and effortlessly.
Back to the table of contents
Preparatory work
The difficulty of erecting self-leveling floors is that they require a perfectly flat surface. In the event that the base is represented by tiles or tiles, you will have to create some roughness. This can be done with sandpaper or sandpaper. Often problems arise when leveling the base if it is made of wooden planks. To do this, first fill up all the irregularities. Unevenness in the subfloor can be well manifested when disassembling the log and removing the old coating.
The permissible difference in the height of the surface of the self-leveling floor is 4 mm. If possible, you can make a concrete screed. If you do not do it, then irregularities and defects are removed with a grinder or grindstone. It is recommended to use a water or building level to determine the evenness of the coating. It is also advisable to prime the surface. The primer prevents moisture penetration and increases the adhesion of the self-leveling floor to the base. After the base is made, it is necessary to nail slats like a plinth around the perimeter of the room. This is necessary so that the liquid polymer mixture does not spread into the voids between the floor and the wall. The slats are fixed with self-tapping screws, nails (if the wall is wooden) or dowels (if the wall is concrete).
Back to the table of contents
Mix preparation and pouring technology
In order to make polymer floors with your own hands, you will need to prepare a working solution. You can buy a polymer mixture at any hardware store. After that, it must be diluted in water. This is one of the most crucial stages of all work, since the result of pouring largely depends on the quality of the solution. It is necessary to prepare the mixture only according to the instructions attached to the product. The mixing process is of great importance. This should be done slowly so that not a single lump remains. In addition, there should be no air bubbles in the solution.
Mixing can be carried out using a special mixer or improvised means. The next stage of the repair is pouring the solution. The liquid polymer must be applied to the surface from the area of the room farthest from the doors and gradually move towards the exit. The optimum floor layer should be about 4 mm. If you make it thinner, then it will not have high strength and reliability. This option is suitable as an addition to the base coat. It is best to pour the mixture together with an assistant. One person holds a container with a polymer liquid and gradually applies it to the floor, and the second evens the surface. For leveling, you can use a wooden batten.
After the polymer self-leveling floor is dry, you can start applying varnish. Varnish is needed to give the coating a certain shine. In addition, the varnish increases the wear resistance of the material and makes it smoother. The drying time of the polymer mixture is on average about half an hour. But it's best to read the instructions on the packaging. The varnish is applied only to the hard surface. It is recommended to paint the floor in two or even three layers. It is not possible to walk on the new self-leveling floor immediately, otherwise traces may remain on it.


Self-leveling polymer floors have now become a promising and fashionable type of flooring and are increasingly being arranged in apartments (houses). Because they very well combine many of the requirements for flooring. Their qualities such as durability, hygiene, resistance to mechanical and chemical damage, the ability to decorate, as well as their electrophysical properties push polymer floors to the first positions. In addition, this floor can be of any color, thereby giving a flight of imagination for design.
Self-leveling polymer floors
And what is important for a home craftsman, you can make such a floor yourself. You just need to have no more experience in carrying out repair work in your apartment, a set of tools and devices. And before starting the installation of the floor, carefully study the instructions that are attached to the set of materials for self-leveling floor... Scrupulously observe the proportions when mixing the components, observe the time ranges, strictly observe the temperature and humidity recommended in the instructions, so as not to disrupt the technological cycle and not let all the work down the drain. If you are not afraid of such conditions, then you can get to work.
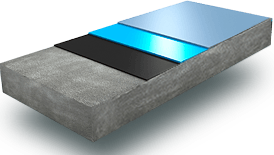
The process of installing polymer floors is carried out in stages:
- preparation of the necessary materials, tools, devices, overalls and protective equipment;
- preparation of the sub-floor;
- treatment of the base of the floor with a primer;
- application of the main layer of the polymer floor;
- application of the top (finishing) layer.
If this is your first time taking on this work, then it is best to start installing a polymer floor with a bathroom. Because there is usually a small floor area and, in case of some flaws, they will not be so noticeable, but after gaining experience, you can continue in other rooms of your apartment.
Preparation of materials and tools.
Once on the building materials market, you will see a fairly large selection of materials for the device. self-leveling polymer floor... They differ in their characteristics and properties. Consult the seller to find the right one for your particular case, depending on the quality of the base of your future floor, its evenness and moisture content.
 Self-leveling floor tools
 Of the tools you will need: an electric drill with a stirring attachment, it is not bad to have a surface grinder, a vacuum cleaner, a regular paint roller, a needle roller, spatulas - normal and notched, special needle paint mortars for moving on a wet polymer floor, and of course personal protective equipment. Provide good illumination of the floor surface while working.
Preparation of the base of the self-leveling floor.
If you are installing a resin floor in your bathroom without removing the old floor tiles, you still need to prepare the floor. To make jointing, grinding, cleaning all seams and cracks, check its horizontal position. If the floor deviates from the horizon, you will have to make a screed to level it. After finishing the preparation of the base, it is necessary to remove all dust in the room with a vacuum cleaner and cover the cracks with putty.
Treatment of the base of the self-leveling floor with a primer.
The primer is a simple but very important detail and must be done with great responsibility. A primer is made with an ordinary paint roller in two layers with drying of each layer for at least a day. To ensure better adhesion of the polymer floor to the base, the freshly laid primer is sprinkled with clean quartz sand. The quality of the completed primer is determined visually after its final drying by the gloss and saturation of the surface where it is applied.
Application of the main layer of polymer self-leveling floor.
Polymer self-leveling floors are subdivided into several systems, and in each there are differences in the technology of applying the main floor layer. The main ones are: paint, self-leveling and high filling.
 Painted polymer floors
 The easiest system to manufacture is the paint system.... It is a thin layer system about one millimeter thick and can be applied to both new concrete and old existing flooring. Polyurethane paint systems are most commonly used, and it is recommended to apply up to 150 g / m2 on each floor layer. The floor arranged according to this system is relatively inexpensive, but due to its small thickness it is not durable and requires good preparation of the base.
 Self-leveling system
 Self-leveling system and is the so-called self-leveling floor, their thickness reaches 5 mm. Self-leveling coatings are available in many formulations. Such compositions are prepared from two components right before use and poured onto a prepared substrate.

Then it is evenly distributed over the surface of the future floor using a notched trowel. The hardening of the polymer mixture begins in 15 minutes, so you need to hurry to have time to level the material and roll it with a needle roller in different directions to remove
air bubbles and its even distribution over the floor surface. In this case, it is not necessary to remove the roller from the liquid material until the end of rolling.
If you need to move on a freshly poured floor, then special paint mortar with needle soles.
Highly filled systems, their thickness is about 10 mm, the most complex in terms of technology and labor intensity of work, and therefore require highly qualified performers. They hide all defects in the subfloor.
 Highly filled systems
 Application of the top (finishing) layer.
At the final stage of the device of a polymer self-leveling floor, a so-called finishing layer is applied over the base layer to make the floor surface more resistant to various influences and improve its appearance. As such a layer, various varnishes are used that are applied with a roller. After the end of the work, access to the room stops until the floor is completely dry.
Video instructions for installing a polymer self-leveling floor.
It is quite difficult and time-consuming to equip polymer floors with your own hands. Many craftsmen recommend laying this type of floor, since it is considered environmentally friendly, shiny and durable. The composition of the mixture used contains several components, the main of them, of course, the polymer, together with which hardeners, dyes and granite chips are used.
More recently, a polymer self-leveling floor was used for pouring only in industrial buildings that had high levels of mechanical or chemical effects. Over the course of time, this material has been modernized. The excellent quality of the flooring and the attractive appearance have played a role, now the polymer floor has become more and more popular. Many people do not use the services of specialists and prefer to create polymer self-leveling floors in their apartments.
Varieties and features of self-leveling floors
Today, in the construction market, self-leveling floors of two types are in demand: polyurethane and epoxy.
Industrial floors made of polyurethane self-leveling coating are used as floor surfaces in warehouses, hangars and production facilities. Also, sometimes this type of floor is used in parking lots or in buildings of the food industry or a refrigerated industrial site.

Industrial polymer floors are distinguished by their high wear resistance, mechanical and chemical resistance. Due to their properties, industrial self-leveling floors perfectly cope with deformations from loads on their base.
Epoxy resin floors, which have another name: "liquid linoleum", are also very durable and resistant to chemicals. Epoxy self-leveling coatings have a smooth surface and a wide range of colors. The epoxy polymer material does not contain solvents, so the coating does not have any strong odors.

Preparation
Like any other construction process, pouring a polymer self-leveling floor has several important stages, each of which must be performed as efficiently as possible, which, as a result, will affect the effectiveness of the work performed.
The process of preparing the base for pouring
This stage is one of the most important, because the polymer floor can only be poured onto a smooth and even surface, without any flaws and defects. This implies that before starting work, you must make sure that there are no defects.
To do this, the surface is cleaned of dirt and dust while using a broom, but it is best to use a construction vacuum cleaner. If cracks and cracks were found during cleaning, it is necessary to repair them with concrete mortar. If these defects are small in size, then putty can be used for sealing. Complete leveling of the floor base is done in several ways: either use a grinder or make a new concrete screed.

After you have processed the base, it must be thoroughly dried and then primed. For this, only a special primer is used, with the help of which a surface with good adhesion properties is created. Also, when using a primer, small cracks and cracks can be repaired. For greater efficiency and reliability, it is recommended to prime the base in two layers.

After the priming process is over, it is necessary to lay wooden slats around the entire perimeter in order to create an expansion joint.
Preparation of polymer mixture
A mixture of a self-leveling polymer floor is made from several components, which are usually found in two cans. It is better to take a separate container for mixing them. But some people transfer ingredients from one jar to another. Still, it is recommended to mix all the ingredients in a separate container.
Do not forget that in the process of mixing the components in the solution, a chemical reaction begins to occur, which entails the release of thermal energy. In order for the high temperature not to affect the quality of the polymer, it is necessary to put the container in which the components are mixed into another container, into which cold water must be poured in advance.

It is recommended to use a construction mixer or a special drill attachment to mix the components. Since the mixture tends to harden quickly, the mixing process should take no more than a few minutes. After thorough mixing, this solution must be applied to the floor base.
Basic steps, materials and tools
The process of pouring polymer self-leveling floors with your own hands consists in performing several stages:
- Preparation of the concrete base;
- Arrangement of the first - the main layer;
- Creation of the second, decorative layer;
- Application of varnish coating.
Basically, epoxy polymer coatings are applied to a concrete base, to which there are a number of certain requirements:
- Necessarily a flat plane, there should be no defects, in the form of cracks, etc.
- There must be a waterproofing arrangement;
- There must be a clean surface, there must be no oil stains;
- Concrete moisture content should not exceed more than 4%;
- The screed should be made of M200 grade concrete as a minimum.

Before starting work with a self-leveling floor, you must have the following set of tools and auxiliary materials with you:
- A container that has a volume of about 30 liters in order to prepare the composition;
- The presence of shoes with spikes (paint shoes), so that you can easily move on the treated surface;
- Availability of a simple spatula for use in hard-to-reach areas;
- The presence of a spatula squeegee, which is used to evenly distribute the solution;
- The presence of a whisk, a drill with low speed;
- The presence of an aeration roller (with spikes) to remove bubbles on the freshly laid surface.
Sorry, no results were found.
Decor elements
Almost all epoxy polymer coatings have good performance characteristics, and their decorative properties can surprise everyone.
This type of flooring allows you to independently create a unique, beautiful and individual surface. To do this, you need to buy decorative elements in advance, for which you can take sea pebbles or small shells, coins or buttons of various shapes and colors.

In some places, this floor is made out in the form of an artistic system, while stencils are used and certain patterns are applied with paints, which allows you to create polymer self-leveling floors with your own hands that are truly unique and inimitable.
In the process, a beautiful stained glass window can be laid out of all this. Such a floor covering has a huge number of decoration methods.
The process of pouring a polymer self-leveling floor
To equip polymer floors with their own hands, they use mixtures of industrial and homemade preparation. For self-preparation of the solution, it is necessary to pour cement, sand and crushed stone into a previously prepared container, observing the proportions provided for in the instructions, then thoroughly mix them dry, and then add water and then mix again until a homogeneous mass is obtained.

In order for the surface to be as flat as possible, a special technological technique is used. This process involves the use of planks that are installed around the perimeter of the room. By this very method, an almost perfect surface can be achieved. For lighthouses, T-shaped steel slats are taken, which are installed on quick-drying mixtures. Laser devices or hydraulic levels are used to define and mark the surface. Visually, you can see the highest point at which a reference mark is made. The floor level can be set with an exceeded total thickness of all layers, and it is also necessary to take into account the fact that for a screed it should not be more than 40 millimeters and less than 20 millimeters.

In order to make the process faster, you can use threads that must be pulled between the walls according to the marks that were supplied when the required floor level was installed.
It is best to fill the floor in stripes. When carrying out work, you need to take an assistant with you who will supply the solution. The pouring process itself is carried out in this way: a ready-made solution is taken and poured in strips between the beacons. After that, the rules are taken and the filled mixture is evenly distributed by them. The tool needs to be moved along the lighthouse rails, moving the mixture in waves. Thus, the distribution of the solution is carried out with the least resistance and most evenly.

Then remove air bubbles from the polymer coating that appear when mixing the components. Usually a needle roller is used for this. Before pouring the floor, you can watch numerous videos about the correct sequence of work.
In the process of smoothing the mixture, it is necessary to carefully monitor so that there are no defects, or rather, voids and depressions. It is necessary to start pouring from the far corner with a sequential movement to the exit. The process itself is carried out in strips along the beacons until the entire surface in the room is filled. After the preparatory layer has dried, the resulting surface is decorated, if necessary, after which the second layer of the mixture is poured in the same way, followed by the application of varnish. Of course, for the implementation of the work, the supervision of a specialist is desirable, who represents what it is and how it is all done, but we hope that with the help of our instructions you will be able to carry out all the necessary work on your own.
The technology for creating a polymer self-leveling floor is complex and laborious, especially when it comes to 3D coating.
Specialists engaged in the creation of polymer floors must have experience not only in pouring this type of solution, but also in other related construction work.
This requirement is associated with the step-by-step actions of the polymer self-leveling floor, which also include rough work with concrete.
A few years ago, polymer self-leveling flooring was used for pouring only in industrial buildings with high levels of mechanical or chemical influences.
Over time, the material has been modernized.
The high quality of the coating and the outwardly attractive appearance did their job, the polymer floor found its application in civil engineering. More recently, an amazing technology has emerged that allows you to create a 3D coating.
Today, without resorting to the services of masters, polymeric self-leveling floors are created by the owners in their apartment with their own hands.
Before proceeding to the diagram of the device of self-leveling floors with your own hands, it is worth getting to know their types and purpose.
Types and features of self-leveling floors
At the moment, in the construction market, self-leveling floors of two types are in high demand: polyurethane and epoxy.
Polyurethane self-leveling coating - industrial floors, which are used as floor surfaces in warehouse, hangar, production facilities.


They can also be used in parking lots, food processing facilities and industrial refrigeration plants.
Industrial polymer floors are endowed with a high degree of wear resistance, resistant to mechanical and chemical influences.
Due to their unique structure, industrial self-leveling floors can perfectly cope with deformation loads on the base.
Epoxy polymer floors (their other name is "liquid linoleum") - also have high strength characteristics and resistance to chemicals.
In addition, epoxy self-leveling coatings have a smooth surface and a wide range of colors.
The epoxy polymer material contains no solvents, so the coating does not emit any pungent odors.
This type of flooring is used for making floors of living quarters with your own hands.
The 3D coating technology stands apart. So far, this innovation is affordable only for a person with an income above the average. In an ordinary apartment or a simple private house, 3D coating is practically not found.
Preparation of the base for pouring the self-leveling floor
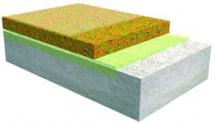
The technology of pouring a polymer coating provides for the following step-by-step actions:
- preparation of a concrete base;
- the device of the first - the main layer;
- application of the second - decorative layer;
- the third stage is the lacquer layer.
If 3D creation technology is used, then such a drawing is created according to a completely different scheme.
A properly prepared sub-floor base is the key to obtaining a high-quality self-leveling surface.
As a rule, epoxy polymer coatings are applied to a concrete base, which has the following requirements:
- flatness of the plane, complete absence of defects on the base (cracks and grooves);
- arrangement of waterproofing;
- cleanliness of the coating, absence of greasy oil stains;
- moisture content of the concrete base is not more than 4%;
- the screed device is carried out on the basis of cement not lower than M 200.
Therefore, if the base of the floor leaves much to be desired, it is recommended to apply a new concrete screed, under which the waterproofing material is laid with your own hands.
It will take several days for the base to ripen, after which you can start priming it.
A carefully primed base should have a surface that visually resembles sandpaper, which will indicate its high adhesive properties and will allow for ease of application of the polymer solution.
Decor elements and a set of necessary tools
In addition to the fact that epoxy polymer coatings differ from all other floor finishes with a high level of performance, they can also surprise with decorative properties.
Such floors allow you to create an original surface that has not been used anywhere else with your own hands.

To do this, it is enough to stock up on decorative elements, as which you can use sea pebbles and small shells, coins or multi-colored buttons.
Subsequently, you can lay out a beautiful mosaic of them.
The floor covering is not limited to the above-mentioned decoration method.
In some places, such a floor is designed in the form of an artistic system, which involves the use of stencils and the application of certain patterns with paints.
That is why the self-leveling floor can be safely called a bright representative of decorative surfaces.
We should also mention the 3D design technology. Of course, such a 3D coating is not cheap, but it is worth it.
Before installing a self-leveling floor, you must have the following set of tools and auxiliary materials on hand:
- a container with a volume of about 30 liters for preparing the composition;
- shoes with spikes (paint shoes) for movement on the treated surface;
- simple spatula, for use in hard-to-reach areas;
- spatula squeegee, which, with the help of an adjustable gap, will evenly distribute the mixture;
- whisk, low speed drill;
- aeration roller (with thorns), to rid the freshly laid layer of air bubbles.
Pouring a polymer self-leveling floor
The technology by which liquid linoleum is applied consists of two stages. At the first stage, the underlying layer is poured with your own hands, at the second stage, the front (top) coating is applied.
This is how liquid linoleum turns out.
The first coating consists of two components: fine silica sand and liquid epoxy resin.
The liquid polymer composition is distributed over the base in order to finally hide minor defects. Moreover, the thickness of its layer should not exceed 1.5 mm.
Work begins to be carried out not earlier than the primer dries out. It takes 24 hours for the liquid layer to dry.
Using the level, the deviation of the floor plane is determined.
If the substrate thickness at the highest point is to be about 2 mm, then an acceptable epoxy layer thickness at the lowest point is about 10 mm.
The finished slurry is spread over the base using a metal spatula, focusing on the high point of the floor surface. In this case, the thickness should be no more than the declared one.
The liquid solution per portion should be prepared quickly and according to the instructions, with a maximum time interval of use no more than 10 minutes.

It will take at least a day to polymerize the applied layer. If defects are found on the basis, then the bulk linoleum is cleaned with their own hands using abrasive materials.
After that, the process of applying the front finish is repeated again.
At the next stage, they proceed to applying the finishing polymer layer.
Polymer linoleum is poured onto the floor surface in strips, their thickness is leveled using a special tool called a squeegee.
In hard-to-reach areas in the apartment, a spatula is used to distribute the layer.
After the bulk linoleum is completely distributed over the base and covered the entire area to be treated, you need to walk over the surface with a needle roller with your own hands.

The technology provides for the use of an aeration roller so that the thickness of the polymer layer gets rid of air bubbles that negatively affect the quality of the polymer floor.
For additional protection of the polymer coating, bulk linoleum in the apartment can be treated with wear-resistant varnish. The thickness of the coating does not matter in this case.
In rooms with a large area, the technology for applying a polymer self-leveling floor with your own hands is slightly different from the flooring in small spaces.
Before pouring linoleum, the base is divided into several sections using expansion joints.
After the epoxy floors are poured, the expansion joints are sealed with a sealant specially designed for self-leveling floors.
In conclusion, it should be noted that bulk polymer floors, in addition to decorative functions, in the apartment also have a lot of advantages, one of which is sufficient thickness.


Therefore, such coatings are ideal for the "warm floor" system, have high strength and practicality.
In addition, they are endowed with the ability to respond to temperature changes without changing the structure.
Floors made of such materials are vapor-permeable, which means that the polymer coating breathes.
After reading the article, you learned a lot about polymer self-leveling floors that can be found in an apartment (even in a 3D version). But often industrial enterprises also choose a self-leveling floor.