A DIY clamp makes the craftsman’s work easier and saves him money. How to make a metal clamp with your own hands - instructions with photos Homemade wooden clamps with your own hands
Every craftsman who makes products and parts made of metal or wood cannot do without homemade clamps. Previously, such a tool was produced in various modifications, from specialized to universal. The main task is to fix the workpiece for processing and joining operations. Let's look at how to make a quick-release clamp with your own hands in various variations.
Angle clamp
This type of do-it-yourself metal clamp is designed for fixing two objects at right angles and connecting them to each other using any methods, however, the main purpose is as a jig for welding metal parts at the angle required for work. To make it properly , you will need the following components:

Corners should be welded at 90 degrees to metal or steel plates. We attach the worm-type structure by welding, and screw a pin-driver into the working nut in order to assemble a stop at the end. The stop must turn freely. Then we need to drill a hole on the back side where we insert a metal rod as a lever. The incredibly simple design and practicality of use have become the key to the popularity of such a clamp among everyone who works with metal and products made from it.
Carpenter's clamp
Such designs used in carpentry are of the following types:
- Standard clamp, which is the most popular or simple;
- In the form of a caliper for small parts and quick fixation;
- Self-clamping clamp for milling processes and working with workpieces of various heights.
The first type is made from two pine blocks, a locking nut, rods, threaded wing nuts and thrust washers. The manufacturing process is very simple:
- We cut out the working pliers from the bars, drill holes for the studs, taking into account a small amount of play;
- We screw in the studs and lock them using appropriate methods;
- We ensure alignment with nuts, made either in the form of wings or standard nuts for improved tension.
 The second option is used when prompt fixation of small parts is necessary. Production is carried out from small bars and thin-sheet plywood. Furniture nuts and collar pins act as a worm system. One stop is stationary; we attach it to the end of the guide rail, in which we cut out recesses to fix the moving mechanism.
There are both portable and stationary versions of this design, where grooves are cut for movement with the fastening of fixed stops. The clamp is a furniture nut, a hairpin and a knob. Due to this, you can work with workpieces of any size.
The self-clamping design has a lever with an eccentric at the rotating end. We turn it at a certain angle, a quick clamp is automatically obtained. The height is adjusted with a pin on the workbench. It is made individually for each matrix, depending on its purpose and the purpose of the work being carried out.
Pipe clamp
 Welding metal pipes end to end is a complex operation. It is considered simpler to weld the pipe to the finished system. The design for such cases is made of a metal angle and steel plates. The halves of such a device should be fixed using the traditional method, namely with threaded rods. As a result, you can get a fairly simple and effective design, which will greatly facilitate the work when welding pipes with various designs.
There are other types of designs, including cam mechanisms, tape and wire clamps, which can be useful for working with specific structures, including particularly fragile and thin ones. However, their production is the subject of separate master classes and articles on specialized resources.
Homemade clamps are indispensable assistants for any craftsman working with metal and wooden parts and products. Making them is quite simple and very exciting. Here it is important to follow the manufacturing technology, find the best instructions and videos. You can buy clamps, but they may ultimately not be suitable due to the specificity of the workpiece or work. This is why you should make your own clamps. Good luck working with various workpieces and making homemade quick-release clamps!
With its square nest design, making panels is a very common task in carpentry. In fact, trees of such thickness that you can cut out, say, a tabletop from them are not very common and there are not enough of them for everyone. Moreover, wide boards are often specially chopped into small pieces and re-glued. This greatly reduces the likelihood of their warping and cracking in their subsequent furniture incarnation.
The gluing process itself contains a number of important points - thickness, orientation of layers, glue thickness, which will be discussed later, but now we are talking about a mechanism for convenient compression of pre-prepared wooden blanks. This is a specialized clamp - vayma. To glue one board, use at least two clamps.
Here it should be said that there is a way to fasten workpieces with these “teeth”, which allows you to increase the gluing area and, accordingly, its strength. Practice, however, shows that since the use of “samovar” wood glue from dry tiles, the chemical industry has stepped far forward, and now, any gluing of even ends is stronger than the main wood. In any case, their coniferous varieties, from which shields are usually glued. Therefore, planing is quite enough.
So, the possible options.
Analysis of existing analogues.
The solution is “head-on”. It’s more convenient than gluing it directly on the workbench, but not by much. The only plus is the simplicity of the design. The base, however, must be very rigid, especially for any significant length.

When gluing, additional simple carpentry clamps and an even strip along the width of the board are required to prevent it from bending under load. However, with infrequent work, the design is quite justified; some complication of the technology can be easily survived.
Symmetrical design. In general, it logically follows from the previous, simple one. The end stops are movably attached to two flat sidewalls. When an axial force is applied, the sidewalls are simultaneously compressed.

Several options for end stops.


The blue version, in addition to painting, is notable for the fact that most of the details are standard - large hardware, a rectangular pipe.
There was even a do-it-yourself construction kit. “Tooths” for stepwise changes in the width of the workpiece will make it easier to push the mechanism onto the workpiece. It is proposed to make the most large and inconvenient parts to store and transport yourself from hard wood. Therefore, the set, presumably, costs a penny.

Practice, however, shows that no matter how careful you are, there will still be glue on the clamps, which can be peeled off from the pieces of iron without damaging them, even using very crude methods, including using an angle grinder. Wooden parts will either have to be protected with rough wooden gaskets, or simply changed frequently. Both are not very convenient.
Homemade metal analogue.

It can be seen that there are no special stop pads here, therefore, in order not to spoil the edges of the future shield with dents, a technological gasket made of wood is placed.


Less obvious clamp design – asymmetrical. The solution is ingenious, simple and elegant.

Our response to Chamberlain.
MASHKOV: Astronauts! Which zappa is here?
BI: There, a rusty nut, dear.
MASHKOV: Everything here is rusty!
BI: And this one is the rustiest.
Kin-Dza-Dza!
I offer my version of symmetrical clamps. The clamps are made without the use of stationary equipment - only with hand tools. Electric welding was used a little, but this was more due to the delight of a neophyte - in those days, he was just mastering the welding inverter and applying a new skill wherever possible.
The materials used were only standard hardware and two types of rolled metal - a rectangular pipe and a strip. Four identical wedges were made, with their help many different blanks were glued together, both of a purely utilitarian nature and for decorative ones.

The size of the clamps is for boards of moderate size, with a maximum width of approximately 700...750 mm, however, you can connect the clamps in pairs and glue large boards in two steps. The length of the shield depends on the number of clamps and with four pieces, it can reach 1...1.5 m. A number of symmetrical holes on the sides of the clamp allows you to easily rearrange its back stop, for convenient work when tightening narrow panels.
The design of the upper screw clamp is simple and technologically advanced; the materials for it are also standard rolled products and hardware, which is a big advantage in conditions of lack of access to machine tools.

The body of the screw clamp is made from a section of the same rectangular pipe 40x25, inside it there is an M12 extension nut.

The nut is held only by the threaded rod and the walls of the housing; the narrow side of the housing does not allow the nut to turn. When unscrewing the stud, the nut simply falls out of the body. The solution is very repairable - in case of thread damage, the elements are easily replaced with standard inexpensive hardware.

The back stop is also made from a piece of 40x25 mm pipe, held by two pairs of earrings. To compensate for the thickness of the “overlap,” two standard M10 washers are placed under one of the pairs, on each side (see photo below).


"Compensation" washers.
What was used for the job.
Tools, equipment.
A set of ordinary plumbing tools, a good vice, a hand-held electric drill. Marking tool - tape measure, square, scriber or alcohol felt-tip pen. For cutting pieces of iron - angle grinder. An electric sharpener will come in handy. Welding was used in some places, but it can be done without it. When working with electric tools, be sure to use safety glasses and headphones.
Materials.
Rectangular pipe 40x25, strip stud with M12 thread, bolts, nuts, M10 washers.
Let's get started. Sidewalls.
We decide on the required number of clamps and purchase the necessary materials.
We cut pieces of a rectangular pipe, mark them, and mark the centers of the holes. If you have a machine, you can drill from one side, right through, but if you work with a hand tool, it is better not to be lazy and additionally mark and drill the reverse side. It is better to drill holes in metal with a relatively large diameter at low speeds. It is convenient to work with a hammer drill in drilling mode, while its clamp is equipped with a small three-jaw drill chuck with a simple adapter. Often, such equipment is included in the hammer drill kit. High power and low speeds make working with such a tool very convenient.
After cutting and drilling, do not forget to dull the sharp edges.

We cut, mark, drill. I marked the rounded edges without any fuss - by applying a suitable coin. We grind the edges on a sharpener, dulling the sharp edges. With a magic file, in a vice.
Earring. 8 pcs. Material – strip 20x5 mm.

Screw clamp, back stop.
I cut the threaded rods to the required length and welded a long “connecting” nut to one end.
Sketch of a screw clamp, where: 1,2 – extension nut M12; 3 – body (pipe 40x25 mm); 4 – threaded rod M12.
If there is no access to welding work, the screwed nut can be drilled and a transverse rocker arm with stops can be inserted into it, in the manner of a vice gate. The rest is obvious.

A clamp is a device that allows you to tie, clamp or glue various surfaces. However, some craftsmen may not always have such tools available.
In such cases, homemade clamps will come to the rescue, allowing you to solve individual problems. A do-it-yourself clamp is relatively easy to make, but at the same time it is particularly reliable when assembled.
What is a clamp
Neither professionals nor amateur craftsmen can do without the use of this tool. It is used for carpentry, plumbing and any other types of work. The configuration of this device has many different options and is available for both universal and specialized purposes. Recently, new modifications have appeared on the market, which are quick-release devices. The force exerted by them can reach 400-500 kg.
All types of this tool have a common task - to fix workpieces when processing them or connecting them to each other.
Naturally, you can buy clamps in many specialized stores, but some craftsmen prefer to make them themselves. Homemade options are in some cases more practical and can be used for a specific and specific type of work, which cannot be said about many factory tools.
What elements does a clamp consist of?
Before you make a clamp, you need to figure out what structural elements are present in it. Among the main ones it is worth highlighting:
- frame;
- pressing jaws;
- movable element;
- lever arm.
The operation of such a tightening mechanism is ensured by a movable movable part, which has a thread. Thanks to this, the clamping device is attracted, pressing the desired object between the planes of the moving elements. The clamping force should be controlled using a lever.
Today, a variety of clamping devices are known that are manufactured as a lever system. But making such mechanisms at home is not possible.
For production that will be distinguished by quality and reliability, it is best to install metal parts. Welding can be used to connect them. Such a fastening mechanism will have a reliable design that allows for tightening elements that have different elasticity. The use of universal metal ties can be carried out to perform a variety of jobs, and their service life is longer than other materials.

Making a clamp with your own hands from metal
To make a homemade clamp, a metal channel must be prepared. Its long size must correspond to the maximum thickness of the products being pulled together. But to be on the safe side, it’s worth providing a small margin.
Marks should be made on the longitudinal center lines running on the channel. They will indicate the location of the holes into which the bolts will be inserted. Small pieces of a similar channel should be attached to the body of the bolts. This can be accomplished using welding. In addition, by welding you can cut holes with the desired diameter.
It is best to give the holes for the bolts a teardrop shape. This design will allow you to make landing nests with a tighter type of fit. The holes should look like keyholes.
After this, we take a small channel plate to weld the bolt to it. The size of the bolt head should be such that it can be installed in the socket without much effort. Having provided for all these aspects, the preparation of the necessary stops can be considered complete.

After this, it is necessary to use a screw with a large diameter. An eye is attached to one end, and a long section of channel is attached to the other. The best option for fastening is welding. Having completed these manipulations, you can fully use the tool.
We use a flexible insert
Often during the work process there is a need to tie parts that have a large surface. In such cases, flexible inserts should be used. For their manufacture, it is recommended to use fairly rigid materials, the surface of which will have a slight bend. For example, such a material is an ordinary metal plate having a thickness of 3 to 4 mm.
At the ends, such an insert is pressed on both sides with clamps to the plate to be glued. It must be positioned in such a way that through its surface it is possible to achieve uniform pressure over the entire plane of the surfaces being processed.
The use of flexible inserts together with a clamp will provide the opportunity for reliable gluing of any surface that has a large plane. Thanks to it, the whole job can be significantly simplified.
There are other ways to make a quick-release clamp with your own hands. But the use of this option is characterized by the greatest versatility. This device can be used when working with large items, such as doors, countertops, etc.
Wooden quick-release clamp
Homemade wooden clamps can be made in various versions. Below we will look at some of the most practical carpentry options.
Option 1
The simplest clamp made of wooden elements, which is used for carpentry work, can be made using the following materials:
- Wooden blocks (2 pcs.) made of soft but durable wood, such as pine. Due to the hard wood, imprints may remain on the product if held firmly.
- A furniture nut with a wood lock.
- Four steel studs. They must be made of expensive hardened steel grades.
- Wing nut (4 pcs.) . Their thread must match the thread of the studs.
- Four thrust washers.
The block is cut in the form of working pliers. In which it is necessary to drill in parallel the required number of holes for each stud, allowing for a small backlash. Each pin is screwed into a furniture nut and locked. Tight alignment can be achieved using wings or regular nuts with open-end wrenches (to obtain a strong grip).

It is noteworthy that by producing two identical sets of clamps, the scope of their use can be significantly expanded. In such cases, you can work with the tool as a carpenter's vice.
Option 2
To ensure quick fixation of small parts, you can use a clamp, which is similar to a caliper.
To make the device you will need bars and thin plywood. You will also need to provide a worm system, which will require the use of furniture nuts and a socket pin. On one side of the guide rails, a fixed stop is firmly attached. On the slats themselves, it is necessary to cut several recesses that secure the moving mechanism.
When moving the bracket to the desired value, to fix the part you need to make several turns with the crank. If you release the thrust mechanism, the carriage can be easily moved, freeing the part.
Option 3
In some cases, it becomes necessary to press the workpiece to the table surface. For this purpose, a self-clamping clamp is used, which must be equipped with a metal or wooden bracket.
The swivel end must have a lever on which there is an eccentric. When you turn it at certain angles, it automatically locks. The overall height can be adjusted with studs that are attached to the device. By turning it to a certain angle, we get an automatic quick clamp.
To perform mass milling, two such clamps must be secured to movable templates. These types of quick-clamping clamps should be made individually, tailored for each matrix, or by rearranging them onto new substrates when cutting out subsequent forms.
Manufacturing of pipe clamps
It is known that end-to-end pipe welding requires special skill and ability. It is quite difficult to connect metal pipes in this way. When welding a piece of pipe to ready-made systems that are fixed in space, the level of complexity is significantly reduced. But to weld a freely lying piece of workpiece, the presence of assistants or special devices is required, which are clamps for welding pipes.

To make a pipe clamp you will need a metal corner and steel plates. The halves of homemade pipe clamps are secured with threaded rods. As a result, you can get a very simple and effective design.
You can learn more about how to make a clamp with your own hands from the video tutorial.
Video “Do-it-yourself clamp. Detailed manufacturing process"
The video presents a detailed process for making a homemade clamp.
The benefits of such a tool as a clamp are known to all craftsmen. An irreplaceable item for carpentry and plumbing work. Clamps are also often used by welders, builders, car mechanics and home craftsmen.
There are many designs and sizes of clamps, but basically they are all similar in that they must be tightened by hand - tighten the tightening screw, after which the objects on which the clamp is installed are securely fixed. It should be noted that this is a tedious task, tightening and unscrewing each time a clamp screw to fix or release an object. On the Internet I found a version of a clamp with automatic fixation. Such a clamp does not need to be tightened by hand on the object being fixed. One click on the upper movable stop of the clamp is enough and the object will be securely pulled to the edge of the workbench, for example, a wooden block.
It will also not be difficult to release the block; to do this, you need to press the upper stop again and the “grip” of the clamp will immediately weaken, the block will be freed from the clamp.
How to make such a clamp?
It's not difficult to do. You will need a metal strip and a size 20 profile pipe.
The clamp consists of two stops, a lower fixed one and an upper movable one.
Bottom stop
We vertically weld a profile pipe to a piece of metal strip from one edge. We weld an overlay made from an old flat file onto the strip. This completes the manufacture of the bottom stop.
Upper stop
Making it will be a little more difficult. Cut a strip of the same length as that at the bottom stop. Using a mini drill, we cut a square hole from one edge of the strip section. The size of the hole should be slightly larger than the size of the profile pipe along which this segment (upper stop) will move.
The piece with the square slot must be clamped in a vice and bent slightly from the side of the square hole. This is the design feature of the clamp, thanks to which the upper movable stop is fixed on the vertical profile pipe.
We weld the plate crosswise to a section with a square hole, and drill regular round holes for bolts along the edges of the plate.
We apply the file plate to the plate with round holes. We make marks on the plate along the holes of the plate.
We weld the bolts to the marks (the caps of the bolts should be cut off so that only the thread remains).

The upper support blanks are made, we connect them together. We install springs on the welded bolts, insert the bolts into the holes of the plate, and screw on the wing nuts.
The top stop is assembled.

We connect the lower and upper stops - insert the profile pipe into the square hole of the top stop.
The homemade product is ready to use!
How to use is described at the beginning of the article. This is what the emphasis looks like on a clamped block. It holds quite tightly, you can't loosen it with your hands.

The springs press the upper plate with a square hole from one edge, the plate becomes skewed and locks on a vertical profile pipe. When pressed again, the plate becomes straight and can again be moved along the pipe.
Self-clamping clamp: how to have fun
zen.yandex.ru
A tool for quickly securing objects!
From a steel strip 30 mm wide, we saw off two sections 100 mm long.
At the end of one plate we place a steel square with a wall width of 10 mm. We outline the square with a felt-tip pen. We drill holes in the corners of the outlined square, then use a grinder to cut out straight walls - connecting the drilled holes to each other. As a result, we should get a square-shaped hole into which the tenth square will be inserted.
It is more convenient to saw through the straight walls of the hole with a mini drill with a cutting disc. Then finish it with a flat file.
We clamp the plate with a square hole in a vice (between the jaws of the vice you should clamp exactly the end of the plate in which the hole is).
Now, along the clamped edge of the plate (where the plate protrudes from the jaws of the vice), we bend the plate at a small angle - 10 - 15 degrees.
Insert a steel square into the hole in the plate.
We weld the square to the plate.
We weld an additional overlay cut from a strip of the same size as the plate itself onto the free end of the lower plate.
On another similar overlay, we install a bolt vertically in its center (with the head to the plate), and weld the bolt to the plate.
At the free end of the plate, which is bent at an angle and is the top one, we drill a hole with a diameter of 8 mm for a bolt welded with a head to the lining.
We put a compression spring on the bolt, insert the bolt into the drilled hole in the top plate, and screw on the wing nut.

The wing nut is needed for ease of adjustment - spring compression.
The tool is ready!
We ended up with a self-clamping clamp, which does not need to be tightened with a screw, like with conventional clamps.
We place the object to be fixed on the edge of the workbench and install a clamp on it.
Press on the top plate.
The plate with its curved end with a square hole moves downwards along the vertical square.
The second end of the plate with a plate, a bolt and a spring attached to it, on the contrary, pulls the plate upward.
Thus, the upper plate is engaged (locked) by a square hole, which is made to skew, on the surface of the square.
The fixed object is securely pressed against the workbench!

To release the object from the clamp (in our example it is a wooden block), just press the edge of the top plate again and lift the plate up square with your other hand.
Quick-release clamp - homemade
In the arsenal of carpenters who perform a large amount of gluing work, there are cabinet clamps such as Bessey KR Revo, GROZ clamps, quick-release or pipe clamps.

It’s difficult to imagine a replacement for a professional carpenter’s clamp, but what to do when you don’t have a clamp at hand, have nowhere to buy it, or can’t order delivery.
A solution to this problem is offered by a Japanese woodworking master and part-time blogger from the YouTube channel. Self-Build. He showed his vision of how to create craft DIY clamps in a new video.

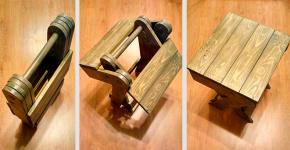
The idea is to use the most ordinary materials for manufacturing: scraps of wooden beams of various sizes and simple fasteners - such as perforated plates and bolts with nuts. The clamping mechanism of the clamp will securely fix the parts, and at the same time, it can be easily adjusted to different lengths of the workpieces.
How to make a powerful clamp with a quick clamp

A clamp is a fastening device used to hold and secure objects tightly together to prevent any movement when internal pressure is applied. There are many types of clamps available on the market for many different purposes. Some are temporary, used to hold components while securing them together, while others are intended for permanent use.
The floating jaws of the Kant twist clamp remain flat on component surfaces even when they are not parallel. The cantilever design eliminates twisting of standard C-clamps, and the built-in V-block securely holds round workpieces. Get all the benefits of conventional C-clamps and parallel clamps in one metalworking clamp. Kant Twist Clamps are ideal for welding and fabrication.
Kant twist clamps provide the best clamping force and long reach without walking. The sleek design eliminates two of the most annoying aspects of the C-clamp: jaw rotation and country of origin. The Kant swivel clamp has long been a favorite of welders because they won't turn or walk as they are tightened.
These types of clamps are easier to use and transport.
Parts used
- Metal plate 6mm thick
- 3/8” bolt (5” long) with nut
- 3 x No. ¼” bolts (2” long) and 8 x No. nuts
- Len bolt (length 1.5")
- 2 ¼ bolts (1/2" long)
- 2 ¼” bolts (3/4” long)
- Round metal piece with a diameter of 22 mm (length 20 mm)
- The same piece with a diameter of 22 mm (length 32 mm)
- M5 hex bolt with threaded end nut (3" length)
- Wooden parts
How to do
First of all, I draw the design of the jaws on a metal plate. After drawing, confirm the drawing is correct by measuring between the points shown above. Some variations are quite acceptable.

I then cut all the pieces out of the metal piece according to the drawing using an angle grinder.

After cutting all the parts (jaws), the next step is to drill holes on these jaws to properly assemble all the cutting jaws.

A 22mm diameter round metal piece is 20mm in diameter and 32mm long. Drill a 5.15mm hole on both pieces of metal and tap the inside of that hole using a set of ¼” tape.

Also drill an 8mm hole on the round face of both round metal pieces and tap this hole using a set of 3/8” tape.
Now the next step is to assemble all the parts as shown in the picture. I also attach wooden rotating clamp pads between the long and short jaws. I painted these wooden rotating clamp blocks in black.

Next step, make the handle of this clamp. This is the last step in making the edging twist clamp. For the handle I used an M5 bolt with a threaded end with a nut (3" long). I attach this bolt to the end of a 3/8” bolt (5” long) as shown in the picture.


The Kant swivel clamp is now ready for use. This clamp is used in both metalworking and woodworking.

advantages
Very durable
Makes reuse much easier
Apply maximum pressure with less effort
Comfortable handle for ease of use
For better understanding, watch the video below.
A clamp is an auxiliary item for gluing parts together; it is used to clamp them between each other or during processing. You can make this important detail yourself. This article provides examples of how this can be done.
Making a clamp with your own hands
- Material: wood, metal.
- What it consists of: the main frame, a movable clamp element (clamping jaws), a lever and a movement element.

In order to make a homemade wooden clamp, you need to thoroughly prepare and become familiar with its structure.
To make a clamp yourself, you will need: threaded rods, boards (plywood), nuts and slats.
Let's start the technical process:
- Take two 200mm studs and two 120mm studs with a diameter of 5mm.
- Prepare nuts that are the right size for the stud.
- Place plywood boards 15*150*200 millimeters each and two pieces of slats 20*40*240 millimeters each.
For a wooden clamp, plywood made from birch, ash, beech or oak is most suitable.
- You need to make two holes in the beam (for the stud and nut).
- Having placed a beam attached to them, fixed to the tabletop, install plywood boards (the plywood should be lower than the beam itself by about 3 centimeters).
- You need to make a hole in the resulting blanks and then insert the pins.
- Attach a board to the bottom beam, and board No. 2 will act as a clamping component.
- In order to secure the weapon, it is necessary to select short pins, and the movement of the formation will be determined by long pins.
- The nuts play a lever role, fixing the moving part and regulating the clamping strength.
There are different types of metal clamps. But we will consider only two options.
Clamp for fixing various workpieces

Let's say that you needed to glue the workpieces until they were completely cured. But you understand that this will take quite a lot of time. Trying to hold it with your hands is pointless, since complete hardening depends on the force applied well to the part. You definitely won’t achieve this with your hands!
Let's get started:
- Take two plates of thick strip metal.
- Drill holes at the ends of the blanks so that when placed on top of each other they coincide.
- Make threads for the bolts in the holes.
How to use?
Place the workpiece between the metal plates. Screw in the bolts until they stop, tightening them with a wrench and making sure that the clamp presses the parts evenly on both sides.
In order to create such a clamp you will need: several monolithic frames of a hacksaw for metal, two small metal plates, two studs, two nuts and screws.
Why monolithic?

Clamps made from old frames cause some inconvenience. After installation, you will have to additionally strengthen the junction of the parts. If parts are clamped tightly, the frame may lose its shape. So there can be no question of the strength of such a structure.
The main thing is to understand the principle of operation of a monolithic clamp. To ensure excellent tension on the part, screws are used for this. It would be better to replace the screws with studs with threads suitable for them and weld metal plates onto the ends of such studs.
Note:
- If you have a different structure made from frames, then its ends should be cut off and the nuts should be attached by welding (the nuts must have perfect threads).
- Screw the locknut to the stud so that they do not diverge.
Use the tips listed above and this will help you in any situations where you urgently need a clamp.

An angle clamp is a necessary assistant for construction craftsmen in gluing workpieces at an angle to each other.
This clamp is very convenient to use if you make any furniture, frames, or timber from wood alone.
In stores, most clamps have one angle - 90 degrees. This is not very convenient, since in some situations a clamp with a non-standard angle is required. Therefore, if you need frequent use, it would be appropriate to make your own corner clamp.
Let's look at two ways to assemble a corner clamp: for metal and for timber.
Clamp for metal
In the future, the structure you have assembled can be used to work with metal-like elements, since the strength of wood products is much lower.
An industrial aluminum carpenter's clamp often fails. This is due to the significant effect of temperature on mechanical forces. Electric arcs also have a negative effect on aluminum.
The best material for making a clamp yourself is metal. But in the manufacture of such a clamp it is necessary to take into account several features, although the use and principle of the device are the same for everyone.
Let's start implementing the corner clamp:
- Take metal (sheet) - 10 millimeters thick;
- Prepare a corner of the size you need (for fixation elements);
If you have a large corner and need to save space, then cut off the shelf adjacent to the Basis. For better fastening, use electric welding.
- Screw clamp. For this device, it is better to use nuts attached to each other (prepare 2-3 pieces);
- Make a bracket. Its thickness should be approximately 30 or 40 millimeters with a threaded hole in the middle.
To be able to change the bracket if it breaks, it must be bolted.
- Make a guide for the base of the internal movement, cutting out a groove 10 millimeters wide;
- Drill a hole in the upper base by inserting a bolt into it;
- Next, attach the nut and washer from below;
To ensure free movement of the bases, do not allow the threads on the bolt to reach the head.

In the future, the structure you have made can be used for gluing plastic, wood beams, frames and other materials.
Let's get started:
- Prepare a sheet of plywood (chipboard can be used) with an even 90 degree angle.
- From the top of the right corner of the plywood/chipboard, insert two beams with self-tapping screws at intervals of 5 centimeters at an angle of 90 degrees.
- It is important that the installation is accurate. The properties of the corner carpentry clamp you assemble completely depend on this.
- Lay the blanks on the plane of plywood/chipboard and fasten them together, pressing them with a simple clamp
To provide access to the edge joint from the bottom side, it is necessary to remove the triangular limb of the protruding corner.
Screw clamp. You can use a bolt/stud, three pieces of nuts, and you will also need a handle and a bracket. The base type should be triangular. With full compression, the end of the pin should protrude at the edge of the base.
- On the lower basis, draw a bisector from a 90 degree angle.
- Glue the nut with the screw turned out with a staple at a distance of 20 millimeters from the point of intersection with the hypotenuse.
- Make a bracket from metal (it is better to use thin metal), bending it according to the model of the nut.
- At the edges of the screw clamp you made, you need to drill holes for the screws.
- Point the bolt head at a 90 degree angle.
- On the other side of the bolt, strengthen the handle with nuts, having previously made it from a metal plate with a hole in the middle.
The carpentry clamps you make will significantly save you money and precious time, allowing you to create a more reliable and high-quality design.
In order to make a clamp yourself, there are many articles on this topic. The main thing is to decide what you will proceed from when building it and what it will be intended for. Decide on the dimensions, prepare all the necessary details and start creating the clamp you need.
Homemade clamp for shields
The basis was taken as sections of steel angle (three pieces) - 45 * 45, and their length was 600 millimeters. Glue a block of wood to the corners of the segments with screws. In this corner and beam there should be holes every 100 millimeters. Insert a bolt with an angle into the resulting holes, and glue it at the bottom using a steel plate with a nut (M8 thread).
Additionally! Attach two eyes to a homemade clamp. Insert a block into the horizontal slope for pressing and better gluing of the workpieces. Take a 55*55 beam with a slightly longer tool length. In a timber with a clogged furniture nut (M10 thread), drill a hole 150 millimeters from the middle. This design will allow you to press the bars when connecting any shield.
Now you can safely choose the option you like and begin fruitful work!