Folding stool made of wood. DIY folding stool made of wood drawings
A stool is a familiar, comfortable and compact piece of furniture that is most often used in the kitchen or country house. Chairs purchased in a store and made from wood composites do not always meet all consumer requirements in terms of aesthetics and practicality for such conditions, and they are also quite expensive. This is why the question arises of how to make a stool with your own hands from wood so that it is reliable and lasts for many years.
Anyone who started making furniture with such a simple product as a stool, having become skilled at it, may later want to make more complex and large-scale structures, for example, a table, a cabinet, or something, which will save a decent amount of money for the family budget.
Popular types of stools
Even such a simple piece of furniture can be made in different variations and used for different needs. To decide which model you would like to obtain as a result of the work, you should consider several similar products.
Children's stool
This stool option will not be out of place in any home, as it is convenient not only for children, but also for adults. It is light in weight and compact in size, so it can easily be moved to any convenient place in the yard or house where it is needed at the moment, and even a small child can move it.

It is best to make such a model from a solid board, which should be well processed first. If you want the stool to be very light, then dry linden is used to make it, which has a beautiful textured pattern and very little density.
If the thickness of the board taken for a small stool is at least 25÷30 mm, then only three main parts will need to be made - these are two legs and a seat, which can be fastened with dowels, even without the use of additional reinforcing elements.
All parts of the product must not have sharp corners or burrs. The workpieces must be rounded and well sanded so that there is no risk of injury or splintering.
This piece of furniture can be used not only for sitting, but also as an ottoman, placing it under your feet - this is especially often used by older people. Therefore, by making such a stool, you can please both kids and grandmothers, showing them your care.
Stool - box
It's common to run out of space for small items in the kitchen or workshop, and this stool model is perfect for clearing out some of the currently unused items on your counter. The boards that form the walls of the box strengthen the entire structure well and at the same time create a box where things that should always be easily accessible can be placed.

For example, women can use such a box to store needlework, as it is spacious enough and there is room in it for balls of yarn and knitting needles, as well as everything necessary for hand embroidery or sewing.
The male half will calmly hide in a box under the seat some items of his home “arsenal” that are most often needed in the household - a hammer and nails, pliers and other not too large tools.
To make such a product you will need a well-processed timber 50×50 mm, a board 200÷250 mm wide and 20÷25 mm thick, plywood for the bottom of the box and fasteners.
Folding stool
A folding stool is suitable for small apartments with small kitchens or for small country houses. It can be kept constantly unfolded, and, if necessary, put away in any closet or niche between the furniture and the wall, since when folded its thickness will be approximately 60÷80 mm, depending on the material chosen for manufacturing and design features.

The seat for this stool model can be made round or square, but each option has its own design for attaching the legs. The legs for such a stool are made of boards or thick, 20÷25 mm high-quality plywood. The base of the product consists of two frames, one of which must fit freely into the other. The frames are fastened together on one side and the other with special screws with bushings or a pin axis, which allows the structure to fold.
Step stool
Another option for a stool that can serve not only for sitting, but also act as a stepladder. This model is always useful both in a private house and in an apartment. For example, it is difficult to do without a stepladder during general cleaning, and without it it is not easy to get the right thing from the top shelf of a high cabinet.

When folded, this design will be no different from a regular stool, since the steps will be under the seat. Turning a stool into a convenient staircase is not difficult - you just need to pull the top of the temporarily inverted steps and carefully place them on the floor. The result is a reliable and stable stepladder, which can also be used as a comfortable footrest when sitting on a stool.
To make this model, you will need massive boards for the seat and steps, as well as thick plywood for the legs and a stringer for the steps.
Stool for the garden
If you plan to use a stool in a summer cottage according to the type, only in a portable version, then you need to prepare a wooden beam for it, since plywood will not work in this case. It will begin to delaminate under the influence of moisture, and the product will soon be hopelessly damaged.

Larch or oak is best suited for manufacturing. If you choose other wood, then it will need to be thoroughly impregnated with moisture-repellent compounds and then painted. Moreover, the process of pre-processing of lumber is carried out even before the structure is assembled.
Furniture used outdoors differs from that found indoors in that between the parts from which the seat and back are assembled (if a bench is made), gaps must be left so that rainwater does not linger on their surface, and parts were ventilated faster.
Stool drawing
Having decided on the model of the future product, a sketch drawing is drawn up, according to which all structural elements will be manufactured. When drawing up a drawing, all the necessary dimensions are immediately calculated and marked on the drawing. It is not at all necessary to make a diagram, observing all the canons and rules of drawing science - even just drawing it by hand will be enough. The main thing is that you can visually evaluate what will happen in the end, see all the parameters of the necessary materials and the principle of their connection.

In the presented diagram you can see the names of some of the parts that are included in the design of the stool - these are drawers, legs and “crackers”. Let’s talk about them in a little more detail, so that in further descriptions it will be clear what we are talking about. All these parts are necessary to hold the structure together and give it the required strength.
- Tsargi are bars or boards located under the seat of the stool and fasten the legs together with tenon joints, creating a strong support for the seat.
- The leg is an element designed to increase the stability and rigidity of the structure. It is located in the central or lower part of the legs (according to their height) and also fastens them together with tongue-and-groove joints.
- “Rusks” are bars, boards or metal corners installed diagonally on the inner corners of the structure under the seat and secured to the drawers and legs.
When drawing up a drawing, it is important to calculate not only the parameters of all visible parts of the structure, but also the size of the internal connecting elements, such as tenons cut at the edges of the drawers, and the grooves in which they will be installed, selected in the legs of the stool.
Tools for work

Without carpentry tools, it is simply impossible to make any piece of furniture from wood. Professional furniture makers have workshops fully equipped with special expensive machines. But just to try yourself as a carpenter, of course, you shouldn’t immediately purchase professional equipment, however, you will still have to prepare some tools.
The list of the most popular tools for working with wood is as follows:

- It’s great if the farm has a set of cutters that will help you process the edges of boards, timber and plywood, drill holes of different sizes, or carefully select grooves and grooves on any of the parts.

- To get rid of tedious operations, you will need a sanding machine with interchangeable wheels of varying degrees of grain to give the wood surface a smooth finish. This work can be done manually, but it will take much longer.

- Electric jigsaw. This tool, of course, can be replaced with a hand hacksaw, but after sawing the boards with it, the edges of the parts will not turn out neat, and you will have to work hard on them using a router. Again, cutting the material by hand will take much longer.

- will be necessary not only for screwing in fasteners, but also for drilling holes in parts. Therefore, it is necessary to prepare a set of screwdriver bits and drills of different diameters. Instead of a screwdriver, you can use any drill and a set of hand screwdrivers.

- Clamps of various sizes. If you want to make a really high-quality and durable thing, then you must have clamps on hand, since when gluing boards into a solid panel or individual parts together, they must be strongly compressed and left in this position for a fairly long time, and besides these no other instrument can do this.
- You always need a hammer and chisels of different sizes. Sometimes you have to resort to using a plane - it can also be manual or electric.
- Measuring and marking equipment is being prepared - tape measure, construction square, wooden ruler 500÷1000 mm, simple pencil, surface planer, etc.
In addition to these tools, to carry out the work conveniently, you will need a fairly large and durable table - a workbench.
Making stools
folding stool
Traditional simple stool

The designs of even the simplest products may differ from each other in some elements, which, as a rule, are intended to give the stool additional strength.
Materials for production
A simple model of a stool looks like this and consists of parts indicated in the drawing by numbers:

1 - Legs.
2 - Stool legs.
3 - Tsargi.
4 - Seat.
5 - Connection elements - supports for installing the seat.
6 - Connecting grooves.
7 - Connecting grooves.
To make traditional stools with a height of 500 mm, a seat of 450x450 mm and straight legs, the following parts will be required:
- Four well-processed, smooth beams for the legs, cross-section 50x50 mm, height 485 mm. They can be straight or have narrowed cuts on the inside.
- For the seat you need to prepare two or four boards 12÷20 mm thick, 450×225 mm or 450×112.5 mm in size, or a plywood panel 450×450 mm, 12÷20 mm thick.
- To give the stool strength, in different types of structures 4 legs and 4 drawers can be used, made of timber with a section of 30×30 and a length of 441 mm, or only drawers - 4 boards, with a cross-section of 30×60 and a length of 441 mm.
- Additionally, connecting elements can be used in the form of small pieces of bars fixed on the inside, in the middle of the drawers, but you can do without them if bars of sufficient thickness are taken for the base under the seat.
- 30×30 mm timber for making “crackers” if they are intended to be installed.
- Wooden dowels (chops) for securing the seat to the finished base - 4 pieces, 30 mm long and 8÷10 mm in diameter.
- Self-tapping screws.
- Wood glue.
Assembling the stool
| Illustration | |
|---|---|
 | The first step, in order not to waste time, is to glue the boards for the seat if it will consist of several elements. To do this, well-fitted and polished end sides of the boards are coated with glue, connected to each other and tightened with clamps. This design should dry thoroughly, and while it is setting, you can start assembling the frame base of the stool. |
 | Next, the bars for the legs are prepared. They must have perfectly even cuts and be the same in height, which can vary, depending on the wishes of the master, and range from 450 to 500 mm. |
 | The next step is to mark the legs and determine the location of the connecting grooves for installing the tenons of the legs and drawers in them (or just the drawer, if the legs are not included in the design). The holes are selected using a router or chisel. |
 | Next, the edges of the drawers and legs are processed. Tenons are cut out on them with a width, height and depth that is 1÷1.5 mm smaller than the holes in the grooves in the legs intended for them. The tenons should fit fairly freely, but still fit tightly into the grooves. |
 | After this, the legs are assembled in pairs, fastened together by means of legs and drawers - their tenon parts are glued into the grooves of the legs. Each of the resulting frames is tightened with clamps. Then, after they have dried, the legs, tied in pairs, are also connected by drawers and legs into a single structure for the base of the stool and again compressed in clamps until they are completely glued. After the glue has dried, all connections are additionally secured with self-tapping screws. |
 | If it is intended to strengthen the stool with “crumbs”, then they are screwed to the sides and the leg of the stool. This element, installed flush with the top edge of the drawers, will create additional support for the seat. |
 | The next step is to mark and secure the stool seat. To do this, glue is applied to the back of the panel according to the markings, and then it is laid on the finished base of the stool, leveled and pressed. Next, in the corners, through the seat panel, one hole is drilled, the diameter of which should be 1-2 mm larger than that of the prepared dowels, and the depth should be 5 mm less than their height. Glue is poured into the hole, and then the dowels are driven in. Exposed glue is immediately wiped off. The top of the dowel is cut off using a router, and this area is sanded smooth. Additionally, the seat must be tightened with the frame using clamps until the glue dries completely. |
The adhesive can be designed for different drying times, and this is usually indicated on the packaging by the manufacturer. It is possible to operate the products only after the specified period has completely expired.
Folding stool

The folding version of the stool is convenient because, thanks to its compactness, it can not only be stored in a small living space, but can also easily fit into the trunk of a car for transportation to the country.
children's stool
Materials for production
To make such a stool model, you will need slightly different materials than those used for the traditional product. Thus, some craftsmen prefer to purchase ready-made furniture panels made from natural wood. They are excellent for cutting design parts, since, having cut them out of this material, all that remains is to process their edges.
For the presented version of the stool, the master required a panel measuring 1120×400×24 mm, and in addition to it, additionally, the following materials:
- A stud with threads cut on both sides and end nuts, 250x8 mm in size, for through installation, or a stud with blunt ends for installation in blind grooves.
- Furniture butterfly hinges size (when opened) 350x400 mm - 4 pieces.
- Dowels or choppers 50×8 mm.
- Wood glue.
- Stain and clear varnish or tinted varnish.
- Self-tapping screws 15÷20 mm long.
The dimensions of all structural parts are clearly visible in the presented drawing.

The folding stool consists of the following parts:
- The seat is round, with a diameter of 350 mm.
- The frame is 166 mm wide, consisting of two bars measuring 500 × 48 × 24 mm, and a cross member 122 mm long.
- Frame 122 mm wide from two bars 500x48x24 mm with cuts at the upper ends at an angle of 30 degrees, and crossbars 70 mm long.
Making a stool
Processing of parts and their assembly is carried out in the following order:
| Illustration | Brief description of the operation performed |
|---|---|
 | It must be said that the seat can have a round or square shape with rounded corners, at the choice of the master. In this case, a round seat with a diameter of 350 mm was chosen. For the convenience of folding the stool, a curved hole should be made in the upper part of the seat, approximately 120 mm long and 20÷25 mm wide, so that it is convenient to grasp it with your hand. It can be cut using a router or drilling two holes with a diameter of 20÷25 mm at a distance of 120 mm from each other, and then connecting them by sawing out the wood between them using a jigsaw, making two cuts. In order for the hole to be neat and smooth, its edges must be processed immediately. |
 | Processing the edge of the seat and the inner edges of the “handle” hole is most often done using a semicircular cutter. But if this tool is not available, then they are put in order by first using a file with a large notch (rasp), and then sandpaper of different grain sizes, gradually bringing the wood to smoothness. |
 | The next step is to process the prepared bars of the legs. In two of them, which will form the outer frame, you need to cut a groove 180 mm long and 8 mm wide, and 42 mm deep, along which the pin will go. Sometimes the grooves are made through - it is for this case that a stud with threads at the ends is selected, onto which a special cap nut is screwed. In the other two bars, according to the diagram, through holes with a diameter of 8 mm are drilled through which the pin will pass - these elements are intended for the manufacture of a narrow frame. |
 | The grooves are cut using a router, or holes with a diameter of 8 mm are drilled along the intended line, which are then combined into a common groove using a jigsaw. The work is carried out on a special machine, or the beam is rigidly fixed in a vice, and then holes are drilled in it using a drill or screwdriver. |
 | The bars that will form the inner, narrower frame of the stool must be carefully sawed off at the top at an angle of 30 degrees - this process can be done on a machine or using a miter box. The corner must be cut perfectly accurately, so this work cannot be done “by eye”. On the lower part of the legs, it is recommended to slightly round the corners and edges. |
 | The crossbars installed between the legs are mounted on dowels, which are glued into the drilled holes. This process can be done in different ways. Most often, the jumper is first installed with glue in the place intended for it, the legs are compressed in clamps, and left to dry completely. Then, through the outer side of the legs, through holes are drilled, which go deep into the end sides of the jumpers by at least 20÷25 mm. After this, dowels are carefully driven into the holes using glue. Each side of the jumpers will require two fasteners. |
 | On the back of the seat, according to the drawing, the places where the butterfly loops will be attached are marked. Then, the loops are laid on the marked place and outlined. Further. From this place, a landing “nest” is selected with a depth equal to the thickness of the loop, that is, when secured, the loop should be flush with the main wooden surface. |
 | Next, the loops are secured on the upper end sides of the legs. They are screwed on with self-tapping screws, the caps of which must be in the same plane as the surface of the hinges. The next step is to attach the second side of the hinges to the sockets prepared for them on the back surface of the seat. |
 | To make the structure look neat, it is recommended to cover the pin with a tube carved from wood. You can replace the wooden version of the element masking the pin with a plastic tube, since turning this part out of wood is not so easy. The length of the tube should be 68 mm, the internal diameter 9 mm, the thickness of the tube walls can be from 2 to 10 mm. |
 | Next, the pin is inserted into the narrower frame through a prepared decorative tube, and its ends are inserted into the grooves of the outer, wider frame, along which they will move when folding and unfolding the stool. |
 | It must be said that a folding stool may have a slightly different design. It uses not one, but two studs, and instead of an internal frame, a solid board is fixed, and it serves as an equally reliable stool leg. The second, outer frame has a jumper at its very bottom, at such a level that when the structure is folded, the leg board fits neatly into it, creating one panel. The fastening of such legs to the seat is carried out in exactly the same way as in the first version of the folding stool. |
 | For comparison, you can see what one and the other model of the finished product looks like, and choose the one you like best for production. It is probably not difficult to understand that the second design option is simpler to implement. |
Stool with wicker seat
A stool with a wicker surface can be made in a low or full, high version - it will be comfortable in any case. Its seat can be made of various materials - durable fabric, belts (including old car seat belts), cord and even plastic-braided cable. It is quite possible to come up with your own version.

Materials for production
The frame for such products is mounted, in principle, according to the same scheme, however, if a high stool is made for an adult, then the design should be more reliable, that is, it is advisable to strengthen it with durable drawers and legs. We must not forget that in a traditional stool the seat is also a reinforcing part of the structure, and its wicker version itself requires a particularly strong frame.
So, for the frame of a rectangular stool measuring 500×400 mm, you will need:
- Wooden blocks 50x50 mm for legs - their height can be selected individually.
- Bars for drawers and legs, section 50×25 mm.
- Metal or wooden corner elements - “crackers”.
- Self-tapping screws.
- Leather or synthetic belts, or durable rope in one or two colors.
Let us immediately note that the model shown in the example has a fairly large seat, which reduces the overall strength of the stool. Therefore, it may be more reasonable to make this structural element a little smaller, for example, 350x300 mm.
Find out by reading the options from “classic” to “transformer” in a special article on our portal.
Making a stool
The manufacture of such a stool is carried out in the following order:
| Illustration | Brief description of the operation performed |
|---|---|
 | The structural elements of the stool are cut from the bars prepared for work. The legs can range from 300mm to 500mm in height and the model shown is 400mm high. In order for the legs to be stable, their end parts must be perfectly flat. Therefore, they should be marked using a construction square, and preferably sawed using a circular saw, which will give a perfect cut. |
 | The next step is to prepare the bars for the legs and drawers. In this case, 4 beams with a length of 450 mm and 4 beams with a length of 300 mm are cut. These elements should also have smooth edges for a snug fit to the legs. |
 | To make holes for fastening structural elements at a certain angle, a special tool (jig) is used that can guide the drill bit in the desired direction. This device is fixed on a block, and two holes are drilled through its guide holes on each side of the wooden part. After all the elements of the stool are ready, they should be thoroughly cleaned - this process is best carried out before assembling the structure, as it will be easier to see all the problem areas on the wood. |
 | This photo shows what such holes look like inside the beam. |
 | Additional fastening of the drawers and legs with the legs can be done using tongue-and-groove fasteners, and then, for maximum reliability, also with metal corners - “crackers”. These parts need to be selected according to the width of the wooden blocks. |
 | If the first fastening option is chosen, using self-tapping screws, then the assembly and fixation of all parts of the stool look as shown in the presented photo. |
 | At the end of the assembly, the stool frame should be strong and stable. When leaning on it, it should not swing. |
 | If it is planned to be painted or tinted, then this process is carried out before the seat is made. |
 | To equip the seat for the model shown in this example, 17 leather belts, 35 mm wide, were required. As already mentioned, seat belts used in cars can be used instead. The straps are screwed with two self-tapping screws measuring 10 mm at a distance of 9 mm from each other, onto the wide side of the beam extending inside the stool frame. The length of the belts must be measured in advance using a tape measure, “traversing” the entire path of the belt with its flexible tape. First you need to secure the belts, which will be located along the length of the rectangle. Having secured the belts on the inside, they go around the beam, pull it through the seat frame to the opposite king beam, go around it and also fasten it on the inside using the same screws. |
 | After the longitudinal belts are secured, the belts that will intertwine the already tensioned elements should be secured in the same way. They are screwed onto one of the long sides of the frame. Then, each of the belts is passed transversely through the longitudinal belts, in the form of weaving. After this, they are also wrapped on the inside of the opposite drawer, stretched and screwed. Having completed this operation, you can proceed to “testing” the product. |
 | Another option for designing a flexible stool seat is to stretch a strong rope or cord over the frame. In this case, paper rope was used. In addition to this, you need to prepare furniture nails with wide heads and a hammer, as well as clamping pliers and an awl. |
 | You can purchase rope of different shades for weaving and display one of the selected patterns on the surface of the seat, getting a stylish piece of furniture that will complement the interior design. |
 | The end of a rope of the same color is nailed to the back side of the drawer using two furniture nails. |
 | Next, the rope is carefully wrapped around two long opposite sides of the frame. If the frame is square, then the process of laying the rope can begin from any side of the structure. |
 | By braiding the opposite sides with a rope, its loops are pressed against each other as tightly as possible and pulled. Having covered approximately 100÷120 mm of the length of the seat with braiding, the rope is temporarily fixed with pliers so that it does not loosen. Work continues in this way until the entire surface of the seat is covered with a wound rope. |
 | Having finished covering the seat along two sides with one color, you can move on to weaving it across with twine of a different color. To do this, in this case, take a white rope and fasten it also on the back side of the drawer, running parallel to the already wound rope. |
 | Using a white cord, any pattern can be “highlighted” from a red background. This process is relatively simple and will be accessible even to a beginner. |
 | In this case, the white cords are pulled between the red rope so that the result is a herringbone pattern, that is, stripes are turned diagonally from the center of the seat. |
 | Having intertwined 6-8 rows and pulled them tight, the white rope is grabbed on the back side of the drawer with a furniture nail. If this is not done, the seat will quickly stretch and sag when using the stool. This procedure must be carried out every 6–8 rows, driving nails either on one side or on the opposite side. |
 | The result should be a durable seat, four threads thick, with an interesting design. If you want to choose a different pattern, woven from three or even four colors of rope, then on the Internet you can always find exactly what will suit a specific interior. |
It should be noted that in the second option, where the seat is covered with rope, the frame is not very strong and is unlikely to support people with heavy weight, but such a stool is perfect for a children's room or as a footrest. If you want to make a full-fledged product for the seat, you need to choose a more massive beam for the frame and strengthen it especially reliably.
Find out by studying several available options in a special article on our portal.
In conclusion, it is worth saying that making a stool yourself, without having experience working with wood and special tools, is not as simple as it seems at first glance. However, if you have the desire and enough patience, then it’s quite possible to try yourself as a carpenter. The main thing is that you need to get ready for serious work and not do it “carelessly.”
Video: master class on making a simple wooden stool
A folding chair is a great helper for picnics, country holidays or a private home. It is very convenient to have such a chair in your arsenal, since due to a special device it folds and takes up minimal space.
You can find it on sale metal, aluminum and wood variations of such chairs. But why buy it if you can make it yourself? All you need is the simplest materials, detailed drawings, step-by-step descriptions and a little free time.
The presented models of folding chairs are very popular on the Internet, since they are both very practical and easy to implement. Many have already acquired these beautiful folding chairs, having made them according to detailed drawings. The descriptions will help you understand the most difficult aspects of making folding chairs with your own hands.
DIY everything in the house - folding chair
If you are familiar with the work of a drill, a hacksaw and an electric screwdriver, which are found in almost every house where men live. Let’s take a look at the presented drawings and begin constructing a folding chair or stool with our own hands.
Selected in this article two popular options folding chair:
- A simple model made of wooden beams;
- Model made of plywood based on the Italian designer Leo Salom.
Choose and make the one that you like the most or for which you have the materials.
Model No. 1: Folding chair made of wooden beams
You can choose a wide variety of wood species for a chair: birch, pine, beech, oak and any others. Pine stools are the lightest, but other materials will give the product additional strength.
For a wooden folding chair you will need:

Print out the drawing of the chair and get to work.
Assembling a wooden folding chair
First thing place the axle bolts, which together with a pair of bars form the leg of a chair. The axis should not be located in the middle, but a little closer to the top. If you make axes in the middle of the bars, the chair will turn out to be unstable due to the extra height. When assembling, remember that the bolt head must be flush.
Now we connect the upper end of the legs with bolts to the crossbars under the seat. We have only 4 beams, 2 of them need to be connected to the external legs, and the remaining 2 to the internal ones. In order not to get confused in this, it is better to study the drawing thoroughly. But if you make a second chair, you will do it much faster.
We received two parts for the type of hinges, the next stage is installing the seat. You need to start with wide bars, while the overhangs will be 15-20 mm . Wide crossbars are attached like this:
- One wide beam to the outer crossbars;
- One wide beam to the end of the internal crossbars.
The photo of the finished chair clearly shows where the connecting points are. The overhead legs should be placed at a height of about 10 cm from the bottom of the legs using self-tapping screws.
It remains to secure the internal narrower bars, which are responsible for the convenience of opening and closing our folding stool. The pattern of their fastening is exactly the same as for wide bars: one to the outer crossbars, the other to the inner ones.
At this stage, you need to put in a little more effort, since both the height of the product and the operation of the entire mechanism depend on it. The height of the chair can be chosen by you as desired from 35 to 45 cm. The second narrow parts of the seat should be placed at a distance of 1.5-2 cm from the wide bars. Moreover, the height can be added by inserting another 20 x 20 block between the middle parts of the seat.
All bars of a folding chair must be processed before installation, giving the parts smooth edges. However, for a dacha, the simplest option may do. By the way, you can attach handles to the chairs for transportation. To do this, the bolts that connect the internal crossbars to the internal legs need to be taken a little longer (about 70 mm). The handle with pre-made holes is mounted during assembly.
Model No. 2: designer plywood folding chair
It often happens that after making furniture or other items, large pieces of plywood remain. This is one of the most unique materials from which you can “create” anything, including a designer folding chair from Leo Salom. An Italian designer has designed a beautiful folding chair that you can replicate at home according to the drawings.
What is needed for production folding plywood chair:

For one chair you need a piece of plywood measuring 900 x 600 mm, and up to 4 similar chairs can be made from one solid sheet of plywood. Moreover, after the first such chair, the rest will go “like clockwork.”
Preparing parts
There is nothing complicated in this design, just pay close attention to the drawing. It is best not to cut it rashly, but to do it and test it on cardboard, since the drawing is very intricate.
To transfer the drawing to plywood, you can choose one of the following methods:
- make templates from paper and transfer them to plywood;
- draw a drawing grid on the plywood with a pencil and apply the drawing.
After carefully applying the drawing to the plywood, we cut out all the parts with a jigsaw. You must realize that a mistake at this stage will render the entire length of plywood unusable except as a piece of "whatever" art.
 Chair in its design has 4 hinges (2 pairs), which require metal parts. You can use butterfly hinges for this, but it is better to make hinges embedded in the very thickness of the plywood parts. This method will require some skills, but the result will be much more accurate.
So, M10 threaded rods are useful for the hinges; their installation locations are marked on part No. 2. In the designated places you need to drill 8 mm holes into which the thread for the studs cuts. You need to remove the thread from one side of the rods, and make a recess for a screwdriver on the other end. Shallow holes are also made in parts No. 1 and No. 3 for tightening the studs.
We screw the studs into the prepared places and install the entire structure. Lay out the finished structure at a convenient angle, and to fix it you need to drill holes in part No. 3 for a fang retainer measuring 30 mm. The DIY designer chair is almost ready.
Final processing
Of course, you cannot leave chairs made of wood (plywood) in such a damp state, because wood is a porous material that absorbs water. Untreated wood products can also cause splinters. To give the product a finished look and protect it from the effects of the external environment, it must be treated with sandpaper and drying oil. A stain under varnish or paint can give the desired tone. You can attach pads made of soft material to the seat and backrest.
A chair is one of the most necessary household items. It is equally necessary both at home in the kitchen and in the country house or backyard. And not a single fishing, hunting or picnic is complete without a folding chair. This simple piece of furniture can be bought without any problems at any furniture store, but it will be much more pleasant to make it yourself.

Peculiarities
This chair model is chosen by travelers, summer residents and artists. The practicality and compactness of this model does not require proof. Today, there are folding camping versions of almost all the pieces of furniture familiar to us: tables, stools, folding beds, loungers and the like. The main advantage of such products is, of course, compactness and mobility.
Traveling several tens of kilometers a day, it is pleasant for a tourist to land on a folding chair during a rest stop. When you travel by car, it is important to have a compact chair, and if you move on your feet, then this becomes a necessity. Large items are not suitable for camping. Products with a back will be especially comfortable.


However, do not think that all folding chairs are a cheap and awkward spectacle that is only suitable for going to the forest, tinkering in the garage, or, at best, for country gatherings. Today you can buy or make yourself very stylish and cozy chairs for a modern kitchen interior. There is no shame in showing such products to guests, especially if the item of pride is made with your own hands.
Anyone can assemble a homemade chair, the main thing is to follow the instructions and drawing.


No special carpentry skills are needed for this undertaking. You just need to know how to use a hacksaw and hold a drill in your hands. The folding chair is assembled according to the drawing, like a construction set.
There are three main materials used to make folding chairs: metal, wood and plastic. Plastic is a light and cheap material that is easy to clean. It is not able to withstand a large body weight and becomes deformed if it is located near heating devices. This material is short-lived, so for constant use it is better to choose something stronger. For example, chairs with a metal frame.
Folding models made of aluminum are reliable and strong. They are not afraid of rust and can withstand heavy weight. The best option is wooden products. They are safe, beautiful and reliable. Such a chair will cost more, but will also last a long time. In addition, even a beginner will be able to assemble a folding camp chair from this material.


Without backrest
The design of the folding chair vaguely resembles a clapperboard easel due to the rising seat. The main parts are bars connected by loops that allow one part to move relative to others.
When assembled, the frames fit exactly together. The chair is ready for use when the frames are extended and the seat is raised. The seat is held on by self-tapping screws mounted in the front frame.

To return the seat to its original state, you need to raise it by closing the frames and at the same time lowering the seat. When folded, this item can easily be hidden under a sofa, behind a closet, or simply leaned against the wall.
Before you begin assembly, position the bolts on the legs so that the axle is on the top of the leg. Otherwise, the stool will be high and unstable. We lightly “sink” the tops of the nuts and bolts.


Tools and materials
When you decide to make a handmade chair without a back, make sure you have certain tools. Everyone has most of them in their garage or on their balcony, and if you don’t find something, you can easily buy it in a hardware store. Below is a list of required tools:
- Jigsaw and saws for it;
- Manual milling machine;
- Screwdriver;
- Grinding machine;


- Roulette;
- Clamps;
- Pencil, eraser;
- Construction corner.


To make a chair, you need not only working tools, but also good materials. The store has everything you need, namely:
- Wood blocks;
- Shkantiki;
- Furniture board;
- Self-tapping screws;
- Glue;
- Screws, bolts, nuts;
- Metal rod.


Pine boards are suitable for making chairs because they are very light, but it is better to use ash, since this material is harder. Pine parts are less durable. The optimal board width is 21 mm. Birch is also a very good material.
In principle, you can use any type of wood that you have. You can come up with an interesting product from plywood.


Frame and fastening of bars
At this stage of work, the upper ends of the legs are connected to the crossbars with bolts, on which the seat will later be located. Two crossbars are mounted to the inner legs, and two to the outer legs.
As a result, we have two parts on hinges. They are first connected using external seating bars. We make a reserve of 1.5-2 cm. The bars are attached to the sides of the crossbar: one to the outer, the other to the inner. Between the legs we make small crossbars, the so-called prolegs.


The next important step is attaching the bars. The middle beams will determine how the chair will fold and unfold. The middle bars are placed in the same way as the wide outer ones. We attach one bar to the internal, and the second to the external crossbars.
The height of the chair depends on the attachment points of the internal beams. The approximate distance is 1.5-2 cm. The height of the chair is usually 35-45 cm, but this is determined individually.
To learn how to make a folding chair without a back, see below.
Painting
First you need to decide on the material for painting. Acrylic and alkyd paints are suitable for such work. It is still better to use acrylic paints, as they are more durable. In addition, they do not have a sharply unpleasant odor. Acrylic perfectly protects wood from damage and the negative effects of moisture. You will also need several brushes of different sizes. The work begins with preparing the product: checking the reliability of fastenings, grinding and cleaning.
If you like natural wood patterns, then purchase translucent furniture varnish. It does not wear off and perfectly protects the wood. The varnish surface is easy to clean.


The easiest option would be to buy aerosol paint in a can. Its cost, of course, will be higher, but it will be easier and more convenient to work with.
If the surface has defects, they can be corrected with a special putty. In this case, it is better to paint the product so that the “patches” are not noticeable. It is better not to seal significant chips and cracks with this composition - they may fall off.


With fabric seat
The advantage of such chairs is that they are extremely simple to manufacture and even more compact. Even a set of such chairs can easily be hidden under the bed, and one can even hang in the garage on a nail. To make such a model, a drawing is not needed, but the materials you will need are:
- A piece of leather or thick fabric such as jeans;
- Self-tapping screws;
- Cuttings from garden tools or metal pipes;
- Washers and nuts with screws.


Instead of wooden cuttings, you can use polypropylene pipes. Prepare the following tools:
- Grinding machine;
- Jigsaw;
- Knife or scissors;
- File;
- Screwdriver;
- Wrench;
- Screwdriver;
- Drill.


We cut off 3 future legs from the selected material, 60 cm long with a cross-section of 4 cm. Then we make 0.6 cm holes on each cutting at a distance of 34 cm from the edge. We drill a hole at the ends to fix the seat. If you choose wooden legs, soak them in drying oil and paint them. This way they will last longer.
The seat will have a triangular shape with a length of each side of 28 cm. We cut the fabric with scissors, and if the seat is planned to be made of leather, then we cut it with a knife. For ease of carrying, you can equip the chair with a belt. The chair can be carried on the shoulder if you attach a belt to it. A loop for attaching it is made at one of the corners of the canvas.


After the legs have dried, we begin assembly. We pass a 6 mm screw 100 mm long through the first leg, after placing a washer on the screw. We put the second washer on, put the screw on the stud with a loop and install the third washer. We attach another leg, put on a washer and nut. The third leg is put on a pin with a loop, then a washer and nut are installed. The fasteners are tightened with a wrench and a screwdriver. We remove the excess threads with a grinding machine, and go through the cuts on the studs with a file.
It's time to attach the seat. Before tightening the screws, place large washers under the caps. If you cut a self-tapping screw with a loop into one of the legs, you can attach a belt to it. The work is completed by installing metal or plastic caps on the legs, which will serve as protection from damage.


We make a comfortable and stylish folding stool with our own hands
There was a dystopian story by Sheckley called “This Mad, Mad World.” It described the world of the future, where “disposable” things reigned. Costumes falling apart, food turning sour in fifteen minutes, furniture falling apart within a week. And the action revolved around a man who gave his wife a real wooden stool as a gift. Today we will try to make a beautiful and durable folding stool for ourselves and our loved ones with our own hands.

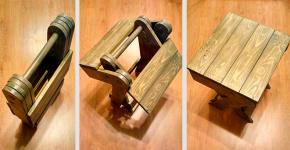
The appearance of a do-it-yourself folding stool
This is not so easy for a beginner, but the main thing is desire.
Required Tools
As in any good undertaking, we immediately encounter obstacles and obstacles, and the first of them is the availability of the necessary tools. I won’t talk about my tool cabinet - you’ll be jealous, but I will pull out the necessary devices and units from it and list them:
- Manual frezer.
- Electric jigsaw with a set of files for finishing wood cuts.
- Screwdriver. It should be powerful enough so that you don’t have to take out the drill as well.
- Sander.
- Long clamps.
- Roulette.
- Pencil.
- Right construction angle.
I will pull out small tools as needed, but I can say this: A good set of tools always pays for itself. Never buy a cheap power tool - it looks attractive, but is only suitable for competitions in aimed throwing into a trash can.
Materials and accessories
I did not set out to set up production, but only researched the question: How to make a folding stool with your own hands. Therefore, I did not purchase materials separately, but purchased a beech furniture panel measuring 1120x400x24 millimeters, from which I cut out the necessary parts. The thickness is quite suitable for all parts - we leave it as such.
Fastening is also minimal:
- Butterfly loops 35x35 millimeters in span, 4 pcs.
- Stud 8x250 mm with double threading and end nuts.
- Dowels or in other words “dowels” 8x50 mm.
- High-quality wood glue or PVA emulsion.
- Tinting varnish - beech wood looks especially “juicy” under it.
The dimensions of the entire sawing are clear from the drawing, so there is no point in listing the details as separate items. But processing them requires some concentration.

Processing parts of a folding stool
Cutting a perfect circle with a diameter of 350 millimeters from beech wood is not difficult for a person with a steady hand. But a folding stool, made with your own hands, requires the presence of a handle. In order to make the handle visible in the pictures, you need a feather drill. I took the first one that came to hand, 22 mm in diameter, and used it to drill two holes in the future seat, maintaining the same distance from the edge of the circle. The distance between centers is approximately 120 mm.
By connecting them with cuts, we get a comfortable handle.

Comfortable handle
There were no special problems with the milling cutter either - I took a regular semicircular end cutter and processed all the parts on both sides. It is clear that there is no need to process the parts of the legs from the inside and the jumper.
But an 8.5 mm straight cutter, which we need to cut a groove in the inner frame of the legs, can pose a problem - they are not sold everywhere. There are two alternative options for cutting this groove:
- Drill holes along the entire length of the groove and knock out the jumpers between them using a thin chisel.
- Drill two end holes (as when milling) and cut a “channel” between them with a jigsaw. In this case, you will have to buy a special saw for longitudinal cutting.

Groove in the inner frame of the legs
The legs on top must be cut at an angle of 30 degrees. The angle is critical, so if you don’t have a miter box, contact a carpentry shop.

The legs must be cut at an angle of 30°
Attention! Do not try to make this angle “by eye” or “at random” - it must be clear and even, otherwise all the work will go down the drain.
It’s better to just round the legs at the bottom.
The jumpers between the legs are placed on dowels with glue. Coat the completely adjacent surfaces and do not forget to drop glue into the holes for the dowels. Tighten the leg parts with clamps and leave until completely dry, removing excess glue.

Finished legs of a folding stool
Assembling a folding stool
The folding stool is assembled with your own hands strictly according to the dimensions indicated in the drawings. Only in this case you will not have problems with this design. The hinges are screwed onto 3.5x16 mm self-tapping screws.

The legs are attached to the seat with hinges
From the scrap of the shield, carve a tube covering the middle of the pin. I have a small lathe, but you can do without it by making a multi-faceted tube instead of a round one using a regular plane - it looks no worse.
Folding stool is ready
Good luck to you.
Folding chairs are a convenient piece of furniture for fishing enthusiasts or supporters of outdoor recreation due to ease of transportation from place to place. In addition, their use allows you to save precious meters in small apartments.
Making a folding chair with your own hands is not difficult. This doesn't even require any special carpentry skills. The main thing is to prepare bars of different lengths, fastenings, the simplest tool. It is necessary to strictly follow the drawings and adhere to the action plan.
The finished product can be decorated or equipped with soft upholstery, thanks to which it will acquire a noble appearance that can decorate any interior. 
Similar articles:
Types of folding chairs
There are a large number of different models of folding chairs, from simple fishing stools to luxury ones designed for use in the most sophisticated apartment interiors.
The main qualifying characteristic of the product is the material of the frame, which can be wooden or metal. A folding chair for fishing is easiest to make from bars and planks. Metal products with soft elements are more suitable for use in the home.
According to its design, a folding chair can be with or without a backrest. The second option is much easier to do with your own hands, but the first is more comfortable to use. The backrest in folding products is attached to supports, which are a continuation of the legs. When folded, such a chair will be much higher than a stool.
The back may be different:
- made of wood or plastic screwed to a wooden frame;
- in the form of a fabric stretched like a hammock on a metal frame (the most common example is a folding picnic chair);
- have soft upholstery.
In addition, transformable pieces of furniture are divided according to the type of legs, which can be:
- straight - attached only to the seat using a rotating mechanism;
- cross - connected to each other using the pin method, and the seat is attached to the front or rear pair;
- solid - form a single part with a supporting cross member.
The most common are cross and straight models. They can be made of wood, metal and plastic.
With solid legs they make it foldable. It consists of a back that smoothly turns into legs, separate supports and a fabric seat. When folded, the wooden elements fit into each other, becoming very thin.
For self-production, the most suitable material is wood. With the right approach, it is easy to make chairs from plywood. The main thing is to choose a material of sufficient thickness that can support the weight of a person.
Drawings and diagrams
They begin to create folding chairs with their own hands from a preliminary drawing. It will display the appearance of the future product, its components, dimensions, which when unfolded are most convenient for the person who will use it.
Then a detailed diagram of the folding chair is drawn: the dimensions of each part, the location of the fastening of the frame elements and the location of the transformation mechanisms.
Already at this stage it is necessary to think about how the product will be unfolded and how to fix the seat to ensure the greatest stability. It is recommended that you first familiarize yourself with ready-made drawings and diagrams, use one of them, or create your own using the example presented.
The easiest way to make it is with cross legs, a seat fixed at the back and equipped with grooves in the support bars.
The slats will be fixed to the crossbar of the front legs. At the same time, there is practically no difference in creating a product with or without a back.
Materials and tools for making a chair
Before starting work, you need to prepare in advance the necessary materials and tools provided for in the drawing of the future product.
When choosing a wood species, you should be guided by the properties of the solid wood. To make the product last longer, it is better to take pear or birch. Pine is the softest and most pliable to process, but a stool made from it will be less durable.
To make a folding chair from wood, you will need:
- bars 40x15x20 mm for the frame;
- slats, plywood or fabric for the seat and back;
- a set of bolts and screws with nuts and washers;
- self-tapping screws;
- sandpaper;
- stain or paint, varnish.
To create and assemble blanks from solid wood you need the following tool:
- hand saw or electric jigsaw;
- a screwdriver or drill with a screw attachment and a set of drills;
- Grinder;
- Screwdriver Set;
- tape measure and pencil.
If you plan to make a folding chair with a back and seat, equipping them with a soft component, you need to stock up on a piece of suitable material and foam rubber 4-5 cm thick.
Manufacturing process: step-by-step instructions
Regardless of the model and design of the chair that you plan to make from wood with your own hands, the creation process begins with cutting blanks. This is followed by careful grinding of all parts until a flat and smooth surface is formed.
Based on the drawing, all necessary holes should be drilled. Considering that the fastener heads need to be recessed, the holes are widened along the edges, according to the diameter of the screw or bolt.
First, let's look at how to make a folding chair with your own hands, which has no back and consists of 2 pairs of legs and a slatted seat:
- First, 2 pairs of legs are connected to each other with axial bolts so that they can easily move relative to each other.
- Then you need to install the lower crossbars. To do this, paired workpieces already connected by bolts are placed parallel to each other. First install the block on the 2 outer legs. Then the frame is turned over and another element is attached to the internal supports. So that they do not interfere with the product folding to the end, the bars are fixed not between the legs, but on top of them. They should move freely like scissors, with one pair fitting into the other, creating a single line.
- Now we move on to installing a support bar at the top of the inner front legs, which will support the removable grooved side of the seat. To do this, a strip is placed vertically between the parts, at an angle of 45° relative to the length line. It is firmly screwed with self-tapping screws using the through method. The angle is needed so that after laying out the block it becomes perpendicular to the floor.
- The next stage will be the manufacture of the seat, which will consist of 2 supporting parts and a slatted covering. Since the inner bars of the seat serve as a support for the entire product, holes are made in advance for the axial bolts on one side, and a 2x2 cm groove is cut out on the other. The fasteners must be positioned so that the cutout is at the bottom, and when connected to the legs, they are placed inside the structure. All prepared slats are laid out on top. All parts are fastened with self-tapping screws joint to joint or at a short distance from each other.
- At the end, the seat support bars are attached to the outer crossbars-legs using the bolt method, not forgetting to install washers.
- Fixation of the stool when unfolded will be ensured by the groove on the seat fitting tightly into the transverse beam between the front legs.
To make your own folding chair with a backrest, lengthen the outer pair of legs so that the height of the chair provides a comfortable position for your back. Then connect both frames, rear and front, using bolts. Unlike a stool, in such a product the seat, when folded, will be placed in the space under the backrest, and not on top of the folded legs.
Making a chair with a plywood back is one of the simplest. At the same time, the product will turn out beautiful and strong.
First, you need to draw 3 parts on a sheet of material that are located inside each other:
- back, turning into legs;
- inside, with a slight indentation, a detail similar to a slingshot is drawn, including 1 lower support and 2 connecting strips at the top;
- the remaining space will be the seat.
Then, using simple hinges, the outer crossbar is connected to the “slingshot” at the top of the slats, and the seat is connected to its central part. After connecting, all 3 parts should form one plane.
To fix the seat, holes are made in it, which will mirror the special spikes on the largest external part. To prevent the parts from becoming loose during transformation, double slits are made in the lower part of the legs and along the edge of the seat and a belt is threaded through them.
What do you do with old furniture?