Do-it-yourself two-level stretch ceiling: a problem to be solved. Installation technology of two-level stretch ceilings How to make a two-level stretch ceiling correctly
Modern stretch ceiling structures are distinguished by excellent operational data, attractiveness and relative ease of installation. It should also be noted that they look especially good in large and tall rooms. In order to make a two-level stretch ceiling with your own hands, first of all, you will need to familiarize yourself with the methods of working with the material used in its arrangement.
An example of such a material is a special vinyl film or similar elastic materials, from which combined curtain structures are most often constructed. When preparing them, special attention should be paid to the quality of the surface to be equipped, taking into account the use of a variety of design solutions, characterized by the following features:
- use of special built-in elements (combined design);
- a variety of surface textures (matte, glossy or so-called satin);
- a large selection of colors.
The stretch ceilings obtained on the basis of these solutions are distinguished by their practicality (electrical wiring and other household communications are easily hidden under them), beauty and ease of use. They can serve a potential user for many years without diverting his attention to special maintenance.
Features of tension type structures

Before making a two-level stretch ceiling it will be useful to familiarize yourself in more detail with such wonderful properties as:
- the ability to create a perfectly flat surface;
- protection of the premises from flooding with water;
- attractiveness of design.
All the unevenness of the rough ceiling is very easily hidden under the elements of the tension structures, with the guarantee of obtaining a perfectly even outer coating.

In the event that the stretch ceiling is installed correctly, there is no need to worry about the safety of the interior of the apartment (furniture - in particular) in case of flooding. The fact is that such a structure does not allow liquid to pass through, but accumulates it in its volume. To eliminate the consequences of flooding, it will be enough to drain the accumulated water by temporarily dismantling the edge of the tension web.

In addition, a wide selection of colors and textures of the used canvases makes it easy to choose the material that best suits your environment. Nevertheless, like any ceiling coverings, such designs are not without a number of disadvantages, which include:
- insecurity of coatings from accidental damage by sharp objects;
- poor tolerance to low temperatures;
- the high cost of the tensioning material and the specificity of the work on its installation.
Preparation for work

It is necessary to prepare the base of the ceiling by its mandatory cleaning from the remnants of old, crumbling plaster, followed by wiring at the locations of point lighting devices.
Before starting work on the independent arrangement of the ceiling, special attention is always paid to the preparatory measures carried out in compliance with the following requirements:
- literacy of the marking of the ceiling surface, which guarantees a perfectly even curtain surface;
- special care when cutting the canvas itself, excluding the possibility of damage to the material;
- possession of safe working techniques (including with a gas heat gun used to stretch the canvas).
Regardless of the design of the false ceiling, the following tools and consumables may be required to prepare it:
- classic screwdriver;
- perforator required for the installation of fastening profiles;
- level;
- a special heat gun equipped with a gas cylinder;
- frame profiles;
- ceiling stretch fabric;
- an ordinary stepladder, as well as special spatulas used for the convenience of stretching and fixing the canvas in the profiles.
The surface of the base must be treated with a special antiseptic primer, which excludes the possibility of mold and mildew formation on it. You can familiarize yourself with the procedure for assembling the frame of a two-level ceiling in the corresponding video on working with curtain structures.
Installation of two-level structures

Before buying a canvas, it is advisable to prepare a small sketch with the intended design of the future ceiling, including the smallest surface details. In addition, on the sketch, the zones of interlevel transitions, as well as the points of placement of spotlights, must be marked. And only after that you will be able to proceed to placing an order for a canvas in a company engaged in the manufacture of suspended structures.
Self-assembly should begin with arranging a frame made of profiles with a set of baguettes used to secure the stretched canvas. In the case of manufacturing a combined structure, plasterboard inserts are installed in the right places of the frame, which are then putty and painted in the required color, after which spotlights are mounted in them.
At the next stage of work, it will be possible to move on to stretching the canvas itself, which must first be heated with a heat gun to a temperature of about 70 ° C. After warming up, the straightened film is fixed in the previously installed profiles with the help of special spatulas (it is fixed on the luminaire bodies by means of special latches).

In the event that you are not completely confident in your abilities, entrust the installation of suspended ceilings to professionals.
In conclusion, we note once again that due to the high cost of decorative canvases, you need to work with them very carefully so as not to damage them during installation.
Video
This video shows how to make a complex stretch ceiling with two levels and with LED backlight yourself:
Photo


The ceiling is like a dome that attracts the eye. A two-level canvas is a unique design solution. This option will effectively hide all the unevenness of the ceiling or various communications. And the "peculiar" steps will visually increase the height of the room.
How to do
If you definitely decided to mount such a canvas yourself, you will need:
- Perforator with a set of drills.
- A gas cannon or a building hair dryer - however, the latter will have to suffer, as it heats up a smaller surface.
- Construction hydraulic level.
- Spatula.
- Shoulder blades.
- Screwdriver.
- The table on which you will stand while working.
Installation of two-level stretch ceilings begins with the choice of an idea. You have to know exactly what you should be able to do in the end. After choosing the shape of the future ceiling, we examine the existing one. Clean up the base layer.
In the presence of a fungus, we treat the surface with an antiseptic. Some experts advise treating the ceiling, even in the absence of fungus, for prevention.
We check the strength of the old plaster. If it holds tight, we leave it, if not, we remove it. Next, we prime the ceiling surface in two layers. After drying, draw the shape of the steps on the ceiling.
Modern materials allow you to create a wide variety of lines.
Next, we find the lowest mark on the ceiling. The size of the profile is added to it. Remember, if you want to put a layer of insulation, then its thickness must also be taken into account. Sets the second mark taking into account all components.
Then we transfer all the dimensions to the walls of the room. The hydraulic level will come in handy.
We connect all the points with a nylon thread.
Then we fix the profile at the second level. Do not forget to place all the wires in the "pocket" that appears.
Designs
Modern technologies make it possible to bring to life the most unpredictable ideas. Lighting helps a lot in this. Modern technologies have long supplanted the "Ilyich's bulb". Point LED designs, fiber optic will create fancy flickering three-dimensional compositions.
LED strips can be positioned at the junctions of your ceiling levels. This will create soft lighting in the room. Spotlights in a variety of shapes and colors will help you focus on a specific area.
A combination of different light sources is possible (fortunately, all the wires are reliably hidden inside the tiers). The bulbs can be turned on at the same time, or they can alternate, illuminating one or the other zone.
Stretch two-level ceilings, photos of which you will find in any catalog of design ideas, look harmonious in all rooms (living room, bedroom, kitchen, office, etc.).
But lighting isn't the only thing that works wonders. Different colors, textures of the canvas will complete the image you have created. Photo wallpaper with the image of the starry sky, which is also illuminated, will attract the eyes of your guests. And the mirrored ceiling will expand the small space. In the bedroom, you can choose a satin canvas. This will emphasize the softness, modesty of the room.
Renovation in an apartment is a large amount of work. Even if it is done in just one room, this means that it is necessary to change the wallpaper on the walls, perhaps replace the floor screed and lay a new linoleum or parquet board on it, as well as update the ceiling covering.
By the way, what is the best place to start making repairs? From the ceiling, of course. Why this is so is easy to understand. He's just above everything. If you first lay linoleum, and then make the ceiling, then particles of putty and dust from drywall will fall on the clean floor. The question is: what is the best ceiling in the room?
The answer can be given by knowing the height of the room. Provided that it is higher than 2.5 m, you can make a two-level stretch ceiling with your own hands. If the room is not high, then a single-level one is the only option for a small-sized room.
Types of two-level ceilings and their advantages
Interestingly, for the first time stretch ceilings were used in France. That is why one-level and two-level structures of this type began to be called by the name of the country - French. Using this method of ceiling construction, you can easily create a unique design in a room, given that such a decoration for the top of the room has many advantages. These include the fact that with such a ceiling it is easy to close any irregularities, hide ventilation and remove electrical networks from the eyes.
Before talking about how to make a two-level stretch ceiling, it would be wise to find out how they differ. If we talk about the material used for finishing the ceiling, several types can be noted - those where it is customary to use PVC and fabric. PVC canvas is made from a film based on polyvinyl chloride. Its surface is glossy. The film itself is very strong and easily withstands a load of 80–100 kg / cm². In addition, this coating is known for the fact that it can be of almost any color and shade, which allows you to create a unique design of the room.
Another advantage is the waterproofness of PVC. If negligent neighbors flood from above, nothing terrible will happen to the ceiling, except that it will sag strongly enough. Even furniture and furnishings will not be damaged! In this case, water is removed from the ceiling, and this is done easily, and it again becomes what it was at the beginning.
Note! How exactly to remove water from a stretch ceiling? You need to turn off the electricity, make sure the neighbors turn off the water. Then the chandelier or lamp in the stretch ceiling is dismantled, a hose is pushed into the hole formed and the water is drained into the containers prepared in advance. If the hose is long enough, you can run it straight into the bathroom or toilet.
The canvas for the stretch ceiling can also be made of fabric. Before installation, it is impregnated with various polyurethane compounds. Unfortunately, the fabric is not multifunctional and is not so popular. Most often, it is mounted in gazebos or rooms where the heating works weakly or is completely turned off. In addition, the surface of such a ceiling is non-glossy, and there is no large selection of colors, as is the case with the use of PVC.
Preparing for installation

A two-tier stretch ceiling, covered with a PVC film, is quite popular today. If you use just such a composition, you can divide the room into zones without installing drywall or aerated concrete partitions. Moreover, such ceilings make it possible to build chandeliers into them, place several spotlights or spots.
During the installation of two-level stretch ceilings, practically no dust is formed, and the installation itself takes little time - only about 3-4 hours. The time taken depends on the size of the room, the size of the ceiling and the number of levels in it.
Note! Indoor flowers will have to be taken to another room, since during installation the temperature in the room can rise to 60–70 ° С. It is enough to simply remove the arranged furniture, or you can leave it alone, if it does not particularly interfere.
Actually, how to make a two-level stretch ceiling in an apartment? In general, it is not that difficult. If you want to see your home beautiful, with an original ceiling, then you can do everything yourself by purchasing the necessary tools and materials.
The necessary materials include:
- the selected canvas (PVC or fabric);
- guide profile, also known as harpoon or baguette;
- sheet plywood from which the frame is made;
- wood block 60 × 60 mm;
- fasteners for the installation of metal lamps in the form of the letter "P";
- special thermal rings in which the lamps will be installed;
- adhesive and a box of plastic dowels 60 mm.
Of the tools you need to have:
- water or laser level - the latter is more accurate;
- propane heat gun;
- hammer;
- drill and screwdriver (battery is better);
- a hacksaw for metal or a grinder, as well as a saw for wood;
- a spatula, which is needed when installing the canvas;
- clip for the canvas (for the same purpose);
- chop cord, tape measure and pencil.
How to properly fix a two-level stretch ceiling

Before installing the frame, lay the wiring necessary to connect the lamps and chandeliers located on the ceiling. However, before starting the fastening, it must be pulled in the corrugation and after that it must be fixed with metal clamps.
Note! Clamps can be made by yourself. For one such product, you will need to cut a strip 1.5 cm wide and 7–8 cm long from a sheet of tin. A hole is drilled in the center of the strip for a dowel, which is already hammered into the ceiling, and a self-tapping screw is screwed into it through the strip. Then you can clamp the corrugation. Alternatively, you can use a self-tapping dowel to which a copper wire Ø1.5 mm is screwed. She can also fix the corrugation.
Further, with the help of a laser level (in its absence, a water level will also work), the first level of the ceiling is marked. You can put marks where it will be located at a distance of 3-5 cm from the old ceiling. The line itself is drawn using a skip.
The next level is lowered to a distance equal to the height of the spotlights, that is, by 10–12 cm. Next, it is necessary to mark this level; the process is carried out in the same way as described above. If it is planned to make any elements of a round shape in this tier, then their outlines must be applied to the ceiling with a pencil so that the frame can be easily assembled along them.
To fix the plywood structure to the old ceiling, you need several meters of timber. It needs to be cut into egg capsules, each about 12 cm in length. Then, using dowels, these pieces must be fixed to the ceiling along the drawn lines that marked the rounding. From one bar to another, it is necessary to make gaps of approximately 15 cm.
A strip of plywood is attached to the installed bars on self-tapping screws. Its width is 10–12 cm. It is required that it never go beyond the drawn line, but repeat its contours.
How to fix the baguette profile to the wall and on the plywood frame? One of the requirements is that they must be on the same plane along the horizon. The bottom molding, which is usually mounted on the walls, must be lowered 11-14 cm from the ceiling. When the frame structure is assembled, you can begin to mount spotlights.
Installation of spotlights and canvas

Luminaires of this type are mounted in the frame. For their fastening, U-shaped fasteners and dowels are used. Then lighting in the form of a wire in a corrugation is supplied to their contacts. A copper cable Ø1.5 mm² is best suited for this. The required power of the luminaires should not exceed 50 W.
The canvas itself begins to be mounted on the tier made first. The fabric unfolds and clips at several corners. Using a gas heat gun, the room must be heated to 59–61 ° C. When exactly this temperature is reached, the canvas softens and easily stretches over the frame. The edges of the film, using a harpoon mechanism, are driven into the groove of the baguette.
Note! First of all, the installation starts from the corners, and only then the middle is fixed. The room needs to be warmed up until the installation of the stretch ceiling is completely completed.
After the first tier is mounted, you can start working with the second. To complete the process harmoniously, a special decorative profile is used, which bends easily and can hide all gaps or irregularities on the wall.
When the canvas is stretched over both tiers, you can finish the work by installing the fixtures. In the stretch ceiling, thermal rings are glued to the places where the lamps are located, after which holes for the bulbs are carefully cut out in them.
Video
This video demonstrates the installation of a multi-level stretch ceiling with LED lighting hidden under the ceiling:
Modern 2-level stretch ceilings have long become fashionable when decorating premises. The available components and materials have made simple what once adorned the castles of kings and nobles 200-300 years ago.
Flax was replaced by the property of the development of the chemical industry with polyester thread and polyvinyl chloride. This made it possible to obtain raw materials from oil derivatives as one of the cheapest semi-finished products for the production of glamorous goods.
Glamor in construction or renovation is charm, charm or charm that embodies the aesthetic phenomenon associated with fashion in the direction of design solutions for decorating residential premises. And as do stretch ceilings.

We install a fabric stretch ceiling in two tiers
To perform work on a multilevel stretch ceiling, it is necessary to thoroughly prepare. Two-level stretch ceilings, or rather their installation, will require you to assemble some kind of tool: a spatula with a round working blade, an impact drill or perforator, a hammer, a hair dryer, a hydraulic or laser level, a hacksaw for metal, a pencil measuring tape (preferably M or TM).
Installation technology
Compared to glossy film stretch ceilings made of polyvinyl chloride, 2-level stretch ceilings made of fabric create a soft and warm shade in daylight and basic lighting.

A ceiling sheet with a satin or other fabric texture does not irritate the retina when reflecting sunlight, and, as you know, the fabric dampens sound vibrations much more strongly than any film or membrane.
How to install a two-level, undulating fabric stretch ceiling
Before making a two-level stretch ceiling, it is recommended to sketch the plan on a piece of paper. On the plan, display the planned design of the ceiling of the room. Installation always starts with its frame.

Installation begins, as a rule, from the frame of the second level or, in this case, the waves. It will run from wall to wall, slightly offset from the center of the ceiling. It is made from a sheet of plywood of the required width (in this case 12 cm). To do this, cut the sheet and moisten it abundantly with water, which in 40-60 minutes will give it the necessary flexibility.
A wave is drawn on the ceiling with a cord and a self-tapping screw. To do this, a dowel-nail is screwed into the concrete (or any other) ceiling and a cord is tied to it. A pencil is tied to the end of the cord at the required distance. You can then draw arcs, circles, or bends on the ceiling in any direction.

A laser or hydraulic level is used to mark the horizontal level of the ceiling. With its help, marks of the second and first levels are transferred to the walls. The lines on the walls are marked with a painting chop string.
When the wave line is outlined on the existing ceiling and the boundaries of the levels on the walls are determined, you can proceed with the installation of the frame of the second level of the stretch fabric ceiling.
Along the outlined line, pine bars 10 cm long and 6 cm high (bosses) are fixed to the concrete floor with dowels and self-tapping screws (at least two self-tapping screws). A strip of plywood veneer with a width of 12 cm and a length equal to the wavelength on the ceiling is attached to them. 12 cm is exactly the distance from the stretch ceiling to the ceiling concrete ceiling, which is necessary for the installation of recessed spotlights.

The plywood strip is fastened with self-tapping screws for wood 40 mm long. In order for the plywood to take the required shape without kinks, it is recommended to wet it abundantly with water. The installation procedure can be started after at least 1 hour.
During this time, the fibers will acquire the necessary elasticity, which will allow them to bend in the desired direction and fasten them to the lugs with self-tapping screws. After drying, the strip will take the shape given to it. On the walls along the marked lines of the second and first level, a wall profile or a baguette is attached. It is recommended to lower the first level of the stretch fabric ceiling as close as possible to the existing ceiling (at least 3 cm).
The clip-on wall molding is attached to the plywood frame to a height of 7 cm from the bottom edge. In order for it to take a curved shape, it is cut with a hacksaw for metal with segments at an angle of 30-40 degrees. Along the line marked on the walls, a baguette is also installed for the first and second levels.
Fastened with dowels and self-tapping screws with a pitch of 10-15 cm. At the joints of the profiles, the pitch should be 2 cm. In the second level, the housing of spotlights is mounted with dowels to the existing floor. Electrical wiring is laid and connected to lighting devices.
The ceiling sheet of the second level is unrolled on the floor, and after laying out, the profile clip is filled with a spatula along the entire perimeter of the frame. First, the canvas is stretched on two opposite walls, and then on the other two. If there are folds on the ceiling sheet, then they must be warmed up with a hairdryer until they are completely smoothed.

After the second level web is stretched over the frame, the first level web is stretched. Stretch it in the same way as the second-level canvas. The body of the luminaires is groped by hand and in these places the protective rings made of plastic are glued with special glue. They will protect multilevel stretch ceilings from heating of the spotlight housing.
Note! It is recommended to use economical LED lamps as a light source in multilevel stretch ceilings. They practically do not heat up.
After the glue dries, the fabric inside the ring is cut out with a sharp knife and the installation of lighting devices is completed. The stretch ceiling is installed and if you have any questions, watch the installation of two-level stretch ceilings in the video.
The backlit two-level stretch ceiling is a decorative structure made of metal and plastic profiles that is attached to the main ceiling to hide irregularities and laid communications. All this is covered with an elastic canvas without forming a rigid metal frame, as when installing suspended ceilings. This solution looks very attractive. Today we will find out how to make such a ceiling at home with our own hands.

Preparatory stage
Installation of a two-level stretch ceiling begins with the preparation of the draft level. The old finish is removed, whitewash is completely washed off down to the concrete layer.

Already at this stage, it is necessary to draw up a preliminary sketch of the future project. The main thing is to determine the locations of the future lighting fixtures. With such a ceiling design, it is recommended to create two levels of illumination - the main (chandelier, lamps) and local (hidden illumination based on LED strips, recessed spotlights).
Stretch ceiling prices
stretch ceiling

The installation itself of the stretch ceiling and its frame begins only after the rough finish dries out. In the room where all this will take place, it is necessary to maintain low humidity (about 75%) and a relatively high air temperature (about 24 ° C). This is necessary to properly spread the tensioned web and prevent it from sagging.
At a time when the primer and plaster dries up, it is necessary to prepare the very sketch of a two-level ceiling. Clearly determine what shape will outline the contours of each of the levels, where the main lighting (chandelier) will be located. First, all this is done in pencil on paper, then transferred to the ceiling.

Curved lines are most conveniently drawn using a plastic profile applied to the ceiling. It flexes easily while maintaining smooth transitions.
Having drawn up the drawing according to which the levels will be created, you need to set the height at which you plan to place the lower level of the stretch ceiling. The optimal size is 15 centimeters or more. If the main ceiling has irregularities and bevels, then you can use the laser level and make marks on each of the walls where a profile will be fixed in the future, on which, in turn, an elastic base will be stretched.
Ceiling profiles prices
ceiling profile

Scheme 1. Construction with hidden illumination: 1 - aluminum construction with hidden illumination; 2 - auxiliary bar; 3 - wall baguette; 4, 5 - harpoon tensioning cloth; 6 - backlight; dimensions are in millimeters.

Scheme 2. Sectional design of a multi-level stretch ceiling ('harpoon' type mount): 1 - upper level of the stretch structure; 2 - separator; 3 - plugs for separators; 4 - bump stop; 5 - base ceiling; 6 - inner frame; 7 - the lower level of the ceiling; 8 - wall profile, as well as a plug to it; 9 - walls; 10 - decorative plinth.
In those places where the lamps and the chandelier will be located, wooden bars are attached to adjust the level. Already after the formation of the tension level, here you need to make holes (by soldering) and attach the lamp with brackets, closing the installation site with a decorative insert.

Installation of a plastic frame
Step 1. The installation of the plastic frame begins with the fastening of wooden retaining bars for the future profile. They are attached to the main ceiling with dowels. This is a simplified variation of the stiffening framework. You can replace it with metal U- and C-shaped profiles, but without experience it will not work to create such a structure. Therefore, it is better to use just wooden blocks. They are fastened with an indent between each other of 20-30 centimeters.


Another option is to install a stretch ceiling frame
Step 2. Now the installation of the plastic profile itself is carried out along the previously drawn line. It is attached to the bars with ordinary wood screws. The ends of the plastic profiles are connected with an additional plastic insert. It should also be fixed to the tree. The lower part of the plastic profile is closed with an angular flexible perforated insert - it is glued onto a polyurethane or similar adhesive. This is done so that when the web is pulled, there are no sharp corners about which the elastic material can break.
Spotlight prices
spotlight


You can also use an aluminum profile - you need to file it with a grinder, and you can't rush here, the final cut is finished with a hacksaw for metal
Step 3. In the process of installing a plastic profile, it is important not to damage the communication cable (for example, a fire alarm). They are either closed with a narrow plastic box, or fixed to the ceiling with brackets. At the junction of the cable and the frame, a small incision is made in the latter.
Step 4. The plastic profile sets the height of the lower level of the future ceiling. Be sure to check the reliability of the fastening. The best option is a point load of 15 kilograms. Such a margin of safety will be sufficient even taking into account the possible flooding from the neighbors (if we are talking about an apartment).

Step 5. In places where the plastic comes into contact with the wall, the corners of the profile are constrained. It is more convenient to do this with a grinder with an emery sheet or a regular file. It is necessary to create a smooth bevel towards the wall so that the point of contact is smooth, without a rough transition. At the point of contact, a metal profile with a harpoon is attached, since the tensioning material will also be attached along this line.
After fixing the plastic, you can start assembling metal profiles. They are attached along the perimeter of the wall at a previously set level (using a laser). In this case, a special profile is used specifically for the stretch ceiling. Its key difference is the presence of an elastic clamping insert (called a harpoon) inside. It is she who will hold the ends of the canvas stretched over the frame. Such a profile is attached to the wall. Dowels are used as fasteners.
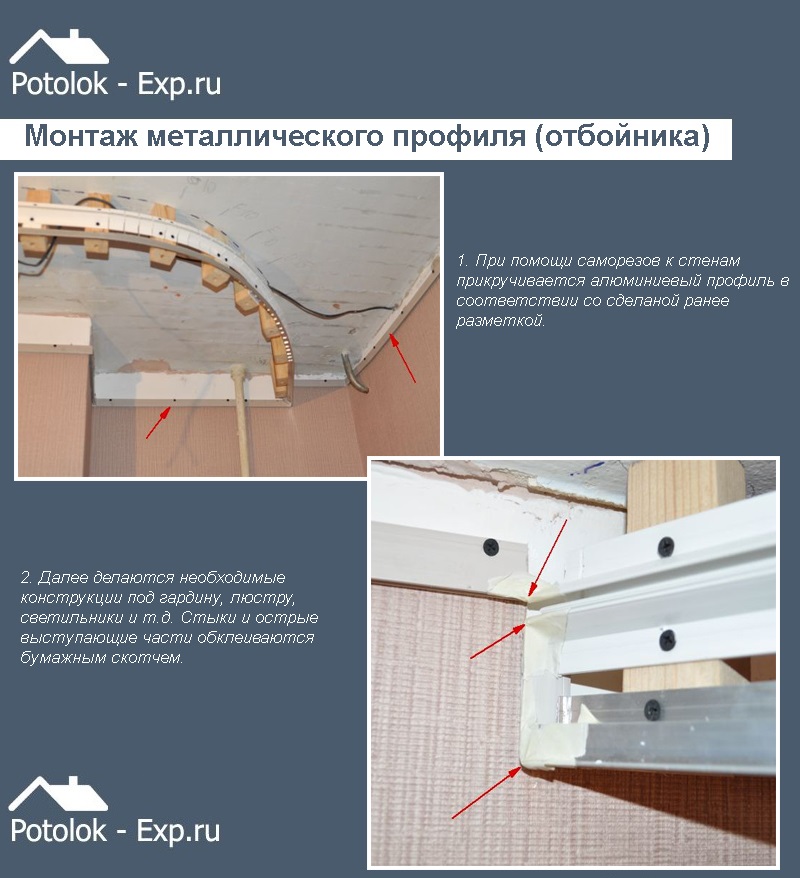
The same metal profile is attached to the plastic one (on the outside, where there are no bars). Self-tapping screws are used as fasteners. Next, you need to close all the noticeable hats of the fasteners with light masking tape. Otherwise, they will be noticeable in the case of using a glossy light base - it shines through in bright light.
The most difficult thing in the installation of profiles is to maintain a given level, therefore, after each stage, you need to check the maintenance of straight lines. If an error is detected in a timely manner, it is easy to fix it. But when everything is already covered with a canvas, then even minor flaws will be striking. To fix them, in this case, you will need to dismantle the frame.
Stretch ceiling materials
There are 2 main types of stretch ceiling materials:
- PVC film (polyvinyl chloride);
- the cloth.
Which one is better? You can list the benefits of each of them.
Table. Comparison of the advantages of fabric and film ceilings.
But fabric material for stretch ceilings is much more expensive. It is allowed to use several materials at once. For example, the first level will be made of glossy PVC film to visually increase the space, the second - from fabric with a satin-like texture. This is the optimal combination that designers often use.

Be that as it may, the final choice is up to the consumer. It is recommended to visit specialized stores and independently assess the attractiveness of each of the materials by examining their texture. You can even order a film on the ceiling according to your own drawing. Everything is limited only by the flight of imagination and the size of the wallet, nothing more.
Is it possible to combine stretch fabric and suspended plasterboard in two-level ceilings? This option is possible, but makes no sense. An exception is forced zoning of space. This is done when, for example, it is necessary to divide one large room into a sleeping and a guest area. An aluminum frame made of C-shaped profiles must be installed under the rigid base.
Tensioning the canvas
The selected canvas is stretched in the following order:
- first the lower level (the one closer to the floor);
- then the upper level (the one closer to the main ceiling).
Below is an algorithm of the required actions.
Step 1. It is imperative that when straightening the canvas, it is blown with a gas heat gun (if PVC film is mounted). This is done to smooth out and eliminate wrinkles and prevent accidental tears.
Prices for fabric stretch ceiling
fabric stretch ceiling

Step 2. Then the canvas is straightened and suspended at a height of at least 1.5-2 meters with special clothespins with rubber "sponges" - no trace remains after them. From below, the canvas is re-blown with a gas cannon to straighten all the folds. As a result, the material looks like it was ironed out. The room temperature will rise up to 30 ° C, but the windows must not be opened.

Step 3. Then you can start stretching the canvas. They start from the side of the plastic profile, from the corner (it is called "base"). As practice shows, it is most convenient to use plastic spatulas. They simply "put on" the edge of the canvas and push it into the harpoon. There, the canvas is securely fastened with an insert, and it will not be possible to pull it out without the same spatula. This is done in every corner, after which the material is re-processed with a heat gun. This time, the canvas should be completely flat and smooth.

Step 4. After the film has cooled down, fasteners are carried out along the entire perimeter of the level. There is no need to rush here. It is imperative to ensure that the tension is evenly distributed so that screeds do not form. The place where the canvas is attached to the plastic profile is sealed with reinforced tape. A new profile for the upper level of the stretch ceiling will be attached there. It is mounted with the same self-tapping screws (you can use self-tapping flea screws with recessed caps). Next, you can start straightening the second canvas.

The technique is similar and includes:
- straightening;
- hanging;
- warming up with a heat gun;
- fastening at the corners;
- reheating;
- final harpoon fasteners.
It remains only to close all the seams with decorative rubber inserts (tourniquet). It is manually pushed into the profile with the thin side without glue. If necessary, it can be quickly removed to pull off part of the canvas. This will be needed to access the wiring, communications, covered with a stretch ceiling.

Installation of lighting and lamps
How to determine where you need to make a hole in a stretched canvas? It is easily pressed with your hands, thereby finding pre-attached bars or plastic rings. You cannot cut through the canvas - it must be burned. You can simply heat a piece of rounded fittings under a hot air gun and make a hole with the required diameter (but not more than 2-3 centimeters). The main thing is that the ends must be melted so that the canvas does not break. Cutting is allowed only in the case of using a special thermal ring made of thin plastic, which is glued in the center of the future hole. Then the material is carefully cut along the inner contour of the ring.


Further, all the lamps are fixed (with a suspension, if necessary), the fastening points are closed with decorative inserts (they are included in the kit with the lighting devices). If necessary, power supplies, automatic machines (for LED backlighting or some energy-saving lamps) are attached to the rough ceiling. When performing these works, it is necessary to de-energize the room.
What other lighting options are combined with stretch ceilings? Hidden LED strips look attractive - they are hidden behind the ceiling cornice. You can even use LED lighting with a changeable lighting color. On request, a remote control unit can also be supplied - manufacturers offer any variations. The choice depends only on the preferences of the owner of the house.
Prices for LED strips

If a glossy PVC film was used as a stretch canvas, then lamps directed to the ceiling can be attached to the wall along the perimeter of the room. You will get the effect of a mirror, which visually doubles the free space. Relevant for small cramped rooms.
After the installation of lighting fixtures is completed, the arrangement of the stretch two-level ceiling can be considered complete. The control is carried out by a laser level. There are no rules for the care of the canvas. If necessary, wipe it with a damp sponge (refers to PVC film). The service life of such a ceiling reaches 20 years. Most manufacturers of tensioning materials provide a 5-12 year warranty. Be that as it may, it is not necessary to change the frame with repeated cosmetic repairs. It is enough to remove the old tensioning material and replace it with a new one. Simplicity, attractiveness and low cost are the main advantages of such ceilings!

And at the end - a few more examples of bunk stretch ceilings
Video - Installation of a two-level stretch ceiling with lighting