Types of porcelain stoneware laying. Laying porcelain stoneware on various surfaces
The widespread use of porcelain stoneware for flooring in various rooms of the house and apartment is rightly due to the large number of positive qualities of this material. And by itself laying porcelain stoneware on the floor with your own hands – is in many ways similar to the installation of another popular floor covering - the usual
Therefore, if you plan to finish the floors with one of these materials, then the question inevitably arises as to which one is better to choose. To determine this difficult decision, it is necessary to conduct at least a small comparative analysis.
What you need to know about porcelain stoneware
The main advantages and disadvantages of porcelain stoneware
First of all, it should be noted that the materials used in the manufacture of tile and porcelain stoneware flooring are practically the same: both types of tiles are made from kaolin clay, feldspar, quartz sand and mineral dyes. However, in the production of porcelain stoneware, several special grades of white clay are used, and also granite, marble or other stone chips can be added to some of its varieties.
Basically, the differences between the considered flooring are in the production technology. So, porcelain stoneware is made by dry pressing, followed by firing at a temperature of about 1300 degrees, which creates conditions similar to the processes of volcanic formation of stone in natural conditions. Due to the high temperature, all the components are fused together, forming a material with a high density. There are practically no micropores in porcelain stoneware, which makes the coating waterproof, increasing the service life of both the coating itself and the concrete base of the floor.
Ceramic tiles have a more porous structure, so if they do not have an outer layer of durable glaze, they can absorb moisture. In addition, the strength characteristics of floor tiles are significantly lower than that of porcelain stoneware.
Prices for glazed porcelain stoneware
glazed porcelain stoneware
- Polished porcelain stoneware - this is a tile, the surface of which is polished to a mirror shine. The polishing process is quite laborious and requires a lot of energy, therefore the material has a high price.
Naturally, it is also not worth laying in hallways or corridors leading from the street to the house, since the surface of the slabs can not only become cloudy from abrasion, but it is also quite slippery, especially when wet, which can lead to injuries. Polished slabs work well for
- Lappated (semi-polished) the finishing material does not have a completely sanded surface, therefore it is somewhat heterogeneous, but combines rough and smooth areas. Such a combination can be thoughtful, for example, staggered, or chaotic.
Such a coating is both less slippery and more resistant to abrasion, so it is suitable for the hallway and, as well as for any other rooms.
- Matt porcelain stoneware can have a smooth or embossed surface, but never shines and, unlike polished tiles, does not slip. Thanks to this quality, it can be safely laid in the bathroom, in the kitchen, in the hallway, corridor, living room, as well as on the balcony. In addition, the surface of matte tiles is difficult to damage as they do not have a glazed finish.
This material looks more relaxed, without irritating the eye with excessive play of glare, it is pleasant to walk on it.
- Structured or embossed porcelain stoneware can imitate the pattern of natural stone, wood, leather, brick, as well as other materials or ornamental volumetric images. Due to the many advantages of this type of porcelain stoneware flooring, it is popular with most designers. I must say that this is no coincidence, since the variety of embossed decoration design allows you to choose it for any interior. In addition, it is non-slip, so it can be applied to any room.
The disadvantage is that dust and dirt accumulate in the unevenness of the relief, and it is much more difficult to tidy up such a surface.
- Satin (glossy) porcelain stoneware visually looks soft and velvety. This effect is achieved by adding special salts to the mass from which the tiles are made. The durability of tiles made from a similar composition is comparable to artificial stone intended for outdoor use. Satin-finished tiles are non-slip, so they are perfect for decorating the surface of floors, in almost all rooms of the house.
The disadvantages of this material include its not too high strength, along with a very high cost.
Embossed porcelain stoneware prices
embossed porcelain stoneware
- Rectified porcelain stoneware - this is a material that has passed the stage of rectification during production, during which, by special processing, all the smallest geometric flaws of the products are removed, and the ideal straightness of their contour is achieved.
Tiles that have undergone this treatment make it possible to form a visually monolithic coating on the floor, since it fits end-to-end without forming visible seams. However, this type of tile cannot be laid on a heated floor, in unheated rooms or on the street, since temperature changes are possible there, which will inevitably lead to damage to the solidity of the coating.
Having dealt with the main varieties of porcelain stoneware presented in the assortment of stores, it is worth considering the nuances that are recommended to pay attention to when choosing this floor covering.
Immediately it must be said that the greatest demand is for imported collections produced in Greece, Turkey, Italy and Belarus. If we talk about the price, then the most expensive are the plates made by Italian companies.
When choosing this or that material, first of all, they pay attention to the design of the tile, but, having decided on this criterion, it is also necessary to get acquainted with its operational characteristics. A conscientious manufacturer always applies a kind of passport to his products, where all the main parameters of a particular coating are indicated.
The illustration below shows pictogram icons that usually convey information about the features of a particular tile to consumers - be sure to pay attention to them.
In addition, you should pay attention to the following points:
- Weight of porcelain stoneware. In the technical specifications or in the catalog, which, as a rule, the seller has, the specific weight of the tile is indicated, which should be about 2400 kg / m³ (it is about the same as that of glass). If this parameter is significantly less than the specified one, then the assumption arises that the production technology has been violated, which means that the technical characteristics of the floor covering will be significantly reduced.
- It is imperative to inspect the back of the tile. If there are recesses on it that are more than 20 mm in size, this means that the manufacturer has decided to save on material. It is not recommended to purchase such tiles.
- You should also refuse to purchase if, when examining several tiles from the same batch, significant differences are found between them in color, relief or pattern (unless this is specifically stated by the manufacturer).
- Porcelain stoneware is subdivided into PEI grades according to its abrasion resistance:
Prices for rectified porcelain stoneware
rectified porcelain stoneware
- First grade (PEII) tiles, the lowest, are usually intended for wall surface mounting.
- Second class finishing material (PEIII) It is used for laying on floors in rooms of an apartment or house, where there is not a large amount of movement of people, for example, in the bathroom, on the balcony or in the bedroom.
- Third class (PEIIII) designed to cover floors in rooms with medium traffic, such as corridors, hallways, kitchens or living rooms.
- Fourth grade (PEIIV) It is used for cladding floors in rooms where consistently high operating loads are expected. These include restaurants, small shops, office buildings, etc.
- Fifth grade (PEIV)- This is the most durable porcelain stoneware coating that can be used in train stations, supermarkets, airports, and other public buildings, which are characterized by a large crowd of people.
As a rule, porcelain stoneware of the fourth and fifth class is not used in residential construction - its strength qualities remain unclaimed, and there is no point in overpaying for it.
- Next, it is worth dealing with the hardness class of porcelain stoneware tiles. To know what to rely on in this matter, it is recommended to make a comparison on the Mohs scale.
The Mohs scale indicates a material's hardness category. For example, quartz sand has a hardness index of 7, so it may well scratch the surface of polished porcelain stoneware. And in order to avoid clouding the polishing, in the hallway it is worth laying a rug that will collect all the solid particles brought on the shoes from the street, or choose for decoration a material that is more resistant to abrasion, with a hardness not lower than "seven".
- When choosing a tile size, you should take into account the area of the room in which the floor will be decorated. For example, you should not choose large tiles for a small room, as it looks less impressive than small tiles. In addition, for laying large slabs of porcelain stoneware (over half a meter on either side), the base must be perfectly flat, and the glue must be of high quality, otherwise it may fail.
For any room size, slabs of the order of 400 ÷ 450 mm are quite suitable - they are most often chosen by designers because of the ease of installation and because they look great in any interior.
To visually enlarge the room, it is worth purchasing smaller tiles, and to reduce and create a cozy atmosphere, larger formats are suitable.
- To make the room seem larger, and the design looks light and "airy", it is recommended to buy porcelain stoneware in light shades for laying on floors.
Calculator for calculating porcelain stoneware tiles for flooring
The calculator below can serve as an assistant in choosing porcelain stoneware tiles. It will allow you to accurately determine the required amount of material (number of tiles), depending on the area to be faced, and on the parameters of the tile itself. In addition, for large areas, a certain value and thickness of the tile seam will be able to play.
The calculation is carried out taking into account the required stock for cutting the material, moreover, the method of laying the tiles is also taken into account - with a diagonal pattern, the consumption of material increases slightly.
Naturally, all these calculations will be valid if it is supposed to revet the entire floor in the room with porcelain stoneware tiles of the same type.


Porcelain stoneware tiles have long appeared on the construction market, and every day they are gaining more and more popularity. This is due to the excellent quality of the material, its strength, versatility and a number of other positive features.
Porcelain stoneware is ideal for flooring in any room. This process is very responsible and has some subtleties, but proper preparation and adherence to all stages of work will help you easily and efficiently finish the floor yourself.

To carry out the work, you must prepare the following tools:
- measuring tool (tape measure, ruler);
- rubber hammer;
- marker for marking;
- level;
- rubber spatula;
- even metal spatula 30-40cm wide;
- spatula with teeth;
- tile cutter or grinder for trimming tiles;
- drill for drilling holes;
- container for mixing glue and grout;
- drill with a nozzle for mixing solutions;
- gloves.
Materials (edit)

- tile;
- special glue;
- crosses;
- silicone sealant;
- primer;
- grout.

Adhesive for porcelain stoneware must have high adhesion of the material to the substrate.
When choosing the type of adhesive mixture, the following points should be considered:
- This facing material has practically no moisture-absorbing properties, therefore, the use of cement or tile glue is strictly not allowed.
- For outdoor masonry, it is necessary to use glue, which contains plasticizers, which make it resistant to low temperatures.
- If the work will be carried out indoors, choose an adhesive mixture with a high content of polymer components (latex or acrylic).
What surface can you put porcelain stoneware on?

Porcelain stoneware is placed both on a concrete base and on a wooden floor or plywood sheets.
For installation on wooden floors, the following work must be done:
- dismantling the wooden floor covering;
- installation of the lag in a horizontal position;
- backfilling with expanded clay space between logs;
- fastening boards with a gap of 8-10 cm using self-tapping screws;
- laying waterproofing material;
- installation of a mesh frame
- installation of tiles.
Laying on plywood sheets is carried out as follows:
- Plywood sheets with a thickness of at least 28mm are located on the logs at a short distance and are tightly attached to the entire base with self-tapping screws.
- After installation, the sheets are carefully sanded, cleaned of debris and primed 2 times.
- When the material is completely dry, you can start laying the tiles with polyurethane glue.
Concrete floor
The concrete base must be perfectly flat, without sagging or depressions. Most often, additional floor leveling is required. First, a layer of waterproofing is laid, beacons are installed, and a self-leveling mixture is poured.

The first step in performing work is a thorough surface preparation. This is necessary for two main reasons:
Tile weight
Porcelain stoneware is a rather heavy material, and in the presence of irregularities, it does not fit evenly onto the glue. This leads to differences between tiles and corner fillets. For the same reason, it is not recommended to lay this material on a layer of glue more than 1 cm.
Tile dimensions
Porcelain stoneware tiles are manufactured in large sizes, which makes it difficult to fill the space underneath evenly without using a comb. If there are voids under the tiles, these places become very fragile, and when a heavy object falls on them, the tile becomes unusable.

Preparation for cladding the flooring begins with the creation of a project, determining the method of positioning the pattern and the method of installation. The tile must be cleaned of factory dust, and if it has a protective wax layer, it is removed with warm water with the addition of cleaning agents. You can also remove the wax with a metal spatula.

Porcelain stoneware can be laid in two ways: using seamless technology and with seams.
Seamless masonry is used to reduce the number of seams and obtain a smoother surface.
For end-to-end laying, it is better to choose a tile of a large size, since the larger it is, the less seams the coating will have. The optimal material size for this technology is 600x600 mm.
The gap between the tiles should not be more than 1mm, the remnants of glue protruding along the seams must be removed immediately.
It is important to understand that the seams between the tiles provide it with additional elasticity, which is required for its safety when heated and pressed, therefore this technology is not used if the tile is placed on a warm floor system.
Laying tiles
- With the help of a cord, it is necessary to mark the middle of the floor from which the laying will begin. It is worth starting precisely from the middle of the base, since smaller fragments will need to be cut along the edges of the surface.
- On the base, separately under each tile, glue is applied, the layer thickness of which should not exceed 5 mm. This is done using two types of spatulas: the first evenly distributes the glue, the second creates teeth that ensure high-quality fastening of the material. The size of the teeth depends on the size of the tile. For example: for 20x20 porcelain stoneware, it is better to use a spatula with 8mm teeth, and if the tiles are more than 30x30, then a spatula with teeth sizes from 12-15mm is used. It is important to have time to lay the tiles within 15 minutes, before the glue has time to set.
- The next tile is installed on the edge end-to-end to the previously laid one, after which it is lowered onto the surface smeared with glue, slightly moved away from the first and pressed down. The laid tiles are tapped with a rubber mallet.
- To ensure the same width of the joints, crosses are installed between the tiles, which remain there until the glue dries.
- The evenness of the masonry is controlled with a level after each tile laid.
- If breaks are made during the laying process, it must be borne in mind that the previously laid tiles settle, and if the new laying is carried out at its level, after the glue has completely dried, drops will appear.
Sawing and drilling tiles

In order to cut porcelain tiles, you need to use an electric tile cutter or grinder with a diamond wheel, which do the best with durable material.
If you need to drill holes in the tile, you will need a powerful drill with attachments: "crown", "ballerina" and "feather", which are designed for working with glass and ceramics.
End of styling
- After the glue has dried (usually after 2-3 days), grouting can be started.
When choosing the color of the grout, it should be borne in mind that the color to match the tiles visually gives the floor covering uniformity and neutrality, while contrasting colors noticeably emphasize the pattern.
- Before grouting, you need to make sure that there is no debris in them, which can greatly complicate the whole process.
- The mixture is applied with a rubber spatula diagonally to the seams, after which it is rubbed with a damp sponge. Excess material is removed immediately.
- If there are gaps between the coating and the wall, they are blown out with sealant.
Assessment of the quality of work
To assess how well the work is done, a level is applied to the surface. The cladding must not have any slopes or bulges, and the seams must be of the same width.
Features and benefits of flooring porcelain stoneware

- Versatility
This material can be used for covering the floors of any premises, both inside and outside.
- Reliability
Porcelain stoneware tiles are resistant to sudden temperature changes, chemicals, and have high durability.
- Low water absorption
The water absorption index of porcelain stoneware does not exceed 0.05%, which allows it to retain its original appearance during prolonged use in the open air and in severe frosts.
- High strength and bending load capacity
These qualities make it possible to use porcelain stoneware in rooms with increased floor load. For example, in a production facility where heavy equipment is installed or in a car park.
- Color retention
Since such a tile does not have a decorative layer, and the pattern lies in its structure, during operation the tile does not lose color, does not fade and does not wear off.
How to choose the right tile?
- Quality tiles must be able to withstand falls from a height equal to their size. To check it, they put it on the edge and release it. If defects appear, the material is of poor quality.
- A package of quality porcelain stoneware tiles weighs about 18 kg. Less weight indicates inadequate quality.
- The depth of pits and grooves on the back of the material should not exceed 2 mm.
- When buying tiles, you need to make sure that all of them are from the same batch and have the same color.
- When tapped with a finger, quality material makes a dull sound. For comparison, you can knock on ceramic tiles, the difference should be obvious.
- A very important criterion for choosing a tile is the type of room in which it will be installed. So, for the bathroom and kitchen, it is necessary to take material with a rough surface, which will slip less when in contact with water. But for a corridor or garage, tiles with increased wear resistance are taken.
- When choosing a tile, it is important to take into account the size of the room. In rooms with a large area, both small and large tiles are taken. For small rooms, it is advisable to use porcelain stoneware with a size of 300x300, since large tiles visually reduce the space of the room.
Compliance with all of the above rules and stages of work will help to lay the ceramic granite tiles as efficiently as possible, quickly, and most importantly, without the cost of the work of the masters. The surface of the porcelain stoneware floor looks decent and does not require any special maintenance.
During the work, do not neglect the safety rules, use gloves and goggles that will protect your eyes from the ingress of working solutions and dust. Since there is no edging on porcelain stoneware tiles, it is easy to cut with its edges, so work should be done as responsibly and carefully as possible.
Otherwise, the process of laying tiles should not cause difficulties even for novice craftsmen.
Porcelain stoneware is used quite often for interior decoration. And this is understandable. The high quality of the material and the resulting result can satisfy any requirement. The work on finishing the premises is quite responsible and is usually done by professionals, but it is also possible to lay porcelain stoneware with your own hands. In order not to make common mistakes, below are the basic rules for performing such work.
General information and concepts
The size, color, shape of porcelain stoneware tiles are extremely diverse. But even without using special types of porcelain stoneware, it can be laid out in a variety of ways. Some of them are shown in the pictures below.
Choosing any of the possible methods of laying porcelain stoneware on the floor, you can, using simple one-color tiles, get a beautiful image, especially if you combine different sizes and colors of the material.
However, it should be borne in mind that rooms are also irregular in shape, in this case, the installation of porcelain stoneware can be performed in accordance with the figure below.
It should be remembered that there are several subtleties associated with laying tiles. They are due to the peculiarities of image perception and are as follows:
- the tile affects the visual assessment, the large size reduces, and the small increases the size of the room;
- to visually increase the width of the room, it is better to lay the pattern across, and to visually increase the length - along the room;
- you can combine different zones into one whole using a through drawing. It is possible to divide into zones using a single drawing.
- light tones of tiles when laying porcelain stoneware on the floor visually enlarge the room;
when the tiles are tilted at 45 °, the edges of the tiles must be parallel to the diagonals of the room. The fulfillment of this requirement can be seen in the figure below.

The procedure for performing work on the installation of porcelain stoneware
The material below can be considered as instructions for installing porcelain stoneware.
To perform the necessary work, you need the following tool:
Materials (edit)
- porcelain stoneware tiles;
- silicone sealant;
- glue for porcelain stoneware;
- grout for sealing joints;
- crosses;
- base primer;
- water.
Preparing porcelain stoneware for laying
You should start by preparing a plan for the installation of porcelain stoneware. In this case, it is necessary to determine how to carry out the styling, drawing, the method of application and the thickness of the adhesive. It is possible to lay porcelain stoneware without a seam, butt. The disadvantage of this method is the use of tiles of exactly the same size, otherwise some of them cannot be used. And also the impossibility of ensuring the same length of the seams and the uniformity of their filling.
The advantage of this installation method is the possibility of obtaining a homogeneous surface and saving materials. However, the traditional method of laying with seams is considered optimal.
Before starting to work with tiles, its surface must be cleaned of a protective layer, which is usually applied by manufacturers to protect the product from damage during transportation. Most often, technical wax is used for protection, it can be removed with warm water using cleaning agents. Paraffin can be easily removed with a spatula.
Preparation of the base
If the base where the porcelain stoneware will be laid is uneven, then it must first be leveled. To do this, a screed is made on the surface, the working surface for laying the tiles must be flat and dry, without voids, cracks and dirt. Glossy, shiny surfaces should be sanded to a matte finish.
When making a screed and bringing the floor to a condition suitable for laying porcelain stoneware on the floor, it is necessary to remember the load-bearing capacity of the floor. Excessive stress on them can backfire.
Work can be carried out at temperatures above plus 5 ° C, when the heating is on and when the floor is heated, it is impossible to lay porcelain stoneware.
Adhesive selection
One of the distinguishing features of porcelain stoneware is zero water absorption. This is decisive when choosing an adhesive, it must provide increased adhesion to the surface. Therefore, the use of cement mortar is undesirable and it is necessary to use adhesive mixtures with the maximum addition of polymers.
When choosing an adhesive, follow the manufacturer's instructions. In addition, it is necessary to take into account the nature of the base and the load in the places of installation of porcelain stoneware, with significant loads it is better to use mixtures designed for use in such conditions.
Laying technology
When laying porcelain stoneware, you need to choose the right tool - you need a comb, a rubber hammer, crosses, grout. The size of the material used will determine the choice of the trowel - the larger the tile, the larger the trowel should be. To obtain a constant width of the seams, crosses must be used.

Before laying porcelain stoneware on the floor, mark the middle of the floor. For this, a cord is most often used. It is pulled along a long wall. Laying begins from the middle in such a way that the middle of the whole tile or its seam runs along the line of the cord.
Porcelain stoneware is laid symmetrically, along the edges of the lined surface there are whole or cut-off tiles of equal width. That is why the calculation should be started from the middle.
On the protrusions of the walls and outer corners, the installation of porcelain stoneware must be started with whole tiles, cutoffs are installed in the inner corners. In the passages between individual rooms, the seams are placed along the line of transition from one room to another.
The laying surface in the niches is distributed so that the cut tiles of the same width are in the middle of the surface or symmetrically along its edges.
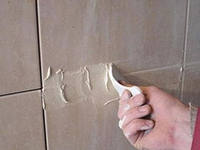
First, the adhesive solution, well mixed to the consistency of thick sour cream, is applied to a small part of the area and leveled with a smooth and then notched trowel.

The adhesive composition is also applied to the reverse side of the tile, after which it must be laid in no more than 15 minutes.
For this, the tile is placed on the edge and abutted against the previously laid one. Then the entire tile is applied to the surface with the adhesive, it must be slightly moved away from the adjacent one, the tile to be laid is slightly pressed into the adhesive. The gap between adjacent tiles must not be filled with adhesive. Crosses are used to ensure a constant gap.


The level position of the laid tiles is checked with a level. You can change the position of the tile (wiggle, shift, press in) within ten minutes. If you have to take a break in laying porcelain stoneware on the floor, then you should take into account that the previously laid porcelain stoneware is a donkey, and the one that is laid later will still settle. So, if they continue to be laid at the same level, then in the future this can lead to a difference in levels.

Care must be taken to ensure that there are no voids in the glue line. Otherwise, the tile may crack during use.

The glue drying process lasts a day, and the full strength of the seam occurs in 3 days.
End of styling
After curing, when the glue is firmly connected to the porcelain stoneware, you can grout the joints. For this, a grout of a suitable color is used. Although there are some nuances here. A contrasting grout will accentuate the pattern, and a matching grout will make the surface of the cladding more neutral and uniform.
Before grouting, check that the joint is clean. Any foreign material can ruin the joint and make grouting difficult. The work itself is done with the help of a special tool - this is what it is called grouting.
The size of the seam (cross) for porcelain stoneware 30x30 cm is three to five millimeters. The gaps between the floor and the wall, as well as in the places where pipes pass through the cladding, must be filled with silicone.
The grout mortar must be applied diagonally to the veneer in relation to the joints. The remains of the joint filler are removed with a clean and damp sponge. Regular cleaning of the lined surface can be started after two weeks, not earlier.
In more detail, you can see the procedure for laying tiles at the link:
How to assess the quality of work
To assess the quality of the work done for the lined surface, the following criteria are used:
This is approximately how the order of work, technology and methods of laying porcelain stoneware with your own hands looks like.
Porcelain stoneware appeared on the building materials market not so long ago, but immediately became in demand due to its excellent properties and high performance characteristics. Laying porcelain stoneware is not the most difficult procedure, it is available for independent execution, but it requires a serious approach and care.
Types of porcelain stoneware
When choosing porcelain stoneware, it is necessary to consider where it will be used, in what conditions it will be used. There are several of its most popular types:
- glazed;
- matte;
- polished;
- technical.
Porcelain stoneware is a very strong material suitable for installation in any room, however glazed and polished should not be used where intense loads are expected. These coatings from prolonged exposure to them can wear off over time, their color will become faded.
Choice of glue and tools
Porcelain stoneware is low-porous and has a very low moisture absorption coefficient. It is because of these properties that its styling has several features that must be taken into account. It does not fit into ordinary cement mortar. For installation, special adhesives are used based on a cement-sand mixture with the addition of polymers. They increase adhesion and give the adhesive good elasticity. It is necessary to mix the glue mixture with water exactly according to the manufacturer's instructions, while remembering that the mixture is added to the water, and not vice versa.
In addition to glue, you will need to stock up on tools necessary in the process of work:
- drill;
- solution mixing nozzle;
- mallet;
- notched trowel;
- level;
- tile cutter or "grinder";
- rubber scraper;
- plastic crosses.
Surface preparation
Any kind of porcelain stoneware is very picky about the base where it will fit. It should be even, without cracks, scratches, protrusions. It is very important that the surface is hard.
This is especially true if porcelain stoneware is laid on a wooden base. In this case, the logs should be strong and set strictly horizontally, the rough floor is tightly fixed on them. It can be poured over with self-leveling compound or leveled with thick plywood sheets.
Regardless of what material is used for the base, it is covered with a primer in two layers. This will remove dust from the surface and increase the adhesion of the adhesive.
DIY porcelain stoneware laying
After all the preparatory work has been completed, all the necessary materials and tools have been purchased, you can start working. If the tile is laid in a straight way or in a checkerboard pattern, work begins from the corner of the room, laying out the first row along the wall. If an ornament of several colors is laid out, or a complex type of styling is used, then they start with it from the middle of the room. It is advisable to draw a plan right on the floor according to which the tiles will be laid out, and sign the name of the flowers. Otherwise, in the process of work, you can make a mistake and not immediately notice it.
The very process of laying porcelain stoneware on the floor is not very difficult, the main thing here is not to rush and follow the sequence:
- The adhesive is applied to the substrate with a spatula over an area equal to two or three tiles. Since porcelain stoneware is a heavy material, the glue should not be applied too thickly, since the tile will simply sink into the solution under its own weight. A small amount of glue should be applied to the tiles as well. This is necessary so that later voids do not form under it. The glue is leveled with a spatula, and then grooves are drawn with its notched side at an angle of up to 60 degrees to the base.
- The tile is pressed tightly until excess glue appears from under it. This is an indicator that the solution is evenly distributed, and there are no voids left under it. The excess is immediately removed with a rubber spatula, otherwise the solution will harden later, and it will be very difficult to do this.
- With the help of even tapping with a mallet on the ends of the tile, it is leveled, leaving a few millimeters at the seam, where plastic crosses are inserted to the full depth. This will prevent the seams from tearing apart before the mortar hardens. If the design assumes a seamless installation, crosses are not needed, and the tiles are tightly pressed against each other. After several tiles have been laid, their horizontal level must be checked with a level in different directions.
- After laying the entire surface, wait 24 to 48 hours. This time is necessary for the solution to completely harden, and only then can you start grouting. This is done with a rubber spatula in the direction of the transverse seam. The excess is removed with a damp sponge. The color of the grout is selected depending on the design. It can be either in the color of the tile, or, conversely, contrast with it.
The porcelain stoneware flooring will be ready for use in 6-7 days, then you can also connect the "warm floor" system.
Ceramic tiles are one of the most popular types of indoor wall and floor cladding. Among such products, models from porcelain stoneware are in great demand.
The material stands out for many advantages, including:
- Increased strength and durability;
- Resistance to moisture, chemicals, temperature extremes;
- Variety of designs.
Unlike classic tiles, porcelain stoneware products have a uniform color throughout their entire thickness, so the pattern does not fade and does not wear off over time. In addition, the material perfectly copies the structure of natural stone, giving the lined surfaces a rich look.
Laying such a floor covering requires certain skills and dexterity, so many people prefer to entrust the repair to professionals. But knowing the main features of the process specified in the building codes and regulations (SNiP), and with due diligence, you can lay the porcelain stoneware slabs yourself.
Styling options and methods

There are two common installation methods for ceramic tiles, depending on the type of subfloor. Among them:
- Laying slabs on a raised floor using special fixing structures. This technique is more often used by professionals, as it needs some skill;
- Application for installation of special, recommended SNiP. This method is quite suitable for self-repair.
The order of work

Whatever base is under the porcelain stoneware cladding, the installation work includes several main stages, enshrined in SNiP:
- Creation of a project, including the choice of the placement of the pattern and the method of laying;
- Preparation of the necessary tools and materials;
- Base processing;
- Direct mounting of plates;
- Grouting.
Features of installing porcelain stoneware on the floor
Laying porcelain stoneware, according to SNiP, can be on a concrete base, on a wooden flooring or a sheet of plywood. Each of these methods has its own characteristics.
When carrying out work in a room with wooden floors, it is necessary sequentially:
- Dismantle the wood flooring;
- Install horizontal logs;
- Fill the intervals between the lags with expanded clay;
- Fix the boards with a gap of 8-10 cm with self-tapping screws;
- Lay a waterproofing base;
- Install the mesh frame;
- Install ceramic tiles.
Installation on plywood sheets also has its own characteristics. This requires:
- Lay a plywood sheet with a thickness of more than 28 mm on the logs and fix the base with self-tapping screws;
- Sand, clean and prime the surface twice;
- After drying, lay the porcelain stoneware with polyurethane glue.
Before laying tiles on a concrete floor, it is necessary to achieve its perfect evenness, for which:
- Use a waterproofing material;
- Install beacons;
- The surface is poured with a self-leveling compound.
Choosing the type of porcelain stoneware
Must have high strength and resistance to damaging factors. In addition, such a coating has an important role in creating an interior, therefore it must harmoniously fit into it. With the help of modern technologies, several types of porcelain stoneware are created, differing in texture.


material includes:
- Technical variety, characterized by the absence of processing of the front part after pressing and firing;
- Matte tiles with a smooth, unpolished surface;
Semi-polished types are presented:
- Structured porcelain stoneware imitating the appearance of natural materials (fabrics, stone, wood);
- Lappated gres with partially worn convex areas.
Among the polished types, you can choose:
- Embossed, decorated with foreign inclusions;
- Aged, with roughness imitating stonecutting;
- Anti-slip, having a matte or technical base with textured ornaments or grooves located on the front.
When choosing a suitable type of porcelain stoneware, its thickness should be taken into account. The SNiP states that in living rooms the thickness of the facing elements should be 7-10 mm, for trade and office halls, products with a thickness of 9-14 mm should be used, in industrial premises - 14-30 mm. best used for wall cladding.
The choice of adhesive

The requirements for adhesives and the thickness of the adhesive layer when laying ceramic granite are described in SNiP. The substance must meet the following characteristics:
- Contain plasticizers to increase resistance to temperature extremes. This parameter is especially important if you want to lay porcelain stoneware slabs outside;
- When facing floors in a house, the glue should contain polymeric materials that increase the elasticity of the substance and its elasticity;
- To lay tiles on concrete, cement mixtures should be used, but only resistant to moisture. When working with difficult substrates, it is better to give preference to an adhesive based on reactive resins.
It is worth remembering that the consumption of glue increases when using large boards.
Required tools

Before putting ceramic granite on the floor, you should stock up on tools, without which it is simply impossible to carry out high-quality installation work. To install floor tiles, you must have:
- Measuring instruments (tape measure, ruler);
- With a rubber hammer;
- Marker;
- Level;
- Several types of spatulas (rubber, even metal with a width of 30-40 cm, notched);
- Tile cutter or grinder;
- Drill with drills and a whisk attachment;
- A container for mixing solutions;
- With gloves.
Preparation for styling

In order to lay the flooring with high quality, after preparing the tools, it is necessary to process the base and clean the tile itself. If there is a wax film on porcelain stoneware products, it should be carefully removed with warm water or a metal spatula.
Careful waterproofing and leveling of any type of surface is necessary due to the following factors:
- The gravity of the material. If you lay the tiles on an uneven surface, there is a high risk of the formation of drops and corner joints;
- The fragility of products in the presence of voids under them. Even a slight blow over a cavity can hopelessly ruin kerogranite tiles.
Laying technology
Porcelain stoneware can be laid seamlessly and with visible seams. Seamless technology makes the coating visually uniform and smooth. For this method, it is recommended to use large slabs with an area of 60x60 cm, which reduce the number of gaps on the surface, and special compounds for grouting. The gaps between individual elements in this technique do not exceed 1 mm, and excess glue from the joints is removed immediately after installation.
In places with frequent temperature changes, the joint gaps provide greater elasticity of the masonry, protecting it from deformations. When heating floors, only this method is permissible.
Laying tiles
Laying porcelain stoneware should be starting from the middle of the room. To do this, measure the required distance using a cord or tape measure. You should start from the center of the base so as not to spoil the overall pattern, since at the edges it may be necessary to cut the tile using special tools (tile cutter, grinder).
The required amount of glue is applied under each plate. According to SNiP, its layer can vary from 3 to 10 mm, depending on the size and thickness of the cladding elements. To put the adhesive on the base, use an even and notched trowel to ensure an even distribution of the edges and reliable adhesion of the materials. The larger the tile, the larger the teeth should be.


It is recommended to lay the tiles for no more than 15 minutes, until the glue begins to set. The next element is placed on the side surface close to the already laid one, and then lowered onto the glue layer, slightly moving it away from the previous product and pressing down. For better bonding, the laid porcelain stoneware is tapped with a rubber hammer, and the width of the gaps is adjusted with plastic crosses.
The evenness of the coating is determined using a level regularly applied to the surface.
Grout cladding


To make the joints look neat and protected from external factors, they are treated with a grout based on cement or epoxy resins. Deciding to lay the cladding in a seamless way, the color of the grout should be matched to the color of the ceramic. Where fixed gaps are present, the color of the composition should be selected for practical and aesthetic reasons.
In order for the cladding installation process to go through without difficulties, you should remember a few simple recommendations:
- Before starting work, it is advisable to mark the future layout on the floor, taking into account the gaps. This will help you better imagine the finished appearance of the coating and calculate the amount of consumables needed;
- When heating floors, special adhesives should be used, on the label of which there is a corresponding note;
- The recommended joint width for calibrated tiles is 2.5-4 mm, and for edged porcelain stoneware, the allowable gap size is 1.5-2 mm.
By carefully following the instructions, using a few tools, you can create the perfect porcelain stoneware flooring that will delight you with durability and beauty for many years.