Mansard roof rafter system - drawings. The structure of the attic roof rafter system How to attach a rack to the attic roof beam
The attic rafter system can be of various configurations; if installed correctly, it is reliable and functional. The rafter structure is a powerful frame, capable of withstanding the load not only of the entire roof, but also the influence of external natural factors.
The frame made of rafter boards is the basis of the entire attic roof structure, which is capable of supporting the weight of the entire roofing system. Before you equip the roof for the attic, you need to know in what order to install all the necessary elements of the rafter structure.
The structural elements of the roof truss system intended for the attic are:
- Mauerlat. The basis of the entire roofing structure, which able to withstand and evenly redistribute the load from the roof system to the supporting walls. Mauerlat consists of boards that are attached to the external walls of the building, and elements of the rafter structure are also attached to them;
- Beam posts or rafter legs, which form the frame of the roof structure. Boards for rafter legs should withstand the load of the roofing pie together with the outer covering;
- Vertical racks. Racks are installed for holding the central part of the rafters and protecting them from bending, as well as to support the ridge beam;
- Runs. Additional bars that are installed at an angle for supporting rafter legs;
- Ridge beam. Mounted on long systems (more than 7 meters) and serves for creating structural rigidity;
- . An additional wooden structure that is attached to the rafter system and serves as a base for the roof.
In addition, there are additional elements: beams, purlins, crossbars, which are installed in various parts of the roof frame to create rigidity and strength of the structure as a whole.
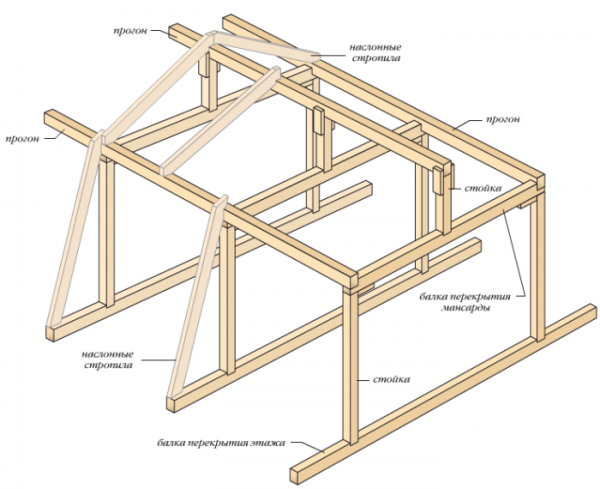
Mansard roof truss system: drawings and photo of the plan below.

Rafter drawing plan
Types of rafter systems for mansard roofs
Roof truss structures for a warm room may be different, and accordingly, the installation of such structures will be different. In addition, the rafter system may have:
- Hanging structure. It rests on the side walls of the room with one edge of the structure and at the top when connecting the rafters - on the ridge element;
- Layered design. Most often it is installed in buildings with a span of more than 10 m. With this structure of the roof structure, the rafter system has support on external walls and a partition inside the building.
Rafter systems for attics can be installed during installation:
- designs;
- roofs;
- Broken gable;
- roofs;
- designs;
- Dome system (cone);
- Vault system.
The classic look of an attic space is represented by a rectangular structure, which is mounted inside the covering, resting its upper corners on the slopes, and the lower corners are included in the support system.
Layered rafters
Installation of attic roof rafters and pitch calculation
The decisive indicator for calculating the pitch of the roof rafters in a warm room is the choice of the external roof covering. So, for different types it is necessary to install rafters for the attic roof as follows:
- Under . The pitch between boards with a section of 50 by 50 mm should correspond to 60-80 cm;
- Under . A beam with a cross section from 50x100 mm to dimensions 50x150 mm is required. The pitch when installing under slate should be 600-800 mm;
- Under . When the cross-section of the rafter leg is 50x150 mm, the step size should not exceed 95 cm and should be at least 60 cm;
- Under . The section of the beam can be 50x100 mm, as well as 50x150 mm. With such a board, the step must be taken at least 60 cm and no more than 90 cm.
In addition, when calculating the step, it is of great importance roof slope. If the slope is 15%, then the distance between the rafter boards is recommended to be at least 80 mm. As the degree of slope of the roof slope increases, the distance between the rafters increases proportionally.

Rafter pitch
How to move rafters beyond the wall line
The rafters extend beyond the line of the outer wall in order to increase the attic living space. The peculiarity of this method is that the support of the lower rafter beam is the floor board, and not the Mauerlat board.
Wherein install reinforcing struts under the extreme part of the triangular sides.
In this case, it is not always advisable to install a Mauerlat, but Concrete pouring must be done, since floor beams will be attached to the concrete with anchors.
When the rafters are moved beyond the outer line, a cornice should be formed, the width of which for houses made of wood should be at least half a meter, for structures made of stone or concrete - at least 400 centimeters.
Removing the rafters beyond the line of the external wall must be done in the following sequence:
- Install external slab beams, with a cross-section of at least 15*20 cm. They serve as the outline of the overhangs and should form a rectangle (based on their roof shape);
- Pull the cord between the outer beams and install the remaining beams in increments of 0.6 m (for a warm room);
- Measure this distance from the left to the right edge, which should correspond to the short leg of the triangle, and mark the points by cutting out sockets for installing the extreme supports;
- Make supports the dimensions of the timber nests are 10*15 cm. The length of the support boards must be more than 10 cm;
- Install temporary spacers for mounting corner posts;
- Using a plumb line on a cord attached to the posts, check the uniformity of the points selections for supports;
- In the central part of the attic gables install two supports;
- Install purlins on supports, firmly attaching them with corners;
- Connect opposite supports with bars, also attach them to the purlins using corners. Install a temporary support under each beam;
- The beam, which serves as a crossbar, temporarily fasten with an inch at a distance of 200-300 mm from the edge. To make it convenient to mount the top of the rafter structure, install temporary plank flooring;
- From edged boards it follows make templates, along which opposite trusses are then mounted:
- The template is made by applying the workpiece to the beam and the end of the purlin, and corresponds to the rafters of the bottom row. Mark the groove lines to size to eliminate excess;
- Install the rafter legs from the end, and then from the lower level of the attic;
- Next according to the template install the top rafter frame;
- To avoid sagging of the crossbars, it is necessary to the trusses fasten the headstocks from below - in a hinged way, from above - with a rigid fastening.
The rafter boards are attached to the walls using wire ties and the gable frame is installed.

Removing the rafters from the wall
How to calculate the rafter system
 Before calculating the rafter system, it is necessary to definitely know the shape of the roof.
It should be taken into account that for comfortable living in the attic the height of the walls of the room must be at least two meters, and the length - from three meters.
The attic project involves the calculation of a rafter system that matches the size and nuances of the building.
If a layered system is provided, then additional support needs to be installed.
In addition, you should keep in mind:
- The ridge beam must be installed when the roof length is more than seven meters, since it significantly makes the structure heavier;
- Don't forget about the skylight system, for which it is necessary to additionally construct a frame;
- Necessarily take into account the loads from climatic factors: wind, snow, which may be important for determining the roof overhang;
- A lot of roofing cake, which is determined on the basis of one sq. meters of its entire structure. In this case, it is necessary to multiply the result by a coefficient (from 1.5 to 3) for a margin of safety.
In addition, the characteristics of the flooring and the performance of the roof should be taken into account.
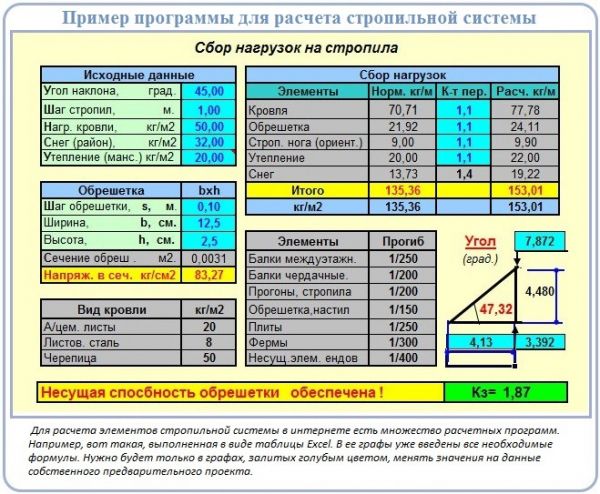
Calculation example
Installation of the rafter system
Installation should begin with the floor beams, which are attached to the mauerlat, and the rafter legs are attached to them. It is important to consider.
- Mark the installation location of the ridge element and supports in the center of the beams;
- At equal distances, install racks made of boards equal in cross-section to the floor beams. It should be fastened with corners, having previously been temporarily secured with nails to determine the accuracy of installation;
- The first pair of racks is fastened with bars made of bars;
- Rafters are attached to the resulting structure in a U-shape, which are installed either on the Mauerlat or on the floor beam by cutting a groove;
- Install ridge rafters by connecting them with bolts and washers or metal plates;
- The rigidity of the structure is provided by struts, which are attached to the center of the side rafters and the post and headstock, which are mounted in the center of the tie.
Other trusses are made in a similar way and are secured together by purlins. The distance between farms can be from 60 to a meter.
To secure the assemblies of the attic structure and give them strength it is necessary to fix them with staples. Next, the sheathing is installed.

Installation of the rafter system

Installation diagram
Installation of attic roof sheathing
Depending on the type of external roof covering provided, there are two lathing options: solid and sparse.
Solid is most often installed when covering:
- Roll. In this case, the lathing is installed in two floorings: the lower one - in 30 cm increments from 20 cm bars, the upper one - from 50x20 boards, which are nailed at an angle relative to the lower flooring of 30-45°;
- Slate flat asbestos-cement;
- Flexible tiles.
The sparse type is set when:
- Steel, metal coating. The bars, the cross-section of which is 5x5 cm, are laid perpendicular to the rafters in increments of 20-30 cm. Installation is carried out from the eaves upwards. A flooring of 70 cm wide boards is mounted on the overhang. Butt-joined bars are attached along the ridge and ribs;
- Metal tiles;
- Asbestos cement slate;
- Clay tiles.
The pitch of laying the sheathing and the thickness of the boards directly depend on the roofing covering and are calculated individually depending on the load and the specifics of the installation.
ATTENTION!
The sparse sheathing bars should be nailed offset so that the joints in adjacent rows are not located on the same rafter beam.
Sheathing boards should be slightly less than the length of the slope.

Lathing
Conclusion
Thus, it has its own installation features. They must be taken into account, since the attic is an additional place to live, and it must meet all the criteria for a given function.
Useful video
In this video you will learn everything about the rafter system of the attic roof:
In contact with
Using all possible space, giving the house originality and significantly reducing heat loss through the roof - these are the tasks that the attic solves. If there is a certain margin of safety at the foundation, in this way you can turn a one-story house into a two-level one. Another attractive thing is that you can build an attic roof with your own hands even without special construction skills. It is important not to make a mistake with the choice of materials and do everything according to the rules.
Windows on a regular floor are located in the walls. In attics there are no or almost no walls. They are replaced by a roof. That’s why windows are made special: they not only must let in sufficient light, but also withstand wind and snow loads, which are much greater on the roof than on the walls.
Dormer windows
When planning an attic, you should take into account the recommendations of SNiP. They recommend making the window area no less than 10% of the floor area. So if the attic is divided into several rooms, each should have a window.
Of all the methods shown in the photo for installing skylights with an attic, inclined installation is the easiest to implement. In this case, it is necessary to ensure the proper degree of waterproofing of the junction, and also to use special models with reinforced frames and reinforced glass - the load on the surface can be significant.
Advantages of a sloping roof window:
- more light, less sharp boundaries of light and shadow;
- the roof surface remains flat, its relief is not complicated;
- relatively easy installation.
When planning such a window, it is necessary to remember that its area increases with increasing angle of inclination. At what height is it more convenient to install such a window and how its height increases in centimeters depending on the inclination, look at the photo.

The steeper the slope relative to the floor, the smaller the window height should be.
The width of the window frame should be 4-6 cm less than the pitch between the rafters. Then it can be easily installed without disturbing the structure of the frame. If the window is wider, it is necessary to make a reinforced beam above it and calculate the load.
If you need to have a larger window, it is easier to place two narrow ones side by side. They look no worse than one big one, and there will be fewer problems.

When installing a dormer window, the roof geometry becomes more complicated: a valley appears on top and on the sides. Because of this, the rafter system becomes more complex both during planning and during assembly. The complexity of laying the roof covering also increases. All valleys are the places where leaks are most likely to occur. Therefore, everything needs to be done very carefully. In regions with a lot of snow, it is advisable to install snow guards over such windows so that they are not blown away in the event of a sudden meltdown.

Installation of a vertical dormer window in an attic roof
The advantage of such a window is that you can stand next to it at full height. But they let in less light, the terrain becomes more complex and the roof becomes more problematic.
A recessed window is usually used if there is access to a balcony through it. In other cases, this method of arrangement is not the best option: little light gets in, the shadows turn out to be very deep, which is tiring for the eye, the geometry also becomes more complex, although not to the same extent as in the previous version.
The easiest way is to make a window at the end of the attic. In this case, a reinforced frame or reinforced glass is not needed. Just high-quality glass is quite enough. It is this option that can most often be seen in country attics: this is the most inexpensive option, which can easily be implemented with your own hands.
Rafter system
When independently building private houses with an attic, they usually choose a broken roof. It allows you to get a room of significant area, larger than under a gable.

With the same width of the base (of the house), the attic space under a sloping roof is larger than under a regular gable roof. The rafter system is becoming more complex, but a gable roof with an attic under a sloping roof is still more popular
The design of the sloping mansard roof is such that the overhangs can be lowered quite low, giving the house an interesting look. But the long overhang of the roof serves not only a decorative role. They also cover the upper part of the wall from precipitation and divert the bulk of the water away from the foundation. Although when planning you need to keep in mind that in strong winds they increase windage. Because of this, it is necessary to use more powerful boards and beams. Therefore, the size of the roof overhang is chosen based on several considerations, the main one of which is weather conditions.
Tilt angle
Depends on the roofing material, but most of all - on the region and weather conditions. The classic version is shown in the figure: the lower slopes in relation to the plane of the attic floor are inclined by 60°, the upper slopes by 30°. Based on these data and the parameters of your building, you can calculate all lengths. Just take into account that according to SNiP, the ceiling height in the attic cannot be less than 2 m. Then, by definition, this is an attic. A person will feel comfortable if the ceiling is raised to a height of at least 2.2-2.3 m. Based on this, according to the rules of geometry, calculate the required lengths.

In the classic version, the load from precipitation on the side surfaces may not be taken into account. Precipitation can only be retained on the upper part, the angle of inclination of which is less than 45°.
In general, the inclination of the side surfaces usually varies between 45° and up to 80°. The steeper the slope, the greater the windage it has, this must be taken into account: in regions with strong winds it is better to make flatter roofs. Then wind loads will be perceived much better.
Types of rafter systems for sloping roofs

The design of a sloping mansard roof is one of the options for the rafter system (the most common)
To make the frame of a sloping roof with your own hands, pine lumber is most often used, grade no lower than 2. The choice of cross-section of timber and boards depends on the size of the roof, the selected roofing covering (its weight), wind and snow loads in the region, and the pitch of rafter installation. All these parameters are taken into account in the calculation. The methodology is prescribed in SNiP 2.08.01-89 and TKP 45-5.05-146-2009.

One of the options for constructing a frame with hanging rafters
The figure above shows a drawing of a frame with hanging rafters. It can only be implemented if the base of the upper triangle is no more than 4.5 meters (in this case, this is the width of the attic room). If more, you will have to make layered rafters, which should rest on the load-bearing wall in the middle (the attic will be divided into two parts by a row of beams).
Another version of the upper part is shown in the photo below (the picture is clickable). In this case, the side rafters are reinforced with struts. They significantly increase the rigidity of the system.
There is a second way to achieve a similar effect - to establish contractions - in the figure they are only outlined with barely visible lines. The length of the side rafter leg is divided by three, and contractions are established in these places. They will be needed if the roof covering will have a significant weight.

Option for installing a sloping roof truss system - with struts that increase the rigidity of the system
For a building that is small in size, the roof frame can be generally simple: at the top there are two hanging rafters, a tie rod, floor beams, racks and side rafters (pictured below).

Installation of a rafter system for a broken mansard roof for a small house
How to calculate a sloping roof
The attic sloping roof of a small house (no more than 6-7 meters wide) has been built so many times that, based on experience, we can say what materials should be used. Many parameters are dependent on other materials. For example, the installation step of the rafters is tied to the parameters of the insulation. To ensure that there is as little waste as possible during insulation and installation is simpler, it is necessary that the distance from one rack to another be slightly less than the width of the insulation (20-30 mm). So, if you are going to use mineral wool, its width is 60 cm. Then the racks need to be installed so that the gap between two adjacent ones is 57-58 cm and no more.
The width of the board for the rafter leg is again determined based on the insulation. For the central zone of Russia, the required thickness of basalt wool is 200-250 mm. That's not all. In order for the thermal insulation to dry, a ventilation gap of 20-30 mm is required (without it, condensation will gradually rot the wood and render the mineral wool unusable). In total, it turns out that the minimum width of the rafter leg should be 230 mm. The thickness of the board is at least 50 mm. This is in regions with light winds and not very heavy snowfalls. To summarize, for all rafters - ridge and side - a board of 230 * 50 mm is required.
If lumber with such characteristics turns out to be too expensive, it will be possible to do the insulation in two directions: partly along the rafters, partly, filling the sheathing, across. You can lay a minimum of 100 mm of basalt wool, therefore you can take a standard board 50*150 mm and leave a 50 mm ventilation gap, or order a non-standard 130*50 mm. It's up to you to see which is more profitable for the money.
For racks and beams, it is better to take a beam of at least 80 * 80 mm, better - 100 * 100 mm. Especially in areas with difficult weather conditions - heavy snowfalls or strong winds.
Order a more accurate calculation from specialists. This is a long process consisting of collecting loads from the roofing material, the structural elements themselves, wind and snow loads. After which, according to a certain formula, elements are selected. For more detailed information on how the calculation is carried out, see the following video.
Do-it-yourself mansard roof: installation procedure
The design of the Mauerlat on mansard roofs is no different from the standard version. If or logs, you can use the upper crown as a mauerlat. It is only pre-treated with impregnation with high protective properties.
If the wall is made of foam blocks, a reinforced monolithic belt is placed on top of it. On a brick wall or made of shell rock or other similar materials, the installation of such a belt is not necessary. Waterproofing is laid in two layers on the wall, and on top is a timber treated with an antiseptic - 150 * 150 mm or a log. It is secured with embedded studs.

When assembling all elements, long nails are used - at least 150 mm long. In the most critical places, it is better to connect three or more elements using bolts or studs with double-sided threads. It is advisable to strengthen all joints with steel plates or corners.
First way
Installation of attic roof rafters is done in two ways. First: they assemble the parts on the ground, then lift them up in finished form. There, the outer structures, which will become pediments, are put up first. They are placed vertically and secured. It is often more convenient to secure them with long bars nailed to the wall (temporary). The following assembled structures are inserted into the prepared recesses in the Mauerlat (they are made at the required pitch). They are positioned strictly vertically and carefully secured. If necessary, additional temporary spacers are installed to fix them in the desired position. Side beams are installed.
How to build a sloping roof in this way and assemble the nodes, see the video below.
Second way
The second method - the construction of a sloping roof is carried out sequentially by assembling elements directly on site. This method is more convenient if the structure is large and when assembled it can only be lifted using special equipment (crane).
First, the floor beams are laid. Stands and ties are attached to them, and temporary spacers are installed to hold them in the vertical direction. Next, the upper and side rafter legs are assembled, and the tie rods and jibs are installed.
During installation, the following sequence of actions is observed: first, the outermost elements are installed and adjusted to the desired position, and securely fastened. If necessary, use temporary spacers. A fishing line, rope, and cord are stretched between them, which will serve as a guide for the installation of all subsequent elements. This simple move allows you to get the ideal geometry (don’t forget to check the slope angle, verticality or horizontality).
On top of the racks, tie-downs are attached - bars, to which the side rafters are then fixed and onto which the tie-down of the upper triangle is installed. The ties are secured using metal corners. Since the beams are long, they sag. This is later eliminated - after installing the upper rafter legs - with the help of vertical beams of fixed or adjustable height. And temporarily they can be supported with racks (so as not to pull the entire system).

To make it easier to maintain the desired angle when installing the side rafter legs, templates are made according to which cuts are made. But since the geometry of buildings built with your own hands is rarely ideal, adjustments may be necessary. To check the resulting angle of inclination, another template is knocked down from several boards, which is used to check the correct installation.
If the standard length of lumber - 6 meters - is not enough, either order the required length (expensive) or increase it. When building up, two boards measuring at least 0.6 meters (30 cm on each side of the joint) are nailed to the joint. They are nailed on both sides or bolts are used.

A reliable way to build rafters. The length of the “patch” is at least 60 cm
After installing the side rafters, all that remains is to install the top ones. A template is also made for them, pre-cut on the ground, and installed on top.

The top part can be made in different ways. Its structure depends on the width of the base. How to make it, look at the photo below.

Since the structure of the attic sloping roof does not provide for the presence of a ridge, a beam is placed in the middle to tighten it, to which the slopes are attached, fixing the triangle in the required position.

Nodes and their drawings
When installing a rafter system, questions may arise regarding the assembly of nodes—the intersections and connections of several structural elements. In the photo you see drawings of key connections.

The second option for connecting the side layered rafters and the upper triangle. Bolts are used for more secure fastening.

How to make a do-it-yourself fastening of the upper tee and rafter leg on an attic roof
Methods for attaching rafter legs to the mauerlat or, as in this case, to the side beam are shown in the figure below. To make it easier to mount a heavy element, a thrust board (bar) is nailed to the bottom of the rafter, which limits its movement: the board rests against the edge and does not allow it to sink lower.

Recently, there has been a return to the use of various architectural elements that were undeservedly forgotten during the era of industrial construction. Again you can find bay windows, mezzanines, and attics, which make the exterior of the house more interesting and, at a relatively low cost, allow you to increase the interior space. For example, an 8x10 attic roof rafter system will increase costs by approximately $4,500, while adding 60-65 m2 of usable space to the area of the house.
Types of mansard roof truss systems
In practice, several types of rafter systems for the attic are used. They are classified according to the type and shape of the roof: two-, three- and four-slope, hip and half-hip, broken. The simplest option is gable rafter system attics. Its advantage is a simple and reliable design that can withstand heavy loads. However, there are also disadvantages - the simple form does not allow you to create an interesting design, which, however, is compensated by the addition of decorative elements. Another more significant drawback is the limited internal space, which is significantly less than in the case of a sloping roof.
Idea You can get rid of the lack of space by building a semi-attic - that is, a room with side walls 1.5-1.8 meters in height. This will increase the internal volume while maintaining the advantages of the gable roof design.The drawing shows an example of a half-attic type mansard roof with walls 1.8 m high
The most interesting from an architectural point of view is the rafter system of the sloping mansard roof. It allows you to show your imagination, of course, subject to compliance with building codes and, above all, strength characteristics. This design can have a regular and asymmetrical shape. The configuration is selected based on the characteristics of the house and the layout of the interior space of the attic. In some cases, the rafter system of the attic roof allows you to create a rather interesting interior space, especially if it is possible to plan a second light or mezzanine. It is important to use the volume as fully and efficiently as possible - this is not an easy, but very interesting task, which allows you to increase the usable area and make the house more comfortable at a relatively low cost.
Advice Since space is limited where the attic floor meets the roof, it is advisable to organize storage areas, install furniture, and lay utility lines.
Spaces near the walls of the attic are best used for installing convenient cabinets, shelves and built-in furniture
Elements and components of mansard roof rafter systems
The rafter system is the basis of the roof, its skeleton, on which the roofing pie and the inner lining of the attic are mounted. It is often used as a basis for laying engineering systems and communications. In turn, the rafter system of the attic roof consists of component units and elements, the combination and relative arrangement of which ensures the transfer of wind and snow loads from the roof to the load-bearing walls of the building:
- rafters (hanging and layered);
- Mauerlat;
- purlins (ridge and side);
- connecting elements (struts, spacers, diagonal connections).
The loads acting on the rafter structures of mansard roofs are quite large and reach an average of 200 kg/m2. However, in each specific case this is determined based on the characteristics of the roof structure, as well as the wind and snow loads present in the area. In any case, the rafters must be guaranteed to withstand these loads and have the necessary strength margin that can withstand very strong winds or heavy snowfall.

When calculating the load on the rafter system, it is very important to take into account the likely amount of precipitation and wind strength
The parameters and main components of the mansard roof rafter system are determined by calculations. Calculations make it possible to determine the length, profile and cross-section of each structural element and the features of how the parts are connected to each other. The strength of the entire structure largely depends on the strength of the connection of the nodes of the rafter system of the attic roof. The most common types of connections are tongue-and-groove, screw, bolted and welded. The choice of connection type depends on the design loads, the material used and design features.
Calculation and drawing of the mansard roof truss system
Having chosen the type and determined, it is necessary to calculate the rafter system of the attic roof. It should be taken into account that the rafters not only provide the strength and reliability of the roof, but also shape the internal space of the attic. It is allowed that part of the area will have a low ceiling height. Furniture is usually placed there, or used to organize storage areas. Despite some restrictions, the interior space should be spacious enough and not cause discomfort.

The first stage of design is the selection of the truss system for the mansard roof. The diagram determines the type and location of the rafter system elements. In particular, the type of rafters is determined: layered or hanging. The difference between these elements is as follows: layered rafters on the attic floor rest on side walls or other supports. Hanging rafters form a single, rigidly interconnected structure. Depending on the width of the span, the truss system of the attic roof can be reinforced with additional connections.

The diagram shows the main elements and parts of the attic roof rafter system and their relative positions
Next, it is necessary to perform calculations that take into account wind and snow loads that will act on the roof. The material, cross-section and distance between the rafters of the attic roof depend on these parameters. It is recommended to use the so-called “safety margin”. This means that the obtained result must be multiplied by a multiplying factor, thereby guaranteeing increased reliability of the attic rafter system. Taking into account the characteristics of operation, the value of this coefficient is taken from 1.5 to 3.
Important When making calculations, it is necessary to take into account the weight of the roofing system. In particular, when using ceramic tiles, the cross-section of the beam for the rafters must be at least 70x150 mm, with a pitch of 0.5 m.Quite often, the rafter system of an attic roof is created from wooden structures. It is recommended to choose wood that is highly durable and at the same time minimally susceptible to rotting. Larch can be considered the best option, however, it is also possible to use cheaper wood with sufficient strength. In this case, more thorough treatment with antiseptic compounds is necessary. It is desirable that these compositions also have fire retardant components.

The rafters of the attic roof must be treated with a special antiseptic to prevent wood rotting
However, it is not always possible to use wood to make rafters. For heavy loads, it is necessary to use timber with a large cross-sectional profile, or to significantly reduce the distance between elements. This leads to a significant weighting of the entire attic roof structure and, as a consequence, to the need to increase the load-bearing capacity of the attic walls. In this case, metal rafters of attic roofs are often used.
The results of the calculations are reflected in the drawings, which indicate all the design decisions made for this attic truss system. If the work is done independently, then instead of a detailed drawing, it is permissible to develop a simplified sketch of the rafter system of the attic roof. In this case, the sketch must have all the information and parameters necessary for assembling and installing the rafters.

An example of a schematic drawing of an attic rafter system indicating the main parameters and distances
Construction of an attic rafter system using the example of a gable roof
The design of the attic roof rafter system depends on the type of roof chosen for the house project. The simplest, and at the same time reliable and effective, can be considered the classic gable roof. Of course, it looks simple compared to complex, broken roofs, but at the same time it contains many basic elements and parts characteristic of all types of mansard roof truss systems.
The rafter system of a gable mansard roof consists of several main parts and elements. In general this is:
- Linear parts and elements - beams, columns, rod systems;
- Planar parts and elements - slabs, panels, floorings;
- Spatial parts and elements - shells, vaults, volumetric elements.
In practice, not all parts and elements of the mansard roof rafter system are used. In particular, for a gable roof, rafters, crossbars, ties, struts and struts are used. Their dimensions and relative position are determined during design. When assembled, all these elements form the truss of the mansard roof truss system.

Six examples of roof truss design, indicating the height of the ridge and the location of the rafters
The truss is the most important part of the rafter system of the attic roof. The number of trusses depends on the length of the facade and the selected installation step. The type of truss and the installation pitch are interrelated quantities; the more complex and durable the spatial structure of the element, the larger the step can be used during installation. In turn, an important element of the farm are the rafters for the attic, or, as they are also called, rafter legs.

Rafter legs are the most important element of the truss, the distance between which determines the stability of the roof
The video attached to the article talks in sufficient detail about the rafter system of the mansard roof. From it you will learn about all the intricacies of constructing a rafter system and performing installation work. Options for roofing systems from a simple gable to a more complex - broken one - are considered. By following the instructions and recommendations in the video instructions, even a novice master can understand the features of this work and perform it independently.
Installation of the attic roof rafter system
The work of installing mansard roof rafters is also called raftering. This is a set of works on marking and installing rafters. At the same time, work is also carried out to remove the horizontal ridge and trim the pediment. You can do the raftering yourself. A good guide for this can be the video instructions below.
The installation of a mansard roof truss system has many features, many of which are unknown to novice craftsmen. The frame must be installed on hydro- and heat-insulating material. This increases service life and reduces heat losses. Another common mistake is coating elements with protective compounds after installation. Treatment with an antiseptic must be carried out before installation, then the entire surface will be treated and the rafters will last longer.
Note to the master Wood for rafter work must be pre-dried; its optimal moisture content is approximately 18%.The quality of fastening of the attic roof rafter system must be given special attention. You can do it correctly, purchase high-quality materials and professional tools, but if the connection of the parts of the rafter system is done poorly, then after some time a major repair will be required. The choice of fasteners is a separate section of the project, in which the length and diameter of the hardware is determined.
To assemble the attic roof rafters, you must use galvanized fasteners of the required size. An attempt to save on fasteners does not give a significant result, but it contributes to the emergence of serious problems during operation. The distance between fasteners is selected in proportion to their sizes. The fastener pitch should not be very small, so as not to reduce the strength characteristics of the part itself.

Installation of a rafter structure for a gable mansard roof of a wooden country house
The first truss is mounted from one of the ends, while checking the correct installation vertically and horizontally. Then, from the other end, a second truss is mounted, and its verticality and horizontality are also verified. Two construction cords are pulled in parallel between the trusses, which will serve as a guide for installing the intermediate rafters of the attic roof.
Advice To temporarily secure trusses, you can use struts made from substandard lumber or scraps.After all the trusses are installed in their places, the installation of side and ridge girders begins. Having assembled the rafter system of the attic roof, you can move on to other types of work: filling and covering the gables, installing a roofing pie, heat and sound insulation, interior cladding and finishing.
When installing rafters for the attic, all technological requirements must be met so that the supporting structure can fully perform the tasks assigned to it. Trusses and other associated elements must be installed so that the finished structure can withstand wind and snow loads for a particular region. All these points are further clarified during the calculation process. If desired, you can install the rafters for the attic yourself, saving money on the services of third-party workers.
Rafter fastening diagram.
Basic information about roof rafters
An attic is a room under the roof; it is located on the attic floor of a building. This technique allows you to competently plan the growth of used areas without significant material costs. You can live in the attic no worse than in any other room. But to do this, it needs to be properly equipped and, in particular, the rafters for the roof must be correctly installed.

Mansard roof rafter system.
Before installing rafters for the attic, you need to choose the appropriate type of structure. Rafters can be layered or hanging.
Layered rafters for attic roofs are best installed in buildings that have a load-bearing intermediate wall. To install a layered rafter system for an attic roof, it is necessary that 2 load-bearing walls are located at a distance of no more than 7 m from each other.
If there are no internal walls, the only option is hanging rafters for the attic roof. The standard design includes rafters and a lower chord - a tie. The Mauerlat is used as a supporting element. Wire and staples are used to secure the rafters. Installation is carried out taking into account the expected load level.
Features of installation of the rafter system

Installation of roof truss system.
Before you begin installing rafters for the attic roof, prepare everything you will need during the work process:
- Unedged board.
- Wooden beams.
- Thermal insulation material.
- Nails.
- Annealed wire with a diameter of 3-4 mm.
- Leg-split.
- The boards are 15 cm wide and 4-5 cm thick.
- Moisture-proofing material.
There are several different types of attic roofing systems, namely:
- Triangular.
- Asymmetrical.
- Symmetrical.
- Broken.
One of the most important design aspects is the calculation of the roof slope angles. When performing this stage, the following features must be taken into account:
- Climatic conditions of the region.
- Type and characteristics of materials used for construction and finishing.
- Personal preferences of the home owner.

Mounting points for the rafter system.
The greater the angle of inclination of the roof slope, the less free space there will be in the attic room. However, if the angle is too small, the roofing system will be more difficult to clean from sediment and dirt. Over time, this will lead to a decrease in system reliability. Therefore, it is very important to choose the optimal roofing material for the existing conditions.
Correct installation of rafters for the attic roof ensures the strength and stability of the roof. When performing this work, you must follow a number of rules. Firstly, the structure is constructed from wooden beams with a section of 100x100 mm or 150x150 mm. Secondly, the system is carefully waterproofed. Typically, roofing felt or roofing felt is used as waterproofing.
The frame structure is laid on reinforced concrete bases. To fasten the supporting unit, wire and metal brackets are used. Quite often a tongue-and-groove connection is used. It is important that the wood used to construct the rafters has a moisture content of no more than 15%. If possible, the choice should be given to coniferous species.
A disinfectant atmosphere must be created. It is strictly forbidden to use damp timber. Because of them, the entire rafter system can simply collapse. Therefore, the bars must be dried before use. Additionally, the wood is impregnated with antiseptic and fire-retardant compounds.
When marking the installation of supports, calculate the installation step so that all rafters are installed vertically in the same plane. A tool familiar to any builder called a plumb line will help you check the verticality of the installation.
To ensure that the parts are held in place as securely as possible, use braces or braces. Upholster vertical posts with suitable materials. Most often, double-sided cladding is performed using plywood and plasterboard. Insulation must be laid between the sheathing sheets.
Step-by-step instructions for installing rafters

Scheme of strengthening the rafters with additional struts.
The process of installing a rafter system for an attic roof begins with laying the top beam. To secure it, you can use nails, screws and metal staples. Bars with a cross section of 150x150 or 100x100 mm are used.
After this, the Mauerlat is installed. It is needed, first of all, to prevent the roof from tipping over in a strong gust of wind. The Mauerlat must be designed and installed in such a way as to withstand the loads that apply to both the roof of the house and its walls. The mauerlat itself is laid out from beams. It is best to use 100x150 mm bars. You can also use boards with a thickness of 50 mm or more.
The selected material should be laid horizontally, having previously calculated the size of the wall surface. A waterproofing material must be installed under each block or board, which will protect the elements of the Mauerlat from the harmful effects of moisture.
Finally, the rafter legs are installed. These structural elements can be purchased ready-made or made independently. First, the pitch of the rafter legs is calculated, after which markings are applied to the mauerlat. To do this, you need to put marks on the rafter frame and the mauerlat. Professionals recommend installing rafters in increments of 1-1.2 m. Lay the outer rafters towards the front. It is important that the edge line of the gable and the top of the legs are at the same level.
Rafters are made of bars or boards. It is important that the boards are straight.
It is better to refrain from using material with knots; the maximum permissible number of knots is 3 pieces per linear meter.

Types of rafter structures.
Next, you need to take the twine and stretch it between the outer rafters. In this case, it will serve as a level for mounting the remaining legs. Finally, you will need to connect the upper parts of the rafters together in pairs and install the ridge beam. It will be needed if the roof is more than 7 m in length, and the rafter frame weighs relatively much.
If the roof is smaller, it will be enough to tie the top of the legs with guy wires. You can use the braces directly as attic ceiling beams in the future. In strong winds and snow, these elements will take on a certain part of the load.
Finally, the sheathing is installed, moisture insulation and thermal insulation material are laid, the roof is installed, and the walls and ceiling of the attic are finished.
If there are windows in the attic roof, the work is performed in the same sequence, but at the stage of installing the rafters, window openings are laid into which window frames will later be installed. Do not forget that the attic must have a size of at least 3x2.2 m. Otherwise, living in such a room will be extremely uncomfortable.
A mansard roof, made in accordance with all the rules, will be a wonderful decoration for any home and will serve for decades. Pay due attention to the design of the rafter system and approach this task with all responsibility. You will not only save money, but will also control every stage of the work, which will allow you to be completely confident in the quality of its completion. Good luck!
The rafter system is one of the final stages of building a house. The durability of the building itself and the comfort of living in it depend on how correctly it is executed. Simplicity of execution allows you to do the work yourself with the assistance of an assistant.
Rafter systems for the attic
Today there is a real boom in the use of various architectural elements in suburban construction, which, in the context of industrial construction, would seem to be a thing of the past forever. We are talking about devices such as bay windows, attics, mezzanines and the like. They can significantly increase the usable space and give the building an original, beautiful look.
Attics are especially popular, allowing you to create a full-fledged living space in the under-roof space. For this purpose, special rafter systems are used to ensure the possibility of creating such a room, provided that the structure is of sufficient strength.
The installation of a broken attic roof allows you to get a full-fledged living space on the second floor
Types of rafter systems
The main types of rafter systems for attic construction are presented in two options:
- gable;
- broken rafter system.
Photo gallery: what is an attic
A sloping roof allows you to obtain the optimal combination of the roof slope and the usable area underneath. It is possible to increase the volume of the attic in a structure under a gable roof only due to the high height of the ridge. The attic can be “equipped” with an external structure with a balcony under a separate roof. The balcony can be an integral part of the attic roof structure.
However, in practice, the roofs of a country house are so diverse that it is almost impossible to classify them. The design uses a variety of elements:
- hip bevels;
- birdhouses;
- awnings;
- semi-built-in translucent structures (greenhouses);
- lanterns and other architectural solutions in the most original and sometimes unexpected combinations.
Photo gallery: projects of houses with a gable roof and an attic
A gable roof can be decorated with an elegant “birdhouse”, which will also increase the area of the attic. In large houses, a gable structure can be used as one of the elements of the roof composition. The main idea of such a house is to combine simplicity of execution with perfectly selected finishing elements
Elements and components of the attic roof rafter system
Obviously, the most durable structure is a gable roof. But to obtain a sufficiently spacious room with such a rafter arrangement, it is necessary to reduce the angle between the slopes, and this leads to an increase in wind loads on the roof. A reasonable solution is to create a semi-attic, when racks are installed from floor to ceiling to a height of 1.3–1.8 meters, and rafters are already attached to them. Such a device requires the installation of low crossbars to compensate for the thrusting loads from the rafter legs on the racks.
 To increase the useful volume of the attic, the crossbars that form its ceiling are installed as close as possible to the ridge unit
 The use of a sloping roof allows you to simplify the shape of the attic room and obtain a larger volume of living space.
 The construction of a sloping roof allows you to get a much larger attic than the installation of a conventional gable roof
 The main elements of the rafter system are:

When installing a rafter system, additional parts are widely used to strengthen the fastening of structural elements.
 The use of modern fasteners allows us to effectively strengthen the structure and significantly reduce installation time
 Calculation of the rafter system
The initial data for the calculation are taken from a previously developed project. For example, let’s look at a roofing diagram with an attic.
 The design drawing indicates the dimensions, installation locations and material of all elements of the roofing system
 The main indicator, calculated first of all, is the pitch of the rafters, depending on the planned finishing coating. So, to install ceramic tiles, the pitch of the rafters should be no more than 60 centimeters, and if you plan to install a plastic covering or soft roof, this figure can be increased to 120–150 centimeters. Again, you need to take into account the nature of the loads - a combination of the effects of wind and snow - and set the optimal angle between the roof slopes.
The procedure for calculating the number of rafters
For example, consider the installation of roofs for a house 10 meters long. As a first approximation, we take the distance between the rafter legs to be 80 centimeters. Then you will need them: 1000: 80 + 1 = 13.5. Since the number of rafters must be an integer, we round the result to 13. In this case, the exact distance between them will be 1000: 13 = 769 (millimeters). This is the exact value of the gap between the axes of the rafter legs.
When calculating the need for materials, you need to take into account their cutting ability. In the case of wood materials, their length can be 4 or 6 meters. During the design process, it is necessary to select the dimensions of parts taking into account the formation of the smallest amount of trim . Coniferous wood trimmings are unsuitable even for firewood for stoves.
Materials for truss structure
The traditional material for rafters in Russia is wood. Larch is considered the best option, however, due to price and availability, it cannot always be used. Therefore, beams made of coniferous wood are used. The size of the section depends on the design of the building.
Composite profiled wood materials are becoming increasingly common. These include:

Construction of a rafter system for a gable roof with an attic
The gable roof rafter system is based on a triangle - the most rigid figure.

Only the main elements of the rafter system are listed. Additional parts can be used to increase the strength of the structure.
Installation of the roof truss system taking into account the formation of the attic
The rafter system of a gable roof can be formed in two ways:
- Assembly of the main structure below, followed by lifting to the ceiling and installation on the mauerlat.
- Installation of rafter legs in detail directly at the installation site.
The first option is a more productive and convenient way.
Assembling the roof trusses below
This work is done in the following order:

Video: assembling roof trusses “on the ground”
Installation of rafter elements
The rafters, as the main load-bearing element of the roof skeleton, must be securely connected to each other. Many different methods have been invented for this, including specific ones designed for certain types of buildings. The rafter system of a wooden house requires special attention. The beam is attached to the Mauerlat by a sliding device, and the ridge connection is made on a hinge. This is due to constant seasonal movements of the log house, which must be compensated.
Photo gallery: methods of connecting rafter legs
The rafter legs are attached to the mauerlat using metal corners. The rafters are connected at the ridge end-to-end or through a cut. The critical nodes of the rafters are connected using metal connecting plates. The rafter legs are connected using special hinge joints, ensuring freedom of movement of the structure during seasonal deformations of the building. The joint in the ridge can be reinforced with bolts.
Installation of support posts and purlins
This is a responsible operation, because at this stage the surface of the front finishing of the walls and ceiling of the attic is formed. Therefore, the execution procedure is the same as when installing rafters:

For the manufacture of all parts of the rafter system, timber of the same dimensions is used, usually measuring 50x150 or 40x150 millimeters.
Video: quick installation of the rafter system
Lathing
This is a mandatory element of the rafter system. In the case where a warm attic space is formed in the under-roof space, the sheathing is done twice:
- External sheathing is used to secure the finishing roof covering. In addition, if each board is attached to the rafters with two nails, it serves as a fastening element of the frame. In addition, an insulating and moisture-proof roof pie is formed under the sheathing.
- The internal sheathing serves as a frame for insulating the attic and installing the final finishing of walls and ceilings.
In addition, counter battens are also installed, with the help of which the ventilation system of the under-roof space is organized.
 The counter-lattice is placed parallel to the rafters and provides clearance for ventilation of the under-roof space
 For the lathing, a board measuring 25x100 millimeters, edged or unedged, is used. Unedged boards must first be sanded. It is not recommended to use a board wider than the specified size. When warping, it can deform the finishing coating or damage the roofing pie.
The sheathing boards are fastened with nails at least 70 millimeters long and at least two nails for each intersection. This method increases the structure’s resistance to wind loads.
The spacing of the sheathing depends on the material of the finishing coating - for ceramic tiles and soft roofing it should be minimal (about five centimeters); for metal tiles or corrugated sheets, a distance between the boards of up to 70 centimeters is allowed.
 A properly laid roofing pie must contain a ventilation gap between the insulation and the roofing material, which helps quickly remove moisture
 Video: lathing the rafter system
Rafter finishing
After installation of all roof elements, the rafter system becomes practically inaccessible for inspection and maintenance. Therefore, before installing each part in place, it must be carefully treated with protective compounds. There are enough special products on the building materials market to protect wooden structures from damage by bacteria and rot, as well as various fire-fighting impregnations.
 Before installing parts of the rafter system, they must be treated with special protective compounds.
 It should be taken into account that carrying out protective operations on a finished structure is not always effective, since hidden surfaces remain untreated.
Any wood protection products are certified by government agencies, so when purchasing, you need to ask the seller for a certificate of conformity. It is issued by sanitary authorities and fire inspectors. First of all, the safety of the composition for humans and its compliance with the declared qualities are guaranteed.
Which of them to choose is decided by the consumer himself, depending on his financial capabilities. In principle, you can always run into a fake, but this will become clear only after many years of use.
Impregnations can be applied with a wide folded brush or roller, but a spray gun is often used.
Video: installation of a gable roof rafter system with an attic
A reliable roof largely determines the life cycle of a building. A properly installed roof ensures the comfort and cost of living in a home. In Russian conditions, when heating is needed most of the year, a properly installed insulated roof retains up to 30% of the heat. And high-quality insulation is possible only with a high-quality rafter system.