How to properly lay a vapor barrier on a roof. Features of installing vapor barrier on the roof: how to avoid mistakes when installing a vapor barrier
The installation of external roofing is clear; its main function is to protect the structure from precipitation. However, today quite often houses are designed under a “warm” roofing cake, and one of the conditions for such a design is the unacceptable penetration of internal moisture into the insulation. For this, a barrier is used to prevent water vapor from penetrating into the layers of the roofing pie. How to install a vapor barrier on a roof, and what should you know about this technology for proper roof assembly?
Why do you need a vapor barrier?
Any volume of air contains a certain amount of moisture in a gaseous state. Its ratio to other gases is constantly changing.
In addition, inside the house, all the air is in motion (the process of convection), colder masses come from above from the roof, and warmer ones rise up under the roof space. Like all gaseous substances, water vapor easily penetrates into the roofing pie, and under the influence of lower temperatures it precipitates in a liquid state, forming condensate. This will lead to the following negative consequences in the functionality of the roof.
1 “Warm” roofing cake implies the presence of a heat insulator, most often mineral wool. The peculiarity of such insulation is the partial or complete loss of energy saving properties when wet. And with the constant accumulation of condensation, the layers of thermal insulation will quickly lose their qualities. 2 Rafter systems are mostly assembled from wood. Condensed water will contribute to the gradual formation of rot and mold in the frame elements, which will lead to a decrease in the safety factor. Also, constant wetting and drying of lumber lead to their deformation, which will contribute to the violation of the integrity of the roof material and the entire pie. 3 Today, metal (,) is very often used as external roofing. Condensation will accumulate on the back side of the sheets, and the slightest chips or scratches in the protective paint coating will lead to corrosion, the same applies to fasteners. Part of the task of equalizing the temperature difference and preventing the formation of condensation is solved by a thermal insulation layer. However, without proper protection from internal moisture, and especially in cold roof types, this will not eliminate the problem.
The main function of preventing water vapor from entering the layers of the roofing pie is performed by a vapor barrier. This layer reliably cuts off moisture particles, while at the same time, without disturbing the natural circulation of air, the roof continues to “breathe.”
What is this material, and what options can it be used for installation during the assembly of the roof structure?
Types of vapor barrier materials

As a vapor barrier, you can use various types of panels that have distinct properties for the penetration of water vapor. Their prices vary, from the cheapest polyethylene films to membrane types of vapor barriers with a relatively high cost. What materials can be installed to protect roof structures from water penetration from the inside?
On a note
The oldest vapor barrier material is glassine, but today there are more effective types of coatings with lower vapor permeability.
- . These are single-layer panels made from polyethylene. They have a fairly high level of vapor permeability, as they have a very heterogeneous and loose structure. Such negative properties are facilitated by the ingress of dust during production and foreign particles into the raw materials for film production. As a result, pores are formed that facilitate the penetration of water vapor at a ratio of 10-15 grams/m³ per day. The material is very sensitive to mechanical damage.
- Reinforced polyethylene. Such thin fabrics are reinforced in the form of a mesh of threads. In terms of vapor permeability, such a material is not much superior to the previous type. However, the layer will be much stronger and more durable.
- Bag polyethylene fabrics. They are made with PET threads in appearance, reminiscent of burlap. The material has slightly better vapor retention properties and is also more resistant to mechanical damage. The relatively low cost contributes to the widespread use of such vapor barrier fabric.
- Non-woven combined fabrics. It is produced from polypropylene and lavsan threads. High vapor permeability does not correspond to the proper quality of the protective barrier. However, these types of fabric can be used as insulation for cold roofing pies. .
- Film and . They have a very low ability to transmit water vapor. Most often, these types of panels are used to insulate buildings with a high level of humidity inside (baths, saunas, etc.).
When choosing the type of vapor barrier material, you should focus on the estimate. If you have a limited budget, you can use polyethylene and bag sheets, but if possible, it is better to purchase more modern two-layer membranes, which will work much more efficiently. You should be guided by the following criteria:
- Vapor transmission capacity.
- Strength and resistance to mechanical damage.
- Ability to tolerate ultraviolet light.
- Easy to install.
When choosing or purchasing a vapor barrier, you should carefully study the manufacturers’ recommendations, which indicate all the basic properties and directions of the panel.
It is also worth knowing that insulation mounted on both sides of the insulation layer will work best. External coating from the street with a higher vapor permeability, internally with a low one.
How the vapor barrier is installed, and what you should know about the nuances of laying such a layer.
Features of vapor barrier installation

Installation of the vapor barrier is carried out in accordance with the requirements, step by step and at a certain stage. When laying protective panels, you should follow these recommendations.
- Laying the vapor barrier layer can begin after installing the insulation. Work should be carried out from the inside (from the attic).
- Installation is possible in compliance with both horizontal and vertical schemes.
- When laying horizontally, vapor barriers work from top to bottom. Having secured the top sheet, the next one is installed with an overlap (50-100 mm). A construction stapler can be used as fasteners, and to seal the joints of individual sections of material, it is better to use adhesive double-sided or single-sided tapes repurposed for this purpose.


During the installation of the vapor barrier, it is fixed without sagging of the panels, observing the tension!
Quite often, vapor barrier installation is carried out with the following mistakes:
- Loose fit to the parts of the rafter system: ridges, valleys, purlins, etc. Typically, such miscalculations are made with complex roof geometry.
- Using narrow types of tape as adhesive tape. The joints are taped with tape with a width of at least 100mm!
- It is unacceptable to carry out installation without a reserve for deformation (sagging and weakening of the canvases). It is formed in the form of folds near windows, inspection hatches, and ventilation ducts.
- Near openings that allow sunlight to penetrate, there must be a finish that protects the vapor barrier from ultraviolet radiation.
- On brick, concrete and other surfaces, fixation is carried out through the use of polyurethane and acrylic adhesives. The film will not provide sufficient adhesion to such rough surfaces.
- The material is laid on the rafters under tension, without bends or contours of the beams.
The vapor barrier layer, laid according to all the rules, is essentially the final layer in the process of assembling the roofing pie. Moreover, regardless of the type of structure (warm or cold), protection must be installed. This extends the “life” of the rafter system, as well as the roofing deck, especially the metal one. In the latter case, laying a vapor barrier under corrugated sheets or metal tiles is mandatory, even if the system does not have a layer of thermal insulation.
Modern roofing materials are an almost absolute guarantee that moisture will not penetrate into the roof, regardless of external conditions. However, from inside the premises, the roofing pie is not protected from this in any way. First of all, the thermal insulation material, which loses its performance characteristics when wet, is at risk. As a result, the house becomes cold and damp. A properly installed vapor barrier will help prevent this process.
The need for vapor barrier
The warm air in the room is saturated with vapor and rises, trying to escape through any openings. But since the air temperature and humidity in the under-roof space are much lower, condensation forms, which can be localized on the insulation, which can lead to its destruction.
Vapor barrier material protects insulation from the destructive effects of moisture
A more severe situation is observed in the cold season. The steam escaping into the under-roof space stops, but first turns into frost, after which it forms an ice crust that will freeze absolutely any insulation in a short period of time.
To preserve the insulation, a vapor barrier is needed
With the onset of spring, the ice in all pores begins to melt and erode the interior finish. This becomes the reason that the insulation ceases to perform its functions, and mineral wool will become unusable after just a year of such use, while polystyrene foam will last a little longer.
Without a vapor barrier, the insulation will last much less
That is why a vapor barrier layer is required. Its main task is to prevent condensation from reaching the insulation. This will warn:
- the appearance of mold;
- heat leakage from the premises of a private house;
- rotting of all wooden structures.
Materials used
There is a wide variety of modern building materials that have vapor barrier properties. Conventionally, they are divided into three groups:
- Polyethylene film. This type of material is universal because it can perform several functions at once. The film is covered with a special reinforced fabric. There are two types of this vapor barrier material: with and without perforation. But the holes are so small that they cannot be seen with the naked eye. For installation, it is necessary to use seals and connecting tapes, since the film is produced in rolls. The strips must be attached as tightly as possible, otherwise the functionality of the layer will be impaired. There are also polyethylene films with a foil layer that retains heat indoors.
Vapor barrier polyethylene film reinforced with fabric
- Polypropylene film. Used as a hydro- and vapor barrier material. On one side, the film is covered with an anti-condensation layer consisting of viscose-cellulose fiber. The principle of operation of this material is quite simple: condensate protruding from the side of the film that faces the insulation is absorbed into it and therefore does not fall on the insulation. Since the installation of the roof implies the presence of a ventilation gap, the moisture absorbed into the vapor barrier dries out.
Polypropylene film has a smooth and rough side
- "Breathable" film. The most modern vapor barrier material. Combines vapor and water resistance properties. The main advantage is that there is no need to arrange a ventilation gap, and this allows you to significantly save under-roof space. This membrane allows moisture to pass through itself, which subsequently settles on the rough layer of material, after which it is absorbed into it and dries. This allows the insulation to remain dry. There are different types of vapor barrier membranes available, which can be single- or double-sided.
Single-sided membranes conduct steam in only one direction; double-sided membranes can be laid on either side
For vapor barrier, it is better to use non-perforated film, since perforated film is more suitable for waterproofing.
A very important stage in arranging a roof vapor barrier can be considered not only the process of its installation, but also the choice. The quality of the roofing as a whole, as well as its service life, depends on this. When choosing, remember that the more weight the material has, the stronger it is. Typically it ranges from 60 to 270 g/m2. As for the vapor permeability parameter, you need to choose a material with a minimum value. The recommended parameter is less than 1 g/m2 per day.
How to properly install roof vapor barrier
Before installation, it is recommended to once again make sure that you have purchased exactly the vapor barrier material. You should also make sure that the vapor barrier you purchase is compatible with your roofing material. In this case, “Izospan B” is universal, which can be used regardless of the type of roofing pie.
Which side to put the vapor barrier on the roof
There are certain rules for laying vapor barrier material. Regardless of the type, the film has two surfaces: one smooth, the other rough. You need to lay it with the smooth side on top of the insulation. At the same time, carefully ensure that the material fits as tightly as possible; gaps are not allowed.
The smooth surface of the vapor barrier must be in contact with the insulation
When laying a vapor barrier membrane, it is necessary to provide a ventilation gap between the vapor barrier and the decorative roof sheathing. It should be at least 5 cm, and the type of roofing material in this case does not matter. A counter-lattice, which is mounted directly on the membrane, can provide this ventilation gap.
How to attach a vapor barrier to rafters
The material must be attached to the rafters from the inside of the insulation. For fastening, you can use different parts, for example, a construction stapler or galvanized nails. Try to minimize the number of punctures in the material, as this may cause condensation to penetrate through these holes during the operation of the roof.
You can use a stapler or nails to attach the vapor barrier.
The option of attaching a vapor barrier material to the rough lining of the attic is also allowed.
The material can be laid in horizontal or vertical strips, rolling out the entire coating without breaks. Additionally, it is necessary to process the joints, both vertical and horizontal. To do this, you need to lay the vapor barrier overlapping, the size of the overlap should be at least 15 cm. Next, seal the joints with a special tape, but you can only choose one that is designed to work with vapor barrier film.
All joints must be sealed with wide tape
It is also necessary to seal the joints of the material with a wooden or concrete base, even if a stapler or nails were used for fastening.
The vapor barrier film must be laid without sagging; it must be well stretched.
Video: rules for installing vapor barrier
Installation errors
Despite the fact that the process of installing a vapor barrier film is quite simple, sometimes mistakes cannot be avoided, but they are typical and can be prevented:
- loose connection of the film to the purlins, valley and ridge beams, especially for complex roof structures;
- the use of a narrow connecting tape, because of this, the sealing of the seam may be broken during the operation of the roof;
- lack of deformation reserve when installing a roof with windows;
- lack of internal protection of a vapor barrier film around the roof windows, due to which ultraviolet rays gain open access to this material and destroy it;
- the film bends around the rafter legs, which creates a gap through which moisture can pass and be absorbed into the insulation.
Video: consequences of improper vapor barrier
Steam is a substance that is quite difficult to block, so vapor barrier of the roof of a private house is a responsible mission. The safety of the roofing pie and wooden structures and the long service life of the roof can only be guaranteed by proper installation of vapor-proof material.
The introduction of each new technology in the field of construction provides an opportunity for a person to improve their own housing, which as a result becomes even more reliable, safe and comfortable. But for this it is also necessary to strictly adhere to established standards and construction norms during the construction of a house.
One of the main structural elements of a house that ensures comfortable living in it is the roof. Therefore, it is imperative to know the technology of laying a vapor barrier layer on the roof.
In this article
The need to install a vapor barrier
The steam generated inside the room mixes with warm air and, according to the laws of physics, rises. But, since its further advancement is impeded by the roof of the house, it penetrates the thermal insulation layer, beginning its destructive effect.
In winter, due to the sharp difference in internal and external temperatures, steam will be contained in the insulating material. As a result of sub-zero temperatures, the steam will first turn into frost, then into ice, respectively, the thermal insulation layer will freeze and remain in this state until the onset of heat, then thaw. As a rule, the consequences of such a process are the complete loss of the protective properties of the insulating material, that is, its unsuitability for further use.
In order to prevent failure of the insulation after just a year of operation, it is necessary to install a vapor barrier on the roof. The vapor barrier material will prevent moisture from entering the insulation and, accordingly, will significantly extend its service life.
Materials used to construct a vapor barrier layer
Previously, the only material installed to protect the roof from moisture was glassine. Today, a wide variety of building materials are used to construct a vapor barrier layer on the roof.
- Regular low density polyethylene film. Due to its low density, experienced roofers do not recommend using it in private housing construction, as there is a high risk of damage during installation and operation.
- Polyethylene film reinforced with a polymer mesh. This is a denser, stronger insulating material, which is most often used for arranging the roofs of agricultural enterprises. It is also not recommended as a vapor barrier for roofing in multi-apartment and private housing construction, since microscopic cracks form at the junction of polyethylene with reinforcing elements, through which steam can penetrate.
- Bag fabrics made from polypropylene threads, which are subsequently laminated using molten low-density polyethylene. The thickness of the vapor barrier material is half that of a reinforced polyethylene film. This vapor barrier material is used for arranging cold roofs.
- Aluminum foil, which has zero vapor permeability.
- Cardboard laminated on one side with polyethylene film.
A vapor barrier fabric made of several protective layers is used for roofs over rooms in which swimming pools, showers, laundries, etc. are installed.

Which side is the vapor barrier installed on?
- A standard vapor barrier film consists of two layers. At the same time, on the one hand, it has a rough surface that holds back drops of condensation, on the other, it has an absolutely smooth surface. It is the smooth side of the vapor barrier film that is adjacent to the insulating material, and the rough side is directed into the room.
- When using foil film for vapor barrier, which is intended not only to protect insulation, roofing, and foundations, but also to return thermal energy back into the room, it is laid with a reflective surface in the room.
- A vapor barrier membrane that can allow air to pass through, protecting the foundations and roofing from moisture penetration, provides the structure with the ability to “breathe.” When using a double-sided vapor barrier membrane that has identical surfaces, it can be laid on either side. If a one-sided membrane is used to install a vapor barrier, then the reverse side of the material is indicated by the manufacturer.
When purchasing any type of vapor barrier material, be sure to read the instructions for its use provided by the manufacturer.
Basic rules for laying vapor barrier film
After determining which side of the room or insulation you need to lay the vapor barrier material on, you can proceed directly to its installation. In this case, the following rules must be observed:

- First– installation of heat-insulating and sound-proofing material is carried out, followed by a vapor barrier film.
- Second– the film should be well stretched, there should be no sagging areas.
- Third– the vapor barrier material is attached using ordinary adhesive tape (adhesive tape). You can also use nails with a wide head (30 cm pitch) or a furniture stapler as fastening elements, which will greatly facilitate the work and reduce the time it takes to complete it. The film can be secured with wooden slats, which are screwed in increments of 30 cm.
- Fourth– individual sheets of vapor barrier film are laid with an overlap of up to 15 cm. In this case, it is necessary to make ventilation gaps up to 5 cm wide.
These are general rules for using vapor barrier material, but when laying it on different bases and roofs, there are specific features.
Roof vapor barrier
Providing moisture protection to the walls of the house is only 50% of the work, since the bulk of the evaporation is directed upward. The formation of condensation as a result of heavy precipitation cannot be avoided. As a rule, the roof of the house takes the brunt of the impact.

It is also necessary to understand that poor-quality installation of vapor barrier performed on the roof will contribute to a decrease in the temperature inside the house, an unfavorable odor, the formation of dampness, mold, corrosion of metal structural elements, etc. Therefore, it is quite important to use high-quality vapor barrier material and install it correctly.
To protect the roof of a house, experienced roofers recommend using membrane-type vapor barrier materials that allow air to pass through and do not allow moisture to pass through. A membrane vapor barrier will also help remove excess moisture from the insulating material. Membranes of a double-sided design will work on both surfaces of the roof covering.
Sequence of materials
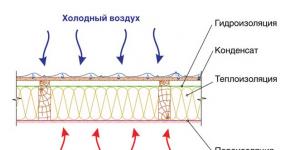
When arranging the roof of a house, it is important that the construction materials are in the following sequence:
- Roof covering
- Counter-lattice
- Lathing
- Waterproofing
- Rafters
- Insulation
- Vapor barrier
- Roof filing
Vapor barrier is one of the important points when building a house, as it protects the elements of the main structure of the house from mold, rot, rust and other negative influences that help reduce their service life. A high-quality vapor barrier layer will also ensure the optimal temperature regime in the house for comfortable living.
An important element in the roofing pie is the vapor barrier of the roof. In short, a layer of vapor barrier material protects the insulation from oversaturation with moisture and, as a result, loss of its thermal insulation properties. To avoid this situation, it is necessary to perform both hydro and vapor barrier of the roof.
Well, if it’s completely to the point, then the answer is already clear from the subtitle. Installing a vapor barrier on the roof protects or insulates the insulation from vapor.
It's that simple. But where does the steam come from? There is such a thing as moisture transfer. The room inside becomes damp for several reasons:
- Cooking food;
- Human breath;
- Taking a shower;
It's no secret that warm air tends to rise. In addition, its ability to transfer moisture (steam) is much higher than that of cold water. This means that it also carries moisture with it. What obstacles does this couple encounter on its way? It can be:
- Concrete and wooden floors;
- Internal ceiling and roof lining.
However, some of the steam still reaches the very top of the roof - the place where the roofing pie is located. And if there were no vapor barrier for the roof, all this steam would directly get into the insulation.

Considering that foam plastic (penoplex) is not insulated inside, insulation means mineral wool, which is used most often.
For example, here is a statement that can be found on the official website of the TechnoNikol company, a large manufacturer of stone wool:
“Rock wool should not be directly soaked, as it loses its properties once wet.”
Total: why do you need a vapor barrier? We found out that the inside of the insulation needs to be covered with vapor film to prevent steam from getting into it. The roof must first be insulated, and only then covered with film from the inside.

Protective membrane on the outside
A waterproofing coating is used under the main roof covering (for example, for a metal tile roof). Since from the outside the insulation will be affected not only by steam, but also by water in two other states, for example in the form of rain, waterproofing is needed there. Using a vapor barrier membrane like Izospan B for outdoor use would be a big mistake.
By the way, the video below tells you very interestingly and scientifically about whether a vapor barrier is needed.
What to use
As with many things, there are different materials used to accomplish the same task. Roof insulation is no exception.
Polyethylene films
To install a vapor barrier on a roof, high strength of the material is sometimes necessary, for example, if we are talking about insulating the attic floor. To increase the strength of polyethylene, they began to reinforce it. There are two types of such films:
- Perforated;
- Non-perforated.

Separately, it is worth mentioning the films on one side, covered with aluminum foil. Their ability to resist steam is much higher than that required for ordinary premises. Most often, such films are used for saunas and baths, so there is no point in choosing them for the roof.
However, there are films that have two significant advantages over polyethylene films.
Polypropylene films
The notorious advantages of such films are:
- Higher strength;
- Resistant to ultraviolet rays.
For example, such films can protect exposed rafters from rain and snow throughout the year.

There is a particularly attractive type of film made from this material. Films with antioxidant coating. On one side, such films are covered with a layer of viscose fiber with cellulose. This coating is capable of absorbing moisture (condensed steam) and storing it for a certain time. After the cause of condensation disappears, the layer dries quickly, preventing moisture from penetrating into the thermal insulation. It is important to install this film correctly. The antioxidant layer should face down from the insulation.
The most commonly purchased films are the following brands:
- TechnoNIKOL,
- Izospan;
- Klober;
- Tyvek;
- Juta;
- Nikofol;
- Everlasting.
Did you know?
Glassine was previously used to insulate the roof. Now this material is practically not used. There are much more advanced and relatively inexpensive materials. Also previously used were roofing felt, roofing felt, or ordinary polyethylene film.

Which vapor barrier to choose for the roof? As we have seen, this mainly depends on two factors:
- Places where insulating material is used;
- Owner's financial capabilities.
By noticing the possible types of vapor barrier, you can more clearly understand which vapor barrier is better for the roof. We settled on polypropylene films with an antioxidant coating.
Principles of vapor barrier installation
Installing a roof vapor barrier is not a complicated process in itself, however, there are some nuances here too. So, we can highlight the following:
- You need to lay a vapor barrier on top of the thermal insulation. Both horizontal and vertical film laying is possible. You need to lay the film horizontally (transversely to the rafters) starting from the top row and moving down. It is definitely important to make an overlap of 10, and preferably 15 centimeters. The films are nailed to the sheathing with a construction stapler. To fix joints, two types of tapes are used: double-sided and single-sided. Double-sided tape is glued to the inner strip of film and covered with the next one. Single-sided tape is used to secure the seams from the outside and is glued directly at the joint.
- If you need to lay the insulation vertically, make sure that the joint is on the sheathing, otherwise the film may tear, even if it is glued with tape. (Besides, it is very uncomfortable when weighed).
- In places where the film adjoins the windows (if the roof is attic), use a special apron. If such an element is not included with the film, apply special tape to the joint.
- An additional beam is attached on top of the laid insulation as a sheathing. This is necessary so that the vapor barrier for the roof and the internal cladding have a ventilation gap between them and air circulation is possible. The minimum thickness of the timber is 25 mm, preferably 50 mm.
- Avoid sagging foam. Mount it tensioned.
What is neglected
As already mentioned, installing a vapor barrier on a roof is not a difficult task, but here there are several common flaws. For example, good, expensive European films are purchased, and, say, connecting tapes are ordered from China. Doing this is extremely wrong. Or the material is not used at all for its intended purpose. For example, Izospan V is used as waterproofing.
Also, puncture sites with self-tapping screws should always be fixed with aluminum-coated tape. Unfortunately, you can often find torn insulation on the roof. Holes greatly reduce protection and steam quickly penetrates the mineral wool, forming frost and damaging the heat-saving layer.
Cost calculation
How much will it cost to create a vapor barrier for a roof? The price depends on the density (measured in grams per square meter) and the brand of the manufacturer. Rolls come in widths from 1 to 3 meters (rolls wider are rare).

For example, a Tyvek Airguard SD5 vapor barrier membrane, a roll 1.5 m wide and 50 m long, costs 9.5 thousand rubles. ($164). This means that 1 square meter of such insulation will cost 126 rubles or $2.17.

A roll of Izovek V Eco costs only 540 rubles or 9.3 dollars. (Size 1.6 by 44 m). Thus, 1 square meter of vapor barrier will cost 7.67 rubles or $0.13. In our example, the last option will be 17 times cheaper.
Izospan RS of approximately the same size will cost about 1,800 rubles ($30).
Don't forget to include joining strips, tape, and stacked staples in your calculations. When ordering a complex roof, laying a vapor barrier (the work itself) will cost 40-80 rubles per square meter.
Roof vapor barrier is the most expensive, but important element of the roofing pie. Vapor and waterproofing reliably protects the rafter system from rotting, and the insulation performs its functions.
Real mistakes on real objects 3 videos
See how an incorrectly installed layer of insulation can damage the sheathing.