Correct installation of attic roof rafters. Mansard roof truss system: drawings, design, materials
The difficulty lies in the fact that it is necessary to take into account several important components: snow load, gusts of wind, slope angle, weight of the rafters themselves, insulation, waterproofing, roofing materials. Rafters can be combined, metal or wood.
The attic roof should be light so as not to load the foundation. Developers are increasingly using thin-walled metal rafters for mansard roofs; their cost is much higher than wooden ones, but the speed and ease of installation of such systems more than makes up for this drawback.
In independent construction, the rafter system of an attic roof is traditionally made of wood, so we will take this material as a basis.
Good to know
In order to correctly calculate the truss structure of the attic, it is necessary to take into account 3 types of loads acting on the roofing system. First, you should calculate the weight of the attic roof itself: roofing material, sheathing, counter-lattice, waterproofing, rafters, attic insulation layer, vapor barrier, finishing. To do this, you will need to know the weight of each material per 1 m2; such parameters are indicated in the instructions and certificates of the manufacturers.
For example, polymer-bitumen waterproofing will require 5 kg/m2, one square meter of mineral wool weighs 10 kg, standard sheathing made of 25 mm boards - 15 kg, ondulin approximately 3 kg, metal tiles - the heaviest roofing material. When calculating the load, add up all the indicators and multiply by a correction factor of 1.1.
Secondly, the design of the attic roof rafter system must withstand snow loads; in some areas this figure exceeds more than 500 kg per m2. Formula for calculating snow load:
S=Sg x µ, where
Sg is the mass of snow on 1m2 of horizontal surface, the indicator is established by regulatory documents for each climatic region separately;
µ - coefficient depending on the slope of the roof: an angle of 25 o - coefficient 1.0, 25-60 o - 0.7, if the slope is above 60 o the coefficient is not taken into account.
And finally, wind loads. To calculate them, the formula is used:
W = Wo x k, where
Wo – normative data, which are determined individually for each district;
k – correction factor for different types of areas and building heights.
Based on the total load on the rafter system of the attic roof, the length, pitch and cross-section of the rafter leg are determined. Below we have provided a table of recommended parameters for installing a rafter system in a temperate climate zone (Moscow region):
| Distance between attic roof rafters, m | Leg length, m | ||||||
| 6 | 5.5 | 5.0 | 4.5 | 4.0 | 3.5 | 3 | |
| Cross section of beams, mm | |||||||
| 0,6 | 50*200 | 50*200 | 50*175 | 50*150 | 50*150 | 40*175 | 40x150 |
| 0,9 | 75*250 | 75*200 | 75*175 | 75*175 | 50*200 | 50*175 | 50x150 |
| 1,1 | 100*200 | 75*200 | 75*200 | 75*175 | 75*175 | 75*150 | 75x150 |
| 1,4 | 100*200 | 100*200 | 75*200 | 75*200 | 75*200 | 75*175 | 75x150 |
| 1,75 | 100*250 | 100*200 | 100*200 | 100*200 | 75*200 | 75*200 | 75x150 |
| 2,15 | — | 100*250 | 100*250 | 100*200 | 100*200 | 100*175 | 100x150 |
Other elements of the attic roof rafter system have their own parameters:
- the Mauerlat is made of timber 150*150, 100*150, 100*100 mm;
- crossbar – 100*200-150 mm;
- purlins – 100*200-150-100 mm;
- valleys, diagonal legs – 100*200 mm;
- tightening – 50*150 mm;
- strut – 150*150, 100*100 mm.
- hemming board – 25*100 mm.
Rafter system of a gable mansard roof, drawing of the main elements of the truss
Main nodes
The truss structures of attic roofs, regardless of whether they include many interfaces and butt joints, are connected to each other, cut into a tie and a mauerlat, have auxiliary elements of the system: crossbars, headstocks, supports or struts, and are additionally fastened with staples, bolts, clamps. The design of the rafter system of the attic roof must provide for the uniform distribution of all loads on the base and load-bearing structures of the building.

Scheme of the attic roof rafter system, main components and elements
Depending on the architectural solution, the type of attic roof is determined, in turn, not only its usable area depends on the configuration of the roof, but also what type of rafter system is applicable in each specific case: suspended or layered.

Layered system, resting the foot on the ridge beam and Mauerlat
Layered rafter legs rest on the load-bearing walls of the attic, and are supported in the middle by intermediate supports; in such systems, loads are transferred exclusively to bending. Hanging ones rest only on attic walls, they are usually installed where there is no internal load-bearing wall, they do not create a horizontal load, only compression and bending.
A hanging system is installed if the distance between the wall supports is no more than 6.5 m; installing an additional support makes it possible to cover an attic up to 12 meters wide; if you need to cover a wider area, then each 3 meters has its own support.

Hanging and layered rafters of the attic roof
If the attic design provides for not one, but several slopes, as in a classic attic roof, then hanging (upper) and layered (lower) rafters usually alternate.
Watch how the rafter system of mansard roofs is installed; the video lesson will help you understand all the intricacies of the construction of a broken structure.
The load-bearing elements of the system ensure the strength and stability of the entire attic roof structure. The load-bearing elements of an attic roof are: sheathing, rafters, and mauerlat. The design features of the system are determined by the type of attic roof: single-pitched, hip, multi-pitched, gable, etc.

Mansard roof truss system, layout diagram of single-pitched floor units
The shape of the attic roof depends on the area to be covered and the architectural design; it is better to choose simple types of attic roofs so that the beams and racks do not clutter up the space inside.

Attic, rafter system of hip hip roof
Stages of installation of the attic rafter system
The technology for installing an attic roof requires a certain sequence:
- Mauerlat installation;
- laying cross beams;
- installation of vertical racks;
- tightening the side posts or installing a ridge beam;
- step marking and installation of rafter legs;
- installation of auxiliary units: crossbars, struts, rafter legs;
- sheathing, waterproofing, roofing material.

Attaching the Mauerlat is an important step for the design of the entire system; it is the basis of the design
Docking technology
Despite the fact that the algorithm for constructing a rafter system is quite simple, installing attic roof rafters requires a competent approach to the installation of docking units. The main load in the system falls on the legs, so the safety and strength of the roof, and the attic as a whole, depend on the quality of their installation on the Mauerlat, as well as on the reliability of their connection to each other.

Rafter system of the attic roof, photo of attaching hanging rafters to the Mauerlat
There are 2 options for connecting the rafters to the Mauerlat: sliding and rigid. In wooden attic structures, it is impossible to make all connections rigid, since wood, under certain conditions, compresses and expands, and with a rigid connection, thrust loads arise on the load-bearing units, which together leads to deformation of the elements of the attic rafter system.

How to properly attach layered rafters for an attic
Important: A rigid connection is used if the rafters are layered, then the leg is rigidly attached to the mauerlat, but at the same time, on the ridge, between each other or on the run, the system nodes must be attached with a sliding connection.If a rigid fastening system is used on the attic roof, then it is necessary to exclude any forces: sliding, torques, turns, shifts. For rigid fastening there are two connection methods:
- notch in the rafter leg;
- support beam patch.
The saddle (notch) is made on the leg, the cuts should ensure a tight fit of the parts, and should not exceed 1/3 of the height of the beam. For rigid fastening, the rafter is notched against the mauerlat, 2 nails are driven from the sides, at an angle to each other, crosswise, the third nail is driven from above, vertically. It is recommended to further strengthen the fastenings with metal plates, corners, and bolts.
The sliding method of connection is that a recess for the leg is cut out in the Mauerlat, then the parts are connected to each other with a special metal corner - a slide. This is how the layered system is attached.

Sliding fastening of the attic rafter system
Regardless of the method of connecting the attic rafter system, the rafters and Mauerlat are screwed together with wire or additionally connected with anchors to prevent the roof from shifting due to strong gusts of wind. The struts, headstocks, spacers and headstocks are secured with staples and clamps.
How to build up and strengthen attic rafters
Often the rafter leg is not long enough for the timber, so they are built up to avoid ordering special boards and to avoid increasing the cost of attic construction.
Important: Since the rigidity of the rafter system is lost at the joining points, connections should be made where the bending moment tends to zero.Rafters made of timber are joined with an oblique cut. Inclined cuts are made in the parts, their length should be equal to twice the section, and the ends should be of a height equal to the cross-section of the beam, multiplied by a factor of 0.15. The joint is secured with bolts. This connection of beams harmoniously fits into the design of the attic, and allows you to leave the load-bearing elements of the roof open.
Sometimes attic rafters are attached with an overlap, the boards should overlap each other by at least a meter, then they are fastened with nails or bolts in a checkerboard pattern. If attic rafters are built up end-to-end, then the cut must be exactly 90°, the elements are applied at the ends, boards are laid on both sides, then the structure is secured with bolts or nails.

Options for extending the rafter leg
If the cross-section of the material is not enough, then the boards are reinforced. Paired rafters consist of two or more boards that fit tightly together; this structure is stitched with nails in a checkerboard pattern. Composite rafters are made from two boards, between which liners are inserted with a length of 2 board heights. The distance between the liners should not exceed 7 foot heights. The top of composite rafters may consist of a single plank.

Ways to strengthen the rafter leg
How to join rafters at the top
There are several options for connecting the rafters of the attic roof to each other at the top. If a ridge is not provided, the boards are cut at an angle, fastened together with nails, and additionally with the help of metal and wooden overlays. Hanging systems for complex raftering of a multi-slope mansard roof are fastened into a tenon with a single or double tooth.

Upper rafter connection on a ridgeless mansard roof
If the rafter system provides a ridge, then the rafters can be attached to the ridge beam with an overlap, or by sawing the ends at the desired angle, the joints must be reinforced with metal or wooden overlays.

Joining rafters on a ridge beam
It is better to assemble trusses on the ground, and then lift and install the structure on the attic floor. First of all, you need to make a template. To do this, the board is placed in place, the corner of the cut is drawn for the upper joint, and a groove is marked for fastening to the Mauerlat, then the second board is tried on in the same way.
On the ground, according to the marks obtained, the boards are sawed down, joined together, the template is lifted onto the roof and tried on. If the geometry of the attic roof is met, then the entire rafter system can be made according to one template, but in case of small deviations, it is recommended to do only the top cut and joining, and make the tie-in into the Mauerlat locally.
DIY attic photoExpanding the living space in a private house after completion of construction will cause a lot of problems, including redevelopment and associated costs. But if you urgently need an additional room, there is a solution. A do-it-yourself attic roof, erected over a house, allows you to increase the living space without adding an additional floor.
The mansard roof is somewhat different from the usual one. Its design is focused on obtaining the required volume and height of the room. To achieve this goal, attics are most often made according to a gable broken pattern.
The shape, angle of inclination and design of a sloping roof are influenced by the following factors:
- the height of the snow cover and the maximum level of precipitation in your area - the higher it is, the greater the angle of inclination of the slopes should be;
- calculated thickness of sound and heat insulation - a thick layer of insulation has a decent weight, which entails the need for additional fasteners;
- in some cases, installing an attic roof with your own hands involves adding an external flight of stairs, which can also affect its design.
Technical terms and safety rules
A do-it-yourself sloping roof is assembled from elements, most of which have their own historical names:
- A beam placed along the walls, acting as a support for the rafters, is called a mauerlat.
- The wooden beams that form the roof slope are called rafters.
- Stiffening elements connecting individual rafters and distributing the load force between them form a suspension.
- Flat boards, plywood, chipboards and other materials on which tiles, corrugated sheets or similar roofing material are laid are called sheathing.
When working at height, it is very important to monitor your own safety. To do this you should:
- use a fastening belt;
- carefully secure the scaffolding during installation;
- do not leave electric or other tools unattended, especially switched on;
- When lifting and moving heavy loads, keep an eye on your assistants and it is advisable to always be within their visibility range;
- do not leave loose parts on the roof slopes;
- try not to be distracted by other matters when working at height.
Do-it-yourself attic photo: building a frame
Mansard roofs begin to be built from the base - the Mauerlat. It is laid along the top of the walls to connect the frame of the house and the roof structure. If the house is not brick, but made of wood, or its last floor is crowned with a wooden part, then the top log or beam can serve as the mauerlat.
In this case, the connection between the wall and the base is made using large staples, powerful overlays, nails or ties. In an old brickwork or concrete wall, the studs or anchors on which the Mauerlat beam sits are driven tightly, and when building a new wall, they are mounted during the masonry process.
Mauerlat is made only from coniferous wood. The beam has a cross-section of 100 - 150 square centimeters. Coniferous wood is distinguished by its durability, resistance to stress and higher resistance to air humidity.
There must be waterproofing between the Mauerlat and the wall.
This can be a layer of thick roofing material or a durable waterproof membrane. Thanks to waterproofing, the roof with an attic will be protected from excessive moisture and wood damage. When installing the Mauerlat, you need to ensure that its surface is strictly horizontal. It will become the basis for setting the verticals and horizontals of the roof structure.
Floor beams are laid on the base so that their ends protrude 30-50 cm beyond the wall line. They are made of softwood, from timber with a cross-section of at least 100x200 mm. Fastening the beams to the Mauerlat is done with steel angles, brackets and other durable hardware.
For greater strength, at the junction of the beams, you can choose pockets of recesses and lay them with one layer of roofing material. To ensure horizontal alignment, it is better to first lay the two outer beams, and level the rest along the stretched cord. Leveling is done by trimming and tamping small wedges and wooden spacers under the beams.
According to accepted standards, the pitch between the beams can vary from 50 to 100 cm. In practice, building an attic roof with your own hands is tied to the size of the materials used, and the pitch between the beams is adjusted to the width of the interfloor sheet sound-heat-insulating material, for example, construction wool. The ends protruding beyond the wall are treated with water-repellent protective agents.
The racks on which the logs will rest are installed vertically on the floor beams. They are made from timber 100x100 or 100x150 mm. The vertical position of the racks is controlled by a level or plumb line. The construction of an attic requires mandatory control of the placement of the upper ends of the racks in the same horizontal plane.
Fixation is done by temporary or permanent bevels, both in the longitudinal and transverse directions, in relation to the axial section of the roof. For jibs, any sufficiently strong boards or cuttings of thin timber are taken. The result will be two rows of racks, equal in height and parallel to each other.
On top of them, in one line with the Mauerlat, purlins are laid - boards with a section of 50x150 mm. Usually they are where the roof breaks. There are other design solutions, but this do-it-yourself broken mansard roof is the easiest to implement.
The runs of parallel rows are connected to each other by tie rods. The tie-girder-beam system forms the rigid skeleton of a rectangular living space. Tightenings work in tension and do not bear lateral load. Therefore, for them you can take a board thickness of 50 mm, and a crossbar thickness of 150 mm. To prevent sagging, it is installed on the edge.
Rafters
The construction of a mansard-type roof itself begins with the stage of constructing the rafter system. With sufficient experience, it is better to assemble the rafters on the ground and move them upward for their sequential fastening on the purlins and the mauerlat. An easier, but more labor-intensive way is to collect them locally right at the top.
In this case, each board of the lower rafters is applied and cut in place, after which it is attached at the bottom to the base and protruding parts of the beams, and at the top to the purlins. The horizontal position of the installation is controlled by a stretched rope. Fastening is carried out with nails, wood screws, steel plates and staples. The lower part of the rafter leg should extend beyond the wall by 30-50 cm. This will be the basis for tamping the fillies that form the hanging part of the roof.
The upper part of the rafter system is formed by hanging rafters. They can also be collected on the ground and the finished corner can be served up. After connecting to the lower rafter legs, the ridge of each corner is rigidly attached to the central part of the tie by means of a headstock.
Under its weight, the upper part of the rafter system forms a strong self-regulating system, similar to an open umbrella. Thanks to this, any vibrations of the roof will be compensated by springiness. If the attic width is large enough, a ridge is tapped along the upper connection of the rafters. With a small width, its role can be played by the outermost boards of the sheathing.
Gable trim
The cladding of the gables can be done with any sheet material or boards. When hemming them, space is left for window and, if necessary, door openings. They are equipped with a reinforcing frame corresponding to the size of the window or door frame. At the same time, fillets are tacked to the lower parts of the rafter legs - extension boards that form the roof overhang.
The type of lathing depends on the characteristics of the selected type of roof. If it is a soft attic roof or bitumen shingles, then the structure should be continuous or with the minimum possible gaps. For hard coverings, their size and lathing pitch are indicated by the manufacturer of specific roofing materials.
Waterproofing is installed under the base for attaching the tiles. It is advisable to thickly treat the boards with a moisture-proofing agent. Plywood and other softwood sheet materials must be waterproof.
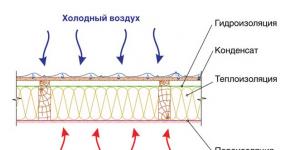
Insulation
A broken attic roof allows you to limit yourself to insulating the living space on the top and sides. At the same time, the lower part of the roof will be well ventilated, which will prevent moisture and condensation from accumulating. Due to the rafter voids, the attic will be protected with your own hands from overheating in the summer, and from hypothermia in the winter.
Attic interior lining
For the interior lining of the attic space, wooden or plastic lining, plywood, thin sheets of chipboard or fiberboard are used. Heavy facing materials should not be used, since the entire load from their weight falls on the wooden beams.
Bottom line
A do-it-yourself attic will best meet your requirements and allow you to make maximum use of the attic space for organizing your living space.
Do-it-yourself mansard roof step by step video
A modern attic roof is an excellent opportunity to significantly expand the living space of your home without any hassle. But if you involve builders in the work, it can cost a pretty penny. It is quite understandable that each of us has thought about the question of whether it is possible to do everything on our own without experience. We assure you that a do-it-yourself attic roof is more than possible. We offer you comprehensive instructions.
Currently, the best option is a broken attic. It is quite spacious and can really become a full-fledged living space with a large area. Naturally, for this you need to make accurate calculations.
Construction of an attic roof will require you to consider many factors before. Let's list the main ones.
Video about the attic roof of a house with your own hands
It is quite clear that the smaller the angle of inclination, the more usable space there will be in your attic. But it is not always necessary to strive for the most flat placement. Let's list some features of the choice:
- If your house is located in an area with a temperate climate, where the weather is often windy and snow is rare, then you can safely make a roof with a slight slope;
- If snowfalls and downpours are a frequent occurrence in your area, a flat roof should be abandoned;
- Do not forget that you need to take care of high-quality heat, sound and waterproofing. The attic is a living space like the rest of the rooms in your house;
- The best materials for roofing are tiles or slate. Many people mistakenly install a metal covering, but with the arrival of cold weather they are faced with problems of heat conservation in the attic. Please note that materials must be fireproof and moisture resistant. The roof always consists of wooden elements. For better preservation, it is recommended to treat all such surfaces with an antifungal solution;
- An external staircase for the attic will significantly save space in the house. An internal staircase is a much more convenient option, but it also takes up a lot of space. It’s great if you take care of installing a ceiling ladder. It takes up practically no space. As an alternative, you can install a spiral staircase, but its convenience is often questionable.

An external staircase for the attic will significantly save space in the house
- To begin with, you will need wooden beams 10x10 cm in cross section. They are applied on top of the waterproofing. The best material for it is roofing felt or roofing felt, which is sold in rolls. Working with them is quite convenient and you don’t need any additional skills. If your ceiling is also made of wood, then there is no need to lay additional timber under the main beams.
- The next step is to install the racks on the beams. The same timber with a section of 10x10 cm will suit you. These racks are a kind of skeleton of the walls of your attic. In order for them to fully perform their functions, they must be placed no further than two meters from each other. Make sure each one is perfectly level. We recommend checking each one with a level and, if necessary, filing in the right places. When the racks are installed, they must be sheathed on both sides. For the inside, an excellent option is plasterboard or ordinary plywood, for the outside - slab. It is important not to forget at this stage to lay the insulation between the racks. Each rack is separately secured with spikes and brackets. To prevent them from tilting, we recommend using temporary braces to secure them properly.
- Next, lay the top beam. Its cross-section should be the same as in the previous paragraphs. You can secure it in any way that is convenient for you. But make sure that the beams are held tightly and firmly.

Each rack is separately secured with spikes and brackets
- Now you need to install the Mauerlat. This is a kind of support for the rafter leg, which is located at the bottom of the structure. For the Mauerlat you will need a beam with a section of 40x40 cm or a board with the same thickness. Thanks to the Mauerlat, high strength of fastening of the roof rafters to the walls will be ensured. It allows you to redirect the weight of the roof directly onto the walls. It is not necessary to take a section larger than 40 cm. All the same, the Mauerlat lies directly on the wall and the load on it is relatively small. Just be sure to put waterproofing underneath it, otherwise it will start to rot over time.
- A well-fixed Mauerlat protects your roof from the effects of wind, snow in winter and other loads. Therefore, make sure that it is secured carefully. For this you can use wire with a diameter of up to 5 mm. It is best to choose annealed wire, which is specifically intended for tying. To make the walls more durable, the wire is embedded directly into them.
- Now you need to install the rafter legs. Make markings on the rafter frame and mauerlat in the places where the rafters will be installed. Usually the pitch is 1-1.2 m. For rafters, you will need a board with a cross-section of 4-5 cm and a width of 15 cm. Choose only perfectly flat boards. It’s better to overpay a little money for them, but be sure that a residential attic with your own hands will not cause your attic roof to collapse.

For rafters, you will need a board with a cross section of 4-5 cm and a width of 15 cm
- The rafter legs should rest on the ridge beam. If your attic has a large area, then the weight of its roof will be large. Therefore, the beam is a mandatory structural element. It is not needed only if the rafter length is less than eight meters. In this case, you can get by with regular stretch marks.
- Installation of fillies. Produce it according to the same scheme as the rafters. To simplify the process, start with the two outermost ones, stretch the twine between them and align with it when installing the next ones.
- Now you need to nail the hem board to the fillies. It will become an obstacle to wind and almost any precipitation.
- Before you make a mansard roof, you must think about where the windows will be installed. Remember that their area should occupy at least 12-13% of the area of the side walls. Where you decide to install windows, you need to strengthen the rafters. To do this, install cross bars. They will take on the role of the lower and upper parts of the opening, where the window frame will be installed and fastened.

Before you make a mansard roof, you must think about where the windows will be installed
When the previous ten points are completed, you need to carefully double-check everything that has been done. Already at this stage you will understand how to make a roof with an attic without any problems, but you should always play it safe. Especially if you are doing this for the first time.
Carefully go through all the rafters and beams with a level, check whether they really hold tightly and reliably, whether there is insulation everywhere, and whether problem areas need to be improved. It would be better if you ask one of the more experienced builders to evaluate with a trained eye whether everything is really done as it should be. Remember that the roof of your home must be safe and strong. But if everything is fine and the structure holds securely, you can proceed to further work:
- You have already created the roof skeleton. Now you need to nail the furring slats to the rafters. The step depends on what roofing material you choose for your roof.
- When the sheathing is installed, you need to install a water barrier on it. In most cases, regular plastic film is best suited for this. It is inexpensive, effectively protects the attic from moisture getting inside and is easily attached using construction brackets. The main thing to remember is that the layers of film must be laid from bottom to top with the layers overlapping each other.
- A thermal insulation layer must be placed on top of the film. One of the best materials that serves for these purposes is mineral wool. It is lightweight, retains heat well and is completely safe for your health, unlike many other thermal insulation materials. In addition, it effectively prevents the spread of rodents in your home.

A thermal insulation layer must be placed on top of the film.
- When you reach the roof, follow the same procedure as with the plastic film. The roofing ball also lies from bottom to top, and the elements overlap each other. Make sure that in those places where there is a break in the roof, the upper ball of the roof protrudes above the lower one. It is very important. Otherwise, with the slightest rain, your roof will leak and the structure will gradually rot.
- The ridge must be installed in such a way that its design completely eliminates the possibility of precipitation getting under the roof of your roof.
Completion of installation
The main part of the work has come to an end. It is recommended to make attic roofs multi-layered so that they provide better heat, sound and waterproofing of the entire attic. Do not forget also that the attic must “breathe”. Modern windows and doors are an integral element of any such roof.
If you have not completely decided on the installation of the stairs, then it is better to install an external one first. It will be cheaper and easier this way. In any case, if you feel that this option is not suitable for you, you can make a staircase indoors at any time, sacrificing space in the house.
Video about a gable roof
Now you know how to build an attic roof according to all the rules and without resorting to the help of an expensive team of builders. Be patient, select high-quality materials and tools, and then follow our instructions. Good luck!
Mansard roof rafter system
More and more architectural, original houses are appearing, decorated with bay windows, superstructures, and mezzanines. Attics are becoming fashionable, expanding the usable area of the house. But attic roofs, unlike a simple gable roof, require complex rafter systems. Correctly calculating them and carrying out installation is not at all easy. Below we will try to briefly highlight this issue and provide useful recommendations from experts.
Types of rafter systems
At the design stage of a house, the roof structure must be calculated. Calculations using complex formulas should give a value for the load per meter of a square rafter system. For residential buildings, the standard load is 50 kg/m2.
In accordance with the calculations, the type of attic truss structure is selected. The main varieties include:
- hanging rafter system;
- sloping roof rafter system;
- layered gable roof system;
- combined.
The most common are combined rafter systems for pitched roofs. It is recommended to entrust the calculation of complex rafter systems to professional designers.

Advice!
To increase the usable area of the building, you should choose a multi-slope mansard roof design.
Rafter roof elements
Experienced specialists will perfectly understand what is being discussed in the article, since they know all the terms and names of structures. To make it clear to everyone, here are the common names of the structural elements of a mansard roof:
- Mauerlat - a beam attached to the upper crown or wall of the house on which the rafter system rests;
- Floor beams are a wooden structure that plays the role of an attic floor and, at the same time, the ceiling of the room below;
- Posts are vertically mounted posts on which rafters and beams are attached.
- Purlins - beams (boards) located horizontally serve as support for the rafters;
- Crossbars are horizontal beams in a U-shaped truss. They serve as a support and tighten the pitched rafters; they are also called “tightenings”;
- Rafters - timber or boards that form the basis of the roof structure;
- Suspension - a rack whose task is to support the crossbar, facilitating its operation, is also installed horizontally;
- Sheathing - a board or plywood base on which the roofing material is laid;
- The filly is a board that serves as the basis for installing the overhang and is installed at the bottom of the rafter system.
 Elements of the rafter system
 Rafter system calculations
The choice of truss structure largely depends on the size of the building, according to which the span length is determined, i.e. distance between main posts. For small houses, preference can be given to a gable structure.

 Gable roof rafter system with attic
 Structural calculations are carried out to determine the load, in accordance with standards and building regulations. The basic rule for an attic roof is to limit its height, which should not be less than 2.5 meters indoors. Thus, the roof must have a minimum height of 2.80 m, since it requires laying an insulating layer and finishing inside the attic itself.
 Gable mansard roof design
 You should definitely make a design drawing, on which you should put all the dimensions and display the frame elements as much as possible. The drawing should show the dimensions of the house, the angle of the rafters, and the height of the roof.

Advice!
To make accurate calculations for all loads on the roof and its elements, it is recommended to use a calculator located on many sites dedicated to the construction of roofs.
It is enough to enter the type of roofing, the material of the attic roof frame and dimensions. The program will calculate the section angles and pitch of the rafters and give recommendations on the design of the sheathing.
Calculation of the rafter system
Attic roof installation technology
You should start with the installation of the Mauerlat, which is laid along the perimeter of the upper edge of the walls, if the house is brick or block. In houses made of timber or chopped with mauerlat, the upper crown can serve. The timber from which the Mauerlat is made must have cross-sectional dimensions of 100x100 mm or 150x150. Coniferous wood for timber must be well dried. The Mauerlat beams are fixed with anchors or studs to the walls in increments of approximately two meters. Waterproofing is placed under the Mauerlat, usually of a roll type (roofing felt).


Next, you should begin installing the ceiling. Beams 150x200 mm, placed on the Mauerlat, should protrude beyond the walls of the house by about 0.3-0.5 m. The beams are fastened with corners and screws (wood screws), starting from the outer ones, then intermediate ones.
Important!
When laying, use a cord to control the horizontal level so that the beams lie in the same plane.
The distance between them is, as a rule, 0.5-1.0 meters; if you plan to lay insulation, the standard sheet width of which is 0.6 m, then it will be more convenient to withstand the same spacing of the beams.
Installation of roof truss system
Installation of support posts and purlins
The next stage is the installation of racks. For them, a 100x150 mm beam is used, which is fastened to the front floor beams. It is necessary, using a plumb line, to check the verticality of each support and fix it with jibs. Intermediate supports are also installed strictly vertically on the beams, forming two parallel rows.
 Intermediate supports of the roof truss system
 Next comes the installation of purlins, which can be made from boards 100-150 mm wide and 40-50 mm thick. The purlins are fixed using nails and corners with screws. Then, on top of the purlins, plank crossbars are laid, for rigidity, installed at the end.
 The purlin beam forms a cantilever to support the diagonal roof rafters
 Advice!
As a result, the outline of the future attic space is formed. To provide additional strength, the supports should be strengthened with struts and braces.
 Roof truss system
 Installation of rafter elements
Installation of rafters starts from the bottom. A board 40-50 mm thick and 150 mm wide is suitable for them. We rest one end on the mauerlat close to the floor beams, and the other is attached to the purlins using angles, screws and nails. To install rafters at the top of the roof, mark the center line of the roof. All rafters must be the same length. To do this, you should make a template board, making cuts on it at both ends. Then you can saw off the rest of the rafters using the template.
 Rafter legs
 The rafters are mounted on purlins, fixed at the top with metal plates. On the purlins, the beams are secured with edge-to-edge cuts and secured with corners on self-tapping screws.
 Fastening the rafter system
 For strength, the lower rafters should be strengthened with struts (board 50x150 mm). After securing the struts, the temporary stops can be removed.
 Often elements are connected not only with carpentry units, but also with fasteners
 Installation of rafters
In cases where floor beams are laid in wall pockets, fillers should be secured to the lower rafters to provide a roof overhang. If the floors lie on the mauerlat, then fillers are not needed, since the beams should protrude beyond the walls to form an overhang.
 Lathing is an important part of the roof structure
 The sheathing is installed depending on the intended covering of the attic roof. Either the sheathing will be solid or with gaps. A waterproofing layer should be laid on top of the sheathing, after which you can begin sewing up the gables and laying the roofing material - metal tiles, corrugated sheets or slate.
Roof sheathing under metal tiles
If the attic roof has a broken structure, then, as a rule, it is not insulated, since the air layer under the rafters protects the premises, while simultaneously ventilating the space under the roof. To do this, when sewing up the gables, you should leave ventilation windows (holes) above the attic floor. Thermal insulation should be done only inside the attic room.
 Insulation of the attic roof
 Thermal insulation of the attic has its own characteristics, since the rooms have triangular or trapezoidal ceilings. Builders consider insulation to be one of the complex technological tasks in the construction of attic spaces. The main thing is to lay the thermal insulation so that on the sloping ceiling and on the fences it does not shrink during operation.
Ksenia Skvortsova. Chief Editor. Author.
Planning and distribution of responsibilities in the content production team, working with texts.
Education: Kharkov State Academy of Culture, specialty “Culturologist.” Teacher of history and cultural theory." Experience in copywriting: From 2010 to present. Editor: since 2016.
There are several roof options under which you can place a comfortable living space. In order to ensure the maximum volume of the attic space under the roof, it is necessary to select the optimal angle of inclination of the slopes and not to forget about the snow and wind load on the roof. We will look at the most popular designs of attic rafter systems in the middle zone.
The design of the attic roof truss system
A mansard roof makes it possible to obtain additional usable space with a relatively small financial investment, which is why this architectural solution has gained great popularity. So what is called an attic?
Attic (from the French mansarde) is an usable attic space (both residential and non-residential premises), formed on the top floor of a house, or the top floor of a part of a house, with an attic roof.
Wikipedia
https://ru.wikipedia.org/wiki/Attic
The attic is located within the load-bearing walls of the building and rests on them through the mauerlat, horizontal beams (strings) and rafters. The larger the attic space, the greater its useful volume, which is achieved by increasing the angle of inclination of the slopes and is formed by a more complex rafter system. The location of the rafters of the attic roof depends on the structure, which can be of different types, namely:
- Tent or pyramidal structure with a minimum volume of under-roof space.
The slopes of the tent structure rest on the side rafters and the central post, so the volume of the under-roof space here is minimal
- A hip or half-hip roof, in which the main living space is located under trapezoidal slopes.
The rafters of the hip roof form two triangular and two trapezoidal slopes
- A gable structure, which is a symmetrical gable roof with gables cut in at right angles, which provides a significant volume of attic space.
The multi-gable roof allows you to equip a full attic floor
- A gable symmetrical roof with an attic is a classic option, characterized by ease of installation and resistance to wind influences due to its rigid structure.
A gable roof requires the least amount of working time and low consumption of building materials
- The rafter system of an attic sloping roof provides the maximum volume of living space at a relatively low cost.
A sloping roof is the optimal solution in terms of the ratio of the cost of construction to the volume of usable space in the attic
The rafter system must withstand constant loads, which consist of the weight of structural elements, insulation and roofing. In addition, there are variable loads depending on the strength of the wind and the weight of the snow on the roof. The choice of the cross-section of load-bearing elements and the method of connecting them should be aimed at creating the most durable and rigid structure that evenly distributes the load on the walls of the building.
Depending on the width of the building, different types of attic rafter systems are used, which are divided into hanging, layered and combined.
- Hanging rafters are those that rest on the walls of the building through the mauerlat and tie, and form a ridge in the upper part. With this connection method, there is no intermediate support, and the bursting pressure on the walls of the house is reduced with the help of crossbars, racks and struts. The hanging rafter system is usually used when the building width is no more than 6 m.
To compensate for bursting forces in suspended rafter structures with a span of up to 6 m, tie rods and crossbars are used
- Layered rafters are called rafters with intermediate support on the internal wall of the house. They are used when the width of the building is from 6 to 16 m. The larger it is, the more elements are used to evenly distribute the load.
Layered rafters have one or more supports inside the house
- The combined type of rafter system is used in mansard roofs with variable slope angles. The most typical example is a broken mansard roof, where the lower rafter legs are layered and supported by a post and a mauerlat, and the upper ones are mounted as hanging rafters supported by a tie rod and a headstock. When constructing mansard roofs, all types of rafter systems are used, and their choice depends on the structure in which they are used.
In the design of a sloping roof, the upper rafters are hanging, and the lower ones are layered
Scheme of the rafter system of the attic roof
To erect a roof, you must have a project that specifies the list and size of structural elements, as well as the method of connecting them. To understand the principle and sequence of installation, you need to know the purpose of the elements of the rafter group and the way the roof adheres to the walls of the building. The attic roof consists of the following elements:
- the connecting element between the wall of the building and the rafter group is the Mauerlat, which is attached to the walls of the house with studs, brackets or anchors;
- strings are attached to the Mauerlat parallel to the short wall of the building, and beds are installed along the long side;
- vertical posts are mounted on the central floor;
- the ridge girder rests on the posts;
- the upper part of the rafters rests on the ridge girder, and the lower part is connected to the tie, forming a cornice overhang;
- the rafter legs in the upper part are connected by crossbars;
- on hip roofs, diagonal rafters and shortened eaves are used;
- trusses serve as additional support for the diagonal rafters;
- for intermediate fastening of rafters, racks and struts are used;
- if necessary, the rafters are lengthened with fillets.
The main load-bearing elements of the attic roof are rafters, beams and tie rods, as well as vertical posts and a ridge girder.
The diagram indicates the dimensions of the elements of the rafter system, their location, angles of inclination and methods of insertion at the connection nodes. Information about the location of double rafters, the presence of additional supports, and the dimensions of eaves and gable overhangs is also required.
The diagram is the main document for assembling the rafter system; it reflects all the necessary parameters. However, before cutting the material, it is necessary to check the calculations again and create templates for the main parts. If there is no project, you need to carry out calculations and create a diagram yourself.
Mansard roof rafter spacing
Before starting work, you need to select the pitch of the attic roof rafters. The distance between the rafters and the eaves (in the case of a hip roof) depends on several factors:
- building size;
- type of rafter system;
- constant and variable load on the roof;
- sections of rafters, racks and slopes;
- type of roofing;
- type and pitch of sheathing;
- insulation sizes.
For rafters, sheathing and counter-lattens, softwood material is selected in accordance with SNiP II-25, and the load on the rafters is calculated according to SNiP 2.01.07 and ST SEV 4868. Based on what is stated in the building codes and regulations, we can say that for rafters less than 9 m applicable beam cross-section from 50X150 to 100X250 mm with a pitch of 60 to 100 cm. The size of the building affects the design of the truss and the presence of racks, struts and crossbars, the use of which increases the strength of the rafter legs and allows you to increase the pitch between the rafters to 120 cm or more . Usually, to select a step, reference tables are used, which contain recommendations taking into account the length of the rafters and the cross-section of the beam.
Table: dependence of the pitch between the rafters on the section of the beam and the length of the rafters
The type of roofing used also affects the choice of rafter spacing, because different materials have different weights:
- tiles, depending on the type, weigh from 16 to 65 kg/m2, slate - 13 kg/m2. Such heavy coverings imply a reduction in the pitch of the rafter legs to 60–80 cm;
- the weight of metal coatings and ondulin does not exceed 5 kg/m2, so the pitch of the rafters can be increased to 80–120 cm.
On hip roofs, in any case, the step of the roofers is chosen to be 50–80 cm to give the slope greater rigidity.
In addition, the installation step of the rafters depends on:

The length of the rafters and sheathing of the attic roof
When doing independent calculations, the dimensions of some structural elements of the roof have to be calculated based on the existing dimensions of the building and the angle of inclination of the slopes. The length of the rafters sometimes has to be adjusted for different types of attic roofs, selecting the optimal dimensions of the entire structure as a whole.
Let's assume that the main dimensions of the building are known and it is necessary to calculate the length of the rafter joists for several proposed options for the angle of inclination and type of roof. Let half the width of the building L be 3 m, and the size of the eaves slope be 50 cm.

Additional calculations show that increasing the angle of inclination of the lower slope from 60 to 70 o will increase the width of the attic by 10%.
The length of the sheathing connecting the rafter legs is determined taking into account the gable overhangs that protect the facade walls from precipitation. The length of the gable overhang depends on the height of the building and is selected in the range from 40 to 60 cm. Therefore, the total length of the slope will be equal to the length of the house, increased by twice the length of the overhang.
Let's assume that the length of the house is 10 m, and the gable overhang is 0.6 m. Then the dimensions of the sheathing must be calculated taking into account the length of the slope, equal to 10 + 0.6 ∙ 2 = 11.2 m.
The parameters of the sheathing should be calculated taking into account the length of the gable and eaves overhangs
Any adjustment to the project requires a careful recalculation of the parameters of the rafter system, taking into account the changes that have arisen.
Video: calculation of the attic roof
Knots of the rafter system of the attic roof
The nodes of the roof truss system represent the junction of individual elements into a single structure, which allows you to evenly distribute the load on the walls of the building. The connection is made with nails, self-tapping screws or bolts using overhead wooden elements or metal squares and plates, as well as by connecting to a groove. To construct a gable roof, the following main components are used:
- A ridge unit that provides a connection between the rafter legs and the ridge purlin.
- Places where the crossbar connects the rafters to give greater strength and rigidity to the trusses.
- Attachment points for struts and posts that provide additional support to the rafters.
- A cornice assembly in which the rafters are attached to a tie rod or mauerlat, forming a cornice overhang.
Nodal connections of the rafter system must be made in such a way as to ensure the most rigid fastening of the elements to each other
A characteristic feature of a gable sloping roof is the knot where the upper and lower rafter joists, the vertical post, the crossbar and the purlin are connected. Such a complex connection requires the use of mortises, bolts, steel plates and construction staples.
In the most complex unit of a broken mansard roof, five rafter elements are connected
The most complex component of a hip mansard roof is the junction of the side or diagonal rafters with the mauerlat. The side rafter in the lower part rests on the corner beam of the mauerlat and on the embedded beam; in another option, a vertical post or truss is placed between the embedded beam and the rafter leg. The upper part of the hip rafters is attached to the ridge purlin using bolts or nails.
The corner rafters of a hip roof bear the greatest load, so their connection to the Mauerlat must be thought out most carefully
The described units are used most often when installing rafter systems of various designs and allow you to install load-bearing elements on your own. For efficient and high-quality assembly, drawings and production of templates with verified angles of joints and inserts are required.
Video: rafter system components
Calculation of the rafter system of the attic roof
The rafter system is the basis of the roof, so it is important to choose the design that is most suitable for the climatic conditions of the region and the existing requirements for the size of the residential attic. After selecting the design, the angle of inclination of the slopes and the height of the ridge are calculated for the required dimensions of the attic room. Calculations are made taking into account the size of the cornice using the following formulas:

The meaning of trigonometric functions can be found in reference tables.
Table: values of trigonometric functions for different slope angles
The most difficult thing when designing mansard roofs is counting lumber. Calculating the number of rafters required and matching them with a standard length of 6 m can sometimes be quite difficult. Let’s assume that we have chosen the hip roof, the most difficult to calculate, measuring 10X13 m, taking into account the eaves overhangs 80 cm long and the slope angle of 45 degrees. Then the side rafters will have a length of 5 / sin 45 o = 7.04 m. Therefore, the standard six-meter beam will have to be lengthened. Typically, for rafters a little more than 6 m long, a 100X200 mm beam or a 50X250 mm board is used.
If the building is large, it requires rafters longer than the standard size of 6 m, so the beam has to be extended
As for the horizontal floor beam, since the width of the building is 10 m, the tie rods should consist of two parts, which either rest on the internal wall of the building, or are joined together by reinforcing elements and rest on the purlin. For tightening and purlins, use timber with a cross section of at least 50x200 mm. Along the perimeter of the building there is a mauerlat, for which timber 150X150 mm or 200X200 mm is used. According to the scheme we have chosen, the perimeter of the building is 39.6 m, so installing the Mauerlat will require seven six-meter beams. The dimensions of all other elements of the rafter system will not exceed 6 m.
The weight of the lumber of the rafter system is calculated by summing the lengths of all elements with a certain cross-section and converting their quantity into cubic meters. This is necessary to determine the mass of the entire roof, and is also necessary when purchasing and transporting material. The calculation is made according to the table, and then the obtained values are multiplied by the weight of 1 m 3 of lumber.
Table: calculation of the amount of lumber in 1 m3 and the volume of one unit of material
Pine lumber weighs 505 kg/m 3 at 12% humidity, and 540 kg/m 3 at transport humidity 25%. Here are some examples of calculations:
- If 1 m 3 of material with a cross section of 50X200 mm contains 16.6 boards, then the weight of one board will be 540 / 16.6 = 32.5 kg.
- If 25 m 3 of lumber is purchased, then it will weigh 25 ∙ 540 = 13,500 kg.
- If 100 boards 25X200 are required, then you need to buy 100 / 33.3 = 3 m 3 of wood, which will weigh 3 * 540 = 1,620 kg.
It is important to note that it is advisable to purchase edged lumber with the lowest moisture content so that after installation it does not warp or crack, especially for large-section timber. For the construction of a rafter system, the wood moisture content should not exceed 18%.
Installation of attic rafter system
Installation of a rafter system with a residential roof space requires careful preparation. It is necessary to install convenient scaffolding, decking and ladders, as well as provide workplaces with safety ropes. Workers must be provided with protective clothing, protective equipment and working equipment. It is necessary to select a flat place on the ground for pre-assembling the trusses, marking the corners and making templates. All wooden elements must be treated with antiseptic and fire-retardant compounds.
After this, you can begin work, which takes place in the following sequence:
- On walls with walled studs, a mauerlat is mounted around the perimeter. If there is a load-bearing wall inside the building, we lay a beam or purlin on it that is the same height as the mauerlat.
If the house is being built from building blocks, then the Mauerlat is most conveniently laid on threaded rods, walled into the wall during its laying.
- Cable ties with cornice extensions are attached to the Mauerlat parallel to the short wall.
- Vertical posts are placed on the tie rods, delimiting the attic space.
- The racks are connected to a tie that serves as the ceiling of the attic space. The trusses installed in this way are connected to each other by horizontal girders.
Vertical posts, top ties and horizontal purlins form the frame of the attic space
- The lower and then the upper rafters are installed, which are attached to the ridge part.
- To strengthen the lower and upper rafters, struts, headstocks and ribs are used.
- The sheathing and front board are installed on the eaves overhang.
After installing all the rafter joists, all that remains is to lay the sheathing and nail the front board
We looked at the assembly of the rafter system using the example of a broken mansard roof. The construction of other structures consists of similar operations and mainly consists of performing work according to the design installation diagram, which reflects the methods of connecting the elements of the rafter system. With carefully calculated drawings, a team of four people is able to install a roof with a rafter system of any complexity.
Video: installation of an attic roof
We examined the rafter group of the attic roof, its design, calculations, as well as a diagram and description of the main components. They offered an option for step-by-step installation of load-bearing structures of the attic, attached illustrations and videos that explain the procedure for assembling the structural elements of the attic roof. Now its successful construction depends only on the careful fulfillment of the requirements of instructions and technologies and the availability of certain skills for the performers to carry out construction work. We wish you success.