How to install a gable roof rafter system. Do-it-yourself attic roof - drawings How to make a rafter system for an attic roof
The rafter system is one of the final stages of building a house. The durability of the building itself and the comfort of living in it depend on how correctly it is executed. Simplicity of execution allows you to do the work yourself with the assistance of an assistant.
Rafter systems for the attic
Today there is a real boom in the use of various architectural elements in suburban construction, which, in the context of industrial construction, would seem to be a thing of the past forever. We are talking about devices such as bay windows, attics, mezzanines and the like. They can significantly increase the usable space and give the building an original, beautiful look.
Attics are especially popular, allowing you to create a full-fledged living space in the under-roof space. For this purpose, special rafter systems are used to ensure the possibility of creating such a room, provided that the structure is of sufficient strength.
The installation of a broken attic roof allows you to get a full-fledged living space on the second floor
Types of rafter systems
The main types of rafter systems for attic construction are presented in two options:
- gable;
- broken rafter system.
Photo gallery: what is an attic
A sloping roof allows you to obtain the optimal combination of the roof slope and the usable area underneath. It is possible to increase the volume of the attic in a structure under a gable roof only due to the high height of the ridge. The attic can be “equipped” with an external structure with a balcony under a separate roof. The balcony can be an integral part of the attic roof structure.
However, in practice, the roofs of a country house are so diverse that it is almost impossible to classify them. The design uses a variety of elements:
- hip bevels;
- birdhouses;
- awnings;
- semi-built-in translucent structures (greenhouses);
- lanterns and other architectural solutions in the most original and sometimes unexpected combinations.
Photo gallery: projects of houses with a gable roof and an attic
A gable roof can be decorated with an elegant “birdhouse”, which will also increase the area of the attic. In large houses, a gable structure can be used as one of the elements of the roof composition. The main idea of such a house is to combine simplicity of execution with perfectly selected finishing elements
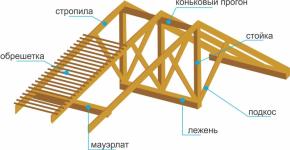
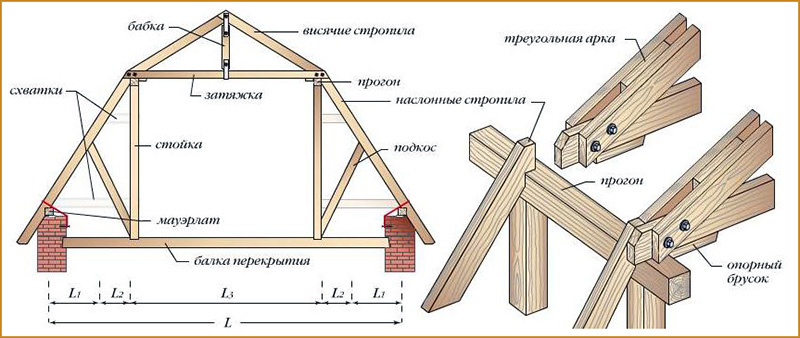
Elements and components of the attic roof rafter system
Obviously, the most durable structure is a gable roof. But to obtain a sufficiently spacious room with such a rafter arrangement, it is necessary to reduce the angle between the slopes, and this leads to an increase in wind loads on the roof. A reasonable solution is to create a semi-attic, when racks are installed from floor to ceiling to a height of 1.3–1.8 meters, and rafters are already attached to them. Such a device requires the installation of low crossbars to compensate for the thrusting loads from the rafter legs on the racks.
To increase the useful volume of the attic, the crossbars that form its ceiling are installed as close as possible to the ridge unit
The use of a sloping roof allows you to simplify the shape of the attic room and obtain a larger volume of living space.
The construction of a sloping roof allows you to get a much larger attic than the installation of a conventional gable roof
The main elements of the rafter system are:

When installing a rafter system, additional parts are widely used to strengthen the fastening of structural elements.
The use of modern fasteners allows us to effectively strengthen the structure and significantly reduce installation time
Calculation of the rafter system
The initial data for the calculation are taken from a previously developed project. For example, let’s look at a roofing diagram with an attic.
The design drawing indicates the dimensions, installation locations and material of all elements of the roofing system
The main indicator, calculated first of all, is the pitch of the rafters, depending on the planned finishing coating. So, to install ceramic tiles, the pitch of the rafters should be no more than 60 centimeters, and if you plan to install a plastic covering or soft roof, this figure can be increased to 120–150 centimeters. Again, you need to take into account the nature of the loads - a combination of the effects of wind and snow - and set the optimal angle between the roof slopes.
The procedure for calculating the number of rafters
For example, consider the installation of roofs for a house 10 meters long. As a first approximation, we take the distance between the rafter legs to be 80 centimeters. Then you will need them: 1000: 80 + 1 = 13.5. Since the number of rafters must be an integer, we round the result to 13. In this case, the exact distance between them will be 1000: 13 = 769 (millimeters). This is the exact value of the gap between the axes of the rafter legs.
When calculating the need for materials, you need to take into account their cutting ability. In the case of wood materials, their length can be 4 or 6 meters. During the design process, it is necessary to select the dimensions of parts taking into account the formation of the smallest amount of trim . Coniferous wood trimmings are unsuitable even for firewood for stoves.
Materials for truss structure
The traditional material for rafters in Russia is wood. Larch is considered the best option, however, due to price and availability, it cannot always be used. Therefore, beams made of coniferous wood are used. The size of the section depends on the design of the building.
Composite profiled wood materials are becoming increasingly common. These include:
- Wooden I-beams. These products are interesting because they are made mainly from wood waste. The supporting surfaces are made of multi-layer waterproof plywood and the wall is made of OSB. Such structural materials have a load-bearing capacity no less than solid timber. The requirements for antibacterial fire protection treatment are much more relaxed; the material has already undergone all protective treatments during the production process. At the same time, it does not undergo cracking, and its mechanical properties are the same in all directions.
In individual construction, wooden materials that mimic the shape of metal ones are increasingly being used.
- Wooden channels. They are produced in the same way as I-beams. The main application is load-bearing elements of wooden structures. The strength characteristics of this profile are higher than those of natural wood and wooden I-beams. Often such products are made from solid coniferous wood. This significantly reduces the weight of the structures and the load on the foundation.
A wood channel is stronger than timber and weighs less
- Glued beam. This material is rarely used for the installation of rafter frames. Its main application is the laying of log houses. They use timber with a core made of ordinary pine needles and outer plates made of expensive wood species: oak, larch and other valuable materials. For rafters, beams made of homogeneous plates of increased length are used in highly stressed areas of the system.
- Metal profiles. They are not used so often for assembling rafter frames. The most convenient material for installation is profile pipe. The disadvantage of metal profiles is the need for periodic measures to protect against corrosion. Elements of the rafter system, as a rule, are tightly closed by the roofing pie and the interior decoration of the attic, which greatly complicates access for maintenance.
The metal truss structure is susceptible to corrosion and requires regular maintenance
Construction of a rafter system for a gable roof with an attic
The gable roof rafter system is based on a triangle - the most rigid figure.

Only the main elements of the rafter system are listed. Additional parts can be used to increase the strength of the structure.
Installation of the roof truss system taking into account the formation of the attic
The rafter system of a gable roof can be formed in two ways:
- Assembly of the main structure below, followed by lifting to the ceiling and installation on the mauerlat.
- Installation of rafter legs in detail directly at the installation site.
The first option is a more productive and convenient way.
Assembling the roof trusses below
This work is done in the following order:

Video: assembling roof trusses “on the ground”
Installation of rafter elements
The rafters, as the main load-bearing element of the roof skeleton, must be securely connected to each other. Many different methods have been invented for this, including specific ones designed for certain types of buildings. The rafter system of a wooden house requires special attention. The beam is attached to the Mauerlat by a sliding device, and the ridge connection is made on a hinge. This is due to constant seasonal movements of the log house, which must be compensated.
Photo gallery: methods of connecting rafter legs
The rafter legs are attached to the mauerlat using metal corners. The rafters are connected at the ridge end-to-end or through a cut. The critical nodes of the rafters are connected using metal connecting plates. The rafter legs are connected using special hinge joints, ensuring freedom of movement of the structure during seasonal deformations of the building. The joint in the ridge can be reinforced with bolts.
Installation of support posts and purlins
This is a responsible operation, because at this stage the surface of the front finishing of the walls and ceiling of the attic is formed. Therefore, the execution procedure is the same as when installing rafters:

For the manufacture of all parts of the rafter system, timber of the same dimensions is used, usually measuring 50x150 or 40x150 millimeters.
Video: quick installation of the rafter system
Lathing
This is a mandatory element of the rafter system. In the case where a warm attic space is formed in the under-roof space, the sheathing is done twice:
- External sheathing is used to secure the finishing roof covering. In addition, if each board is attached to the rafters with two nails, it serves as a fastening element of the frame. In addition, an insulating and moisture-proof roof pie is formed under the sheathing.
- The internal sheathing serves as a frame for insulating the attic and installing the final finishing of walls and ceilings.
In addition, counter battens are also installed, with the help of which the ventilation system of the under-roof space is organized.
The counter-lattice is placed parallel to the rafters and provides clearance for ventilation of the under-roof space
For the lathing, a board measuring 25x100 millimeters, edged or unedged, is used. Unedged boards must first be sanded. It is not recommended to use a board wider than the specified size. When warping, it can deform the finishing coating or damage the roofing pie.
The sheathing boards are fastened with nails at least 70 millimeters long and at least two nails for each intersection. This method increases the structure’s resistance to wind loads.
The spacing of the sheathing depends on the material of the finishing coating - for ceramic tiles and soft roofing it should be minimal (about five centimeters); for metal tiles or corrugated sheets, a distance between the boards of up to 70 centimeters is allowed.
A properly laid roofing pie must contain a ventilation gap between the insulation and the roofing material, which helps quickly remove moisture
Video: lathing the rafter system
Rafter finishing
After installation of all roof elements, the rafter system becomes practically inaccessible for inspection and maintenance. Therefore, before installing each part in place, it must be carefully treated with protective compounds. There are enough special products on the building materials market to protect wooden structures from damage by bacteria and rot, as well as various fire-fighting impregnations.
Before installing parts of the rafter system, they must be treated with special protective compounds.
It should be taken into account that carrying out protective operations on a finished structure is not always effective, since hidden surfaces remain untreated.
Any wood protection products are certified by government agencies, so when purchasing, you need to ask the seller for a certificate of conformity. It is issued by sanitary authorities and fire inspectors. First of all, the safety of the composition for humans and its compliance with the declared qualities are guaranteed.
Which of them to choose is decided by the consumer himself, depending on his financial capabilities. In principle, you can always run into a fake, but this will become clear only after many years of use.
Impregnations can be applied with a wide folded brush or roller, but a spray gun is often used.
Video: installation of a gable roof rafter system with an attic
A reliable roof largely determines the life cycle of a building. A properly installed roof ensures the comfort and cost of living in a home. In Russian conditions, when heating is needed most of the year, a properly installed insulated roof retains up to 30% of the heat. And high-quality insulation is possible only with a high-quality rafter system.
- This is not a very ordinary design.
Such a structure must not only complete the entire structure of the building and perform protection functions.
But also conducive to a comfortable life in the room located underneath it.
In order for the living space to be suitable for use, it is necessary to understand the essence of the design of such a structure and the nuances of its installation processes.
Such a design has a number of elements that make up a complete roof system.
The structure of the attic roof looks like this:
- Roof. Roofing is necessary for providing reliable protection from the influence of atmospheric conditions both the entire house and the entire roof system.
- . The supporting part of the attachment system is most often constructed from wooden boards.
- Ridge run. The very top of the entire system.
- Rafters. Supporting ribs that create rigidity for the structure. They have two varieties - hanging and layered.
- Mauerlat. The element is represented by beams that used for fastening the rafter system. The element repeats the location of the perimeter of the house and is fastened to each wall using fasteners.
- Diagonal piles. For that, so that the roof structure system has a high level of reliability, the rafters are connected to each other by beams located longitudinally and by vertical posts, which are connected together by diagonal braces or bevels.
- Internal supports. An element that is located under each rafter leg and provides it with stability.
- Insulation layer. This layer unites the entire roof system into a single whole, while creating reliable sealing, vapor and sound insulation. This layer has its own structure and is multi-layered. All materials that are used to equip this layer are necessary to provide all kinds of properties that ensure comfortable living in the attic.
What components and parts does the attic roof consist of, you will see in this drawing:
Mansard roof design drawing
Roofing pie
 Each type of roof has its own individual structure.
It is represented by several layers of different materials, which necessary to protect the attic space from cold air masses and high humidity levels.
The roofing pie of the attic roof includes:
- Lathing;
- Vapor barrier layer;
- Counter grille;
- Thermal insulation layer;
- Waterproofing;
- Ventilation systems;
- Roofing material.
Each layer is designed to perform specific functions that are necessary for the proper functioning of the entire roof system.
If you make mistakes during installation or neglect any of the layers, then this may lead to the need to redo the entire structure.
- . The simplest type of roof over an attic, but not very popular. Represents one inclined plane, which is supported on load-bearing walls of various heights.
- . This kind represented by two slopes, which are located opposite each other.
- Broken. This type of roof has other names - half-hip. This type of design allows you to make the attic space optimal. This design has four slopes. It is quite convenient to live in an attic with this type of roof.
- Conical. The most complex type of design, represented by a cone. Suitable for buildings which have round or polygonal outlines.

Types of roofs
If we talk about the types of rafter systems, they come in 3 types:
- The hanging type of rafters ensures the transfer of load in a horizontal position to load-bearing walls. Such rafters are the basis of the entire system. There is no need for intermediate supports; wooden or metal ties are used to connect the beams.
- The layered variety of rafters is used if the load-bearing wall is located in the center of the building or if there are intermediate supports. This type of rafters is installed on external walls, while their middle part is supported by internal walls. Such a structure can only be built if the distance from the load-bearing wall to another is up to 6.5 m.
- The hanging and layered version of the rafter system is represented by triangles having a right angle. Additionally, this design is equipped with contractions at the bottom and top of the system. To suspend the ceiling, use the tightening of hanging rafters.

Mansard roof: gable structure of a wooden house
Tilt angle
 A very important parameter in roof construction is determining the angle of inclination of the roof. This value is determined not only by the design of the building, the features of the facade, but also by the selected roofing material and local climatic conditions.
If precipitation in the area where the house is located is of great importance, then The roof angle ranges from 45 to 60 degrees.
This slope value will ensure better snow removal from the surface, and, accordingly, a decrease in the load level. In addition to precipitation, this angle parameter protects the roof from icing.
If the house is located in an area where strong winds are a frequent occurrence, then the value of the slope angle should be minimal. Otherwise, the structure may be destroyed due to weather conditions. Under such conditions, variations in this parameter range from 9 to 20 degrees.
However, the most common and optimal roof angle is 20-35 degrees.. This value is suitable for arranging a roof with almost any type of material.
CAREFULLY!
The angle of inclination largely determines the durability and reliability of the structure.

Tilt angle
Installation process
In order to install an attic roof, you must follow a certain sequence of actions:
- Initially, the upper beam is attached, which has section parameters of 10x10 or 15x15 cm. Fastening is carried out using nails, metal staples or self-tapping screws. At the same time, the first beam provides the function of a rafter frame.
- The following is installation of the Mauerlat, which is necessary to take most of the load. To install it, you will need a board with a thickness of at least 5 cm and a beam with cross-sectional parameters of 5x10 cm. Before laying the board, lay a layer that is necessary to retain moisture and not destroy structural elements. The Mauerlat is attached with nails or staples and additionally tied to the walls using metal wire. The wire is installed at the stage of wall construction.
- Next, install the rafters, choosing for this step from 0.6 to 2 m.
- The gable rafters are installed first., after which they tighten the level and begin to mount the remaining elements.
- After the rafter legs are all installed, provide additional structural reinforcement, connecting the rafters to each other in their upper part.
- If the roof length exceeds 7 m, then installing ridge beams. Otherwise, equipping the rafter system with a similar element is not necessary.
- Once installed move on to equipping the layers of the roofing pie, having previously installed the sheathing.
- The last stage in roof construction is laying roofing.

Installation of sheathing

Installation of rafters

Mansard roof rafter system
More and more architectural, original houses are appearing, decorated with bay windows, superstructures, and mezzanines. Attics are becoming fashionable, expanding the usable area of the house. But attic roofs, unlike a simple gable roof, require complex rafter systems. Correctly calculating them and carrying out installation is not at all easy. Below we will try to briefly highlight this issue and provide useful recommendations from experts.
Types of rafter systems
At the design stage of a house, the roof structure must be calculated. Calculations using complex formulas should give a value for the load per meter of a square rafter system. For residential buildings, the standard load is 50 kg/m2.
In accordance with the calculations, the type of attic truss structure is selected. The main varieties include:
- hanging rafter system;
- sloping roof rafter system;
- layered gable roof system;
- combined.
The most common are combined rafter systems for pitched roofs. It is recommended to entrust the calculation of complex rafter systems to professional designers.

Advice!
To increase the usable area of the building, you should choose a multi-slope mansard roof design.
Rafter roof elements
Experienced specialists will perfectly understand what is being discussed in the article, since they know all the terms and names of structures. To make it clear to everyone, here are the common names of the structural elements of a mansard roof:
- Mauerlat - a beam attached to the upper crown or wall of the house on which the rafter system rests;
- Floor beams are a wooden structure that plays the role of an attic floor and, at the same time, the ceiling of the room below;
- Posts are vertically mounted posts on which rafters and beams are attached.
- Purlins - beams (boards) located horizontally serve as support for the rafters;
- Crossbars are horizontal beams in a U-shaped truss. They serve as a support and tighten the pitched rafters; they are also called “tightenings”;
- Rafters - timber or boards that form the basis of the roof structure;
- Suspension - a rack whose task is to support the crossbar, facilitating its operation, is also installed horizontally;
- Sheathing - a board or plywood base on which the roofing material is laid;
- The filly is a board that serves as the basis for installing the overhang and is installed at the bottom of the rafter system.
 Elements of the rafter system
 Rafter system calculations
The choice of truss structure largely depends on the size of the building, according to which the span length is determined, i.e. distance between main posts. For small houses, preference can be given to a gable structure.
 Gable roof rafter system with attic
 Structural calculations are carried out to determine the load, in accordance with standards and building regulations. The basic rule for an attic roof is to limit its height, which should not be less than 2.5 meters indoors. Thus, the roof must have a minimum height of 2.80 m, since it requires laying an insulating layer and finishing inside the attic itself.
 Gable mansard roof design
 You should definitely make a design drawing, on which you should put all the dimensions and display the frame elements as much as possible. The drawing should show the dimensions of the house, the angle of the rafters, and the height of the roof.

Advice!
To make accurate calculations for all loads on the roof and its elements, it is recommended to use a calculator located on many sites dedicated to the construction of roofs.
It is enough to enter the type of roofing, the material of the attic roof frame and dimensions. The program will calculate the section angles and pitch of the rafters and give recommendations on the design of the sheathing.
Calculation of the rafter system
Attic roof installation technology
You should start with the installation of the Mauerlat, which is laid along the perimeter of the upper edge of the walls, if the house is brick or block. In houses made of timber or chopped with mauerlat, the upper crown can serve. The timber from which the Mauerlat is made must have cross-sectional dimensions of 100x100 mm or 150x150. Coniferous wood for timber must be well dried. The Mauerlat beams are fixed with anchors or studs to the walls in increments of approximately two meters. Waterproofing is placed under the Mauerlat, usually of a roll type (roofing felt).

Next, you should begin installing the ceiling. Beams 150x200 mm, placed on the Mauerlat, should protrude beyond the walls of the house by about 0.3-0.5 m. The beams are fastened with corners and screws (wood screws), starting from the outer ones, then intermediate ones.
Important!
When laying, use a cord to control the horizontal level so that the beams lie in the same plane.
The distance between them is, as a rule, 0.5-1.0 meters; if you plan to lay insulation, the standard sheet width of which is 0.6 m, then it will be more convenient to withstand the same spacing of the beams.
Installation of roof truss system
Installation of support posts and purlins
The next stage is the installation of racks. For them, a 100x150 mm beam is used, which is fastened to the front floor beams. It is necessary, using a plumb line, to check the verticality of each support and fix it with jibs. Intermediate supports are also installed strictly vertically on the beams, forming two parallel rows.
 Intermediate supports of the roof truss system
 Next comes the installation of purlins, which can be made from boards 100-150 mm wide and 40-50 mm thick. The purlins are fixed using nails and corners with screws. Then, on top of the purlins, plank crossbars are laid, for rigidity, installed at the end.
 The purlin beam forms a cantilever to support the diagonal roof rafters
 Advice!
As a result, the outline of the future attic space is formed. To provide additional strength, the supports should be strengthened with struts and braces.
 Roof truss system
 Installation of rafter elements
Installation of rafters starts from the bottom. A board 40-50 mm thick and 150 mm wide is suitable for them. We rest one end on the mauerlat close to the floor beams, and the other is attached to the purlins using angles, screws and nails. To install rafters at the top of the roof, mark the center line of the roof. All rafters must be the same length. To do this, you should make a template board, making cuts on it at both ends. Then you can saw off the rest of the rafters using the template.
 Rafter legs
 The rafters are mounted on purlins, fixed at the top with metal plates. On the purlins, the beams are secured with edge-to-edge cuts and secured with corners on self-tapping screws.
 Fastening the rafter system
 For strength, the lower rafters should be strengthened with struts (board 50x150 mm). After securing the struts, the temporary stops can be removed.
 Often elements are connected not only with carpentry units, but also with fasteners
 Installation of rafters
In cases where floor beams are laid in wall pockets, fillers should be secured to the lower rafters to provide a roof overhang. If the floors lie on the mauerlat, then fillers are not needed, since the beams should protrude beyond the walls to form an overhang.
 Lathing is an important part of the roof structure
 The sheathing is installed depending on the intended covering of the attic roof. Either the sheathing will be solid or with gaps. A waterproofing layer should be laid on top of the sheathing, after which you can begin sewing up the gables and laying the roofing material - metal tiles, corrugated sheets or slate.
Roof sheathing under metal tiles
If the attic roof has a broken structure, then, as a rule, it is not insulated, since the air layer under the rafters protects the premises, while simultaneously ventilating the space under the roof. To do this, when sewing up the gables, you should leave ventilation windows (holes) above the attic floor. Thermal insulation should be done only inside the attic room.
 Insulation of the attic roof
 Thermal insulation of the attic has its own characteristics, since the rooms have triangular or trapezoidal ceilings. Builders consider insulation to be one of the complex technological tasks in the construction of attic spaces. The main thing is to lay the thermal insulation so that on the sloping ceiling and on the fences it does not shrink during operation.
Ksenia Skvortsova. Chief Editor. Author.
Planning and distribution of responsibilities in the content production team, working with texts.
Education: Kharkov State Academy of Culture, specialty “Culturologist.” Teacher of history and cultural theory." Experience in copywriting: From 2010 to present. Editor: since 2016.
A house with an attic is not only an additional living space, but also a respectable appearance for the entire building. Even if the room under the roof is made unheated and is used only in the summer, it still creates a powerful “air cushion” that helps retain heat inside the entire building.
And about that - read on our portal.
Attic project
When drawing up a diagram for the construction of an attic, it is best to do this in different projections in order to see and understand the placement of all elements of the rafter system. It is very important to correctly calculate the height of the roof ridge, since the size of the area under it will directly depend on it.

When drawing up a design diagram for the construction of an attic roof, you need to calculate the height of the ridge, ceiling and total area of the room.
The minimum height from the floor to the ridge should be 2.5-2.7 m, but if this distance is less, then the room is not an attic, it can only be called an attic. This parameter is established by SNIP standards.

In order for all the elements to be drawn accurately and have the desired location in the overall system, you need to start from a figure with right angles, that is, a rectangle or square - a section of the attic room being created. Based on the sides (height and width of the future room), it will be almost impossible to make a mistake with the magnitude of the angles at which the roof slopes are located, with the location of the ridge, rafters and all supporting elements. When determining these parameters, they must immediately be entered into the drawing.
First you need to find the middle of the width of the front wall. Starting from this point, the parameters of the height of the ridge, the future ceiling of the attic, the location of the wall studs and the size of the eaves overhang are determined.
Due to the fact that each of the structures has a certain number of connecting nodes, which have different configurations, it would be a good idea to draw each of these connections separately in order to understand their features of connecting all the elements together at this point.

Any rafter system consists of basic elements and additional ones, which may not be present in every structure. The main components of an attic roof include:
- Floor beams, which are the basis for the remaining elements of the rafter system. They are laid on the main walls of the building.
- A rafter leg, straight in a gable roof system or consisting of two sections - in a broken pattern. In this case, the top rafter is called the ridge rafter, since it forms the highest point of the roof - and the rafters that form the walls of the attic are called side rafters.
- A ridge board or beam is a mandatory element for a gable roof, but is not always used when installing a broken roof model.
- Mauerlat is a powerful beam attached to the main side walls of the building. Rafter legs are installed on this element.
- Racks are the supporting elements necessary to strengthen a gable and broken structure. In the latter case, the ridge and side rafters are attached to it, and in the first, the stand is a reliable support for a long rafter. In addition, the racks serve as a frame for insulating and covering the walls of the attic.
- Diagonal bracing members or bevels additionally secure posts or longitudinal beams and rafters, making the structure more durable.
- Attic floor beams are used in all versions of the attic - they connect the racks, and they also serve as the frame for the ceiling.
- Inter-rafter purlins are installed in a broken roof for structural rigidity.
To be sure that the prepared project is developed correctly, you need to show it to a specialist. Only he will be able to determine whether the attic parameters are correctly selected for the width and length of the walls of the building.
Video: professional calculation of a mansard roof using special software
Material parameters for the construction of an attic roof
If the graphic design is ready, then, based on the dimensions marked on it, you can calculate the amount of materials required for the construction of the attic roof. Materials must be selected according to their characteristics, which must meet fire and environmental safety requirements. For wood, it is necessary to provide special treatment with fire retardants, which will reduce the flammability of the material. So, for construction you will need:
- Boards for rafter legs. Their cross section is selected based on the results of special calculations - this will be discussed in more detail below.
- A beam having a cross-section of 100×150 or 150×200 mm is for floor beams, depending on the chosen rafter system and the width between the load-bearing walls, as well as for purlins, diagonal legs or valleys - if they are provided for in the design.
- Beam with a cross section of 100×150 mm or 150×150 mm for laying the Mauerlat.
- For racks, timber 100 × 100 or 150 × 150 mm is usually used.
- Unedged board for laying the subfloor and some fasteners.
- Annealed steel wire with a diameter of 3-4 mm - for fastening some parts together.
- Nails, bolts, staples of various sizes, angles of various configurations and other fasteners.
- A metal sheet with a thickness of at least 1 mm is for cutting out overlays.
- Lumber for sheathing and counter-lattens for roofing material - depending on the type of roof chosen.
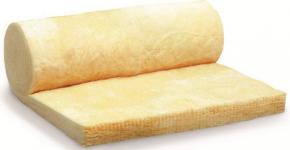
- – for thermal insulation of the roof.
- Waterproofing and vapor barrier membranes.
- Roofing material and fastening elements for it.
What section of rafters are required?
Rafters are roofing elements that will bear the main external loads, so the requirements for their cross-section are quite special.
The size of the required lumber will depend on many parameters - on the step between the rafter legs, on the length of these legs between the support points, on the snow and wind load that falls on them.
The geometric parameters of the rafter system design are easy to determine in the drawing. But with the remaining parameters, you will have to refer to the reference material and make some calculations.
Snow load is not the same for different regions of our country. The figure below shows a map on which the entire territory of Russia is divided into zones according to the intensity of the snow load.

There are eight such zones in total (the last, eighth, is rather extreme and cannot be considered for the construction of an attic roof).
Now you can accurately determine the snow load, which will depend on the angle of the roof slope. For this there is the following formula:
S = Sg × μ
Sg– table value – see the map and the table attached to it
μ — correction factor depending on the steepness of the roof slope.
- If the slope angle is me 25°, then μ=1.0
- With a slope from 25 to 60° - μ=0.7
- If the roof is steeper than 60°, then it is considered that snow does not linger on it, and the snow load is not taken into account at all.
It is typical that if the attic roof has a broken structure, then for different sections of it the load can have different values.

The slope angle of the roof can always be determined either with a protractor - according to the drawing, or by a simple ratio of the height and base of the triangle (usually half the span width):
Wind load also mainly depends on the region in which the building was built and on the characteristics of its surroundings and the height of the roof.

And again, for the calculation, the initial data on the map and the table attached to it are first determined:
The calculation for a specific building will be carried out according to the formula:
Wp = W × k × c
W– table value, depending on the region
k– coefficient taking into account the height of the building and its location (see table)
The following zones are indicated by letters in the table:
- zone A - open areas, steppes, forest-steppes, deserts, tundra or forest-tundra, wind-exposed sea coasts, large lakes and reservoirs.
- zone B – urban areas, wooded areas, areas with frequent wind obstacles, relief or artificial, at least 10 meters high.
- zone IN– dense urban development with an average building height above 25 meters.
With– coefficient depending on the predominant wind direction (wind rose of the region) and on the angle of inclination of the roof slopes.
With this coefficient the situation is somewhat more complicated, since the wind can have a dual effect on the roof slopes. So, it has a direct, overturning effect directly on the roof slopes. But at small angles, the aerodynamic effect of the wind takes on special importance - it tries to raise the slope plane due to the resulting lift forces.

The drawings, diagrams and tables attached to them indicate areas of the roof exposed to maximum wind loads, and indicate the corresponding coefficients for calculation.
It is characteristic that at slope angles of up to 30 degrees (and this is quite possible in the area of ridge rafters), the coefficients are indicated both with a plus sign and negative, that is, directed upward. They somewhat dampen the frontal wind load (this is taken into account in calculations), and in order to neutralize the effect of lifting forces, it will be necessary to very carefully secure the rafter system and roofing material in this area, using additional connections, for example, using annealed steel wire.
Once the wind and snow loads have been calculated, they can be summed up and, taking into account the design features of the system being created, the cross-section of the rafter boards can be determined.
Please note that the data is given for the most commonly used coniferous material (pine, spruce, cedar or larch). The table shows the maximum length of the rafters between the support points, the section of the board depending on the grade of the material, and on the pitch between the rafters.
The value of the total load is indicated in kPa (Kilopascals). Converting this value into more familiar kilograms per square meter is not difficult. With completely acceptable rounding we can accept: 1 kPa ≈ 100 kg/m².
The dimensions of the board along its cross-section are rounded up to standard lumber sizes.
| rafter section (mm) | Distance between adjacent rafters (mm) | ||||||
|---|---|---|---|---|---|---|---|
| 300 | 600 | 900 | 300 | 600 | 900 | ||
| 1.0 kPa | 1.5 kPa | ||||||
| higher | 40×89 | 3.22 | 2.92 | 2.55 | 2.81 | 2.55 | 2.23 |
| 40×140 | 5.06 | 4.60 | 4.02 | 4.42 | 4.02 | 3.54 | |
| 50×184 | 6.65 | 6.05 | 5.28 | 5.81 | 5.28 | 4.61 | |
| 50×235 | 8.50 | 7.72 | 6.74 | 7.42 | 6.74 | 5.89 | |
| 50×286 | 10.34 | 9.40 | 8.21 | 9.03 | 8.21 | 7.17 | |
| 1 or 2 | 40×89 | 3.11 | 2.83 | 2.47 | 2.72 | 2.47 | 2.16 |
| 40×140 | 4.90 | 4.45 | 3.89 | 4.28 | 3.89 | 3.40 | |
| 50×184 | 6.44 | 5.85 | 5.11 | 5.62 | 5.11 | 4.41 | |
| 50×235 | 8.22 | 7.47 | 6.50 | 7.18 | 6.52 | 5.39 | |
| 50×286 | 10.00 | 9.06 | 7.40 | 8.74 | 7.66 | 6.25 | |
| 3 | 40×89 | 3.06 | 2.78 | 2.31 | 2.67 | 2.39 | 1.95 |
| 40×140 | 4.67 | 4.04 | 3.30 | 3.95 | 3.42 | 2.79 | |
| 50×184 | 5.68 | 4.92 | 4.02 | 4.80 | 4.16 | 3.40 | |
| 50×235 | 6.95 | 6.02 | 4.91 | 5.87 | 5.08 | 4.15 | |
| 50×286 | 8.06 | 6.98 | 6.70 | 6.81 | 5.90 | 4.82 | |
| total snow and wind load | 2.0 kPa | 2.5 kPa | |||||
| higher | 40×89 | 4.02 | 3.65 | 3.19 | 3.73 | 3.39 | 2.96 |
| 40×140 | 5.28 | 4.80 | 4.19 | 4.90 | 4.45 | 3.89 | |
| 50×184 | 6.74 | 6.13 | 5.35 | 6.26 | 5.69 | 4.97 | |
| 50×235 | 8.21 | 7.46 | 6.52 | 7.62 | 6.92 | 5.90 | |
| 50×286 | 2.47 | 2.24 | 1.96 | 2.29 | 2.08 | 1.82 | |
| 1 or 2 | 40×89 | 3.89 | 3.53 | 3.08 | 3.61 | 3.28 | 2.86 |
| 40×140 | 5.11 | 4.64 | 3.89 | 4.74 | 4.31 | 3.52 | |
| 50×184 | 6.52 | 5.82 | 4.75 | 6.06 | 5.27 | 4.30 | |
| 50×235 | 7.80 | 6.76 | 5.52 | 7.06 | 6.11 | 4.99 | |
| 50×286 | 2.43 | 2.11 | 1.72 | 2.21 | 1.91 | 1.56 | |
| 3 | 40×89 | 3.48 | 3.01 | 2.46 | 3.15 | 2.73 | 2.23 |
| 40×140 | 4.23 | 3.67 | 2.99 | 3.83 | 3.32 | 2.71 | |
| 50×184 | 5.18 | 4.48 | 3.66 | 4.68 | 4.06 | 3.31 | |
| 50×235 | 6.01 | 5.20 | 4.25 | 5.43 | 4.71 | 3.84 | |
| 50×286 | 6.52 | 5.82 | 4.75 | 6.06 | 5.27 | 4.30 | |
Tools
Naturally, during work you cannot do without tools, the list of which includes:
- Electric drill, screwdriver.
- Building level and plumb line, tape measure, square.
- Axe, chisel, chisel, hammer
- Circular saw, jigsaw, hacksaw.
- Carpenter's knife.
Installation will be accelerated if the tools for the work are of high quality, and the work will be carried out with competent mentors and assistants, carefully and step by step.
Installation stages
It is necessary to strictly follow the sequence of work - only under this condition the structure will be reliable and durable.
Mounting the Mauerlat
Installation of any rafter system begins with securing a powerful supporting structure to the end of the side walls of the building. timber - mauerlat, on which it will be convenient to install rafter legs. The Mauerlat is made from high-quality timber with a cross-section of at least 100 × 150 mm. It must be laid on roofing felt waterproofing laid along the upper end of the wall (regardless of the material).
Due to the Mauerlat, the load will be evenly distributed over the walls and transferred to the foundation of the building.

The Mauerlat is secured to the wall using metal pins, which are pre-embedded in a concrete belt or crown running along the upper edge of the wall, or with anchor bolts with a diameter of 12 mm. They must go into the wall at least 150 — 170 mm. If the Mauerlat is installed on a wooden wall, then the beams are attached to it using wooden dowels.
Installation of truss structure
- Installation of the rafter system begins with the installation of floor beams. They can be attached to the mauerlat from above if the beams are planned to be moved outside the perimeter of the building and thereby increase the area of the attic. In this design, the rafter legs are fixed to the floor beams.
 Floor beams fixed on top of the Mauerlat (Fig. A)
 - In another case, they can be stacked on waterproofed walls and fastened with corners or staples to the inner edge of the Mauerlat. This option is used when the rafter legs are planned to be attached directly to the mauerlat.
 Another option is that only the rafter legs are attached to the Mauerlat
 - Next, you need to find the middle of the floor beam, since this mark will become a guideline for determining the location of the support posts and the ridge.
- The racks should be located at the same distance from the marked middle of the floor beam. They will subsequently determine the location of the walls of the attic room, that is, its width.
- The bars for the racks must have a cross-section equal to the size of the floor beams. The constructions are attached to the beams using special corners and wooden overlays. However, to begin with, they are first nailed, then carefully leveled using a building level and a plumb line, and only then are they permanently secured, taking into account future loads.

- When the first pair of racks is installed, they are fastened together from above with a bar, which is called a tie. This tightening is also connected to the racks using special metal corners.

- After securing the tie, you will get a U-shaped structure. Layered rafters are installed on its sides, the second end of which is attached to the floor beam or placed on the mauerlat.
- A special recess (groove) is cut into the installed supports for the timber or in the rafters. With its use The rafters are tightly installed on the Mauerlat beam and secured with metal brackets.

- To provide rigidity to the structure, additional struts can be installed from the base of the rack to the middle of the installed side rafters. If this does not seem enough, and saving material is not in the foreground, then you can strengthen the overall structure with additional racks and contractions (they are indicated in the drawing, Fig. A, with translucent lines).
- Next, while tightening, the middle is calculated - the headstock will be attached to this place, supporting the ridge connection of the upper hanging subsystem of the rafters.
- The next step is to install the ridge rafters, which can be fastened together with various connections - this can be a metal plate or powerful bolts with metal plates or washers.

- After installing them, the headstock is attached to the ridge and the middle of the tightening.
- Having completed work on one part of the rafter system, you need to make all the rest according to the same principle. The distance between adjacent rafters in such a system should be no more than 900 — 950 mm, but the optimal interval would probably still be 600 mm - this will provide the necessary rigidity and stability of the structure, and will be convenient for insulation using standard mineral wool mats. True, this makes the structure heavier and will require more materials.

- First, the side parts of the system assembly are installed, and then the intermediate parts. They are connected to each other by purlins, which are installed between the upper ends of the racks and act as spacers. Thus, you will get a rigid structure of the attic rafters, in which the frame for wall cladding will already be ready.
Prices for various types of fasteners for rafters
Rafter fasteners
Waterproofing attic roof
When the rafter system is built, you can proceed to finishing it and accompanying materials.
- The first coating that should be fixed directly on top of the rafters will be a waterproofing and windproof film. it is attached to the rafters using staples and a stapler, starting from the cornice. The canvases are laid with an overlap of 150 — 200 mm, and then the joints are glued together with waterproof tape.
- On top of the waterproofing, a counter-lattice is placed on the rafters, which will more reliably fix the film on the surface and create the necessary ventilation distance between the windproof and roofing material. The counter-lattice is usually made of boards 100 wide — 150 mm and thickness 50 — 70 mm.

- The sheathing is fixed perpendicular to the counter-lattice, on which the roofing material will then be laid. The pitch between the slats must be calculated depending on the type and size of the sheet roofing material, taking into account the overlap required for it
- If a soft roof is chosen, then plywood sheets are most often fixed to the counter-lattice.
Roofing installation
The roofing material is attached to the prepared sheathing or plywood. Its installation usually starts from the roof eaves and proceeds in rows, from one of the edges - depending on the type of roof. Roofing sheets are mounted with an overlap. If a metal profile or metal tile is used for the coating, then such material is secured with special self-tapping screws with elastic gaskets. Fastening elements are usually matched in color to the roofing material.

The most difficult thing in covering an attic sloping roof is the transition from layered side rafters to hanging ridge rafters. There may be certain difficulties if the roof has projections for installing roofs over balconies or windows.
In addition, if a chimney pipe goes onto the roof, it requires a separate design of the hole inside the rafter system and an insulating layer, and on the roof, reliable waterproofing must be installed around the pipe.
You can find out in detail how and what is the best way to cover a roof on our portal; there is a whole section where you can find answers to many questions, including recommendations for reliable insulation of an attic room.
Prices for popular types of corrugated sheets
Corrugated sheet
Video: detailed video tutorial on building a mansard roof
It should be noted that the work of constructing any roof, and especially one as complex as an attic roof, is not only responsible, but also quite dangerous and requires special, increased safety measures. If you have no experience in carrying out such construction processes, then it is better to entrust their implementation to professionals or perform all actions under the supervision of an experienced craftsman, and with the utmost care and precision.
An attic in a private house is an ideal solution for expanding living or utility space without adding an upper floor. Arranging an attic in the attic space is an original and new exterior of the house, saving energy by reducing heat losses in the roof, and increasing living space. But the large size of the house is not a reason to start work on arranging the attic: you need to have a foundation with a sufficient margin of safety for the weight load, since the finished attic space will have to be thoroughly remodeled.
Features of the attic
The main thing that distinguishes an attic from ordinary rooms is that it has almost no walls in the usual sense, since the walls are a modified rafter system constructed from many inclined roofing surfaces. Therefore, the design of the window will be very different - it should not interfere with natural light, and must take on loads in the form of precipitation and strong wind - the impact of weather conditions on a sloping roof is stronger than on the massive elements of the building.
Important! SNiP regulations stipulate that the area of the window opening should not be less than 10% of the floor surface in the common room. Therefore, when dividing an attic space with partitions, it is advisable to also make a window in each newly formed room.

It is easier, cheaper and faster to install inclined windows in the attic roof than to make a special vertical projection under it, violating the design calculations. In any case, the window opening must be waterproofed or a window with reinforced glass and a reinforced metal-plastic profile must be ordered.
Advantages of installing a tilted roof window:
- A large flow of natural light, smoothing out chiaroscuro;
- There is no need to radically alter the shape of the roof or change its relief;
- Simple installation, feasible for the owner himself.
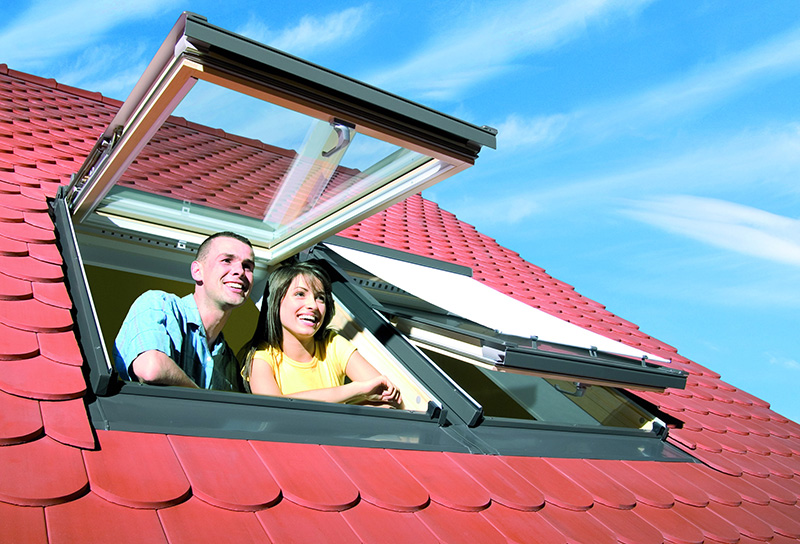
The degree of illumination depends on the area of the opening, which is proportional to the angle of inclination of the roof. Therefore, the conclusion is obvious: the steeper the sloping attic roof, the wider and higher the window opening should be. The thickness of the metal-plastic profile should almost fit into the distance between the rafters, so that there is something to attach the window to without destroying the rafter system. If you order a wider window, you will have to make a reinforced lintel that fastens the rafters cut at the place where the window is inserted. If you need to install a wide window, you should first think about the option of installing two small adjacent windows so that the roof remains solid. 
When installing a dormer window (a vertical dormer window that requires the frame to be moved outside the attic), the geometric shapes of the roof must be complicated by installing the top and side valleys, and the laying or installation of the roofing also becomes more complicated. It is much more difficult to remake a finished rafter system than to install a new attic window into your individual one. Valleys must be carefully waterproofed, since their location and geometry relative to constant atmospheric influences make these places most vulnerable to the penetration of moisture and cold. In regions with high average annual precipitation, it is recommended to install snow guards over dormers. But the main advantage of the dormer - you can stand next to it at full height - outweighs all the disadvantages that can be eliminated.
A window recessed into the roof is made if access to the balcony is provided through this window. In other cases, this is an unattractive option: poor natural lighting, unjustified complication of the roof geometry, high labor costs with minimal effect. 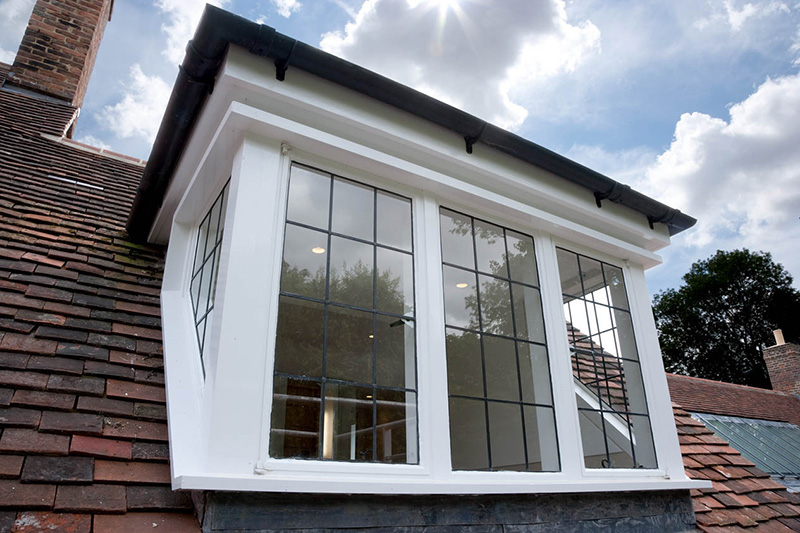
The most affordable option is a window at the end of the attic - a cheap and practical solution that can be fully implemented without outside help.
Attic rafter system
In individual construction, a house with an attic is often built with a sloping roof, although this is an expensive solution. Sloping attic roofs, due to their design features, greatly increase the usable area of the interior of the attic. With the same width of the foundation of the house and the floor, the rooms in such an attic will have a larger area due to the projections and niches than the rooms under the roof of a conventional structure. 
The standard design of a sloping roof allows you to lower the eaves overhangs much lower, not only making the exterior of the house very original - such overhangs protect the walls and foundation of the house from wind and moisture, directing precipitation away from the home.
The more complex a do-it-yourself sloping roof, the stronger the dependence of the reliability of the structure on the materials from which the roof is made, on climatic conditions, on the thickness of the beams of the rafter system and other factors. The classic do-it-yourself mansard roof, drawings of which are given below, has a slope ratio of the lower slopes to the floor of 60°, and the upper slopes of 30°. 
SNiP stipulates a comfortable ceiling height in attic rooms - at least 2 m. Therefore, a scheme with a roof slope of 600 is completely justified, and the reliability of the structure is ensured by thicker floor beams and rafter beams than with a conventional gable roof.
In the classic construction of an attic, the force of the wind and the load from the weight of snow on the sides of the roof with a large slope are not taken into account. Snow will accumulate on the upper surface of the roof, made with a slope of 300-450. The greater the angle of inclination of the roof, the stronger the windage of the roof, so in climates with strong winds it is necessary to build roofs with a small slope, and this poses a problem for arranging an attic - the area of the house in such conditions should be quite large.
Sloping roof schemes
The frame of a sloping roof is constructed from first or second grade pine lumber. To carry out calculations, parameters such as the cross-section of timber and sheathing boards, the dimensions and weight of roofs made of various building materials, snow and wind loads, and the spacing of rafters are regulated. 
A roof design with a hanging rafter system is justified if the base of the triangle (top in the figure) has a size of ≤ 4.5 m - this determines the width of the attic. If the width turns out to be larger, then layered rafters are installed, which are mounted on the wall.
How to calculate a broken type roof
The pitch between the rafters is often determined by the width of the insulation - this solution allows you to save on rolled materials, and the distance between the rafters is chosen 2-3 cm less than the width of the insulation material. For example, with a mineral wool slab width of 60 cm, the distance between adjacent posts should be 57-58 cm. 
The rafter boards are also calculated in width based on the insulation parameters. To ventilate the layers of thermal insulation, it is necessary to provide a ventilation clearance of 20-30 mm, otherwise the accumulating condensate will cause rotting of the wood, and then damage to the insulation. For conditions in the middle zone, the thickness of the insulation can be no more than 230-250 mm, therefore the minimum width of the rafter legs is 230 mm with a board thickness ≥ 50 mm. The greater the wind, temperature and snow loads in the region, the thicker the rafters should be made. 
We recommend: To save lumber, insulation can be laid in two directions: along and across the rafters, making a thin and sparse sheathing between the layers. With a minimum thickness of basalt wool slab of 100 mm, you can use a 50 x 150 mm board, leaving a 50 mm ventilation gap.
Installation of attic roof
The mauerlat on the attic roof is equipped with standard techniques - fastening the timber to the wall with tying wire, anchors or studs. If the house is made of timber or logs, then the upper crown of the log house, impregnated with an antiseptic and substances that increase the moisture resistance of the wood, can serve as a mauerlat. 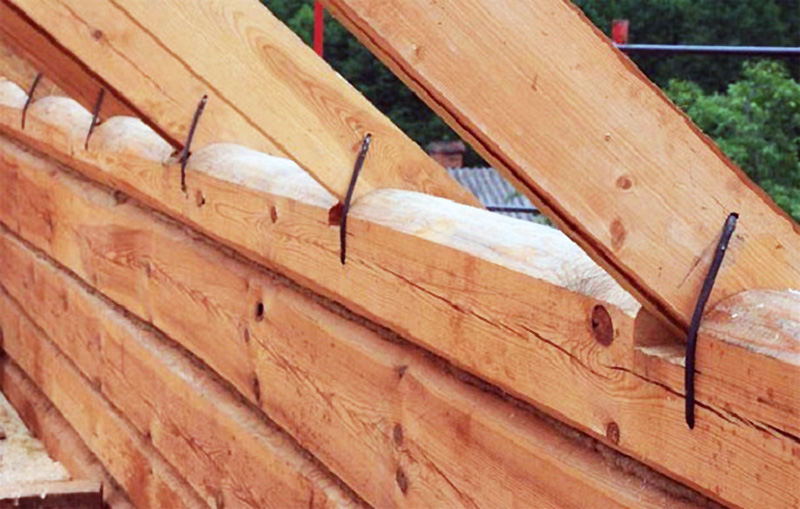
For the Mauerlat in a house made of cellular concrete, a monolithic reinforced grillage is poured on top of the walls, and the Mauerlat itself is attached to the rods concreted into the wall. For walls made of brick or reinforced concrete, there is no need to make such a concrete grillage - the wall material itself is quite strong and will withstand any method of fastening the rafter system. It will only be necessary to make two-layer waterproofing around the entire perimeter of the house, and the Mauerlat beam with a cross-section of 150 mm.
To assemble elements of the rafter structure, long nails are used - 150-200 mm. At the corners and at the intersections of load-bearing walls with the internal partitions of the house, it is better to make bolted connections, or use double-sided threaded rods. It is also recommended that all intersections of roof elements be additionally reinforced with metal plates. 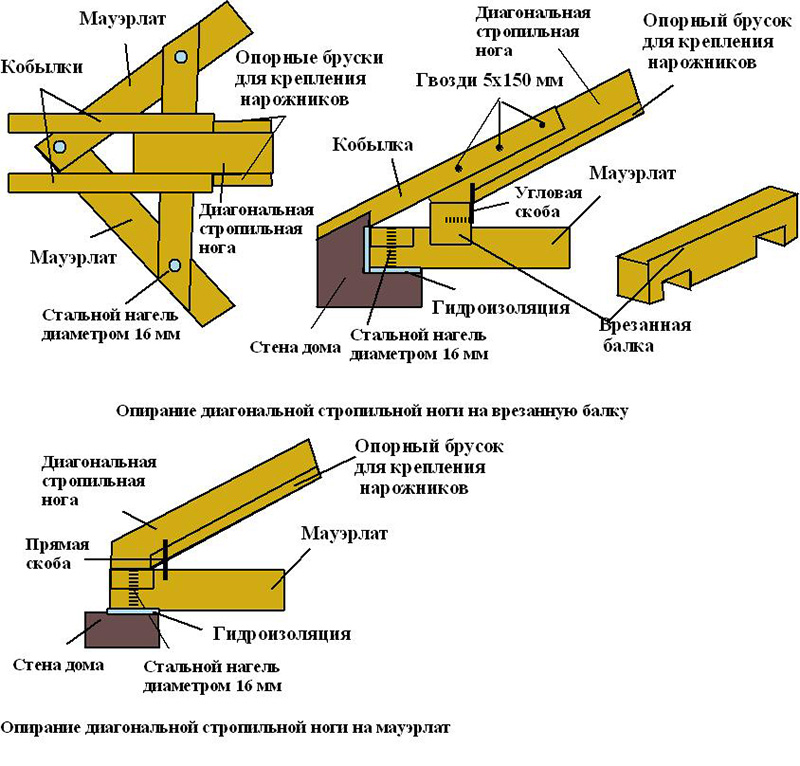
Installation of the attic rafter system can be carried out in two solutions:
- Assembling elements on the ground, lifting finished structural units to the top. First of all, the vertical corner elements are attached, which form the future gables. The remaining elements of the rafter structure are vertically inserted into the grooves made in the Mauerlat timber at a calculated distance and rigidly fixed. To impart rigidity and the correct geometry, you can temporarily secure the elements with spacers and jibs, and after installing the side beams, when the structure acquires the desired rigidity, the spacers can be removed;
- The second method is the sequential assembly of the attic roof on site. It’s more efficient and convenient to work this way, because with a large rafter system, lifting the assembled roof manually will be problematic - you’ll have to rent a crane. After assembling the structure, floor beams are laid, to which vertical beam posts are attached to the grooves, and temporary jibs are installed to provide rigidity and give verticality to the system. Then comes the assembly of the upper and side rafter legs, and the jibs and spacers are mounted in the same way.
The last stage is the installation of the upper beams, which are made according to a template, and grooves for the rafters are immediately cut into them. Since the attic sloping roof does not have a ridge, slopes are mounted on the beam in the middle, which are designed to fix the upper triangle of the attic roof.