Do-it-yourself frame water tank. Stretch film on the go
Not every dacha has the opportunity to connect to the water supply or equip its own source in the form of a well or well - the only option that allows you to provide yourself with precious liquid in such a situation is to create your own "reservoir". A water tank in the country will allow not only to establish watering of plants, but also to create a full-fledged water supply system. How to choose, install or make a storage tank for a summer residence with your own hands will be discussed in this article - together with the site moyadacha.org we will deal with various options for solving this issue.
Plastic containers for water in the country photo
Water tank in the country: varieties and their features
The first thing you need to know, when approaching the issue of choosing a container for storing water in the country, is that they can be made either from metal or from modern polymers - plastics, which are far superior to metal in all their technical characteristics. Let's compare these two types of capacity and see which one is better.

You can see what plastic containers are for summer cottages in this video.
In general, the advantages of polymers over steel are obvious, and you won’t have to suffer for a long time with the choice between one and the other product - in all respects, light and durable plastic tanks are much better. Also in favor of tanks of this type is also the simple technology of their installation, which can easily be done by hand. We will talk about this a little later, but for now we will deal with other options for classifying water storage tanks in the country.
Drinking water tanks for summer cottages: underground or ground installation
Additionally, all existing tanks and reservoirs for giving can be divided according to the type of installation - in this respect, they can be underground and ground. Each of these containers has its own advantages and disadvantages, which you should be aware of when wondering which storage tank for water in the country is better?

In general, the choice is yours - what capacity to purchase for a summer residence is up to you. If the area of \u200b\u200bthe site or the strength of the floors in the house allows, then why not use a simpler surface option?
How to install a water tank in the country: installation features
The installation of ground and underground dislocation tanks is carried out in various ways - this is clear to everyone, it is not clear just how exactly this is done. And this is done in the following way.

The process of installing the tank, in principle, is laborious, but quite simple - there are practically no subtleties here. So you can safely take on an independent installation. Unless, of course, this is a high-rise installation, which is associated with the manufacture of serious supporting structures (since they must be calculated).
In conclusion of the topic about water tanks in the country, it remains to say only a few words about cone tanks, which are an excellent solution for creating an open-type reservoir. So to speak, a technical reservoir from which watering can be carried out.
moyadacha.org
SAVE… WATER
 Any garden or personal plot, as a rule, gives returns and pleases the owner with a sufficient amount of ... water. If there is a natural source or central water supply nearby, then the problem of irrigation is simplified, but in most cases one cannot even hope for a source. In hot summers, when it rarely rains, water consumption increases sharply, and wells and wells can no longer cope with the increased load. In such cases, it becomes necessary to have a supply of water on the site. And here the question arises: where to store it?
If possible, you can buy a medium-sized tank truck or something similar, but still this is not a way out. In addition, over time, the metal rusts, polluting the water. It is much more practical and affordable to make a tank of concrete, and make it underground so that it does not take up space on the site.
Where to start building? First, it is necessary to determine the location and size of the future storage. Considering that the construction is quite laborious, very large sizes should not be laid. Practice shows that the most optimal volume is 3.5 ... 4 m3.
So, when a place is chosen and the contours of the pit are drawn on the surface of the earth, they begin to dig it. In this case, it is necessary to periodically control the verticality of the walls and the correctness of the shape in plan. After excavation, the pit is prepared for concreting. This work is not difficult; however, there are some features in the installation of formwork. It is best to use formwork from several parts, and not install it at once to the full height, since in this case the concrete mass may hang and voids may form. It follows from this that the height of the formwork part must be chosen such that it is possible to compact the concrete manually. Usually it is 500 ... 600 mm. Simplified formwork can be done by driving stakes into the bottom of the pit near the walls, behind which sheets of iron are inserted.
The thickness of concrete walls is determined from the strength condition:
where σr - design stress, kg/cm2; σ - allowable stress, kg/cm2;
σр=(D*ɣ*h)/(2*t),
where D is the diameter of the tank, cm; ɣ - specific gravity of water, kg/cm3; h is the internal height of the tank, cm; t - wall thickness, cm.
For example, let's take a tank with a diameter of 1.6 m and an internal height of 2 m (volume 4.35 m3), σр = 5 kg/cm2, then:
t=(160*0.001*200)/(2*5)=3.2 cm.

Underground tank:
1 - ring (steel), 2 - "glass" (reinforced concrete), 3 - sand, 4 blind area (concrete).
With a triple margin of safety, the wall thickness turns out to be 10 cm. We made this small digression into theory not by chance. The fact is that there are often containers obtained by simply plastering the walls of the pit with concrete. They serve for a very short time, if they do not fail at the first filling with water. Typical places of destruction: the bottom of the walls, the bottom or joints with the ceiling. In the latter case, the reason is the incorrect design of the ceiling: the blind area protruding beyond the contour of the tank serves as its support on the ground. When filled with water under its weight, the tank sags, and the upper part hangs on the blind area, as on a base plate, after which it comes off. This implies the conclusion that the blind area must be performed, as shown in the figure - without connection with the "glass".
After the formwork is installed, reinforcement is placed in the resulting space between it and the ground (any scrap metal can be used) and concrete is poured.
The poured concrete mixture hardens in a day or two; then the formwork is rearranged.
After erecting the walls of the "glass", the formwork is removed and the bottom is poured. The final stage in the processing of the internal surfaces of the tank is the so-called ironing. It consists in plastering with cement diluted with water to the consistency of sour cream. You can apply this solution with a brush. A layer thickness of 2 ... 3 mm will protect the container from water filtration.
Overlapping is carried out taking into account the above recommendations. The formwork for this operation is suspended.
The dimensions of the overground part of the storage are selected within the range of 600…700 mm in height and 500…550 mm in diameter. It can be camouflaged as a well of the appropriate style, then the whole structure will become an architectural addition and decoration of the garden plot.
During operation, the underground tank must be periodically completely freed from water and cleaned - otherwise, like any body of water, it will become contaminated.
L. KURDELYAS, p. Terny, Mykolaiv region
Noticed an error? Select it and press Ctrl+Enter to let us know.
modelist-constructor.com
Water tanks: plastic, reinforced concrete, metal, what to choose, can you do it yourself
 Water is the source of life, and man cannot exist without water. In addition to drinking, water is used in everyday life, and for a full-fledged comfortable life, the owner must definitely take care of the source on his site. Water supply has not been carried out in every settlement, but there are many options for how to install a storage tank near your home.
What varieties are there
Depending on the purpose of using water, there are several types of reservoirs:
- metal;
- plastic;
- reinforced concrete xenons;
- homemade tanks;
 If the water is used for drinking and cooking, then the tank is made of high quality stainless steel that meets all standards. For air exchange in such containers, openings are provided, covered with nets and protected from atmospheric precipitation. Two pipes are connected to the tank: inlet and outlet water, on which water taps are installed. Such tanks need to be cleaned and disinfected 2 times a year, for which a special hatch is provided through which a person gets inside. The main disadvantage of such a tank is the high price and the high probability that the metal container can be stolen if left unattended for a while.
There are also rainwater tanks. They are made of lower quality metal than drinking water containers. But it's not always bad. As statistics show, in the summer a person uses 100 liters of liquid every day, most of which goes to watering the garden and other household needs. In order not to spend a lot of money on drinking or tap water for domestic use, there are special tanks for collecting rainwater. It consists of a working part, where liquid enters in the form of precipitation, and a room for equipment, where filters are located.
Such a tank is placed under the roof of the house, where the gutter roofing system collects water and sends it to the tank through special gutters. But this is a rather expensive system, so it would be impractical for an ordinary summer resident to install it at home. Rainwater can be used for washing with soft water, watering plants, etc. At the same time, if the house is large enough, and it is located in an area where summers are often rainy, significant savings will be noticeable.
The easiest option is to install an ordinary metal barrel of at least 5 cubic meters. l. and wall thickness of 5 mm. Its main advantage is the ability to leave water for the winter. Then in the spring there will be no need to worry about where to get water for household needs. Among the disadvantages of a metal barrel are:
- the need to paint the surface so that it does not rust;
- difficult to transport;
- if it is made of valuable metal (aluminum, galvanized), the barrel can be stolen.
Plastic
The most popular are plastic water containers for summer cottages. This is due to the main advantage of plastic - low weight and the possibility of transportation. In addition, the advantages of plastic tanks include:

On the market you can find a plastic container of any shape and size. Due to the hygienic nature of the material, drinking water suppliers use plastic containers on order, for example, eurocubes of any size.
Table: types of plastic water storage tanks
Reinforced concrete
 This is a special type of water storage tank. It is a reinforced concrete monolithic structure in which a large amount of water can be stored. Installation and installation of xenons should only be carried out by professionals, because poor-quality connection of plastic waterproofing sheets can break the tightness of the tank, and the water in it will quickly deteriorate. However, the cost of such a structure is very high, so it makes no sense for a simple summer resident to install such a monumental structure if he does not have a farm of 300 head of cattle and a huge plot of 20 hectares.
In the event that there is no money for a factory-made water storage tank, or other circumstances prevent this, you can use improvised means and build a storage tank from what is at hand.
How to make a storage tank for water with your own hands
The best tires for such purposes will be tractor tires, namely, tires from the T-150 diesel tractor. Or you can buy used tires from a truck at any enterprise or in a car park. It must be said right away that the water from such a reservoir cannot be used for drinking or cooking. For household use only! And at the same time, such a tank becomes at the same time a rainwater storage tank that does not contain chlorine. Unlike plastic, tire containers cannot be punctured or scratched. The tire does not rot or leak water. 
Tire tank manufacturing steps:
Capacities will be very useful in the country. Water can be used for irrigation and other household needs.
septik.guru
Water supply to the cottage: building a water tank
The lack of water in a summer cottage is the most unfavorable moment that residents of country houses may face. Even if there is running water, the problem of lack of water can arise: problems in the system, pollution by sewage, silting, any difficulties associated with ensuring a constant and uninterrupted supply of clean water. In this case, summer residents provided for the storage of water in reserve in various containers.
 Water tank for the cottage made of plastic, different in displacement
 The most common water storage tank is plastic containers of various shapes and sizes. To date, this is the most affordable container, which is not difficult to find in the supermarket. In such vessels, water can be brought even by car, if there is no well or well in the vicinity.
Plastic containers are made using the most modern technologies, they can easily store drinking water. Quite often, at their summer cottage, housewives start canning fruits and vegetables. Such plastic barrels are just perfect for pickling cucumbers, tomatoes, sauerkraut, for pickled apples. For almost everything that grows in the garden and in the garden. And if the summer cottage is also replete with grapes, then without making homemade wine in such containers, then you will reproach yourself for the missed moment. Plastic barrels do not affect the fermentation process, they can easily be fitted with vent pipes. Delicious and very fragrant wine made from homemade grapes, prepared with your own hands, will be an excellent reason to show off to neighbors and friends, especially since plastic containers do not affect the taste of wine.
Why you should use plastic containers:
- a large range of displacement;
- weightlessness of the material;
- heat and moisture resistance;
- not subject to rotting, corrosion, various kinds of damage;
- they are not affected by alkalis, solvents, acids;
- withstand a wide temperature range: from - 30℃ to + 60℃;
- do not have seams and due to this they are quite tight;
- do not cause trouble when washing and cleaning;
- durable;
- do not absorb odors;
- do not change the main taste characteristics of the products that are stored in them;
- resistant to UV and sunlight;
- if you follow the basic rules for caring for such a container, they are ready to serve at least 50 years.
Plastic containers for water in the country are needed like air. Often there are situations when even in winter there is no water. When purchasing such vessels with any volume, you can not worry that there will be no water for watering your favorite plants, for brewing coffee and tea, for showering. Water should always be on the site, and as it is used, it should be constantly replenished. Before purchasing a plastic barrel for storing, for example, water, you need to clearly understand for yourself what consumption and for what period should be spent. If the consumption is small, then barrels with a volume of 3000 liters, 5000 liters will be very bulky, and they do not have the lowest price.
How to make a water tank for a shower
 Water tank for a summer shower in the country
 Water procedures in the country, especially in the hot summer season, are simply necessary. Most often, the cottage is not only a place of rest, but also a place of work. In this case, an outdoor shower is indispensable. It will contribute to a charge of vivacity after working in the garden, walking in the forest, gatherings around the fire with friends. The most important detail that will be needed to build such a useful device is a water tank for a shower. You can buy it ready-made in the store, especially since their choice is very huge, or you can do it yourself at minimal cost.
See also: How to build a brazier.
The water tank must be:
- capacious;
- sealed.
Under such conditions, a galvanized steel water tank, which is widely used as a shower tank, is perfect. A light zinc coating helps to keep corrosion, but over time it can still occur. Such barrels should be carefully stained. For one person, a 40-liter container will be enough, and for the whole family, a barrel with a two-hundred-liter volume is suitable. These containers are quite durable. With proper maintenance, they can last 10 years or more. As a rule, such barrels in the upper part have a hole for filling with water, the so-called hatch, while the lower part has a ball valve and a "watering can", if desired, fittings for the hose can also be installed.
Many summer residents dream of acquiring a stainless steel shower water tank. The chromeplating protects steel from possible corrosion. This container does not need to be additionally treated with various anti-corrosion materials. You don't even need paint. This material is very reliable, even with a minimum wall thickness of 1 mm, the design will not be inferior in strength and other qualities. Such a container costs a little more than its "brothers", it can be made by yourself if you have the necessary material and tools. A very important point: the water in such a container does not acquire an “iron” smell, does not “bloom”, always remains fresh. At the same time, the service life of such a tank is at least 20 years.
Plastic shower water containers are at the top of this list. Let's start with the fact that such a tank can be operated for more than 40 years! These containers are designed for long-term storage of water. The water in them has no odors, it always remains fresh. Unlike metal containers, propylene tanks are corrosion resistant, environmentally friendly, and UV resistant. Having small weight, they are easily transported, quickly installed. From a plastic container, even a used one, you can make your own shower water tank. To do this, you need to make a threaded outlet and a faucet with a nozzle for the future shower.
Having done this procedure, you can fill the container with water. It can be poured into the hatch manually or using a pump and a metal-plastic pipe. The shower tank must be firmly fixed on a special structure. As a result, we get a wonderful full-fledged shower, but already made with our own hands. This will require a minimum of costs, and such a shower will last for many more years. A variety of containers made from a variety of materials can be adapted to the shower water tank. What material to choose is the business of every summer resident. But, it is necessary to emphasize that this is a fairly simple design and it is very simple and inexpensive to do it yourself.
Remote suburban areas are often cut off from the central water supply system, which makes it much more difficult to care for the crops grown. Throughout the season, plants require abundant watering, especially in hot and dry weather. If it is rather problematic to equip a well on a site, you can create your own storage facility where water will be accumulated and saved.
Everyone can afford to install a tank for irrigation on the site. With its help, timely watering is organized, and a prototype of a water supply system is created, which allows the use of liquid for various purposes.
What materials are storage containers made of?
Tanks for storing and supplying water are available on the market in various versions and are made of metal or durable plastic. When buying a container for irrigation for a long time, you should consider what material it is made of. Modern polymers make it possible to create very durable products with high technical characteristics. In terms of quality and strength, they can surpass metal counterparts.
Metal

A tank made of this material is a classic version, familiar to most summer residents. Iron products have been used to store fluid for many years. Everyone who works in the country and uses an artificial metal drive knows about all its shortcomings:
- susceptibility to corrosion;
- fast contamination;
- difficult care.
Protecting a metal tank from destructive corrosion is quite difficult. To maintain its holistic appearance from the outside, it is enough to paint the surface with paint. But inside, the water will create a constant impact that destroys the metal. After a couple of months, sediment forms at the bottom of such tanks. Internal cleaning is a difficult task. The positive side is the good warming up of the barrel and its contents under the rays of the sun.
An alternative solution would be to purchase a stainless steel product that does not have these disadvantages. This also applies to the option with high financial costs.
VIDEO: Barrel for watering, making a stand
Durable plastic
Buying a watering tank of 500 liters or more is a reasonable decision, based on the fact that they do not have the disadvantages of metal structures. Such products are made of high-tech plastic, which allows them to withstand heavy loads. Unlike cheap plastic, they are not afraid of temperature changes. Integrity is also maintained under the influence of high water pressure.
.jpg)
One of the main advantages of plastic tanks is their light weight. They are easy to transport and install in the right place. You can install the plastic structure yourself without special equipment.
In order to prevent the tank from bursting when the water freezes in winter, it is either completely drained, or a large log or 5-liter plastic bottles are thrown inside, which completely cover the surface.
To make a container for irrigation for a large volume, it is additionally strengthened with special metal rings. This design gives the final product resistance to the pressure generated by water. The next advantage of products made of plastic is the price. It is more affordable than analogues made of metal. The technology of manufacturing plastic containers allows us to offer the buyer tanks of various shapes:
- cylindrical;
- rectangular;
- square.
The shape of the container does not affect the quality of irrigation. The main thing is that it succinctly fit into the surrounding landscape and be convenient for installation.
eurocube

The Eurocube has a cubic shape, reinforced on the outside with a solid metal grate. The container is installed on a special pallet. This is a great option for organizing a drip irrigation system with the addition of fertilizers. It is designed for one cube of water. The design provides for a screw-on lid and a tap for draining the liquid at the bottom. To protect against rupture, the same technology is used as described above.
How to calculate the volume of the tank for irrigation
If, in the manufacture of a metal container, you can independently determine the volume in advance - from 1 to 10 cubic meters (a larger volume may not withstand the support), then a plastic one is bought ready-made. In general, the volume of the reservoir depends on the area of the irrigated area. On average, 1 square takes about 30 liters of water per irrigation. Thus, if the area of \u200b\u200bthe garden or plot is 50 sq.m., then the minimum volume of the tank will be 1.5 cubic meters (1500 liters), while a supply of water is required.
Gardeners on plots of 6 acres usually install 3 cubic meters, which is enough for a weekly watering.
Installation of containers for irrigation
All the positive characteristics of tanks for storing and supplying water for irrigating plants are offset by poor installation and location. Therefore, it is important to properly place and install the irrigation tank on the site. The storage tank must be located in a place where rainwater drains. This is the easiest way to restock this resource without any effort. Rain water is the most useful for plants.

It is necessary to determine where the barrel will stand:
- underground;
- on the surface;
- on a special platform.
Mounting the product in a suspended state allows you to install a faucet, and by connecting a hose to it, get pressure from its own weight of water. Otherwise, a pump is installed that supplies water from the barrel.
For reference! To create the optimal pressure of the water column for the required pressure, you need to raise the tank to a height of two meters. This will result in a pressure of 0.2 atmospheres. It is desirable to make it higher, but at the same time you need to think carefully about how to make a stable pedestal and how to give it optimal rigidity.
Technical advantages of using a vegetable garden irrigation tank
Using a pump to raise water from a well is quite enough to meet domestic needs. However, their power may not be enough to supply liquid to the planted area. Inexpensive pumps are not able to work at a pressure of 3-4 bar. The pump will operate at its maximum capacity, but will not create optimal conditions for irrigation.
If a tank for irrigation is installed on the site, then this problem will be solved. Gradually, the pump will pump the necessary amount of liquid for abundant irrigation of all plants. In order for the water from the barrel to flow and flow through the hoses, there is no need to create high pressure. Automatic protection installed on the equipment will turn off the pump when the water runs out.
To protect the pump from permanent shutdown or possible breakdown, it is necessary to set the level, dropping to which water will again flow into the tank. You can protect yourself from overflowing with a float valve.
If you take water in the country directly from the well, then it will flow to the plants in a cold form. This adversely affects their condition and causes the development of various diseases. The liquid passing through the storage tank is heated to the ambient temperature, which is optimal for garden crops.
The well may also contain various particles that will be in suspension in the water. Their contact with plants is not desirable. Water that has stood for several hours in the tank will give a sediment at the bottom with all the harmful impurities.
Modern solutions for the manufacture of containers for irrigation
Those who do not want to connect hoses, valves and other equipment for arranging an irrigation system should purchase a watering tank based on the installation of a special equipment system inside the tank. This is a station for supplying heated water under pressure, which is configured for automatic irrigation of plantings.

This set of equipment consists of:
- durable plastic tank;
- powerful submersible pump;
- filters;
- locking valve;
- valves;
- automatic water level control systems;
- bottom drain.
Such systems for irrigation of the site have a number of key advantages:
- operate in silent mode;
- provide maximum pressure;
- filter and warm water;
- control the liquid level in the tank.
With the correct installation of the barrel used for everyday irrigation, the land plot will be fully provided with the resource necessary for caring for garden plants. The main thing is to correctly determine the amount of capacity required for your needs. It should correspond to the water flow in your area with a small margin.
VIDEO: Irrigation tank and outlet water pressure
Installing a water tank in the bath opens up a number of amenities and advantages for the owner. Firstly, it becomes possible to prepare hot water in the process of heating the furnace, which allows you to save energy resources and spend them as expediently as possible. Secondly, the use of such a unit in most cases makes it possible to abandon the installation of an electric water heater, which also benefits the budget allocated for the arrangement of the bath.
There are several basic requirements for water tanks: they must be capacious, durable, warm up in the shortest possible time and retain heat for as long as the needs of the steam room visitors dictate. Among the options available to the average user, products made of stainless steel meet the listed criteria to the greatest extent.


Scheme - an example of installing a remote water tank
The modern market offers a wide range of water tanks made of cast iron, stainless steel and enamelled material. As practice shows, it is stainless steel that is most popular among bathhouse owners, which is due to a competent and acceptable ratio of operational and technical characteristics and cost indicators.
Stainless steel is characterized by excellent thermal conductivity, normally tolerates temperature fluctuations and objectively lasts longer than various ferrous metals.


Here a logical question arises: which of the existing brands of stainless steel is better suited for the manufacture of the container in question, intended for use in a bathhouse? Firstly, it is brand 08X17 (430), secondly, 8-12X18H10 (304). These materials, among other things, are used for the production of dishes and are characterized by high resistance to high temperatures, are completely hygienic, do not rust or deform during use. In addition, such materials are unpretentious and extremely easy to maintain.

Summing up the above, we can distinguish 3 main advantages of water tanks made of stainless steel:
- products do not require the arrangement of additional protection against high humidity and normally tolerate operation in conditions typical for a bath steam room;
- stainless steel is characterized by high thermal conductivity, which makes it possible to obtain hot water in the shortest possible time;
- stainless steel tanks do not deform due to sudden temperature changes, or these deformations are insignificant.
Prices for stainless steel sheets
stainless steel sheets
Design options for water tanks for a bath
Water tanks designed for use in a bath can have a different design. There are 3 main options: built-in tank, remote tank and pipe-mounted unit. You can find the features of each type of construction in the following table.
Table. Stainless steel water tanks
| Construction type | Description |
|---|---|
| The installation of representatives of this category is carried out in the process of building a sauna stove, as a result of which the stove and tank become a single structure. The heating of water in a built-in stainless steel tank is carried out by the forces of fire, due to which the efficiency of the water tank itself is kept at a rather impressive level. The key disadvantage of this design is the fact that a significant part of the heat is spent on heating the water in the tank, as a result of which the heat transfer from the sauna stove itself drops noticeably. Helpful note! Much easier to manufacture and use is a top-mounted/hinged tank mounted on top of the heater. |
|
| A more convenient and practical option compared to the previous model, especially if the tank is designed and installed for permanent use. If desired, a ready-made stainless steel water tank can be installed in the washing room of the bath, connecting it with a pipe system to the furnace heat exchanger. The optimal pipe material is copper or brass. The only significant drawback of an external water tank is the likelihood of burns in case of careless handling - the situation is especially relevant if children go to the bathhouse. |
|
| The tubular water tank can be installed either directly above the sauna stove or in the attic space. In such structures, water is heated in the shortest possible time. At the same time, the heat transfer indicators of the furnace unit do not decrease. The undoubted advantage of installing a water tank in the attic is the ability to "unload" the steam room, excluding the container from its environment and providing more free space. |
The table does not include another possible option for installing the tank - on the side of the stove.

 Stove with a side tank - photo
The method is neglected for the simple reason that it is the worst. Water in such a tank will boil very quickly. If the soaring process drags on, the atmosphere in the steam room will become simply unbearable due to the constantly boiling water. Yes, and with the maintenance of such a tank there are continuous inconveniences: in order to save space, the capacity is made high, but very narrow.
Having dealt with the features of stainless steel water tanks and choosing the most acceptable design option, it remains only to determine the optimal volume of the container, after which you can proceed directly to the stage of its manufacture.
When choosing the required volume of a stainless steel water tank, it is necessary, first of all, to focus on the planned number of visitors who will go to the bathhouse at the same time. For example, if the steam room is not capable of accommodating more than 2-3 people due to its physical dimensions, you can safely put a tank of 50-80 liters, at the rate of 25-30 liters of water for each attendant.

Tanks come in different sizes - choose the right one
Using the above recommendation, you can calculate the required volume of the water tank, taking into account the attendance of the equipped bath. For greater convenience, it is recommended to add at least 10-20 liters on top of the calculated value - each person has different needs and ideas about comfortable washing.

DIY stainless steel water tank
Most factory models of water tanks are made of 1 mm thick stainless steel. For self-production, it is recommended to use thicker sheets - about 1.2-1.8 mm (a specific indicator is selected in accordance with the volume of the container). The cost of manufacturing the structure in this case will be higher, but for many years you will not have to think about the need for repair, painting, coating with various special compounds and other similar maintenance of the tank.
As an example, you can use the following drawing - this is the easiest for self-assembly and one of the most popular design options.

You can proportionally change the dimensions in accordance with the required volume of the container. The calculation of the volume is carried out according to the standard formula, i.e. indicators of length, width and height of the product are successively multiplied. For example, the volume of the container presented as an example will be about 25 liters.
Useful advice! An even simpler version of a water tank is a product made from a piece of seamless stainless steel pipe. By giving preference to such a solution, you get a number of advantages. Firstly, you don’t have to waste time and effort on cutting sheet metal, calculating allowances, stocks and other points, i.e. the possibility of errors is reduced to a minimum. Secondly, the manufacture of a water tank for water from a pipe requires the use of welding in a minimum amount.
Stainless steel pipes with a diameter of up to 1020 mm and even more are available for sale, which makes it possible to purchase a product for the manufacture of a container of the required volume without any problems. To determine the volume of the cylinder (namely, this is the shape that the storage tank will have in the end), use the following formula.

Helpful note! If you wish, no one will forbid you to make a tank from a profiled stainless pipe, and then the tank will have a rectangular shape.
The further procedure for self-manufacturing a water tank will be considered precisely on the example of using a pipe segment as a blank.

Pipe - billet
Important! If an on-pipe water tank is planned, it is better to use a shorter but wider blank for its manufacture so that the chimney can be passed through the internal cavity of the tank. It will look something like this.


The procedure for manufacturing a water tank from a pipe is presented in the following table.
Table. Making a water tank for a bath
| Stage of work | Description |
|---|---|
| Previously, a formula was given to calculate the volume of a cylinder. With its help, we find the required height of the water tank. For example, we want to get a tank with a volume of 30 liters and use a pipe with a diameter of 1020 mm to make it. By simple arithmetic manipulations at the level of grade 5, we transform the formula into the following form: H \u003d 30 / (3.14 * 0.512) \u003d 37 cm - this is the length that a pipe cut should have to obtain a water tank of the specified volume. To cut a piece of pipe, use a grinder. For working with stainless steel, discs with a thickness of 1 mm and a diameter of 11.5 or 12.5 cm are suitable. |
|
| In order for the finished water tank to look beautiful, you need to properly process the cut areas. In the future, similar actions will be performed when boring holes for connecting nozzles with taps. The most convenient tool that allows you to quickly and efficiently deal with the solution of the above tasks is a manual drill. Such devices are equipped with a wide variety of abrasive nozzles, allowing you to achieve the maximum quality of processing a particular material. In the absence of a manual drill, the seams will have to be put in order with improvised means: a file, sandpaper, etc., which is definitely a longer and more laborious undertaking. |
|
| At this stage, we need a stainless steel sheet. The lid, and especially the bottom, is recommended to be made of a material that has a greater thickness than the walls of the pipe chosen for the manufacture of the body. The work is carried out in several stages: - a circle is drawn on a sheet of stainless steel according to the diameter of the holes that it will close. You can simply put the pipe on a sheet of metal and draw a circle by circling the product along the contour; - in accordance with the markup, 2 blanks are cut. For cutting and subsequent grinding of the edges, you can use the previously mentioned grinder and manual drill. If the pipe method of installing a water tank is assumed, at the same stage, holes can be prepared in the bottom and lid according to the diameter of the chimney pipe (it is better to 1 mm more so that the chimney can pass through them, in the future the gap will be leveled by welding). Also at this stage, it is possible to prepare holes for further connection of branch pipes with taps, if they are mounted in the bottom (relevant for remote structures installed away from the furnace, in the case of over-furnace / built-in and tube tanks, it is more expedient to cut the pipes into the wall of the tank body). In more detail, the nuances of drilling and welding stainless steel will be discussed in the relevant sections of the instructions. |
|
| The photo shows a profiled pipe, but the welding process for this case and working with a round billet remains the same. Products from the material in question can be connected in different ways: - by soldering using lead-free or high-temperature solders; - manual or automatic welding (in the case of stainless steel, work is carried out exclusively in a protective gas environment). The most preferred is the second option, the easiest to learn - manual arc welding. Argon is used as the shielding gas. Welding is carried out using a non-consumable electrode for working with stainless steel. In the international classification, devices designed for such welding are marked with the abbreviation TIG. When buying or renting a welding machine, do not forget to purchase / rent an argon tank and a reducer. The function of the latter is to reduce the pressure of the protective gas at the outlet. Seams should be as neat and uniform as possible. After completion, it is recommended to clean them up. Recommendations for a suitable tool for this have been given previously. Useful advice! If desired, the tank cover can not be welded, but attached with bolts and lugs, or simply made removable. The option is relevant for cases where water will be added manually by the user, and not supplied through the water supply. The container is ready. We proceed to the preparation of holes for further insertion of pipes. |
|
| The structures under consideration are equipped with two branch pipes with taps. Cold water is traditionally supplied to the container through the upper pipe, and the heated liquid goes to the consumer through the lower pipe. The diameters of the plumbing pipes correspond to the diameters of the water pipes used in combination with them. Most often, pipes with a diameter of ½ or 1 inch are used. For drilling stainless steel, an ordinary electric drill is suitable. The main thing is that the work is done at low speeds - no more than 100 rpm. In a drill with an electronic regulator, setting the required mode is not a problem. If there is no such regulator, you simply need to activate the start button with short presses - within a second the tool will not have time to accelerate to operating power. Holes are best made with a P18 drill. An even more convenient option is a special stepped drill (shown in the image). Such a tool does not lift the edges of the hole, so that it gets a perfectly round shape. Along with this, for drilling holes with a diameter of more than 14 mm, it is more convenient to use special nozzles - the so-called. "crowns". |
|
| The presented diameters of such crowns correspond to both inch and metric graduations of plumbing pipes. With the help of appropriate drill bits, you can also prepare holes in the bottom and lid of the tank if it is intended to be installed on a pipe. |
|
| Branch pipes with taps are available for sale to shut off the flow of water. In combination with a stainless steel tank, it is preferable to use components made of the same material. In order not to waste extra time on arranging the thread, the pipes are simply welded to the previously prepared holes. Recommendations for tools and welding modes remain the same. After installing the water tank in accordance with the selected scheme (to be discussed later), water pipes are connected to the nozzles (it was previously noted that it is best to use copper or brass products) of a suitable diameter. The connection of the branch pipe to the pipe is carried out in any suitable way, for example, using a threaded adapter. |
So, the water tank is ready, and even the pipe fittings have already been installed. It remains only to connect the finished device for its subsequent use for its intended purpose.
How to connect a stainless steel water tank
Important notes before you start
It was previously noted that the following options for mounting the tank are most common: inside the furnace, away from it and on the chimney. We propose to replace the first option with a method in which the installation of the tank is carried out above the stove heater. This method is easier to implement, at the same time, you can resort to using it, even if the stove has already been built - suddenly you thought at first that you would not need such a heater, and after studying the material presented, you understood all the advantages of using it and wanted to install it in your bath .
Important! It will be possible to implement the mentioned replacement only in the case of a collapsible chimney. The proposed method involves the combined installation of the tank - it will be simultaneously placed above the stones and around the chimney, which will make the efficiency of water heating as high as possible. Otherwise, you will either have to give preference to the built-in tank model (if the furnace is just being built), or install the unit at a distance from the stove.
If the oven is brick, the preparation of the place for the tank and its direct installation are carried out during the masonry process (the specific stage depends on the chosen design of the oven and the size of the furnace, most often it is the 10th row). When laying a row, an opening is left to accommodate the tank. The size of the opening should exceed the dimensions of the structure to be installed by several millimeters to compensate for thermal expansion.

On the diagram - an opening for installing a tank
Note! Pipes are laid between the marked quarters of bricks, the presence of which will increase the heating efficiency - these are the design features of this particular furnace unit, these pipes may not be available in the project you have chosen.
The oven with the tank installed looks like this.

A sanitary faucet is embedded into the wall of the tank from below. It is assumed that the user will collect hot water directly in the steam room. If desired, the design can be improved by inserting the previously mentioned branch pipe instead of a tap, connecting a water pipe to it and leading it into the washing room.
When the masonry is brought to the upper edge of the tank, 2 metal strips are laid on it, the presence of which will allow you to safely cover the storage tank with a brick.


In the case of metal sauna stoves, the water tank is welded over the firebox (recommendations regarding welding were given earlier). As a result, the heating of the container is carried out by the forces of the flame, which ensures the fastest possible preparation of water. The design looks like this.

Important! If a built-in tank design is preferred, metal with a thickness of more than 1 mm should be used for its manufacture and, at the same time, make sure that the quality of the welds is as high as possible. Otherwise, the tank will either burn out quickly or leak through poor-quality seams.
Useful advice! In the case of a brick oven, you can go the simpler way by laying the water tank on the body of the oven above the firebox. The structure looks something like this.

Installing a water tank above the heater
This method, as noted, involves combining the options for installing the tank above the heater and on the chimney. The distance between the heater and the bottom of the tank is usually maintained in the range of 20-35 cm with the possibility of changing in both directions: the smaller this indicator, the faster the water will heat up, but the tank will last less, and vice versa.
It makes no sense to give detailed step-by-step instructions - you already have all the necessary knowledge. Previously, it was described how to prepare holes in the bottom and lid of the tank for passing a chimney pipe through them. Do it.
Next, you need to pass an element of the smoke exhaust system through the internal cavity of the tank and connect the pipe to the tank at the entry and exit points (in the bottom and lid) by welding. You also know how to do it.
Stainless steel water tanks are relatively light in weight (for example, cast iron is much heavier and a tank made of it would require fixing to the ceiling with chains or other suitable method) and do not require additional fastening. Further installation of the chimney is carried out according to the standard scheme, depending on the type of construction chosen.
Ideally, the finished system will look like this.


In the image shown as an example, pipes and taps are not visible. The next design is not so beautiful in appearance, but the connection of the water outlet is clearly demonstrated here.

As for the supply of cold water, it can be organized in several ways, depending on the particular situation:
- filling the tank is carried out manually;
- water is supplied from a well / well;
- Water is supplied from a centralized water supply system.
We will not consider in detail each of the listed options, because. these are topics for separate voluminous instructions.
Installing an external water tank
The arrangement of such a system is also not overly complicated. The only thing is that the scheme is supplemented with a new device - a heat exchanger. It can be built-in or external. For self-production, it is better to choose the second option - it is more convenient and easy to implement.
A diagram of a system with an external water tank is shown in the following image.
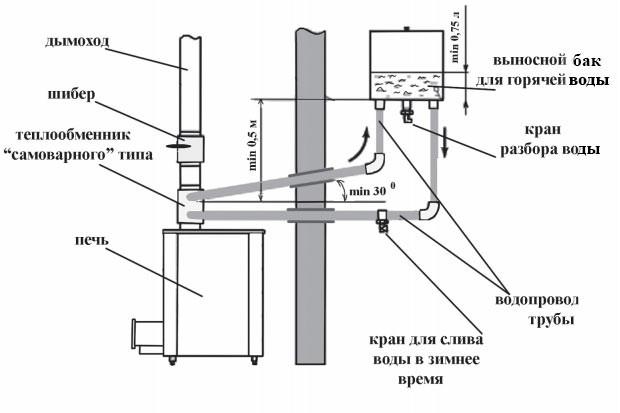
Here we see that the external heat exchanger is installed on the chimney. The water in the heat exchanger is heated by the heat of the flue gases transferred through the pipe walls. If an open heater is located under the heat exchanger, additional heating will be carried out by the heat of hot stones.
Heated in the heat exchanger, the water goes into the external tank, from there, cooling down, back to the heat exchanger. Water circulation will be ensured by the slopes created and the pressure difference in the tanks with hot and cooled liquid.


Remote tank with hot water for 60 l
You can make a heat exchanger yourself. In fact, this is the same water tank, the manufacturing instructions for which you have already studied, only of a smaller volume (usually up to 5 liters). The installation of the heat exchanger is carried out in the same way as the tank in the previous instructions (on the flue pipe).


Register - heat exchanger for sauna stoves

Prices for heat exchangers
heat exchanger
You already know how to make the necessary holes, install pipes, taps and pipes. Where to do it - look at the diagram. It remains only to prepare all the required elements and assemble them into a single system, maintaining the necessary distances and slopes in accordance with the above scheme.
In this example, a remote water tank is installed in the wash room and is equipped with a standard plumbing tap to drain the water. Pipes, like the mentioned tap, are cut into the bottom of the tank. Holes for laying pipes through the partition can be made using a suitable tool, such as a puncher.
In accordance with the current provisions of the current standards, pipelines for cold and hot water supply, if they are laid through a partition wall, must be laid through a sleeve. The diameter of the latter is selected so that it exceeds the outer diameter of the pipe being mounted by 0.5-1 cm. To seal the gap between the sleeve and the pipe, a non-combustible soft material is used, so that, as a result, it is possible to move the pipe along the longitudinal axis in the event of thermal expansion. This is shown schematically in the following image.

The gaps in the partition can be masked in any suitable way, for example, by filling the mentioned soft fireproof material and closing it with an exterior trim element (lining, etc.).
It remains only to figure out how to fix the water tank on the wall. The easiest option is to install on metal corners, the power of which would be enough to support the weight of the water tank.
Fastening is carried out as follows. Having attached the corners to the wall, you put marks on the surface, drill holes according to the marks and mount dowels in them. Next, screw the corners to the wall with bolts 8-10 cm long and 1-1.2 cm in diameter.

You can install your water tank on the corners. The method is extremely simple to implement, but not the most reliable (they made a mistake when choosing the corners - they caved in - the tank fell), and it is objectively suitable only for small rectangular structures. More reliable is the fastening method used when installing domestic water heaters. To implement it, you will have to work with the welding machine again. You already have all the necessary knowledge, so no further explanation is required. The procedure is as follows:
- a strip of metal is cut off (the same stainless steel is suitable) with a thickness of 1.5-2 mm, a width of 5-10 cm and a length so that it protrudes beyond the side walls of the heater by several centimeters on each side;
- holes are drilled in the strip according to the diameter of the mounting bolts (you will understand by looking at the image below);
- the finished mounting plate is welded to the rear wall of the tank.
Further actions are similar to the previous instructions, with the only difference that the water tank is not installed on the corners, but is attached to the wall through them by means of a welded bar. It looks like this.
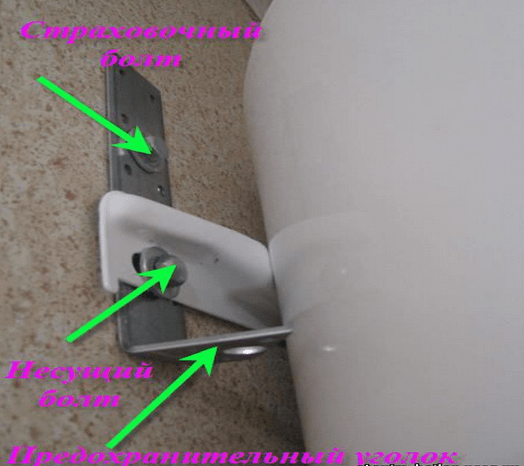
Buck installed. You can test and, if everything is fine (no leaks, excessive heating and other adverse phenomena), take the structure into permanent operation.
If desired, the system can be improved almost to infinity, completing with a variety of automation, measuring instruments, etc. The possibility of installing additional wiring in order to connect the tank to the shower cabin in the washroom is also not ruled out - this will allow you to wash with maximum comfort. An example of the implementation of such an idea is shown in the following image.

Useful advice! Install the tank in such a way that it is as far away from both the sauna stove and the hot water intake as possible.
Having sufficiently mastered the art of stainless steel welding, if you wish, you can make a tank not from a pipe, but from sheet material - this is a more responsible job compared to the considered option. An example of its implementation is detailed in the attached video.
Successful work!
Video - How to make a stainless steel water tank for a bath
It makes no sense to prove the need to have a supply of water for irrigation on the site. If something happens to the irrigation system, and your flowers and vegetables will turn into hay during the days of the July heat. When my old steel tank leaked, I needed to urgently find a replacement for it. Having assessed the harsh reality, I decided to make a structure that would decorate the site, be durable, inexpensive, and not attract “guests”. Having gone through different options, I chose, as it seems to me, the most successful one: to make the base of the container from galvanized steel sheets, “dressing” it in concrete.
Sheets of steel measuring 1000 x 2000 mm were connected to each other by a ring. In order for the container to have a volume of 1 m3, I made a ring of 2 sheets. The seam before “pressing in” was treated with sealant for plumbing work, as well as all subsequent seams. It turned out a springy flexible ring, which can be given any shape.
For a capacity of 1 m3, it is enough to make a foundation 120-150 mm thick, laying it on a crushed stone pillow. The area of the foundation must be larger than the area of the container. Having chosen a place, he took out the soil to a depth of 200 mm, filled the pit with rubble and sand, rammed it, spilled it with plenty of water, and prepared concrete. I laid out half of it on rubble, on it - reinforcement made of steel rods and pipes, and poured the rest of the concrete on these structures. Water should be added to the concrete so much that it does not spread, but resembles gingerbread dough. This does not require formwork, and the edge of the foundation will look like stone "nodules". Concrete is not poured into place, but is laid with a shovel and rammed, or with a wooden mallet.
The next operation is the installation of a metal base. The laid concrete is carefully leveled. To do this, he poured a cement-sand mixture (1: 3) of the consistency of liquid sour cream onto the foundation and dispersed it with an even rail. Letting the leveling layer dry (lose fluidity), put a sheet of galvanized steel on it and pressed it with bricks. This is the bottom of the future tank. Previously, the sheet was cut to fit the configuration of the container and protruded along the perimeter by 20 ~ 30 mm. In this state, the foundation was left to dry for a day.
A day later, I installed a manufactured ring made of galvanized steel on the bottom, having previously made 2 holes in it: one at the bottom at the very edge for the drain pipe, the other 300-400 mm above the edge for the selection of clean water. If all the previous work was done carefully, then gaps in some places of no more than 5 mm are permissible between the wall and the bottom - they will not affect the quality of the container. Having installed the wall and fixed it with bricks, he overlaid the joint between the wall and the bottom with a steep but plastic “dough” from a mixture of cement and sand (1: 1) with the addition of PVA glue (1 tablespoon of glue per 0.5 l of water). After drying the "dough" for a day, he removed the bricks and completed the sealing of the joint in the places occupied by the bricks. Having completed the sealing of the joint, I installed a tube (aluminum, stainless steel, plastic) into the wall hole at the bottom, carefully overlaid it with a cement solution. Then proceeded to the construction of the concrete wall.
Concrete for the wall is prepared the same as for the foundation. He performed the work as follows: he took a portion of concrete with a trowel, laid it against a steel wall (it played the role of a one-sided formwork), lightly rammed it so that the concrete spread and pressed tightly against the wall. And so around the perimeter. When laying concrete, one must strive to ensure that the wall thickness is not the same. Then a surface is formed that resembles the natural texture of a stone. At the same time, you can show your abilities as a sculptor, guided by a sense of beauty and harmony.
When constructing a wall, one should not forget that a drain pipe should go out at the bottom, and at a height of 200-300 mm from the bottom, another pipe with a thread for the valve must be mounted into the wall in order to draw clean water. So that during the laying process the steel base does not deform, it is advisable to lay brick columns inside the tank, which do not allow the wall to "go" inside under the pressure of concrete.
Finishing the masonry, you need to make a small influx inside the container on the edge of the steel base so that it does not peel off from the concrete.
The last step is finishing. Various options are possible using ceramics, bottle glass, natural stone, etc. I chose a simple option: the entire surface of the container was smeared with a cement-sand mortar (1: 1) and treated with a wet broom. The gray color of the cement looks good in the greenery of the garden.
Such a container has many advantages, it is quite cheap, there is only one drawback: it cannot be moved. Therefore, the place must be chosen carefully, remembering that a capital structure is being built.
There are two ways to solve problems with a shower water storage tank: buy ready-made products in the store or make them yourself. The second option is much preferable for several reasons:
- It is possible to choose the volume of the container according to your own needs. Depending on the design of the shower and the number of family members, you can install a container with a different volume;
- if desired, you can install additional automation systems. If you have minimal experience in performing plumbing work without big problems, you can make automatic filling of the tank, water intake only from the upper warmest layer, electric heating, etc.;
- low cost. All structural elements can be used, you do not need to buy anything. If you have to go to the store, then only for cheap additional elements;
- enjoyment of doing your own work. This is an important factor, in many cases outweighs all others.
The article will give detailed step-by-step instructions for making several options for shower tanks, each has both strengths and weaknesses.
The shower tank can be metal from galvanized sheet steel, stainless steel or carbon (black) iron and plastic. In order to consciously choose the best options, you should familiarize yourself with a real comparative table of manufacturing materials.
| Production material | Advantages | Flaws |
|---|---|---|
| Almost unlimited service life. But it is unlikely that this advantage is critical for shower buildings in suburban areas. | Technological complexity of manufacturing. Requires professional tools, the ability to conduct welding work with stainless steel. Another very unpleasant drawback is the high price. | |
| Service life up to fifty years. The lightness of the tank, the ability to install even on fragile supporting structures. | The complexity of manufacturing, you need to have special tools and skills for soldering. They are in the middle in terms of value. | |
| For most cases, the best option both in terms of price and performance. | They require periodic cleaning of the inner surface, on the outer surfaces the paint layer should be restored. | |
| They are cheap, there are no problems with finding containers. | They are afraid of negative temperatures and hard ultraviolet radiation. | |
| The service life is several decades. | Not all users are satisfied with the price. |
Experienced practitioners advise making a shower tank from used plastic or metal containers. Such containers are easy to find, in most cases you will not have to pay anything.
For one washing one, up to 40 liters is enough, depending on the number of family members, you can calculate the optimal sizes. For information, it is worth saying that industrial companies during the manufacture of shower tanks proceed from the calculation of approximately 20 liters per person, 40 liters allows not only to take a shower, but also to fully wash without the need to save water.
plastic barrels
A very common option for manufacturing a tank for a shower stall, they are distinguished by good indicators of physical strength. It is allowed to use both new and used ones. The volume can be different, from 50 to 1000 liters. For a shower, there is no need to use large containers, it is enough to have a volume in the range of 50–200 liters.
There are two general requirements for all plastic containers:
- Production material - UV-resistant plastic. Finding such containers is quite difficult, and they are not cheap;
- should have a dark color, and preferably black. Plastic must be painted with mineral paints during the preparation of polyethylene for pressing. Most plastic barrels are blue or white. Why is it recommended to have containers made from painted plastic? Because the paint on the surface of the plastic will not last long, within one summer they will fall off. The reason is not only the low coefficient of adhesion, but also the high values of thermal expansion. And all dyes react negatively to changes in the linear dimensions of the painted surface.
Step by step instructions for making a plastic tank
If you have an old plastic barrel, then you need to wash it thoroughly. The container can be considered clean only when various odors have completely disappeared. For installation in a vertical position, a frame and a base should be made, the stop is located over the entire bottom area. To reduce wind loads, it is better to lay the barrel on its side, but then there are problems with sealing the lid.
How to seal the lid
Step 1. Thoroughly rinse the junctions of the lid with the barrel, remove oily stains, dust and dirt.
Step 2 Try on the cover, check whether it fits snugly around the entire circumference. Align the cover if necessary. To do this, heat the deformed places with a building hair dryer, place the lid in its place on the barrel and press firmly. In this position, the lid is held until it cools completely. Wear gloves and follow safety precautions.
Step 3 Re-degrease the surfaces and carefully lubricate with special glue. If you have a machine for welding plastics - excellent, such a seam has a strength of at least 90% of the strength of the base material. If there is no device, use glue.
Step 4 Wait until the adhesive is completely dry. The time depends on the brand of glue and drying conditions.
Step 5 Re-apply the glue where the lid fits on the barrel and let it dry again. Don't rush, don't skip.
Step 6 To increase the strength of the joint, lubricate the joint again and wrap it tightly with clean plastic wrap. Pull the film on top with a soft wire.
Instead of a wire, it is permissible to use a clamp
If you have little experience in such work, then do not rush to install the barrel on the shower stall, first check it for strength and tightness. Everything is fine - cut a small hole in the upper part, connect fittings and a shower head. Leaks were found and they cannot be eliminated - place the barrel in an upright position.
How to tie into plastic barrels
Not as simple a question as it might seem. The fact is that it is near the insert that points of increased tension of the material are formed, with the passage of time microcracks appear, which increase up to complete destruction. As a result, you have to completely change the barrel, it is very difficult to repair such leaks. And after the repair, no one can guarantee that problems will not appear again in the same place or next to it in a few weeks.
For a quality tie-in, you will need a drill with a set of drills of the appropriate diameters, rubber gaskets, bolts and metal plates. The insert is made not only under the shower head, but also for supplying water and draining excess.
Practical advice. Use silicone hose for all connections. It is not afraid of frost, resistant to UV rays and, which is very important for plastic barrels, soft and does not create additional stress on the joint.
Step 1. Buy tie-ins for the tank. They consist of washers, rubber seals, a fitting and a nut.
The number of tie-ins depends on the number of pipelines connected to the drum, and the diameter is selected taking into account the nominal size of the hose. Additionally, you will need a faucet coupling, a faucet, a shower head, a float from an old cistern. If you plan to install additional automation fittings, then at the same time buy elements for fixing it to a plastic barrel. It is advisable to use quick disconnects to connect / disconnect the hose, they greatly facilitate the process of caring for a tank for a country shower.
Step 2 Prepare two metal plates for each cut-in, approximately 5 × 10 cm in size, at least one millimeter thick. It is due to them that the platform will expand significantly, perceiving static loads from the connected plumbing fixtures and dynamic forces that occur during the on / off of the shower head or the shutoff valves of the water supply. Be sure to remove the sharp corners on all sides of the plates with a circular grinding machine.
Step 3 In the center of the plate, drill a hole for the tie-in, for two plates you will need two holes, grind sharp corners and burrs after the drill.
Step 4 Drill a hole in the barrel, the location must meet the requirements for the placement of the tie-in and its specific purpose. It is quite difficult to drill a hole in a round plastic barrel, the drill constantly “runs away”, especially with a large diameter.
Practical advice. Drilling holes will become much easier if you use simple recommendations.
Clamp a small carnation in the pliers and heat it with a lighter until a red glow appears.
Without allowing time for the metal to cool down, very quickly, in a pre-marked place, melt a small hole in a plastic barrel with a hot nail, it can also be blind.
Take a drill with a diameter of about 2 mm, drill a through hole. The mark made will hold the drill in the desired position. This will be the center, then you can continue to work with a large diameter drill.
Step 5 Use sandpaper to remove all burrs around the perimeter of the hole, they should not interfere with the hermetic installation of metal strips.
Step 6 Bend the metal plates along the radius of the barrel. Use for this any improvised devices. There is nothing to worry about if you fail to bend the plate perfectly, but it is desirable to strive for such a result. The more accurately the radii match, the larger the contact area, the lower the load per unit area, the more efficient the device.
Step 6 To fully guarantee the elimination of leaks, lubricate the surface of the plates with any glue or sealant, you can do the same operations with tie-ins.
Step 7 Install all the elements in place, the metal plates should be on both sides of the container. You will need an assistant to fix the nut, it is difficult to do this alone. But it all depends on the size of the container. Remember that standard tie-downs have left-hand threaded nuts, screw them counterclockwise.
Constantly control the position of the plates, do not allow them to rotate and change the original correct position.
According to the same algorithm, holes for all tie-ins are strengthened. Do not be lazy to make reinforcement, it greatly increases the operating time of the country shower tank. Next, a tap, hose, quick connector or other equipment for the tank is fixed to the thread.
Video - Installing a drain on a plastic barrel
Metal shower tank
We will not consider rather "exotic", in our opinion, options for the manufacture of stainless steel tanks. Let's dwell on the two most successful ones - from a finished barrel or welded from sheet steel of ordinary quality.
1. Metal tank from a finished barrel
First, we should talk about the types of barrels, their advantages and disadvantages.
| Barrel type | Advantages | Flaws |
|---|---|---|
| Low price and availability. Currently, such containers are used to store most liquid and bulk products; you can always buy them in a store or find a used one. They are light in weight, easy to mount on simplified frames. | Difficulties arise with fastening tie-ins and plumbing fittings, the service life rarely exceeds ten years. | |
| The mesh thickness is up to 1 mm, which allows you to securely fix additional elements of the tank. Service life of fifty or more years. | At present, it is difficult to find thick-walled barrels; at cost, they are much superior to thin-walled ones. Slightly more weight, volume of at least 200 liters. Such operational parameters can narrow the areas of possible use. |
Making a tank from a metal barrel
A hole is made in the bottom of the barrel for a shower head. If the barrel is thin-walled, then it is recommended to install metal plates to strengthen the junction. How this is done is described above using a plastic barrel as an example. To supply water, a hole should be made in the upper part of the tank. During the manufacture of the frame for the tank, be sure to take into account the weight of the filled container, the fixation must be reliable and safe.
2. Production of a tank from sheet steel
The best option for many cases, has a number of advantages.
- Possibility of manufacturing a tank of any capacity. This makes it possible to take into account the needs of users as much as possible.
- The shower tank can simultaneously serve as its roof. To do this, the dimensions in length and width must correspond to the parameters of the shower, the frame of the building simultaneously serves as a frame for the tank. In the step-by-step manufacturing instructions, we will consider just such an option.
- It is allowed to install all systems for filling automation and additional artificial water heating on the tank.
Step by step instructions for making a metal tank
For manufacturing, you need to prepare sheet iron with a thickness of about 1 mm, the dimensions of the sheets depend on the length and width of the shower cabin. For most cases, 1.2 m × 1.2 m is sufficient.
Step 1. Draw a sketch of the blanks and calculate the volume of the tank. For example, we will take a volume of 100 liters. With a length of 1.2 m and a width of 1.2 m, the height should be: H = 100000 cm3 (100 liters): (120 cm × 120 cm) = 6.9 cm. 120cm×120cm for top and bottom. And four plates measuring 120 cm × 7 cm for the sidewalls.
Step 2 Transfer sketches of blanks to metal. Clean its surface from rust and dirt, accurately draw the outline of the workpiece. Dimensions need to be transferred only for one sidewall and top, these elements will later be used as templates for the rest.
Step 3 Using a circular grinder with a metal cutting disc, cut the blanks. Check that the dimensions are exactly the same.
Important. When working with a grinder, follow the safety rules. In terms of injury risk, this tool occupies the first position. The disk must rotate on the operator, this is extremely important. Beginners try to change the direction of rotation, they do not like that sparks fly towards the worker. This is very dangerous, in this position the angle grinder can be pulled out, the injuries from it are complex and severe.
Step 4. Trim the cut points, try to achieve the most even line. Gaps of no more than two millimeters are allowed. Try to pre-fold all the elements and check their quality.
Step 5. Start welding individual elements. Adjust the amperage of the welding machine and the diameter of the electrode. The metal should not burn out, this condition significantly reduces the strength of the seam. In addition, a strong current burns through thin sheets, making it difficult and time-consuming to seal holes. Keep in mind that the weld "pulls" during cooling, the value of the angles changes. To avoid mistakes, first grab two elements in several places and let them cool. After that, check the corners with a square and, if deviations are found, correct them. Only after such preparation can a continuous seam be applied.
Step 6. Beat the flux along the entire length of the seam, check its integrity. There are gaps - put a second seam. If the experience of welding is not enough, then professionals recommend that seams be applied from the inside and outside at the bottom of the shower tank. The cover is welded only from the outside.
Step 7 Mark the connection points for the water inlet and the shower head. Drill holes, taking into account the diameters, clean the burrs with a grinder. We do not recommend that you weld in threaded fittings; it is much easier to purchase special tie-ins in stores. They have a set of washers and rubber gaskets, quickly installed in place, do not require special knowledge. Welding adapters is quite difficult, beginners will definitely have leaks.
Step 8 Re-clean all welds from flux, pour water into the tank and check the tightness of the tank. There are no leaks - pour out the water, clean the surfaces and paint the outer walls. The paint, of course, must be black for exterior work as well.
The finished shower tank can be mounted above the shower cabin. If you have a desire to make it from stainless steel, then the technology is almost the same. Except for changing welding modes and brands of electrodes.
You can find options for making a shower tank from galvanized sheet steel. We do not consider this option successful for several reasons:
- very thin walls require additional special measures to strengthen them;
- Zinc has poor adhesion to most coatings and will peel off quickly. And it is not economically feasible to use special expensive paints;
- for the manufacture of the tank, the elements used at the joints are bent, and then sealed. This is a very long time, you need to have or specially make bending devices;
- without solid experience in soldering galvanized sheet iron, you should not hope for a positive result of your work.
How can you improve the tanks for a country shower
Each owner of a summer cottage, taking into account their needs and capabilities, can independently improve the tank, install the simplest mechanisms that allow not only to increase the comfort of water procedures, but also reduce the time spent on its maintenance and preparation. We will not touch on complex automation, we will consider only the most "budget" options. Although they are low-cost, they are in no way inferior to expensive analogues of industrial production in terms of efficiency, safety and durability of use.
Water temperature
For those who already use the simplest shower in their summer cottage, it is no secret that the water temperature changes during washing. Sometimes the temperature difference can cause significant discomfort. It is impossible to completely eliminate this phenomenon, but there are several ways to minimize the drop and increase the temperature of the water in the tank? For now, we will not consider factors that depend on the location and color of the surface, but will focus on purely technical solutions.
- Make a water intake from the top of the tank. The easiest way, but very effective. To do this, attach a flexible hose Ø 15–20 mm to the inlet of the shower head. The main thing is not the size, but flexibility, the hose can be made of various materials, the wall thickness does not matter. In the shower, water moves by gravity, there is no increased pressure, on the contrary, it is somewhat lower than in the tank due to physical phenomena that occur during the movement of the liquid. The length of the hose to be connected should be approximately 20–25 cm longer than the maximum height of the drum. Specific values are determined taking into account the characteristics of the hose. The main requirement is that it should not completely bend during operation and not disturb the speed of the water flow. The upper end of the hose is fixed to any float (it is better to take a piece of foam) from below. As the barrel fills or empties, the float will move up/down, and the intake end of the hose always takes water from the warmest top layer.
- Install a simple electric heater. Now in the implementation there are a huge number of devices that differ in power, price and method of fixation. Choose for yourself the most optimal, taking into account the maximum number of different factors. You can not focus on power. In addition to additional heating of water, the heater will perform another task - to constantly mix it in the tank. Mount it at the very bottom, warm water will rise up, and cold water will sink down. Due to continuous mixing, the temperature of the water in the entire volume will become the same. If desired, you can additionally install a temperature or time sensor, but this is already quite complicated work. And the presence of conductive elements in the water tank has a negative impact on the safety of using the shower.
Tank filling
There are two most commonly used methods of filling the cistern: manually with a bucket or with a faucet. Both methods are often used and have the right to life, but we advise you to make the third option, which in our opinion is very successful. In addition, almost no additional costs will be required, and all the work will take no more than an hour.
Step 1. Prepare the details. You will need a hose and an ordinary float mechanism from the toilet cistern. As a rule, they very rarely fail, such elements can be found and used for the tank during the replacement of plumbing equipment. If there are no old ones, buy it in a specialized store, the price of devices is quite affordable for all consumers.
Step 2 Drill a hole in the container, do not forget to install additional plates to strengthen the insertion point.
Step 3 Install the float, use sealants to prevent leaks.
Important. If for all the cases described above, small leaks are considered an unpleasant phenomenon, but not critical, then the connections with the float must be tight. Otherwise, a large amount of leaked water can cause very unpleasant consequences.
Step 4 Adjust the position of the float so that the barrel is always filled to the desired volume. If you wish, you can make a drain insurance hole, insert a tube into it and lead it to a safe place. The tube will make it possible to notice the malfunction of the float in time and minimize the consequences of the “flood”. But you can not do this, the shower in the country is not the right place to take special care of leaks, the main thing is that not all the water leaves. Of course, during a long absence, you must not forget to completely turn off the water supply.
Thermally insulated outdoor shower with heating, sensors and pump
country souls
The option of a shower tank should always be considered before construction begins, and not vice versa. If you have a temporary shower, then you should not spend a lot of effort and money on making a tank. You can find options for using fuel tanks from cars and trucks, large canisters, milk cans, etc. for these purposes. Professionals recommend paying attention to efficiency and, of course, the designer look of the shower. The tank should not be conspicuous, but perform its tasks "imperceptibly".
And the last. In everything you need to observe the optimal ratio of cost and quality. You have a stationary shower that you plan to use on cool autumn days - think not only about electric heating of the water in the tank, but also about thermal insulation. It should be removable and installed only in cases where the sun's rays are no longer enough to heat the water to the desired temperature. It is best to use foam boards, they are quickly installed and removed, and can be used for several seasons. The price suits all consumers.
Video - Do-it-yourself shower tank

