Making a parallel stop and other useful devices for circulars. Guide ruler for a circular saw with your own hands Guide ruler for a circular saw with your own hands
The price of a factory guide bar is equal to the cost of a circular saw. This is a very necessary accessory and should not be neglected. You can make a guide for the circular with your own hands.
A specialist who uses a circular saw always knows what is enough hard to make a straight cut. You can move the saw with all your might along the applied ruler, it still tries to deviate from it. The result is spoiled material and wasted time.
Purpose of the guide bar for a circular saw
Many people have found a way out. They fix the bar according to the marking with several clamps. For a manual circular saw, this method is not suitable, because the clamps cling to the cutting tool.
You can write a few additional arguments in favor of using a guide rail:

Do-it-yourself guide rail for a circular saw
The main goal is to make a geometrically correct tool with your own hands. Everyone wants to do reliable and comfortable tire spending a small amount of time.
Do-it-yourself guide rail for a circular saw
Making a good guide rail from laminate, which is the most affordable and simplest material, is very simple. Should follow the following instructions:

When using such a carriage, it is necessary to extend it as far as possible in front of the saw blade. outsole lug is obliged to step on a homemade tire for a couple of centimeters. You need to take a special disk for sawing laminate and saw off the edges of the tires on the spot so that they fully correspond to the markings.
Such a product is quite a bit able to eat the cutting depth, but it is quite convenient to use and easy to make with your own hands.
Homemade guide bar for a circular saw
It is worth considering the usual rule for construction as the basis for the guide. Ideally, a model with special handles moving along a small groove can fit.
Manufacturing process do-it-yourself guide for a circular saw is as follows:

Homemade guide bar for a hand-held circular saw
To get the most accurate cut with a manual circular, you need fulfill a very important condition. The edge of the base of the electric tool adjacent to the tire must be completely even. Factory-made units with molded bases have this property right from the start. This cannot be said about cheap blade models. It is worth suggesting an additional tire option called a rail.
The circular is able to move along it, while not resting on the guide rail. The force required to push the tool is noticeably reduced. To make a rail, you need an aluminum profile. It is necessary to take several segments of various sections. A small profile must be inserted into a large segment.
Guide rail assembly procedure do it yourself the following:

- we insert a smaller profile into the rail and remove the height of the bases so that it is flush;
- we fix the cut profile to the base of the saw parallel to the cutting disc;
- we place a circular saw on a homemade carriage. To do this, insert a profile into the rail. We turn on the saw, saw off the excess strip in width.
Thus, it is quite simple to make a guide rail with your own hands. Additionally, they can help numerous videos and drawings which can be found on the web.
Any citizen, for the first time purchasing a cutting power tool for homework, very quickly comes to the conclusion that, despite all the charms of the purchase, it is not able to provide an even cut by itself. Additional accessories required. It is good if the manufacturer took care of consumers and diversified its range with such devices. But what if the creators of your unit did not show such foresight?
In any case, do not despair, and even more so do not think about replacing the power tool. Perhaps you are more fortunate than the customers of "caring manufacturers". The fact is that in almost 100% of cases, additional devices are compatible only with power tools created by the same company. At the same time, the price for them, to put it mildly, is not adequate to what you are holding in your hands. No one will convince me that the cost price of an aluminum bar for a circular saw can be 100and more than % of the cost of the saw itself.
Business sharks bite, but you need to cut. Fortunately, there are always arguments against predators. One of them is the manufacture of devices for power tools with their own hands. Moreover, making them is not as difficult as it might seem.
Today's story is about making a guide rail for a circular saw with your own hands.
There are tons of examples of homemade guides on the Internet. Most of them are created according to a single principle - a flat bar, to which you need to press the sole of the circular saw and at the same time push the saw along the guide. This can be a flat board fixed on a workpiece to be cut or a separate tire in the form of a strip of plywood, along which a beam (rake) with a smooth edge is fixed.
After thinking carefully, I was forced to abandon this approach, and here's why:
Firstly, when cutting, it is necessary to simultaneously apply multidirectional forces to the saw body - forward (for cutting) and to the side (for pressing against the template). The evenness of the cut in this case is better than without a guide, but still depends on skill.
Secondly, there must be absolute certainty that the edge of the saw sole, with which we press against the even template, is absolutely parallel to the cutting disc. I have a cheap household saw with a stamped rather than a cast base. From experience I know for sure that these things are not parallel with my saw. In addition, the electric motor of the saw is located quite low and the even template to which it needs to be pressed will be too thin and flat. Raising the saw above the base will reduce the depth of cut and further disrupt the parallelism of the blade and the edge of the base (flimsy design).

In order to compensate for the shortcomings of the mentioned guides and my own circular saw, I chose another option. The saw will move along the metal rail, and not rest against a flat template, which will make it possible to apply efforts only to move the saw forward. In addition, this effort will be less (rail after all). Using a metal template instead of a wooden one will increase the accuracy of the cut and the durability of the guide itself.
I started designing the tire by buying a cutting disc. Most often, laminated chipboard and plywood are to be sawn. To ensure a clean cut, a blade with a large number of teeth is needed (the more teeth, the better the cut line).
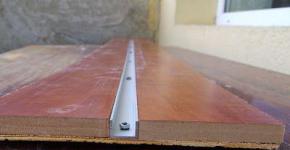
As a rail in a building supermarket, I purchased U-shaped aluminum profiles. The smaller profile without gap and backlash enters the larger one and slides freely over it.
Let's start building:
- We fasten a large aluminum guide to a sheet of plywood 3 mm thick with M3 screws and nuts. Screws and self-tapping screws must have flat heads so that they can be screwed "flush".
- Close to the guide, we fasten plywood 10 mm thick with self-tapping screws. I had on hand laminated pressboard casings of the same thickness - I used them instead of plywood.

Now let's take a circular saw
- The photo shows that the smaller profile inserted into the larger one protrudes by 1 mm. Having screwed the profile with self-tapping screws to the end of the desktop, I removed the excess with an electric jigsaw.


- On the base of the circular saw, parallel to the cutting disc, we attach a smaller profile and fix it with two M4 screws with “lambs”. I have already talked about problems with the base on my saw. Therefore, I focused not on the platform, but on the plane of the cutting disc. To ensure the parallelism of the disk and the fixed profile, I raised the protective cover and pressed a flat wooden block against the disk, and pressed a piece of aluminum profile against it. I fixed it all with clamps, drilled holes in the profile and twisted it. Then he removed the clamps and removed the bar. The saw is ready.

A manual circular electric saw, which is simply called, is a convenient tool for cutting and cutting lumber.
Included with it are usually supplied devices that help the master in his work.
But the same devices can be made or improved with your own hands. Yes, and work experience will sooner or later lead to the appearance of completely home-made devices (as they are called), which, for all their simplicity, can greatly facilitate sawing and save time.
Parallel stop
A regular circular fence is a good example of how a small addition can make a big difference. Almost every hand-held circular saw is equipped with a parallel stop for longitudinal cutting of a given width. This is a really useful tool.
The standard stop has one drawback. For safety reasons, it is set to values that allow it to cut with a width of less than 20–25 mm. This is done so that the stop does not interfere with the movement of the protective casing of the saw. But it is enough to attach a wooden block to the parallel bar of the regular stop with screws - and its capabilities will increase, while the minimum cutting width will not be limited in any way.
Note! We must remember about safety - when making cuts less than 15 mm, the bar does not allow the protective cover to close the saw blade.
Stop for transverse and angled cuts
A cross cut device is also often used. With it, boards are cut quickly and accurately at an angle of 90 °. Such an emphasis is also used for trimming boards. Its base is a sheet of plywood 10 mm thick. A guide bar or rail with a height of at least 20 mm is fixed on it with glue or self-tapping screws. An emphasis is attached to the underside of the base, perpendicular to the guide and made of the same bar.
The excess part of the base (from the guide to the saw blade) is cut off. Since this distance is different for each model of a manual circular, the fixture is always made individually. It is usually attached to the material being processed with clamps.
Advanced craftsmen make their fasteners from wooden washers, one of which has the shape of an eccentric. The clamp is carried out with a wing nut on the screw. Such a clamping device allows you to very quickly fix the stop on lumber of different widths.
If, on the other side of the guide, you install the same bar, but fixed at an angle of 45 ° to the first one, and then also cut off part of the base at 45 ° with a saw, you will get an angular universal stop for cuts at both 45 ° and 90 °. A more versatile design of the corner stop will be obtained if the bar rotates. And observance of the angle can be monitored by the protractor, fixed on top. It should be noted that making a do-it-yourself protractor for a circular is a more difficult task.
saddle stop
If you have to saw a lot of identical bars with a circular saw, then you should spend time making a simple saddle stop. Its use will more than return the spent minutes. The saddle stop works especially effectively when sawing thick bars, for which the disc requires two cuts from different sides.
Emphasis-saddle has a U-shape. The base is a board 25 mm thick, its width is exactly equal to the thickness of the sawn timber.
Side surfaces of 10 mm plywood are attached to the base. The width of the sidewalls must be greater than the width of the cant in order to support the platform of the circular until the saw blade comes into contact with the cant.
The saddle is put on the beam at a distance from the cut marking, corresponding to the working distance to the saw blade, and is pressed against the beam with clamps through the sidewalls. Using the sidewall as a stop for the saw platform, cutting is carried out. If the thickness of the beam is such that one cut is not enough, then it is turned over and another cut is made. The position of the stop does not change in any way.
Guide bar
For cutting large and long sheets of lumber on the table, a long hand-made guide bar for a circular saw will be useful.
The basis in this case is (8–10 mm) plywood strip with a length exceeding the dimensions of the sheet to be cut. The tire itself can be wooden (a bar 15–20 mm thick) or metal from a U-shaped profile. The tire is attached to the base with glue or screws. On one side of it should remain a narrow edge of the base, sufficient for fastening to the sheet with clamps. On the other hand, the first cut is made with a saw along the base. After that, the edge of the base will exactly coincide with the passage of the circular disk. When working, it is combined with the markings on the sheet, the stop is fixed and the sheet is sawn.
Edge stop
This is already a rather complicated device that requires time and precision in manufacturing. It allows you to cut parallel to the edge of the material being cut. It will be useful to make a drawing of it before starting work, so as not to miss the size. In fact, such an emphasis is included in the circular saw kit, but its short length does not always provide an even cut. Large size and desired strength require the base of the stop to be made of plywood with a thickness of at least 15 mm. From it you can also make a stubborn bar.
Steps for making a stop:
- at the base, longitudinal grooves are made for the dowels;
- hardwood dowels are mounted on a thrust bar;
- between the longitudinal grooves, another through groove is made to secure the thrust bar during operation;
- a hole is cut in the base for the circular saw blade;
- restrictive bars are placed on the sides of the base for the installation of a circular and clamps are provided for its secure fastening.
When installing the stop on the material being processed, the stop bar moves in the grooves of the base to the desired distance and is fixed through the through slot with a clamping wing screw. In order not to suffer every time with a ruler, you can fix it (or a piece of tape measure) on the basis of the stop along the guide grooves.
There are such small devices that even a tool is shameful to consider. At the same time, they are great for cutting. These are the tricks of experienced masters.
Setting bars
The simplest detail that facilitates the installation of any stop and a marking guide is a bar of small section. Cuts are applied on it, the distance between which is equal to the segment from the end of the saw sole to the saw blade. Two of these bars will help to install any guides quickly and accurately at the required distance from the marking line. It remains only to fix the guide.
Pull-out protection
Protection can be any bar, the width corresponding to the thickness of the workpiece being cut. If it is fixed at the exit point of the saw blade from the material being processed, it will act as a limiter and serve as protection against tearing and chipping.
These devices are not limited to a set of useful homemade products that make it easier to work with a hand-held circular saw. These are the easiest to make. Others require time and skill. But craftsmen even make such a device as a protractor for a circular with their own hands. There would be a desire.
A do-it-yourself guide for a circular saw is quite simple, but at the same time, it greatly facilitates the process of sawing wood.
Specialists sawing wood note that very often the cut must be perfectly accurate, and it is extremely difficult to achieve this without a special guide.
Of course, the guide rail is sold ready-made in various hardware stores, but its cost is quite high.
This is the main reason why craftsmen working with a circular saw prefer to use homemade options.
They are much cheaper, and their creation does not require significant time costs.
Why is a guide needed?
Craftsmen who often work with a circular saw know that in some cases the evenness of the cut does not matter.
However, there are situations when the cut must be very even. Even not very experienced specialists know that with all the effort it is almost impossible to draw a circular saw exactly along the markup.
As a result, you can spoil the material and redo all the work, which is not only unnerving and time-consuming, but also entails financial losses.
The output can be a flat wooden plank attached to the product being sawn with the help of clamps, however, when using a hand-held circular saw, this method is not very effective.

This is due to the fact that sooner or later the saw will reach the clamps that protrude above the product from above and below, and it will be necessary to twist the fasteners so as not to spoil the tool.
Even if you manage to set the bar for the second time perfectly even, with a new cut, in most cases a step appears.
Even a small one, it will still spoil the quality of the cut edge, and you will either have to grind it off with a special tool, or redo all the work. Therefore, craftsmen prefer not to even try to cut the product in two approaches.
A high-quality, even cut is obtained only when the saw moves without interruption along the marking from the beginning to the end of the wooden product.
In addition, when clamping a wooden plank with clamps, there is always a risk that the fasteners will not be good enough, and the guide will move to the side under the pressure of the circular saw. In this case, the workpiece will definitely be damaged, and it will be necessary to start all over again.
Circular saws, released in the form of a machine, are often free from this problem, since they already come with a guide rail and everything necessary for its even fastening.
Manual circular saws (with the exception of expensive industrial ones) do not have any guides, and therefore the problem of an even cut sooner or later confronts every owner of such a tool.
To achieve a perfectly even cut, a special guide rail is used. However, a finished tire for a circular saw in a store is quite expensive, so craftsmen prefer to make it on their own using scrap materials.
Tire manufacturing often does not take much time and requires an order of magnitude less financial investment.
In addition, to make a guide for a circular saw with your own hands, you do not need to have any special skills, and almost everyone can do this job.
DIY guide rails
One of the most common, cheap and simple options is an aluminum rule guide rail, which is used to level surfaces after applying putty or screed.
It is necessary to purchase a rule that has a groove for handles on its reverse side. In addition, you will need two clamps with a removable top.
The handles from the rule will need to be removed, as well as the top of the clamps. Then, from polypropylene or fluoroplastic, using a hacksaw and a file or a milling machine, runners are made that resemble the shape of the letter T.
Experts explain their choice of this particular material by the fact that such runners will not slide in the groove and at the same time are quite durable.
Products must be inserted into the clamps instead of the removed upper part and brought into the groove of the rule. After that, you can safely use the resulting product as a guide rail.
Due to the location of the clamps far from the cut, there is no danger of the circular saw coming into contact with the metal.
Such a guide rail is several times cheaper than a ready-made one. Another advantage is that in the future the entire product can be disassembled, and the rule and clamps can be used for their intended purpose.
A more expensive option would be a guide rail made using metal corners.
To make it, you need to attach a small U-shaped profile to the base of the saw with screws.

Then you need to build the guide itself using a larger U-shaped metal profile and chipboard sheets with plywood.
A large profile is attached to the plywood base (its dimensions are selected so that the small one fits tightly into it on the basis of the circular saw) and is hugged on both sides by chipboard strips.
Then, on the other side of the sole, a bar or a metal profile of the same height as the entire guide is installed (this is necessary so that the base of the tool is strictly parallel to the wooden product when cutting).
The guide rail is fixed at a sufficient distance from the saw with clamps, a small profile is inserted into it on the basis of the circular, and work can begin.
This guide bar ensures a smooth cut and smooth running of the circular saw without wobble.
There is also a more expensive option for making a DIY guide bar, suitable for craftsmen who use a circular saw to work regularly and often.
On the basis of chipboard, a metal U-shaped profile is attached with the base up. A corner with a carriage on bearings is attached to the sole of the circular saw.
The rollers run along a guide fixed with clamps, thereby ensuring the evenness of the cut and the smooth movement of the tool.
A guide bar for a circular saw is an often necessary thing for all those who often use these tools.
Making it yourself is quite simple, it does not require special skills or expensive materials.
However, it must be remembered that a circular saw, along with homemade devices, can cause serious injury, so you need to work carefully, observing safety rules, and in no case drink alcoholic beverages while working with such a dangerous tool.
Ruler for a circular do-it-yourself device, related part or steering wheel of a car. There are many offers in the form of different stops, different shapes and sizes, different ways of fastening. In my opinion, when it comes to setting up a guide ruler on a circular table, the most important question is how to reduce the amount of time in settings, and this is quite difficult to do.
Always need a do-it-yourself circular ruler
What should be the parallel stop? It must be durable, have no more than three operations in the setting:
- ease of moving the stop to the desired size;
- one measurement of the stop distance to the saw blade;
- fixation of the stop at one point.
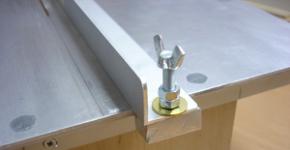
 This device has a body made of three strips of laminated chipboard, the length of the stop must necessarily be equal to the length of the circular table. The strips in the box are interconnected with screws (in the secret). Why laminated chipboard? It is more resistant to deformation and provides a good smooth, slippery surface, mobile in settings, easy to move. One of the main questions was to facilitate the method of attaching the stop to the circular table. Several different designs were considered, in the end, I decided not to complicate the device and did it simply. The guide ruler is pressed to the table through a wooden block fixed in the back of the parallel stop and the clamping mechanism in the front of the ruler.
This allows you to use the stop, like a large clamp, on the table of a circular saw with your own hands.
Making the clamping mechanism at the front of the ruler is the most difficult part of this stop. Although at first a fair amount of time was spent on its manufacture, this method of fastening justified itself, it is shown in more detail in the photo at the beginning of the article, see the details on the manufacture of the clamping mechanism in the video at the end of the post.
Essentially, the rip fence acts as a clamp. By turning the clamping knob, you clamp the stop on the edges of the table and fix it in a certain place. Observing accuracy in the manufacture of parts, a do-it-yourself ruler for a circular saw will not cause difficulties in assembly, adjustment and operation.