DIY money tree on wallpaper. How to make a money tree with your own hands
Good day to all!
I made this “Money Tree” as a gift.
I used:
- wooden photo frame 30x40; 30x45 (smaller size possible)
- Fibreboard (chipboard)
- PVA glue, hot-melt gun or Titan glue (Moment glue transparent)
- coins (washing powder, Comet, vinegar, salt, alcohol or degreaser, rubber gloves)
- brush, pencil, scissors, foam sponge
- two-layer - three-layer paper napkins, papier-mâché from egg trays, pieces of wallpaper, tow, twine, thick threads for knitting
- a piece of leather for a money bag (imitation leather), braid for decoration
- black acrylic enamel paint (dark brown) for primer
- bronze acrylic enamel paint for stamping
- scrapbooking: key lock, owl, pebbles-shells, eggshells (glued with PVA glue, beans are pebbles (glued with Moment glue), chain, money bag, birds-butterflies, flowers-leaves, sun, turtle , ladybug and any little thing.
1. Prepare the frame and base: remove the glass, replace the cardboard with chipboard. The glass can then be inserted from the reverse side and a congratulation or description of the symbolism present on the panel can be placed under it). A description of the symbolism can be read here - If you make a mount on the back side to hang a picture, then glass will not be needed. Drill 2 holes in the chipboard, insert screws and secure a strong cord on which the panel will be hung. On the front side, the screws will be covered with a layer of coins. The frame can be left initially as is, or it can be stamped with a sponge and gold or bronze acrylic paint, or decorated with crumpled napkins on PVA, painted and stamped before inserting the panel into the frame.

2. Prepare coins: soak in 9% vinegar and salt in a thick paste for 20 minutes. and wipe with gloves) can be cleaned with washing powder, soda, “Komet”. Degrease with alcohol (degreaser). Dry.
3. Roll flagella from 2-3 layer napkins (strips 1.5-2 cm wide or of different widths): * take a strip, moisten with water, twist at an angle of 45 degrees in one direction, not tightly. Lay out the flagella to dry.
To form the trunk, you can use thick threads, tow, papier-mâché from egg trays, and twine. The background on chipboard can be decorated with PVA napkins with a crinkled effect.
4. Draw a sketch of the trunk and crown. Coat the area where the barrel will be with PVA glue. We form a trunk from flagella, gluing chipboard on PVA to the base. If the flagella are dry, spray them with water from a spray bottle to make them elastic.
When gluing the extreme contours of the trunk, use as little glue as possible without going beyond the boundaries of the sketch.

5. Form a trunk, branches, roots and hollow for the owl. Using a heat gun or just glue from a bottle, create a tree crown from coins, first along the outline of the sketch, then fill in the middle.
Dry and remove the “cobwebs” from the glue using a coarse brush.

6. Glue symbols: the sun, an owl in a hollow, butterflies and birds in pairs, a lock key on a branch, a chain on a trunk, a ladybug, a turtle, leaves on the crown, pebbles or eggshells placed at the roots of the tree, a money bag at the bottom of the panel ( made of thin leather or leatherette, foam inside), flowers, etc.
We cover the first layer of coins and the entire panel with black acrylic paint, painting over all the cracks. Dry

Stamp with bronze acrylic paint or gold: lightly dip a foam sponge into the paint and carefully, pressing slightly, stamp over the entire surface of not only the wood, but also the background and symbols. The sponge with paint should be almost dry. Before stamping, make a test print on a sheet of paper to remove excess ink. We highlight the sun with sweeping movements, forming rays.

Glue the second layer of coins (the empty spaces between the coins so that they do not show through). Glue the last 3rd layer of the most shiny and beautiful coins on top of the painted coins. The painting can be varnished.
Insert the finished panel into the prepared frame.

“The money tree attracts money.
Let there always be enough of them in your home!
May this gift bring joy.
As the tree grows, let your income grow."

You can make such a monetary souvenir as a gift to a friend, relatives, or boss. In a word, a money topiary can be useful in more than one situation. If you want, place it in your workplace as a symbol of financial well-being. In the photo gallery you can find enough examples of such money trees that are easy to make with your own hands.
Of course, such an art object does not involve the use of real banknotes, unless you decide to use coins. Fake banknotes can be purchased at souvenir shops and can often be found in children's playrooms. It’s up to you to decide which banknotes to use, but the currency with three zeros, of course, looks more respectable.
And also the money topiary is:
- Alternative to an envelope, in which it is customary to present a monetary gift. A couple of real banknotes may be hidden in such topiary; give a vague hint about this to the hero of the occasion.
- Tree of Happiness- if someone just lacks finances for this happiness. Try to attract them into your life in this creative way.
- Interior decoration. Well, if you are focused on a career and climbing its ladder, such decor will only be appropriate.

And to create such a topiary with your own hands, use the following point - MK (master class).
Topiary money tree: master class
Essentially, this is a master class on how to make money flowers in a simple design, that is, in a pot. By the way, such a MK will be useful to the groom who is waiting for a ransom. When the real money runs out, you can always buy it off with a tricky tree. At the same time, the groom will show his ingenuity.
The master class involves the use of the following material:
- Paper bills (fake) - 33-36 pieces;
- Blank for the crown (either ready-made foam, or in the form of a newspaper lump intertwined with threads);
- Hot glue gun;
- Copper wire;
- Floral tape;
- Pot;
- Gypsum;
- Decorative elements.

The master class begins with making a round base. It’s good if you already have foam blanks; if not, any round object of sufficient density will do. At worst, do it the old-fashioned way - make a lump of newspapers, crumple them well to make a round piece. Drag the lump with threads so that the shape finally becomes round.
To see how else you can make a base for topiary, watch the video.
Do-it-yourself topiary base: how to make a foam ball (video)
The resulting lump should be made green and monochromatic. Green corrugated paper is suitable for this.
- You need to create flowers from banknotes. There can be many options, some use the origami technique, while others go their own way. Flowers with seven petals glued together in the middle look most aesthetically pleasing. The bill is folded at the corners and in the middle on both sides, the petals tend to the center. Look at the photo, which option is more interesting for you, this is the flower you will get.

Having chosen the flower option that suits you, you need to make a sufficient number of them. As a rule, if you completely decorate a medium-sized crown with flowers from banknotes, you will need at least five dozen of them.

- To fix the flowers you need hot glue. Before gluing, make a temporary stem. Stick any object that resembles it into the workpiece, just do not deform it. Glue the first flower by the tail with hot glue at the very base of the stem (temporary).
- Hold this flower and all the others for a few seconds so that the glue hardens. The work is not in a hurry.
- Glue the second and subsequent flowers not randomly, but according to the logic of movements - first around the stem, and then go up, row by row. There should be no free space between the flowers, look at the photo - all trees have a uniform, dense crown without so-called gaps.
- To make a stem, this master class suggests using copper wire. It is easy to give it the desired bend, fold it in several layers, etc. If you go the simple route, you can then simply decorate the wire with floral ribbon. Actually, that would be a good thing too. Don’t forget to take out a temporary stem, pour hot glue into the hole formed, insert the decorated wire there, and hold until the stem hardens thoroughly.
- Now the tree needs to be planted in a pot; plaster will be needed to secure it in the container. You need to leave literally two centimeters from the plaster to the edge of the pot. Don’t even out the top layer too much; it won’t be visible anyway. The plaster must be allowed to harden, and the moisture, of course, must evaporate.
- The top layer is decorated with greenery - some craftsmen have adapted a washcloth for this purpose. Yes, an ordinary round green washcloth, which will create the desired effect. But other decorative materials, straws, threads, and pile can also become greenery.
- Decorate the stem with your own hands too. Or you can tie a bow from an emerald aspidistra ribbon.
- Beads, buttons, decorative braid - all this is also used, if desired, of course. You can write a wish on the pot itself with acrylic paints.

This master class suggests building just such a tree, a fairly simple option.
Money trees: topiary, decoration
Money topiary quite implies creative improvisation. During the process of work, you can deviate from the MK, replace something with your own hands, improve something.
Topiary design options:
- The ball base can be made of polyurethane foam;
- Leaflets from banknotes can be formed according to the principle of an ordinary bag - in numerous photos of topiaries this is exactly what is done;
- Felt leaves can also complement the crown, creating a tree made from banknotes and textile inclusions;
- At the foot of the stem, you can decorate the top layer of the pot with sesal - in many MKs this material is used for decoration;
- The tree may have another trunk - you can also make it with your own hands from skewers, sushi sticks, a plastic stick from a flower shop;
- And the pot can also be different - for example, an inexpensive beautiful flowerpot, a coffee cup, a plastic cup, a small beautiful box.

You can also fold a banknote with your own hands into a fan, roll it into a tube, into an airplane, or tie a double tube with decorative thread. You can get inspired by examples in the photo gallery.
DIY money topiaries: step-by-step instructions (video master class)
The next master class involves forming a crown with souvenir bills and real coins.
Part 1: banknote blanks for topiary (video)
Part 2: registration of the crown with paper bills (video)
Part 3: decorating the crown with coins (video)
Part 4: wood assembly, decoration (video)
A topiary created with your own hands is filled with the energy of good wishes, your efforts, and the desire to please the person for whom it is intended. Don’t forget to take a photo of the topiary so that the photo remains in the collection of ideas and successful creative works.
Topiary made of money (photo)


A beautiful hand-made “Money Tree” panel is not just a decoration, but a symbol that attracts money and promotes material well-being.
Of course, one can be skeptical about this statement, but this will not make the original decor any less attractive. The coin panel is suitable for the wall of a home office, hallway, office, room in which the cash register of an enterprise is located. This gift is ideal for a company manager or accountant.
Materials and tools for creativity
To make a panel with a money tree, you will need:
- A4 frame;
- a piece of textured wallpaper;
- scissors;
- tube with PVA glue;
- twine;
- heat gun with silicone rods;
- coins of different denominations;
- small pebbles;
- metal figurine “owl”;
- brush;
- polyethylene;
- acrylic paint in black, bronze and gold shades;
- transparent glossy varnish.
Prepare everything you need right away so that you can be distracted by searching for details while on a creative wave. Think about good things while working, charge the talisman for enrichment.
Step-by-step manufacturing technique
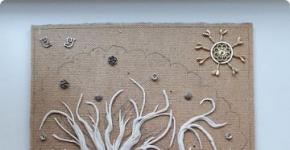
Take an A4 frame and remove the base made of hardboard from it.

Select a piece of textured wallpaper. The color doesn't matter, but the design does. Wallpaper with a burlap texture is perfect.

Wallpaper the base, generously greasing it with PVA glue.

Once the glue has dried, you can continue working. Take the twine and make a small skein of it that fits on the hardboard. A skein can have from 15 to 50 turns, their number depending on the desired thickness of the wood.

Fix the central part of the resulting skein with a heat gun in the middle of the panel base. Using scissors, cut each coil at the top and bottom.

Make branches from the upper ends of the twine, and make money tree roots from coins from the lower ends. There is no need to skimp on silicone; it is important that all elements of the panel are securely fixed.

Now take coins of different denominations. The color does not matter, the main thing is that they are of different diameters.

Glue coins in a chaotic pattern on the branches of the money tree.


Fix them with a heat gun near the roots. Arrange the pebbles as you wish, rarely or completely filling the space below.

Glue a hollow formed from a piece of twine onto the trunk and secure a metal figurine of an owl in it.

You practically made a money tree for the panel with your own hands.
The next stage is painting. Place the work on a piece of plastic and cover the entire surface with black acrylic paint.

Once the black paint is dry, paint the trunk, branches, roots, coins and pebbles with bronze and gold acrylic.

Apply strokes either over the entire surface of the elements, or partially. The last stage is the application of glossy varnish. Cover the work with 1-2 layers and leave overnight until completely dry.


This is such a beautiful tree!

A panel of coins in this form can be hung on the wall. But it’s better, of course, to put the craft in a frame.
This will make the work look more complete.

Don't be lazy and create your own symbol of prosperity.
A tree with coins will definitely bring success to your home, company and financial stability to the entire team.
A master class on making a money tree panel with your own hands was prepared specifically for the site Women's Hobbies. If you want to know what else is made from, read our publications about this type of needlework.
Even more lessons with step-by-step photos. All MKs are grouped by technique, but choose not only from familiar ones, but also from new handicraft techniques.
A beautiful money tree is not only a real plant with a thick trunk and voluminous fleshy leaves. Among needlewomen there is a concept associated with the money tree. Many craftswomen have already made topiaries with coins or banknotes.
Do you also want to make a money tree with your own hands? If you use the step-by-step master classes with photos presented below and watch several selected videos, you will be able to make an incredibly beautiful, stylish, voluminous money tree. This craft in a pot will be a wonderful interior decoration. However, this is not the only benefit of this product. It is believed that such crafts bring financial well-being, joy, success, happiness, and the opportunity to achieve career heights to the home. Such a souvenir can be given to loved ones just like that or for a special occasion.
Step-by-step master class on creating an original money tree

Making a money tree with your own hands for interior decoration or as a gift is as easy as shelling pears. To do this, simply use the instructions with step-by-step photos presented below.
To make a money tree with your own hands, we will need a set of certain materials and tools. So, what do we need to get the job done? It is recommended to prepare the following:
- flower pot;
- a set of toy bills;
- plaster or plasticine;
- sisal;
- stick for the trunk;
- glue gun;
- several green satin ribbons;
- leg-split;
- scissors;
- Styrofoam.

To make a luxurious money tree from banknotes yourself, you first need to choose a container for the future tree. Even a small plastic cup will do. Do not be afraid. This container will not be visible. Later it is covered with decor. You can use plaster as a base weighting agent, but ordinary plasticine will also work, since the product turns out to be quite light and will not fall. For decoration you can take sisal. If you can’t find one, then any unusual paper that fits into the color scheme will do. As for the stick for the barrel, you can buy special devices. You can also use sushi chopsticks, ordinary twigs or wire. Such budget options can be draped with satin ribbons or twine. But the most important thing is the selection of foam for the base. Without it, our craft simply won’t work. When all the materials are prepared, you can safely get to work.
Step-by-step instructions with photos
Working on such a craft is incredibly exciting and interesting. Making a money tree with your own hands from banknotes is quite simple.
- First of all, we need to take the prepared container. If you use plasticine, then it needs to be compacted into the selected cup. It is not necessary to fill the entire container with it. Also at this step it is worth measuring the stick. Don’t forget to leave a margin in order to fix the base on top, on which our banknotes will be fixed in the future.

- Following the MK on creating a money tree with your own hands from banknotes, next you need to work on foam plastic and cut a blank from it. You choose the shape and size yourself. The figure can be any. However, the classic is a ball. The prepositional master class is also focused on creating a classic round base. Keep in mind: the larger your ball is, the more magnificent the crown of our future money tree with banknotes will be.

On a note! If you don’t want to do extra work, then you can immediately buy a round blank for topiary made of foam. In specialized stores, such a part costs mere pennies.
- Now we need to design our container. To do this, take sisal or other fabric or paper that you have chosen for decoration. Fix the material with a glue gun. But remember that you should not apply too much of the fixing layer, as it may bleed through the sisal. Because of this, you can get burned, and the container will look untidy and ugly. Also, if you choose a plastic base, too much hot glue may cause it to melt or warp. For additional fastening, tie a satin ribbon around the container decorated with sisal. You will need to insert the barrel into the decorated container. This must be done thoroughly, since the integrity of the structure as a whole depends on its stability. Firmly compact the surface next to the trunk. Cover everything on top with sisal. You will need to attach a foam ball to the top of the barrel.

Note! You should first try the ball on the barrel. You need to make a hole in it and fill it with glue. Hold the foam ball onto the barrel as tightly as possible. This is necessary so that it is properly fixed, because the adhesive base does not set immediately.
- Next we need to get to the fun part. This is the preparation of our decor. To do this, you will need to take artificial money; all bills need to be cut into two parts, in half. Many people often wonder how many cut souvenir bills are needed to decorate a topiary. It’s difficult to give a definite answer here, since foam bases can vary significantly in size. That is why each needlewoman is recommended to focus on her individual conditions. But you shouldn’t cut too many bills either. This is a waste of energy and time. It’s better to trim the missing elements later.

- Now we need to start rolling up our blanks. Take half a bill. It needs to be rolled up like a little bag.

- Then it folds in half lengthwise.

- Next you need to bend it again.

- The result is a design that resembles two small pockets. There is no need to smooth the resulting banknote blank.

- Holding the paper element with your fingers, you need to drop a little glue onto its tip. The paper blank is glued to the foam base.

- You need to glue the foam ball from the bottom; the banknote blanks are fixed in rows, completely covering the ball to the very top. The distance between them must be determined individually. The main thing is not to leave empty seats. The foam should not show through again! All that remains is to decorate the topiary. Here you can give free rein to your imagination. The composition can be supplemented with beads, rhinestones, satin ribbons, coins, whatever you like. Moreover, if you plan to give the finished tree to someone close to you, then supplement the money tree with real banknotes. Nicely roll up and tie the money with twine, attach it to a tree trunk or place it on top of the sisal.

We have created such an unusually stylish, beautiful, original money tree.
MK on creating a lush tree from banknotes

Here is another version of a money tree made from money that you can make with your own hands. This product looks very airy and stylish. The crown for this topiary is also created from paper bills. Such a money tree can become a talisman for the home or a wonderful president for friends or relatives.
Required materials and tools
What do we need to make such a money tree? To work you will need to prepare:
- 200 bills from the joke bank;
- toothpicks;
- sisal;
- trunk;
- toothpicks;
- foam base;
- architectural plaster;
- varied decor;
- glue gun
If you want to make a money topiary tree from real money, then prepare small bills in the amount of 200 pieces.
Step-by-step instructions with photos
Even a child can create such a money tree with his own hands.
- The first step is to prepare all the necessary materials. You can see them in the photo below. As you can see, we don’t need any particularly rare materials or tools to create such a topiary.

- Next you need to start preparing the bills. If you use them all, the tree will turn out too big. This is why it is recommended to cut the paper money from the joke bank in half. From them you need to roll the so-called pounds. It is recommended to glue toothpicks into some blanks. But you will also have to fix the halves of wooden skewers. Since it takes a lot of time to make pound cakes, do this work in several stages. Otherwise, you will quickly get bored with the process, and you will lose interest in creating such a money tree.

On a note! It is recommended to calculate in advance the exact required number of paper blanks. If you use a standard foam base (5 cm ball), then you will first need to make about 70 blanks from artificial banknotes. If there are not enough of them, you can always add new pounds.
- Now we need to create a crown for our money tree. To do this, a foam ball is fixed to the barrel. To do this you need to use a glue gun. Now you need to glue the blanks equipped with toothpicks into the ball. Needlewomen often call them beacons. For such a craft, it is optimal to use about 20 similar blanks. All other paper elements will be placed between them.

- It is recommended to glue them in groups: it is convenient and quick. But do not forget that toothpicks must be lubricated with a solution from a glue gun. This is what we got.

- All the space between our boys needs to be filled with the rest of the paper blanks. It is recommended to glue sisal fibers in some places between the pounds. They will make our tree more voluminous, lush, and beautiful.

- Now you need to take care of the pot itself. Take a container. This could be an ordinary flower pot. It needs to be filled with architectural plaster. But first, do not forget to fill it with foam cubes; these are the ones that need to be filled with plaster.

On a note! If you fill the entire container with plaster, it will turn out too heavy.
The topiary trunk is inserted in the center. Before the plaster hardens, you need to decorate the pot. For this purpose, grass is made from sisal. It can be decorated with various decorative elements. It is best to use a glue gun for this. What can be used as decoration? A variety of elements are suitable here: flowers, keys, beads, greenery, rhinestones, birds. Of course, you don’t need to use everything at once. You can choose only what you like.
Video instructions
With the help of video instructions, making a money tree from banknotes with your own hands will not be difficult:
Have you been saving coins for many years? We suggest using this banknote to create amazing paintings that can attract wealth and prosperity to the family, according to the beliefs of Feng Shui. An excellent example is a painting of a money tree with your own hands made from coins - you will find a step-by-step master class in this article in several variations. In this instruction you will learn all the secrets of creating such a talisman, which does not need to be as carefully cared for and watered as a living plant. You just need to hang it on the wall, which is located in the southern or eastern part of the room. An equally interesting alternative to a money tree can be a painting-amulet depicting a horseshoe, which can be decorated with coins. More on everything in order further in the text.
Painting-amulet “Money Horseshoe” 2018 step by step
Our ancestors believed that if you find a horseshoe, it will be a great success.
Important! According to popular beliefs, one blacksmith shoed an unclean man and made a deal with him that if the horseshoe hangs with its horns down, then he will not enter the house. Therefore, a do-it-yourself picture of coins is a strong protective amulet that should be in every home, preferably above the door.
We offer MK how to make a painting with a picture of a horseshoe, so that there will always be prosperity and good luck in your home.
Materials and tools
For work we will prepare the following materials and tools:
- The base is rectangular (size 250 by 200 mm - depends on how you want your creation to look).
Important! For the base, you can take cardboard, plywood or a ready-made photo frame.
- Burlap, which exceeds the size of the base by 10-20 mm on each side (270 by 220 mm).
- Curly shaped wooden glazing beads.
Important! Glazing beads can be replaced with a thin ceiling cornice.
- Thick white thread or jute twine.
- Furniture stapler.
- Acrylic paint in black and bronze colors.
Important! To make a painting, you can use any acrylic paint - in a tube or can. It can be glossy or matte - it all depends on your preferences.
- Glue gun with transparent sticks.
- PVA glue.
- Sponge.
- Marker
- A small brush.
- Scissors.
Important! To make the amulet, only natural materials are used, each of which carries a specific semantic designation. For example:
- burlap represents prosperity and abundance;
- tree - integrity and strength of the family.
Therefore, try to use natural materials that will direct the energy of the picture in the right direction.

Stages of creating the painting “Money Horseshoe”:
- First you need to prepare the foundation. We cover the rectangular blank with burlap, which we secure with a stapler or glue gun.
- We install the glazing beads by first measuring and cutting at an angle of 45°. For fastening we use glue, a stapler or small nails.
- Now we make the crown of our tree. Take a thick white thread or jute twine and soak it in PVA glue to form a dense base for the horseshoe.
- On a rectangular blank we draw the selected image with a pencil - for this you do not need to have artistic talent.
Important! You can draw a horseshoe on a piece of paper, cut it out, and then trace it on a wooden base.
- Next, lay out the thread in any shape, starting to glue it onto the outline of the image. Here you can experiment, for example, lay a continuous thread over the entire pattern, glue it with a zigzag or twist it into a ring. The end result should be a horseshoe made of tightly lying white threads.
- We glue a short horizontal thread to the bottom of the horseshoe to create a full-fledged pattern.
- We are waiting for the base to dry completely.
- Using a glue gun, we glue coins all over the horseshoe, leaving gaps, imitating a real horseshoe.
- Leave the painting for a day to dry.
- Apply black paint to the surface of the entire painting. It is better to spray in the fresh air, in the entrance or garage, but not in the apartment. Let the paint dry thoroughly again.
- Now we take the bronze paint on a sponge and apply it with light movements on top of the canvas.
That's all the work. The painting-amulet “Horseshoe” is ready to decorate your home!
DIY coin paintings - master class “Money Tree”
An original panel with a picture of a money tree can be bought in a shop of skilled craftswomen, or you can create such a masterpiece on your own. Why not? The manufacturing process itself is very interesting and exciting. If you understand the whole system of work, you will be able to easily make interesting pictures both for yourself and for people close to you.
So, we prepare the following materials for work:
- Wallpaper, burlap or fabric.
- Coins.
- Table napkins (3-5 pieces).
- Water.
- Acrylic paints (black, gold and silver).
- Foam sponge.
- A simple pencil.
- Scissors.
- Loose glitter (can be bought at a cosmetic store).
- Frame for a picture or photograph.
- PVA glue (you can use Moment glue or a heat gun).
- A rag to remove excess glue.

Step-by-step instructions for creating the “Money Tree” panel:
- We cut out the base for the future painting. To do this, you need to disassemble the photo frame and place the back part of the plywood on the wallpaper (fabric or burlap), trace it with a pencil and cut out the material.
- Using glue, glue the blank to the back of the plywood.
- When the wallpaper is dry, draw a sample of wood on top of the base.
- In a plate, dilute PVA glue and water in equal proportions 1:1.
- We cut the napkins into different pieces, the width of which should be 2-3 cm.
- Now take one strip of napkins at a time and carefully dip it into a container with a sticky liquid, trying not to wet it too much, as the napkin may get damaged.
- We roll the napkins with our palms into tubes, maintaining an angle of 45°.
Important! Try to roll the strips more tightly so that there are no gaps. Different widths of the tubes are needed later to form the tree trunk - for the crown and for the branches.
- Let the tubes dry.
- Apply PVA glue to the drawn wood sample.
- Now it’s time to lay out the finished flagella from napkins and give a beautiful bend to the tree, forming a crown, branches and roots.
- Using a glue gun or quick-drying glue, we glue our coins in a chaotic manner. You can glue coins overlapping each other to create a three-dimensional image.
Important! Before gluing coins, they need to be degreased with alcohol or regular dishwashing detergent.
- Using black paint in a can, we thoroughly paint the entire surface of the painting. Give it time to dry.
- Now we dip the sponge in silver acrylic paint and cover the money tree again. The result should be a scuffed effect, so do not press too hard on the sponge with your hand. Let the paint dry again.
- Shade the gold acrylic paint over the coins without touching the background of the picture.
- While the last layer of paint has not dried, apply dry glitter to the surface of all gold coins.
- Leave the product until completely dry.
Canvas “Money tree is ready.” Now you can insert it into a frame and enjoy the work of your own idea!
- The root of the tree can be made more interesting, for example, colored. To do this, you need to dilute colored paint, glue and water in a container.
- Coins can be painted green, imitating the foliage of a tree - dip a sponge in green paint and walk along the crown.
- In the same way, you can paint the trunk in its inherent brown color.
- If desired, you can cover the coins with white paint, creating a snowy effect, giving the picture tenderness and special lightness.
What else can be made from coins?
A DIY painting of trees is not the only way to use coins.
Options for using metal money in creativity:
- We scatter the coins onto the plywood, insert it into the frame and cover it with glass on top - we get an unusual and stylish panel.
Important! You can depict absolutely any drawings: a goldfish, an elephant or a portrait of a person.