What can you make with your own hands and sell profitably? DIY crafts from improvised materials at home We make them ourselves.


The foot mat is one of the first things we see when entering the house. It can not only protect against dirt, but also become a decorative element if you choose it with imagination.
Decide what you like best: bright colors, unusual shapes like animals or clouds, or rugs made from special materials like pebbles. Funny signs, such as “Wipe your paws” or “Do not enter without cookies,” are very uplifting.
2. Set up a winter garden in your apartment


There can never be too much! They can be used to furnish not only a room and a balcony, but also a bathroom and hallway, if at least a little light gets there. Often you don’t have to buy flowers: ask your friends and relatives. Surely among them there will be those who have extra or overgrown plants. If you forget to water your flowers, succulents and cacti are what you need.
3. Buy more decorative pillows


With small pillows, relaxation becomes twice as pleasant. These are indispensable items for the recreation area. Pillows can be placed under the back and head; it is very comfortable for guests to sit with them, and children love to build houses out of them.
One of the best ways to relax after a long day is to come and collapse on your favorite sofa or bed with plenty of pillows. And if you want it in the interior, just buy other covers.
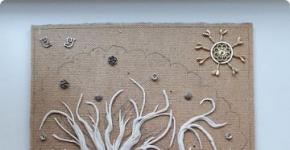
4. Decorate your home with natural materials


You can decorate your home in an original way without spending a penny. Design materials surround us everywhere: on the street, in the park, in the forest. You can collect cones and put them in a vase in the corridor. Or bring sand, color it and put it in a glass bottle. Moss makes an excellent filler for a florarium, and shells brought from vacation can be used to paste over photo frames.
5. Insert stained glass or stick stained glass film


Stained glass became a popular and elegant home decoration back in the Middle Ages. You can admire the colored glass, permeated with sunlight, for a very long time. Stained glass is quite an expensive pleasure. But it doesn't have to be big. A piece in the doorway or in the window in the kitchen will be enough to change the overall appearance of the room.
Modern stained glass film will cost you even less. It easily sticks to glass and looks quite impressive. And in the summer it will also protect from the sun.
6. Hang a chalkboard

Five minutes - a lot or a little? It depends on how to use this period of time, and it is known to be the most expensive. Using every free minute for creativity, you thereby save yourself from idleness, and at the same time get a lot of pleasure from the knowledge that the item you received was made with your own hands. So what can you do in five minutes?
This section is dedicated to home craftsmen who, due to the nature of their activities, are very limited in time. Here you will find unique instructions for creating various useful and necessary things, made with your own hands in a short period of time.
This section also provides ideas for making a gift with your own hands from improvised materials that can be presented for any occasion. You will spend much less time than going to the supermarket to buy the original product.
You can devote any free minute to using your abilities and skills, and you can take ideas for creating masterpieces with your own hands from our website. Look around and you will see how much material is available near you! And with our instructions, it only takes five minutes to transform your unwanted items into unique DIY projects.
Someone will certainly look at this collection of ideas and say that it would be easier to buy new furniture or decor. But this article is not for them, but only for true connoisseurs of unique style and handmade products. Here you will find 10 of the most beautiful interior items that you can make for your home with your own hands without spending extra money.
The best DIY home crafts from scrap materials for 2018!
1. Decoupage and other DIY furniture repair ideas
Restoring old chests of drawers and sideboards is perhaps one of the main trends of our time. Many pieces of furniture fail over time: the cabinets of tables and chairs become loose, upholstered furniture is dented and requires new “filling.” But chests of drawers and sideboards can stand for many years and bother you with their outdated appearance.
Home crafters and decoupage masters not only found a way to update the design of old furniture, but also created a fashion for using vintage “grandmother’s” chests of drawers in the interior. You will find detailed instructions on painting and decoupage in our article. .
Below are some photos of amazing home projects to inspire you.

Restoration of an old chest of drawers with replacement of handles and hand painting: 
 Painting and finishing an old cabinet with metal buttons:
  As a result, the furniture acquired an original decorative effect in the Moroccan style. Simple, like everything ingenious:
By the way, in this way you can create more sophisticated things for the home:

Decoupage and painting amazingly transform old furniture facades, but not every person has enough time and patience for this painstaking task. Therefore, the best DIY home ideas will also include remodeling furniture using duct tape to look like marble, gold, and other fancy finishes. A minimum of effort - and the most ordinary piece of furniture will turn into the main decoration of your interior.


2. Beautiful things for the home with your own hands: carpets
Perhaps the most pleasant thing about creating things for the home with your own hands is when one of the guests asks: where did you buy such beauty? A stylish rug with a zebra print (or other motif of your choice) is sure to earn such a compliment. And more than once.

The fabric can be any. The main thing is that it is not too demanding to care for: it is not afraid of moisture and is easy to clean. In this case, the master chose vinyl fabric. It is heavy and durable enough to look like a true carpet. What's more, the quality of vinyl these days is very impressive and is available in a wide range of colors and interesting textures.
All necessary materials and tools:
- Thick paper;
- Vinyl upholstery fabric;
- Scissors;
- 2 Krylon pens or regular fabric paint.
Procedure:
- Create a stencil from paper. Draw and cut out the outline of the zebra skin, then the drawing itself on it. Don't worry about your artistic talent - a zebra's skin shouldn't look uniform or symmetrical. As a last resort, the pattern can be copied from a picture on the Internet or even printed to cut out.
- Attach the stencil to the vinyl fabric and trace the outlines of the stripes with Krylon pens (apply paint with a spray or brush). After this, the stencil can be removed and you can continue painting the areas inside the contours.
- Let the paint dry and you're done! To make sure the pattern will stick, you can “seal” the rug by spraying it with a clear coat of acrylic spray paint.

Krylon pens create a stunning gold leaf effect on the surface of the fabric. In addition, the paint in them dries quickly and adheres very reliably. If you cannot buy them in your city, then use regular paint for fabrics or walls. As the next hero of our article.

He took a cheap white rug as a base and decided to give it an interesting DIY look with a chevron pattern. All he needed was thin duct tape, scissors, a thick brush and latex paint in two different shades.

Finally, another inspiring example in which a makeshift stamp is used instead of a stencil. The craftsman had a rubber bath mat, leftover wall paint (it was slightly diluted with water to achieve a vintage effect), a roller and an old IKEA wool rug. Let's look at the photo what he managed to cook from these ingredients.


3. Unusual “marble” DIY crafts (photo)

7. Turn photos into wall decor
It's much cooler than just hanging framed photos! Your personal photos or any images you like from the internet can be turned into beautiful wall art for any room. To make this decor with your own hands, you can use any of the following methods.
- Find or buy a backing. It can be a thick sheet of polystyrene foam or polystyrene foam (as in this case), a board and other available materials.
- Print the photo, having previously edited its dimensions so that they are approximately 5 cm larger than the dimensions of the substrate. These “extra” centimeters will be used for folds.
- Cut the photo and backing into pieces if you want a modular set rather than a whole painting. Otherwise, skip this point.
- Place the photo on the backing and fold the ends. The author of this product used double-sided adhesive tape to secure the photographs. You can attach it with regular glue or other available means. The surface of the photographs itself can also be treated with glue or paste for shine.

- Print the image and prepare a canvas onto which it will be transferred.
- Stretch the canvas over the frame and apply a thick layer of gel medium on it. These gels are widespread and today they can be bought at any finishing materials store.
- Place the photo on the greased canvas and press down. Leave it like this for several hours, but periodically spray it with water from a spray bottle.
- Carefully, using your fingertips alone, begin to erase the back surface of the image from the canvas. Remove all paper in this way.

The result is a beautiful one with wear and tear that will only give it a touch of vintage style. All that remains is to apply the final layer of gel medium on it as a protective coating.

For inspiration, we’ll give you a couple more ways to decorate your interior using photos.
 We use an old window frame as a photo frame. What do you think of the idea?
8. Creative homemade lampshades for lamps
Homemade lampshades made from fabric, paper, thread and other improvised means will not only decorate your home, but also bring an unusual atmosphere to it every dark time of the day.

Look for the best ideas to suit your taste in our article . The next photo shows a popular creative lampshade made of threads.

9. Succulents - living home decor with your own hands
A succulent living wall is perhaps the most amazing of all the DIY home crafts you can make. Agree: if you saw it in someone’s living room or other room design, you wouldn’t be able to remain indifferent!

Dekorin will tell you how to get such impressive and environmentally friendly decor:
- You will need a shallow wooden container for planting and a metal mesh.
- To secure the mesh to the container, use an improvised wooden frame, which can be made from small boards or wood chips. Attach to staples or nails.
- Prepare any for composition. They easily take root in the most difficult conditions and look most advantageous when you combine different shades and shapes of leaves. Common examples of succulents: aloe, various cacti, young or rock rose (Sempervivum), sedum (Sedum), rockweed (Orostachys), etc.
- Fill the container with soil and plant your chosen plants in it. Use any cactus mixture for drainage.

Here are examples of crafts for the home that you can make with your own hands using the above method.


10. DIY home crafts from glass containers
Glass bottles and jars often accumulate on balconies and in storage rooms. What they are not turned into today: lamps, candlesticks, vases, table decor... It’s simply amazing how easily they become part of a stylish interior, you just need to use a little ingenuity, as well as paints, fabrics, threads, paper and other improvised means. Last batch of photos for today. Also read:
10 best ideas on what you can do for your home with your own hands updated: March 21, 2018 by: Margarita Glushko
Many people prefer not to work "for someone else." Such citizens need to earn money somehow. For example, by organizing your own business. This is the most correct solution for those who want to receive money without being hired. But in this case, every businessman faces the question of defining activities. Quite often people prefer handmade things. They are highly valued in the modern world. Today we have to find out what we can make with our own hands and sell. What tips and tricks will help you make good profits from your business? Where and how best to distribute handmade things? If you thoroughly study the answers to these questions, you can become a famous businessman with a good income.
About popularity
With the advent of man on Earth, handicrafts arose. In the past, people made things out of necessity. With the development of society, handmade things began to be valued not only because of their importance, but also because of their beauty.
The so-called handmade is usually genuine, original and unforgettable. It carries the love and positive energy of a person. Many say that the philosophy of art of conserving the planet's resources is promoted through the creation of handmade things. After all, craftsmen usually use only natural materials in their work.
Owning and wearing handmade items means always being on top of fashion. People also think about what they can do with their own hands and sell because such things are distinguished by their originality and uniqueness. They emphasize a person's individuality. Besides, not everyone can do something with their own hands. Some people don’t know how to do anything, some are good at embroidery or sewing, others have a talent for drawing or forging. In any case, in the modern world, handmade items are in great demand.
Problem of choice
Is it possible to sell something you made yourself? Yes. A similar prospect opened up in ancient times. As already mentioned, people used to make things for themselves. Then they started exchanging objects. With the development of the economy on Earth, handmade goods began to be sold. This is normal.
But every businessman who wants to create handmade things faces a number of problems. The first of them is the question of what you can make with your own hands and sell. Next, the most common, relevant and useful ideas will be presented for those who plan to try themselves in the field of handmade. 
Jewelry and decorations
The first thing we can recommend is to make jewelry and accessories. They are usually worn by women. Such handmade things are always in price. They never go out of style. Such items are unique and eye-catching.
What can you make with your own hands and sell? Any jewelry and accessories. They can be either male or female.
You can make beads, bracelets, pendants, brooches, keychains and so on. In this case, the use of absolutely any materials is allowed - beads, clay, wood, wire. This is not an exhaustive list.
What can you make with your own hands and sell? Bracelets made of beads and beads made of polymer clay are now popular. Even a schoolchild can make such decorations.
Many people say that kanzashi style jewelry is very popular - these are unique hair decorations. When making such handmade items, they use the technique of folding fabrics in a variety of ways.
Please note that many jewelry made from semi-precious stones without a clear cut cannot be found in stores. Such items can only be purchased secondhand. They look original, which attracts buyers.
Paper filigree
What can you make with your own hands and sell at a profit? The next idea is suitable exclusively for diligent and neat people. We are talking about paper filigree. It is called quilling.
What it is? The art of creating various crafts (decorations) from paper. Typically, craftsmen use paper tapes for their handmade items. They create different decorations that can be used to decorate cards, letters, frames and gift wrapping.
In addition, using quilling you can make a variety of decorations. What exactly should I do? It's difficult to predict. Any figures made from paper ribbons will be bought up by modern fashionistas. 
Some ideas for paper filigree:
- creating flowers;
- crafts in the form of zodiac signs;
- paintings;
- toys.
Paintings are especially popular today. Making them with a certain skill is not difficult. And such hand-made items are sold at a high price.
Quilting
What can you make with your own hands and sell? At home, modern people can create a variety of objects. The range of available materials is practically unlimited. Therefore, there are plenty of ideas for business.
The next interesting direction to work is quilting. This is the process of creating objects from scraps of fabric. Usually such things turn out to be bright, original and original.
The art of quilting has come to the modern world from past centuries. Ancestors quite often sewed from scraps of fabric. Modern craftswomen use expensive fabric of different colors in their work.
What can be done this way? Here are some ideas:
- blankets;
- pillows;
- towels;
- paintings;
- rugs;
- toys;
- bags.
This is not a complete list of what can be done with quilting. But these ideas will help you test the activity and evaluate its profitability.
Decoupage
Not everyone can do tinkering. Some people have certain talents for art. What can you do with your own hands and sell in this case?
When decoupage, the use of any materials is allowed - from napkins to fabric. Such a business will not require any special expenses. The main thing is to have talent in the field of decoration.
You can paint anything - plates, saucers, cups, vases, stands and even furniture. It all depends on what exactly a person wants to do. At first, it is recommended to work with available items - dishes and vases.
The idea of making a bouquet of paper flowers is very good. To make paper crafts, we will need to purchase colored paper, cardboard, markers, a stationery knife, tape, scissors and PVA glue.
Paper bouquet
First you need to make three blanks for each flower, two of which should be the same color, they should have six petals.

Place one blank in front of you and glue a circle on top of it.

On the mug, first make holes for the eyes and mouth in the form of a smiley face.

After gluing the mug with the flower, you need to color the eyes with a black felt-tip pen, and then bend the petals inward.

The next step is to cut out the stem, which we then attach to the flower, and on the other side of the flower we need to attach the same blank.
You can also make leaves for the bouquet, which can be made from green paper.

First you need to draw an oval and cut it out, and then use scissors to make notches.

In order for individual pieces of paper crafts to become a single whole, tie the flowers with ribbon or some other fabric to decorate the bouquet.

This bouquet will never fade and will be an excellent decoration for your home.

Simple crafts from plastic bottles
The simplest crafts for children include bottle crafts.

For example, from a bottle you can make a piggy bank, which requires only a marker, a stationery knife, dice (4 pieces), a small bottle, glue and colored paper.

The first step is to cut a straight line, the width of which can be 5 centimeters, and the length of this line should be enough to encircle the bottle.


We draw eyes with a marker, and draw nostrils on the bottle cap. Using a utility knife, cut a hole for coins.

As legs for the pig, you need to attach the dice using glue.
Note!


This craft develops a child’s imagination and is also useful in everyday life.
Ball of thread
The craft can be used as a lampshade for a lamp or simply hung as a decoration.

A ball of thread is made very simply; to make it you will need colored threads, a ball, and transparent glue.

First, we need to inflate the balloon and tie its tip so that the air does not escape.

Then you need to wrap the inflated ball with threads, then apply glue to the surface of the ball and wait until it dries.

Note!

Now you need to separate the ball from the threads, to do this, just pierce it with a needle and the craft is ready.

Plasticine gnome and pine cones
As a simple DIY craft, you can make a gnome. For the craft you will need a pine cone, light-colored plasticine, pieces of fabric, glue and a brush.
First of all, the child should roll a ball out of a piece of plasticine, after which, using a brush, they need to make indentations for the nose, eyes and mouth on the ball.


At the next stage of our craft, we need to attach the resulting head to the top of the cone.

Then the child must cut out a triangle from the fabric and glue it on the sides, resulting in a cone. The cone will act as a hat for our character.
Note!


Finally, you need to make mittens from fabric, and then attach them to the pine cone using plasticine and our gnome from the pine cone is ready.
Paper bookmark
A paper bookmark is perfect as a simple craft for kindergarten. For children to be able to make this simple craft, they will need a pencil, ruler, colored paper, scissors and glue.

To begin, children must draw a square measuring 20 by 20 centimeters.

Then divide the resulting square into 4 equal parts using a pencil and ruler, resulting in 4 squares measuring 5 by 5 centimeters.

The second step is to divide the upper right and lower left squares in such a way as to obtain triangles, that is, you need to draw a line diagonally from the upper corner to the lower corner.

We don't need the triangles with the outside and can cross them out.

Then you need to cut out a figure from paper without taking into account the crossed out triangles.

The top triangle needs to be trimmed. If everything is done correctly, the paper will be in the shape of a diamond, to which two triangles are glued.

The next step is to fold all the triangles in half, and then one by one place them on the tip of the rhombus. You should end up with a pocket that fits over the tip of the book page.

To make a bookmark original, you can advise children to cut out some kind of applique from colored paper.

Photos of simple crafts