Do-it-yourself brazier from car disks. Brazier from car disks for barbecue and for a cauldron
Self-assembly of a brazier from discs from car wheels is a very cheap way to purchase a useful and functional thing that is needed in the garden. It is no secret that during the summer season, residents of megacities vacationing outside the city find themselves in an environment devoid of their usual comfort. Instead of convenient stoves and multicookers, you have to adapt to electric stoves with 1-2 burners. In the event of a sudden power outage in a holiday village, a primitive period begins. You can solve the problem of the inconvenience of cooking on a fire with the help of an ingenious device developed by craftsmen.
It is very easy for car owners to get 1-2 rims. Although these parts do not change as often as tires or tubes, you can find some barbecue material in the garage. Waste wheels are thrown into landfills or handed over to scrap metal collection points. A lightweight structure on a metal site can be bought for a purely symbolic amount. 
In addition to the disks themselves, you will need:
For painting the portable version, you need to pick up heat-resistant paint. Staining will give the structure an aesthetic appearance and protect it from the effects of precipitation when stored outdoors.
The easiest way to make a brazier from rims is to lay the spare part open side up. Regular holes in the cap will serve as a grate for the fuel placed inside. This design can be supplemented with handles and taken with you on picnics: it is light and practically does not take up space in the trunk, but it can reliably prevent forest fires, preventing the coals from scattering, and limiting the fire to the diameter of the rim. Here is a video instruction for you right away, how to do it quickly and what you need to pay attention to when working:
How to make a Finnish hearth from rims from a car?
A distinctive feature of this type of stove is an open hearth installed in the center of the table. It does not take a lot of time and materials to make it. A round metal firebox can be successfully replaced by a rim raised to the desired height. The base for it can be made of stone, cinder block or bricks, remembering to leave free space for air to flow into the furnace.
Install the disk from the machine on the prepared base and surround it around the circumference with wild stone or brick, leaving a small hole at the very bottom for blowing. The height of the masonry should be such as to completely hide the base and the metal hearth. You can slightly improve the design by welding a pin with a hook on the side for hanging a teapot or pot. 
On the resulting low column with a recess on top, you need to lay a round tabletop. This can be a saw cut of a large tree, a specially made slab of artificial stone, a sheet of thick metal, or another accessible item. There should be a hole in the center of the tabletop, the diameter of which matches the size of the rim. 
Such a brazier from car disks is stationary. Around it you can arrange circular seats. To protect from rain, it is best to build a light canopy, and if desired, the master can build a warm gazebo.
Portable brazier of complex design from auto disks
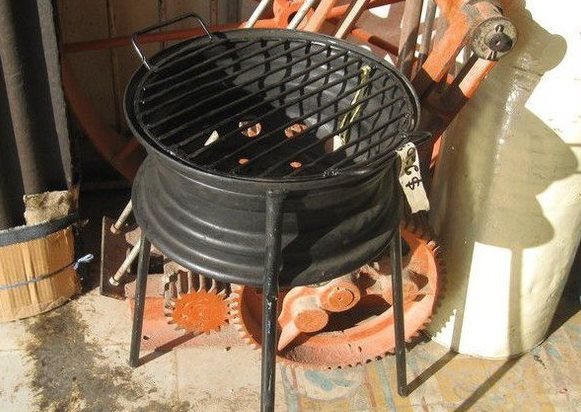
A metal brazier made of car rims, made by a master with imagination, can serve as a source of his pride. Despite the simplicity of the design, such a stove is a multifunctional device: it is a grill or barbecue, and a convenient stand for a cauldron, and decorating a recreation area in the garden. In the photo you can see the design of the miracle stove with forged elements, and the fire-breathing Darth Vader. 
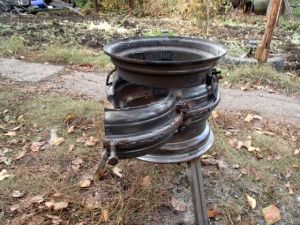
Such a hearth is not very heavy, so it can be installed in any convenient place on the site or taken with you to nature. A design feature is the use of 2 identical discs from the wheels of a passenger car at once. The material must first be prepared for work: cut or cut out the middle of one of them so that only the rim remains.
Install the disks from the machine in this order:
- place the whole one below, laying it with the cap down;
- install the one from which the central part was removed from above.
The upper part of the structure must be positioned so that the rib remaining after the removal of the cap is located on top, creating a partial overlap of the roof of the firebox. It is on it that it will be possible to lay the grill grate or put a cauldron and a kettle. The sides from the top of the rim will hold the cauldron in position. 
Weld the upper and lower parts of the brazier around the circumference. So that during the operation of the product you do not have to remove the dishes installed above the fire every time, you need to cut a door in the side of the oven. Mark and cut out a rectangle of a convenient size so that a threshold about 10 cm high remains above the grate (bottom of the furnace). This will allow the coals not to fall out when the door is opened.  The remaining parameters of the hole can be arbitrary. In principle, everything can be seen in the provided photos.
The cut piece must be provided with loops on one side and a valve on the opposite side. For these purposes, you can use ordinary metal fittings (latches, hooks, door hinges, etc.). You can attach small parts using a welding machine or bolts with nuts.
In order to raise the brazier to a height convenient for cooking, 3-4 legs must be welded from below from pieces of a corner or professional pipe. These parts are most conveniently placed inside the rim, the slope of the walls of which will give the structure elegance and stability, ensuring the divergence of the lower part of the supports. If desired, the master can solve the problem in another way, by welding a single leg in the center of the structure and supplementing it with a wide and heavy base.
Here is another idea how you can do everything without using welding:
After burning out the remnants of the old paint and applying a heat-resistant coating, the braziers can be considered ready for use. If desired, you can supplement the design with supports for laying skewers over the neck of the brazier, handles for easy carrying and other necessary little things.
Self-made hearths of different types will simplify the process of cooking on an open fire. Each option can become the heart of a friendly company in nature, and in the garden, and in the gazebo. The relatively safe design of portable models requires their installation on non-combustible materials if the floor in the recreation area is wooden. Especially for this, you can lay out the hearth zone with bricks or paving slabs.
Today, many people can make a brazier with their own hands, and for its assembly you do not need expensive materials, but enough improvised means that can be found in any home, workshop or garage. In this article, you can learn how to assemble a street grill from car rims, on which you can cook food and heat water.

A brazier made of car disks is an outdoor structure that does not have a chimney and thus is not installed in enclosed or partially enclosed spaces, such a unit has small overall dimensions and optimal weight, due to which it can be removed into the house while it is not in use, transport, as well as rearrange from place to place. In this article, you can review and familiarize yourself with step-by-step assembly guides, diagrams, instructions, photos and videos in detail.
Design features and performance criteria
The brazier disk is a universal installation that is suitable for summer cottages and gardens with any area and layout; this design can be used for cooking, heating food and boiling water. The disk brazier is very easy to assemble and erect, and the materials for it can be found in any home, thus its construction will cost almost nothing.
The disc brazier is small in size, it is distinguished by simple design features, durability and strength, and the following improvised materials are used for assembly, which almost everyone has. At the heart of the brazier frame are disks from under an old car that are no longer used, they can be bought at a minimal cost, as they are often rented along with scrap.
The brazier is a very important element, it will complement the garden of your private house or cottage, and in case of problems with car rims, you can even assemble it from one, you can also ask neighbors and friends for unnecessary old car wheels and buy it at a symbolic price.
Before you make a brazier from disks with your own hands, you need to know about the main advantages of such street structures, primarily due to the fact that car disks act as the main frame of the structure, the base has a good thickness. Therefore, such a brazier will be resistant to deformations, distortions, burnouts, high temperatures, their sudden changes, and the advantage of such a unit is its round shape, which is ideal for pots, pans, metal bowls and other kitchen utensils in which you can cook food.


The brazier from rims has a number of its unique design features, however, if we talk about the method of its assembly, it looks like a brazier from a barrel, cylinder, while it can perform the following functions:
- Act as a grill, for this the design can be equipped and supplemented with a removable grill and skewers;
- The brazier can be supplemented with a barbecue function, in order to achieve this effect and the possibility of roasting meat and steaks, it is necessary to initially provide for the presence of a hermetically closing and tight-fitting lid;
- If you use a brazier from car disks without a lid, grate and skewers, then it will be possible to heat various foods on it, boil or fry it in a pot or pan;
- If you are very puzzled and try to get everything possible from such an outdoor appliance, you can supplement it with the function of a smokehouse and thereby smoke fish, meat, and poultry on it.
The brazier from the disks of the car works extremely simply, for its kindling and operation it is necessary to lay coal or firewood in the lower part of the installation, which are kindled, a grate or skewer is installed on the upper part. Also, if you just want to heat food, you can put a pot or pan just on top of the wheel, if its diameter allows it to be done safely. Heating and cooking of dishes is carried out due to the resulting smoke and heat from burning coal or firewood. In order for such a garden unit to become a smokehouse, it is necessary to equip it with an airtight lid, ensure that the chips smolder, and also block all exits, ensuring a certain comfortable temperature inside the container.


Brazier from disks from a car can have different dimensions, design, functionality, however, in most cases, such installations are made according to a single or similar technology and a step-by-step guide, which you can read later in the article.
How to assemble the brazier and manual
A brazier from a wheel disk can have various assembly methods and execution, before starting work, you need to familiarize yourself with the most common variations:
- The brazier can be made from just one rim, in this case, coals are laid in the lower part, and dishes are placed on top, grates and skewers are fixed;
- The brazier can be assembled from two rims, in which case such a unit becomes higher, it warms up better and more evenly, allows you to install even massive and bulky cauldrons, as well as to slowly extinguish food;
- If you want to be able to smoke products, it is best to assemble a hermetically sealed structure equipped with a lid;
- The most difficult to build with your own hands are barbecues from car disks of a complex type, which at the same time are ways to combine all of the above functions.
When assembling and designing a brazier from car wheels, it is necessary to take into account smaller nuances, for example, the presence of support legs, which are necessary for units assembled from two or more disks and are not needed for models from one. It is also not recommended to install a brazier on the ground, as it goes cold, which will significantly worsen the heat transfer of the unit. It is dangerous from a fire point of view and installation of the structure on a wooden floor and other flammable objects, materials, or simply near them - the floor and all surfaces near such a home-made device must be well insulated and sealed.


Before you start assembling a brazier from car rims, you need to take into account that you must have at least a little experience and skills in working with a grinder and a welding machine.
To assemble the first option, you need to acquire the following materials:
- Old auto disks and a grinder;
- A nozzle for cutting metal and a disk with which it will be possible to clean rust, but it looks like an iron brush;
- File and drill;
- Hammer and bolts;
- Profiled pipes and steel bar;
- The grate with which the grill will be reproduced.
All the materials and tools listed in the list will be required to assemble the brazier with your own hands, and the profiled pipes themselves are also necessary in order to assemble the legs of the unit, they will need about 4-6 pieces, depending on the weight and dimensions of the installation.
Before using car wheels for assembling a barbecue, it is necessary to fully prepare them for use, for this rust and paint are removed from their surface, for this a grinder, brush and drill are used.
The simplest and most classic version of assembling a brazier from disks is the following; to assemble it yourself, you must follow the following step-by-step guide:
- On the one hand, it is necessary to cut out the partition that is located inside, so you will form a compartment;
- If the bottom of the disk has many different holes through which coal will spill, it is necessary to cut a sheet of metal of this shape and make small holes in it, and then weld it onto the top of the disk;
- The sidewalls of the structure are complemented by supporting legs, which must be of suitable and optimal length, about 40-50 centimeters. This will provide the barbecue with maximum stability and reliability, while it will not touch the floor or the ground.
All cuts and joints are manually filed and scraped off - this is necessary so that there are no sharp corners and joints that can hurt you. If you want to use the unit as a grill, just prepare a grate that is suitable in shape and dimensions, which will be fixed on the upper surface of the brazier, it is unnecessary to weld it. Also, the brazier is complemented by handles that are welded into each side with the same symmetry, and in order for firewood or coal to be easily cleaned, it is initially possible to make a cleaning window in the lower side part of the design.
If three or more discs are used to assemble the brazier, you can not assemble the supporting legs, since the structure will already be quite high and stable, and the additional height, on the contrary, will make it shaky.
Also, if necessary, the brazier from car wheels can be equipped with a smokehouse function, such installations have a slightly different device than those that were assembled according to the first guide. Such an installation is assembled from two rims, which are hermetically welded to each other, and the upper part in this case is complemented by a sealed cover, which can be removed if necessary. The brazier smokehouse is also complemented by a grill and skewers, which allows you to cook barbecue, meat and steaks if necessary. It is important that the smoke in such a home-made smokehouse comes in gradually, for this small holes are made in the frame, so that a constant same temperature will be maintained inside the equipment closed with a lid.


In order for two car disks to be hermetically connected and adjacent to each other, it is necessary to first cut the partitions and join both elements, and then weld them to each other using a continuous seam. The bottom is complemented by supporting legs, there can be 2-4 of them, in order for you to have access to the inside, it is necessary to equip the installation with a door, a small hole is cut in the center using a grinder. The door is fixed with nuts, symmetry must be observed with regard to the weld, bolts are also welded to the barbecue, which will become fasteners for the door, the bolts must be installed in already pre-welded nuts. The door is applied to the opening and fixed in a level position.
A brazier made of car disks is a simple and winning solution for any summer cottage or garden plot, such designs are distinguished by their budget cost, minimal time spent on construction, and versatility.
This video clip shows how to assemble a brazier from a car wheel with your own hands:
Many have used rims lying around in the garage or in the country. They have already worked out their service life, and it is a pity to throw it away, as always.
They can be used - to cook a stationary or portable, convenient and safe barbecue. From analogs, the brazier from automobile disks differs in compactness, stability and accurate appearance.
Its production will require a minimum of time and even less material costs. Such a brazier can be a hearth for a Finnish gazebo and an excellent camping stove.
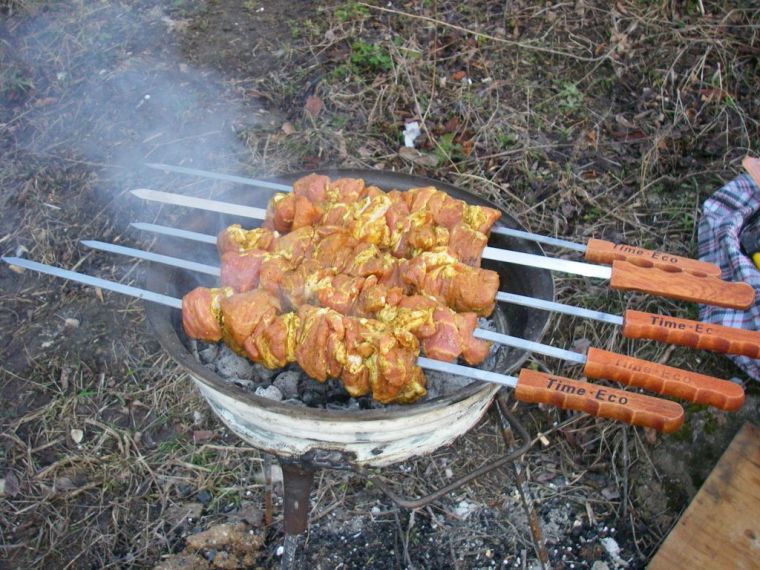
On it you can cook not only the usual barbecue on a skewer, but also barbecue dishes, as well as install a pot or a cauldron.
The presence of a stationary hearth in a summer cottage will allow you to please yourself and loved ones with delicacies cooked on an open fire much more often.
The design of the furnace provides excellent air access, which greatly simplifies maintaining the required temperature. Convenient height and the ability to install anywhere will add comfort to parties.
Such a brazier is easy to clean, does not burn out, takes up a minimum of storage space.
On the photo is a brazier from car disks
Like any device that is made by craftsmen with their own hands, the brazier from car disks has many different options.
The simplest of them does not require additional materials. It is enough just to cover the bottom hole with a sheet of metal or even ordinary ceramic tiles.
But, such a model, although simple to manufacture, has a number of disadvantages:
- the plane on which food is cooked is too low;
- such a brazier installed on the ground may fade due to lack of traction;
- small furnace volume.
In general, cooking on such a model, in terms of convenience, does not differ from the hiking option, when simple bricks are used as a skewer stand.
Tools and materials
If, however, you want a reliable and convenient barbecue that will turn any picnic or party in the country into a pleasure for many years, then you should consider a more complex design of two wheels.
Before work, you need to prepare tools and stock up on materials. For a barbecue from car disks, you will need:
- angle grinder (grinder);
- welding machine and electrodes;
- personal protective equipment (gloves, mask);
- two identical disks;
- profile pipe about a meter;
- three bolts and nuts to them of large diameter;
- 4 nuts 10mm;
- Wire meter 8 mm.
All materials can be redeemed for a penny at any recycling center, but most household summer residents can find them in the garage.
Work order
How to make a barbecue from car rims so that it lasts a long time?
Foundation preparation
In one of the disks it is necessary to cut a partition. This can be done with a gas cutter or, having made notches with a grinder, simply break it out with a hammer.
After that, two disks must be welded to each other around the entire perimeter. The result should be a metal container in which the remaining partition will be the bottom.

Door manufacturing
One of the most difficult stages is the manufacture of the door. Its presence will allow you to cook dishes in a cauldron without violating the temperature regime. With it, you can throw firewood without removing the dish from the grill.
To make everything work out neatly, mark a rectangle in the middle of which the weld will pass. The bottom side of the door should be a few centimeters above the bottom partition.
Cut out the marked rectangle. The edges must be processed so that there are no sharp edges and burrs. After that, you need to grab the bolt heads to one of the vertical sides.
Closer to the opposite edge, at a distance of several centimeters, a hole is drilled into which the third bolt is screwed so that it looks out 4-5 cm from the outside. It will become the door handle.
Nuts are screwed onto the welded bolts, which, having put the cut-out fragment in place, are grabbed to the body.
The metal door on improvised hinges is ready.
Legs - the basis of the product
It remains to make the legs and close the hole in the bottom. The legs are made of such a height that it is convenient to cook. You can measure in each case individually. But, the optimal height from the ground to the top of the barbecue is 60-80 cm.
Having decided on the length of the legs, you need to cut off three equal pieces of the profile pipe. They, focusing on the factory holes in the partition of the lower disk, are welded at an equal distance. 
The angle of inclination will be the same if they are rested against the partition and the side. It is recommended to make three legs, since this design has the greatest stability. Even on uneven ground, it will not swing.
Comfortable handles - safe and comfortable
For greater convenience, you can make grill handles from car disks.
To do this, turn the body so that the door is directly in front of you and mentally draw a line that will divide the circumference of the entire barbecue in half, put marks.

This will be the line that will have the middle of our handles.
From the mark, lower the perpendicular along the side wall of the case, at a distance from the upper edge of the disk, step back 5-7 cm to the right and left and put new marks.
4 nuts are welded on them. Handles bent from 8 mm wire are threaded into them.
It is better not to weld the bottom of the resulting brazier with metal. You can close it with a metal mesh or weld on pieces of thick wire, making a kind of grate. This will provide good traction.
Additional trivia
This completes the installation work. Now it remains to ennoble the grill. First of all, it is calcined so that the remains of oil, gasoline, garbage and other things burn out.
After that, the surface outside must be cleaned of soot and sanded. You can paint the brazier with heat-resistant paint, but it is better to choose a dark color. Black in this case does not look gloomy, but noble.
Applications
The described model is mobile. Such a brazier can be carried with you on hikes and simply transferred around the site to any place. It is light enough to be lifted by one person.
But, if desired, it can also be used in stationary buildings on a personal plot.
For example, this the simplest version of the hearth for the Finnish gazebo. A covered resting place with a hearth in the center of the table is becoming more and more popular in our country.
In this case, the body is installed on a brick pedestal. When calculating masonry, do not forget about the need to blow air for combustion. Therefore, an empty space is left under the furnace body. The entire brazier is lined almost to the top with brick or natural stone.

On the resulting pole, a tabletop with a hole in the center is installed. Benches are set up around the resulting table, and the whole ensemble is covered with a roof with a hood.
In such a Finnish gazebo, you can enjoy barbecue and fondue not only in summer, but also in the cold season. The fire from the hearth will not let you freeze.
Also, the brazier can simply be overlaid with facing materials and made the center of the resting place on your backyard. A metal firebox extends the service life of the hearth many times over and greatly facilitates its operation.
In addition, laying out the finished structure is much easier than laying out a full-fledged furnace.
The use of a brazier from car rims will allow you to create a comfortable and beautiful place for relaxing friendly parties, even for those who do not have special skills in the construction business.
For those who are not accustomed to throwing things that have failed into a landfill, the idea of \u200b\u200bhow to make a brazier from a rim will be useful. It's pretty easy to explain. Firstly, the discs are made of durable and high-quality steel. This ensures a long service life of such a product. Secondly, versatility. By installing the grate, we get a ready-made barbecue or oven, which is suitable for cooking in a pot or pan. Such barbecues can be used under a cauldron.
Brazier from rims, pros and cons
If you are going to make a brazier from the rims of a car with your own hands, you should take into account their advantages and disadvantages. Product advantages:
- low cost;
- compactness;
- ease of manufacture;
- easy to clean;
- unlimited possibilities for creativity;
- multifunctionality;
- durability.
- small volume of the furnace;
- if installed directly on the ground, there will be weak traction, and cooking is inconvenient due to the low height.
 List of required materials and tools
In order to make a brazier from car rims with your own hands, you will need:
- a used or unnecessary disk from a car, the size R16 or 15 can be considered optimal;
- profile pipe 20 X 20 and 25 X 25;
- grate, preferably stainless steel;
- wire (6-, 8- or 10 mm);
- dye;
If there is a desire, then the brazier from car disks can be ennobled with forged elements. From the tool you must have:
- grinder;
- sandpaper;
- grinding, cutting wheels;
- welding machine;
- drill with a set of drills for metal;
- brush or spray gun.
 Work order
Analyzing how to make a brazier at home from rims from a car, there are 4 main stages. This refers to the simplest and most classic model. Although there are many options here.
First stage
The holes that are in the stamped rim should be welded. This is necessary in order to prevent spillage of coals. Use pieces of sheet 3 or 4 mm metal. Patches are pre-cut out of it - according to the diameter of the holes.
All holes do not need to be fully welded. Better to use wire. This ensures air circulation.
Second phase
Welding the legs to the barbecue from the rim. The standard quantity is 3 pieces. Here it is important to consider how you plan to use the product, as stationary or portable. In the first case, the legs are welded directly to the disk from the wheel. If the brazier - barbecue is planned to be periodically taken with you on trips, and it should fit in the trunk of the car, then it is better to make the legs removable. The easiest option is to weld pieces of pipes, making them into original nests for the legs. The latter are then simply inserted into them. To do this, use pieces of profile pipes 25 x 25, and the legs themselves (removable) are made from a pipe 20 x 20. Bolts, studs, and so on are used as clamps.
If you want the legs not to be strongly pressed into the ground, it is recommended to weld nickels to them.
Third stage
Production of stands for skewers and pens. To make the product truly versatile, it is enough to equip it with a stainless steel grate. This way we also get a barbecue.
Masters recommend, when making a brazier from a car disk with your own hands, use 10 or 8 mm wire for handles. It is easily bent, so giving the desired shape is not difficult. For fastening to the body, appropriate nuts are used, which are put on the ends of the wire, then they are welded.
Tip - in order to prevent the handles from heating up during the use of the barbecue, it is necessary to exclude their pressing. To do this, the ends of the wire are bent at a right angle. This makes it possible to position the handles so that they rest against the brazier body.
Fourth stage
It remains only to give the product a beautiful aesthetic appearance. To do this, with the help of a grinder, the structure is cleaned and painted with heat-resistant paint. The best result can be achieved using an airbrush or special spray cans with special paint, but it is quite possible to get by with an ordinary brush.

Independent production of a brazier takes just a few hours and requires a minimum of financial costs. Especially when there are rims in the garage or in the country that are no longer needed, but it’s a pity to throw them away. At the same time, the brazier from discs is really universal and will allow you to diversify your menu with dishes on an open fire, if you want barbecue, please, fish or grilled meat, pilaf, fish soup and much more. All this is available with a homemade design from car rims. Plus neat appearance, beautiful design and ease of maintenance.
When you really need a brazier, but there is no money to buy it, or you just want to make it yourself, there are many options for making a brazier from improvised means. Especially for a motorist who probably has old car rims lying around in the garage.
Device
Brazier for shish kebabs from car disks is distinguished by its compactness, stability and original appearance. It takes a little time and effort to make it. This one can be modified from a barbecue grill not only in, but also cook on it, because it is round.
The design of the hearth provides excellent access of air to the fuel, which greatly simplifies maintaining the required temperature. Such a do-it-yourself design is convenient to clean and has a small weight, which allows it to be moved around the site or even transported.
The simplest version of the brazier from car rims is practically does not require additional investments in the form of materials. Enough steel sheet under the bottom or regular ceramic tiles, even . But such a model, made by hand, loses some of its advantages and becomes uncomfortable due to its low location. The plane on which the meat is cooked is too low in this design, and the meat may burn due to close contact with the fuel. Such a brazier from machine wheels can fade due to insufficient traction.
Manufacturing
Have to do two-disc brazier. This will increase the distance between the fuel and the meat, increasing the amount of air circulating in the fryer, which will help to kindle and maintain the fuel.
For this design you will need:
- Bulgarian;
- welding machine and electrodes;
- gloves, mask;
- two identical disks;
- profile pipe - 1 m;
- bolts and nuts to them;
- wire - 1 m / Ø4mm.
In one of the discs with a gas cutter or, making notches with a grinder, partition is cut out. After disks are welded to each other around the perimeter. The result should be a container-type structure with the remaining partition in the form of a bottom.
Read also: Unusual barbecues

DIY rectangular markings, in the middle of which there will be a weld, is not difficult. The lower part of the door should not be made close to the bottom of the brazier, but should be several centimeters higher than it. The rectangle is cut out and attached to the hinges, additionally equipped with a handle and a valve. The edges of the door are processed from sharp burrs. Also, the door can be bolted, and the third can be a handle.
Legs for barbecue are made in a length suitable for the height of the cook who will cook at the grill most often. The average height of the entire barbecue with legs is 60-80 cm. It is not necessary to make four, three legs will be enough, since the design of the brazier is round. The legs from the pipe are attached to the bottom of the future barbecue at an equal distance from each other.
For ease of transportation to the product, you can attach handles to the sides. Construction surface needed clear of soot and sand down. You can paint the brazier with heat-resistant paint for a longer service life.


