Do-it-yourself wobbler made of wood. Features of making a wobbler with your own hands Do-it-yourself wobbler from a plastic bottle
Avid spinning fishermen try to make their own. This solution has significantly more advantages than disadvantages. At the same time, the bait can be made in such a way that it is simply ideal for your fishing conditions. This, in turn, will have a positive effect on the bite, which will significantly improve the catch - the result of fishing.
The reasons that force a fisherman to make wobblers with his own hands are of two types. The first of them is a limited budget. Now the most modest price for such a bait is 10 USD. If you also take into account the fact that under certain circumstances it can either be torn off by a fish or get caught on something at the bottom and remain there, then it turns out to be a not entirely pleasant waste of money. Another reason is psychological. If you were able to do something yourself, it increases your self-esteem. This thing is doubly pleasant to use.
Materials for making a wobbler
Making wobblers with your own hands is carried out on the basis of 2 main materials - wood and plastic.
For wooden wobblers, leaf and coniferous trees are used. They are not that difficult to get, and the processing and manufacturing process is much simpler compared to plastic ones. The strength of wood is higher, so similar devices for spinning fishing are usually made from it. Plastic is used in cases where it is impossible to achieve the required shape of a wobbler made of wood.
Crafting tools
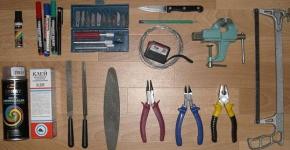
In the process of making such a bait, you will need a standard set of metalworking tools. The greatest attention should be paid to a wood hacksaw, file, plane, and chisel. The final result and how good the wobbler turns out will depend on the quality of these tools. Special attention should also be paid to sandpaper. There should be several types with different roughness. This will allow you to get a bait with a smooth surface and the desired appearance.

Determining the shape of the wobbler
It is necessary to start with the traditional procedure - drawing a sketch, and also decide what kind of fish this bait will be designed to catch. Its size and shape will depend on this. For small fish, a small wobbler with 1-2 hooks is suitable. If you plan to catch larger fish, then it makes sense to make a larger sample, on which 3-4 hooks will be installed. As practice shows, it makes no sense to install more hooks.
Step-by-step instructions for making a wobbler
Important points
At the first stage, the design of the bait is worked out and the resulting shape is drawn on a sheet of paper. Then, based on the sketch, templates are made on paper that may be needed during the manufacturing process. You can also use cardboard for these purposes.

Harvesting and processing
At the next stage, the blank is made. To do this, using templates made earlier, the drawing is transferred to the tree, and the necessary markings are formed. According to the markings, using a chisel or a hacksaw, the final required wooden blank with the appropriate dimensions is cut out. Next, the wobbler is cut and turned with your own hands. At the final stage, it must be processed with a file and sandpaper. The sandpaper grain size should gradually decrease and end at zero.
Wobbler painting
At the end, you need to open the wobbler with paint or a protective layer. This will significantly increase its service life.

At the first stage, it is necessary to clean the surface of all impurities. To do this, it is recommended to immediately treat it with a brush and then wipe it with a clean cloth until all remaining dust is removed after the manufacturing procedure. Then the surface of the bait is covered with the first layer of primer and time is given to dry. After drying, apply a second layer and repeat the procedure. Then, once priming is complete, you can begin applying paint. Any type of enamel that is resistant to prolonged exposure to water is suitable. It is also recommended to do it in 2 layers, this will significantly extend the service life of such a wobbler.
Some spinning anglers additionally design a similar bait. For these purposes, for example, special plastic flakes are used, which are then glued to its surface. Also, to make it more believable, you can paint it and make fins from scrap materials. The end result will be a fish that will be no different from the original.
The design of the bait should be flexible and hard at the same time. Flexibility will allow it to create the necessary vibrations, which will certainly attract fish and the bite will be excellent. But the hardness and rigidity will allow you not to think about the bait throughout the entire fishing. These requirements must be taken into account both when choosing materials and when developing the design. To better understand manufacturing issues, watch the video of a DIY wobbler.
Video lesson “Making a wobbler with your own hands”
Conclusion
This article describes how to make a wobbler with your own hands. Experience shows that there are no problems with such a procedure. Given the availability of raw materials, materials, tools and certain theoretical training, anyone can make such a product. (Read also: “ “) The main thing is to be creative and try to think outside the box and the result can be a wobbler that will be so different and effective that your fishing will exceed all your desires.

The second important component of a successful manufacturing process is thoroughness and consistency. If you don't rush, you can make a bait that you will like better than the one from the store counter.
Any experienced fisherman can tell you about the value of a wobbler. They know how important and useful this simple looking tool is for catching fish. In order not to spend money on buying a wobbler, we suggest making it yourself. It won't take much time and will cost you pennies.
How to make a wobbler with your own hands?
Before you start making, you need to consider a few points:
1. Decide what kind of fish you want to catch, as different fish react to different baits differently.
2. What material will you make the wobbler from?
3. At what depth are you going to fish?
Our main goal- there is a chub, so we will make a copy of the wobbler called L-minnow 44.
Let's decide on the material - wood is simpler and best. It is the easiest to process and the wobbler turns out to be of very high quality. You can choose the type of tree yourself, but it’s best to make several wobblers from different species, and test in practice which will be better. Try to choose wood with an even texture, this will simplify the processing process.
1. Take a piece of wood and draw the outline of a wobbler on it. Then we cut it out with a saw.

2. We take a knife and shape the future wobbler. We cut off unnecessary corners and unnecessary parts. Next we finish it with a file.

3. Take sandpaper and sand the surface until it becomes smooth.

4. We take a pencil and begin to make the following marks: holes for the blade, as well as for the lower and rear loop.

5. We make three loops using an awl and stainless wire. Carefully make small holes with a drill. The third loop will be attached to the front, and we will use it to tie the wobbler to the fishing line.

6. Now a very important point - we should make a hole for the blade. At this stage, we do not recommend rushing; it is better to take good measurements and cut so as not to make a mistake with the blade.

What to make a blade for a wobbler from?
Blade- a very important part of the wobbler, so you should pay a lot of attention to it. You can use organic glass, plastic or metal. In our case, organic glass was used.

7. Screw in all the hinges and insert the blade.

8. Next, let's look at the weight of our wobbler. Often weight affects the performance of the wobbler, so it needs to be weighted with lead. Using a drill, we make small holes in the bottom of the wobbler and insert pieces of lead there.

9. Our wobbler is almost ready. Let's saturate it with drying oil so that it lasts longer and does not absorb water. Attach treble hooks.

10. There is very little left. Using epoxy resin, we secure all the hinges and the blade.

11 . We have already impregnated it with drying oil, now we will work with a primer.
Few fishermen in their practice have not had to repair or make baits and equipment with their own hands, so almost every angler has the skills to work with tools and materials. Moreover, the passion for making and improving baits and gear is as exciting as fishing itself and contributes to progress in the development of amateur fishing. Many fishermen start tinkering not because they do not have the funds to purchase certain gear, but simply out of curiosity. In addition, not every bait can be found in the store, and if this is possible, then the price for it can be prohibitive. So why waste time on sometimes fruitless searches, if you can try to make it yourself, despite the fact that its cost will be tens of times lower.
DIY wobbler in 10 hours
Many articles in magazines and books are devoted to the production of wobblers, and on the Internet, almost every website in the homemade section has at least one publication on this topic. But still, I decided to describe my technology for making a wobbler or any other bait of this type. This is not the manufacture of any specific “catchable” wobbler, but simply a chain of steps leading to the creation of your and only your catchable bait, which has no analogues.
And so step 1
First you need to decide what kind of bait you want to make, whether it will be similar to any serial model or something of your own, unique. Well, in the first case, it is clear that you need to have the original or at least a photo of the bait with a description of its characteristics. In the second case, everything is simpler; you don’t need anything except decide on the size, shape, and color. Although you need to imagine the nature of the game of the future bait: the speed of the retrieve, the desired depth of immersion and the amplitude of the oscillations it makes.
In this case, I didn’t really think about what kind of wobbler I needed, because the goal was different, although why waste time and your labor in vain if you can try to do something necessary. Therefore, I will try to make a wobbler with positive buoyancy, medium size (10 cm) for wiring at minimum speeds, and at the same time with a maximum (but not frequent) amplitude of oscillations and immersion depth. Wow! (Autumn pike loves these)
Step 2
Selection of material for manufacturing.
Since most wobblers have positive buoyancy, we choose either foam or wood. Any wood is suitable, although linden or aspen is easier to process, but the disadvantage of these species is their low specific gravity and hardness, as well as the need to create very good protection from water.
Once the bait gets into the pike's mouth, the integrity of the paint coating is damaged, which leads to swelling of the wood and cracking of the decorative finish of the wobbler. Even impregnating the bait with epoxy resin before painting does not always help, and such wobblers last no more than a season.
Polystyrene foam has all the advantages of wood and, moreover, does not rot, does not swell from water, and is much easier to process than wood. True, this only applies to the so-called “dense” yellow foam. Using polystyrene foam does not eliminate the need to strengthen the top layer of the bait before painting. Therefore, everyone must decide for themselves in the choice of material depending on the goal.
I chose foam.
Step 3
We draw the outline of the future bait on the blank.
If we are making a clone, then we first build a contour from a photograph or the original on cardboard on a scale of 1 to 1 and transfer it to a blank, which should be somewhat larger in size, and if this is a “flight of design thought,” then it is advisable to make sketches on paper or even sculpt plasticine model.
I just drew it by hand.
Step 4
We cut the workpiece along the contour.
If foam plastic is used to make a wobbler, then it is enough to use a stationery knife with replaceable blades.
If you use wood, you will also need a jigsaw. When processing the workpiece, it is necessary to ensure the perpendicularity of the cut.
It should look something like this.
Step 5
Marking the top view.
Turn the workpiece over and draw a center line along the entire perimeter. Draw the contours of the top view. Using a knife, cut along the line.
Using 40-60 grit sandpaper we got this.
Step 6
When creating a resemblance to serial analogues, you may have to make several patterns copying the contours of the original. In my case, this is not necessary, and I processed the workpiece to my taste. At the same time, I used the same stationery knife and sandpaper from 40 to 100 grains.
Step 7
Strengthening the bait
Since the foam material is porous and not hard enough, it must be processed in one of the following ways:
1. Impregnate the surface with epoxy resin.
To do this, you need to purchase “epoxy” with a hardener in a glass bottle. It is in glass because the rest (in plastic) do not dry completely and remain rubbery, even if you pour in a triple dose of hardener. (Checked, apparently they add a plasticizer)
You need to impregnate it 2 times with intermediate cleaning of the wobbler with sandpaper. For high-quality impregnation, you need to insert 2 toothpicks into the body of the bait (from the head and from the tail) so that they are located on the same axis. Next, you need to dilute the resin with a hardener, which must be added slightly in excess of the norm (1.5 times). This will speed up the drying time and give greater hardness to the foam. Then you need to use a stick to evenly apply the resin to the workpiece and, holding the ends of the toothpicks, hold it over the burner of a gas stove with the flame turned on slightly. By rotating the wobbler over the flame, you need to achieve uniform spreading of the resin. The drying time in this case will be 15-20 minutes. After drying, sand it with sandpaper and repeat the same thing again. By the way, if you put the resin diluted for the first impregnation in the freezer, it will be enough for the second layer, you just need to warm it up before application.
2.Coat the foam with automotive glass-filled putty.
The advantage of this method is that polyester automotive putties dry very quickly, are easy to process and even allow you to adjust the shape of the bait, the disadvantage is that they are not very hard.
3. Give strength to the wobbler using fiberglass.
In my opinion, this is the best way, although more labor-intensive. To use it, you will need epoxy resin with the same properties as for impregnation and fiberglass. It is better to use thin fiberglass because Fiberglass, made from thin fiberglass fabric folded in several layers and impregnated with resin, has greater strength than thick fiberglass, but in one layer.
I only got the thick one.
Step 8
Gluing the workpiece with fiberglass
As you can see in the photograph, the fiberglass fabric was cut out to a slightly larger size and cut on the “bias”, i.e. the fibers are located at an angle. This is done in order to better repeat the bends of the workpiece and prevent folds. If thin fiberglass is used, then this is not necessary. Before using any fiberglass, it must be annealed from paraffin because... not annealed will not be impregnated with resin. You can anneal it using a gas stove. (It will smoke a little)
The cut fiberglass fabric must be placed on a thin polyethylene film (stretch packaging) and freshly prepared resin, as for impregnation (1 part resin and 1.5 parts hardener), must be applied to the fiberglass fabric and the workpiece.
Then fold the fiberglass fabric in half to shape the workpiece and smooth it well, squeezing out the air.
The joint of the fiberglass should pass through the center of the belly of the wobbler.
If the film breaks during the smoothing process, you can add a few more layers.
Now you need to let the resin thicken. You can speed up the process using a fan heater.
Step 9
We use clothespins
To ensure that the fiberglass tightly fits the body of the wobbler and does not slip during the drying process, we use clothespins.
Dry the resin completely using a fan heater.
Step 10
Bait processing
Using scissors, trim off excess fiberglass around the perimeter and file. Then, using needle files and 60-100 grit sandpaper, sand the entire bait.
Step 11
Finding the center of gravity of the bait
To do this, we use a thin thread with a loop tied to a noose. We hang it and, by moving the loop, achieve a horizontal position of the wobbler. Having found the center of gravity, we mark the position of the loop on the back and belly of the bait with a marker. Next, draw a center line from the tail to the nose.
Step 12
We make a cut along the belly of the bait
Using a hacksaw blade for metal, we make a cut from the tip of the nose to the upper edge of the tail of the bait. This cut will later contain wire for attaching tees and lead plates for loading the wobbler.
Step 13
Using a flat file, we widen the cut in the places where the weights will be installed. Next, from stainless wire with a cross-section of 0.5-0.8 mm, depending on the size of the bait, we make fittings for attaching hooks, and cut weights from flat cable lead with scissors. The shape, size and exact position of the weights is determined experimentally (in a container of water) and depends on what type of bait you need to get. In my case, the wobbler must have positive buoyancy, so I loaded it 2/3 of its height.
Step 14
We glue the reinforcement and weights
Before gluing the reinforcement and weights, the wobbler must be thoroughly dried. Water probably got into the cut after buoyancy tests. Using epoxy resin, we glue the reinforcement and weights into the body of the wobbler. It is better to dilute the resin in advance, i.e. let it thicken, and before use, heat it until it becomes fluid. This is necessary in order to avoid its leakage from the cut during the drying process. By the way, at this stage you can glue in a sound capsule, if necessary. When the glue has dried, we clean the wobbler from smudges, if necessary, treat it with fine sandpaper and test it in water.
This is how mine floats.
Thus, we got a floating “blank”, which has yet to be turned into a wobbler. All subsequent steps in manufacturing play a decisive role in what happens in the end. In the following stages, I made several mistakes that should not be made, and I will definitely note them.
Step 15
Making a cut for the blade
Here I made a mistake by cutting at too small an angle relative to the center line. Although this could have been corrected by gluing in a piece of polystyrene foam and sawing again, I did not do this, thinking that in the future I would simply bend the blade.
When making a cut, I used needle files and made sure that its width did not exceed the thickness of the plexiglass from which the blade will be made (I used 3mm). The spatula should fit into the groove quite tightly.
Step 16
Making a blade
I cut out the outline of a blade from a piece of cardboard folded in half and transferred it to plexiglass.
While I was trying to cut it out with a jigsaw, I erased the entire outline drawn with a marker. Moreover, cutting it out with a jigsaw is generally not realistic. It fuses onto the file and jams it. So I did it differently. Using the same method, I cut out an outline from a piece of self-adhesive tape and pasted it onto plexiglass, and then processed it on a sanding machine.
Step 17
Blade adjustment
Having inserted a spatula into the cut and tied a piece of fishing line to a ring, I dipped the wobbler in the pond near the house. At the very first retrieve, I realized that this wobbler dived well, but did not show even the slightest signs of hesitation!
As it turned out, the whole point was in the loop to which the fishing line is tied. In fact, it had to be done on the shoulder blade itself, and not on the nose. I got out of the situation by bending the shoulder blade and making an additional loop.
I tried it again, tying the fishing line to the bottom loop. Now the wobbler began to play just as I wanted - with a good amplitude and at a low retrieve speed. I’ll find out how deep it goes in the spring.
Step18
Glue the spatula
After drying the wobbler, we glue the blade on epoxy resin, having previously drilled a couple of holes and cleaned the surface at the gluing points.
Step 19
We prime Primaka
Before painting, the bait must be primed. For this I used automotive nitro primer. Before priming, I sealed the blade with self-adhesive film. (Making tape will also work). I primed it with a squirrel brush.
Now everything is ready for painting.
Painting the bait
Before you start painting the bait, you need to prepare some materials and equipment:
1. Paints. I use nitrocellulose. They are affordable, dry quickly and are not afraid of moisture. I make some colors myself, such as translucent green or blue, using nitro varnish and ballpoint pen paste (not gel pens). To finish the wobbler for perch, I needed the following colors: white, orange or red fluor, yellow fluor (sold in fishing stores), silver or bronze, translucent green. In general, the range of paint colors is unlimited and depends on your imagination, especially since intermediate shades can be obtained by mixing primary colors.
2. Nitrolac. When choosing a varnish, you need to pay attention to its transparency; the more transparent it is, the more vibrant the paints coated with it will look. (i.e. you need colorless)
3. Solvent for nitro enamels (for example, 646).
4. Thin squirrel brush.
5. Airbrush (optional). If you don’t have an airbrush, you can use spray paints or make a homemade spray gun from 2 ballpoint pen refills, which does not require a compressor.
6. Mesh fabric. Necessary for drawing scales.
Now that everything is prepared, you can start painting.
Step 1. Substrate.
The substrate is always done with white nitro paint on the ground, using the immersion method in 2-3 layers. To obtain a high-quality glossy coating, you need to quickly immerse the bait in the paint and then very slowly, without jerking, remove it from the paint container. In this case, the paint will flow evenly and no streaks will form. You need to dip the bait by first taking the bait by the ring on the tail (1st layer), then by the ring on the head (2nd layer), if you need to cover it again, then again by the ring on the tail. This is done in order not to upset the balance of the wobbler. By the way, the number of layers depends on the thickness of the paint; the thicker the paint, the fewer layers need to be applied, but smudges cannot be avoided. It is better to apply 2-3 layers using liquid paint, which flows well and gives a more uniform coating. Between layers it is necessary to keep the bait for 1 hour to dry. Final drying 24 hours.
Step 2. Paint the breast of the bait.
Using an airbrush and orange fluor, we spray the breast of the wobbler.
Step 3. Paint the sides and back of the bait.
To do this we use yellow fluorescent paint and an airbrush. In this case, we do not paint the abdomen (it remains white).
Step 4. Imitation of scales.
Using mesh fabric and clothespins with silver paint, using an airbrush or a spray can, we dust the scales. (The paint needs to be applied more tightly to the back.) The tighter the mesh fabric adheres to the body of the bait, the clearer the pattern will be.
After the silverfish has dried, remove the mesh fabric.
Step 5. Apply stripes.
Using a template made in advance, we apply stripes to the body of the bait. To do this you will need a translucent dark green varnish. The closer the template is to the bait, the sharper the edge of the strips will be. If it is necessary to create smooth contours, the stencil must be slightly removed from the body of the wobbler (about 1mm). Since a translucent green varnish is used, the required intensity and density is achieved by the number of layers. The varnish is applied with an airbrush.
Step 6. Paint the back.
In most cases, the back of the wobbler should be darker than the belly, therefore, using black paint, placing the bait with its back up, we apply it using a sprayer. I didn’t have black, so I used the same paint as for the stripes, only I applied it more tightly.
Step 7. Draw the eyes.
Of course, you can simply draw the eyes using a brush or glass tube of a suitable diameter. This will require black and orange paint. I wanted to make my eyes more voluminous and more expressive, so I went a different route.
To do this, I printed out this picture on a color printer on self-adhesive paper. (You can create something like this in any graphics editor.)
Then, using a punch of the required diameter (you can use a sharpened Kalashnikov cartridge case or a steel tube), I cut out eyes of a suitable size and glued them to masking tape. After that, I filled each eye with epoxy resin. In general, it’s better to do the eyes while you’re working with the resin; there’s still a little bit left over.
When the eyes were dry, I glued them in place. I didn’t use any adhesives because... The paper used is self-adhesive.
It turned out quite expressively, although this is needed more for me than for the fish I catch, she doesn’t care...
Step 8. Coat the bait with varnish.
Following the same principles as when making the substrate, we coat the bait with varnish, although several more layers can be applied.
Step 9. Stripping and equipping the bait.
After the time required to dry the bait (preferably 48 hours), you can remove the protective film from the blade, clean the loops and equip the wobbler with tees and winding rings.
That's it, the bait is ready.
I started making wobblers more than 15 years ago. Before that, I successfully caught pike with spinner spoons. For pike perch only with baits for fry. In the magazine “Fishing and Fish Farming” I saw pictures of the first rapala wobblers and the idea came up to carve a similar one from wood. At that time, in our there were no traces of them in the city. The first wobbler copied the original floater. I painted it as best I could, giving it the color of a perch, and what was my surprise - I caught a good pike perch on my first fishing trip. Since then, I became interested in wobbler construction. Over time, I came up with new shapes. I remade a lot of wobblers, but I couldn’t surpass this first one - it consistently caught pike perch, the pike ignored it, but the pike perch simply adored it. For several years I caught pike perch with this particular wobbler, even periodically repainting it.
Well, now let's move on to the main thing - how to make a wobbler with your own hands. There is nothing complicated here. A minimum of tools and available materials. I will describe the whole process briefly, otherwise the article will be very long.
To begin with, we select the necessary timber - anything will do, except heavy and resinous ones - pine, birch, we immediately sweep away.
mark the size and saw off the blanks


longitudinal to a depth of no more than 7 mm, under the blade too and strictly perpendicular to the longitudinal one. The angle of inclination depends on what kind of depth is required. Next we need stainless wire and material for the blade - it can be plexiglass or in this case fiberglass.


We saw off a small rectangle from fiberglass to form a blade.

It is more convenient to do this on a machine with a round cutter, but you can also use a hacksaw for metal.


After the workpiece is sanded, we make a loop. To do this, you need pliers, round nose pliers and a skein of thread. And, accordingly, wire.


The loop is made as in the photo according to the size of the bait. After this, the ends are wrapped with thread - this is necessary so that the loop fits tightly into the longitudinal cut.

and insert the loop inside, making sure that the loops protrude evenly.


And insert the spatula.


Then we secure the blade and loop with a few drops of superglue. After the glue has set, we give the blade the desired shape. This is best done using sandpaper.


There is no point in describing the painting work - here everyone gets away with it as best they can. The main process of making a workpiece for painting is simple and clear.

And most importantly, a wobbler made with love catches better than famous brand names.
Maybe my technology for making wobblers will be useful to someone. There is nothing complicated here.
And now the wobbler that I made in the article is already ready for use. It was no coincidence that the blade was made from fiberglass - when fishing mainly on stones and sometimes the blades break, the pike starts kicking so much while you pull it out onto the stones that the blades fly off, then you’ll miss in the dark and instead water - on the edge of the stones from all over. Plastic is not iron - it breaks off from a strong blow. Blades made of fiberglass do not have this drawback - you can shovel them on the stones as you like, but they won’t break.

Making a wobbler with your own hands is not as difficult as it seems. Any complex pattern consists of simple lines, and a bladed wobbler consists of simple elements: a body, a load, a frame with rings for attaching tees, a blade. You can spend time and effort making such a wobbler in pursuit of several goals.
Saving. Branded wobblers are not cheap. It’s not a fact that a “brand” will work better than a self-made wobbler made according to branded patterns.
Experiment. Testing your work, bringing your ideas to life, using an expensive branded wobbler is not a completely rational approach. It is more advisable to spend some effort on homemade products, implementing your ideas from scratch.
Material selection
First of all, you need to decide on the materials and tools for making bait.
Frame
Tree
- alder– hard material;
- Linden– hard material, easy to process;
- balsa- a hard material, the lightest in weight of plant materials, the only species of the subfamily Bombaxaceae;
- cork– soft material.
Synthetic material
- Expanded polystyrene. A type of polystyrene foam is a soft material;
- PVC– soft material, easy to process.
Blade (blade)
- metal (1-1.5 mm);
- plastic-polycarbonate (2 mm).
Frame
Usually made of ferrous wire and used to hang tees. You can use mesh wire - chain-link with a diameter of 0.4-0.6 mm.
Shipment
- hunting shot;
- lead pellets;
- lead rectangles and cylinders.
paints and varnishes

- epoxy resin;
- deck varnish;
- waterproof glue;
- BT-177 silver, bronze, gold (can be mixed with epoxy resin to form the main color of the wobbler);
- waterproof paint for painting the body.
Tools
- A fine-toothed hacksaw or jigsaw with a fine-toothed blade.
- Electric or hand drill.
- Wood drills of various diameters.
- Hammer.
- File.
- Sandpaper No. 0, No. 1, No. 2.
- Pliers.
- Files.
- Vise.
Main stages of production

The whole process can be broken down into the following steps:
- manufacturing of the parts themselves (body, blade, frame);
- assembly;
- finishing;
- tests.
- Option 1
- primer;
- painting the bait;
- varnish coating.
- epoxy resin coating;
- spinner painting;
- varnish coating;
- final fine processing.
Plan for manufacturing a blade wobbler
Case manufacturing
Wobbler drawing
- The contours of the bait are drawn on hard paper or aluminum foil - the wobbler is outlined with a pencil - side view, top view, adjusted using a ruler and patterns. You can make an accurate drawing using a caliper, patterns, or ruler. You can use drawings with exact body dimensions from the Internet.
- The outline is cut out.
- The contour is transferred to workpiece No. 1, outlined with a felt-tip pen or marker, and additional markings are made with a marker to indicate the places of fastening of the shipment, the frame for the tees, and the blade.

It is best to prepare preparation No. 1 in advance. A block of the required thickness from hard or soft material is cut to the size of the wobbler without a blade.
Making a rough model
- Using a fine-toothed saw, a rough model of a spatula is cut along a pre-marked contour from workpiece No. 1, made of hard material (You can use a jigsaw if you have the skill to work with a fine-toothed saw).
- Using a knife, a rough model of a spatula is cut out along a previously drawn contour from workpiece No. 1, made of soft material.
- The corners are trimmed with a knife, processed with coarse sandpaper, then with fine sandpaper. Recesses in the form of gills, eyes, and other profiles are sharpened with a knife and a file.
- Smoothed again with zero sandpaper.
Rough model of a wobbler – Blank No. 2 made of solid material, ready for further processing.
Workpiece No. 2 made of soft material is processed as follows:
- It is cut in half along the axis with a slight offset in any direction. You will get two halves - one slightly thicker, the other thinner.
- In the thicker half, channels are cut for the wire frame, and recesses are made for shipping. A lead shipment in the form of a small rectangle, which is easy to make with pliers and a hammer, works best.
- The two halves are processed with fine sandpaper to give the final shape of the wobbler.
- Wire frame is inserted and shipped.
- The two halves are connected, but until the bait passes the test, they do not stick together. The two halves are held together with a thin rubber band or thin wire.
- A slot is made in the head part of the bladed wobbler with a hacksaw at a certain angle to install the blade - the blade. When the blade is ready, it must be inserted into the slot, and the wobbler will be ready for testing.

Processing workpiece No. 2 from solid material.
The channels are cut with a fine-toothed saw for the wire frame and for the blade.
There are many shipping placement options:
- Fastening the pellets: in certain places, symmetrically on both sides, on the sides, holes are made with a drill with a depth slightly larger than the diameter of the pellets, the pellets are inserted, then filled with epoxy resin.
- Along the axis of symmetry: on the back or abdomen, in certain places, a hole is made with a drill to the size of the pellets, the pellets are inserted, and filled with epoxy resin.
- In the material of two halves, in the inner part, holes for pellets are cut in certain places.
- Fastening lead cylinders. In the solid material, in the right place, in the side of workpiece No. 2, a through hole is drilled to the diameter of a lead or iron cylinder, then the cylinder is inserted.
- The placement of rectangular shipments for soft material has been described previously.

Rattle made from pellets. A hole of the required diameter, larger than the diameter of the balls, is drilled along the axis of symmetry of the wobbler. The balls are inserted into the hole, the hole is plugged with a plug made of wobbler material, greased with glue, and covered with epoxy resin. Or this: a thin-walled metal tube (can be picked up from children's toys or removed from a brush) is inserted into the hole, in which balls are pre-filled.
There are no clear instructions and recommendations on where and how to place the shipment. It all depends on the preferences of the angler. The main thing is to decide what kind of spoon you are preparing in terms of buoyancy, game, and retrieve. In any case, during testing, the weight and location of the shipment can be adjusted. Excess holes are plugged with a plug made of the same material as the wobbler, covered with epoxy or glue, and processed with a knife and fine sandpaper.
Making a blade
A blade of the required size is sawn or cut out of metal (1-1.5 mm) or plastic-polycarbonate (2 mm) along the prepared contour, the edges are processed with fine sandpaper or a file.
Depending on where the main line is supposed to be attached - to the head or to the shoulder blade, a wire frame is prepared. The loops are made in the places where the tees are attached. If you attach the fishing line to the blade ring, it is recommended, in addition to gluing the blade at the junction with the body, to prevent it from being pulled out of the body, to make a through hole in the body and blade, and insert a pin from a thin nail with a cut off head.
A nail slightly larger in diameter than the hole should fit tightly into the hole. In this case, the loop on the wire frame is twisted at the location of the stud pin. The pin will securely connect the body, wire frame, and blade. When loaded, the blade will not break out of the bait body.

The sketch shows that to attach the ring to the blade, it is recommended to make two or three twists in the wire bent in half to form a ring, insert both ends of the wire into the hole of the blade up to the ring, cut off the excess ends of the wire, straighten it, pressing the antennae tightly to the blade, cover with epoxy resin , clean up the sagging marks with sandpaper after drying.
Frame
The frame is made of ferrous wire. A wire with a diameter of 0.4-0.6 mm from a chain-link mesh used for country fences is suitable. Loops - rings on a wire frame are twisted at the points where the tees are attached. In the case of attaching the fishing line to the blade, the first loop in the front part of the frame is made in the same plane as the spoon. A pin - a nail - must pass through this loop, so it is made small.

Assembling a wobbler from solid material
- A wire frame with rings is inserted into the channel.
- Filled with epoxy resin.
- The spatula is inserted. Waterproof adhesive can be applied either to the paddle slot in the body or to the paddle.
- In the case of attaching the fishing line to the blade, a pin is inserted in the head part, as described above.
- We are waiting for the glue and resin to harden.
- We process frozen smudges.
Tests
For testing, a bath filled with water is suitable. The assembled bladed wobbler must be run-in. The fishing line is tied to the spatula either by the head or by the shoulder blade and pulled through the water.
If balancing, play, and buoyancy are satisfactory, then the bait is ready for further processing. If not, you will have to experiment with the inclination of the blade and the release. Excess holes can either be plugged with a plug with glue applied, or filled with epoxy.
After testing a wobbler made of soft material, we proceed to assembly.

Assembling bait from soft material
Let's repeat what was described above:
- After testing the bait in a bath of water, remove the temporary fastenings.
- Glue the two halves together.
- We are waiting for the glue to dry.
- Insert the spatula with glue applied into the slot.
- We are waiting for the glue to dry.
- We process glue smudges.
Finishing
Extra dents, holes, chips are not yet a reason to throw away a homemade product. Defects can be covered with epoxy resin. After the resin has dried, the sagging is treated with zero.
We finally clean up all the defects with sandpaper No. 0.
The body must be ready for painting.
Painting options
First
- Before painting, prime the body with any white primer enamel.
- The base paint is applied, and after drying the selected pattern is added.
- After the paint has dried, deck varnish is applied in several layers.
Second
- The workpiece is coated with epoxy resin with the addition of BT-177 paint to give the wobbler the desired base color.
The product is dry and ready for use.

Made from foam or plastic in the shape of an insect
You can make disposable baits in the form of insects, crustaceans, and worms. An insect, for example a cockchafer, is cut out of polystyrene foam (plastic) and processed with a file and fine sandpaper to give it its final shape. Portrait resemblance to the original is not necessary. For predatory fish, the main thing is that your work is in motion.
Two-piece foam fish
You can make a soft composite fish from foam rubber. Usually a two-piece fish is made.
- A loop is made at one end of a ferrous wire of the required length.
- From the other, sharp end, a blank of the first half of a soft fish cut from foam rubber is strung along the axis.
- A second loop is made.
- The wire for the other knee is threaded into the lower loop, and the loop is twisted on the second wire.
- A foam rubber blank of the tail part of the fish is strung onto the wire of the second bend.
- The last loop is made for the tee.
- The soft foam parts of the fish can be painted, although there is not much point in this. It is better to pre-paint the foam rubber in some color.
Whether or not to hang a tee in the middle is up to the fisherman to decide. Instead of tees, doubles or single hooks are sometimes used.
Such a fish is used with a lead sinker installed in front of the fish, or attached when fishing with a lead. When moving, if everything is done correctly, it will wag its tail and attract predatory fish.
Useful video
Making bladed wobblers with your own hands at home can not only become an exciting hobby for an angler, but will also save him from significant expenses on purchasing branded products. It will also allow you to bring ideas and plans to life. There is no more pleasant moment for an angler than catching a large fish using a mini wobbler of his own making. In addition to the pleasure of a good catch, a person experiences the joy of creative success.
Knipovich Nikolai Mikhailovich
Zoologist, hydrobiologist. Graduated from Leningrad State University named after Zhdanov, Faculty of Biology and Soil Sciences. I am interested in fishing at a professional level.