Do-it-yourself desktop jigsaw. Sawing from plywood: handicraftsmen from FORUMHOUSE share their experience Drawings for a jigsaw
Lately I have been very interested in cutting out with a jigsaw, I don’t even know why. It all started with the fact that I needed to cut out several gears from plywood...
And off we go. At first I cut out the gears by hand, then I thought, pumping the muscle with a hand jigsaw is of course good, but if you automate the process, it will be much faster!
So, first of all, let’s get acquainted with this manual jigsaw for artistic cutting.
(all photos in this article were found on the Internet)
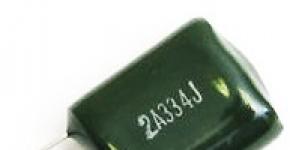
To saw you need files, they are thin as wire, with sharp teeth. Previously, such files were sold in a pack of 50 pieces, recently I went to the store, and these “bimesmen” started selling them individually. You can break a couple of these files in an evening.
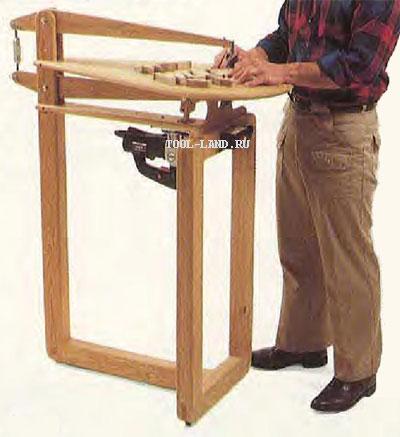
For cutting, we will also need a special table, it can be a board with a conical slot, screwed to the table with screws or a clamp.

To make it easier to attach the files to the machine, it is better to use a special device that will compress the contour of the jigsaw, so you can easily change the file without effort. With the help of a wooden eccentric, compression occurs.

And now about automation. In the next photo you see a factory-type tabletop jigsaw; you can find a sea of different modifications on the Internet. This thing is not very expensive, but even if I really want it, I won’t be able to find it in my city, and in principle there’s no need. 
Industrial machines are, of course, good, but I’ll probably use them for a couple of months and give up on this activity, and in general, such a machine, as I learned, can be easily assembled yourself from plywood and wooden blocks.


The following photo uses an industrial manual jigsaw and a spring to return the saw.

So, we can easily assemble a tabletop jigsaw with our own hands at home. I personally did just that, but I have a special design, there are no photos of me in this article, but I will definitely post them, as well as a video in progress.
Cutting plywood with a hand jigsaw requires attention and time. The result is beautiful, practical products.
A hand saw is used to process the material to create decorative elements. As a result of processing wood, plywood, and plastic, crafts are created that have practical application and aesthetic value.
Figure sawing is a fascinating hobby that brings practical, moral and material benefits. From plywood and wooden blanks you can make:
- a vase for sweets;
- basket;
- table stand for postcards;
- lamp;
- hanger in the hallway, living room;
- photo frame;
- pincushion;
- bread box;
- panel;
- candlestick;
- hot stand for eggs;
- box.
For beginners, for carving, you can choose light drawings, simple diagrams, drawings of crafts, sketches that have a pleasant appearance. After mastering the cutting technique, you can try your hand at jewelry models with openwork fragments.
Using a jigsaw you can make platbands for home design. The variety of sketches allows you to create this element, which will provide artistic decoration of the interior. By figure cutting you can make crafts from wood.
You can cut beautiful decorative elements from plywood. Using jigsaw stencils, you can easily make photo frames, mirrors, and much more from blanks. Handmade will complement the design of the room and emphasize the chosen style.
Operating procedure
To obtain a high-quality product and minimize the formation of defects, you need to do the work slowly and focus on the process. Before starting work, it is recommended to make sure that the thickness of the plywood is equal to the height of the groove on the printed sketch.
Preparing the stencil
Schemes for sawing with a tool can be of different sizes. To create a drawing of an interior item, for example a shelf, you will need to use whatman paper in A1 or A0 format, and for toys you can use a standard sheet of cardboard.
The contour of the product is applied to the surface in compliance with the exact dimensions. Templates for cutting with a hand jigsaw can be found on special resources. But it’s easier to come up with your own compositions based on the type of workpiece. An individual approach to developing a product design will highlight the texture of the wood.
Transferring an image to the surface of plywood or boards
To accurately apply a contour to the surface of plywood or wood, print the template on thick paper. Transferring a drawing from an A4 drawing can cause a lot of trouble if you draw the ornament with a pencil.
In order to apply contours and complex patterns, you can use auxiliary methods. One method involves using carbon paper. To do this, the carbon copy is placed on the workpiece. Place a template on top and draw lines.
The drawing can be glued to the plywood with 2-sided tape. When using glue, you need to clean the surface with sandpaper. An accessible method involves using a stencil made using nail scissors. After preparation, the template is applied to the surface and each fragment is outlined with a pencil.
For convenience, the sheet is secured with tape or insulating tape. The design can be applied thermally. For this, an inkjet printer is used, with which the diagram is printed. After this, the design is applied to the surface with the front side and processed with a heated iron.
Sawing process technology
Sawing from plywood is carried out after applying the drawing to the workpiece. Processing begins with the internal elements of the product, and then the outer contour is cut out. This order of work allows you to get a straight line and provides convenient fastening of the workpiece.
Holes for the blade must be drilled in sharp places on the internal contour. This requires attention as chips may form on the back side. To avoid this, it is recommended not to make the holes completely.
You can limit the depth using insulating tape that is wrapped around the drill. After this, turn the workpiece over and process the hole with an awl. After finishing the work, the product is polished using a file or needle file.
Small elements require delicate handling, so it is recommended to be smart when processing. To do this, cut a thin strip of sandpaper and insert it into a jigsaw file instead of a blade.
Sawing with hand tools requires the equipment of a special machine with a clamp. This device is used as a base. During processing, the workpiece is fixed at chest level, which provides convenience and allows you to closely monitor the process.
For beginners, it is important to be careful when using a jigsaw in order to practice smooth movements. Jigsaw cutting blade fragile Therefore, it is recommended to avoid distortions, sudden movements, and overheating.
When processing a workpiece, the movements must be reciprocating, and the tool must be positioned vertically. Using an electric jigsaw requires securing the workpiece to a workbench. When using this equipment, workpieces up to 5 cm thick can be processed.


Defects in work
If the workpiece processing technology is violated, the tool may shift. A jigsaw may cut crookedly if the tool is tilted or improperly fastened. If the blade gets stuck at the stage of forming the figured elements, then you will need to carefully draw a new line located parallel to the fragment with the defect.
A little about safety
The jigsaw for figured cutting is an arched frame. The tool is equipped with a handle and 2 attachments for a cutting blade, which allow you to cut patterns of varying complexity.
Depending on the type of work, different attachments are selected. Thick saws are used to cut out contours, and thin blades are used for openwork work. The workpiece processing process can be mechanized using electric tools. To speed up the process, some models are equipped with a pendulum mechanism.
A stationary electric tool, which is mounted on a static surface, is similar in principle to a sewing machine. The use of this type of equipment eliminates perpendicular cutting errors.
Sawing with a jigsaw requires compliance with safety rules. The workplace must be properly equipped. When working, it is recommended to use personal protective equipment.
After several unsuccessful attempts to cut out complex shapes with an electric jigsaw, I decided to make a homemade desktop jigsaw using the drawings from the network. It will be very easy to cut complex shapes of small sizes from lightweight materials.
To assemble a jigsaw machine with your own hands from a jigsaw you will need:
- electric jigsaw
- sheet of plywood and boards for support
- wood screws
- bolts with nuts
Tools: drill, sandpaper, clamp, tape measure.
Step 1: Cut out the lid and base


Draw two 250x300 mm rectangles on a sheet of plywood and cut them out with a jigsaw. These rectangles will be the base and cover of your machine. Carefully sand the surfaces of the rectangles, especially the one that will be the lid.
Step 2: Making the front pillars


Show 4 more images


Measure the height of the jigsaw from the sole to the handle so that the jigsaw fits in the machine box; the stands must be greater than this distance. My jigsaw is 18 cm high, so I made 20 cm long posts from the board. Then I pressed the two pieces together with a clamp and sawed off 5 mm from them on both sides so that both posts were the same height.
Now the racks can be screwed to the base. To prevent the wood from cracking, you need to pre-drill holes for the screws and countersink them.
Step 3: Attach the jigsaw to the lid


Show 7 more images


- Remove the soleplate from the jigsaw using the supplied hexagon. There is already one hole in the cover, you just need to drill three more so that there is a mounting hole in each corner.
- In the central part of the plywood cover, mark the place where you will attach the jigsaw sole and the hole for the jigsaw blade.
- Now you can drill four holes in the plywood, countersinking them with a countersink bit so that the screw heads are flush with the surface. All that remains is to make a hole for the file.
- Now put the sole back on the jigsaw skis, and attach the plywood cover to the sole so that the file fits into the hole provided for it.
- Insert a washer into the widening of each mounting hole, insert bolts into the holes and tighten them on the other side with nuts. It was a little difficult to tighten the bolts, so I secured the head of each bolt with a flat head screwdriver and turned the other side with a wrench.
Step 4: Install the jigsaw on the base


Lower the cover with the jigsaw onto the base with the stands and secure it on top with screws, having previously drilled holes for them. Be sure to countersink these holes to prevent the wood from cracking when screwed. The jigsaw should not touch the base and should have a good grip on the lid. Therefore, the screw heads must be flush with the surface of the lid, otherwise they will unscrew while the jigsaw is running.
From the remains of the board, I made two additional rear posts, so the machine became much more stable.
Step 5: Modification of the machine

At this stage, the machine is quite functional; it is enough to simply secure it with a clamp on the tabletop and you can work.
I identified two features of my jigsaw:
- the blade moved a little to the sides, especially when working at high speeds.
- The blade width was wider than standard jigsaw blades, making cutting particularly thin holes poor.
Step 6: Reduce the width of the canvas


A narrower blade will give you the ability to cut fine curves and make it easier to cut rounded corners.
- Pull the saw to the maximum, do not forget to turn off the jigsaw from the mains.
- Mark the point where the blade exits the housing. Below this point nothing needs to be removed.
- Remove the file from the jigsaw and use a grinder to grind the blade down to the desired width. When grinding, dip the file in cool water so that it does not overheat, otherwise the metal will lose its hardness and the file will no longer be able to cut through anything. A change in color is a sign of overheating of the metal.
- Once you have the desired blade width, place the file back into the jigsaw.
Step 7: Making a guide for the file


The guide will prevent the blade from moving to the sides during cutting, especially at high speeds.
I made the guide from a small strip of PVC plastic. At one end of the strip, use a jigsaw to make a small slot at an angle to the middle of the strip. We secure the strip behind the file by screwing it to a wooden L-shaped piece mounted on the lid of your machine. The guide can be lubricated with oil for better movement.
Remember:
- The guide should never be higher than the blade at the lowest point in the blade's path.
- The guide limits the size of the material you are going to cut due to its height and mounting point on the surface. Therefore, it is better to fix the guide as high as possible (taking into account the previous remark), and move it as far away from the canvas as possible, with a slope to the side as soon as possible.
Step 8: Conclusion


With a little effort, you will have an almost real tabletop jigsaw. Of course, it will not replace a real machine, but given its zero cost, it is an excellent option.
Crafts made from plywood will decorate your garden and flower bed, kindergarten area and playgrounds in the yard. From this material you can create decorative elements for the interior of a room, a wall panel or toys for children. The figures of animals and birds, people and insects look interesting. You can make fairy tale heroes and cut out children's puzzles.
It is not difficult to cut out of plywood; you need to purchase the material, have the necessary materials for surface treatment and painting of finished products. The drawing is thought out in advance, it is either immediately drawn on the surface of a wooden sheet, or an image is copied from Internet sites if you do not have artistic abilities.
In this article we will tell you in detail how to cut plywood and which material is more suitable for the job. You will learn detailed information about the types of plywood sheets, as well as which jigsaw is more convenient to use when cutting along contours. We’ll also tell you how to correctly transfer a design from a sheet printed on a printer to a wooden surface. Let's present several options for products made from plywood sheets, created by craftsmen at home.
Material characteristics
Plywood is a wood-laminated board assembled from veneer or tree bark. Birch or coniferous trees are used. The sheets are distinguished by the thickness of the canvas, the types of coating of the outer layer and the type of glue that is used to glue the layers together.
If you want to place crafts cut from plywood in the fresh air, then it is best to take sheets assembled using phenol-formaldehyde glue. It's called FSF plywood. It has the highest level of protection from moisture and resistance to environmental influences. But such products cannot be used indoors, as they are harmful to health.
For children's crafts and decorative elements for the interior of rooms, use FK type plywood based on urea glue. Such sheets are used for furniture even in kindergartens. It is not harmful, but is not able to withstand moisture. Therefore, such crafts cannot be soaked in water.
Hand tool
To cut a figurine of a person or animal from plywood, you need to have a special tool. Work at home is done either with a manual jigsaw or an electric analogue.

A hand jigsaw is an arched metal frame with file clips at the ends. The saw blade has a thin size, thanks to which you can cut out figures by changing the sawing direction. The frame is large in size so that the saw can be used inside a sheet of plywood.
If the work begins not from the very edge, but from the inner point, then you must first make a hole in the middle of the drawn figure with a drill, and then insert a saw into it, unscrewing one of the jigsaw clamps. After stretching the blade, secure the saw back with a clamp and continue cutting along the contours.
Electric jigsaw
This tool has a motor that drives the saw. There are battery-powered options for working on-site or on the street, and there are jigsaw models for plywood with an electric cord.

There are guide rails at the bottom of the jigsaw that protect your hands from injury. It's faster to work with, but you need to have the strength to hold it in place and only move along the drawn line. If you decide to take cutting out figures from plywood to an industrial level and make money from this craft, then purchase the following version of a jigsaw.
Bench electric jigsaw
This is an excellent and convenient tool for working with plywood. It is permanently mounted on a flat surface, operates from a regular 220 V outlet, and is equipped with a dust bag for sawdust and fine dust.

When working with such a tool, the master does not hold the jigsaw in his hands, but holds and moves a sheet of plywood. This is much easier, so even women can cut out figures from plywood.
Drawing a design on a sheet of plywood
If you know how to draw well, then before cutting a figure out of plywood, draw its outlines onto the wooden surface with a pencil or marker. If you do not have the talents of an artist, then you can either redraw the picture from the finished one, or transfer it using the method shown in the photo below in the article.

The selected design is printed on a sheet of paper using a printer, then draw its outlines with a thick marker and, turning the sheet over with the design facing the plywood, iron the back side with a hot iron. The design will be imprinted on the wood. If the print comes out with gaps, re-draw it with a marker. Then cut out the figure using a jigsaw along the bright lines.
Some craftsmen attach a sheet of paper directly to the plywood with thumbtacks on the edge and then cut out the design with the paper at the same time. But here an opportunity may occur and a sheet of paper will move to the side due to vibration, ruining the evenness of the line.
Figurine processing
Let's first look at what can be cut out of plywood. These can be large figurines for the garden, for example, a rat running away from a cat, a bunny sitting in the middle of a flowerbed, figurines of the fabulous Cheburashka and Gena the crocodile playing the accordion. They can be installed on a long block and buried in the garden.

In order for the figurine to look neat, it needs to be processed correctly. Plywood has rough edges after sawing. All irregularities must be removed using sandpaper. First take a coarser one, for example No. 80, then wipe again with No. 100, fix the result with a fine one, for example No. 180 or No. 240 grit.
Surface coating
After sanding, the surface of the plywood must be dried and dust and sawdust residues must be thoroughly wiped off. If necessary, cover the top with a thin layer of putty to perfectly level the surface. If this is not important, since the craft will be located on the street or in the garden, then you can skip this procedure.

Before painting, the surface must be primed. Most often, ordinary drying oil or a primer with an alkyd base are used for these purposes. Now there are special compounds on sale that fill the pores of wood.
This is an important stage in preparation for painting. After all, wood is a living natural material; it can change size due to changes in temperature and humidity, the pores of the wood narrow or expand. If you apply paint right away, such changes will quickly cause it to crack. The primer fills all the cracks and pores, which will protect your craft from such a fate.
Painting of products
It is best to paint plywood with acrylic paints. They are safe and environmentally friendly, sold in a variety of colors, which allows you to make the figurine bright and colorful. The paint adheres easily to the surface of the plywood. If the craft is installed outdoors, then you can use facade paint. It is as durable as acrylic, but has a specific smell.
If the surface is monochromatic, you can use a sprayer or roller. If you are applying a multi-color design, you will need several brushes.

Plywood is painted only along the grain. After the first layer has dried, you need to sand the dried craft again with fine sandpaper, since the paint raises the wood pile a little. Re-paint the figurine to brighten the color.
Crafts for home
If we cut out animals from plywood to play with children, then it is advisable to treat the surface of the toy only with sandpaper or, in extreme cases, cover it with acrylic varnish.

When cutting along the contours, you can make such a wonderful puzzle of elephants of different sizes. This is an educational game that teaches children to navigate in space.
As you can see, plywood figures can have a thematic focus. This could be a craft for the birth of a child in the family or a heart for a wedding in the shape of a puzzle. But most often such figures are made to decorate a personal plot.
The basic skills that are taught in labor discipline classes, for the majority of people, remain just a couple of trinkets for memory. But for some, a favorite hobby begins with the basics of working with metal or wood, which later brings pleasure from the opportunity to show imagination, apply skill and end up with a household item or simply a decorative item. One of these areas of folk art is sawing out of plywood, which is also popular among users of the FORUMHOUSE portal. We will dwell on it in more detail in our article, we will analyze what, with what and by what technology real carved masterpieces are created and in what cases stencils are used for cutting. Fortunately, our craftsmen are happy to share their experience.
- Characteristics of plywood
- Tools, templates, assembly


Characteristics of plywood
Plywood is a multi-layer, sheet building material made from veneer of deciduous or softwood by gluing several layers into a single sheet. Due to the peculiarities of the arrangement of the fibers (at one angle), the sheet usually has an odd number of layers - three, five or more. If coniferous varieties are represented in several plywood (fir, spruce, pine), then deciduous ones are mainly made of birch. There is also a combination - a coniferous “filling” and birch cladding, in which case the plywood will still be birch. The best is entirely birch plywood, but it is also the most expensive.
The material is divided into varieties and brands, depending on the decorative effect and the chemicals used in production. There are five grades, differing in the quality of veneer and the appearance of the sheets:
- Elite grade (E) - no defects on the surface of the material, uniform, monochromatic, smooth texture without knots, cracks, wormholes or repair inserts.
- First grade (I) – there may be microcracks (up to 20 mm) and knots of small diameter on the sheets.
- Second grade (II) - even fused knots are acceptable if their number does not exceed ten pieces per 1 m² of sheet and their diameter does not exceed 25 mm. There may also be some wormholes and veneer repair inserts.
- Third grade (III) – fused knots without quantitative restrictions, voids in place of fallen knots, up to a dozen wormholes (up to 6 mm) per 1 m² of sheet.
- Fourth grade (IV) - the sheet must have a strong adhesive connection, peeling is unacceptable. The entire spectrum of appearance defects - in almost any quantity, but the diameter of wormholes, knots and voids - no more than 40 mm.

The grade concerns only the outer layers of the sheet and is indicated by two numbers, and the grade can be either common to both sides or vary, more often, within the same grade - I/I I/II E/I and so on. Except for the fourth, lowest grade, all other grades of plywood are sanded on both sides, and the elite grade can be additionally varnished.
Naturally, the higher the grade and decorativeness of the material, the more beautiful the finished product will be. But considering that the cost of the elite, and even the first grade, is decent, and the parts cut out are most often small in size, you can use a lower grade if you actually cut a high-quality blank from the sheet. The plywood from which the workpiece will be cut should not have knots - they may fall out and other defects. They also pay attention to the ribs - you cannot cut out masterpieces using fragments with voids in the middle layers.
The grade of plywood and its main characteristics are determined by the chemical compositions used:
- FB – impregnation of veneer with bakelite varnish, which provides resistance to high humidity.
- BS – bakelite glue (alcohol-soluble), provides high performance characteristics, such plywood is stronger and more durable.
- BV – water-soluble bakelite mixtures; plywood is resistant to high humidity.
- FC – phenol-urea resin bonding, relative water resistance, for indoor use.
- FSF – gluing with phenol-formaldehyde resin, moisture-resistant material for external use.
Which plywood is suitable for sawing
For cutting out products intended for home use (boxes, stands, shelves, utensils, decorative elements), the best option is FK plywood.
Phenol-urea resin is safe for others and tolerates high humidity well, so products made from such plywood do not emit harmful substances and are resistant to deformation.
FSF brand plywood is not suitable for household items due to aggressive formaldehyde, but it can be used for outdoor decoration - carved trim, coffee tables for open verandas or gazebos, various benches.
For cutting, plywood with a thickness of 3–5 mm is most often used. If loads are expected (chairs, stools, benches, tables, etc.), the thickness is increased. It is more difficult to cut from a thick sheet (more than 10 mm), so lace openwork from such material is unlikely to be obtained. As an option, a main canvas made of thick sheets and carved inserts to increase decorativeness.
Portal member temernik, who opened a topic that is still active to this day back in 2011, uses sheets of different thicknesses, depending on the purpose of the objects.
temernik FORUMHOUSE Member
For my father’s anniversary, I cut out a carved frame from 4 mm plywood, and 8 mm thick sheets were used for the stand for the flower pot on the bears.

Tools, templates, assembly
Patterns on plywood are cut out with jigsaws - this can be either a manual or electric tool. For complex, openwork elements, a manual jigsaw with replaceable files is often used. They can accurately cut out the most intricate patterns, while a jigsaw is more likely to ruin the design if the skills are insufficient.
Even in labor lessons, they teach that the quality of the saw and ease of use largely depend on the tension of the file - with a loose set it is more difficult to make a cut exactly according to the template.
Temernik uses his son’s old jigsaw, left over from his school days. This simple tool is enough for him to create his plywood openwork.

To start cutting out a design, a puncture is made on the blank with a sharp awl, into which a file is then inserted; the second option is to drill with a drill with a thin drill bit. In both cases, it is not recommended to bring the hole directly to the contour line, if the motive allows. Puncture or drilling at a distance will help avoid possible cracks and “cuts”. To process the edges of cuts (ribs), files or sandpaper with the appropriate grain are used; this grinding gives the pattern a finished look and removes minor flaws, leveling the edge. In addition to the basic tools, you may need pliers, a hammer, a drawing set (ruler, compass) and others.
Even the simplest design is cut out according to a template applied to plywood - if you have artistic talent, the patterns for sawing are drawn “out of your head”; if nature is not so generous, they are transferred from a stencil.
There are enough standard preparations on the Internet in free access, in thematic publications. In a thread on the forum, many craftsmen share their favorite templates with each other. Temernik The Internet and my wife’s drawing talent help.
temernik
I take drawings from the Internet, then I come up with a method of fastening and modify it; if something is wrong, then my other half completes the drawing, she does it well.
The design is transferred from the stencil to the plywood with a pencil or pen; for convenience, the base is secured to the sheet with buttons. Particular attention is paid to small contours; a few inaccuracies can spoil the entire appearance of the finished product.
To increase decorativeness, products cut from plywood are joined into a tongue-and-groove pattern and glued, most often with PVA glue for wood. First, dry “fitting” is carried out, and after adjustment and cleaning, the adhesive assembly is completed.
temernik
Everything is attached in the following way: some parts have grooves cut out, others, on the contrary, have protrusions, everything is first fitted “dry”, and then assembled with PVA glue. The ends were sanded.
After assembly, the plywood is covered with protective and decorative compounds - varnishes, stains, paints, depending on the desired effect.


Examples of work by portal participants
Open temernik The topic received a lot of responses, many shared their creativity in it.
Bosun1955 I started with a similar technique.

And now he combines it with equally interesting, multi-layer cutting.

Boatswain1955 FORUMHOUSE Member
I finally understood the essence of cutting out plates of various shapes - two drawings of the same size are made, the waves are drawn in opposition to each other. That is, where on the first there is a ridge, on the second there is a trough. After cutting, the parts are assembled one at a time. This makes two plates. I sawed with a hand jigsaw without any fuss; for a long time I could not figure out how such shapes were made. So I took my soul away a little, sawed some plates and a basket.


56Vladimir1981 He is also a master at using a jigsaw.