Drawing pattern. Pattern ruler - how to get rid of routine measurements? Construction using a compass
Sewing is a technologically complex and multi-stage process of creating things. The key task for a tailor is not so much to sew a product, but to be able to design it, creating a high-quality pattern. For seasoned professionals, this process occurs easily and smoothly thanks to their vast experience in their field and because they have irreplaceable assistants - patterns. These are ready-made templates with which you can quickly and correctly make a pattern.
What is a pattern?
Patterns are special tools that tailors use to facilitate the design, modeling and construction of a pattern and its details. Their main function is to measure the contour of a particular curved line in drawings with subsequent correction. To avoid special terminology and give a more understandable explanation of this subject, we can say that patterns are ready-made templates according to which the basic pattern of the future product or its individual elements is built. Thus, the greatest difficulty for fashion designers when making a drawing is often the marking of curved lines of the armhole, shoulder, collar, neckline and others. This is why patterns were created.
In the sewing business, this term also refers to template patterns, the so-called basic patterns. These are variants of the most common product models, the details of which are modified along the way depending on the style of clothing and the wishes of the client.
Types of curves
There are several types of sewing patterns. First of all, these are instruments of constant or variable curvature. In the first case, the tool is a ruler without a scale or markings with one or more curved lines, with the help of which circles are lined up in the drawings. Variable curvature patterns are special corners with a scale and an additional device that helps to selectively lower or raise the curve, taking into account a specific model. Most often, such tools provide millimeter markings to help you adjust the part to size.
Patterns for sewing clothes are both ready-made patterns for a product and only a basic drawing of the human body on paper. The latter is carried out in accordance with the measurements taken. It is on the basis of the basic template that the final versions of the models for cutting are created. There are also working patterns for sewing clothes. They are designed based on the features of a particular model, a standard size chart, and according to the customer’s individual measurements.

Basic cutting tool
Professional patterns are high-precision tools with which a tailor can perform several functions at once. The main and most significant is the competent and accurate design of a drawing for a clothing model. However, even after creating the pattern, it is too early to put the pattern aside. It can be useful in adjusting it, making changes after the first fitting, as well as when adjusting the product to your figure.
Another area of use for a tailor’s tool is transferring ready-made patterns (for example, from magazines or downloaded from specialized websites) onto paper. The templates presented in periodicals are also patterns, the size of which is highly averaged. Using tools, the cutter will be able to adjust the pattern to the desired parameters.

Where can I get a pattern?
Beginning tailors often face a reasonable question about where to get clothing patterns. Especially if the sewing process is put on a conveyor belt, and the master simply does not have enough time to make patterns manually every time. It is much easier and more effective to adjust a ready-made sample created on the basis of patterns to the desired size and style. This tool can be purchased at specialized sewing stores.
Retail outlets offer their customers several varieties of it, the most popular are for drawing armholes and sleeves, universal. In the first case, we are talking about a small instrument, shaped like a golf club. The inner side of such a pattern is smooth, but the outer side is a convex line that ends in a wide circle. A marking scale is applied along the entire length of the arc, which greatly simplifies the work of the designer.

A universal tailor's pattern is a corner with graph paper, inside of which there is one or several curves of different lengths and depths. Some models even have special slots for creating buttonholes. In addition, patterns with a large number of arcs and curves of variable radius are realized.
Alternative
The price of a simple plastic pattern in specialized sewing stores starts from a thousand rubles. More advanced models can cost 2-3 thousand; for a high-quality professional tool you will have to pay even more.
However, you can always cheat and buy ordinary drawing patterns, which are sold in stationery stores, and build patterns using them. Another option and the opportunity not to spend money on expensive tailor’s tools is to create patterns yourself. It is enough to create a high-quality pattern according to the required parameters once, transfer it to thick cardboard or paper (glossy magazine covers are good for this) and use the resulting template in the future.
I think that many of you, when drawing rounded parts, use improvised materials - a plate, a jar lid.
But this is terribly inconvenient, isn’t it? Every time you need to draw or draw a rounded part, run around looking for a suitable round object. Isn't it better to collect all the necessary circles in one place?
Yeah! Collect plates or lids, jars or boxes in one pile? :) And where should I store all this?
No! Everything is much simpler!
The idea for this master class arose when I needed to restore my old tattered patterns.
I draw a lot. I draw with my hands - a pencil with a ruler, a square, I use a regular eraser - these are my main tools for design work. And, of course, I constantly use it at work. such a pattern that I want to tell you about and show you how to make it with your own hands.
Actually, this pattern is correctly called - pairing pattern.
You can buy it at stationery or handicraft stores.
In some cases they are convenient. But their main inconvenience, in my opinion, is that it is very difficult to draw the same line twice. The pattern is very movable and has no fixation.
If you are repeating the same curvilinear contours, then it is better to make a mating pattern for yourself. In my work, I most often use several of the most common radii and several arbitrary ones.
Such patterns can be used not only in sewing, but also in other types of creativity where beautiful contour lines are needed.
An example of a working pattern, where I used a pattern with radii or a mating pattern

As you already understand, we need a pattern with radii for several reasons:
1. A beautiful harmonious look of our products - if we draw many identical ones, that is symmetrical lines, nodes, contours.
2. Saving time - if we don’t want to run around looking for the “right circle” every time.
3. Your signature contour - if you have some kind of personal, signature and very beautiful contour, then with such a personal pattern you can do it quickly and accurately.
______________________
We will make the pattern in 3 ways:
- in science - using a compass;
- using available materials - using lids, jars and other suitable round objects;
- artistic, that is, we will draw as we want (within the strict framework of a geometric figure).
We will need:
- A piece of cardboard, a cardboard folder from a binder, designer cardboard, a shoe box lid, whatman paper, in general, any thick paper. I just don’t recommend using corrugated cardboard - it’s very inconvenient to draw on a loose edge.
- Square.
- Ruler.
- A simple pencil.
- Eraser.
- Compass.
- Scissors.
- Suitable plates, jars, lids.

So, first way, scientific :)
We work with a compass.
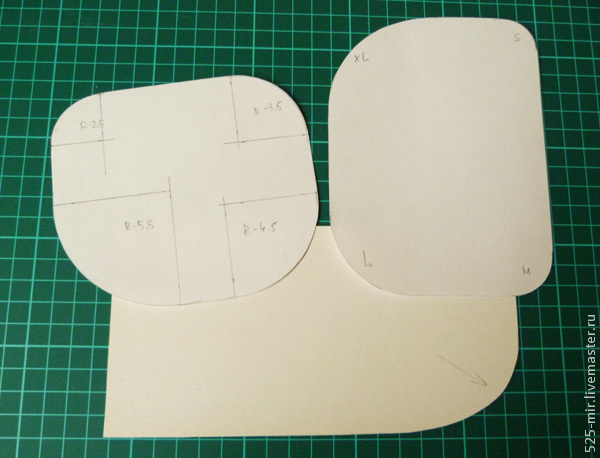
Using a compass, we will make patterns for small radii of 2.5 - 3.5 - 4.5 - 5.5 cm.
1) I suggest drawing several rectangles at once, so as not to be distracted by the routine later.
I got rectangles that fit into pieces of whatman paper - approximately 11 x 14 cm or 12 x 16 cm. The main thing is that the finished pattern fits into A4 format - for convenient storage.
I hope everyone remembers from school that a rectangle is a figure with all right angles.
From my many years of experience, I realized that when working with such a pattern, it is more convenient for me when the radii are inscribed in a rectangle. It is more convenient to draw using this pattern, since for each radius there is a long and a short side.
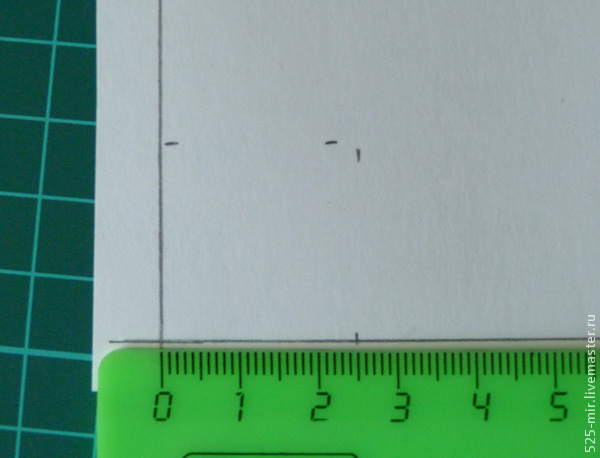
Example of long and short lines in the photo:


2) So, we drew rectangles:

3) Now we need to find the points from which we will draw our radii with a compass. Ours are 2.5 – 3.5 – 4.5 – 5.5 cm
From each corner we build a square with sides, respectively, 2.5 - 3.5 - 4.5 - 5.5 cm. In the photo I will show an example of constructing one corner with a radius of 2.5 cm. All other angles are built according to the same principle .


4) We take a compass in our hands and measure the radius using a ruler - 2.5 cm.

5) Place the leg at the point (red circle) and draw.


7) Immediately, so as not to forget which one is which, sign the value/number of the radii. This is convenient if we draw using different radii.

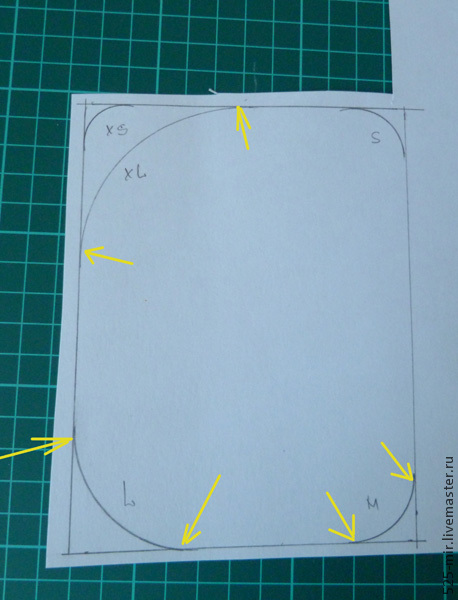
8) An even and beautiful joining line is a beautiful cut or pattern.
Please note that the connecting lines must match.
What is pairing? This is when straight lines smoothly turn into oval and vice versa.
On the picture yellow arrows- beautiful pairing, red— it didn’t work out very well and needs to be redone.

We put aside the finished pattern and move on to the next one.
Second way.
We use the “tools” at hand.
1) Take a new rectangle.
We select lids, jars, boxes, spools that suit the circumference - whoever has what is on hand.

2) Take a coin and circle it.
We carefully check that the lines are perfectly matched.


3) Repeat the same with the cap, coil and powder.
This is what we should get. We sign the resulting radii.
Again, I draw your attention to pairing lines.
4) Since in this master class I show the process of making my own patterns, I didn’t like the too small radius of the coin (red arrow), and I decided to circle the bowl (yellow arrow).

We put this pattern aside and move on to the next one.
Third way.
Art.
Here we will not have real radii, but some kind of arbitrary line.
After all, we often draw or draw something “by hand, by eye,” and if we have a lot of such drawing in our work, then we can make our life easier by making an auxiliary pattern. And there can be any number of such patterns. Or rather, as much as we need.
The convenience of using such a pattern is obvious - all our arbitrary lines will be the same!
1) Take the next rectangle and draw an arbitrary line by hand. The one we like!

Now we carefully cut out all the patterns at once.
In this photo you can see that I simply cut off the smallest radius of the coin.


___________________________
In conclusion, I want to show you how to use all our patterns.
On paper.
We draw some detail. We outline one rounding.

Then another - in a mirror image. This way we get perfect symmetry (the blue arrow is the middle of the part).

On fabric.


We put the finished patterns into a folder with files.
Now, when we need to draw a part with a rounded part, we will simply open the folder and take out the desired pattern.

I hope that with such patterns it will be easier and simpler for you to draw perfectly symmetrical curves.
And you can make any patterns, focusing only on your imagination!
_________________
I hope for your understanding.
Creative success!
Your Ira Bortnik.
The straight edge for checking the plane got its name from the Old Russian “lyakati” (lekati), which meant to bend. Thus, this is what they bend, bend. However, today both the meaning and areas of use are somewhat different; we will discuss this below.
The meaning of the ruler
A modern ruler-pattern has two purposes and, accordingly, two definitions. On the one hand, it is a tool for drawing or checking irregular curves. Many such devices can be seen in engineering departments. Drawing patterns come with variable and constant curvature. A ruler with variable curvature has a device with which you can change its configuration. Usually made of steel.
On the other hand, a measuring pattern is a tool without a scale, rather a template for tracing and controlling the contours of curved parts or parts. Typically, this is a steel plate with a working edge cut according to the profile of the product. Where and when this product was invented, and who first began to cut out parts and lay out walls along the finished contour, is now difficult to determine. The idea turned out to be fruitful and today various patterns, templates, squares and rulers are used in all spheres of human activity.
Ruler-pattern in industry
Shoes are sewn using patterns, cookie molds are made, even the smallest garment is cut using a ruler. But besides these well-known industries, such devices are used in aircraft manufacturing, shipbuilding, automobile manufacturing, in the construction of houses and roads, tunnels, in finishing work for architectural and interior decorations. Using such lines, non-standard decorative bricks and many other different parts and products are formed, which must be absolutely identical in size and configuration.
Shipbuilding patterns are distinguished by their unique shape, with many combinations of curves and smooth lines. Therefore, the creation of such rulers is possible using the template-plaz method (plaz or plaz - area). The plaza room must be spacious enough so that the entire theoretical drawing can be transferred to the floor plane. Previously, such a drawing was made with graphite pencils on a light wooden floor.
Now the contour is transferred using modern photochemical methods, this significantly facilitates and speeds up the work. Patterns are made directly from the drawing. They are made of transparent plastic with marks of joints, rivets and bolts. The work of making rulers is painstaking, requiring patience and time. Almost all edge making and finishing operations are carried out by hand. The drawing on the floor is kept until the construction of the ship is completed. The production of aviation patterns is carried out according to the same scheme. They are all numbered. Paired parts are made according to one template, if necessary in a mirror image.
Particularly high demands are placed on the accuracy of manufacturing aircraft and ship patterns.
In the automotive industry, bodies and cabins are cut out using such lines. Blanks for mass production are made of hard metals; for piece production, less hard materials can be used - thick cardboard or plastics. Patterns are widely used in the production of containers for the chemical industry, especially for the manufacture of gas tanks (spherical containers). Such containers are used to store aggressive liquids, often under high pressure, so increased demands are also placed on the patterns for manufacturing.
Pattern ruler in construction
Arranging arched openings using patterns greatly simplifies and facilitates this labor-intensive operation. It consists in the fact that the ruler is made in accordance with the design of the structure, installed between the walls and secured. Brickwork is done according to the pattern. The Roman staircase is constructed in approximately the same way. Templates are made according to the shape of the steps. Most often, such stairs are installed in swimming pools, and the steps, in fact, are an extension of the bowl. The steps of Roman stairs usually increase towards the bottom, and each one has its own pattern.
In many country houses, wooden stairs are installed. and stringers (if the stairs are installed on this type of supports) are also cut according to the pattern. Such templates are usually made of thick cardboard and do not require special precision. When roofing roofs, it is always necessary to cut holes for chimney and ventilation pipes. For each project, separate patterns are prepared in accordance with the angle of the roof slope and the size of the pipes.
They are used to control the laying of slopes when constructing pits, drainage ditches, ditches, etc. Such patterns are made from thin boards and have the shape of a triangle, the hypotenuse of which is the slope line. A liquid level is built into one of the legs. To mark the slope line, a ruler is placed on one of the corners so that the level shows the horizontal location of this side, then the hypotenuse shows the magnitude of the slope. Separate levels are made for areas of different heights.
Plaster patterns are made of thick plywood, particle boards or boards, and are impregnated with drying oil or painted with oil paint. Using such templates, window and door frames, cornices and other architectural decorations are formed. The patterns are fixed strictly horizontally and at the same level if there are several windows. The solution is poured onto the thickness of a ruler and leveled with plastering tools. After removing the workpiece, platbands remain that repeat their shape.
Using patterns you can round the corners between the wall and the ceiling. These templates are made on site and can be made from ordinary plywood, metal or hard plastic. The technology is simple: a sketch of the solution is made in the corner, then stretched with a pattern. Because The plaster layer may be too thick, then the operation should be performed in several stages. Begin each next stage after the previous one has completely dried, and with a new pattern, larger in size, but of the same configuration.
Types of pattern rulers - marking
Flexible patterns - rulers with variable curvature - are used to capture and reproduce irregular curves. They are a strip of flexible steel to which spacers are attached to hold the rail in a given position. The pattern triangle is used for marking and checking right angles, is used in metalwork to check the perpendicularity of the arrangement of parts and parts, and is made of stainless steel.
Straight edges are used to check flatness for clearance and straightness. They are made from high-quality hardened steel, accuracy class 0 or 1. LD grade with polished working surfaces located on both sides at an angle in the shape of a knife, is used to control the accuracy of metalwork and pattern work. The LT and LC rulers have three- and tetrahedral shapes; a radius groove runs along all working parts.
Model ШД – straight edge, used to control the plane of machines, tables and other working surfaces. It is made of tool steel, the cross-section is an I-beam with a wide working surface. The UT ruler is triangular, angular, and is used to control the flatness of the surfaces of metal products using the “spot on paint” method (the clarity of the contact trace is checked). These rulers are made of cast iron. Most often, such metal rulers have a heat-protective coating.
Pattern Patterns
Pattern- a drawing tool for constructing or checking curves. A constant curvature pattern is a template containing one or more different curves of variable radius. A variable curvature pattern is usually a steel strip (ruler) with a device that changes its curvature.
The tool allows you to relatively accurately construct sections of curves such as ellipse, parabola, hyperbola, and various spirals. Also used for making clothing patterns.
The measuring pattern is a scaleless measuring tool for monitoring the curved contours of parts. The measurement is usually made by assessing the width of the gap between the pattern and the part or using a feeler gauge that is inserted into the gap.
The simplest construction is done in sections: for each section, three points are constructed, a suitable curve on the pattern is selected for them, and a line is drawn as if under a ruler. In addition to these three points, the presence of several more neighboring points or directions is absolutely necessary (they are sometimes not constructed explicitly, but they exist in the mind of the drawer), since through any three points that do not lie on the same straight line, a circle can be constructed.
Modern patterns are cheap and at the same time indispensable for manually constructing curves that cannot be constructed using a compass and ruler.
Modern computer-aided design (CAD) systems use vector graphics to produce the most accurate curve radii. They don't need patterns.
Musical treble and bass clefs have a shape reminiscent of patterns.
Story
The invention of the pattern improved the quality of drawings, allowing curved lines to be drawn, and gave people the opportunity to create better buildings and products.
see also
Wikimedia Foundation. 2010.
Synonyms:See what “Lekalo” is in other dictionaries:
1) patterns according to which ship parts are finished and plasterers draw out cornices. 2) instruments for measuring the diameter of kernels or calibrating them. 3) a curved figure, used when drawing. Dictionary of foreign words included in Russian... ... Dictionary of foreign words of the Russian language
Model, template Dictionary of Russian synonyms. pattern noun, number of synonyms: 2 model (44) pattern ... Synonym dictionary
1) a drawing tool for drawing or checking curved lines. 2) A measuring tool or marking device (template) with a working edge corresponding to the profile of the product. Serves to control or outline curved contours of shaped... ... Big Encyclopedic Dictionary
MATTER, pattern, cf. (specialist.). Template, model for making curved lines in construction work or modeling. || A special ruler for drawing curved lines. Ushakov's explanatory dictionary. D.N. Ushakov. 1935 1940 … Ushakov's Explanatory Dictionary
MEDICINE, ah, cf. 1. A drawing tool for drawing curved lines. 2. Template, model used in the manufacture of products with complex profiles. | adj. patterned, oh, oh. Ozhegov's explanatory dictionary. S.I. Ozhegov, N.Yu. Shvedova. 1949 1992 … Ozhegov's Explanatory Dictionary
Wed. pattern, sample for the external outline of a thing; curved rules of various types, for curved drawings, especially ship drawings; a sample hewn from boards according to a drawing, in full size, for lining ship members and iron ... ... Dahl's Explanatory Dictionary
When starting to sew, the master acquires a whole arsenal of tools - a notebook with measurements and sketches of clothing models, measuring tapes, special tailor's pencils, not to mention equipment (a machine, an overlocker). The more tailors immerse themselves in their craft, the more professional their skills become, the more ready-made designs, basic patterns and templates they have. Set aside, previously made samples allow you to reduce the time for modeling an individual drawing according to dimensions (your own or the customer’s), quickly and accurately draw all the lines. One of the most convenient tailoring tools is a pattern. Even those who are just starting to sew should get them.
The tool is a ready-made template consisting of curves - fragments of circles of different radii, smooth lines, angles. With its help, you can quickly draw identical parts, maintaining proportions, symmetry and evenness of the drawing. Tailor's patterns are indispensable if you need to draw a beautiful line for an armhole or neckline, smoothly round the bottom of a dress or skirt, draw a collar, and so on. Working with them is simple: just select the desired area in the drawing, identify several key points, attach a shape and draw a strip along it like a ruler.
In order not to use improvised means when sewing - lids, jars, coins - you need your own patterns. Ready-made ones are not always convenient if the master works according to individual sizes. It’s worth making several templates yourself so that, using them, you can draw out elements on the pattern as quickly as possible. You can assemble a set for any type of clothing, for all rounded and pointed parts of the drawing, and simply “assemble” it while working.
What are the patterns?
In tailoring and drawing, patterns of two types of curvature are used - constant and variable. The first are “static” figures with fixed lines, the second can be changed. Patterns with constant curvature - a classic pattern familiar to tailors with several bends on the sides (for example, a standard pattern). A variable type tool looks like a ruler with a device attached to change the curvature.
A separate type is a flexible mating pattern. This is a “moving” tool that is used to measure complex curves by transferring their outlines onto paper. There is no fixation, and it is very difficult to draw the same line twice. They, like measuring or slope ones, are of little use in tailoring and are used mainly by designers, road engineers, and builders.

etsy.com
Traditional tailor's patterns, which are used in the design of clothing, are tools of several types.
- "Corner". In any pattern there are many pairings of sides with a vertex point - from the basic rectangle on the drawing grid to triangles for darts. Angle patterns are needed if the pattern paper is not marked or you want to easily draw parallels and perpendiculars. The template usually also has a curved side that allows you to draw a curve along the side or bottom.
- "Barrel". This pattern is often called a “saber”. It may have a different size, radius of the circle of the edges. With its help, sides, darts, bottom hem and sleeves, raised and rounded lines are drawn.
- “French” (or for armhole). A very useful and popular tool among craftsmen. The line along the armhole is often difficult; it is difficult to draw it by hand without breaking the symmetry. The pattern will allow you to model a neckline with different depths, adjust and adjust patterns to fit, and draw the sleeve cap.
- Patterns of “drop”, “allowance” shapes, universal, combined varieties.
Why you should make your own patterns
Making a sewing pattern with your own hands is not difficult, and there are many benefits from it. The template can be used for designing clothes, making soft toys and other handmade items, doing creative work, and so on. Having made several templates with the most “usable” radii, curvatures and angles to the desired dimensions, you can create patterns without even thinking about drawing complex lines - hyperbolas, parabolas.

livemaster.ru
Patterns allow:
- sew things that are harmonious in appearance, with respectable proportions, designing beautiful side seams and design lines;
- save time when working, do not create new paper templates every time - if the pattern is basic, you can immediately draw on the fabric using a pattern;
- work according to a “branded” individual contour - if you have come up with spectacular lines for clothes that particularly suit you, they should be saved in the form of a pattern;
- maintain perfect symmetry on “mirror” rounded parts.
If you apply markings to the pattern (for example, along the long side of the “angle” variety), it will replace the ruler. By making several templates and collecting them in a separate folder, you don’t have to waste time lining up curves with a compass. It is enough to get a sample of the desired shape.
Basic principles of pattern making
Before you make your own patterns, you need to choose a material and shape for them. Factory products are made from plastic, wood and even metal. It is not necessary to cut out, but in any case it is worth taking material stronger than tracing paper or ordinary graph paper, otherwise the template will quickly become unusable. You can take thin transparent plastic, which can be cut with good scissors or a paper knife. It is easy to mark it using any paint, even nail polish.
Patterns for DIY sewing are also made from different materials.
- Made from thick cardboard (not corrugated, it’s loose). The best option for quickly making a template that, if handled carefully, will last a long time.
- Made of polyethylene film, transparent but dense (like material for covering plants or furniture). The pattern can be rolled into a tube, it will not take up much space.
- Made from flexible paraplene, thick glossy paper and other wear-resistant materials.

rukodelie.kz
Most patterns are marked with centimeters and millimeters, halves, quarters, thirds and even sixths. Take your time: this will help you immediately determine the necessary parameters on the pattern and save time on additional calculations.
If you are making a device from a transparent material, you can draw allowances on it - usually mark levels of 0.6, 1.2 and 1.5 cm. When cutting, it will be easier to be careful - this is especially important for novice craftsmen. On the rounded sides, place degree markings for angles (from 30 to 90 degrees) and, if desired, an additional measuring scale to make the length of curved segments easier.
Simple ways to make templates
To design your own patterns, prepare everything you need:
- base - plastic, film, unnecessary shoe box, any dense material;
- “auxiliary” paper - graph paper, copy paper, tracing paper;
- pins and needles;
- scissors and shoe knife;
- pencil, eraser and pen;
- squares, rulers, objects with rounded edges;
- compass - for precise design.
The simplest samples can be made using materials at hand (jars, plates) or drawing lines by hand. For the greatest accuracy and ideal mates, you need to draw correctly - using a compass, calculating the lengths. If you need to quickly make a template, you can limit yourself to a simple option.
- Trace the edges of a rectangular base with objects of different diameters - from a coin to a dish.
- Carefully draw the junctions - the places where the curved line transitions into a straight line.
- Label each corner on the inside with a radius symbol.
- Cut out the finished pattern.

qulady.ru
You can also draw on the base by hand, arbitrarily choosing the outline of the template. Full circles are not needed - just mark the key points. If the hand is steady and the eye is true, the figure will be smooth and symmetrical. It's better to practice a little on plain paper and then draw random lines on the chosen base.
You can make patterns using a finished item or a pattern that you like and has been “tested in practice.” For example, if there is a basic drawing of a skirt from which different models are created, it can be used to construct a template. The pattern pieces need to be placed on thick material and carefully traced along the contour, not forgetting to transfer the darts. If a finished product is used as a prototype, you need to:
- rip the item apart at seams and darts;
- Carefully pin the carbon paper onto the desired fabric part with a paint layer;
- apply the base for the pattern to the ink surface of the copy sheet;
- circle the prototype part and darts (for these you need a carbon copy).
Darts can be transferred by pricking the contours with a needle or awl onto the fabric and cardboard right through. The holes should be made at a distance of 3-5 mm from each other. After pricking, the fabric is removed and the template is cut along the contour.

Construction using a compass
The most accurate way to make patterns is design using a compass. It allows you to make templates with small radii, up to 5.5-6 cm. The finished product must “fit” into the A4 paper format to make it convenient to use.
Progress
- Draw a rectangle on the base with sides 10-12 cm and 14-16 cm - this template will be easier to use.
- Designate the starting points of the radii - from each corner, construct a square with a side of the required size and draw a diagonal from the top of the rectangle to the opposite point.
- Measure the required radius on the compass using a ruler.
- Place the leg of the compass at the starting point of the radius and draw part of the circle, “cutting” the vertex of the rectangle with its line.
The remaining corners of the rectangle are drawn using the same principle. You should immediately sign the dimensions of the radii so that you can use them with ease later. A very important stage is the alignment of the mates. The transition between straight lines and ovals must be clear, you need to ensure that the lines match perfectly. After spending a little time, you will get a convenient universal tool for quickly and accurately modeling any patterns.