How to make a sewer in a private house. How to choose an autonomous sewage system for a private house - detailed instructions
Sewerage in a private house is absolutely necessary if you live there permanently, and it is highly desirable if you only bring the summer months there. I will help you figure out the basic diagrams of the sewerage system, and together we will analyze the algorithm for performing the key stages of the work.
Sewerage scheme
Sewerage for a private house is an essential condition for a comfortable stay. It is possible to use the street and cesspool only temporarily. Sooner or later, the question of creating an integrated system is understood.
Before making a sewage system in a private house, you need to decide on its configuration. The easiest way to do this is consistently:

- Analysis of existing communications. If the settlement has a centralized sewer network, then the work is simplified by an order of magnitude. It will be enough for us just to get to the collector pipe and connect to it.
To connect to a common collector, you need permission from the local administration, and it is better to entrust the work itself to specialists. But in any case, it will be much cheaper than making a sewer tank yourself.
- Determination of the type of tank. Here we have only two options: a septic tank or a cesspool. It is more difficult and more expensive to make a septic tank, but it needs pumping less often, a cesspool - on the contrary. The optimal choice is a septic tank combined with a biological treatment station, but the high cost acts as a limiting factor.

- Choosing a location for the tank. In this matter, you need to be guided by the current regulations, which determine the minimum distance from a pit or septic tank to various objects. It is advisable to find a point in the lower part of the relief (dig less) at a distance of at least 10 m from the house and at least 15 m from the well / well.
- Allocation of a room.The sewerage system of a private house should link together all the water discharge points. It is worth collecting them as close to each other as possible, therefore we determine where the bathroom will be located. It is advisable to place it against the outer wall, on the side of the house where the reservoir will be - this way we will spend less effort and money on laying pipes.

- Pre-planning.Based on the information received, we build a plan for the entire system and preliminarily calculate how much and what materials we need. According to the calculations, we plan the budget (we immediately put in it an excess of 30%) and evaluate whether the project will be "lifting".
If the preliminary stage ended successfully, you can proceed to purchasing and performing preliminary work.
Materials for creating an autonomous sewage system
An independent sewage system in a private household is a rather resource-intensive project. What is the minimum material required for its implementation?
The main items of expenditure are shown in the table:
| Illustration | Structural element |
 |
Ready septic tank.
The optimal solution for an autonomous sewage system is the installation of an industrial septic tank (Tank, Triton and analogues). Such products are equipped with multi-chamber tanks of sufficient volume and all the necessary devices for primary wastewater treatment, so we just have to install them. The main disadvantage - high price. |
 |
Plastic container for a septic tank.
A plastic (polyethylene, polypropylene) waste storage tank can be used as a reservoir. You can also purchase the so-called "Eurocube". A plus - complete tightness of the system. Minus - rather high cost and the need to install additional cleaning devices. |
 |
Concrete rings.
If saving money is a priority when creating a sewer system, then tanks for the accumulation and treatment of wastewater can be made from standard concrete rings. Disadvantage - the need to additionally seal containers and the complexity of installation. Perhaps, one cannot do without attracting a crane. |
 |
Pipes for outdoor sewerage.
To connect the cesspool or septic tank with the house, special outer pipes (orange paint) are used. They tolerate temperature changes well and do not deform even under significant pressure when laid at depth. |
 |
Pipes and fittings for internal sewerage.
Internal sewerage wiring is formed from polypropylene (gray) pipes with a diameter of 110 to 40 mm. Together with pipes, it is advisable to purchase the required number of fittings for registration of turns, bends, revisions, etc. |
 |
Pipe thermal insulation.
When laying the outer part of the network, as well as when installing communications in unheated rooms (basement, basement), there is a risk of pipes freezing. To avoid this, it is advisable to insulate the sewer system using casings made of mineral wool, polyethylene foam, polyurethane foam, etc. |
In addition to the basic materials that are used directly to create the system, additional ones will be needed:
- gravel and sand for excavation and drainage;
- cement mortar;
- sealant based on moisture resistant silicone;
- revision wells - if you need to lay a long or winding pipeline.

Outdoor work
Stage 1. The principle of operation and calculation of the volume of the septic tank
Sewerage installation in a private house includes two types of work:
- outdoor - consist in the device of the reservoir (cesspool or septic tank) and laying a pipe to the house;
- internal - presuppose the installation of piping in the house and the connection of water consumption points to it.

If possible, then these works are performed in parallel, but if not, then you need to start with the device of the outer part.
The most effective design for autonomous sewerage of a private house is a septic tank. Unlike a cesspool, it does not accumulate wastewater, but ensures its processing. At the exit, relatively clean water is obtained, which is filtered into the soil, polluting it with organic matter at a minimum level.

The septic tank works quite simply:
- Upholding... First, wastewater enters the first tank - a sump. It separates wastewater into fractions: solid particles precipitate (sludge), light organic matter floats on the surface, and clarified liquid is collected in the middle part. Here, bacterial decomposition of waste takes place with the release of gaseous reaction products and mineralization of the residues.

- Overflow... An overflow hole is made in the wall of the first tank, which is located at the filling level. Through the overflow pipe, clarified water flows from the sump into the second chamber, and solid residues are retained.
- Filtration... In the second chamber (filtration or drain well), the clarified waste flows through the drainage layer at the bottom. Drainage also retains some of the contamination, so almost pure water enters the soil.

Almost all septic tanks work on this principle, both home-made and factory-made. The difference lies in the design of the tanks, as well as in their number. Sometimes a septic tank has not two, but three chambers - then another tank is added between the sump and the filtration tank for more effective cleaning.
Before you arrange a septic tank, you need to calculate its optimal volume.
The calculation of the volume of the septic tank is carried out according to the formula:
V \u003d n * Q * 3/1000where
- V - the required volume of the septic tank in cubic meters;
- n - the number of people permanently residing in the house;
- Q - rate of water consumption per person, liters per day;
- 3 - average duration of wastewater cleaning, days.

If we take 200 liters approved in SNiP as the consumption rate, then, for example, for 4 people the volume will be as follows:
V \u003d 4 * 200 * 3/1000 \u003d 2.4 m3.
Stage 2. Installation and equipment of the sewage tank
Now let's figure out how to properly make the sewerage system in a private house. The algorithm of work on the device of a septic tank in the table:
| Illustration | Stage of work |
 |
Digging a pit.
In the selected place, we apply markings to the site, after which we dig a foundation pit to install the tanks. We select the dimensions of the pit with a margin - so that a layer of bedding and waterproofing / drainage can be laid on the bottom, and a clay castle can be made on the sides. For septic tanks of a small volume, the pit is dug manually; for large-scale structures, it is better to use the services of an excavator. |
 |
Preparation of the base.
We level the bottom of the pit, after which we lay the sand bedding up to 20 cm thick. Under the installation site of the sump (first tank), you can pre-lay a waterproofing pad made of clay or a concrete disc, the diameter of which will correspond to the diameter of the well. |
 |
Installation of containers.
We lower concrete rings to the bottom of the pit, from which we form two wells. We seal the joints between the rings in order to exclude the ingress of untreated wastewater into the ground. |
 |
Tank bottom device.
We make the lower part of the sump airtight, pouring a layer of concrete up to 10 cm thick. Additionally, you can treat the base with bitumen mastic and lay a waterproofing roll material. We fill in the drainage at the bottom of the filtration well: pebbles, gravel, broken ceramic bricks, etc. You can also make holes in the bottom ring of this tank or use a special perforated reinforced concrete blank. |
 |
Overflow decoration.
We connect both tanks with an overflow pipe, which we insert into the holes at a distance of about 1.5 m from the bottom. To prevent organic waste from entering the filtration tank from the sump, we install a T-shaped fitting on the pipe. Due to the presence of the lower branch pipe, such a fitting allows the selection of the clarified liquid under the surface organic film. The installation locations of the overflow pipe are carefully sealed. |
 |
Overlap and necks.
Floor slabs with holes for hatches are installed on the wells. If the septic tank is located deeply, then necks can be additionally used - narrower rings providing access for cleaning, revision and repair. |
 |
Ventilation and hatches.
We build a ventilation pipe into the ceiling. It is desirable to make it higher - this way the unpleasant smell will evaporate faster. We cover wells or separately withdrawn necks with hatches of a suitable diameter, fixing them with cement mortar. |
If the septic tank is below the groundwater level, then it is advisable to seal it outside using roofing material or bitumen mastic. Also, laying a dense layer of clay around the perimeter of the tanks - the so-called clay castle - will help prevent moisture from seeping into the chambers.

Stage 3. Laying pipes from the tank to the house
The next element of the external sewage system is a pipe connecting the tank to the house. Wastewater will flow through it to the treatment / storage facility.
Pipe laying technology:
| Illustration | Operation being performed |
 |
Digging and preparing trenches.
We dig a trench between the house and the septic tank with a depth of 50 cm to 1.5 m (the deeper the soil freezes in winter, the more you have to dig). For the most efficient drainage, we form a slope towards the septic tank of about 2 cm per 1 m. At the bottom we put sand bedding up to 15 cm. We moisten the bedding and ram it. |
 |
Pipe laying.
We put a waste drain pipe in the trench. The optimum pipe diameter for the outside of the sewer system is 110 or 160 mm. |
 |
Thermal insulation of the pipe.
If the septic tank is located relatively shallow, and the pipe cannot be deepened more than 1 m, the circuit requires additional insulation. To do this, we wrap it with rolled material based on glass wool or mineral fiber, or we use cylindrical casings of a suitable diameter. |
 |
Entering the septic tank.
We see one end of the pipe into the septic tank through a hole in the concrete wall of the well. As with the installation of the overflow, the hole is carefully sealed. |
 |
Entering the house.
The place of entrance to the house can be decorated in different ways, but most often the pipe is wound through a hole in the basement or foundation. It is advisable to insert a metal sleeve into the hole, which will protect the sewer system from damage during movements and subsidence. Also, the input node should be insulated. |
After the completion of these works, we fill up all the trenches and pits completely, and then we lay fertile soil or a layer of sod over the backfill.
It is also advisable to make marks on the wall of the house at the entrance. These marks will be needed when we look for exactly where the sewer pipes are laid.
How to make a sewer wiring correctly
Stage 4. The main elements of the internal network
The next stage is the arrangement of the internal sewerage system. Its configuration directly depends on where the sources of sinks are located, so here I will give a description of its main elements:

- Riser- central vertical pipe, large diameter (at least 110 mm), which unites all the circuits together. As a rule, in a private house one riser is made, but in large buildings there may be several of them. In the lower part, through the knee, it is connected to the outgoing sewer pipe.
- Fan pipe- mounted in the upper part of the riser, it serves to remove gases accumulating in pipes from the system to the outside. It is discharged into a separate ventilation shaft or connected to a ventilation pipe located above the roof level.

Without a waste pipe, the pressure in the system will increase, which can lead to incorrect operation of the shut-off valves. In addition, accumulated gases cause unpleasant odors.
- Trunk lines- pipelines with a diameter of about 50 mm (2 inches). Used to connect plumbing fixtures and other sources of drainage to the riser. Since the local sewage system is usually done by gravity (i.e., working without additional pressure), the pipes are laid with a slope towards the drain. For two-inch pipes, the optimum slope is about 3 cm per 1 m.
- Supply pipes- are used to connect outlets of plumbing fixtures with highways. The diameter of such a pipe cannot be larger than the diameter of the line.

- Revisions - special fittings, which are a single branch tee equipped with a closing hatch. The revision is placed at the base of the riser, at bends, forks and at the ends of highways. It provides access to the inside of the pipeline for removing blockages or maintenance work.
Step 5. Connecting pipes

All pipes are connected to each other using fittings that allow you to make turns, bends, branches, etc. When installing the system, it is advisable to avoid turns at sharp and right angles, forming smooth arcs - this way we reduce the risk of blockages in the place where the flow rate decreases.
Typical modern pipes equipped with sockets and elastic cuffs are easily assembled by hand :
| Illustration | Assembly operation |
 |
Cutting the pipe.
Using a hacksaw with fine teeth, cut the straight end of the pipe to the desired size. |
 |
Chamfering.
We clean the cutting site, removing burrs from the outer inner side - they can cause a blockage. |
 |
Socket preparation.
Insert a rubber O-ring into the socket. We level the seal by placing it in the groove and making sure that there are no bends and creases. |
 |
Pipe connection.
We insert the branch pipe into the socket and push it in until it stops. If necessary, turn the pipe so that the bend or inspection hole is in the desired position. |
After assembly, all pipes are installed on supporting surfaces. The instruction allows both hidden (in the grooves or behind the casing) and open gasket. In the second case, plastic clamps with a snap or screw fixation are used to fasten the pipes.


Stage 6. Connection to plumbing fixtures
At the last stage, the plumbing equipment is connected:

- Toilet bowl - usually installed in the immediate vicinity of the riser. The outlet of the toilet bowl is connected with a corrugation or a piece of pipe either with a riser outlet, or with a short line with a diameter of at least 110 mm.

- Bathroom or shower - connected to the sewage system using compact siphons, which are placed under the drain holes. The optimum outlet pipe diameter is at least 50 mm.
Some models of shower cabins and toilets require a vertical sewage supply - this must be taken into account in advance when designing the system.

- Sinks in the kitchen and bathroom - are built into the system using siphons with water locks. The siphon is usually in the shape of a flask and is located under the sink, and it is connected to the sewer outlet with a flexible corrugated pipe.
- Washing machines and dishwashers - also mounted using flexible corrugated hoses. To connect such devices, a separate sewer pipe branch should be installed, equipped with a socket with a rubber sealing collar.

Conclusion
The sewerage system installation technology includes a number of nuances that directly affect the final result. Now you know them. You can clearly see the intricacies of the topic in the video in this article. You can get answers to any questions that arise in the comments to this material.
The phrase “convenience on the street” is heard less and less in private sectors. This is not surprising - after all, everyone strives for comfort. However, there can be no talk of him if on a frosty night, waking up, you have to get dressed and run through the snow to a booth, standing 15 m from the dwelling. So home craftsmen equip latrines directly in the house. But in order for them to function normally, it is necessary to correctly mount the sewage disposal system into a septic tank located on the street. Today we will look at how the sewage system is mounted in a private house with our own hands. We will also consider the scheme of its device, and along the way we will find out the cost of such work when performed by specialists.
Read in the article:
How to correctly draw up a diagram of a sewerage device in a private house with your own hands
When starting to draw up a sewerage scheme for a private house, you need to decide on the number of drain points. It should be understood that in the presence of two floors in a residential building, the circuit of each is mounted, as planned, separately, with subsequent output to a common riser that goes to the septic tank.
The presence of only one riser is unacceptable only in the case of installing a pool or sauna - for them you will need to mount a separate drain.
Important! Its performance and ease of installation will depend on the completeness and correctness of the compiled sewage system for a private house with your own hands. The plan must indicate the length of all pipes - this will help to correctly calculate the amount of material.

Challenges to face when designing
The main difficulty in drawing up a project can be the introduction of a sewer pipe into the house. To do this, you will have to break through the foundation or install special pumps. Their installation will also be necessary when arranging a bathroom in a basement or basement room. In this case, a special installation that can grind organic matter does not interfere. The sewage pump together with the assembled knives is called a multi-lift.

Expert opinion
Engineer-designer of VK (water supply and sewerage) LLC ASP North-West
Ask a specialist“If the house is under construction, then regardless of whether the toilet is planned inside the house or not, it is worth installing a sewer pipe in the foundation. To begin with, you can simply drown it. If you need to install a sewage system, it will be very useful. ”
When designing, the number of residents must be taken into account. This indicator will directly affect both the volume of the septic tank and the diameter of the sewer pipes that will be used when installing the system. Do not forget about the depth of soil freezing - the system must be in the ground below this mark.

What types of sewage are there
The main types are:
- Dry closets. This format is not very common in private homes. It is more suitable for a summer residence where there is no need for a constantly functioning sewage system.
- Cesspool - the easiest and least expensive option to install. Its inconvenience is that it requires periodic pumping out using special equipment, and this is an expensive pleasure.
- Septic tank - the most common version of the sewerage system. Waste products are processed using live bacteria and microorganisms or by adding chemicals to the container that decompose organic waste.
The septic tank device cannot be called cheap, but it allows you to do without pumping for a long time. The main task is to add the necessary substances on time. As for the sewage system itself for a private house, it will be the same for both the cesspool and the septic tank.

Sewerage in a private house with your own hands: a diagram and its main components
When drawing up a project for laying a sewage system in a private house, it should be noted on the diagram of the location of plumbing devices, such as a sink or. All pipes are also taken into account (their length and diameter are prescribed in the plan), connections, corners and branches. Data on the location of the riser and its output to the septic tank are entered.
If you describe in detail all the parameters, you can mount the entire system much faster and better. The plan, after the installation of the sewage system, must be saved. It can help with blockages or other abnormal situations.
When drawing up a sewage system for a private one-story house (as well as buildings with several floors), it is important to think over the installation locations of the cleaners - special branches with plugs that will help get rid of blockages. Do not forget about calculating the slope of the highway. With a weak slope, the drain will be ineffective, and with an excessive one, fat and dirt will settle on the walls, which will eventually lead to an emergency. Let's try to figure out how to correctly draw up a sewer system diagram.

Drawing up a sewer system diagram
The first thing to do is to draw a plan of all the premises of the building by floor. It is more convenient if there is such a scheme - quite often such schemes are drawn up during construction. In this case, it can be copied, and already on it "lay" the sewer routes. Having indicated the installation points of plumbing devices, we begin measurements. Every millimeter can play a role here.
Important! When installing thinner pipes (for example, from a sink), if they are longer than necessary, there is a risk of bending. If this happens, the water will stagnate, leading to grease and dirt build-up and blockage.
If possible, it is better to place all plumbing devices in the immediate vicinity of the riser - this will allow the sewage system to be performed with the greatest efficiency. All tie-ins in the riser are indicated. A prerequisite is the connection of the toilet bowl drain directly into the main pipe, without additional connections. The drain of the bathroom and sink can be combined - this will save material and get rid of unnecessary pipes and tie-ins into the main riser.

What diameter should the pipes be
The diameter of the pipe is selected based on the number of residents and the planned intensity of use of the system. However, there are generally accepted norms. So the diameter of the main riser directly to the septic tank is usually 100-110 mm. The same diameter as the toilet flush. Thinner pipes go from the sinks and the bathroom. Most often, a diameter of 50 mm is used for such purposes. This thickness will be sufficient.
All connections and tie-ins must be made at an angle of 450. If the angle of the sewer pipe is even, it is this point that will periodically clog up.
When installing a sewer system, it should be understood that the riser should go to the roof, from where air will be supplied. Consider what will happen if there is no air access, and the upper part of the riser is plugged, using the example of a two-story house. Everyone knows that there is a hydraulic lock in the toilet, which prevents the smell from the system from entering the room. In the absence of free air access, flush the water in the toilet on the first floor. Due to the vacuum, water is drawn from the plumbing fixture of the second floor. The hydraulic lock is open, all the smell from the sewer system rushes into the living quarters.

How can you improve the efficiency of sewage
It is possible to improve the quality of the autonomous sewage system both by installing additional equipment and by purely installation parameters. To do this, you just need to correctly distribute the slope of the highways. The most effective is a slope of 3 cm / m. But for greater efficiency of the sewer system, this parameter can be increased to 4-5 cm / m. This will be quite enough for the efficient operation of the system and not enough for the rapid formation of fatty or mud deposits on the inner walls of the pipes.
Modern means very effectively fight deposits on the walls. But do not expect a miracle from them when a thorough blockage occurs. Advertisements may claim that the tool will handle any of them with ease, but this is not entirely true. In fact, such remedies are good for intermittent prophylaxis. If the pipe is already thoroughly clogged, then there is nothing better than a good old cable.

Speaking of additional equipment, one cannot fail to note the benefits in preventing blockages of equipment such as a household waste shredder under the sink. It prevents large cleanings and other debris from entering the sewer pipe. Everything that is sent to the drain after grinding, in consistency resembles a liquid porridge, which is not able to clog the highway.
How to properly make a sewer in a private house: stages of work
All work on the arrangement of the sewerage system of a private house is carried out in several stages. There is no need to carry out them without interruption, which means that you can perform installation in your free time for a long time. However, in the opinion of professionals, such work is rarely delayed - as soon as starting the arrangement, the home master tries to complete everything as soon as possible. Let's look at the step-by-step steps to be followed. The algorithm of actions should be as follows:
- we calculate the required volume of a septic tank;
- we install and equip the tank;
- we lay the highway from the septic tank to the house;
- we make internal wiring of sewer pipes and connect them to the system;
- we connect plumbing equipment.

Observing this order and simple rules for the production of work, you can be sure that the system will work flawlessly. Let's look at each step in more detail.
How to calculate the required volume of a septic tank for a private house
The calculation can be made empirically: for this, you need to summarize the entire water consumption of the family living in the house. However, if the sewerage system is installed during the construction phase of the dwelling, this method is unacceptable. Then you can take the average values \u200b\u200brecommended by SanPiN. However, it is much easier to use the specially designed calculator below:
In order to understand how to make the sewage system in a private house efficient and easy to use, it is necessary to understand the classification of systems. Features of their design and maintenance, the nuances of installation and the cost of equipment largely determine the choice. The accuracy of work at all stages is also of great importance.
Types of sewer systems
Sewer systems can be classified according to various parameters, primarily by:
- method of transporting wastewater through communications,
- type of waste disposal.
Depending on where the drains are directed, sewers are distinguished:
- schemes with tie-in to centralized systems,
- autonomous systems with individual accumulators or utilizers.
Depending on the method of transporting wastewater, systems are distinguished:
- gravity sewers (movement through pipelines is carried out due to their inclined position),
- pressure sewerage systems (transportation of wastewater using pumping equipment),
- combined sewerage systems that combine the features of pressure and gravity systems.
The cheapest way is to install a sewerage system in which wastewater flows by gravity, however, in some cases, the layout of the site is such that the sewer horizon is higher than the place where the house is located. In such a situation, it is impossible to lay pipes with the required slope, as well as in the presence of rocky soil, which does not allow for significant deepening of the pipeline.
In such cases, fecal or drainage pumps are used, however, it is impractical to ensure the movement of effluents using pumping equipment throughout the sewer system in a private house. Most often, the optimal solution is a combination of pressure and gravity sections in one sewage system.
Recyclers types
Before starting the installation and laying of sewage systems with your own hands in a private house, the system is designed and, first of all, the method of disposal is chosen.
All possible options in this regard can be divided into two types:
- (cesspools),
- treatment facilities (depending on the type of device, cleaning can be carried out completely and partially, in the second case, periodic pumping of the remaining waste will be required).

Note: There is another sewage option - in which part of the effluent is drained into the soil. But such a design can only be used with a small volume of wastewater, less than 1 cubic meter per day, and is most often arranged in dachas or in country houses with periodic residence and with a low level of groundwater.
Various designs can be chosen as a treatment plant for a private house.
- Septic tanks cost less and perform partial wastewater treatment. They may require additional soil treatment (reduction of the content of impurities in the water during its drainage) and pumping out of the sludge component after the partial decomposition of impurities and settling of effluents.
- Biological treatment plants - these are expensive and rather large structures with complex technical equipment and the need to connect to power supply. After the cleaning cycle, sewage is transformed into safe and suitable for irrigation of plants water (up to 98% removal of impurities) and fertile sludge (it can be used as fertilizer).

Important: The volume of a sewage treatment plant is calculated using the formula: the number of residents is multiplied by 200 liters and all this is multiplied by 3.
The inside of the sewer system
Do-it-yourself installation of a local sewerage system in a private house involves not only the selection and construction (installation) of the utilizer and the utilities leading to it, but also the device of internal wiring with the installation of the necessary equipment.
The main elements of the interior of the sewerage system are:
- plumbing equipment,
- household water consuming units (including dishwashers and washing machines),
- pipes (in most cases, products are used 32-50 mm, and for a toilet - 110 mm).

Reception, collection and transportation of wastewater from household appliances and plumbing is carried out using pipes. They can be laid in various ways.
- With open installation, communications are fixed to floors, walls and ceilings using.
- When laying pipes in a closed way, pipes are mounted inside the walls, as well as in the ceilings under the floor.
The method of installation is selected depending on the structure of the building, the requirements of the connected units (in some cases, hidden piping is unacceptable), as well as taking into account aesthetic considerations and ease of maintenance.
To ensure the free flow of the contents of the sewer and prevent blockages, it is necessary to install pipes with a certain slope. This value depends on the diameter of the pipes.
- For a diameter of 50 mm, the optimum slope is 3.0 cm per meter of line.
- For a diameter of 110 mm, these values \u200b\u200bare 2.0 cm, respectively.
- For 125 mm - 1.5 cm.
There are certain rules that must be followed when installing an internal sewage system.
- When connecting to plumbing risers, the outlet of the unit must always be located above the point where the outlet is tapped into the riser.
- Pipelines no longer than 10 meters are laid in the overlap, otherwise it will be difficult to detect and eliminate defects (leaks, blockages).
- The connection of the branches with the risers is done using fittings (crosses or tees).
- The connection of bends to straight sections of pipelines is always carried out at oblique angles, turns at right angles are performed with two 45 ° fittings, which minimizes the possibility of blockages.
As a riser, a vertically installed pipe is used, the diameter of which is more than 110 mm (should not be less than the largest branch, which is usually a 110 mm branch from the toilet). The riser must be equipped with an inspection hatch, which is located at a height of 1 m from the floor level. The distance from the toilet bowl to the riser is a maximum of 1 meter.
The connection of the internal part with external communications is carried out using the release, which is thermowell and a section of pipe passing through the foundation, the diameter of which corresponds to the diameter of the riser.
 The diameter of the sleeve should be about 150 mm, and its edges should extend beyond the foundation on both sides by 100-150 mm
 Sewerage ventilation system
The ventilation of the internal sewerage system ensures the removal of generated gases and the flow of air to fill the system. Intense drainage (high volume or flow rate) creates low pressure zones in the pipelines. With effective ventilation, such a space is quickly filled with air, and the pressure balance is restored. Otherwise, the system will "suck" air through the siphons of the nearby plumbing fixtures. As a result, the operation of the system will be accompanied by loud sounds and the appearance of unpleasant odors in the room.
Internal sewerage ventilation is carried out with a fan pipe, which structurally is a continuation of the riser (with a large area of \u200b\u200bthe house and separately, at different ends, installed by plumbing, it is advisable to install several risers and, accordingly, several drain pipes).
It is displayed on the roof through the heated internal space in such a way that its edge is located above the pipes of heating devices and the outlet of the general ventilation system of the house.
 The fan (ventilation) pipe is a continuation of the sewer riser and goes to the roof
 For those who are interested in how to properly make a sewer in a private house with their own hands, it is useful to know that the presence of a drain pipe for one-story buildings is not necessary according to the established Rules, however, such an addition significantly increases the efficiency and usability of the system.
External communications
For the outside of the sewer system, it is important to choose the right pipes.
Do-it-yourself sewer construction in a private house is usually carried out using PVC pipes, ordinary or corrugated products. With a low weight, they are strong enough and able to withstand temperature changes. In addition, polymer materials are completely resistant to corrosion.
The depth of the trenches for laying the external sewer pipes should be greater than the level of soil freezing. If it is impossible to fulfill this condition, you should think about how to do sewer insulation in a private house with your own hands. Typically, thermal insulation materials are used for these purposes, for example, Energoflex or extruded polystyrene foam. A more expensive option is to lay a heating electrical cable next to the pipeline.
As in the case of internal communications, the efficiency and reliability of the external part of the sewage system depends on the provision of the required slope towards the storage or utilizer. If the diameter of the tubes is 110 mm, the optimal angle of inclination will be 2 cm for each meter of the length of the communications.
 When choosing a place for a treatment plant on a site, you need to adhere to certain rules for the remoteness of the sewage system from various objects
 Bad smell and its elimination
The appearance of a sewer odor in the room indicates a malfunction of the system.
In order to protect your home from such phenomena, it is not enough to know how to make a sewerage system in a country house, it is necessary to provide high-quality service of the system, to be able to identify and eliminate defects in a timely manner.
The appearance of a sewer smell in a house is most often due to an increase in pressure in the sewer lines. Under its action, gases are forced out into the space of the rooms. As measures of elimination, it is recommended to carry out a set of measures:
- install siphons with water traps on the devices,
- clean the pipes (plugs overlapping the lumen are one of the most common causes of malfunctions, and with incomplete overlap, such a plug may not give out its presence except smell).
The smell can also appear as a result of a leakage of the sewerage system. Check all joints carefully and remove even small leaks.
Having decided to build a house on your own, you need to take care not only of the foundation and roof, but also of how to make a sewage system in a private house. There is a step-by-step instruction on how to make a sewerage system in a private house that will work effectively and provide comfort to residents.
The sewer system project is being developed together with the house project. Before purchasing materials and laying pipes, it is necessary to understand the nuances of the system's operation, calculate all the parameters and understand the purpose of each individual element.
Do-it-yourself construction of a sewer system will not only save finances, but it can also be much stronger than with the work of professionals.
First you need to determine at what distance the central highway is from the site. If there is direct access to it, then a non-professional builder can easily cope with the installation.
The entire sewer system in a private house is divided into three parts:
- internal;
- external;
- sedimentation tanks.
The inner part includes all the elements that are in the room, the outer part, respectively, the elements that leave the house and are located on the street. Sediments or collectors are cesspools, septic tanks and other containers.
From the very beginning, you need to think over all the details and connections in the house, since disassembling the entire system after putting it into operation can be more difficult than making it from scratch. Disruption in the work of the inner part of the sewage system will bring problems most of all.
Necessary materials

The structure of the sewage system in a private house and apartment buildings has many similarities. The main element of the system is the riser. All water used in everyday life and waste from the bathroom are sent to it. All work is reduced to the passage of the liquid along the riser, its movement along the sewer pipe and its transfer to the sump.
In order for the sewage system to serve for many years, the materials must be expensive and of high quality.
To work in a private house you will need:
- pipes (the number is determined during design);
- adapters for connecting pipes of various sizes;
- tees that are needed for branching;
- fasteners for fixing all elements;
- bends by pipe size;
- plugs for sealing holes, silicone sealant.
It is better to make the riser and pipe to drain the toilet from the house as wide as possible. The place for the riser is chosen depending on the layout of the bathroom. It can be installed in the corner of the room or a special mine can be built. You can hide the structure in ceilings, walls, floors.
The stand is securely fixed and secured. Next, the connecting nodes for pipes are aligned, which will depart from the bathroom, sink and toilet. If the choice stopped on plastic pipes, then rigid fixation is the key point, since under the influence of fluid pressure, the material can bend. Seal ring joints are sealed with silicone sealant.
Technical nuances
When self-installing a sewage system in a private house, you should be guided by the following rules:
- In order for water to easily and quickly drain from the toilet or bathroom into the sewer, the pipes must be installed at an angle. Each meter the pipe tilts about 3 degrees.
- At the point of exit to the street, an inclination of 15 degrees is set.
- It is better to use smooth pipes in work. Debris can linger in the relief, which will lead to clogging, and further breakdown of the system.
- After connecting the pipes, it is necessary to make fixation. Waterproof materials are used, or a drywall box is constructed.
- Where the vertical drain changes to the horizontal one, a 45 ° connector is preferred. Less fluid pressure will be exerted on such a node than on a 90-degree one.
- To easily clean the clogged sewer, sight couplings are pre-installed.
- Wells are being built along the highway to eliminate blockages.
- In order not to damage the foundation, as well as to exclude clogging of pipes, a distance of 5 to 15 meters is laid between the foundation and the sump.
- To make a trench for a sewer pipe, you need to focus on the climatic conditions of the region. The pipe must pass below the level of soil freezing.
Work with the internal system

Internal sewerage system includes plumbing, household appliances. In a private house it is possible to organize a bathhouse, a swimming pool.
For work, you will need pipes with a diameter of 32 to 50 mm, a pipe extending from the toilet bowl with a diameter of up to 100 mm and risers.
You can determine the angle of inclination of the pipe knowing the diameter of the pipe. If its size is 50 mm, then the slope should not exceed 3.5 cm, if the pipe size is 100 mm, then the optimal slope is 2 cm.Wide pipes with a diameter of 125 mm are inclined by no more than 1.5 cm.
For the efficient operation of the sewer system, you must know the following rules. To connect the pipes to the riser, crosses and tees are used. The elbow in a rectangular section must be more than 90 degrees. The maximum length of the branch pipe is 10 meters.
As for the riser, it is displayed on the roof of the house and acts as ventilation. The minimum rise of the pipe above the roof is 70 cm. In the room itself, at a height of 1 meter, a hatch is installed on the riser, through which an audit will be carried out. If the room is not heated, it is recommended to insulate the riser.
Work with an external system

In order to make an external sewage system, corrugated pipes made of polypropylene or PVC materials are used.
For the system to work smoothly, it is better to make it straight. If this is not possible, small smooth turns are allowed. Sharp bends should be avoided.
The depth of laying the main part of the pipe is selected based on the degree of soil freezing. But its beginning should not be deeper than 50-80 cm. This will create favorable conditions for creating the correct slope.
Next, you need to do earthwork. It is necessary to dig trenches for the sewer pipe and a place for a septic tank. Under these elements, a bedding of coarse sand is necessarily made. The main task of the bedding is to protect the sewage system in the event of soil subsidence. It will also make it easier to set the tilt angle. The replacement of sand with brick, stone, soil, boards is excluded. All these materials can lead to mechanical damage to pipes.
In an external sewer system, the angle of inclination is slightly different. The pipes tilt towards the septic tank by about 2 centimeters, but not by every meter, but by 10 meters.
You can choose one of three septic tanks:
- with mechanical cleaning;
- autonomous treatment plant:
- cesspool.
Procedure

To make a sewage system with your own hands in the house, you must follow the following plan:
- Draw up a building project.
- Determine the places for the risers.
- Determine locations for plumbing and household appliances.
- Determine how to connect plumbing to openings.
- Apply the layout of the connecting pipes to the building project, taking into account the wiring and tees.
- Apply to the markings the pipes that connect the styles and sedimentation tanks to the plumbing.
The order of work:
- Install risers.
- Install waste pipes.
- Make all sewerage stains in the room.
- Make an external sewerage project, taking into account the outlet and the well.
Connect the inner and outer parts.
For the wastewater disposal system to function flawlessly, several nuances must be taken into account when arranging it. Today we will tell you what a sewerage system is for a private house, how to install it correctly and what mistakes should be avoided.
Pipe routing
Sewerage wiring is one of the most difficult processes, therefore, its arrangement should be given the utmost attention. Its assembly must fully comply with the requirements of SNiP.Installation of the sewerage system is carried out in stages:
first fits release (a pipe connecting the external street and indoor system);
Release device
Further mounted riser - a central tube located vertically; to facilitate maintenance, it is better if he is alone in the house; as a rule, it is located in utility rooms or a toilet; do not install it in living rooms or kitchens; it is installed openly or fits into a special shaft;
The last to connect bendsstarting with the crosses, only flared up; in this case, the toilet bowl is connected to the riser only separately with a pipe of 100-110 mm, the rest of the devices can be connected to a single common supply with thin pipes of 50 mm.
Advice... Liquid soap can be used to make it easier for the pipes to slide into the fasteners.
Installation of the outlet
1. For him, it is better to mount a special hole during the construction of the house. If it is not there, then a hole is made in the foundation 200-250 mm wider than the very diameter of the pipe.2. Hole waterproof using bituminous mastic.
3. Next, a special sleeve is inserted into it (a segment with a diameter of 20-40 mm larger than the outlet pipe). It serves to prevent the main pipeline from collapsing. The sleeve should protrude 150 mm from the foundation on both sides.
4. The outlet pipe is placed in the sleeve. The space between them is carefully filled with foam.
5.With the domestic sewer pipe, the sleeve is connected oblique tee (tee 45 °) and by diversion.

Sewer crosses, tees and bends
Slope angle
Since the wastewater flows through the pipes by gravity, in order to avoid blockages, the angle of their slope should be correctly determined. It is calculated based on the diameter of the pipeline. Moreover, for each plumbing fixture, it is selected separately:40-55 mm - from 3%;
85-100 mm - from 2%.
Naturally, the further the device is from the riser, the more the slope should be increased. Let's say the drain pit is located 200 m from the riser itself. To obtain the required angle of inclination, the pipe should be displaced in height by 60 mm.

Angle of inclination of pipes
Council. When choosing pipes for sewage, please note that street pipes are always painted orange, and pipes intended for indoor installation are always gray.
Installation of a riser
1. He is only going to upwards... For such a pipe, appropriate openings are prepared in the floors and roof. To reduce the noise of the passage of water from the wall or groove, retreat 20 mm.2. The riser is mounted only strictly vertical... Minor deviations of up to 2 mm for every 2 m are allowed.
3. So that the joints do not interfere with the passage of liquid, the sockets are mounted from above.
4. When assembled, gradually connect side bends and inspection hatches. For this, oblique tees and crosses are used.
5. When connecting branches, pipes running parallel to the floor are laid on special supports.

Sewer system diagram
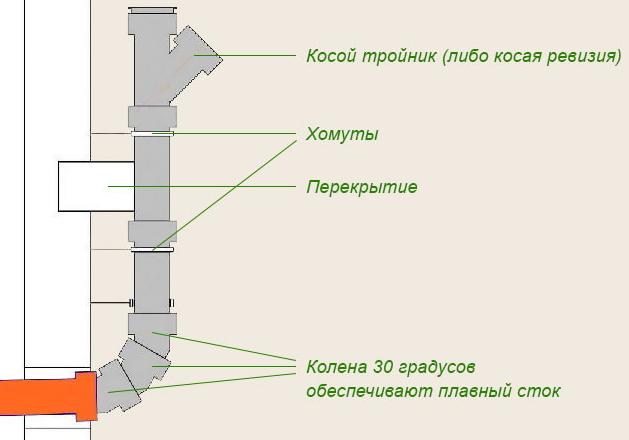
6. Excessive turns of pipes should be avoided, if they cannot be dispensed with, it is better to use two tees at 45 °, and even better three at 30 °; if you choose one at 90 °, then the waste in it will be stagnate; in addition, when connected at a right angle, the pressure in the riser will be limiting, which will lead to excessive noise in room.
Council. Since blockages occur most often in places of turns, be sure to provide inspection or inspection hatches next to them.
7. The riser is fixed to the wall with clamps, which must be located under the sockets. The distance between the clamps is up to 4 m. In order not to damage the system, the holes for them should be prepared in advance or, during their preparation, disassemble the riser for a while.
Riser assembly diagram
Hood arrangement
To prevent odors from entering the room, a curved pipe is provided at the bottom of all plumbing fixtures (sinks, toilets, etc.) - odor trap... However, with intensive use of the sewage system, a vacuum is sometimes formed in the riser. In this case, there is a "breakdown of the hydraulic seal" - gases without water resistance begin to penetrate into the house.To avoid this, it is necessary to provide for their removal to the atmosphere. The drain pipe for ventilation of the sewer system is led out through the roof. Its diameter is always equal to the diameter of the main pipe. If the waste pipe runs through an unheated attic space, it must be insulated.
With a small sewage capacity sewerage equipment without hood is allowed... However, in this case, the riser must necessarily end with a cleaning or inspection hatch.

Inspection hatch and opening for cleaning (equipped with a plug)
Basic wiring rules
So that during operation there are never problems with the sewage system, the following rules should be followed when arranging it:To prevent the splash of sewage, all plumbing is connected above the toilet;
To avoid blockages, strong bends and unnecessary tight pipe bends;

Sewerage system installation
pipe diameter is selected equal to or slightly larger than the size of the largest pipe from the plumbing fixture;
If there is a toilet in the house common riser diameter must be greater than or at least equal to 100 mm - the diameter of the toilet pipe;
The lead to it should not exceed a meter; from other plumbing fixtures allowed eyeliner length up to 3 m; if for some reason it is made larger, then its diameter is increased to the size of the common riser (at least 100 mm); in order not to increase its diameter, it is possible to equip a vacuum valve at its upper end;
To service the system, provide inspection and cleaning hatches; they should be placed every 10 m;
To prevent the pipes from freezing in winter, in the places where they pass underground they should be carefully insulate.