House making simple window frames. Window frames for a wooden house (and not only)
For a long time, houses were decorated with wooden frames on the windows. Modern technologies allow you to create a unique design of the house, combining beauty, convenience and the best traditions of Russian architecture.
Choice of wood for platbands
Getting started on the creation of platbands, you need to decide on the choice of raw materials. The type of wood will depend on the way the platband is carved (invoice or slotted), the desired effect, the texture of the house and the material of the windows:
It is quite simple to make platbands from deciduous trees: aspen, alder and linden (wood of medium softness, easily amenable to machine and manual processing, needs careful impregnation).

Trees such as pine and birch will delight you with their properties (they are resistant to external influences, have high strength and do not need much care).

If your main requirement is durability, then you cannot find helpers better than oak and ash (it should be noted that sufficient hardness of the material presupposes the presence of professional equipment).

The apple tree is well suited for complex decorative details (it has high softness and plasticity).


Tool for the manufacture of wooden platbands
When making wood trims on your own, you will need tools such as:
- electric jigsaw;
- a set of chisels;
- a set of knives;
- sandpaper;
- hacksaw;
- drill;
- sanding paper;
- miter box;
- milling machine.

Manufacturing of platbands
Many people ask the question "How to make wooden platbands?" To perform high-quality work on the manufacture of carved platbands, the following sequence must be observed:
- Taking measurements, you need to know the exact width and height of the window opening.
- Selection of material, preparation of lumber. The wood must be dried (in order to prevent further deformation) and have a suitable thickness for the thread (the invoice assumes 10 mm, and the slotted one is 30 mm or more).
- On the side that will be the "wrong side" of the work, wood is selected by a few mm. This will ensure a good fit.
- The sketch or template is transferred to the surface of the board.
- After drawing the pattern, the pattern is cut out with a jigsaw and various drills.
- The resulting holes are carefully processed along the edges with emery or sanding paper.
- Small parts are attached to the base. This can be done in two ways: building glue and nails.

Of course, while admiring wooden lace, many people want to recreate such beauty on the facade of their houses. In order to determine the required format, we have selected the most interesting photos of wooden platbands. The presented pictures convey the possible options for decorating your window openings, various types of carving and fastening.

It is important! The elements of the pattern must be laid out along the grain of the wood, otherwise, when dry, the finished part may lose its appearance.

Installation of wooden platbands
Quality installation is half the job. You can fix carved wood trims in three ways:
Install on the spike using special glue. A deaf thorn is attached from the seamy side of the part, holes are drilled specifically for it in the window frame. This method ensures a neat appearance of the finished product and protects the junction of the frame and platband from unnecessary moisture.
Diverse in ornament and style, platbands on a wooden house will fill it with a special atmosphere. Carved frames on the windows define the entire appearance of the house and give it individuality. You can make them yourself or order them to your taste, color and budget.

Photo of wooden platbands


The old tradition of making and installing carved frames on windows in a wooden house was remembered relatively recently, when the first boom in the construction of log cabins from rounded logs and beams took place. Having lived for several years in a new wooden house, the owners almost always begin to treat it as a living being, so it is not surprising that surprisingly beautiful carved patterns began to appear on the windows and entrance doors made of wood, serving as both decoration and protection.
Functions and purpose of carved platbands
Most experts dealing with the culture and history of wooden architectural monuments note that carved frames on windows, photos, are almost a status item. A house without carved patterns looks like a wooden hut, even if it is very large and beautifully decorated, with platbands - it turns into a tower.
Traditionally, carved window frames are installed for two purposes:
- Protection of cracks around the perimeter of the window frame from rain, snow and wind blowing;
- Additions and decorations of the window opening, the facade of a wooden house as a whole.
For a wooden house, builders traditionally offer window frames made of wood or metal-plastic window profiles complete with a double-glazed window. Ordinary plastic PVC trims can also be ordered in a carved version. Just choose a drawing or pattern, most likely, will not work, carved plastic window frames are made according to traditional patterns by stamping and only give the look of handwork.

Advice! Today, many restoration workshops and firms have at their disposal three-axis milling machines that can automatically cut a pattern of any complexity from polycarbonate, foam and epoxy plastics.
Such work will not be cheap, but the quality of carved platbands for plastic windows will be even higher than manual cutting. It remains to choose a drawing and a pattern.

About the third task of the casing on the windows, rarely any of the owners of the house can tell more or less clearly and reliably. We are talking about protective functions that protect a wooden house from the "evil eye", diseases and uninvited guests. You can relate to beliefs and traditions in different ways, but it will obviously not be superfluous to take into account the specifics of choosing a pattern for platbands in your home.
Patterns and figures on carved wooden platbands
It is clear that any self-respecting owner will not hang the first platbands on the windows of a wooden house, the process of selecting a theme and pattern can be delayed, so you should not abuse the use of symbols whose meaning is incomprehensible or unknown. If the mystical and culturological part of the carved platbands creates psychological discomfort, you can treat the carving as a way to decorate the window openings of a wooden house.
It was no coincidence that they were invented to decorate the carved platbands, and they were carefully kept and passed on practically unchanged. Most wood carvers cut just like copiers, so you will have to plan and decode the drawing on your own.
Advice! In any case, before using carved wooden platbands on windows with patterns and pictures of incomprehensible content, it makes sense to try to understand the meanings of carving elements, patterns and figures.
For example, figurines and images of animals have always symbolized positive wishes for the house of prosperity and well-being:
- A snake or dragon has always signified wisdom and strength to protect the home;
- Birds in flight mean hospitality and friendliness, sitting in the corners - attention to guests and news;
- Fish, deer, bunches of wheat and grapes mean a wish for wealth.
It was not customary to depict pets and figurines of people, especially in the same canvas with climbing plants and flowers.

More modern designs on carved wooden platbands usually have a traditional, regular pattern.

It can be intertwining flowers, vine leaves arranged in a regular pattern. In the carved compositions of the 18th-19th centuries, more modern images of columns, porticoes and drops, used in the wooden architecture of that era, have already appeared.

Most of the carved platbands are ordered from master carvers. If you wish, it is not difficult to make carved window frames with your own hands according to templates or ready-made schemes. The simplest lines and drawings can be transferred to a workpiece and cut out with an engraving attachment; you will have to tinker with more complex schemes and remember drawing lessons at school.

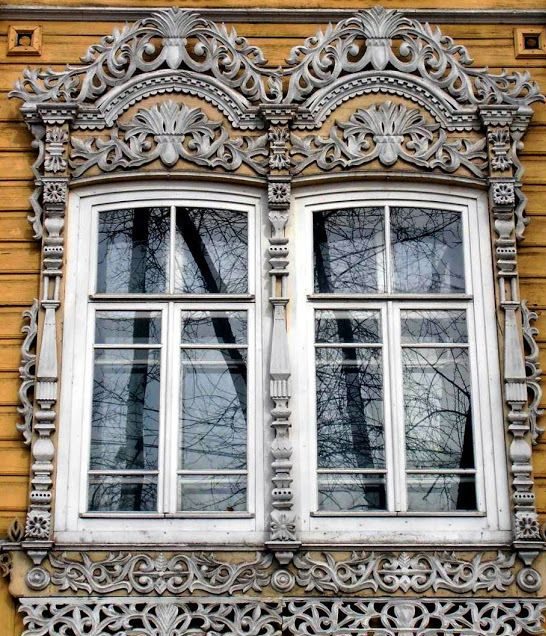
The upper part of the platbands was called a headpiece, this is the most complex and beautiful part of the decor, on the one hand, the headpiece set the general tone of the carved composition, on the other hand, it served as a visor over the window opening. At the top of the composition there was a diadem symbolizing the rising sun, and in the center there was always a medallion or crown made of plants. The lower part of the window was covered with a carved apron, usually in the form of an open fan.
If the mystical and culturological part of the carved platbands creates psychological discomfort, you can treat the carving simply as a way to decorate the window openings of a wooden house.
The usual intertwined pattern of vines or flowers will be far from any mystical content, while the beauty of the platbands and carvings of the frame of the window of a wooden house will only intensify. Carved platbands with a regular pattern have a serious advantage over a complex multi-tiered composition:
- First, the patterns of carved window frames are transferred to a wooden or plastic blank much easier and faster than a drawing with a complex multi-tiered composition;
- Secondly, even if you cut an intertwining vine or edging with your own hands and make small flaws, it will be almost impossible to see them in a patterned field, this is how human psychology works.
Therefore, before making carved window frames, choose a simple pattern for yourself, with a minimum of individual details. Even the most uncomplicated pattern on the facing strips can transform the appearance of a wooden house window beyond recognition.

DIY carved platbands
Wood carving has always been and remains quite an expensive undertaking, so instead of buying ready-made platbands, cut or stamped on furniture equipment, you can try to make decorative strips with simple patterns with your own hands. At home or in a carpentry workshop, you can use one of three methods:
- Transfer the template to the prepared board and cut the patterns using the engraving kit;
- Cast patterns under a carved platband made of polyester or epoxy resin, followed by painting or finishing with a wood-like laminate film;
- Cut out the overhead pattern of the platband using a jigsaw.
Before you try your hand at making carved platbands, you need to choose the right material. For carving and engraving, you will need hard types of wood, beech or oak is well suited, pine or spruce is slightly worse, poplar and aspen are not suitable. You can use a regular floorboard to cut the overlay pattern, but the material should be free of knots, defects or intricate weaves.
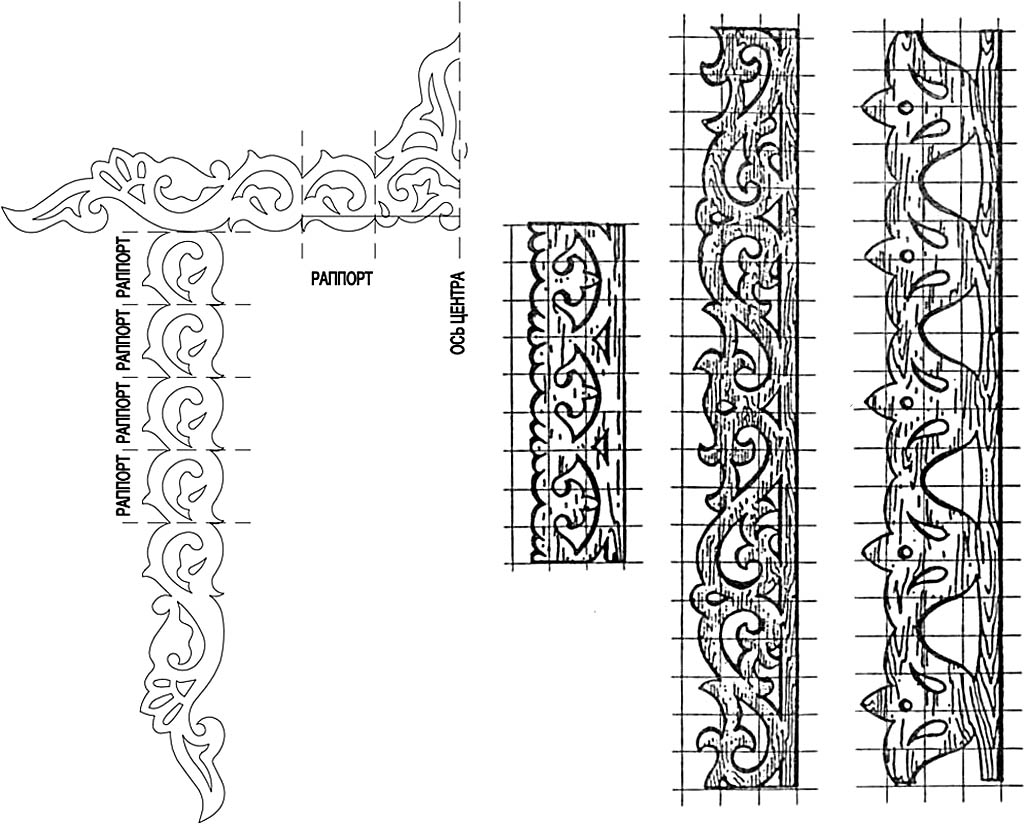
Templates for cutting an overhead pattern
To make the simplest patterns, you can use the simplest patterns of intertwining plants, flowers, grapes. In fact, this is a flat tracing paper from more complex carved reliefs. This pattern can be used to design the vertical side trims of the casing.

To decorate a window, you need to look not for regular, but single patterns, for example, a composition of symmetrically located figures or interweaving of plant stems.

The same pattern can be converted into a contour line and turned into a flat ornament that can be easily cut out of plywood, boards or even MDF boards.
The most complex relief or volumetric patterns are made by typesetting method. Initially, ordinary wooden platbands are made from planks, individual elements of the cladding are carefully adjusted to the size of the window and assembled into a finished frame.
All other decorative elements are sequentially cut out of wood, cast from a casting polymer or sawn out from MDF boards, after which they are sanded, primed and glued to the prepared frame.

Making carved platbands with your own hands
Most often, patterns for finishing a window are cut from a waterproof OSB plate in the form of overhead decorative elements. Initially, on tracing paper, a piece of graph paper and with the help of the program, the necessary template for the drawing is developed.


Next, you need to make a working template with which you can transfer the pattern to a wooden substrate an unlimited number of times, photo. To do this, a drawing printed on a printer is glued to a fiberboard sheet and cut out with a slotted nozzle for a drill or with ordinary metal scissors.
After marking the wooden blank, you can start cutting the casing. The easiest way is to make cuts with a jigsaw on a joiner's workbench.
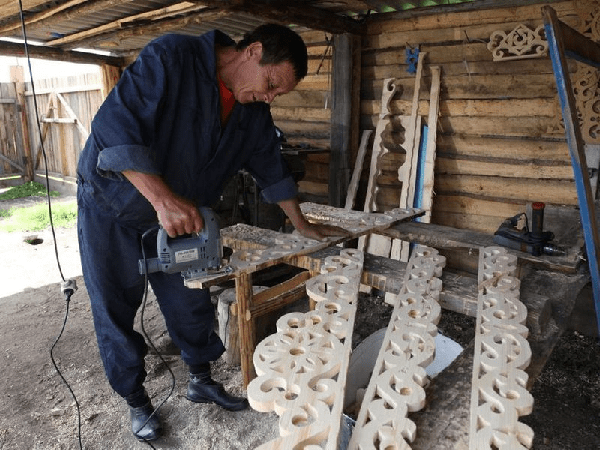
Along the line of the cuts made, you need to carefully remove the chamfer with emery paper so that during further processing the front surface of the carved pattern does not chip off. If a fairly thin strip was chosen as a blank, then the cut out carved part of the decor can be glued to the fabric base.
In the same way, small overhead elements in the form of rhombuses, squares, rings, braids are cut out. After sanding, the cut elements are grinded on an electric grinder with a stone for grinding wood. With the help of a circle, you can quite simply give a rhombus or any other geometric figure the required shape, form faces or transitional curved planes.
After gluing the decor, the carved platbands are primed with hydrophobic impregnations and aged. This is done in order to remove the whiteness of freshly polished wood. For this, solutions of salts of iron, copper, chromium are used. As a result, it is possible to choose the color and shade of the carved platband to match the wooden window frame. It remains to open the tree with varnish or oil impregnation and install the carved decor on the window.

Conclusion
Very often, the owners of wooden houses, instead of making new decorative elements, prefer to buy old carved platbands preserved in villages, abandoned houses and buildings. Quite often the cost of a set of carved platbands for three windows of a building facade is cheaper than hand carving of one platband by a modern craftsman. In some cases, among the old décor, one encounters real works of art made by hand by the masters of the last century. Such carved platbands are usually deeply restored and installed not on the outer parts of windows, but inside the room.
Platbands on windows are a simple and economical way to make the front part of the house original and beautiful. Many people think that window trims are a relic of the past. In fact, this is not the case, it is still customary to decorate wooden houses with platbands, and even though their meaning is now only in decorations, the pattern will give the house individuality.
Do-it-yourself cut-out window trims will look expressive, interesting and unusual.
Platband design
Platbands are divided into overhead, which are attached to the wall of the house itself and plug-in, attached to the slopes of the opening or directly to the frame.
Also, this type of decoration of the external facade can be divided according to the degree of protection. There is a platband-portal, and there is a frame. The portal also has a visor in its design to protect the frame and window from precipitation. The platband-framing does not have such a protective function, therefore, it is placed from the side of the living quarters of the house or on the windows that are under the roof, for example, on the veranda or porch.

In order to know how to make window trims, you first need to design an interior solution. To do this, draw a drawing of the house with all the elements that are already on it. After that, they draw a sketch of the architraves, and see how it looks like. Ready-made sketches can be found on the Internet or in the catalogs of companies that offer pattern stencils.
You can do this on paper. But it will be much clearer to use special 3-D software on a computer, which in the volumetric plane will give an accurate representation of how everything will look. This will save you from making the wrong choice. Sometimes in our heads we imagine everything beautifully, but in reality it may be that the option you have chosen turned out to be completely inappropriate for the facade of the building. It will be a shame, since the work of cutting out the platbands is quite painstaking.
After you have decided on the project, you need to prepare the tools. You will need:
- electric drill and drill;
- screwdriver;
- jigsaw, preferably modern, with the ability to cut at different angles and with a smooth start.
- Grinding machine.
- Tools for paintwork.
It is also necessary to prepare all materials for the platbands. We'll talk about them in more detail in the next chapter.

Before making platbands for windows with your own hands, you need to decide on the material. If the platband does not imply complex patterns, then it is better to take pine wood. For carved platbands, they take linden. Its only drawback is that it is moisture permeable. But this can be easily eliminated by applying a special varnish.
In general, linden is an ideal option, since the wood is soft, it is very convenient to cut out of it. But if the house is located in an area where the climate is very humid or temperature fluctuations are serious, then it is better to choose hard species - oak or beech. Due to their hardness, they cannot be processed with hand tools, they cannot be shaped, a special machine will be required. But on the other hand, such platbands will last much longer than fake ones.
It is better not to take a spruce for the platbands, there are many knots in it, which will still appear under the layer of the topcoat, or even fall out altogether.
Birch is also unsuitable for such purposes, since this tree is a real breeding ground for fungi. Even repeated impregnation will not help here.
If you want the cheapest option, soak the plywood twice with a special emulsion based on polymers and water. Then this material will be suitable for platbands.

How to make window trims? There are several nuances that you need to know before making your own window frames.
With the installed platbands, the window sashes should come off almost completely. Therefore, the platband is placed above the window at a height of about 300 mm.
If it is supposed to install additional decorations on the upper part of the casing, then this can be done already on the delivered structure using thorns. This is called a kokoshnik.
On the lower part of the casing, there must be a bevel along which the water will drain. The lower part is about 10 mm thicker than the upper one.
On the sides there should be slats that will smooth the difference between the wall and the casing, their thickness depends on the difference.

In order to make the window frames with your own hands, you need to decide on the pattern. There are stencils for this, they will allow you to cut out any pattern without professional training.
A stencil can be bought at a hardware store, it is a structure of the lower and upper planks and vertical slats. There are also additional decorative elements.

Once you have decided on the material and pattern, you can make beautiful window frames with your own hands.
Sawing out the frame for the platband
The process of making platbands for windows with your own hands begins with the frame. It should be 200 mm larger than the window frame. It is fastened with thorns and dowels.
The process of cutting out the platband itself
So, how to make platbands for windows with your own hands:
- The stencil is leaned against the wood and its contours are transferred using a carbon copy.
- Use a jigsaw to cut out all the small details and curls.
- Then the outline is cut. In order for the jigsaw to move freely and turn, you need to use a tool with which you can make holes at different angles. This will make it easy to cut even complex and small monograms.
- If you need to cut out some element in the center, then a hole is made in the middle with a drill. If the wood is thin, then a jigsaw is used instead of a drill.
Thus, the whole process of cutting out the platband is carried out. In general, nothing complicated, the main thing is to adapt and do everything neatly. If you are doing this for the first time, then it is better to make simple platbands on the windows with your own hands. This will make it easier to avoid mistakes and inaccuracies.

How to make a window trim correctly? As a rule, platbands are attached either to the wall itself or to the sloping parts of the opening. Previously, platbands were nailed, but now it is better to use self-tapping screws.
To begin with, it is necessary to make holes in the casing for fastening every 12-17 sq. Cm. If it is supposed to fasten it to the slopes, then the fastenings should be much more often, every 1.5-3 cm, depending on the weight of the casing itself.
But there is another option for installing platbands - on glue. The main thing is that it is not organic, otherwise it will harm the wood. You can take special glue for wood, or you can take plumbing.
If you will fasten on nails or thorns, then the joints are glued with glue in advance.
How to correctly put platbands on the windows of a house that has a finish on top?
Do-it-yourself window frames for a house sheathed with siding or clapboard are attached directly to the frame. For such cases, there are special platbands called "telescopes".
They will stand securely only on a reinforced PVC or special wood frame. Installed on additional elements that are firmly attached to the frame. If the groove is in the frame itself, then such platbands are placed from the side of the dwelling, otherwise a strong gust of wind will tear out the entire structure.
If the windows have a keyway, then the platband can be installed without touching the window itself. If this is not the case, then the window will have to be removed, the frame should be placed under the platband, the platband on it, and then the window will have to be mounted in place.

How to make window trims beautiful? Paint.
After the platbands are installed, the holes with self-tapping screws are putty and painted to match the platband. You can putty with a mixture of sawdust and glue.
Before painting the platband, it is necessary to treat the tree with an antiseptic solution so that bugs do not eat it and the decay process does not form. It is important to apply this composition everywhere, even in the most inaccessible places. The more carefully you do this, the longer the platband will last. You need to start painting after the antiseptic is completely dry.
Also, after the antiseptic, it is advisable to apply a protective layer in the form of varnish or impregnation. This is an optional procedure, but the casing will last much longer with it. You can completely abandon the paint, replacing it with an impregnation that will not crack over time.
If you do choose paint, then it should be water-based, especially for wood. Any color can be taken, depending on the overall design concept.
In order for the staining to turn out even and neat, you need to buy two brushes in advance - 5 cm wide and 2 cm wide. You will coat the main surface with a wide one, and a narrow one inside curls and patterns.
After the first soy has been applied thoroughly and without gaps, it is allowed to dry properly, and then the second is started.
At the end of the work, the workpiece is varnished. It is also worth choosing water-based. The varnish can be applied in one layer, this must be done as scrupulously as possible, if smudges go, then the whole look can deteriorate. The finished product should dry in the fresh air.
Some experts advise you to first grind the platband with a grinding machine with a grain size of 80, then cover it with an antiseptic, paint, patch, then assemble it on the ground and, at the end, mount it at home. This option is also acceptable and in some cases it is even more convenient and optimal than the first.

Often the width of one board is simply not enough to make a shield. There is an option to fasten several boards together. But if you use a steel rod, then over time it will split and crumble. Fastening by the type of furniture is not intended for strong winds and precipitation. Another option is needed here.
- The film is spread on a horizontal flat surface.
- Boards are placed on the foil and fastened together with glue. You can use regular PVA or carpentry.
- After the boards are lightly glued, they are wrapped in foil, having previously placed on the boards suitable plywood sheets.
- All this must be tied very tightly with a rope.
- After the glue has completely dried, everything is removed, and thin bars are stuffed on the back for strength, on top of the boards.
Thus, the shield for the platbands is ready.

It is not so difficult to make platbands on windows with your own hands, however, some problems may appear. To avoid them, follow these tips:
- Choose boards no thicker than 400 mm and no thinner than 300 mm.
- Practice on a draft. It is better not to tackle the complex intricacies of patterns right away, but choose something less complicated. A simple do-it-yourself window trim looks very good too.
- The width of the platband should be such that the ends of the wall are covered, and moisture does not rise there.
- So that the platband does not crack over time, you need to make patterns along the structure of the wood, and not a reproach.
- When choosing a pattern, pay attention to large elements, too small details merge in the distance and the effect will not be the same as you would like.
- Before starting work, you need to calculate the financial and time costs. If there is no desire to tinker with a tree, and there are no skills in working with it, it may be easier to buy a ready-made version.
- Also, before making the frames for the windows, you can flip through the pages of the Internet, see photos, get inspiration and decide on a model.
- A wooden platband will look awkward if the house itself is not made of wood. Even an imitation of a timber and a purely wooden platband will go into the cut. For such cases, it is more expedient to choose options for platbands not made of wood. There are many different models on the construction market.
These rules will save you from the most common mistakes when making this decorative element.
Simple platbands on the windows. How to do? We found out that the procedure is quite understandable, the cutting itself can be difficult, but if you take the appropriate tool, practice on the sample and choose a simple pattern, then the result at the end will delight you.
Also, do-it-yourself window trims are also economical, since making them to order costs from a master from 3,000 to 15,000 rubles per window.
How to make platbands on windows with your own hands: video
The creation of the front of the house should be treated with full responsibility. After all, from how the building looks outwardly, the first opinion about the owner of the house is formed. This is the "face" of the entire structure. That is why caring owners are trying to make it unique and individual. Thanks to the decoration not only of the walls, but also of the windows, it is possible to obtain unsurpassed results. Platbands are able to create the integrity of the composition, visually increase or decrease window openings. With their help, you can achieve any visual effect.
Platband is a traditional element of facade decor
Platbands have been used since ancient times. These are traditional and well-liked. Naturally, platbands are not mounted on apartment buildings. They are designed to decorate exactly. With their help, it is possible to change the appearance of the house beyond recognition. The simple design creates a dreamlike effect.
Platbands for windows in a wooden house, photos of which can be viewed on the Internet, clearly show how these elements are needed. Beautiful and original products complement the building and make it look complete. With their help, it is very easy to create an ensemble of all structures in the yard. That is why many years ago they were used in the most expensive houses. They were proud of them and introduced them to guests, because once they treated their own home in a completely different way. “My home is my fortress” - the ancient people believed and created strong and individual buildings.
Functions of platbands in wooden houses, their advantages
But the elements are famous not only for their beauty and noble appearance facade decor... Window frames perform different functions:
- decorative element that serves as a real decoration. The platband emphasizes the windows, makes their features more expressive and noticeable. With its help, you can give the window a different shape;
- visual change of the window opening. This is a great option in cases where you want to narrow the window or, conversely, increase. For example, it is very easy to enlarge small windows by framing them in openwork lace trims;
- highlights the style of the house. With the help of such products, it is very easy to create a real ensemble of buildings in the courtyard. If you competently approach the design and decorate all the windows in the courtyard in the same style, you can achieve the integrity of all structures;
- reliable protector of seams. V wooden village houses the window is placed in the same plane with the wall. With the correct installation of the platband, the product also slightly covers the wall, thereby reliably covering the joint. Thanks to this arrangement, the seam is reliably protected from cracking, dust and harmful environmental influences. It will always remain airtight, will not let the cold into the house.
Modern platbands are beautiful products that reliably protect the structure. That is why it is worth buying window trims in a wooden house. In such a simple way, you will not only decorate your home, but also reliably protect the openings from destruction, especially since in the modern building materials market a huge number of varieties of such an element of facade decoration are available for selection.
Cons of wooden platbands
In addition to the advantages of platbands, it is worth remembering their shortcomings. Although they are insignificant in comparison with the benefits, it is still necessary to be aware of them:
- Platbands are very responsive to weather conditions, because they are not protected by anything. This applies primarily to wooden products. To avoid such troubles, wooden platbands are treated with special substances that contribute to their long service life. Products made from artificial materials are less demanding on care. Modern technologies make it possible to create them that look similar to natural ones, but many times exceed them in functionality.
- They require increased attention to themselves. require constant care. They must be painted or varnished. Cracked platbands look ugly on the building, they have a detrimental effect on the entire appearance, making it untidy and sloppy.
- Inconsistency of the material can be detrimental to the appearance of the house. The choice of platbands should be approached with an understanding of style and design. It is best to entrust the choice to a professional who will help you choose the most advantageous decor option.
Types of platbands
Today, consumers have access to different types of platbands:
- Slotted, which impress with their beauty and grace. Openwork patterns will emphasize individuality and peculiarity, indicate the excellent taste of the owner of the house. Such products are made as a solid canvas with a beautiful pattern. Windows decorated with such trims create the impression that the window openings are crowned with graceful lace. platbands on windows in a wooden house are the best type of decoration and a reliable protector from the harmful effects of the environment on the joints.
- Overhead, which are more complex designs. Such products are superimposed on a special plate. They have a wide variety of patterns. Thin lines are perfectly visible on the "lining" and impress with their transitions. Such an element can be placed on platbands that are already on the windows. This is the best way to upgrade. In addition, if the dummy material and the openwork platband itself are painted in different colors, then you can get the effect of a three-dimensional pattern.
- Simple. They have a smooth surface. They are missing any patterns. The product can have different shapes, rounded edges. Typically, this type of trim is installed to protect the seam. They also give facade finished look. The choice of such platbands can also be an element of stylish design.
Whatever the shape and appearance of the platband, it must withstand unfavorable weather, temperature changes, and not react to humidity. That is why special requirements are put forward for such products. platbands on windows in a wooden house allow you to create an element that will meet the requirements of the owner of the building.
The exterior decoration of the house (we are, of course, talking about private buildings) cannot be considered complete if the window openings are not decorated. Ready-made window trims can be purchased, although some articles indicate that they are rarely found on sale. No, there are enough of these elements of protection and decoration on the market, and in a large assortment and at an affordable price. Even carved samples cost no more than 300 rubles / r.m.
But upon closer inspection, you can see that they are all somewhat monotonous, and the dimensions are mainly for standard parameters and configuration of openings. If the house is being built according to a special project, and the original one, taking into account all the preferences of the owner, it makes sense to install unusual frames on the windows, emphasizing the individuality of the dwelling. This article will tell you how and from what to make beautiful window frames with your own hands.
Material for platbands
On this point, the opinion of all specialists is unambiguous - if with their own hands, then only wood. First, the material is the most accessible. Secondly, it is easy to work with wood with the simplest tool, that is, in the full sense of the word, independently make platbands from scratch, with the most complex pattern. Thirdly, wood goes well with any building and finishing material. Consequently, such platbands are equally well suited to various buildings, regardless of their features and the option of the general design of the facade.

What to consider:
- Samples for platbands (board or plywood) should have a minimum of knots. Therefore, the purchase of lumber should be of high quality, although it is more expensive. Otherwise, when cutting out patterns or grooves, the tool will constantly bump into such problem areas, and it is not a fact that the board will not have to be rejected as a result.
- The thickness of the samples is chosen arbitrarily, depending on the characteristics of the electric / jigsaw and the type of wood. As a rule, for platbands ranging from 5 (overhead) to 50 (slotted) mm. How they differ will become clear in the course of the presentation.
Wood species
If you take this issue seriously, and not just set yourself the goal of making strips with your own hands that close the gaps between the window frame and the opening in the wall, then many points should be taken into account.
In cases where we are talking about a typical version in the form of a solid narrow plank, it is advisable to focus on hard wood species. This parameter is directly related to the porosity of the material. Consequently, such platbands will last much longer, since they will not intensively absorb liquid, unlike soft rocks. Recommendations that they can be protected by painting with a moisture-resistant composition are hardly worthy of attention. First, the naturalness of wood is lost, especially if the house itself is made of the same material. Secondly, updating the coating layer, taking into account the complexity of the patterns, is so painstaking and time-consuming that there are not many people who want to do it regularly.
Oak, ash, birch, pear are worthy of attention from the affordable wood species. With all their advantages, there is a significant drawback - such blanks are difficult to handle with your own hands. Even the simplest selection of grooves is already a problem. With a lack of experience, hand tools will not help, and you will have to look for the possibility of using machine tools. That is, pay for the service.
For carved platbands, you should focus on wood with a lower density. Larch, pine, ash, linden, spruce are mainly used in construction and decoration. The last 3 breeds, although convenient in terms of do-it-yourself processing, are not suitable for platbands, given that they are attached to the front of the house. Such boards (planks) are characterized by hygroscopicity and insufficient strength. Therefore, there will be difficulties with moisture protection (additional drying of workpieces, repeated impregnation) and fastening. Consequently, the durability of such platbands is questionable.

Climate features
This factor cannot be ignored either. It is better to abandon soft woods for platbands right away if:
- humidity at the location of the house is constantly excessive (for example, near large natural bodies of water) or, conversely, minimal (that is, the air is too dry);
- even during the day, the temperature changes within a wide range (significant drops).
The best option for platbands is pine or larch. These types of wood are equally well suited for making any platbands with your own hands, regardless of the shape, size and pattern of the planks.

Drawing up a drawing of a casing
Any ready-made drawing can be altered to fit your window openings, observing the scaling. Or develop patterns of your choice.

Required tools and fixtures
As a rule, the “home craftsman” uses what is at hand. But some tools are not among those in demand in everyday life, so you will have to purchase something.
- The jigsaw is electric. It is pointless to work manually. It takes a lot of time to achieve high quality patterns. In addition, it has limited use, since the platbands differ not only in the thickness of the board, but also in its width. This is the main difficulty of using the simplest jigsaw.
- Screwdriver.
- A set of chisels - angular, cranberries, "caesarics", semicircular and so on. One alone will not be enough. Even in a solid board, you will need to select materials with different groove widths, at different angles.
- "Tenon cutter". A specific tool, but for the manufacture of eyelets, seams in platbands is extremely necessary.
- Knives (cutter, joint).
- A set of drills (feather).
- Sander. Even with great diligence, manually giving the wood an absolute smoothness with sandpaper will not work. And it will take a lot of time.
The procedure for assembling the casing
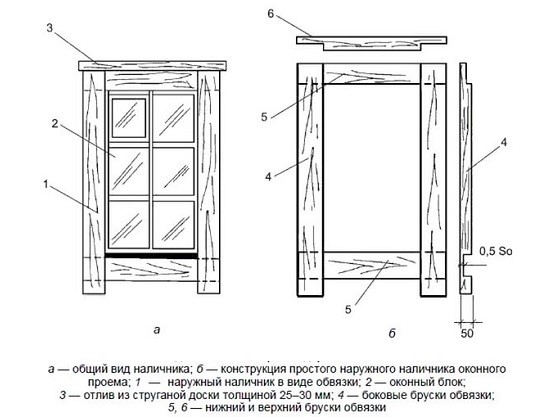
Since there are enough varieties of platbands, one of the simplest options is considered. Its peculiarity is the symmetry of the samples located on opposite sides of the window. Having understood the very principle of making individual parts of the casing and assembling them into a single structure, it is not difficult to choose any of the ones described on the Web or to develop your own.

Decorative elements
Further - an algorithm of actions for the manufacture of a figured casing. No comment is required on solid bars. Sampling of longitudinal grooves with a chisel (s) is all that is needed. You can perfectly decorate windows with simple, monolithic platbands and in another way. In addition to sampling grooves in a tree, there are other options: artistic painting of the strips (with a brush, a soldering iron tip) or firing.
- A stencil of the frame element is made according to the sketch. For example, which will be mounted to the left of the window.
- The corresponding pattern is transferred to the back (back) side of the selected strip.
- Holes are made along its contour. Their locations depend on the specifics of the pattern. It is in them that an electric / jigsaw file will be inserted for further cutting out fragments in the indicated segment. The drawing explains everything well.

The final stage of this part of the work is trimming the board along the outer contour.
The second "sidewall" is made in the same way, but in a mirror image. To do this, it is enough to turn the same stencil by 180 0. This procedure is followed to obtain the second pair of elements - the top and bottom of the casing.
No matter how interesting and original the drawing vending may be, it is not worth choosing patterns with small details, complex ornaments for window frames. Firstly, the work of making individual figures is so painstaking, requiring perseverance and utmost precision, that not everyone can complete it. Secondly, miniature elements are beautiful only when viewed up close. At a distance, they merge, so it is inappropriate to use such complex, small patterns for the exterior decoration of window openings.

Cleaning the front surface of the samples
Grinders are of different types. Therefore, the general recommendation is that the grain size of the abrasive (sandpaper or disc) is selected to be about 80.. Sufficient sanding quality will be ensured regardless of the type of wood.
Assembling the platband frame
Even if the platband is made curly, then it makes no sense to directly attach such wooden patterned elements to the walls. There is no need to talk about strength, and it will not work to connect them reliably. How to proceed? Each master has his own opinion, so the author just shares his own experience. And it is up to you, the reader, to accept these comments to the manual or not.

As a rule, when measuring the geometry of a window opening, it turns out that all of its slices do not lie in the same plane. That is, some distortions appeared during the construction of the walls. For building a house, especially with your own hands, small tolerances are common. They are not critical if they do not go beyond the established limits. But for the installation of the platband, this fact is important. Therefore, for the purpose of additional alignment, you will have to make a subframe. In fact, these are boards (slats) that close the gaps between the frame and the end parts of the wall along the perimeter of the window opening. It is on them that the platband is fixed.
The dimensions of the casing are chosen so that it overlaps the window frame by at least 20 mm on each side (outer). In this case, it is necessary to check whether the sash will open at an angle of 120º (the generally accepted norm).
Conventionally, all platbands can be divided into 2 groups (according to the specifics of the frame assembly): monolithic, that is, when the pattern is cut directly into the board (plank) and overhead. These are separately manufactured figures that are attached to the sides of the frame by gluing, tongue-and-groove or otherwise. The technology described above (slotted) refers to the first option.

Wood processing
Soil impregnation
This is rarely done by anyone, but such preparation of the material gives advantages. Firstly, the pores are filled with the preparation, which reduces the hygroscopicity of the tree. Secondly, with the subsequent application of a protective layer, the consumption of the paint and varnish composition (any of which is more expensive than a primer) decreases.
Finishing decoration
As a rule, varnish, especially when it comes to a log house. In other cases, you need to focus on the overall design of the facade and shutters. ...
The author hopes that this article will help the reader make the best choice and will become a step-by-step instruction on how to make decorative elements with your own hands. For those who are interested in more complex options for window trims, we recommend that you deal with such structural parts as "kokoshnik", "towel", "diadem", "shoulder". The work is much more difficult, but it is worth it - the exclusive is provided.

