Sealing cracks in a wooden floor - how and how to carry out repair work? How to fill up the gaps in the floor: folk, original and radical methods How to fill in the gaps on wooden floors.
The appearance of cracks is one of the most pressing problems of plank floors. Floorboards creaking, heat leaks, dust and insects penetration are all unpleasant consequences of such defects, and if measures are not taken in time, the floor will have to be completely changed. Meanwhile, there are several effective ways to seal floor gaps between planks and significantly extend the life of the flooring. All of them are quite simple, they do not require special skills, and therefore everyone can do it. So why do gaps form in the floor and how can they be fixed?
To find the best way to seal the gaps, you first need to accurately determine and eliminate the cause of their appearance. If this is not done, the result of the repair work will be short-lived and after a while everything will have to be repeated again.
The following factors contribute to the appearance of gaps:
- natural drying out - any wood is subject to shrinkage, only with different intensity. Boards that have been processed in vacuum chambers almost do not change their geometry during their service life, but ordinary lumber can dry out by 5-10%, or even more, depending on the initial moisture content and wood species;
- low indoor humidity - if the air in the house is too dry, the boards will intensively release moisture and decrease in size. For wooden floors, the optimum air humidity should be kept within 40-65% at temperatures from 18 to 25 ° C;
- incorrect installation - violation of the laying technology leads to loosening of the boards, their subsidence and deformation, as a result of which gaps are formed between the floorboards. The most common mistakes are non-compliance with the plane when installing the log and poor fixation of the flooring;
- rodents living under the floor - mice and rats are able to gnaw through the thickest boards to get into the room. The more active the pests, the more cracks and holes they will make, and it is most difficult to eliminate such damage;
- laying raw lumber - drying of the boards during the operation of the floor almost always leads to significant deformations of the flooring and the appearance of gaps between the floorboards. That is why, when choosing, you need to give preference to well-dried flat boards with a relative humidity of 8-12%.


Depending on the number and size of gaps, as well as the general condition of the wooden elements, repairs can have varying degrees of difficulty - from repairing individual damage to a complete replacement of the flooring.
Defects elimination methods
The choice of the sealing method should be approached thoroughly, taking into account the cause of the damage, the location of the cracks, as well as the labor costs and time that will be spent on repairs. The financial aspect is no less important, because the larger the work, the more funds you will need.
| Embedding method | Description |
|---|---|
| It is used to eliminate small gaps and cracks in the floor. Scotch tape is needed not simple, but reinforced, 50 mm wide. The floor is cleaned of dirt, degreased and dried, after which the cracks are sealed with tape, the edges of which are fixed to the floor with a stapler. The method is very simple and budgetary, it takes a minimum of time. Minus: the floor with stripes of adhesive tape does not look aesthetically pleasing, so carpet, carpet or other roll covering must be laid on top |
| It is used to eliminate gaps between the floor and walls, which appeared as a result of wood shrinkage. It is carried out after dismantling the skirting boards and cleaning the gaps from debris and dust. If the slots are too wide, pieces of foam are placed in them before blowing the foam. After the foam dries, its excess is cut off at the level of the floorboards, the cuts are putty so that dust does not accumulate in the pores of the material, the baseboards are installed back. The method is convenient, does not require much physical effort, it takes little time. Cons: high foam costs, fragility |
| This variant is suitable for small gaps between the floorboards. Only a special wood putty is used. The composition is applied with a spatula, carefully filling all the grooves and gaps, after drying, the surface is sanded. The method is fast, does not require special skill, and is quite affordable at a cost. The disadvantage is fragility - the putty tends to crack and crumble, especially with intense loads on the floor |
| Homemade repair mortars are often used to seal wide gaps and cracks in the floor. Traditionally, a mixture of wood glue and sawdust is used, which is applied with a spatula to problem areas, tamped into recesses, and after drying is sanded. To seal the cracks gnawed by mice, cement and broken glass are added to the glue solution. To speed up the hardening process, epoxy is used instead of wood glue. This method of sealing is very affordable and durable, moreover, it is simple to execute. |
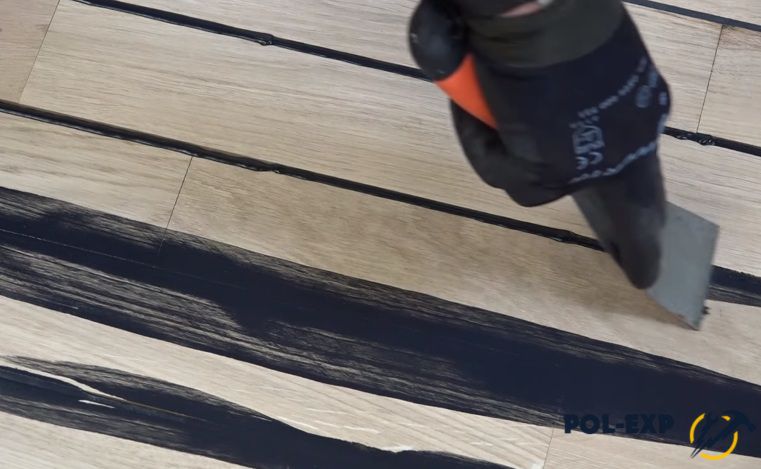
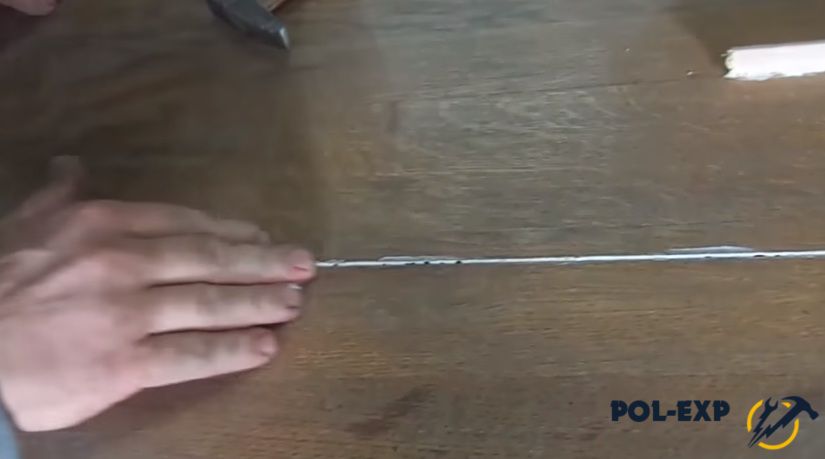
| Both narrow and wide gaps between floorboards can be easily sealed with wood sealant. The syringe-shaped nozzle allows you to effortlessly evenly distribute the composition and fill all the recesses. Due to its elasticity, the sealant will not come off the boards during temperature deformations and will reliably serve for more than one year. To mask the repaired areas, putty is applied over the sealant to match the color of the coating. The method is convenient, simple and durable, the material costs are low |
| This method allows you not only to eliminate cracks, but also to effectively get rid of the squeak in the floors. In hardware stores, a special synthetic cord of various thicknesses is sold, which is selected according to the width of the gap. You can use a regular hemp rope instead of a cord. To seal the defect, the cord is abundantly greased with wood glue, laid on the floor and tightly hammered into the slot with the corner of a spatula so that 2-3 mm remain from the cord to the floor surface. This depression is filled with a mixture of sawdust and glue, smoothed, and polished after drying. Similarly, you can use plumbing tow. The method is reliable, inexpensive, although a little time consuming |
| Used to close wide gaps in the floor. Wooden slats are cut in the form of wedges according to the size of the gaps, thickly coated with glue and hammered into the gap with a rubber or wooden hammer. After the glue dries, the part of the wedge protruding above the floor is removed with a plane, the working surface is polished and painted. One of the most practical ways is inexpensive and durable. Cons: trimming and fitting takes extra time, requires some effort and skill in working with carpentry tools |
| It is used in case of significant drying out of the floorboards and the appearance of wide gaps in the floor. To do this, the boards are carefully dismantled, and then laid again, compacted with wooden wedges, clamps, a jack or a special lever. As a result of tightening, additional 2-3 floorboards will be needed, depending on the degree of floor shrinkage. The method is characterized by high reliability, durability and low cost. The disadvantages include the duration of the process and its laboriousness. |
| It is used in cases where there are many gaps and the appearance of the floor leaves much to be desired. Plywood is laid on the floor so that gaps of 1-2 mm remain between the sheets, and the joints in each row are displaced by at least a third of the sheet. The sheets are fixed with self-tapping screws, sinking the caps into the tree, then the grooves are putty, the flooring is sanded and the topcoat is laid. This method allows not only to close all damage, but also to insulate the floor, as well as to level the base under the decorative coating. Cons: high material costs, labor intensity |


Prices for reinforced tape
reinforced tape
All described methods have been repeatedly tested in practice and are widely used by home craftsmen. And now let's take a closer look at the most popular options for sealing gaps: which tools to use, how to properly prepare the surface and the technology of the workflow.
Prices for silicone sealant "Moment"
silicone moment sealant
Gap sealing technology
Most often, cracks are eliminated with sealants or putties, which are presented in a large assortment in hardware stores. As a more budget-friendly option, many people prefer embedding with wooden wedges.
Sealing gaps with sealant
The effectiveness of this method directly depends on the type of sealant. In residential premises, compounds based on silicone or acrylic are used for wooden surfaces. The former have greater elasticity, and therefore better withstand deformations of the coating when changing humidity and temperature conditions. But they emit an unpleasant odor during application and are unsuitable for subsequent staining, so to mask the treated seams, you must first buy a composition that matches the color. Acrylic sealants can be putty and stained, odorless, easy and quick to apply. Their disadvantage is the tendency to shrinkage and lower elasticity.
Council. Acrylic sealant is best suited for heated rooms with low fluctuations in humidity. For unheated rooms, or irregularly heated, it is worth choosing a silicone-based composition.

In terms of quality, Ceresit, Tytan, Moment and Bostik sealants are considered the best.

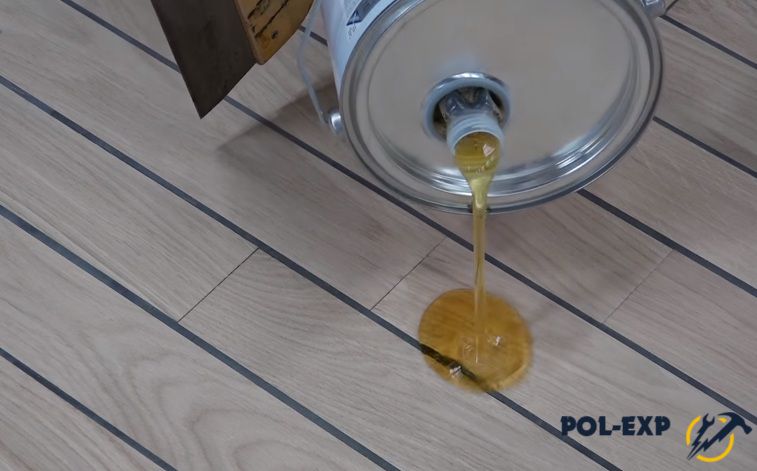
In addition to the sealant, you will need a narrow and wide spatula, a clean, dry cloth and a protective impregnation, for example, parquet oil.

The floor is well cleaned of dirt, paying special attention to the crevices. If necessary, the surface is degreased or washed with water, after which the wood should be allowed to dry completely.
Carefully cut off the tip of the nozzle along the width of the gap between the boards, insert the tip into the gap and squeeze out the sealant in an even continuous strip.


After filling the gaps in a certain area of \u200b\u200bthe floor, take a narrow spatula and level the composition by running the tool along the gaps. The trowel blade should be held at a slight angle to the surface to remove the sealant flush with the planks and not leave any ridges or indentations at the seams.
Step 4. After finishing the leveling, wipe off the excess mixture with a clean, dry cloth.
A small amount of parquet oil is poured onto the floor and spread over the working surface with a wide spatula. The movements of the spatula should be arcuate, across the boards, so that the protective compound fills the smallest grooves efficiently.

Now all that remains is to wait for the surface to dry. If everything is done correctly, the cracks in the floor will not bother you for a long time.
Elimination of cracks with putty
What you need to work:
- putty for wood;
- wide spatula;
- sander.
| Step, no. | Procedure |
|---|---|
| The floor is vacuumed or wiped with a well-wrung cloth to remove dirt. |
| Stir the putty and pour a small amount onto the floor. |
| With a spatula, carefully spread the mixture over the floor, starting from the corner. The trowel blade is pressed tightly to the surface and is drawn along the junction of the wall and floor across the floorboards. The floor is treated in wide strips, moving from the far corner to the doors. The layer of putty should be as thin as possible so that the texture of the wood shines through. The main thing here is to fill the gaps, so the putty is carefully rubbed into the gaps and recesses, and the excess is removed with a spatula. |
| After the process is completed and the putty has dried, the floor must be sanded. If the room is small, sanding can be done manually. |
| Now it remains to vacuum the floor and cover the boards with a protective compound. If there are few cracks, there is no need to putty the entire surface. In this case, the composition is applied with a small rubber spatula exclusively on the cracks, carefully filling all the grooves. |


Sealing the gap with a wooden lath
In the process of work you will need:
- thin wooden lath;
- large awl or screwdriver;
- pVA glue;
- a hacksaw with fine teeth;
- a hammer;
- putty for wood;
- sandpaper.
The gap between the boards and the floor surface are cleaned of dirt and dust.

The tip of a screwdriver or awl is inserted into the slot and several times with effort is carried out along the entire length of the board so that the rail fits more tightly into the gap.

Step 4. Take a rail, insert it with an edge into the slot and knock it down with a hammer. For convenience, the lower edge of the rail can be hung in the form of a wedge - this way it will go deeper between the boards and fill the gap more tightly.

Council. If there is no wooden mallet, you can knock out the rail with an ordinary hammer, turning it on its side. You can also use a block of wood as a lining so that no hammer dents will remain on the rail.
When the glue dries, the protruding part of the rail is cut off with a hacksaw flush with the surface, then cleaned with a planer.


The treated area is covered with putty to eliminate the smallest defects, then sanded with fine-grained emery paper.

After that, it remains to clean the dust and treat the boards with any protective compound - oil, varnish, stain or floor paint.
Video - How to close up the gaps in the floor between the boards
None of the existing materials has the slightest chance of displacing the good old wood from the pedestal, loved by everyone for its beauty, environmental friendliness and durability, for its ability to store heat. It is used in many types of construction and renovation work, especially attractive and pleasant wooden floors. However, over time, such coatings also have a big drawback - ugly gaps between the boards. The reason for this is the drying out of the natural material. Not all owners are ready for drastic changes, and they don't really want to part with a comfortable floor, so the question of how to seal the cracks in the floor will always remain relevant. There are several ways, and they are all quite effective, simple, and therefore do not require special skills from the owners.
Causes of an unpleasant phenomenon
If the owners eliminate the cracks, but do not identify the culprits of their formation, then soon the defects that appear will "please" them again. Therefore, the first necessary step is to identify the causes of the cracks. Several factors can be suspected of "complicity".
- Shrinking due to natural causes. Any type of wood loses weight over time, but the intensity of this process depends only on the species. The exception is boards that are processed in vacuum chambers, they are almost not characterized by a change in geometry. An ordinary building material, on the contrary, is capable of losing 5 to 10%, or even more: the numbers depend on the type and initial moisture content.
- The air in the house is too dry. In this case, the tree will give off moisture very quickly, which means it will decrease in size. Normal conditions "for life" of such coatings are temperatures from +18 to + 25 °, humidity from 40 to 65 °.
- Laying dry material. The optimum relative humidity for raw materials that are preparing to become a floor covering is in the range of 8-10%. If the wood is damp, then it will have to dry during operation, and such conditions lead to cracks.
- Violation of technology. Incorrect installation - poor fastening of the flooring, non-observance of the horizontal lag are the most common causes of loosening, "walking" of boards, their subsidence, and, of course, deformation.
- "Living creatures" living underground. Rodents - rats and mice - have to constantly grind their incisors, so they have to "train" on everything that comes their way. The second reason is hunger, which pulls them to feats. These cracks and holes are the most severe "injuries".
- Wrong choice of material. Optimal boards made of oak and softwood. A floor made of beech, cherry, pear, maple or ash will definitely require repair, since these types are most susceptible to deformation.
- Extremely high operational load.

The front of the work depends only on the size and number of slots, so repairs can be both simple and incredibly difficult. The most serious damage already requires a radical measure - a complete replacement of the floor.
"Treatment" of cracks with folk remedies
Since the problem has been known to people for a long time, quite a lot of ways have been invented to get rid of defects. Before work, it is necessary to thoroughly study each type of disposal, and then choose how to fill up the cracks in the floor so as to forget about the flaw for a long time.
Paper, paste, copper sulfate

This method has a big plus - it is cheaper than other "treatment" options, but effective. To camouflage annoying cracks in the floor, perform the following operation:
- Paper (for example, a newspaper) is torn into small pieces, then they are filled with water.
- While it is soaking, a paste is prepared: starch (or flour) is mixed with warm water, copper sulfate is poured into the resulting "jelly" (1:10, where the first is copper sulfate).
- Squeezed soggy paper is introduced into this composition, the putty is thoroughly stirred until its consistency becomes uniform.
- After clearing the gaps from dirt and dust, the crevices are smeared with a mixture, then it is tamped, leveled.
- After drying, the surface is lightly sanded with sandpaper, then painted.
Any composition will reliably hold only in one case - if a high-quality cleaning of the cracks is carried out. When dirt cannot be removed, the gaps widen. Otherwise, the work will be ineffective: the gaps in the floor will appear again.
Sawdust and their "associates"

In this case, there are two ways to prepare a life-saving mixture: glue (PVA for wood or carpentry) with sawdust alone and a tool in which cement is also added for greater strength. A clean composition for small crevices is done like this:
- Small sawdust is poured with boiling water, mixed well, closed and left to swell for an hour or two.
- Then the adhesive is added to them in such an amount that a viscous mass is obtained.
- This putty is applied with a spatula, the excess is removed, leveled, given 2-3 days to dry.
- The dried surface is sanded.
Floor slits with a width of 3-7 mm require other large sawdust. Better yet, take a mixture of different fractions.
Sawdust with cement
The preparation of a super-product with cement requires precise proportions, so they measure:
- water (also hot) - 15 parts;
- glue - 2 parts;
- sawdust and cement - 5 parts each.
The technology is also different here:

- Water is poured into the glue and mixed, then the remaining components are added: first sawdust, then cement.
- To make the composition have a color similar to the flooring, oil paint or dry dye is added to it. Let it brew for about 10 minutes.
- Before covering the floor cracks, the mass is slightly warmed up. This solution dries for 2 weeks. It is also treated with abrasives.
This composition is used not only for sealing cracks, the method is used to level the entire surface of a wooden floor.
Sawdust, varnish and / or paint

Here other ingredients, more familiar and familiar to the floor, become "colleagues" of small shavings. This composition will be able to "cure" cracks of any depth and width.
- Sawdust, thick oil paint and varnish are mixed in a ratio of 4: 1: 1.
- If the gaps are small, then the entire composition is poured out immediately.
- When the flaw is quite large, the mixture is applied in layers after a short period of time.
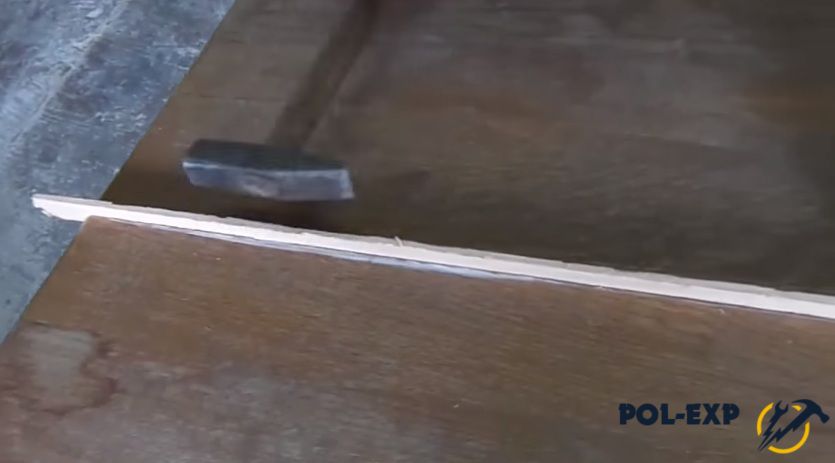
Reiki wedges to help

This method is very common, because it is difficult to argue with the logic of this decision. Thin slats, oiled with adhesive, are very easy to drive into any crevices, and the gaps hidden in this way will cease to be a headache for a long time (forever?). The work is done like this:
- Wedges are prepared from pine boards. The width of the elements must be 0.5 mm less than the gap.
- The slots are cleaned, then slightly widened. The gap and the rail are abundantly greased with glue. The wedge is driven in with a rubber mallet or hammer, but then a small board is placed on it.
- They are waiting for the adhesive composition to dry. The part protruding above the surface is removed using a planer. Tiny defects are camouflaged with a mixture of sawdust and glue.
- The wedge is stained and painted (varnished).
It is rare to have identical floor gaps, and making wedges for each gap is a little pleasure. Therefore, all holes are adjusted to the same size with a cutter. The advantage of this work is the removal of old wood: fibers on a fresh cut and wedges guarantee a more reliable connection.
Cement and broken glass

This method is suitable for those who have rodents in the floor who are happy to try even concrete on their teeth. Therefore, a simple solution is not a panacea, it can quickly turn into a "washcloth". And in this case, it is best to first close the seam with broken glass (for example, fragments of rather thin beer bottles), then fill this "anti-personnel ditch" with concrete, and putty on top.
Decent alternatives to broken glass are wire dishwashing products cut into pieces, store-bought mortar containing aluminum chips and concrete mortar. They say that Macroflex polyurethane foam belongs to this category, unloved by rodents, but such material is not optimal for the gaps between the boards.
Rope, tow, cord

To implement this method, any twine or rope is suitable, the thickness of the cord depends only on the width of the slots in the floor: it must be larger than the holes. You will also need glue (PVA, carpentry), sawdust and putty. The work goes in the following sequence:
- The cord is abundantly coated with glue, it is better to immerse it in the composition and leave it in it for a short time. A mixture of glue, sawdust and putty is prepared separately.
- The cord with the help of a core and a hammer is deepened into the gap between the boards by 2-4 mm. The remaining space is filled with a homemade mixture, but the gap is filled with a margin, since the mixture will shrink when it dries.
- After it hardens, the seams are covered with paint to match the floor.
To get rid of small cracks, in almost the same way, they use plumbing tow, which is also lubricated (moistened) with glue. It is laid in the holes, tamped, and after drying, the floor is painted.
The newest alternative is a sealing cord made of expanded polyethylene. He does not need glue, 4-5 mm of free space is left on top. It is closed with a putty, the best look is an oil-based composition for wood.
Epoxy mix

This method is considered one of the best options for dealing with cracked boards. Epoxy-cement "mortar" is praised because of the reliability and strength of such a composition.
- Epoxy adhesive is mixed with cement in equal proportions. In consistency, this composition should be similar to thick sour cream.
- Pour it in with a small margin, because it will shrink during the drying process.
- The last stage is traditional: it is floor polishing and painting.
Not everyone welcomes this type of adhesive, which guarantees strong adhesion. The reason - frequent emergencies during operation - its breaking off together with large fragments of boards.
Chipboard, plywood

This is the most original answer to the question of how to seal the cracks in the floor. The use of this method is advisable when the gaps in the wooden floor are countless. In this case, "putty work" will take a lot of time. Therefore, the most effective way is to lay sheets of chipboard or plywood. However, after this radical operation, a new topcoat will be required.
The sheets are attached to liquid nails, self-tapping screws, or regular nails. When choosing the last two types of fasteners, holes of a slightly smaller diameter are first drilled in the material than those of screws (nails). The reason for this is the possible deformation of the material.
Means - professionals
The construction market does not know the word "deficit" now, so the choice of various compounds is simply huge. Many of them are specially designed to mask all sorts of imperfections. Therefore, the question of how to seal the gaps in the floor can be asked to sellers, but it is better to get acquainted with possible applicants in advance.
Sealants

Their main "vocation" is to make the seams of materials inaccessible to moisture. For work with wooden floors, 2 types of sealants are suitable:
- Acrylic compounds. Their plus is the ease of washing off the hands, a perfectly flat surface, which is obtained after grinding and painting. Cons - inability to withstand temperature extremes and relatively large shrinkage. However, these disadvantages for indoor flooring are not too scary.
- Silicone sealants are a real salvation for walking floors. They have many merits. These are plasticity that remains after drying, enviable resistance to stress and compression, good adhesive properties. But there is a minus: such mixtures are not suitable for staining. In stores, compositions of different colors are sold, but it is not a fact that the owners will be able to successfully choose a shade.
The order of work is as follows:
- The cracks in the floor are cleaned with a vacuum cleaner, washed and dried.
- The sealant is squeezed into the gap, then leveled with a spatula, gloved fingers (fingertips) or a spatula.
- Wipe off any excess with a dry cloth.
The operation is simple and uncomplicated, it does not require excessive efforts either. However, the main condition for success is a thorough preliminary cleaning of the crevices.
Polyurethane foam

It is recommended to use construction foam only for filling gaps around the perimeter of the room, and not between the boards. The reasons for disapproval are deformation of the coating under pressure, uneven filling, change in the shade of the foam under the influence of ultraviolet radiation. The whole operation for the areas under the skirting boards is as follows:
- The floor is cleaned of debris and dust. If the gaps are impressive, then thin strips of foam are put in them.
- The empty space is filled with foam, then they wait for it to dry.
- Excess is cut from the seam, and the surface is putty.
Putty - palliative

This option cannot be considered a reliable replacement for the previous methods, since this composition will eventually begin to crack, crumble, and fall out. The meager assortment of colors is another drawback. Situations in which the use of these mixtures is justified is the expectation of an early repair, if the floor is planned to be covered. The work is carried out in the following order:
- On the cleaned surfaces, putty is applied with a rubber spatula, pressed into the cracks.
- After the composition has dried, the seams are leveled with sandpaper.
For filling the cracks, some recommend taking parquet putty, since it has greater elasticity and does not crack so readily. If in the near future they plan to lay tiles or laminate, then they do it much easier: the gaps are glued with tape.
Putty with glue

This method gives you a chance to seal small gaps in the floor. It is also suitable if ugly cracks appear on the surface. For this operation, a certain type of putty is required - a dry finishing mixture intended for drywall. The same PVA acts as glue.
The composition is mixed in small portions so that its consistency resembles the thickness of sour cream. After applying it in the cracks, the putty-glue is immediately sanded, then quickly leveled, since otherwise it will quickly harden, and in this state it will not be possible to perform the operation qualitatively.
How to deal with playful boards?
Such a nuisance happens for two reasons: an incorrect lag step is to blame, or the wrong boards are chosen - the material is too thin. There are also two ways out - installing additional logs or installing thicker boards. Both are not very attractive, as they involve removing the flooring. Yes, these options are optimal, but there is a simple way - rallying neighboring elements with dowels. It makes it possible to stop the "game" of the tree, to eliminate the deflection.

This operation is not so elementary, because there are many nuances in it.
- Correct drilling of holes at an angle is the first trick. Make sure that there is a sufficient layer of wood between the fasteners and the bottom / top plane of the boards. The angle of inclination is chosen based on the thickness of the material.
- Hole diameter for fasteners. It should be at least 0.5 mm larger than the dowels. The remaining gap will be occupied by glue (stationery PVA), which cannot be squeezed out. It will contribute to the swelling of the fibers, so the connection will become reliable and super strong.
- Drill and template. The length of the tool must be maximum, but it is very difficult to find a suitable option. The way out is possible: this is welding of a bar of a similar diameter. The template will greatly speed up your work, especially in the "start of glorious things."
- Spray gun for glue. It is made from a tube with a diameter suitable for the bottle spout. The length of the segment is 20 cm. The tube is sealed from one end, and small holes are made in it, which will not allow the glue to stain everything around.
The dowels moistened with glue are installed in the holes, also treated with the compound. The compounds are left alone until dry. The towering part of the chopiks is removed with a grinder, and the cut is grinded with what is at hand - the same angle grinder, a hand grinder, or a drill with an appropriate nozzle, but at low speeds.
The question of how to seal the cracks in the floor can now be considered closed. Since the choice of a suitable material largely depends on the depth and width of the flaws, then the owners will have to decide: any means will do, and it does not matter at all whether they are folk or purchased. However, the best solution is to unite the floor. In this case, the cracks will no longer show through, which means that you can not be afraid that at one "fine" moment all the carefully pushed "good" will fall out again.
One of the options for transforming a slit floor can be seen in this video:
One of the common plank floor problems is the appearance of gaps between the planks. Debris gets clogged in the gap, water leaks, this can provoke rotting of the boards. If the base is not insulated, it pulls from below with cold. Insects can sneak into the room through the cracks, and if they are large enough, then rodents. So they need to be repaired, there are many old, old-fashioned methods, in recent years new, simpler and more reliable ones have appeared.
Before eliminating gaps, you need to understand why they appeared. Main reasons:
- Reduction of board width due to wood shrinkage... The higher the moisture content of the boards at the time of installation, the more pronounced the shrinkage will be
- Incorrect styling, poor fixing of boards, as a result of which they "walk"
- Rodent damage
- Rotting floorboards due to lack or ventilation
Shrinkage can occur due to excessive dryness of the air in the room; when the humidity level rises, the boards will expand and close again. Therefore, such seasonal gaps should not be repaired, so as not to provoke deformation of the boards in the future. It is better to take care of maintaining a stable air humidity.
If the boards start to rot, you cannot do with sealing the cracks, you need to re-grind the coating, taking care of the hydro-barrier and the ventilation gap under the floorboards. Rotten planks will have to be replaced so they don't infect others. If the cracks are gnawed by mice, first you need to get rid of them. If the boards move back and forth due to insufficiently high-quality fastening to the base, they must be fixed, and only then the cracks must be closed.
The most radical method of eliminating gaps is to lay the boards tighter. It is usually used if the board was not dry enough at the time of installation. In this case, temporary laying is carried out, only every 4 or 5 boards are attached to the base, after final drying, the fasteners are dismantled and the boards are laid according to all the rules.
Ready-made and home-made putties, sealants
 Small gaps are usually filled with a plastic compound, which hardens after drying. The easiest way is to use a ready-made pasty putty for wood, but you can prepare a composition for filling the gaps with your own hands. Before sealing the cracks, they must be thoroughly cleaned of debris and degreased, the composition is applied and leveled with a spatula. After final drying of the mixture, the surface is sanded. If the composition shrinks during drying, a second procedure may be necessary.
Formulation options:
- Sawdust glue... Pre-steam fine sifted sawdust with boiling water and leave to swell for up to 2 hours, then mix with glue (PVA, wallpaper or carpentry) until a viscous mass is obtained. Drying time is 2-3 days.
- Glue, sawdust and cement... Joiner's glue or PVA is diluted with hot water in a ratio of 2:15, 5 parts of cement and sawdust are mixed, all components are combined and kept for about 10 minutes. Before work, the mixture is heated, and the gaps are primed with glue. You can start grinding no earlier than 2 weeks later.
- Paste with paper... Grind the newspaper and cover with water. While it is soaking, prepare a paste of starch and water, cool slightly and add 1/10 of copper sulfate to prevent fungal infections. Mix squeezed and rubbed paper with the paste
- Parquet primer BONA ParketGrunt with added wood dust can be used as a filler for gaps up to 5 mm
- A mixture of epoxy glue and cement 1: 1 turns out to be liquid, but sets quickly. It's just poured into the cracks
- Linseed oil wax mixture is also poured into the gaps in a heated state. This composition is suitable for small and perfectly cleaned crevices
A mixture of cement with broken glass or a store-bought compound with aluminum shavings is used if it was not possible to get rid of rodents. This putty will prevent them from gnawing new holes in the same places. You need to work carefully, with gloves, so as not to injure your hands, and cover the composition with a regular putty on top.
Hardening inelastic putties have a significant drawback - if the boards continue to "play", the cracks will widen and narrow, and the putty will crack and crumble. It is better to fill cracks with unstable dimensions with an elastic sealant, which will compress and stretch as the wood moves.
Acrylic or silicone sealants are more expensive than putty, but provide a more reliable and durable result. Acrylic sealants can be painted on top, silicone sealants should be selected in the color of the floor. You can also fill the cracks with polyurethane foam, which provides additional thermal insulation. Before applying foam or sealant, the surface is prepared like a putty.
Foam and sealants are squeezed out using a special syringe gun, when working with foam, it must be set to a low flow. Excess foam is cut off with a knife after it is completely dry. From above, painting is required - under the influence of sunlight, the foam is destroyed.
Sealing with rope, cord, slats
 Deep slots are filled with rope, cord or tow to save the putty. A cord, twine, a rope of such a diameter to block the gap is taken, passed through glue (PVA or carpentry) so that it covers it from all sides and soaks it. The rope (cord) is laid in the gap and compacted so that 2-4 mm remain to the surface. This gap is filled with a putty made from the same glue and sawdust.
The tow is also moistened with glue and the cracks are filled to the top. For large gaps, you can use a thicker rope, and pour a mixture of epoxy and cement on top. Also large gaps are sealed with wooden wedges cut from pine laths, glazing beads... For such a repair it is necessary:
- Align the edges of the boards with a cutter, if necessary, remove the old paint from the area around the gap
- Cut out a wedge insert, slightly tapering downwards, so that it is 0.5 mm narrower than the slot width
- Glue the edges of the gap and wedge
- Insert the wedge into the slot and hammer with light blows from the mallet through the board spacer
- If there are gaps, fill them with a filler made of glue and sawdust
- After the glue has completely dried, cut off the protruding excess with a plane and sand the surface
If the plank floor will serve as the basis for a finishing coating, the cracks can simply be sealed with reinforced tape. Depending on the topcoat, a shock-absorbing underlay or plywood sheets are laid on top.
Sealing cracks is one of the types of repair work, about other types of floor repair from boards.
Gaps between floor and walls
 The floor board is laid with a small indent from the walls, so that a gap is formed around the perimeter to compensate for the thermal expansion of the wood. Initially, it is recommended to make it 0.5-1 cm wide, since it can increase due to shrinkage of the boards. A gap of up to 2 cm is covered with a plinth and does not create problems, in extreme cases, you will have to replace the plinth with a wider one.
If the gap is too large, it will have to be repaired. For these purposes, it is better to use an elastic material, since the linear dimensions of the boards can change due to changes in temperature and humidity. Eliminating the excessive width gap starts with removing the skirting boards. As a placeholder you can use:
- Jute, tow, caulk felt
- Silicone or acrylic sealant
- Mounting foam
Gaps that are too wide (more than 5 cm) are best filled with foam strips and foamed, so you can reduce foam consumption. Its excess is cut off after drying, putty is applied on top. To sort out the covering is not the best option, in the longitudinal direction, as a result, another board may lie, whole or sawn, and the lack of length will have to be compensated for by short cuts of boards, this is troublesome and ugly.
Video
Sealing gaps and cracks in plank floors, eliminating squeaks, varnishing
Making homemade filler for filling cracks
Outcome
The methods of sealing the gaps between the boards depend on their size and the reason for their appearance. Small gaps can be repaired with a ready-made or homemade compound, elastic wood sealants are preferred over hard fillers. Deep slots are pre-filled with glue-impregnated cord, rope, and deep and wide ones are clogged with wooden dowels. Sometimes it is necessary to close not only the gaps between the boards, but also the gap between the floor and the wall, if its dimensions exceed the permissible ones.
Traditional natural wood floors are beautiful in every way - they are environmentally friendly, easy to install, beautiful and practical. However, of all materials, wooden boards are most susceptible to various deformations.
So, during operation, in almost any wooden floor, gaps appear between the boards. These cracks promote decay, a large amount of heat escapes through them, dust and dirt accumulate in them. If cracks appear, they must be repaired. What's the best way to do this?
Reasons for the formation of cracks
Gaps between floorboards can be caused by many factors:
- Thermal deformation. Due to regular temperature fluctuations, the tree dries out, the joints of the coating elements become wider. This is avoided by the material dried in the factory using a special method, in which all the water is removed from the tree cells using a vacuum. Ordinary boards dry for several years and during this time they noticeably change in size.
- Rodents that spoil wood. In this case, just patching up the flaws is not enough, you also need to get rid of the mice, or at least prevent them from gnawing the floor by getting a cat.
- Errors when laying boards. In this case, you need to securely fix the coating, and then cover up the cracks.
- Poor ventilation, due to which the tree quickly decays. In this case, having closed the joints, it will be necessary to equip a ventilation grill in the wooden floor.
Modern repair methods
Putty

It is easiest to cover the cracks in the wooden floor with putty, but this option is not durable. If the boards continue to move during use, the putty will quickly crack and you will have to do it all over again. In addition, the putty is very visible against the woody texture.
Related article: We select accessories for the bathroom (48 photos)
Sealant
If the gaps are dynamic, the filling material should also be mobile and have good elasticity. To ensure this characteristic, acrylic or silicone based sealants are used. The blurring process is as follows:
- the floor surface is cleaned and dried;
- the joints of the boards are filled with an assembly gun;
- the sealant is spread with a spatula.
The silicone sealant can be matched to the floor. Acrylic based sealants are also a great option. They are resistant to temperature fluctuations and high humidity, easy to grind, paint and varnish. The tensile strength is very high - the gap can stretch twice without losing the integrity of the sealant.
Polyurethane foam
It is very easy to close the joints of the boards in the floor with this substance. All you need is a special gun and a plastic soft tube that is compressed and pushed into the slot. The foam should be delivered evenly and with a slight pressure. You need to act quickly, since the foam hardens almost instantly.
A narrow gap can be covered not from the inside, but by applying foam from above. It is not necessary to smear the foam with a spatula, since the material will stick tightly to the metal. Better to use a damp piece of wood, oiled with soapy water. Excess foam is removed with a utility knife after drying.
The disadvantages of foam are its ability to collapse under the influence of ultraviolet radiation, porosity and attraction of dust. But a layer of polyurethane foam works well as a heater.

Scotch
If an additional finishing layer of the coating will lie on the wooden floor, and the attractiveness of the seams is not important, you can simply glue the joints with construction wide tape. Its edges are fastened to the board with a stapler. Scotch tape will perfectly protect the room from drafts and cold coming through the joints of the boards.
Traditional methods
These methods of filling gaps have been proven over time and often turn out to be optimal.
Related article: Working pressure in the heating system
Wooden slats

It is very simple to close the gap with a rail. The technology of the method is as follows:
- The edges of the boards are processed with a hand cutter.
- The slats are cut to a suitable size. It is best to take pine boards, as they are easier to process.
- The edges of the floorboards and the side edges of the slats are greased with adhesive.
- The rail is inserted into the slot and securely fixed. Remaining empty spaces can be repaired with a mixture of glue and sawdust.
- The resulting surface is sanded with a belt sander or manually. In this case, you need to protect yourself with glasses and a respirator, as a lot of dust will form.
- Masking tape is glued to the joint.
- The renovated floor is painted and varnished.
- Putty from scrap materials
The old recipe for putty, according to which you can make a putty with your own hands, is a sticky composition of wood resin and sawdust.
You can also mix sawdust with PVA glue. The resulting mixture adheres perfectly to the wood, and after drying it becomes very hard and durable. The only downside is the roughness of such a putty; to give a decent appearance, you will have to carefully process it with sandpaper. In addition, this material darkens with use.
A similar recipe is a mixture of varnish and wood dust.
Floor covering with plywood, chipboard, drywall

Other similar materials can be used. It is recommended to close up the joints of the boards in this way in the case of very wide gaps, which can no longer be covered with anything. On top of a layer of sheets of plywood or other material, you can put any decorative coating.
On the old wooden floor, a frame is formed from miniature logs. To do this, you need to use a bar made of solid wood. Bars are installed in increments of 60 cm, depending on the thickness of the coating sheets. Under these elements, you need to put pieces of linoleum or roofing material in order to absorb the load on the floor.