How to calculate roofing, battens and rafters for a pitched roof using an online calculator. Simple pitched roof How to put the rafters on a pitched roof yourself
For the construction of small buildings and houses, there is no need for a complex roof structure. As a design solution, a shed roof rafter system can be adopted. In this case, the scheme is simplified, but some nuances appear.
Advantages and features of the shed system
The advantages include:
- simple calculation;
- reducing the number of nodes and connections;
- simplification of installation;
- reduction in wood costs;
- maintainability.
When deciding to make such a roof with your own hands, you must take into account the following features:
- the need to erect high longitudinal walls of the building or special frames;
- the complexity of using the roof space as an attic room;
- it is necessary to place a house or building on the site so that in most cases the wind blows on the high wall of the building (it is necessary to familiarize yourself with the wind rose of the construction area);
- the angle of inclination is taken depending on the used coating material.
The scheme includes the following main elements:
- two Mauerlats;
- rafter legs.

With large spans, you will need to use your own hands to install additional elements that unlock the load-bearing beams and increase their bearing capacity:
- rafter legs (struts);
- racks;
- runs;
- lie down;
- contractions.
All elements are made of coniferous wood of the first or second grade... To correctly choose the most suitable material, you need to pay attention to the following points:
- the place of felling (it is better to choose the northern regions);
- felling time (a tree felled in late winter - early spring will be stronger).
System calculation
Before proceeding with the assembly of the structure with your own hands, it is necessary to make a calculation and choose the correct cross-section of all elements.
Roofing is a responsible process in which no mistakes can be made.
Depending on the width of the building and the required cross-section of the rafter leg for the projected span, a constructive solution of the rafter system is selected.

Section selection
When building a house by professional builders, according to a pre-prepared project, a calculation is performed for two limit states, which determines the height and width of the load-bearing beams according to two requirements:
- rigidity;
- strength.

When building a private house with your own hands, the calculation can be skipped, but it is necessary to take into account the recommendations depending on the span. Rafters on a pitched roof are always layered.
- Span up to 4.5 meters. The scheme assumes the use of solid rafter legs, without loosening with struts or struts. Convenient to use if an attic is planned: it allows you to increase free space due to the absence of intermediate supports. The recommended cross-section of rafters at a pitch of 0.6 m is 50x150 mm, for a pitch of 1.1 m, an increase of up to 75x175 mm is required.
- Span up to 6 meters. In this case, it all depends on the angle of inclination and span. In some cases, the standard length of the board or timber is enough - 6 m.With a large angle of inclination and a span close to 6 m, you will need to join the rafter legs along the length. As additional support, struts are provided (rafter legs). At the junction of the brace to the rafter, the leg is joined along the length. The recommended section with a step of 0.6 m is 50x200 mm, with a step of 1.1 m - 100x200 mm.
- Span over 6 meters. In this case, intermediate struts need to be made, which will take on part of the load and reduce the sagging of the beam. Correctly install the supports so that each span of the rafter leg is less than 6 meters. The calculation in this case is performed as for a multi-span beam, taking into account intermediate supports. When building with your own hands, the cross section is taken in the same way as for a span of up to 6 m (previous point). In this case, all rafters are composite.
If you plan to lay insulation between the rafters with your own hands (warm attic, attic), then the calculation takes into account the minimum height of the beams.
The thickness of the insulation should not exceed the height of the rafter legs for polyurethane foam, polystyrene foam and extruded polystyrene foam.
If you plan to lay mineral wool, then additionally take into account the ventilation gap of 5 cm. Partly it is provided due to the supporting beams, and partly due to the counter-lattice, which is mounted on top of them.
Selection of the pitch of the beams
The step of the rafter legs depends on the following factors:

In the first case, the dependence is inversely proportional. The design of a pitched roof assumes a decrease in the pitch of the rafters with an increase in the span or load. For the type of insulation, the following recommended values for the distance between the rafters in the clear (clean) can be given:
- foam and extruded polystyrene foam - 0.6 m;
- mineral wool - 0.58m;
- polyurethane foam - the step does not depend on the insulation.
When designing an attic and using dormer windows as light sources, it will be necessary to provide a rafter pitch 4-6 cm more than the window width in the places of their installation.
Tilt angle
 Roof slope angle
 Depending on the type of roofing used, it is allowed to take different angles of inclination of the roof slope. Below are the values for the most common materials. It is important to remember that the steeper the slope, the less the likelihood of leakage and the load on the elements, but this complicates the construction and requires the construction of a high longitudinal wall.
- Ceramic tiles. The optimum tilt angle is 30-45 degrees, the allowable one is 12-65 degrees.
- Bituminous (soft) shingles. Optimal - 20-45 degrees, permissible - from 6 degrees.
- Metal roof tiles. Optimal - 20-45 degrees, permissible - from 12 degrees.
- Galvanized roofing steel. Allowable - from 14 degrees.
- Slate. Allowable is 6-27 degrees.
The smaller the angle of inclination, the lower the consumption of materials for the construction, but at the same time the load on the roof and the likelihood of leaks increase.
Work order
After the calculation is completed, they start buying material and assembling the structure.
- Treatment of elements with an antiseptic. It can be done after installation in the design position, but if you plan to store wood, you need to process it immediately after purchase.
- Waterproofing of contact points of materials with different properties. In the place where the Mauerlats are laid, a layer of roofing material, linocrome or waterproofing should be laid on a brick or concrete wall.
- Laying the Mauerlat and fixing it to the wall. Can be performed on wire, staples, studs, anchor bolts.
- Laying the rafter legs. Fastening them to the Mauerlat. Can be fastened using staples, nails or corners with self-tapping screws.
- Installation of waterproofing and lathing.
- Insulation laying.
- Roof covering.
- Installation of the bottom lathing and ceiling sheathing.


It is important to correctly select a single-pitched roof scheme, sections of elements, rafter pitch and angle of inclination. Compliance with the technology for doing work with your own hands will ensure the reliability and durability of the structure.
The alluring simplicity of a single slope roof inspires thoughts of the opportunity to prove themselves in the field of a successful builder. The construction of an unpretentious structure consists in the banal laying of rafter legs on the supporting walls. No complicated knots, tricky and numerous joints. However, even in the simplest carpentry business, there are tricks that require thorough study. The future performer needs to know firmly how the shed roofs are fastened in order to exclude deformation and damage to the elements of the frame system.
Traditional "wooden" troubles
The scheme of the rafter frame of a pitched roof is simple to the limit. It is a row of parallel-laid planks or beams resting on the edges on two walls of different heights. To install and fasten the rafter legs to the building structure, a transitional element made of wood is used.
Depending on the type of the equipped box and the material of the walls, the function of the transition element is performed by:
- Mauerlat. In a pitched roof scheme, these are two separately laid wooden beams, completing concrete or brick walls.
- Upper piping of the frame structure. A belt of double stitched planks or beams installed on top of the frame racks.
- The upper crown of the foot, folded from a bar or log.
The rafter legs and the elements in contact with them are made of wood, which has the property of changing its own dimensions following fluctuations in the humidity background and temperature drops. In spring and autumn, especially during the rainy period, the length of the rafter legs will be slightly longer than in dry summers and frosty winters.
Imagine what would happen if the rafter rigidly fixed at the top and bottom increases in size. There will be gaps in the waterproofing, the fasteners will loosen, the slate sheets will move, the metal tile will move. In addition, the deflection and swelling of the roof frame will certainly affect its wear resistance.
However, changes in the linear dimensions of the rafters are not at all the main hitch of wooden rafter systems. An unpleasant surprise, if not taken into account, will be the draft of the newly built box.
It manifests itself most vividly near wooden walls, but structures made of concrete and brick are also very characteristic. Recall that pitched roofs rest on walls of different heights. Without calculations, you can understand that they will sag by different amounts. Those. there is a threat that, due to the difference in the subsidence of the walls, the new roof will not just change the slope angle. There will be a possibility of a violation of the nodes with extremely negative destructive consequences.

Despite the simplicity of pitched roofs and the direction of laying the rafters close to the horizontal, the listed risks should not be forgotten. The nodes used in fastening the rafter legs of a pitched roof must take into account the "whims" of the wood.
The work of the developer of his own project of a shed roof is to find the right solution to three important tasks, according to which:
- It must be possible to move the wooden parts relative to each other.
- All probable causes of poor connections should be ruled out.
- It is necessary to provide the rafters with the opportunity to adapt to the consequences of wall subsidence so that they can take a stable position.
The rafter legs of single-pitched roofs erected above walls of equal height are classified as layered. The hanging type is used if the box being equipped has walls of equal height and the ramp is formed by rafter triangles.
With the fastening of triangles, everything is clear: with the horizontal side they are installed on a strapping or Mauerlat, have a maximum docking area with supporting elements, and are fixed in the usual way.

With layered rafter legs, everything is much more complicated. They are installed at an angle to the supporting elements. Without processing and preparation for installation, the rafters have only two unreliable points of contact with the strapping or Mauerlat.
No matter how powerful the fastener is, two points are not enough for a solid fit of the part. Even with a slight impact, such a slope will simply slide down along with a solid crate and a multi-layer roofing cake. However, there are methods invented by ancient builders to avoid such troubles.
In order to prevent unwanted movements, the contact area of the rafters and the supporting element is increased; for this, the following is performed:
- Selection of cuttings. These are cuts in the shape of a triangle or a triangle with a tooth. Saw them exclusively on the rafters, so as not to weaken the bearing Mauerlat.
- Washed down the upper or lower edge of the rafter leg, thereby creating a support platform that increases stability. It is performed strictly vertically or horizontally.
Depending on the type and place of sawing or trimming, cuts and saws can limit or not restrict the movement of a wooden part. The restrictions are considered relative, because there are no absolutely rigid fastenings in the construction of pitched roofs. Experts classify the knots used according to the degrees of freedom: from one to four.

In the construction of roofs with one slope, most often appear:
- One-degree-of-freedom attachments are virtually fixed joints that allow the rafter to pivot slightly around the attachment point.
- Attachment nodes with two degrees of freedom - connections that provide the ability to rotate around the fastener and slight horizontal displacement.
- Three DOFs are connections that allow horizontal and vertical rotation and displacement.
The presence of degrees of freedom does not at all mean that the rafter can freely rotate and move in the area of the node. They are fastened quite rigidly, because they have to hold the crate, corrugated board or other type of covering, snow cover.
The connection will show its own capabilities only if the load is exceeded. Then the rafter legs will just move and take a new position, and the system will remain intact.

Any scheme of a shed roof visually depicts the presence of at least two connecting nodes. Let's divide them conditionally into upper and lower ones. In the construction of truss roofs, the rule applies: if one of the nodes is fixed rigidly, then the second should have more opportunities for movement.
Projecting and simplifying the technological principle, we can say: if the fastenings in the upper nodes of the pitched roof are made rigidly, then the lower connections should be more free in order to ensure the possibility of displacement when pressure is exceeded. And vice versa: if the lower mount is practically motionless, then at the top of the rafter you need to provide some kind of reserve for movement and rotation.

Details about the nodes of the pitched roof
After getting acquainted with the theoretical side of the question of fastening the rafters of a pitched roof, you can proceed to practical research of the demanded nodal schemes. Note that most projects of systems with a single slope are designed for the installation of rafters that form overhangs due to their own length. However, when overlapping large spans, it happens that there is not enough standard lumber dimensions. In these cases, filly are sewn to the rafters, creating an overhang. They are installed on the side of the installed leg and do not affect the principle of forming a knot at all.
The second reason for using fillies in the formation of overhangs is too weighty rafters, which are very difficult to lift and install. The third prerequisite lies in the peculiarities of the nodal bindings: if the lower heel is installed on a slider with a cut-off edge.
No. 1: Support at the top and hinge-movable bottom
A scheme with a rigidly fixed top and a relatively movable bottom is used in the construction of roofs over extensions, in the construction of objects with a steep roof and a significant difference between the height of the supporting walls.
Simply put, where the upper edge of the rafter rests against a wooden beam, the purlin or wall of the main building is not left with space for movement. The lower knot in such situations is calculated on a slider, which allows it to move slightly.

Algorithm for the classic version with the top resting on the girder:
- We install the purlin frame supports. On the strapping of the frame building from opposite sides, we install supports sewn from three pieces of board 25 × 100. The middle segment should be 75mm shorter than the outer ones in order to form a kind of notch.
- We build a purlin frame. We put a board 25 × 150 of the required length into the recess.
- We apply a 25 × 100 board of arbitrary length to the end of the future roof, but more than the diagonal drawn from the top of the running frame to the strapping, by about 30 cm. Mark the vertical line of the upper cut, outlining the adjacent edge of the run. We mark the line of the bottom cut and the vertical for trimming the edge of the rafter.
- We cut out the rafter according to the marks, try it on in fact, correct the cuts if necessary.
- According to the made template, we cut out and mount the rafter legs.
We select the type of fastener based on the expected load. It is more convenient to fix the top with corners, the bottom - with corners, twisting no more than three self-tapping screws in them, or sliding supports. If necessary, the lower knot can be stabilized - sew a support block to the rafter leg from below.
The junction with the purlin can be designed a little differently: the rafters are laid on the beam using a cut. Here the groove is selected strictly according to the size of the material. But if it is necessary to increase the degree of freedom, the horizontal wall of the cut is beveled at an insignificant angle, and the lower unit is equipped with a sewing bar.

No. 2: Top and bottom hinge-fixed
The scheme is applicable when arranging boxes, the walls of which have already undergone intensive shrinkage. Suitable for detached objects. The upper knot is made in the form of a triangular cut, the lower one is in the form of a gash with a tooth resting on the Mauerlat.
The construction process of a shed rafter system:
- We install the blank board with an edge on the Mauerlat beams anywhere on the roof.
- Lay a well-cut piece of board flat on the lower Mauerlat. We put it so that the extreme edge coincides with the inner edge of the Mauerlat. Having outlined the trim, we get the outline of the lower attachment point.
- We transfer the cut to the area of the upper cut and outline it, because the lower heel of the rafter will decrease by this amount.
- A workpiece with knots drawn and then sawn out will serve as a template. Using it, we make the number of legs specified by the project.
- We install the rafters. We fix it at the bottom with staples or pins, at the top with corners.
If it is necessary to increase the degree of freedom, by analogy with the previous method, the vertical edge of the upper cut will need to be slightly beveled. The angle of the cut will then turn out to be not 90º, but 95 - 97º. Experienced carpenters make simple cuts directly on site, turning the workpiece upside down. Beginner performers should not be imitated in the early stages.

The rafter pattern is used in roof construction only when there is no doubt about the geometric characteristics of the box. In the opposite situations, the rafters are tried on and made piece by piece. First, the extreme elements of the system are installed, then ordinary legs along the lace stretched between them.
One of the variations on the theme of two hinge-fixed nodes involves the device of a vertical gash at the top and notches with a tooth at the bottom. Work on their arrangement is carried out as follows:
- We install the blank board on the Mauerlat so that its lower corner is directly above the outer edge of the timber.
- At the top, using a piece of board, mark the vertical line of the cut (x) and measure its length.
- We transfer the length of the upper cut to the area of the lower node. We set aside the length of the cut (x) upward vertically from the inner upper edge of the Mauerlat.
- Draw a horizontal line from the resulting point. The result is a notch with a tooth.
- We cut out the nodes along the marks, set them in place, fasten them with corners, duplicate the lower nodes with brackets.
As the dimension (x) increases, the slope of the roof will increase, while decreasing it will decrease.

No. 3: Free top and hinged-fixed bottom
The ideal scheme for the construction of a pitched roof with rafters, the edges of which protrude beyond the walls. After some adjustment, it can be used in the arrangement of outbuildings.
- We install the workpiece with an edge on the upper and lower Mauerlat beams with the removal of the edges outside the walls. Here you need an assistant to hold the board over the canopy.
- We apply a template - a cut-off piece of board sequentially to the lower and upper Mauerlat so that the outer edge of the template coincides with the outer edge of the beams. We mark the lines of the upcoming cuts.
- We select the cuts according to the outlined lines. Slightly beveled the vertical wall of the upper cut.
- We install the rafter, fix it at the top with nails or corners, at the bottom with staples.
- We make and install the rest of the rafters in the same way.
It is clear that mobility with its antagonist is a relative concept. However, you cannot treat them with coolness. It is required to take into account the degree of freedom of the node both during the design period and when choosing fasteners. Lack of mobility of the structure will lead to deformation, excess will contribute to instability.

No. 4: Mobility of both attachment points
A scheme with two movable nodes can be used if both fasteners have no more than two degrees of freedom. Those. horizontal mixing excludes top and bottom limiters.
Consider an example in which the rafters of an extension are laid at the top into niches cut into the wall. This means that horizontal displacement is excluded, rotation and some movement along the vertical are possible. The bottom is planted with cuttings, but in the horizontal direction it is limited by metal corners.
Actions of the builder of the "shed" step by step:
- Preparing the object for work. We put a Mauerlat made of 100 × 150 timber on the brick wall of the extension. We put it on the wide side closer to the inner edge of the wall. We fasten with anchors every 80cm. In the main wall of the building at the design height, we cut grooves for the upper heels of the rafters. The depth of the cuts is 12cm, the step between them is 70cm. If you don't want to mess around with gouging, you can use metal brackets screwed to the wall.
- We make a rafter leg template. We set the blank board with the upper edge in the groove, with the lower edge on the Mauerlat. Departing from the bottom corners of the workpiece 10 cm in the horizontal direction, draw two triangular cuts.
- According to the indications of the template, we make rafters. We install them, fix the position with metal corners.
The device method is valid for overlapping spans up to 4.5 m. If you need to block a larger span, the rafters will need a support group as part of the struts.


No. 5: Rigid attachment to the inclined harness
The method is used in frame construction, because it is possible to lay the support element at an angle only on racks cut at an angle. Either the racks of the frame itself, or a cantilever-running structure installed on the box, are sawn obliquely. In principle, the latter option is quite suitable for the construction of a pitched roof on concrete and brick walls.
Stages of the device of a shed roof along an inclined strapping:
- Putting together the structure that creates the slope of the roof. On the gable side of the frame building, we mount short racks with the upper edge cut at an angle.
- On the inclined top of the racks, we lay the board in one row for small outbuildings, in two for more serious houses.
- We equip the end sides of the roof with frames in the shape of a right-angled triangle, the hypotenuse of which should repeat the slope line.
- We apply the rafter to the end of the roof to mark the line of the lower cut.
- We make the required number of rafter legs according to the template. We install them on the harness, fix the position of the elements with metal corners.
Without a shadow of a doubt, we will classify the latter method as the simplest category. Of all the methods of attaching the rafters to the harness and beams of the shed roof Mauerlat, this one is most conducive to attempts at independent implementation.

Final fastening work
After installing the entire row of rafter legs, we check the design position of the elements, the distance between them. We apply an arbitrary board flat to the frame of the slope, identify flaws and correct flaws. Then we fasten the rafters with staples or bundles to the walls through one in regions with medium and low wind activity. We fix each leg in areas of high wind load.
Fillets, if planned for installation, are made of material half the size of the rafter legs. Sew them on the side to the rafter. The length of the sewn-on section is on average 60-80cm.
Video for a visual study of the process
The presented methods and schemes for fastening the rafters of a pitched roof have been tested by practice. They are used most often in their "pure form". However, some adjustments according to specific specifications are not excluded.
The guarantee of the durability of a residential-type house or any other purpose will be a safe and durable roof. The quality of installation is based on the correct selection of materials, fasteners and the technology of joining structural units.
Whatever the roof, it presupposes the presence of several basic elements, among them the rafter frame, the sheathing and the roofing package can be distinguished. As for the rafter system, it is the main supporting element of the roof, which is also sometimes called the skeleton. The lathing is the ribs on which the covering material is installed. The varieties of rafter systems can be reduced to two main classes, among them hanging rafters and those called layered.
Hanging rafters
If you need to fasten the rafters to the Mauerlat, then it is important to know that the first of them can be hanging. They are formed by a triangular rigid connection of the structure, which looks like trusses. They include timber and rafter boards. In this case, the puffs are removed to the Mauerlat. The latter is a thick support bar that is securely attached to the top of the wall. Its task is to create the basis for the profile frame.
Rafters
If it is necessary to fasten the rafters to the Mauerlat, then you need to remember that the first of them can be layered. In this case, the rafter beams, which are located at an angle, have two points of support at the ends, namely a Mauerlat and a ridge bar. The latter rests through intermediate racks on the wall of the building located inside. A massive longitudinal beam can also act as a support.
Options for attaching rafters to the Mauerlat
As a feature of the building inclined frame, it is the fact that its components can have a movable and a fixed connection between them. If we are talking about a wooden building, then the last crown of a log house or a bar, which belongs to the upper trim of the walls, acts as a mauerlat. If there is a need to fasten the rafters to the Mauerlat, then the connection of the upper ends with the ridge is made articulated-movable. This also applies to the pairing of the lower part. This requirement is due to a decrease in the arising internal stresses that are inherent in the rafter frame. Such stresses are caused by temperature fluctuations, deformations of wooden buildings, house shrinkage, as well as uneven load from snow and wind. If manipulations under the ridge are carried out at a considerable height, which is not very convenient, then it is preferable to choose a rigid connection of the rafter boards. In this case, freedom of movement is left for the lower ends.
Fixing the rafter leg
When there is a need to fasten the rafters to the Mauerlat, the lower node, as a rule, is fixed in one of the following ways. The technology can be spacer, it involves the arrangement of a fixed connection unit, in this case the rafters abut rigidly against the base of the beam. The connection can be rolling. In this case, the rafter will slide along the surface of the timber, holding on to it exclusively with the help of fasteners. Both of these methods are quite widespread and have their own characteristics.
Types of fixation without a wash down and with its presence
Fastening the rafters to the Mauerlat without gash is applicable only with a sliding pairing. At the same time, the rafter leg will freely lie with its edge on the surface of the Mauerlat. In this case, corners are used as fasteners. This mounting option is not considered completely reliable under heavy loads from the roof. For this reason, it is used to bridge spans with small dimensions. In order to ensure a more reliable pairing of the components of the lower unit, the blocking saw tooth is cut out. It can be performed using a specific technology. Instead of a saw in the rafters, a persistent bar is often used, which is broken through for strength. If it was decided to fasten the rafters to the Mauerlat with staples, then the saw should be done in the rafter leg, and not in the Mauerlat. This will prevent deformation and loosening.
Types of fasteners
Fastening the rafters to the Mauerlat, the photo of which is presented in the article, can be carried out using nails and staples, as the simplest option is wire rod, which is folded in several rows. Fasteners of various types can be found on the building materials market today. Nails, which are used in the joints, exclude loosening of the fasteners. However, for this, fasteners with a notch or a so-called twisted nail should be used. If you decide to use bolts and screws, it is important to place washers or plates made of steel under them. This will prevent the fasteners from sinking.
Rules for the implementation of work on fastening rafters
If the rafters are attached to the shed roof Mauerlat, then the workpiece is placed on the ridge beam with its upper edge, while the lower corner should be connected to the inner edge of the Mauerlat. Using a piece of board that acts as a template, it is necessary to outline a line on the surface of the rafters that is parallel to the upper border of the Mauerlat. If a gash will be done, then you need to mark the persistent teeth from the inside or outside. Next, trimming along the lines is performed. When cuts are made, the markings of the corners should be observed in order to ensure a snug fit of all elements of the wooden structure. When the rafters are fastened to the Mauerlat with nails, the next step is to install the element in its place. You can now commit. If nails are used, then they must be installed at an angle through the rafter board into the beam, two on both sides. If it was decided to use brackets, then their installation is carried out from the inside of the timber approximately in the central part. Its other end is turned at a right angle towards the rafters, and then hammered into them.
Alternative use of fasteners
If the rafters are fastened to the gable roof Mauerlat using wire rod, then it must be folded in four rows, forming a clamp. With the help of it, the rafter is screwed to the Mauerlat from the outside. Most often, the connection with staples or wire is combined with other types of connections, while you get a backup fastening. Perforated mounting tape can be used instead of wire. Corners are often used. They are screwed to the upper edge of the Mauerlat on both sides of the rafter, you need to strengthen the corners to it. In order to provide more impressive reliability, the corners should be used with two rows of holes, as well as a stiffener. Instead of corners, you can use special plates that have a turn of the ends at a right angle.
If the rafters are fastened to the Mauerlat with corners, then the so-called sleds can be used. They have a sliding plate. With their help, you can provide a reliable mate that compensates for deformations. After the installation of the lower unit is completed, you can begin to connect to the ridge bar. Roofing takes half the time it takes to build a house. Material costs for it are about the same. At the same time, it is important to avoid even the smallest mistakes, which can become a source of very impressive problems when using the system.
Fixing rules
If the rafters are fastened to the Mauerlat in a wooden house, then only high-quality elements should be used. Saving in this case is unacceptable, since low-quality hardware will not guarantee the creation of a durable and stable roof. The cuts, if any, on the rafters must be done very carefully, this will avoid the need to install additional gaskets or inserts. These parts will help ensure a good connection, but are best avoided. This is due to the fact that over time they are able to deform and completely fall out. This will cause the entire structure to weaken. It is recommended to install rafters on steel plates and corners. These are best purchased before starting work on the roof. Otherwise, you will have to stop the installation for a while, which will extend the period of the manipulations. However, you can use other types of fasteners, which have been described above. But this will only be a temporary measure. To install a bar, nails and self-tapping screws are the most optimal option. To equip a durable structure, bolted connections of the type of studs are necessarily used. When installing a roof, experts recommend using sliding mounts. This technology is good for pairing rafters with a Mauerlat. The mobility of the structure is a prerequisite. Before fixing the rafters, it is necessary to prepare special recesses. They are able to provide a tight sealed fit of the elements. Templates should be used to ensure the grooves are the same. If the roof slopes are made at different angles, then the templates must be made separately. If there are cuts in the structure, then their depth should be equal to 1/4 of the width of the rafter leg. To comply with this parameter, you must additionally carry out accurate measurements.
Conclusion
When the rafters are fastened to the Mauerlat without sawing, it is important to ensure the strength and stability of the roof when exposed to strong winds. It is also important to take care of the problem of the bursting force, which has a significant impact. The roofing system must be assembled initially on the ground. This preparation is considered necessary. All measurements can be made, as well as inserts in the Mauerlat. Ultimately, you need to fit and fit the elements in place. The finished parts must be installed on the structure one by one. When purchasing hardware, you should remember that their poor quality can cause not only distortions, but also the collapse of the entire structure. It is for the same reason that it is not recommended to use a lining material, making the connection as strong as possible, since it will not loosen over time and will not suggest the need for repairs.
December 27, 2016
Are you planning to build a roof, do you need a simple structure with good strength and reliability characteristics? In this case, a single-pitched roof would be an excellent option. It will make your house, garage, extension or other structure original in its own way. In addition, the shed roof truss system is easy to install. It can be done without building experience.
Why shed
The roof structure of 1 slope has the following advantages:
- When building on a pitched roof, any kind of roofing material can be used. Because the angle of inclination can be as small as possible, an almost flat roof can be built.
- The sail of this design is much less than that of the dual-slope. This option can be used in areas with strong winds.
- Ease of installation and operation. You can build it yourself.
- Low weight compared to other types of roofing.
- For a pitched roof, slopes can be built in several floors. This solution will add design to your home.
- The construction of a pitched roof is the most economical and does not take much time.
- In this design, the water rolls down only one side.
- The roof is suitable for any type of building.

Like any other design, a pitched roof has several disadvantages:
- With a small angle of inclination, the area of the attic space is minimal.
- Has a less attractive appearance. What can be fixed if there is a designer's imagination.
Structural calculation
The shed roof rafter system, in fact, consists of layered rafter legs. You need to fasten the rafters parallel to each other. The rafters, in turn, are supported by two points. Basically, they are the load-bearing walls of the building.
Create a ramp angle
The required slope angle of the slope is achieved in several ways:
- When developing a building project, one of the walls on which the rafter legs will lie is made slightly higher. This method is common, as it greatly simplifies the design of the rafters. But in this case, more material will be spent on the construction of the walls. The side walls running parallel to the rafters are trapezoidal.
- This method is a variety 1. Also, when planning, the frame racks are taken into account. In this version, the extreme posts on one side are higher, and on the other they are lower by a certain height.
- With the same height of the walls, vertical posts of the required height are installed on one of the walls. At first glance, this design is unstable, since the rafter triangles have free play to the right and left. But this fragility of the structure is eliminated when installing the frame lathing and sheathing the front part of the roof with wood.
- Single-pitched farms can be used. This method is good enough in that you can build one truss, adjust it to the desired dimensions and use it as a template. And using the template, you can build the rest of the farms on the ground. There are ready-made roof trusses. They are ideally suited to any type of roofing. For them, it is enough only to install and fasten to the Mauerlat. Further, you can freely sheathe a pitched roof with a crate.
- When building an extension near the house, this method is used. In this case, racks or a wall can be planned on one side of the extension, and on the other, we already have the main wall of the finished building. Attachment to it can be done using a well-fixed horizontal girder or separate fasteners, also horizontally aligned. All fixings on the wall of the building are made above the posts or the wall of the opposite side.

Determine the side of the roof slope
Often the question arises, in which direction to determine the roof slope? In the case of an extension to the house, there are no special options. The slope is made in the direction from the building to ensure free flow of water in case of heavy rains.
If a separate building is planned, then here you can choose a side. Basically, the location of the ramp is done on the back of the building. Although there are times when the slope is produced on the front side. In such a situation, the choice is based on the design style of the building, the territorial features of the site, from which side it is more convenient to lay the communication system, and the like.
But in this case, you should also not overlook some of the nuances:
- The location of the pitched roof in the windy direction will be more correct. Thus, the impact of the wind is minimized. After all, the wind directed into the roof with a small angle has practically no effect on it.
- For a rectangular building, you can choose the location of the slope along or across. But here it must be remembered that the rafters of a pitched roof cannot have unlimited length. For some distance, they need to be strengthened. According to the rules, the free size of the rafters is 4.5 meters. When installing a rafter system up to 6 meters, a rafter leg is required. It is placed at an angle of 45 degrees on the support bar.

The steepness of the slopes
If we are talking about a pitched roof, then in most cases the angle is not chosen up to 30 degrees. This choice is explained by the fact that the roof is highly vulnerable to wind load on the front side of the building. Although they try to build the slope of the slope from the windy side, this does not exclude the presence of wind from the side of the facade. Therefore, a steep angle of inclination creates a high lifting force. In strong winds, a high load falls on the roof structure.
A slope below 10 degrees is also unacceptable, as the load on the rafter system immediately increases during snowfall. With the beginning of the thaw, an ice crust appears at the edge of the roof, preventing the free flow of melt water.
The material of the roof covering is important for determining the angle of the slope. Indeed, for different materials, the manufacturer also indicates its own slope angle.
Depending on the material, some standard values for the slope angle can be distinguished:
- Up to 2 degrees - almost flat roof. It requires at least 4 layers of coiled bitumen coating. It should be applied using hot technology. It also requires a gravel dressing embedded in the mastic.
- 3-5 degrees - assumes three layers of roll coating. You don't need to use gravel powder.
- 9-15 degrees - with roll material, 2 layers are enough. You can also use some types of corrugated board or metal.
- 10-17 degrees - you can lay corrugated slate with a reinforced profile.
- 11-20 degrees - soft bituminous shingles.
- 14-25 degrees - asbestos-cement slate, at 25 degrees, corrugated board and metal tiles lay down practically without restrictions.
- 27-50 degrees - ceramic, cement tiles.

Mounting
When building a shed roof with your own hands, for a correct and reliable installation, you need to use the drawings and detailed instructions, which will indicate all the dimensions and the amount of the required material. You can create a schematic drawing yourself or find a ready-made sample on the Internet. You can also order it from construction professionals.
Before starting construction, you need to choose a ventilated or non-ventilated type of roof. The first is great for living quarters, as ventilation provides a comfortable microclimate inside the building. All this is achieved by using gaps between waterproofing materials. The second type is suitable for the construction of a terrace or storage room.
Construction of rafters with a pitched roof
The rafter system of a single-pitched roof involves a couple of popular methods for its installation:
- Fastening the rafters of the pitched roof to the load-bearing walls. In this case, the roof will turn out to be more economical and less lumber will be used for it. The load-bearing wall must be at the same height as the roof. Since the upper part of the rafter rests against it.
- A triangular truss is constructed, which includes beams and racks. She will unite the structure of the rafters. With this method, you do not have to build a load-bearing wall to the height of the roof, but more wood will go. This method is convenient because you can mount all the farms below using a template.
When erecting rafters, additional supports and struts will be needed. The number of such complementary elements depends on:
- Slope of the slope.
- Weights of the rafters.
- The length of the junction points between the roof and the wall.
- Roof material.
- Insulating layer materials.

Rafter step
The distance between the rafters can be determined by the box on which the roof is being erected. So that the distance between the rafters is the same, the slopes on which the rafter legs rest are divided into equal sections. Depending on the materials to be installed, some values can be distinguished:
- For rafters from a bar, the step is from 1.5-2 meters.
- When using paired boards, the distance between the rafters is 1-1.75 meters.
- The use of single boards relies on a pitch of 0.6-1.2 meters.
Also, the type of insulation affects the distance between the rafters. It is recommended that the thermal insulation layer is rigidly installed between the rafters. After installing the rafter system, you can go to the Mauerlat. It will help distribute the load on the walls.
Nuances of Mauerlat installation
Mauerlat is a complementary element to any roof. The lower edge of the rafter is installed on it. It is fastened to the load-bearing wall or between the beams of the rafter system. For fastening the Mauerlat, it is necessary to use reinforcement, if the walls of the house are made of porous material, burnt wire, if the walls are brick, anchor bolts for a wooden house.
To extend the life of the Mauerlat, you need to install it on a waterproofing layer.

Floor beams, their installation
In addition to the Mauerlat, for some designs of pitched roofs, the installation of floor beams is implied. The rafter legs rest on them. Such beams are mounted with a step similar to the rafter system. Fastening the rafters to the Mauerlat is always done with a saw. The gap between the rafters and the Mauerlat is minimized.
With a rafter system of more than 4.5 meters, rafter legs are installed. They give strength and eliminate deflection of the rafter beam. The installation location depends on the width of the spans. A gable roof of a huge area, without exception, should include rafter legs. Otherwise, it threatens to break or collapse.
It must be remembered that when increasing the step between the rafters, you will have to reduce the step of the sheathing or make it solid.
When installing a pitched roof, do not forget about some of the nuances:
- You need to place the slope on the windy side. To prevent the roof from being blown off by the wind.
- When calculating the rafter system, you need to take into account the climatic conditions. This is the amount of snowfall, heavy rains, wind strength. The even distribution of the load on the rafters will increase the service life.
- Consider overlap when calculating materials.
- The smaller pitch of the rafters of the pitched roof allows you to withstand higher loads.

An example of a lean-to garage design
The walls are built of foam blocks. The first step is to install the Mauerlat. With a pitched roof, these are 2 beams laid on walls of different heights.
A phased scheme for the construction of a rafter system consists of:
- On the inner sides of both walls, we install a beam of 100x150 mm. Its installation is carried out on a waterproofing material roofing material. This will be our Mauerlat. Mauerlat fasteners are made using reinforced corners 90x90. For this we use dowels with a diameter of 14 mm.
- We take a board of 50x200 mm and install it on the Mauerlat with a margin of 50-60 cm. The stock should exceed the planned dimensions of the cornice. After that, all unnecessary is cut off.
- We mark further cuts on the board, the depth of which should not be more than 1/3 of the board's width.
- We mark the walls so that the last rafters do not touch them. The recommended distance is 4-5 cm.
- Using the template, we make the rest of the rafters. We fix it with staples or corners.
- Taking into account the width of the overhang, we produce filly. We mount all the elements of the cornice so that there is a layer of waterproofing between the tree and the wall.
- We cut off all the surplus and fasten the 25x100 mm wind board.
The simplest scheme for the construction of the garage has been completed. The next steps will be to install the sheathing and decking of the roofing material.
Unlike the gable version, the gable roof is used in the construction of residential buildings much less often, one might even say reluctantly. First of all, because of the external angularity and excessive simplicity. A residential building under such a roof does not look very attractive. An exception may be the author's design projects for cottages with several multi-level single-pitched roofs, they look very beautiful, but they are quite complex and require considerable effort in practical implementation.

What is the peculiarity of a pitched roof
Such a system is simpler and more affordable to make with your own hands, it is quite simple to assemble it for a garage or warehouse. Often, a pitched roof is the simplest and most effective solution for arranging simple auxiliary or utility rooms, for example, for making a roof on a brick extension to a house.
The advantages of a gable roof include the following positions:
- The weight from the rafters and power trusses in the roof frame does not create bursting forces, as is the case with gable options;
- The rafters of a single-pitched roof, even with a large roof span, do not require the use of a massive and thick beam, as for more complex two and four-pitched options. The main part of the load is transferred by the rafter system to the floor beams and walls of the building using struts, racks or load-bearing support trusses made of a conventional 50th plank;
- The use of a pitched roof often becomes the only possible option if you need to add an extension to the main wall of the house, as in the photo, or even make a roof over the balcony.
Due to the minimum requirements for the quality and size of lumber, from which the shed roof rafter system is built, the simple installation of rafters and a roofing package, this method of arranging the roof is almost indispensable for the construction of any auxiliary buildings.

Features of the use of a pitched roof
In addition to the listed advantages and simplicity of the device, the single-pitched rafter system has its own specifics, which should be taken into account when planning the roof parameters:

Advice! The most preferable way of arranging a pitched roof would be the option of an extension to the main wall of the finished building.
Shed roof rafters
There are three main ways to install roof rafters. According to the configuration of the construction of the rafters, they have a lot in common, the main difference lies in the way of compensating for the vertical loads on the rafter.
Installation of a rafter system from short beams
With a span not exceeding 4.5 m, the rafters can be made from a bar or board with a section of 50x100 mm and installed with support on the upper and lower row of the Mauerlat. If the Mauerlat is laid in a niche below the upper edge of the wall, then the upper edge of the rafters is cut vertically, and the support surface of the board is cut with an angle to support it on the Mauerlat bar. In this case, the joint between the end of the rafter and the wall surface must be closed with an overhead cornice element.

If the rafter rests on the Mauerlat, laid on the upper plane of the wall, in this case the edge of the rafter beam is also sawn under the support on the timber, but the vertical cut of the end is made under the plane of the wall. After leveling the roof rafters, the vertical plane of the cut is closed with a film and sewn up with a board. In both cases, the rafter beams are sewn with staples or steel tape directly to the Mauerlat board.

The lower edge of the rafter can be installed with an emphasis on the masonry of the wall. To equip the overhang, "filly" can be sewn to the rafters, and the beam itself is abutted against the corner of the Mauerlat and fixed with a wire loop on the inner surface of the walls or ceiling board. Usually, this option is used for roofing made of corrugated board or bituminous tiles, as in the figure.

Roof device made of long rafters
A more complex option for assembling a shed roof is a system with a long span. With a ceiling length of up to 6 meters, it is enough to support the rafter beams with additional supports. The rafter leg is attached to the rafter board with a steel plate and self-tapping screws without a tie-in.

For spans longer than six meters, at least one intermediate support is required on the inner wall or a reinforced beam in the ceiling. With a large span, there may be two or three intermediate posts. In this case, in the transverse direction to the roof slope under the rafters, an additional run beam is laid, leveling the roof plane. Each run is installed on a vertical stand and reinforced with rafter legs and grappling.

Installation of a simple truss system on transverse truss frames
The most common scheme for constructing a frame from prefabricated rafters is the option with the support of rafter beams on prefabricated trusses. In previous versions, the installation and fastening of the shed roof rafters was carried out on the basis of two walls of different heights. This gave certain advantages. Due to the high rigidity and strength of the brick walls, there were no problems associated with the occurrence of shear lateral forces when arranging the roof; therefore, the shed roof structure was configured only for vertical loads.

In practice, such ideal conditions arise only when an extension is made to a finished brick wall of a capital building. Much more often it is required to assemble a pitched roof on a brick or cinder block box of a garage or bath with the same height of all walls. In this case, the roof rafter system will be more vulnerable to shear force from wind load.
In this version, for the assembly of the roof frame, layered rafter beams are used, laid on two prefabricated trusses or frames. One of them is combined with the main pediment of the building, the second truss is installed in the middle, on the main inner wall of the building. The entire roof structure is installed on a 50 mm board laid with a harness that acts as a Mauerlat. The board is attached to the brick of the wall with wire, steel tape and fence dowels. The result is a strong and flexible enough mount.

First, a first support frame is made. The first truss is assembled from vertical racks fixed to the base of the Mauerlat with spacer metal corners. This is the most laborious and crucial moment of work, it is required to align the upper support bar of the frame strictly horizontally, it depends on how smooth the roof slope will turn out.
Before proceeding with the assembly of the second frame, it is necessary to assemble two reference rafter beams on the ground. As usual, long rafters are made by splicing two short ones with padding over the halves of a third piece. Both rafters are laid out along the edges, with one end on the first truss, with the other end on the Mauerlat board from the opposite side, and carefully adjust the angle of inclination of both rafters.
Further, focusing on the height of the installed reference rafters, a second support frame-frame is assembled, located in the central part of the box. At the next stage, the pediment of the first frame is sewn up with a board, spacer beams and wind boards are installed, as in the photo. This will ensure high rigidity of both frames, even in strong frontal winds. This is the specificity of creating a roof on frames of increased rigidity.

The rafters are attached to the harness board with steel brackets and wire loops. If desired, you can use a bolted connection as a fastener for the rafter system. One of the advantages of layered rafters is that they can be easily spliced using two shorter planks. Most often, the two parts of the rafter are laid on the supporting truss-frames, after which the two halves are simply knocked together with nails. Each of the rafters is carefully aligned at two points - the middle support frame and the lowest point of support on the harness. Next, it remains to hammer in 100 mm nails, the laid and adjusted rafter beams.

Before performing the lathing, the side gables of the roof are sewn up with a board. This gives the entire structure the necessary rigidity and strength. Some of the rafters are made in the form of lower and upper overhangs. The end surfaces of the rafter boards are knocked out with a cornice board and the lower part of the cornice is sewn up with clapboard. At the next stage, it is necessary to tie the rafters with sheathing boards, they are laid on the beams and nailed in a checkerboard pattern. It remains to lay the ceiling and roofing material.

Various assembly options for mounting rafters on a pitched roof
In addition to the above variant of assembling the frame for a pitched roof, in practice, simpler and more affordable ways of attaching the rafter system are often used.

For example, when assembling a garden house from a bar, it is enough to simply lay the rafter beams with a certain pitch on the pediment and the upper beam of the back wall of the house. In this case, the rafters, in addition to the supporting structure for the roof, play the role of a stiffening element for the whole house.

It is quite simple to assemble a shed roof structure for a wooden extension to a house from a bar. The upper edge of the slope is installed on a beam, which rests on vertical posts nailed to the wall of the house. It can be seen from the photo that the lower support beam for the roof rafters is installed on vertical posts, the whole structure is made in the form of a frame with additional frontal stiffeners. Each of the rafters has a cut under the supporting surface of the bearing beams.
In some cases, for example, when attaching a garage to a main wall, you can use the ends of the ceiling beams to fasten the rafters, as in the photo. In this case, the rafter is rigidly attached with a pair of steel corners to the protruding end part of the beam.

Conclusion
Installing rafters for a pitched roof is no more difficult than assembling a frame for a gable roof. If you have experience working with spatial structures made of wood, like a garden house or a shed of your own construction, even a novice carpenter can make a roof for an extension to a house.
- Bikrost TKP
- Chimney for a brick oven in a bath
- Hipped roof
- Shed roof rafter system
If, in the process of building a house, you are thinking about how to make a roof correctly and interestingly, then you have two common options - a single-pitched and a gable roof shape. Although the gable roof is very popular, it is quite complex and will take a long time to build. The single-pitched form of the roof is gaining more and more popularity due to its unusual appearance and ease of installation.
Therefore, in this article we will consider the device of a pitched roof, how to choose the right materials for the roof, how to insulate this part, and how to do the work with our own hands. And so that the shed roof with our own hands turns out to be correct, we will provide drawings and photos.
Choosing the correct angle of inclination of the roof
Shed roofs are quite simple, they are easy to build, but, most importantly, to think over everything in advance. The angle of inclination of the roof can be determined depending on the snow, wind load and climatic conditions of your area. In addition, it is important to consider that each material for shed roof sheathing has its own minimum recommended angle of inclination. Let's consider some of them:
- Slate and ondulin - at least 6 degrees.
- Ceramic or cement-sand tiles - at least 10 degrees.
- Bituminous shingles - at least 12 degrees.
- Metal tiles - at least 6 degrees.
- Asbestos-cement slabs - at least 27 degrees.
- Copper, galvanized or zinc-titanium sheets - minimum 17 degrees.
- Decking - at least 6 degrees.
In the event that the minimum angle of inclination of the roof is greater than the recommended one, there will be no problems, if less, it is necessary to redo it in order to obtain the recommended indicators. When you do not adhere to the technology of installing the roof and roofing material, then it can not only begin to flow at the joints, but also when a large amount of snow falls out, it simply deforms. The most optimal angle of inclination of the roof is about 20 °. But before starting work, it is better to calculate the angle that is suitable for your area. In addition, when buying, check this information with consultants, since manufacturers sometimes indicate other numbers for the slope of the roof. It happens that manufacturers can indicate a slope of 14 °, although GOST for the minimum angle of inclination of this material is about 6 °.
Advice! If the slope of the roof is less than 12 °, all joints of the roofing material should be coated with a special compound that will not allow the leakage of a pitched roof. To do this, you can use bitumen mastic or roofing sealant.
It is very important to draw up drawings, thanks to which it will be possible to choose the angle of inclination of the roof and make the correct calculations. If you are building a new house or agricultural building on which you plan to install a pitched roof, then one of the walls must be raised higher. For the correct calculation, you can use the right triangle formulas. Please note that the calculation does not take into account the length of the roof overhangs. They are needed to protect the walls of the building from snow and rain. The minimum overhang should be at least 20 cm. In any case, it should not stand out against the general background and look harmonious with the roof.
Advice! There are many design programs with which you can view your idea in 3D. These programs will help you decide which roof overhang is best and will clearly show your home on the monitor.
Do-it-yourself shed roof step by step
Installation of the rafter system
The device of a shed roof begins with the assembly of the rafter system. This is the main roof frame on which the roofing material will be installed. To work you will need:
- timber 100 × 100 mm or 150 × 150 mm;
- nails;
- laying boards, at least 50 mm thick;
- thermal insulation and waterproofing materials;
- tape measure, stapler, building level;
- chisel, ax, roof hammer;
- saw, knife, screwdriver.
The choice of roof truss system depends entirely on the size of the building and the roofing material. Also, consider what the walls are made of. The Mauerlat always serves as supports for the rafters.
Roofing Mauerlat
Mauerlat is a timber laid on top along the entire perimeter of the wall. It plays the role of a lower support for the rafters. If a metal frame of rafters is used for your building, then the Mauerlat is made of a channel or other metal material. This element connects the roof to the walls and distributes the load over their entire area. When installing a roofing Mauerlat, it is imperative to lay a waterproof material (waterproofing) under the bottom. Roofing material is often used for this, which is laid in several layers. If this is not done, the wood will start to rot, and the metal will eventually rust. It is important to connect each link with two adjacent ones, which, together with the rafters, will turn into a fairly reliable structure.
In order to understand how to make a pitched roof, it is important to take into account what kind of building you are covering. For example, if it is a shed, utility block or garage, then too large beams are not required for such a building. If the width of the building reaches 6 meters, it is beneficial to use a pitched roof. The thing is that the design is quite simple and does not require the use of supports or purlins. Thanks to this, you can save your energy, time and money. If the building is up to 5.5 m, beams from 50 to 150 mm can be used. If up to 4 meters - from 50 to 100 mm. But in any case, take into account the weather conditions in your specific region. In addition, if the angle of inclination of the roof is small, you should not save on beams. Indeed, otherwise, due to snow, the roof can simply bend and deform.
For the construction of a pitched roof up to 4.5 m, the frame between the walls is quite simple. It consists of two Mauerlat logs, which are fixed to the walls, and rafter beams, supported by the Mauerlat.
For the construction of a pitched roof up to 6 m, between the walls, you additionally need a bed and a rafter leg resting on the beam in the middle.
For the construction of a pitched roof from 6 m, it would be good if there was another load-bearing wall inside, on which the racks could be supported.
For a single-pitched roof structure more than 12 m, the rafter structure will be much more complicated due to the presence of additional rafter legs. If you need to grow beams on the sides, for this you need to use wood of the same section. For reliability, it is important to fix two wooden strips on the sides, the length of which is at least 60 cm.
In order for the rafter to be attached to the Mauerlat, it is necessary to make a cutout in the rafter, with which it rests against the Mauerlat. If you do not want to bother with each rafter, create a template according to which you will make the necessary cut in all the bars.
Advice! If you are making a roof frame on a wooden house, then you cannot rigidly attach the rafters to the Mauerlat. This is due to the fact that most of these buildings are sinking. Subsequently, the structure may be skewed. Therefore, for such buildings use fasteners, which are popularly called "sliding". They are corners that are attached to the Mauerlat and movably connected metal strips attached to the rafters. "Sliders" are fixed by two per rafter leg.
Installation of rafters
The installation of the rafters is as follows: we attach the rafter beams to the Mauerlat. The spacing should be determined depending on the selected roofing material. This is usually 50 to 80 cm. For fastening you will need anchors or large nails. You need to lay the rafter with the end up or, in other words, "on the edge".

It is important to carefully monitor the angle of inclination of each rafter board. If this is overlooked, it will be difficult then to expose a flat surface for laying the roofing material. To make it easier for yourself, install the first and last joists and stretch the line. This will serve as a guide and greatly simplify your work.
Advice! If all the walls of the building are even, and you do not want to cock one of the walls above, then there is a way out. Roof trusses will save you both money and effort. Farms can be bought ready-made or made by hand. For a garage or shed, wood is suitable as a material. For living quarters, it is better to use metal.
The choice of roofing material
When choosing a roofing material, it is important to consider the type of construction. For example, if this is a shed-type structure, then you can choose not too expensive roofing material. If this is a residential building, then you need to choose a durable, aesthetically beautiful roofing material that will have good sound insulation. Below are the most common materials for roofing:

All that is required of you is to weigh the pros and cons, decide on a budget and choose the right material for yourself. After that, you can start the construction of a pitched roof.
Installation of the lathing

It is very important to align the base as best as possible for the roofing material. Otherwise, the roof will be uneven and even drips are possible. In addition, when installing roofing, it is important to adhere to the technology recommended by the manufacturer.
Roof insulation
For living quarters, it is better to insulate the roof. The insulation process is carried out in the following order:
- We fasten the waterproofing with a stapler.
- We install insulation.
- We fill the counter-lattice.
- We install a vapor barrier.
The most common insulation material is rock wool or foam. Usually, a 10 cm layer is enough for the roof, but for each region the information should be clarified. Below is a diagram of the correct insulation.
Output
As we saw from this article, the pitched roof shape is perfect for both a garage or a shed, and for the roof of private houses. Do not forget to inspect the already made surface for damage. In addition, timely repair is important, and with the right material and technology implementation, you are guaranteed an excellent result!
The simplest covering used in the construction of new buildings is a pitched roof, which every skilled owner can build with his own hands. If you belong to such homeowners and decide to make a roof with one slope on your own, then first go through 3 preparatory stages:
- Make sure this solution is right for your home.
- Think over the design of the rafter system and complete its drawing.
- Check out the nuances of the selection of materials and the construction itself.
You will find all the information listed in our article.
Scope and design flaws
The undoubted advantages of the pitched roof shown in the photo are the simplicity and low cost of construction. Indeed, in comparison with a broken mansard roof, and even an ordinary gable roof, a much smaller amount of building materials is spent on it. This is one of the reasons why this design is used in most budget buildings.
It is customary to make a roof with one inclined slope in the following types of buildings:
- in detached saunas, garages and sheds;
- in gazebos and verandas attached to residential buildings;
- at commercial real estate objects - pavilions, small shops and warehouses.

The picture clearly shows how much one facade is higher than the other.
But in private houses and large country cottages, a pitched roof is quite rare, despite the cheapness. The reason for this is several significant design drawbacks:
- Appearance. To ensure the slope of the only slope, it is necessary to withstand the height difference between the front and rear façades from 0.4 to 2 m. Not everyone likes this design.
- The device of a residential attic room is practically excluded due to the peculiarities of the rafter system.
- Shallow pitched roofs lack usable attic space.
If you know about the listed shortcomings in advance, then it is quite possible to put up with them, since they do not play a big role for budgetary and outbuildings. But there is a nuance that, under certain conditions, neutralizes the main advantage of pitched roofs - low cost.

One slope looks very harmonious on the attached veranda
With the width of the span to be overlapped from 4.5 to 6 m, it is enough to reinforce the rafters with struts. If the distance between the supports exceeds 6 m, you will have to assemble a rigid roofing structure - a truss, which will increase the consumption of timber. If you add here the costs of building the front facade, then the financial picture will not come out too rosy.
Advice. When deciding to build a gable roof with your own hands, weigh the pros and cons, compare it with the cost of a gable roof of a residential building. If the width of the span does not exceed 6 m, or there is a load-bearing wall in the center of the building, then there is no need to tinker with a rigid frame.

The choice of the rafter system
When erecting any roofs, 2 types of systems are used - hanging and layered. The first ones have only 2 points of support in the form of external walls, while the second ones are placed on 3 walls (sometimes more), one of which is an internal partition.

If the width of your house or veranda does not exceed 6 m, then feel free to accept for execution the hanging rafter system shown in the diagram. With a length of up to 4.5 m, the rafters do not need additional supports, and with a span width of 4.5 to 6 m, the installation of struts is required. This is the cheapest roof option, suitable for all sorts of outbuildings, sheds and small baths.
Note. A span of up to 7.5 m can still be covered with a hanging system if you arrange a frame ceiling from beams and build a so-called truss truss. The bottom line is to support the middle of the rafters with a headstock - a rack with struts, fixed to the ceiling beam.

Spans up to 18 m are divided into sections with a length of no more than 6 m and are covered by a layered structure, whose device is shown in the picture. Under a long rafter beam made of two or three planks, additional supports are placed, fixed on the inner wall partitions. For rigidity, the trusses are interconnected by girders, which is shown in the drawing.

As for the step of installing the rafters, for pitched roofs erected in temperate and northern latitudes, it is better to take an interval of 600 mm. In southern regions, where the snow load on the pavement is low, this distance can be increased to 1-1.2 m. Take the slope angle of the roof from the range of 8-45 °, depending on the purpose of the building and other conditions. The calculation of the angle is described step by step.

The graph can be used to determine the minimum slope angle for various coatings.
Work instructions
Before making a pitched roof, it is necessary to choose the right timber for the rafter system and lathing. In this regard, we will give the following recommendations:
- for a span up to 4.5 m wide, rafters from a bar of 15 x 5 cm are suitable, up to 6 m - from boards of 200 x 50 mm, spliced in pairs or in length;
- a beam of 150 x 50 mm will go to the wall trim (Mauerlat) and the bed;
- section of racks, struts and girders - 10 x 5 cm;
- the crate is made of boards 20-25 mm thick and 10-15 cm wide.

Advice. Fasten the frame elements to each other with nails or using galvanized self-tapping screws and bolts through metal plates and corners.
For waterproofing, you will need roofing material and a superdiffusion membrane, and for laying the topcoat, metal tiles, corrugated board or other roofing material. If we are talking about a residential building, do not forget about insulation: prepare mineral wool of the required thickness (or other insulation) and a vapor barrier film.
Mauerlat laying
The strapping bar should be placed on 2 opposite walls where the rafter legs rest. If the support of the layered system on the internal partitions is envisaged, then a board called the bed is also laid on them. The exception is log and frame houses, whose walls are ready for the installation of rafters.

The technology for laying Mauerlat on walls made of different materials looks like this:
- Studs are embedded in the brickwork in advance, on which the strapping bar is attached. Before installation, the stone wall is covered with 2 layers of roofing material. If the studs were not supplied, then the Mauerlat is fixed with anchor bolts or attracted by steel strips.
- Porous walls built of aerated concrete are supposed to be tied with a reinforced reinforced concrete belt before installing the Mauerlat, as done in the diagram. The studs for fastening are laid into the monolith during pouring.
- In wooden annexes (verandas, terraces), erected by hand, to support the rafters, you need to attach a second board of the same width to the upper strapping beam of the wall. To install the upper end of the rafter leg, it is necessary to screw a horizontal beam 15 x 5 cm to the wall of the existing building. This operation is shown in more detail in the video below.
Note. When laying additional boards on the upper part of a wooden wall made of beams or logs, waterproofing from roofing material does not need to be laid.
Installation of rafters step by step
Before building the frame, you need to determine the real length of the rafters, taking into account the outlets beyond the walls that form the eaves. However, the visors can be extended after installation by nailing boards cut to size to the rafter legs - the so-called filly. The minimum length of the roof overhang is 300 mm.
Advice. When it is required to dock the boards along the length, lay them on top of each other so that the length of the common contact plane is at least 50 cm.

- To build up the internal partition to the height of the inclined plane of the roof, assemble the frame from vertical supports connected from below by a lay, and from above by a run. The location of each rack must match the pitch of the rafters that will rest on them. Secure the frame with struts for stability.
- Try on the rafter in place and cut it from below at three anchor points in order to increase the area of contact with the Mauerlat and the beds, as shown in the photo.
- Install the rafter leg and attach it with self-tapping screws on the steel corners, Repeat the operation at 3 points, then move on to the next beam.
- Trim the legs of the eaves, and then sew them on the bottom and sides with clapboard. It is more convenient to do this while the roof covering has not been installed.

Note. If it is planned to make a flat ceiling in the room, then first you need to install the floor beams, and then build the frame.
If the side gables are not laid out under the slope of the future roof, then they should be revetted immediately after assembling the rafter system. Otherwise, then you will have to do this work from the stairs or build scaffolding. See the next video for the installation of the shed roof rafter system of a large building:
Lathing and topcoat
Before laying the boards on the roof slope, the rafter system is covered with superdiffusion membrane canvases, which provide protection from wind and moisture ingress into the attic space. The canvases should be laid horizontally, starting from the bottom, and fixed to the upper plane of the rafters with 5 x 5 cm counter-lattice bars.The membrane should sag slightly between the rafter legs to drain water, and the adjacent canvases should be glued together (overlap size - 15 cm).
Note. It is not necessary to put a waterproofing membrane on the pitched roofs of sheds, garages and other non-residential and unheated structures.

Sheathing boards are nailed to the rafters with a step depending on the type of roofing:
- for metal tiles - 35 cm;
- for corrugated board and slate - 50-60 cm;
- under the shingles, bitumen and ceramic tiles, the sheathing is continuous.
The last step is covering and insulation (if necessary). It is better to insulate a pitched roof along the ceiling, leaving the unexploited attic cold. How to properly insulate ceilings is described.
Conclusion
Installation of a pitched roof of an outbuilding or an open terrace will not be a big problem. Even if you have just started carpentry, you can build such a roof on your own or together with an assistant. Another thing is a residential building or a bathhouse, here you will have to work pretty hard with fitting the frame and insulation. For more details on the assembly of frame roofs, see the training video:

Design engineer with over 8 years of experience in construction.
Graduated from the East Ukrainian National University. Vladimir Dahl with a degree in Electronic Industry Equipment in 2011.
Related entries:

It has the most simple device, since there are no additional elements - transitions, skates, etc. It is an inclined plane (slope) that covers the building (or part of it) to protect it from the effects of precipitation and compensate for the wind load.
Improper roof arrangement entails the appearance of unnecessary loads on the walls and foundation, the formation of leaks, failure of the rafter system and damage to the entire building.
Therefore, all of its elements must be carefully calculated taking into account all the acting factors.
Such as:
- Climatic conditions.
- The size of the building, the number of floors.
- Roof material.
- Insulation used.
- roofs.
Such parameters have great influence on the tested load of the rafter system and walls so all calculations are based on them.
In this article, we will tell you what a shed roof calculator is, which will help you in calculating the structure of a truss.
The calculator produces calculation of the roof of a pitched roof.
Before proceeding with the calculations, in the upper right corner of the calculator you need to select the roof covering.
Labeling fields in the calculator
Please indicate the roofing material:
Select material from the list - Slate (corrugated asbestos-cement sheets): Medium profile (11 kg / m2) Slate (corrugated asbestos-cement sheets): Reinforced profile (13 kg / m2) Corrugated cellulose-bitumen sheets (6 kg / m2) Bituminous (soft , flexible) tiles (15 kg / m2) Galvanized sheet metal (6.5 kg / m2) Sheet steel (8 kg / m2) Ceramic tiles (50 kg / m2) Cement-sand tiles (70 kg / m2) Metal tiles, corrugated board (5 kg / m2) Keramoplast (5.5 kg / m2) Seam roofing (6 kg / m2) Polymer-sand tiles (25 kg / m2) Ondulin (euro slate) (4 kg / m2) Composite tiles (7 kg / m2 ) Natural slate (40 kg / m2) Specify the weight of 1 square meter of coating (? Kg / m2)
kg / m 2
Enter roof parameters:
Base width A (cm)
Base length D (cm)
Lift height B (cm)
Side overhang length E (cm)
Overhang length front and rear C (cm)
Rafters:
Rafter pitch (cm)
Wood grade for rafters (cm)
Side rafter working area (optional) (cm)
Crate calculation:
Sheathing board width (cm)
Sheathing board thickness (cm)
The distance between the boards of the crate
(cm)
Snow load calculation:
Select your region using the map below
1 (80/56 kg / m2) 2 (120/84 kg / m2) 3 (180/126 kg / m2) 4 (240/168 kg / m2) 5 (320/224 kg / m2) 6 (400/280 kg / m2) 7 (480/336 kg / m2) 8 (560/392 kg / m2)
Wind load calculation:
Ia I II III IV V VI VII
Height to the ridge of the building
5 m 5 m to 10 m 10 m
Terrain type
Open area Closed area Urban areas
Calculation results
Roof angle: 0 degrees.
The angle of inclination is suitable for the given material.
It is advisable to increase the angle of inclination for this material!
It is desirable to reduce the angle of inclination for this material!
Roof surface area: 0 m 2.
Approximate weight of roofing material: 0 kg.
Number of rolls of insulation material with 10% overlap (1x15 m): 0 rolls.
Rafters:
Load on the rafter system: 0 kg / m 2.
Rafters length: 0 cm.
Number of rafters: 0 pcs.
Lathing:
Number of rows of crate: 0 rows.
Uniform distance between battens: 0 cm.
The number of battens with a standard length of 6 meters: 0 pcs.
Volume of lathing boards: 0 m 3.
Approximate weight of crate boards: 0 kg.

Calculator field descriptions

Snow load region
Impact on rafters and roofing
 The calculation of the loads on the rafters and the roof consists of two terms:
The constant load is determined by summing the weight of all the elements present on the roof, and the payload is also taken into account - the weight of expansion tanks, attic cladding, windows or other objects that load the roof and under-roof space.
If for constant loads the calculation does not look like something complicated, then it will be more difficult to take into account natural factors... You will need data on the prevailing directions and strength of the wind, cases of hurricane squall manifestations, the amount of snow in winter, its quality indicators - dry snow is much lighter than wet.
CAREFULLY!
In order for the calculation to be correct, it is necessary to take into account the limiting states, since they are the most dangerous and destructive.
Snow load calculation produced by the formula:
S = Sg * µ
where Sg- the weight of snow per 1 sq. M of the plane, falling out in a given area.
µ - a correction factor that takes into account the angle of inclination of the roof (for flat roofs up to 25 ° it is equal to 1, for steeper ones - 0.7).
With a roof slope of 60 ° and more, the weight of the snow is not taken into account.
is calculated like this:W = Wo * k
Wo- normative indicator of wind strength for a given area.
k- a correction factor that takes into account the type of terrain and height above the ground.
Both formulas show the load per square meter; to obtain the full value, the result must be multiplied by the roof area.
It should also be understood that these calculations do not always take into account ultimate loads or special cases - for example, snow accumulations or single strong gusts of wind, atypical for a given area, but sometimes occurring. For, to have a guarantee of strength, it is necessary to take the load with a margin of 15% - 20% of the calculated one.

Rafter system
The amount of roofing for a pitched roof
Roofing calculation is based on individual characteristics of the material... A simple calculation of the roof area in this case will be very approximate, since the size of the longitudinal, transverse overlap, the size of the sheet will not be taken into account.
That is, the area of the roofing material sheet is not fully utilized, the calculation takes into account only the useful part... Each type of material has its own, determined by the size of the wave or the step of ribbing.
In addition, it is necessary to take into account the dimensions of the canopies or overhangs, which also consume the roofing material. If you are not completely sure of the quality of an independent calculation, it is recommended to use our shed roof calculator.

Roofing set for metal tiles
Number of battens for a pitched roof
 The number of lathing directly depends on what kind of roof covering will be used in this case. The battens should be spaced with a step corresponding to the dimensions of the sheet of material.
This alignment is very important without it, the correct installation of the roofing material will be complicated or completely impossible... Therefore, to calculate the amount of lathing, first of all, it is necessary to determine its step. You can refer to SNiP, which contains detailed and accurate information on the rules for installing all roof elements.
For solid lathing is often used, when the distance between the planks is 2-2.5 cm. In this case, the calculation of the lathing is reduced to dividing the length of the roof by the width of the plank plus 2 cm by the gap.
Stiffer types of material do not require continuous sheathing and the calculation is done based on the distance between the planks used for this type of roof.
A simpler solution would be to use online calculators that carry out a specialized calculation according to the specified. The data obtained should be clarified by recalculation on another online calculator.
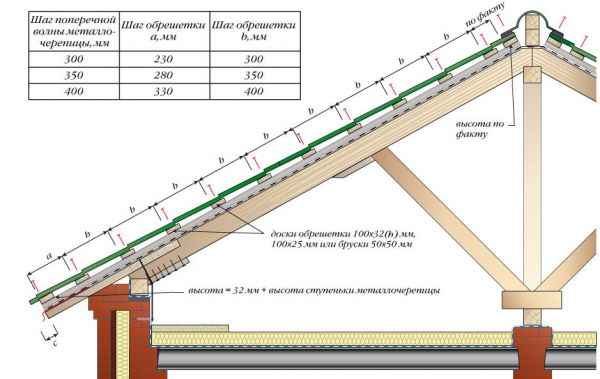
Number of lathing
Calculation of material for rafters of a pitched roof
- the main load-bearing element for roofing and under-roofing elements. Insufficiently careful calculation or not fully taken into account loads can cause sagging or deflection of the rafters, which will entail the appearance of leaks and damage to the entire building.
For the calculation, first of all, you should decide on the choice of material. In this case should follow the traditional approach and use a 50 x 150 mm edged pine board. This choice is time-tested, pine absorbs little atmospheric moisture, it is lightweight and strong enough.
ATTENTION!
At the same time, it is important to dry the boards before installation work, so that they dry out, do not deform, do not violate the geometry of the system.
In addition, you need to consider:
- The purpose of the building, in particular, the attic space.
- Roof dimensions, length and slope of the slope.
- Roof material.
- The amount of snow and the strength of the wind.
Taking these factors into account will help determine the optimal distance between the rafters. and also calculate the amount of lumber. If the length of the slope is more than 6.5 m, then additional racks will need to be installed.
The standard step size of the rafters usually ranges from 60-70 cm, which allows for a simplified calculation of the system. That being said, it is recommended that you turn to online calculators to check your results.
A pitched roof has the simplest structure, but the space underneath is more difficult to use for residential purposes. Most often, this option is used for ancillary or auxiliary buildings, when the attic is not considered as a living space.
In such cases, the weight and load from the roof to the walls are reduced due to the absence of an insulating layer, which simplifies construction and reduces material costs.

Material calculation
In contact with

