How to use plastic bottles in the household. Useful things from a plastic bottle
Hello friends!
I continue the summer theme, last time we reviewed. Decorated the garden and garden with the cutest products, remember? We also took a look at what's new this year. Today we continue to draw up our sites, and you know what? Yes, regular plastic bottles.
With great popularity, such wonderful toys or how to call them creations are gaining more and more recognition among summer residents. Do you know why? Of course, because we all always have a couple of unnecessary bottles in our apartment that lie and gather dust on a shelf. So why don't we take and build gizmos from them that will delight not only the eye, but everyone around.
Ah-ha, let everyone go and envy such beauty. Or maybe they will come up with something extraordinary new and will brag to you. Along the way, soon competitions and exhibitions will be held in cities and villages, as well as competitions for the best work. And why not, so to speak.
After all, it's really great, and most importantly, it inspires everyone else to come up with cool and unique compositions year after year. Well, get acquainted with the content and quickly scroll through and look at the beautiful masterpieces that I tried to find on the Internet. Intrigued? This is good.
The PET material is lightweight and also durable, so you can easily and quickly make any thing out of it. I'll start by showing huge vehicles. Oh, and now there will be impressions.
Any bottles, even canisters, will do for this purpose. Look at how many jobs there are. If you have children, they will be interested in such products. Choose any work and make a whole composition on your backyard.

You can also take equipment or helicopters as a basis.

From a jar for shampoo, you can also make a masterpiece and get an airplane. Paint with acrylic paints so that weather conditions do not spoil the craft.

All the same, the furniture looks wonderful, it would seem, wow. Of course, here you need quite a lot of the desired material.


Entire houses are already cultivated and greenhouses and greenhouses are being built. Also, gazebos made of such waste materials began to be in demand.

And of course, furniture items such as chairs, stools and trash cans. Well, everyone will love it for sure.

You can also make an ottoman and place it, for example, in a bathhouse or in a gazebo. Therefore, do not throw away juice cans.


And under them place the mushrooms, and it can be fly agaric. Dream and success will come by itself.

They also make decorative ornaments for the fence, cut the bottoms of bottles and lay out plots.

They also decorate stumps and benches. It comes out bright and beautiful.

On playgrounds, as well as schools, flowers and the sun are cultivated. These are the most famous works.

And of course, you can’t do without flower beds and flower beds. You can even make it from one ordinary transparent soda bottle. What a wonderful mouse came out.

Or make ordinary pots and plant any climbing plant or flower there.

It looks pretty wonderful and cute, even look at the magic ball built.

Whoever is ready for something, then creates. It surprises us, but we take an example and do not lag behind.

This picture is also very beautiful, but imagine if you still plant daisies or other flowers and how it will all bloom.

Also unusual butterflies will be a great decoration. They will cheer up and make the interior even more beautiful.
You will need a template, cut it out of paper, and then attach it to the bottle.

Circle and paint with acrylic paints, and then cut along the contour.

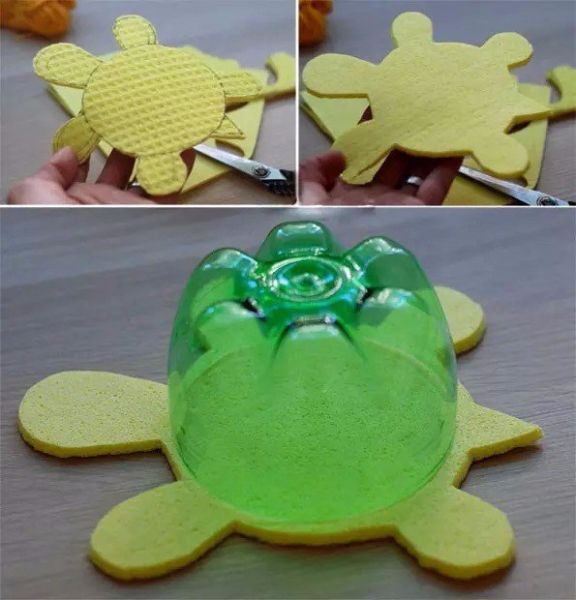
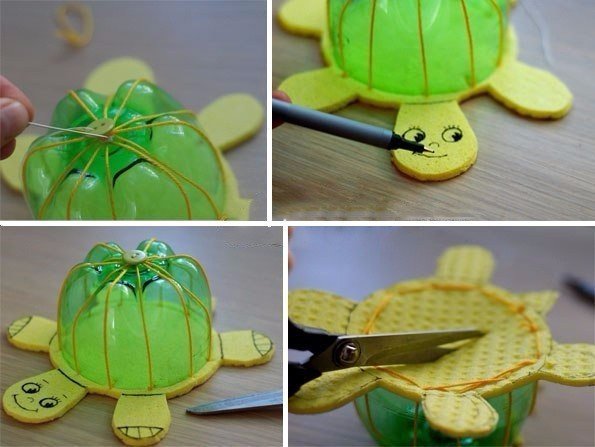
Or these funny turtles.

Make them with your kids and decorate the porch or dressing room. Here is a step-by-step photo instruction for you in detail, by the way, this is also a piggy bank.


Interesting work from plastic bottles for beginners (photos and descriptions are attached)
If you are a beginner and you think that you will not cope, then you are deeply mistaken. Nothing is impossible, start with the simplest, and then choose something more difficult.
Look, what a funny pig turned out in the form of a wonderful flower pot, like a flower bed. Read the description right now.

And here is the end result. It remains only to cut a hole on top and place the seedlings there or leave it like that.

Also an interesting idea from tin cans and bottles. This is such a person or a robot.

You will also need music CDs. In metal cans, make holes with an awl and thread the wire and connect one to the other.

Make the body from a large plastic bottle and also thread the wire to secure the arms and legs.

The eyes can be glued with a thermal gun, and the pupils will be beans.

I also suggest making a bird feeder, it is done quite easily and simply. There will definitely be no questions. Cut off the top of the bottle as shown here.

Then use a knife to make a fairly large hole.

Connect like this, you get a roof.

Make holes on the cork so that you can thread a thread or wire and hang it on a tree.

Color with acrylics for fun and to attract birds.


Also, if you wish, you can make a hunting trophy.


Probably the simplest is a craft in the form of a beehive with bees. Paint any container yellow with paint.

On the lid, draw a muzzle, eyes and mouth with black varnish.

Glue the strips with black tape.

Well, already a real bee, zhu-zhu.

Only the wings are missing, draw them first on another vessel.

Then cut with scissors or a sharp utility knife.

It remains only to fix.

And such a bright flying charm will come out. Looks cool, doesn't it?

A cool bug, as my little one once called insects and bugs.

We make animals from plastic bottles
Probably many of you, when you got into this article, were looking for animals, because your dacha will certainly look great with them if you make them and seat them around the site.
Take as a basis this step-by-step instruction with a diagram. I propose to make a cockerel from waste material. Tape the three bottles together.

From multi-colored disposable cups, make an outfit for a rooster.

Of these, and feathers for the tail. But, it’s better to take disposable plates and cut off the edge from them, and then cut them. Use a glue gun or stapler to secure.

Now almost everything is ready, the head remains.

It can be made from any ball or ball, in this case, a ball for a children's pool is taken.

Draw or glue on eyes and a comb.

Now, as the animals promised, these are, for example, mischievous turtles.

Caterpillars, and they can be made from bottles and corks.

Cool options with horses and donkeys. Below, a master class will be shown, read on.

Cute pigs, one even winks at you.

Shown here are chicks and a sister fox from the fairy tale Gingerbread Man. Well, you can't do without a bear.

Look, a mischievous black cat, kittens and a poodle. And of course the brave peacock.

Frog princess, make sure if you have a pond. Bunnies and lamb.

And now, as promised, let's dwell on the donkey in more detail.

First, prepare the container for work, you will even need bottles of yogurt. Screw jar lids to the largest volume.

Then you need to make the head and neck.

This is the layout that should come out.

You can't do without ears either.

Straight really donkey came out, it looks like one to one.

Here is how the mane is done.

Remember to paint in the desired color, such as gray and white, use acrylic paints.

Then attach the box and why not another summer cottage masterpiece.

Here is such a scheme for cooking a peacock in my piggy bank, maybe it will come in handy for someone. More foam is needed.


By the way, have you thought about making a living zoo, for example, there will be giraffes and zebras in it.

And a boa constrictor or a snake will crawl nearby.

You can make a hedgehog from improvised means, taking more cones.

Or a scary toy in the form of a shark, you can have some fun at the same time.

Without birds, the garden is also not fun, make a dove.

Or a magpie, for example, here already give free rein to your imagination.

Of course, the place of honor is occupied by swans.

No area is complete without them.

Because they are very beautiful, straight queens.

You can create a ladybug from plastic spoons or cut out details from a bottle and paint it in the desired color.

But the hero from the cartoon Crocodile Gena, only Cheburashka is missing.

These are the clumsy elephants that escaped from the zoo.

And this bird really struck me, an owl or an eagle owl, and instead of eyes, CD-disks. Well thought out.

Also, such a bird, which symbolizes the birth of a child, is a stork. Plant it in cabbage, it will be quite elegant. True, you will also need plywood, wire, polystyrene foam and milk cans.


Master class on how to make a palm tree with your own hands on the site (scheme)
A tropical plant, like a palm tree, has long won the hearts of the inhabitants of Russia, it is it that often fills the interior in the garden. See this diagram and follow the steps you need.

And if you have any questions, you can watch the video.

In any case, you will understand, there is nothing difficult in this. So hoard stuff.)
What can be done with plastic bottles
Now I want to invite you to look at the most unusual ideas that I came across. There will only be new items. I want to show such a Christmas tree from a green Fanta bottle.

They even make brooms and shovels for cleaning the territory. Great idea.

Unforgettable look topiary, take a look.
Or from traffic jams decorate fences and gates.

And in the villages, houses have already begun to be cultivated. How many of them you need to accumulate, horror.

But they even came up with the idea of using instead of a light bulb, the light and rays of the sun hit and illuminate the room in the attic.

Here is such a box for little things, or something else.

Take care of the birds, make them a feeder.

Or such an octopus will please your eye.

Girls and boys, nesting dolls and other little people.

And of course the flowers are lilies of the valley.

Or daisies, poppies, what do you like more?


And here are the lilies, how wonderful.

And someone can put a decorative teapot and a mug on the table.

We talked about butterflies above, and here is the dragonfly, but so huge.

Well, you can’t do without a washbasin, build one, especially since it’s still a great option if you go out of town for a picnic.
You can often find unique fences that can be made from bottles of dairy products.
Or decorate with strawberries, it looks just great.
 These are some pretty flower stands.

Or a watering device, screw the bottle onto the hose and make holes in it, you will get a spray, like from a watering can.

Who would have thought even cacti can be built, and even with thorns.

Also very popular are the minions, as they are to you.

Interesting ideas, right?

Beautiful crafts from plastic bottles, caps and corks
I suggest immediately adopting these ideas from this video:
See you soon here. See you.
Sincerely, Ekaterina Mantsurova
Original taken from pervakov How to do it: Useful things from plastic bottles
Almost anything can be made from plastic bottles, from water bottles and bracelets to a three-story pavilion.
You just need to turn on your imagination, find the number of plastic bottles (which is not very difficult nowadays), and of course, get the right tools that will help you achieve the desired result.
Let's start looking at several options for plastic bottle products.
Cosmetic bag from a plastic bottle
1. To make a handbag, you must first prepare two plastic bottles of 5 liters.
Cut these bottles as shown in the picture. Pay attention to the fact that the cap is cut as low as possible to the bottom of the bottle, where the plastic box is thick and springy.
2. Get your yarn and hook ready. To make holes like those in the picture, you can use an awl, soldering iron or punch.
The holes should be spaced approximately 7 mm apart and from the edge.
3. Let's start making a pen. It is necessary to combine and make holes in the lid.
4. Now tie the resulting blanks.
5. Sew with a double seam. The first seam must be laid along the knitting edge, and the second in the holes.
6. Sew on a handle to make it easier to open and carry the bag.
7. If you want to hide the zipper joint, you need to sew a tied plastic strip on the back, the width of which should be 1 cm, and which should have holes in the middle.
8. To make a cosmetic bag, you need to prepare a pattern. You can use templates or draw by eye.
9. All parts of the cosmetic bag, not counting the sidewalls, must be folded with concave parts to each other.
10. Place a pattern under the plastic and press with a ruler. Next, make holes. A template made of thick cardboard that you can lay on top of the work can help you. When you make holes around the edges, you will have plastic streaks that you can simply cut off with a knife.
11. When all parts are ready, crochet everything. Completely you need to do this with the bottom and top, and in the rest, only the side parts. Then sew.
12. Top and bottom must be tied. Knit 2 double crochets in between pieces. Next fold the bottom. Sew on.
13. It remains to attach the zipper, install a tied strip on top and sew the cover. You can decorate the box according to your taste.
Do-it-yourself coasters from plastic bottles
You will need:
1.5 liter plastic bottles
iron tray
Napkins
tassel
Pencil
1. Cut off the bottom of the plastic bottle
2. Put the iron tray on the gas stove and heat it up. When it heats up, put the cut off bottom of a plastic bottle on it. To ensure smooth and rounded edges, rotate the tray in different directions.
3. Attach the bottom of the bottle to a napkin and circle, while you need to step back from the edge by 0.5 centimeters.
4. Cut out the napkin and separate its top layer.
5. Now you need to grease the bottom with glue.
6. Insert the napkin into the bottom and gently spread it out.
7. On top of the napkin, apply glue and varnish with a brush - for decoupage.
8. Let the product dry and harden.
DIY plastic bottle bags
Such bags can be used by children to store pencils, designers, etc. Adults, in turn, can use these bags to store clothespins, cookie cutters, etc.
You will need:
Plastic bottle
Eyelets
Ribbon (can be replaced with lace)
Candle (can be replaced with a needle with a plastic top or an awl)
1. Prepare a plastic bottle and cut off the top (you choose the height yourself).
2. To make holes in one line, you can use an elastic band. Holes can be made with a heated needle or awl and should be about 2 mm in diameter.
2. Determine the desired size of the top, which will be made of fabric. In this example, the width of the fabric is 26 cm + 2 cm allowance, and its height is 15 cm (including allowances).
3. Now you need to iron the folds (at the bottom 1 cm, at the top it is folded twice by 0.5 cm and by 3 cm - this is done in order to hide the raw edge).
4. Install the eyelets and stitch the top edge.
5. We make a side seam. To do this, retreat exactly 1 cm from the edge. If you pay attention to the image, you will see that the bottom is turned up. It must be stitched in expanded form. Next, you need to iron the seam.
6. Attach the top to the plastic bottle. First, turn the top inside out, and then put it on the bottle. This must be done so that the folded edge can pass exactly under the holes. Then you need to raise it, and the ironed fold should be 1 mm below the holes.
7. Lift the fabric and thread the string through it.
Master class from plastic bottles. Mobile phone holder.
From a plastic bottle, you can also make a good and very useful mobile phone holder. It is needed when you urgently need to charge your phone, you have found an outlet, but there is nowhere to put the phone.
Prepare a 0.5 liter plastic bottle, and pierce a hole with a knife to further cut off the unnecessary part of the bottle.
Using scissors or a utility knife, cut out the circle for the fork.
It remains only to insert the cord from the charger into the "neck" and plug it into the outlet.
Master class from a plastic bottle. Chandelier.
You will need:
50 plastic bottles (volume 0.5 l)
flower wire
plain wire
Bulb
Paint can
Glue (glue gun is better)
Scissors
Stationery knife
1. Prepare plastic bottles and remove labels from them.
2. Cut each bottle in the shape of a flower (see picture). To do this, use a clerical knife.
3. Spread the "petals" of flowers.
4. Once you've done steps 1-3 with all 50 bottles, it's time to paint them. Use spray paint, or you can spend a little more time and paint each flower with acrylics. You can choose any color. You can also vary the colors by making some flowers one color and others another.
5. Make a circle from ordinary wire. Wind the jute, and use a glue gun to glue it to the wire. You will get the base of the chandelier to which the flowers will be attached.
6. Using flower wire, attach each flower to the circle you made from the wire.
There are two ways to attach floral wire to a flower: wrap it around the neck, or glue it.
Here is what the first layer looks like.
7. Repeat all steps to make multiple layers. In this example, 3 layers were made.
8. Attach the chandelier to the ceiling using jute (see picture).
What can be made from plastic bottles. Sprinkler.
Just make holes in the cap of a plastic bottle with an awl or a nail.
Products from plastic bottles. Funnel.
Plastic products from bottles. Money box.
1. Prepare a plastic bottle. Wash it with hot soapy water and leave to dry.
2. From colored cardboard, cut out details such as ears, eyes, a snout and nostrils.
3. Use glue or double tape to attach all the details.
4. Wrap the bottle with patterned paper.
5. For legs, you can use empty coils that need to be glued to the bottle.
6. Make an incision at the top for coins.
We make a dispenser for plastic bags from a plastic bottle
You will only need one 3 liter plastic bottle to store your plastic bags.
Simply cut off the bottom of the bottle so you can put bags in, and the neck so you can carefully remove one bag at a time.
You can use sandpaper to make the edges of the bottle more even and smooth.
We make bracelets from plastic bottles
You will need:
Plastic bottle
Adhesive tape (the width of the bracelet depends on the width of the tape)
Double-sided tape
Felt (or other material)
Scissors
Stationery knife
Decorations
1. First, wrap the bottle with duct tape. Make several "rings" as shown in the picture. Everything needs to be done neatly and evenly, since it is the tape that will determine how smoothly you can cut the bracelet out of the bottle.
2. Using a utility knife, carefully cut off each ring.
3. Carefully remove the adhesive tape.
4. Glue double-sided tape to the resulting plastic bracelet.
5. Prepare two felts of different colors and cut out pieces of different sizes from them. Carefully glue each piece to the double tape on the bracelet.
6. Cut off excess parts with scissors.
7. Start decorating the bracelet as you like. You can use beads, sequins or make flowers.
Very beautiful and very easy to make such curtains.
Just prepare some plastic bottles and cut out the bottom of them - you will get a shape resembling a flower.
Make several holes in each "flower" with a heated needle.
Prepare a fishing line or strong threads and connect all the "flowers".
The product can be hung on a window or in a doorway.
You can also make a hole in the middle of each "flower" for LED bulbs, and you will get a beautiful glowing garland.
You can use bottles of different colors, or use spray paint to give different colors to the product.
Irrigation from plastic bottles to give
You will need:
2 l plastic bottles
Awl or screwdriver
1. Using a knife, make two small cuts at the base of the bottle and two more in the middle. Also make two small holes with an awl in the bottom of the bottle.
2. Pour water into the bottle to see if the water seeps out quickly or drips a little, ideally you want the water to drip and not squirt.
3. Dig a small hole in the ground where you want to irrigate, and insert a perforated bottle into it. Next, fill the bottle with water.
Photo of products from plastic bottles
Frame made of plastic bottles (video)
Plastic bottle products. Three-story pavilion.
What to make from plastic bottles for the garden and garden
| . |
The trend of rational use of household waste has recently become more and more popular, especially for plastic containers. From plastic bottles, you can do with your own hands almost the entire country interior and more. One of the main advantages of this material is its long service life, besides it is very elastic. Do not forget that plastic bottles are an affordable material that every owner or hostess always has in stock.
Cheap and cheerful - we make flower beds from bottles
Plastic containers are ideal for as they have a great advantage over wood and even metal. Wooden fencing on flower beds or flower beds cracks or rots over time under the influence of moisture and the sun. Even metal curbs are susceptible to corrosion and require periodic maintenance, such as regular painting.
But what about plastic? It does not lose its shape and does not collapse for a long time. This means that such a flower bed will last more than one season and even more than one year, moreover, it does not require any maintenance at all. Even if a “breakage” occurs, the desired “element” can always be found in the pantry and easily replaced without resorting to long tedious shopping trips in order to find a suitable fragment.
So, what can you do with plastic bottles with your own hands?
bottle borders
 If you need to protect the flower garden, plastic containers of different sizes will do just fine. This will not only limit the space and prevent the growth of perennials, but will also retain moisture and prevent the emergence of weeds.
The shape and size of the flower bed depend only on the imagination of the summer resident: it can be either equilateral or in the form of some animal or plant. Also, bottles can be divided into segments of the flower bed itself.
Even a child can build a bottle border (with the help of adults, of course):
- First of all, on the site, you should draw with a sharp object or pour the contours of the flower bed with sand.
- Release the bottles from the labels, wash them, pour sand into them and tighten the cap. If this is not available, ordinary earth or water can be used. This is necessary for stability, since empty containers will quickly fall out of the fence.
- Dig a groove along the outlined contour so that the bottle can be deepened by about 1/3 into it.
- Place the filled bottles in the groove with the neck down, as close as possible to each other, and cover with earth.
For a visual effect, you can use bottles of different colors of plastic (green, white, brown).
 Some summer residents do without digging in bottles. For example, bottles without a bottom are simply inserted into each other, forming a circle. The finished design can be "put on" or taken into the ring near the trunk circle of the tree. To fix the curb, it must be firmly pressed to the ground with arcs.
Multi-tiered flower bed
 If you really want to have a flower garden, and there is a catastrophic lack of space, you can do it yourself from plastic bottles. The principle is the same as for the construction of the curb, only after laying the first tier, it is necessary to fill it with nutrient soil, and only then lay out the next floor.
When planting plants for the lower tier, it is better to choose moisture-loving specimens, since water will flow down when watering.
Mini flower beds
 Beautiful and useful crafts for giving can be made from 5-liter plastic bottles. They will serve as miniature and cute flower beds, for example, in the shape of everyone's favorite piglets.
 Group compositions in the form of trains with flowers look no less impressive.
 And if you sow lawn grass instead of flowers, a large bottle turns into a cute hedgehog with green spines. It remains only to attach the eyes and nose.
 Those who are not afraid of small rodents will like cute mice from small (liter) bottles. They are good for planting petunias.
Flower pots and flowerpots
 With a little imagination, plastic bottles can be easily transformed into small decorative pots for flowers or spicy greens. You can make them even or cut them into a marker in the shape of a muzzle. Such flowerpots will look great not only in the garden gazebo, but also in the house on the windowsill.
 But if you put a fabric cover on a cropped bottle and attach ropes, you will get elegant planters for a summer veranda.
 The easiest way to make hanging pots is to cut out fragments of the walls on both sides of the bottle, and fasten a string for hanging under the neck. In such flowerpots, compact undersized plants can be planted.
Making a beautiful garden path
Tracks made of plastic containers are especially popular with summer residents. The strength of such a path depends on the laying method and what part of the plastic container serves as a building material:

Paths made of plastic bottles become very slippery in winter.
Fun playground - decorate a place for children's games
Caring parents always strive to give their children a place to play in the country, where children can pass the time while adults are busy in the garden. Of course, it should be not only safe, but also colorful to please the kids. With the help of plastic bottles, it is easy to decorate the playground by making a variety of plants and animals. Ordinary paint will help to give them brightness.
In the shade under a palm tree
 What is a playground without a sandbox? And where there is sand, a palm tree must “grow”. For a Tropican, you will need green and brown bottles for the trunk and leaves, respectively.
Before proceeding with the assembly, you need to take care of a solid base. For example, fix a metal pin in a concrete screed, and it should be quite long so that the tree turns out high, and children can walk freely under it.
When the base is fixed, you can start "growing" palm trees:
- cut off half of the bottle (the top with the neck is not needed) and form a jagged edge;
- make a hole in the center of the bottom, string the blanks onto the base pin, while bending the teeth to the side for a more natural look;
- cut off the bottom of the green bottle and make straight cuts along the entire contour to the place where the wall goes into the neck (if desired, the branches can be made curly - cut into 4 parts and place cloves on each);
- string fragments of the branch on the base;
- firmly attach the finished branches to the top of the stem (by welding or construction harnesses).
 If after assembling the palm tree there are still many green bottles left, you can make a small (or large) Christmas tree from them. Remove the bottom from the bottle and cut it into long narrow strips right up to the very neck. Trim the edges of the strips to look like thorns. Thread the leaves onto the base.
Such a Christmas tree will look great on the site in winter, especially under snow, and will also help out on New Year's Eve those who, in a hurry, did not have time to buy a living tree.
Guests from a fairy tale - funny animals
 And of course, there must be toys. Often children take their old pets outside. With the help of plastic bottles, you can easily diversify the "zoo", creating real masterpieces - from the fabulous Frog Princess and the Golden Fish to modern cartoon characters.
 Take at least a handsome cat, painted in black and white paint. And you can use brown beer bottles, and you get a brown cat, also beautiful.
From the two bottoms of the bottle, form a head (connect them), while the bends on the bottoms will really look like a real head. On one of them, draw eyes, eyebrows and mustaches with white paint, and a neat tongue with red paint. From above, insert cut out small ears. For the body, string the same short cut bottoms onto the base, close the body last. Melt the edges of the bottoms. Walk along the melted contour of the ears and fragments of the body with white paint, and on the front bottom make a white speck on the breast.
Glue the head and legs - the upper parts from bottles with an elongated neck will come in handy for them. Cut them off to the point where the bottle expands, cut the edges with sharp teeth and build legs from 4-5 parts, putting them on the base wire. Screw the corks onto the upper necks, glue the paws to the body with them. For the tail, take a long wire and string the narrowest parts of the neck onto it, but without plugs. To make the tail fluffy, cut the edges into thin strips.
 Beautiful animals are also obtained from large 5-liter containers. With the right combination of bottles of different sizes and with the help of bright coloring, you can place a zebra, a horse, a cow, a donkey and even a giraffe on the site.
Flowers for my daughter
 In the sandbox, children not only sculpt Easter cakes. Little girls are very fond of flowers and often pick dandelions on the lawn (or in their mother's flower bed) to plant in their sand garden. But you can make a whole greenhouse of flowers out of bottles, while the girls will be happy to take part in the manufacture of the simplest options. Daisies, cornflowers and tulips will decorate the sandbox, especially since young flower growers will be able to repeatedly "transplant" them from garden to garden without harm to plants and mother's nerves.
For flowers you will need:
- stem wire;
- flat parts of bottles for cutting leaves from them;
- necks or bottoms for the most inflorescences;
- dye.
 More complex options can be done by adults. Plastic roses or poppies will decorate not only the playground, but also flower beds.
plastic design for garden
From plastic bottles have an extensive scope. So, if small animals and birds look appropriate in flowerbeds and playgrounds, then larger-scale animals can be placed in the garden, among trees and shrubs. They will give the garden a unique look and enliven it.
Amazing Garden Sculptures
Representatives of large birds made of plastic look almost alive. With the help of multi-colored paints, you can achieve a stunning realistic effect. To make them, you just need to master the technique of cutting feathers from the sides of bottles and prepare a frame on which they will be fixed.
Very impressive in the garden will look:

In the garden, you can place sculptures not only of birds, but also animals of a large enough size so that they do not get lost against the backdrop of tall trees.
 Among the greenery, a bright spot will be a white sheep, which is quite easy to make if there are bottles of 2 liters and several 1.5 liters lying around in the pantry:
- Cut off the necks of two 2 liter bottles and put them on top of each other - this will be an elongated head. From the third bottle, cut out long ears, roll them up a little with a tube and attach to the head in the appropriate places with wire (or glue). You can draw eyes or glue two plugs.
- For the body, insert the whole neck into the bottle cut off from the top. Make 3 more such blanks and attach them to the first on the sides and top, thus giving the lamb the desired “waist” volume.
- A whole two-liter bottle will serve as a neck, which should be fixed on the body at an angle of about 120 degrees so that the cork is on top.
- To the neck (on the cork) set the head.
- For legs, cut off the top of a two-liter bottle and insert a whole bottle of a smaller volume (1.5 liters) into it. Make three more such blanks and attach the legs to the body with the wide part up.
- From the cut bottoms of two-liter bottles, make a fleece, fastening them together, and put on the body. Under the belly, tie the edges of the fur coat.
- Paint the sheep with white paint and draw black eyes.
Bird care
Plastic bottles can be used not only for decorative purposes, but also for the benefit of the garden. After all, it is always inhabited by the summer resident's little helpers - a variety of birds that collect pests from trees. In the warm summer, they have something to eat, but in winter it becomes more difficult to get food. That's when the feeders hung around the garden come in handy. And if you involve children in the process, you get a double benefit: for children - an interesting activity and pleasure, and for birds - a cozy house with grains.
 The simplest can be made from large 5 liter plastic bottles by simply cutting large arch-shaped holes on both sides.
So that the birds do not injure their paws on the sharp edges of the bottle, they must first be melted or pasted over with electrical tape.
For those who rarely visit their summer cottage in winter, a feeder that fills automatically is useful.
 You can make it from a bottle and two wooden spoons:
- make two holes in the bottle opposite each other, while the second should be slightly lower;
- unfold the bottle and repeat the procedure on the reverse side;
- insert spoons into the holes crosswise.
After the bottle is filled with food, it will be poured through the holes into the spoons as they are empty.
A cozy place to relax from improvised means
Not only birds, but also the owners themselves should have their own secluded corner among the greenery, where on warm summer evenings you can enjoy a cup of tea, inhaling the aromas of nature. Many prefer to put in the garden. They are very beautiful, you can’t argue with that, but they require certain financial investments. But from plastic it is cheap and cheerful to make not only a recreation area, but also to completely equip it.
Alcove? Easy!
Arbor - one of the largest crafts for giving from plastic bottles. But a plastic gazebo has two big advantages:
- it is easy to assemble;
- will last more than one year without damage to the material.
Perhaps the only drawback of the building is the presence of a large number of bottles that need to be stored somewhere during the collection process.
What the gazebo will look like depends only on the desire of the owner, and, accordingly, on the availability of “building materials”:

Practical curtains in the gazebo
In summer pavilions there is a lot of fresh air, but, unfortunately, also dust. Ordinary tulle requires frequent washing, while a plastic curtain does not collect so much dust, and you can “wash” it without even removing it - just pour it over with water from a hose (of course, if such a curtain does not hang in the house). 
For dreamy and romantic hostesses, delicate curtains made from the bottoms of plastic bottles, strung on a base, are suitable. 
Energetic people who love bright colors are more suitable for cork curtains, assembled according to the same principle.
garden furniture
 A table, ottoman, armchair and even a sofa in the gazebo can also be made from plastic bottles. The old one from the house is also quite suitable for outdoor recreation, but, like the curtains, it will eventually become a collection of dust. In addition, it is quite difficult to take a wooden sofa outside, because such furniture is rather bulky and heavy. But rearranging a plastic chair is not difficult.
It is not difficult to assemble furniture - you just need to put the bottles tightly and connect them with adhesive tape, giving the desired shape. For ottomans, knit or sew a cape - from the outside, no one will guess what they are actually made of.
 Leatherette covers are more suitable for a sofa.
Unbreakable garden chandeliers
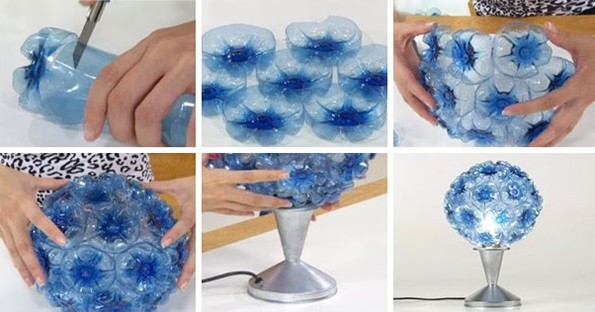
 If you plan an evening tea party, you should definitely spend it in the gazebo. To ennoble the light bulb, you can cut the bottle into two parts and make a simple ceiling lamp from the upper half and paint it or paste over it with colored thread.
In plastic chandeliers, it is better to use economical light bulbs - they do not heat up so much and will not melt the material.
In more complex versions, chandeliers are assembled from fragments of leaves or flowers cut from multi-colored bottles. 
Garden supplies for gardening
In order for the summer cottage to look beautiful and tidy, it is necessary to take care of it all the time - weed weeds, collect fallen leaves and small debris. This will require tools. Of course, it will not work to make a chopper or a rake out of plastic, but simpler specimens are quite possible.
Craftsmen have long known how to use plastic bottles for their own benefit and savings for the family budget. After all, if the scoop suddenly breaks, you no longer have to run to the store for a new one. From household waste that is in every home, you get a lot of useful things at no extra cost:

garden care
From plastic bottles you can make useful things not only for the garden, but also for the garden. These can be both small crafts in the form of, and larger structures such as greenhouses.
Greenhouses for seedlings
 Most summer residents grow seedlings of garden crops on their own. Some do it in apartment conditions, but better seedlings are obtained from greenhouses - there is enough heat and light.
You can no longer talk about the cost, but as for durability, plastic bottles will certainly last longer than film shelters or glass structures.
To increase the service life of plastic bottle greenhouses, it is advisable to put them on the foundation, and use a metal profile for the frame.
The simplest version of the greenhouse involves the construction of walls from whole bottles that are put on top of each other.
 It will take a little longer to tinker with the greenhouse of the plates, but it will turn out to be warmer. In this case, even parts must be cut out of the bottles and fastened (sewn) together in the form of a canvas. From the finished canvases, mount a greenhouse.
Watering "systems"
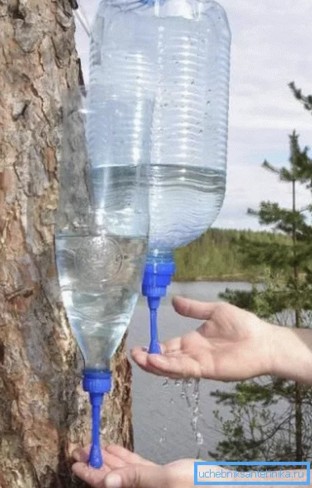
 For gardeners, watering is no less a pressing issue than the presence of a greenhouse. Instead of ready-made watering systems in the garden, you can use. They must either be suspended above the bush, having previously made holes in the lower part, or dug into the ground.
 In addition, the bottle makes a good sprinkler - you just need to make small holes in it and connect it to a watering hose.
Getting rid of pests
A plastic bottle repeller will help drive the summer resident's worst enemy from the site -. He not only plows the beds, digging his tunnels, but also damages the root system of plants in the course of action, depriving gardeners of the future harvest.
 If you cut the side walls in the bottle, bend them and put the container on a steel bar, with gusts of wind the bottle will spin and make noise. The sound through the rod will go into the ground and deprive the mole of the desire to manage in this noisy place.
The list of what you can make from a plastic bottle with your own hands is quite long. These are just a few crafts that make life easier for summer residents. Agree - it is better to get the maximum benefit from bottles than to pollute the environment. Take care of nature and work with pleasure!
21 ideas for using plastic bottles - video
That only skillful hands do not make from unnecessary (junk) items. Crafts from bottles with their own hands are made for arranging summer cottages, playgrounds. And they look very attractive and original. Plastic is the cheapest and most affordable and very flexible material. From it you can create figures of animals, flowers, dolls, children's transport, borders. Some craftsmen use them in the construction of arbors, fences, greenhouses, garden furniture and even boats.

Features of plastic as a material
Many people throw away plastic containers, considering them garbage, but this is a unique material for crafts that will certainly find application in the household. Its features as a material for creativity are that:
- For the manufacture of crafts and work, you will not need any complex tools or devices, except for those that every good owner has in the house: scissors, sharp knives, candles, glue, stapler, drills, glue gun and so on.
- Not only the bottle itself will fit in the work. From the covers you can create colorful panels, paths, decorate old furniture with them.
- Thanks to the flexibility of the fluorescent bottle, even flexible structures can be created both indoors and outdoors.
- Crafts can have different shapes and sizes, so both very small bottles and large bottles will come in handy.
- Plastic is considered a safe material, so you can create crafts from it for playing at home or in kindergarten.

What bottles can be made for kindergarten or kindergarten
Creating characters and all sorts of figurines for children is a special area of amateur creativity. It is advisable to do them together with them. So it is easier to accustom them to perseverance, to teach attentiveness, concentration, to develop imagination. Consider, using the example of master classes, how to create simple figurines and fairy-tale characters for children.
chamomile
There are several options for making this delicate flower.
Option 1
White bottles are required for work. They usually sell their milk and should be picked up a little. In extreme cases, you can use transparent, but then repaint it in white. For each chamomile we need 3 bottles. All of them must have the same neck diameter, otherwise we will not be able to put together the magnificent parts.
We cut off the upper part (neck with a lid), just below the place of expansion. We do this with only two bottles, we leave one. It is desirable that the lid is yellow.

Cut out about 8 petals on each neck. Only so that they hold on, and do not fall apart. Bend them one by one in the opposite direction.
Let's start collecting the flower: we put on one of the blanks on top of the one that remained uncut.

Then the second in the same way.
We unfold and bend the petals so that the chamomile looks natural and lush.

We fix all three layers with a lid, we try to make it tighter.
Such flowers can be left as is, or you can paint them in different shades after assembly. They can be planted on a wire stem or attached to a fence.
Option 2
This daisy is more complex in design, but it also looks more natural and beautiful.
We cut circles from the cylinder of the bottle (about 8 cm in diameter, more if you want to create a large chamomile). Each will require three mugs
Each circle is subsequently cut into 16 strips and we form flower petals from them.
In the center with an awl, hot on fire, we make a hole.

A little later, when we collect the workpiece, you need to hold it a little over the fire. So the petals wrap themselves, creating the correct shape of a camomile.
We cut out the core of the flower from the yellow cover, pierce it and fasten it with wire with the inflorescence.
We make a sepal from a green bottle, also melt it a little over the flame.

We first attach the sepals to the stem, then three blanks of petals, the core and bend it with pliers so that the chamomile does not fall apart. After bending, we draw the wire through the sepal again and twist it with the stem.

The stem will be a wire, on which thin strips (about 5 mm) of green plastic are wound. In order for the layers to stick together well, they also need to be scorched.

If you want to create a whole composition, make leaves by cutting them out of green plastic, singe them a little, wind them around the stem.
You can bouquet and diversify the bouquet by combining them with cornflowers. Here you need blue plastic, the petals are cut out in the shape of cornflowers. A flower is going to be similar to a chamomile.
With this technique, you can make any kind of wildflowers, and even roses, if you can roll them correctly.

Option 3
Now let's try to make a giant daisy.

As you can see, to create such wonderful decorative flowers, it will take only a few hours of time, a bottle, an awl, a candle, glue and scissors.
Penguin
Plastic Coke bottles are useful for creating a penguin, due to their narrowed shape in the middle and expansion at the bottom, a believable penguin body is obtained from it.
Tools and materials:
- 2 bottles of the same size;
- scissors;
- cool gun with silicone pencils;
- brushes;
- black marker;
- a piece of dense fabric;
- white, black and red colors.
Step by step penguin assembly:
- We cut the container in this way: the first, acting as the bottom, is cut in the middle or a little closer to the bottom, the second is the top of the penguin, so we only need the bottom. Rice. one
- Now we connect both parts with slices to each other. Fig.2
- When connected, fix with glue (you can use a silicone gun). Fig.3
- Next, according to the plan, we will paint the body of the penguin. Select the type of paint so that it is not afraid of moisture. We paint the future toy in several layers. Rice. 4
- When the paint coating dries, outline the chest and muzzle with a black marker. Fig.5
- Paint over the outer part (behind the contours) completely with black paint. Leave only the top - this will be the place of the cap. Rice 5. and 6.
- In principle, the penguin is almost ready. It remains only to paint the place left under the cap with red paint. You can, as shown in Figure 8, decorate it with black dots.
- Draw eyes and a beak on the muzzle. This can be done with a thin brush and paints, or you can use colored markers. Rice. 9.
- Cut a scarf from a small piece of fabric, tie it on a penguin.

Crocodile
Let's try together to make another toy for kindergarten - a crocodile.

Prepare for work:
- two plastic bottles, 0.5 l;
- twist plugs from the same container - 4 pcs;
- sharp knife;
- stationery scissors;
- thin cardboard;
- glue;
- brushes;
- waxed paper;
- paints for drawing;
- eye buttons.
Manufacturing and assembly instructions:
Cut the bottles first in half, then so that a distance of about 7 cm remains to the neck.
It is necessary to form the edges so that the body of the crocodile is slightly bent during assembly. As shown in the photo.
Glue the covers in place of the legs.
Form dense balls from cardboard - eyes, attach to the body.
Cover the entire body of the alligator with green colored paper.
Cut out eyes, teeth, paws from paraffin paper.
Paint the teeth (white), nostrils (black), eyes (also black) with a brush, or use dark buttons as eyes.
bees
These funny insects are very easy to make.
Option 1
Prepare ahead of time:
- plastic containers with a capacity of 0.33 l;
- sharp scissors;
- acrylic paints;
- cup 0.5 l;
- brushes;
- glue;
- black tape;
- wire;
- stationery knife.

Instructions for execution:
From a plastic cup, cut out the wings of a bee, as shown in the photo.

The bottle does not need to be cut completely. We make only small cuts on the sides, with a clerical knife. These will be the placement of the wings.
Insert the wings into place, glue them.

Next, proceed to painting the bee. There are two ways to paint: paint the body black, then make yellow stripes, or vice versa, make it completely yellow, then draw black stripes. Let's use the first one - paint it dark.

Draw the eyes in white on the lid, and the mouth in red.


Option 2
You can make it in one copy, you can create a whole hive
To create a hive, prepare:
- plastic bottles according to the number of expected number of bees;
- yellow enamel or paint;
- black electrical tape;
- wash brushes - 4 pcs;
- for the eyes - beads or buttons;
- glue gun;
- synthetic thread;
- leg-split.

We paint plastic bottles yellow. You can do it a little differently - pour yellow paint inside, twist the bottle so that the paint evenly lies on the entire inner surface.
This method is a little more difficult and longer, but the coloring will turn out to be more effective and with gloss. In addition, it will not wear out, break or deteriorate.
This should be done in several stages to evenly paint the entire surface. Fill the bottle with paint, shake and lay on its side. As soon as the first layer of paint begins to set, twist it to paint the next area and so on until the end.
When the bodies of the bees take on a yellow color, we make transverse strips with black electrical tape.

On the lid we glue eyes, a nose from pre-prepared beads and buttons.

From another plastic container, we cut out shapes that look like wings. To them, at the same stage of work, we attach threads. For them, we will then hang the bee to the tree.

To the body of the bee, with the same glue gun, glue the thread with wings.

Color it yellow too. You can, again, use the complex method of painting. Or, in order not to lose a lot of time, just paint on top with a brush.

We will make the roof of the hive from wash brushes. We take them in a pile, tie them with twine.

On the lid of the bottle - this is our roof area, we apply a thick layer of glue. We spread the wash brushes on it so that they are evenly distributed on all sides. If somewhere they are a little unstuck, glue it.
Leave the craft for a while at rest to dry.

Everything is ready and the bees and the hive. It remains only to take it to the kindergarten and hang it on a tree.

In a similar way, you can make many bees, but without a hive and hang each one from a tree. Thus creating a real children's beekeeping center.
Creating bee crafts is an interesting activity, the work is not difficult. If the child himself makes it, under your strict guidance, it can be a good souvenir for grandparents. Such a craft will look very impressive against the background of the abundant foliage of a tree.
butterflies
Simple in execution and very interesting model of crafts.
Option 1
Let's prepare the materials:
- plastic containers (a few pieces will be enough);
- paper, not smaller than A4;
- stationery scissors;
- silver and brown nail polish;
- sequins;
- gel red pen;
- rhinestones;
- butterfly in a stencil.
Let's start making the insect:
First, let's prepare the bottles for work: wash, preferably with soap, release it from the label, dry it.
On a blank sheet of paper, scan or transfer the figure of a butterfly through carbon paper. For this we need a stencil. You will find it at the end of this subsection.

With a gel pen, you need to circle the contours of the insect on the plastic surface and cut it out.
We got a figure with wings curved down.
Turn it over, we need them to look up.

We take the gel pen again and draw all the lines, as shown on the stencil.
Paint over the middle (trunk) and antennae with silver nail polish. Let's draw the contours of the wings in the same tone.

Now with varnish you need to draw all the rulers, including the smallest ones, which were previously drawn with a gel pen.
Before the edges we put small dots (blotches).
Against the background of the silver drawing of the wings, we also put dots, only in brown.
We decorate the body of the butterfly with rhinestones. To do this, with any nail polish, put droplets and plant a pebble on top.

The butterfly is ready, for everything about everything, it took us a little time and material, which, for sure, will be found at home on the farm and with mom.
Similarly to the previous butterfly, we make another one, only this time it is plain and without pebbles.
We got two plastic butterflies, painted in the same tone.

If you stick a magnet to them, they will serve as a good decoration on the refrigerator or any other metal surface.
Option 2
Let's look at another implementation. We will paint it not with nail polish, but with stained glass paints. In the first version, we drew a butterfly on plastic, cut it out, and only then proceeded to coloring. Here the technology is different. We will draw an insect on the bottle, and we will paint it on it.
Let's prepare everything that is useful in the work:
- stencil drawing paper:
- plastic containers;
- stained glass paints;
- wire or thick fishing line;
- scissors;
- beads (several pieces of small size);
- awl.
Step-by-step instructions for execution:
We transfer the butterfly from the stencil to the paper.
Redraw the insect on plastic. You can do it like this. We cut the bottle, adjust the drawing from the inside so that we can clearly see it from above. With a gel pen we transfer the contours to the plastic.
When we finish drawing, we can start coloring. Recall that we paint without cutting out the insect, the paint falls on the bottle, along the contours. After painting, leave the workpiece to dry. After it dries well, cut it out. Give the desired shape with your fingers.
We form the body. To do this, take the wire or fishing line that we have prepared, string a few beads on it. You can take the same color, or you can make it multi-colored, it's as your heart desires.

A butterfly, or not one, if you have made several of them, are ready. They can decorate indoor flowerpots, hook onto curtains by attaching a pin from below, it is better to glue.
If the insect is made by a child's hand, then it will be a pleasant surprise and a gift for March 8 for mom, teacher or grandmother.
Stencils for making butterflies


hedgehogs
Waste material has a lot of opportunities and ways to extend its life. Moreover, in every family there is at least something. Here you don’t need to buy or invent anything special, much less spend money on them. Let's try to make a hedgehog from the same waste material as used plastic containers.
For work we will need:
- plastic bottle;
- pine cones, about a dozen, as long as they are the same size;
- two white caps, from the same bottles;
- glue (you can use "Moment" or, if there is mounting foam);
- colored plasticine.
Hedgehog creation technique:
First, we bring the container into the proper form: wash it, clean it from the label, wipe it and dry it.
On the prepared container, glue the cone directly on top with glue or foam (you can also use a glue gun if there is such an item on the farm). We start from the center, this will be the back of the hedgehog. We glue each cone as a separate element, after making sure that the previous one is firmly held.
If at least one of them falls, and the neighboring ones hold on tightly, then it will be difficult to “put” it in place. Take this into account and don't rush.
When all the cones - the needles of our hedgehog, are planted in their places, we will begin to form the muzzle. To do this, glue the bottle cap with black plasticine.
For the eyes, you will need white covers prepared by us. On them, in the center, we glue circles from the same black plasticine - these will be the pupils of the hedgehog.
Glue the eyes to the muzzle of the animal.
Now let's embellish our craft a little. What is a real hedgehog without stocks. We will make mushrooms, leaves, fruits with berries from plasticine. Then carefully lay it on his back.
You can create a baby for the company of an adult hedgehog by molding him with their plasticine. And since its dimensions will not make it possible to experiment with pine cones, the needles on the body can be made from sunflower seeds.
Helicopter
An interesting craft that you can do with your son for kindergarten. In this way, you will teach him to use various waste materials as a material for creating toys and other necessary things.

Prepare for work:
- a small plastic bottle, you can use baby yogurt;
- one tailor's pin;
- 3 tubes for juice;
- scissors;
- one ping pong ball
- stapler.

Step by step work:
First, make a hole in the lid so that the tube can freely enter there.

Cut the bottle so that the upper (with a thickening) part remains intact.

Take the remaining 2 tubes, cut them to the length of the intended propeller blades.

Cross them and pin them in the middle with a pin. Insert the tail of the helicopter into the cork of the bottle. Make skids from the two remaining parts of the tubes, connect with a strip cut from the unnecessary part of the bottle with a stapler.

Attach the main part of the helicopter with skids with a stapler too. Insert a ping pong ball into the hole.

The helicopter is ready. A minimum of time was spent on it, and the child will have a lot of pleasure from a toy created by his own hands.
Matryoshka
Matryoshka is probably the only toy that more than one generation has grown up with. In addition, it is considered a symbol of Russia. Many foreign tourists, coming to our state, buy them as souvenirs. Is it possible to create such a complex figure with your own hands, and even from waste plastic? Yes, you can, let it not be as functional as modern ones in toy stores, but it will be personal and, for sure, the most beloved.

In creating such crafts, not only plastic food containers are suitable, we will consider this a little later. The toys that you see in the photo below are made only from the tops of the flasks. So they will be more stable. So that the edges are not too sharp, they can be processed with electrical tape.

In this photo, the top part is inserted into the bottom, the middle one is generally removed. This nesting doll has a more respectable appearance, looks more natural and believable. Painted with acrylic paints. Children will not succeed in doing the same, but there are many stickers and patterns of a similar image on the Internet. As a last resort, they have a lot of options to learn and draw nesting dolls on such a layout.

The following photo and the model itself can be attributed to multifunctional. Here is a nesting doll in its own design and a pencil case for storing pencils and pens. As you can see, it is not made from a food bottle, and their containers are from shampoo or cream.

Approximate drawings and schemes for creating nesting dolls from plastic containers in kindergartens and at home.


Bottle cut diagram
An important advantage of plastic bottles is their availability. As a rule, this ornamental material after use goes into the category of household waste. But the imagination and ingenuity of the masters allows you to use containers to create:
- greenhouses;
- summer shower and toilet;
- gazebos;
- children's play houses;
- utility buildings, etc.

The availability of the material, the correct fastening of the bottles to each other, make such structures reliable. For construction, you will need a lot of empty containers. Therefore, the only drawback is that the bottles are produced in different sizes and colors, it will take time to assemble the right amount of the same containers.

According to its physical properties, plastic is a soft material, it is easy to process, cut, without resorting to the use of special tools.

In addition, if a large amount of packaging is required, the master participates in solving the environmental problem. After all, plastic must be disposed of, picnic glades, roadsides, parks and squares are polluted with bottles.

Types of crafts and their manufacture
Using this material, you can make many crafts. All of them are divided into categories, depending on the purpose. In addition to building walls, bottles are used to make furniture, plant pots, animal figurines, country fences and much more. In general, the number is not limited, as long as there is enough imagination and perseverance.

Manufacture of furniture and interior decoration elements
For the manufacture of furniture, you will need a lot of the same capacity. Such furniture is not inferior in terms of convenience to ordinary furniture. All that is required from the master is the presence of adhesive tape and scissors.

The seat for the chair is made of bottles connected in layers with adhesive tape. The back and sides of the chair are made in the same way.

From interconnected several layers of bottles you get an excellent pouf.

To make the furniture soft and comfortable, some of the air is released from several containers.

Another option is a table. Four bottles will serve as legs, and the tabletop can be made of plywood or fiberboard, which is covered with a tablecloth.

The interior of the house can be supplemented by making a plastic vase and flowers. To do this, you need to cut out the correct shape of the petals, the stem of the flower can serve as a wire pasted over with paper. To give the petals the desired shape, you can heat them and wrap the corners with tweezers. The resulting bouquet is placed in a plastic vase. If you equip a bouquet with diode bulbs, you will get an excellent lamp for a child's room.

Fastening is carried out using glue, a stapler or bends.

Crafts for household needs
Very often, pots for flowers and seedlings are made from large plastic containers. In this case, there is no limit to the imagination. You can make a hanging pot or put it on the windowsill. The edges of the cropped container are cut into small strips and subsequently curled.

Use bottles and as a container for seedlings. This allows you to grow greens in the cold months of the year on balconies or greenhouses.

From plastic containers you can make a bird feeder. To do this, cut a hole above the bottom of the bottle so that a bird can get in and peck at food.

Also, a plastic container serves as a trap for small rodents. After filling the container with poisoned grains, it is placed in the corner of outbuildings and at the roots of trees. And filling the bottle with sweet water, the container will become a trap for wasps.

A country washbasin can be made in a very simple way. To do this, you need to completely or partially cut off the bottom of the container and hang it upside down in a convenient place. The bottle cap will serve as a kind of faucet.

To make a cosmetic bag, you need to connect the two bottoms of the bottles together with a zipper. This craft will be an excellent storage for women's accessories.

In addition, a lot of things can be made in the same way: money boxes for money, a case for glasses, clasps, beads, etc.

Products from plastic bottles as an element of decor
Crafts for New Year's decoration of the house are very popular. From the material you can make a lot of unsurpassed things: from garlands to Christmas balls and figurines.

By cutting a strip of plastic container into several identical round strips, you can get a transparent ball. Fastening and decoration of the ball is carried out:
- using glue or a stapler;
- then the ball can be pasted over with rain or ribbons;
- decorate with beads, colored stones.

From curly bottles you can make a snowman, Santa Claus. The container is pasted over with paper or cloth, with the help of varnish or paints draw eyes and a mouth.

Curtains and curtains made of plastic bottles are a unique type of crafts made from this material. Such products will decorate the house, terraces and suburban areas.

There are several options:
- Rolling curtains. Taking several bottoms of small bottles, they are tied using a fishing line.
- Cover curtain. Caps of one or more colors are strung on a fishing line of the desired length. Several of these tapes are attached to each other at the top. It makes a great curtain.
- New Year's garland. Plastic covers can be alternated with electric garland bulbs. The craft will become an unsurpassed decoration of the holiday.

Equipping summer cottages, yards and playgrounds with crafts
Plastic flower beds, of course, are inferior to living plants. However, they compensate for their lack in early spring and late autumn.

The ingenuity of the master allows you to recreate lilies of the valley, tulips, roses, daisies. For bouquets of such flowers, you will also need appropriate pots filled with sand or earth. You can often see that an artificial flower flaunts on a bed of living plants. This solution is practical, decorates the site.

In addition to flowers, the interior of the summer cottage is perfectly complemented by palm trees, artificial trees, figurines of animals.

The improvement of playgrounds is of great importance. And here the flight of fancy has no limits. Children are very fond of various kinds of fairy-tale characters, animals, as well as cars, motorcycles.

To make a bird, you need:
- Decorate the head, make a beak and eyes;
- Make the body, neck;
- Attach feathers;
- Make a tail and wings;
- Make paws.

Such an artificial bird can be located on a tree, among the greenery on the ground.
All this will make the child's pastime more cheerful.

- Plastic bottles are a very common craft material. To collect the required number of containers, it is advisable to seek help from neighbors. Together with children, bottles can be collected in the forest zone, in glades, in squares, thereby providing a great benefit to the environment.
- Many bottles can be found in bins and bins designed for plastic containers.
- Before proceeding with the process of making crafts, it is necessary to thoroughly rinse the container, remove the label and remove any remaining glue.
- Please note that plastic is not a heat-resistant material. Heating is advisable in the manufacture of flower petals, curls.
- If a vertical fence is being made, then it is necessary to fill the container with sand for stability.
- For greater aesthetics, craft elements can be painted. They use both ordinary paint and spray paint, various varnishes and coatings.

Using plastic bottles to make crafts is a great solution. This material is publicly available, easy to process, allows you to make unsurpassed crafts that will delight the eye of both a child and an adult. Skill, imagination and patience are the main factors that provide such a variety of forms and purposes of products from plastic containers.

