DIY paper globe. How to make a globe with your own hands out of paper Scan for the globe political map
Master Class. Globe "Planet of Knowledge"
Making a globe with your own hands using the "Gossamer" technique. Master Class
The master class is designed for children of secondary school age, as well as their parents and teachers.
Every year on the first Saturday in October, we celebrate such a wonderful holiday as Teacher's Day. And every year the same question arises: "What gift to present to your beloved teacher?" Every child wants to please his teacher with something special. Children love to create gifts for their teachers with their own hands. And it is right! Someone will write a verse, someone will draw a still life, and someone will make a postcard with tender wishes. And for those who have not been able to decide which gift is better to make, we present our master - class on making a globe with your own hands, using the "Web" technique. First, let's remember what a globe is?
The ball on the stand is a miracle
Colorful and beautiful.
You can't count all the colors,
What is on the ball.
There are mountains and seas there,
The ball is magic, they say
Oceans and forests
These are the miracles!
And there are many other miracles
I've seen the ball.
For example, if you want,
You can turn the ball!
On a magic ball
We all have our own home,
Each has a route.
The ball is called GLOBE.
So that you can imagine
The globe is a copy of the earth!
Well, now I propose to proceed directly to the manufacture of our miracle - a gift.
For this we will need : crepe paper (blue, green), velvet colored paper, threads (blue, blue, green), sour cream cup, ball, Crystal glue, PVA glue, skewers 6 pcs., alabaster, cotton pad 2 pcs. , button 2 pcs., synthetic winterizer.

To make the "body" of our globe, we need PVA glue, an inflated ball (medium size), a needle and threads of three colors. We thread a thread into the needle (first blue, then blue and green), pierce a bottle of glue, and after stretching the threads through it, we begin to wrap our ball (previously greased with petroleum jelly or any other cream).

Then you need to let our "ball" dry thoroughly.
While it dries, we will start making a mount for our globe. To do this, we will take a wire and form it into a frame of the desired shape and size. And then we wrap it tightly with woolen thread.

Our base is ready, which means it's time to make an "axis" around which everything will revolve. To do this, we need 6 skewers glued together with Crystal glue, and wrapped in woolen thread to match our fastening.

After complete drying, you can start making the "body" of our globe. The first thing we have to do is to remove the ball we don't need, for this we pierce it and carefully remove it. Next, we fill the "ball" with padding polyester, as tightly as possible. We glue the “continents” cut out of velvet colored paper with the help of “Crystal” glue.

We glue the cut-out cotton pads in place of the supposed "poles". We also use Kristall glue.

So, all the parts are almost ready, you can start assembling. We put the “body” of the globe on the “axis”, fix it at the base and fix the previously prepared buttons at both ends.

Now let's get down to making the base, in which we will subsequently fix our globe.
To do this, wrap a sour cream cup with crepe - paper and decorate it with woolen thread.


Well, our wonderful globe is ready!
You can proudly present it to your beloved teacher !!!
It is most convenient to visually study continents and water spaces with a model of the globe. However, not everyone has the opportunity to purchase a ready-made globe. Then you can feel like a creator and make a miniature planet yourself. Moreover, it can be made in several ways. Consider how to make a globe with your own hands out of paper.
Preparatory stage
Cover the table on which you are going to tinker with newspapers, unnecessary papers or special oilcloth. Prepare all the necessary materials so that you do not get distracted in the process by looking for them.

You will need:
- pots;
- glass containers;
- spoon;
- water - five glasses;
- flour - one cup;
- newspapers or consumer paper;
- balloon;
- primer;
- brushes;
- paints (acrylic or gouache, diluted with PVA glue);
- scissors;
- hot glue;
- toilet paper roll;
- plastic plate (cake stand).
A globe needs a base. Therefore, you need to figure out how to make a paper ball with your own hands. Ideally, you need a round balloon. Choose the diameter with which you want to make the globe. Inflate the balloon and tie tightly. Place it on top of a glass or any other convenient container that can serve as a stand. If you want to make the most realistic model of the planet, then try to achieve a slightly flattened shape. If you only find a standard oval balloon, just inflate it lightly.
Cook the paste
Before making a globe with your own hands out of paper, you need to prepare a binding solution - a paste. Pour four glasses of water into a saucepan and put on fire to boil. Meanwhile, in another container, knead the flour with the rest of the liquid. As soon as the water boils, gradually add the resulting mixture into it, stirring constantly.

Reduce heat to low and cook for a couple of minutes. Do not stop stirring, otherwise it will burn. The finished paste can be put in a cool place so that it cools down faster.
How to make a paper ball with your own hands
Tear the newspaper with your hands into small strips or squares. Lubricate the balloon with oil or petroleum jelly. Place a pot of binder in front of you. Dip the newspaper pieces into the paste and apply to the ball. So make some layers. Do not forget to leave a small hole through which you will later take out the ball. Cover the remaining paste with a tight lid or plastic bag. Leave the workpiece to dry for a day.
Warm up the adhesive mixture and repeat the whole process. That is, wrap the ball with pieces of paper and let dry. In principle, you can stop at this stage. But the more layers of paper there are, the stronger the ball will be.

We are already approaching how to make a globe with our own hands. We did not make a completely closed blank out of paper, but with a small hole. Pierce a balloon through it or untie the tip and deflate. Do not let go of the tail, keep it with your fingers. Remove the balloon. The result is a hollow papier-mâché blank in the shape of a ball.
We paint and create continents
Cover the future globe with a primer and let it dry. Now paint the ball blue. This is how we simulate the oceans and seas. Freehand or using stencils, draw the continents with a pencil. Paint them in green, brown, yellow and white based on a real mockup. Optionally sign the names of continents, bodies of water, islands, and so on. Now it remains to make a stand to make a desktop globe. But first, let's look at how else you can make a map of the world.
Other options for creating continents
We paint the globe blue. We cut out the finished continents from paper and glue it to the ball. The map can be left white so that during the learning process, the child himself painted the continents and bodies of water in the desired colors. Or you can completely cover the globe with blue paper, and then apply the continents.

The easiest way is to transfer a ready-made world map. Some craftsmen process the image in a graphics editor: enlarge, stretch, and then print and paste. And you can do even easier - take as a basis a ready-made model of a globe made of paper. For example, you can use the image above and resize it to the correct size.
Globe stand
Take a toilet paper sleeve, cut one side and fold it back. Apply hot glue to these and attach to the middle of the plastic plate. You can use the bottom of a round cake box instead. Expand the hole in the globe if necessary. Insert the other side of the sleeve, previously greased with glue, into it. The desktop globe is ready. If the papier-mâché blank is quite weighty, then weight the stand with plaster of paris or use a container with sufficient weight instead of a plate.
How else to make the base for the globe
- Simply crumple up the newspapers and wrap the paper in several layers until you get something that looks like a ball. The method is simple and quick, but not neat.
- Buy a pre-made foam blank.
- Use Christmas balls if you want to make a small globe.

Take as a basis a volleyball, soccer, gymnastic or other ball of a suitable diameter. You can immediately draw or stick continents on them. Or you can use them as a form for papier-mâché. Only the piece of paper will have to be cut to remove the ball. But you can attach loops to the halves and turn the model of the planet into a box.
Now you know how to make a paper globe with your own hands. Try to make it with your children, they will definitely enjoy this fun process.
The word globe comes from the Latin globus, which means "ball". For modern people, of course, it is no secret that the earth has a spherical shape. But it was not always so. The history of the origin of the model of our planet and how to make a globe out of plasticine with your own hands will be described in this article.
Globe history
Back in the III century BC, ancient Greek scientists established that the earth has a spherical shape. The first globe is mentioned in history around 150 BC. Its creator was Cratet Mullsky. His model was depicted as a single continent, lined with rivers. The oldest surviving globe is considered to be the globe of the German cartographer Martin Beheim. He made his model by stretching calfskin over metal ribs.
Of course, the New World had not yet been discovered in 1492, so it was not on the Benheim world map. They were based on the maps of Ptolemy. Taking this model as a basis, in the future, cartographers made changes associated with new geographical discoveries. After that, the globes spread throughout Europe. They were given to dignitaries and even monarchs. Actually, in our country, the globe appeared as a gift to Alexei Mikhailovich Romanov from the Dutch ambassadors. Later this globe passed to Peter the Great. Today the globe is considered a symbol of enlightenment.

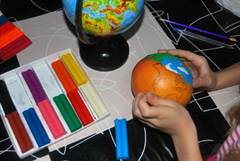
Citrus variant
Try to make a model of the globe out of plasticine with your child. Why plasticine? This material is ideal for making children's crafts. It is very flexible, it is convenient and safe for them to work. Sculpting helps to train fine motor skills of the hands, which contributes to the formation of speech, because the speech center and the center responsible for coordinating the fingers are located in the brain next door. Thanks to sculpting, attention and memory are trained, and making crafts close to real models helps to better understand the essence of things. And of course, imagination develops and the child's creative potential is realized.
In creating a globe with your own hands, the master class provided below with a photo will help you.
So, to make a three-dimensional model of the globe, you will need:
- Grapefruit or large orange;
- Ball pen;
- Plasticine of various colors;
- Stack;
- A real globe.
Prepare the base by thoroughly washing and drying the fruit. Using a ballpoint pen, trace the contours of the continents to the orange. This can be done by attaching tracing paper to a real globe and redrawing the outline of the land on it. Then cut out the pattern and circle it with a pen on the orange. Or you can draw continents from the globe by eye.
Most of the globe is occupied by oceans. It is with them that you need to start making the model. Next, mark the continents in green.
Do not forget that Antarctica and Greenland are covered with snow, they will be white.


You can now apply hills. Looking at the actual card, apply yellow plasticine where necessary.


The next color to be applied is orange. Remember to check the map.

Mark the highest places on the globe in brown.

Add deep ocean spots with dark blue plasticine.

See how bright and beautiful the globe is.

On a stand
The next master class is perfect for children.
To make a globe on a stand, you only need plasticine and a real globe. It is necessary to correctly position the continents and mountains in the vast expanses of the oceans of our planet.
Make a large ball out of blue plasticine.

Draw the poles using white plasticine.

Then, after carefully looking at the map of the world, make cakes from green plasticine and, using a stack, give them the shape of the continents of the Eastern Hemisphere - Eurasia, Africa and Australia. Don't forget to add Madagascar Island.

Place them in the right places of the layout, focusing on a real globe.

Moving on to the Western Hemisphere. North and South America are located there. Form them out of plasticine and place them on the model.


Now we need to add deserts and mountains to the globe. Make them with orange and brown plasticine.

To make a footboard, make a ball and flatten it. The second part can be made by forming a plasticine roller. Flatten it slightly and bend it into a crescent shape. Place the globe on a stand. The craft is ready.


On a stick
For another option for making a globe, see the next master class.


To make such a model of the Earth, you will need:
- Plastic or foam ball;
- Thick wooden skewer;
- A glass of sour cream;
- Plasticine;
- Colored paper;
- Buckwheat and semolina;
- A real globe.
At the base of the ball, you need to make a hole and connect it with a wooden skewer using plasticine. The lower part of the skewer must also be reinforced in a glass with the help of plasticine. The side walls of the cup can be pasted over with colored paper or painted with acrylic paint. Apply the blue plasticine to the ball in an even layer. Cover the wooden stick and the bottom of the glass with white plasticine. Using a real model of the Earth, make continents out of rolled green plasticine. To do this, you can use their patterns. Use yellow and brown plasticine to mark the hills and mountains. Sprinkle the locations of the glaciers with semolina, and inlay the places where the highest mountains are located with grains of buckwheat. The globe on a stick is ready!
Master Class. Designing from paper "Globe" for children of the preparatory group with OHP.
Nomokonova Svetlana Anatolyevna teacher of MBDOU "Kindergarten No. 197", BarnaulTarget: Develop children's interest in designing from strips of paper. To teach to convey in the work the characteristic features of the model of the globe - the globe. To consolidate the ability to properly use scissors, glue stick. To develop the fine motor skills of children, accuracy in work. Expand the vocabulary of children.
Material for the lesson: Globe, blanks from colored paper, scissors, glue, plasticine, cardboard, wooden skewer.
Progress:
They bought me a small globe as a giftA motley ball rotates on the leg.
The seas, the oceans are blue
And different countries are like colored spots:
Italy, France, Cuba, China,
Some (you will die with laughter!) U-swear-wai ...
I studied the names of countries for a long time,
And in the evening to dad and mom he said:
“I want to go around the whole world as soon as possible,
Buy a ticket for the morning train. "
I invite children to consider the globe, its features.
To make a globe you need:
- blanks from colored paper: blue, yellow and white;
- scissors;
- glue;
- plasticine;
- cardboard square 7x7;
- wooden skewer
Cut the blue strip of paper into 4 strips 1 centimeter wide and glue the snowflake,

then glue the ball is a globe,

we pierce our ball with a skewer and set it on the axis

cut out a circle from a square of cardboard - this is a stand for a globe
we install the globe on a stand with the help of plasticine; cut out continents and islands from white and orange paper

glue them onto the resulting globe.

Our Globe craft is complete.
Meticulous but interesting work needs to be done. It is important to find the most suitable card and print it out. In the vastness of the network, there are many ready-made maps of the globe. An old political map will work as well.
When making a globe out of paper with your own hands, make sure that the scale of the map and the base on which the map is glued match. There are several ways to create a base.
Globe layout from cardboard blanks
For such a globe, you need to patiently and correctly make several five-sided cardboard blanks. This is the most difficult and responsible part of the job. Their number will depend on the size of each of them. You need to complete the elements according to the scheme.
What to do next, how to make a globe with your own hands from these strange elements? Cut the map into the same elements and glue it with PVA glue on the cardboard parts of the future globe. You should have a designer, which will be assembled for spare parts, and which can later be disassembled if you notice that some part is pasted incorrectly. Do this slowly. All the elements must then be assembled in strict sequence so that the copy of the earth is correct.
The task is not as difficult as it seems. But, naturally, the child will need the help of an adult to create this interesting model.
How to make a globe with your own hands based on a finished ball
Another blank can be made from a regular old soccer ball. Just cover the ball with newspaper, apply several layers of paper with glue. Then you can choose one of the options:
1) Stick the marked and painted globe blank.
2) The child can independently paint the earth ball.
Suitable for making a globe and any other ball-shaped object that you find at home. It can be a toy rubber ball, or a small ball that was a Christmas tree toy. Anything, let the child show imagination and make a globe with his own hands. Surely he will be proud of it.
A copy of the earth made of paper
Also, making a globe with your own hands will work well from photographic paper. Such a model would be the most plausible. It will consist of 2 parts: from the hemispheres of the North and the South. They will then be glued together using a strip of hard cardboard paper that will be the equator.

Use good photographic paper to print the full layout of the globe. Desirable already with all continents, with the names of countries. Cut straight down the center. Then you need to carefully cut out the elements. Their number is 24, in accordance with the number of meridians. Cut each meridian very carefully so that the globe does not turn out to be crooked. We begin to glue the sheets at the top, that is, from the poles. Sheets are glued from the inside. When in the center, connect all 24 sheets, bend them and fasten them to the "equator". Be sure to number all the sheets on the inside of the paper with a pencil.
When you completely make the globe with your own hands, come up with a stand for it, and you will have a wonderful copy of the original globe. It is best to cut the stand out of wood. Make the semicircle supporting the axis of the ball thin and not heavy, the stand for it needs a thicker one to support the weight. Make sure that the semicircle is the right size.
Origami globe
Any experienced origami lover will be able to make a globe with his own hands. A parent can give a child a master class on making a paper copy of a globe using this technique.
There are several origami globe layouts. But most often they make a craft of a globe in the form of a square "ball". After all, this craft is only a funny decoration, a trinket. No scale is observed here. From origami, the globe is folded for fun.
A real round globe will turn out if you make a craft from paper modules. More than 1,000 modules need to be prepared for the globe. It's much more complicated, but modular origami looks very nice and your Earth will really be spherical.
Globe for the little ones
Try to make a globe for your little child with your own hands from plastic plates. It's very simple, it doesn't take long. Just glue over 2 plates with lines and glue them.

But if you do not find such a layout, then download the usual one, on which only the meridians are indicated. And then glue the cut out continents on top. On the continents, your child will draw whatever he wants. This is a "trial version" to show the kid what the planet looks like. You don't even need to glue the meridian layout, but just stick the blue paper depicting the oceans. You can also recommend your child to make continents out of plasticine and use superglue to attach them to the plates at the places you indicated.
All these copies of the Earth are made in order to interest the child, to spend time with him. But such a globe, made with your own hands, will not be educational material. These crafts are mock-ups with low accuracy. But at the same time, to make a whole globe of the earth with his own hand - who is not interested?

