Summer kitchens in the country are simple projects. How to build a summer kitchen (40 photos)
The arrangement of a summer kitchen in the country gives a lot of positive aspects. Firstly, outdoor cooking turns a routine process into a pleasant pastime. Secondly, for the period of mass harvesting of canned vegetables, compotes and jams, you can get rid of fumes and odors in a country house. And the third - if you equip the summer kitchen with your own hands, then in the future you will not have to look for a place for evening gatherings with relatives and weekends with friends.
Do-it-yourself brick summer kitchen with barbecue
The special aroma and appetizing appearance of dishes cooked on B-B-Q will be appreciated by both adults and children. For a summer residence, you can buy a factory structure that allows you to cook food on a grill, however, a summer kitchen built of bricks with a barbecue oven can serve not only as equipment for frying meat and fish, but will also become the central figure of a summer cottage recreation area.
We present to your attention the E. Gudkov barbecue oven, which you can build with your own hands. It combines all the advantages of a grill and a hob with a burner. Using the detailed instructions, in which the drawings and ordering are given, it will not be difficult to fold such an oven with your own hands.


The project of the stove for the summer kitchen. A photo
Construction of the foundation of the summer kitchen
The design proposed for repetition has an impressive weight, so the arrangement of a serious foundation for it is mandatory. To build a tiled foundation, you will need concrete reinforced with a metal mesh.
Materials and tools
Our construction is not so responsible to use high-quality and expensive building mixtures, so concrete grade M200 will suffice. For its preparation, you can use the following ratio of building materials:
- 1 hour - cement brand 400;
- 4 hours - crushed stone or coarse gravel (fraction 30 mm);
- 2 hours - coarse river sand.

Make sure that the content of impurities in sand does not exceed 10 parts of its volume, and in crushed stone - a value of 2%.
Using the proposed proportion will require the following consumption of building materials per 1 cubic meter. m. of concrete:
- Cement M400 - 325 kg;
- Sand - 1.3 t
- Crushed stone - 1.3 t
- Water - 205 l.
To strengthen the foundation, a mesh frame of class A3 reinforcement is required. Starting to mark the base, 20 cm are added to the dimensions of the future furnace on each side. With a structure size of 1.4 × 1 m, a foundation is laid out with a size of 1.6 × 1.2 m.

The project of the foundation of the summer kitchen. A photo
When starting to pour the base, prepare:
- narrow, round and square rammers;
- scraper, trowel, trowel;
- probe for removing air bubbles from the mixture;
- shovels for soil and mortar;
- trowel;
- board for fine leveling of the surface.

How to lay concrete correctly
In order to build a solid foundation, it is necessary to take into account soil features Location on. Water-saturated, swelling, peaty and other specific soils will require additional strengthening before arranging the base for the furnace.

To mark out foundation, it is enough to drive pegs into the ground, check the diagonals and pull the cord. At the same time, the dimensions of the pit for the tiled foundation must correspond to its size (in our case, 1.6 × 1.2 m). Since the building is designed for outdoor use, the ground under its base will freeze and thaw in winter. Therefore, in some cases, a sand cushion up to 1 m thick may be required.

It will be right when arranging a sand cushion to protect the bottom and walls of the pit geotextile, which will prevent erosion of the base by groundwater. Tampering is performed in several stages. To do this, sand is added every 10-15 cm, which, after compaction, is additionally spilled with water.
In order to waterproof and to avoid leakage of concrete into the sand, two layers are laid on the prepared site. roofing felt. Further along the contour of the pit, every 0.5 m, racks for formwork boards are driven in and fixed with slopes. Fix and moisten the formwork.
Before pouring concrete, install fittings, for which, at a height of 20-30 mm from the bottom, a grid is installed over the entire surface of the foundation. Then, with the help of vertical jumpers, a second reinforcing belt is installed at a distance of at least 20 mm from the upper plane of the foundation slab.
They try to pour concrete and compact it at a time. In this case, the solidity of the structure and a certain period of concrete hardening will be ensured.

A prerequisite for high-quality concreting is to maintain optimal humidity, so the foundation is covered tarpaulin. After 3 - 4 hours after pouring on the surface of the base of the furnace, they are covered with sawdust or sand. Concrete is moistened with water for 1 - 2 weeks until the foundation finally sets.
The formwork is removed only when the corners of the structure acquire sufficient strength. It is possible to start the construction of the furnace no earlier than two weeks after concrete work.
Construction of Gudkov's barbecue oven
For the construction of the furnace body you will need fireclay refractory or red clay brick in the amount of 465 pcs. Refractory material is preferred because it can withstand elevated temperatures with ease. If you decide to use ordinary ceramic bricks, then make sure that the material is fired with high quality. Cracks, voids, insufficient firing are unacceptable. Not suitable for barbecue ovens and sand-lime bricks.

In addition, you need to prepare the following oven parts:
- cooking stove with one burner 500 × 420 mm in size;
- grate 500 × 420 mm for barbecue;
- sheet metal 600 × 500 mm;
- soot removal door 140×140 mm;
- blower door 140 × 270 mm;
- loading door 270×250 mm;
- grate 300×200 mm;
- metal corner with a shelf length of 32 mm, a thickness of 4 mm - 4 pcs. 500 mm and 6 pcs. 600 mm each;
- steel wire OE2mm - 10 m;
- asbestos cord OE5 mm - 10 m.

Masonry mortar
Brick during the construction of the furnace is laid on a clay-sand mortar, using plastic grades of red clay and coarse sand sifted on a sieve. The ratio of materials is chosen, depending on the fat content of clay:
- add 1 hour of oily clay - 2.5 hours of sand;
- for 1 hour of medium clay - 1.5 hours of sand;
- for lean clay - the ratio is 1: 1.
You can determine the degree of fat content of clay by the content of sand in it:
- from 2 to 4% - oily;
- up to 15% - medium;
- from 30% - skinny.

To prepare the working mixture, the clay is soaked for 1 day, and then, gradually stirring, sand is added to it. To prepare the solution, you can also use special factory-made high-temperature mixtures, which can be found in the distribution network.
Furnace body
It is best to start work on the furnace with the construction of a temporary canopy under which it will be possible to work in any weather. To avoid mistakes during the laying process, the body of the building can be laid out dry.
Construction begins with moistening the brick. Red ceramic bricks are dipped into water for one or two minutes, and fireclay bricks are rinsed from dust.
Brick laying is carried out with dressing of seams in half a brick, observing the thickness of the seams from 3 to 5 mm (the smaller value is for refractory material). It is important that chips and cracks on the surface do not face the inside of the working chamber or chimney.
As you lay, you will need to install oven appliances. To ensure the reliability of the structure, a wire is attached to the metal parts of the furnace, which is embedded in the masonry. Since metal and ceramics expand differently when heated, a thermal gap of 3–5 mm is necessarily made, which is subsequently eliminated with an asbestos cord.
Orders


After the level of the combustion chamber is completely removed, a grill-brazier or metal grill is installed on the corners. hotplate.


Metal corners as a support are also used in the arrangement of the arch. The smoke channel can be 270×140 mm, 270×270 mm and 400×140 mm. To reduce the formation of soot on the inner walls of the chimney, they are plastered.
To finish the barbecue oven, plastering, pasting with tiles or tiles, as well as simple jointing are used.

After the summer kitchen with a barbecue is built, do not rush to test the stove to its full potential. To avoid cracks, the stove should be warmed up with small portions of firewood during the week.
Summer kitchen in the country with their own hands. Step-by-step instruction
The proposed design of the summer kitchen combines a hob, a small Russian stove, as well as work surfaces that provide additional convenience in the cooking process. Installed under a canopy made of boards or polycarbonate, an open kitchen will take on all the responsibilities for preparing all kinds of dishes and sunsets in the summer.

Summer kitchen project A photo
The main materials that will be needed for construction:
- cinder blocks;
- red or fireclay brick;
- finishing materials;
- formwork.

Having chosen a place for future construction, they begin to draw up drawings and calculate the amount of materials. The step-by-step instructions below will help systematize all the stages of building a summer kitchen.

Foundation for the summer kitchen. A photo
Foundation construction
Having marked a hole for the foundation with the help of pegs and a cord, they begin earthmoving. Having reached a depth of the pit of 35 cm, its walls are reinforced with formwork boards, and the bottom is covered with a 5-cm layer of gravel and compacted.

Equip two-layer armored belt from a metal grid and vertical steel bars. Make sure that the reinforcement does not touch the boards, and after pouring it is protected by a layer of concrete with a thickness of at least 20 mm.

After pouring, the concrete is compactedvibrating screed, cover with a film and leave for 2 weeks until complete setting.

Summer kitchen with your own hands. Step-by-step instruction
Hull masonry
Laying starts from the corner, constantly controlling the geometry of the rows and corners with the help of a level and a plumb line.

To shift the rows by half a brick, the laying of the second row begins in the dressing.

After passing two rows, they equip the blower by mounting its door into the front wall. In the overlap of the working space above the blower, a grate is installed, and one row higher - the door of the combustion chamber. The combustion zone itself is made low, one or two rows of bricks above the loading hole, otherwise the flame will not reach the stove with burners.

The furnace body is built to a height convenient for further operation.

Summer kitchen in the country with their own hands. A photo
After laying, the seams are filled with mortar and smoothed with a grater.
Table top installation

The arrangement of the working surface begins with the laying of supporting rods from steel reinforcement. Formwork is mounted on them, which is poured with concrete.

After the concrete has set, the countertop is finished with flagstone, carefully leveling the individual fragments and the gaps between them. At the final stage, the walls of the summer kitchen are plastered or lined with heat-resistant finishing materials.
Choosing a stove for a summer kitchen
Of course, in the summer kitchen you can install an electric stove or a gas stove powered by a liquefied gas cylinder, however, truly delicious meals are obtained in a real wood-burning oven. In the carefully heated space of a miniature Russian stove, you can cook hot dishes in cauldrons or bake amazingly fragrant pies and pizza.
Many articles have been written about how to put the stove in the summer kitchen. In our design, the simplest scheme of the Russian stove is used. For its construction, a semicircular vault is made with a side channel, which leads into a common chimney.

Do-it-yourself stove for the summer kitchen. A photo


How to make an oven for the summer kitchen. A photo


The outer lining of the wood-burning hearth can be made with sandstone, carefully fitting the fragments of the decoration to each other. After that, the seams are filled with mortar and smoothed with a spatula and grater.


Summer kitchen roof
After the stove and the working area are equipped, they begin to equip the roof of the summer kitchen. To withstand the style in which the proposed structure with a wood-burning stove is built, it is best to make a gable roof.

Do-it-yourself summer kitchen roof A photo


To do this, a frame made of wooden beams with a size of at least 100 × 100 mm is installed around the working space, after which a ceiling is made of wooden boards, metal tiles or other materials.
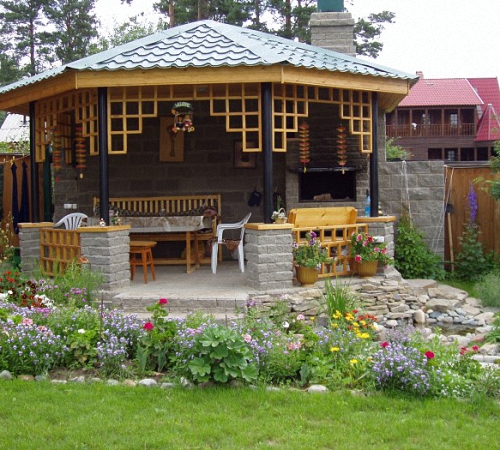
Summer kitchen design and finishing options
When equipping a summer kitchen, you want to get not only the functionality and convenience of an open working area, but also a beautiful structure, designed in the style of other buildings and structures of the summer cottage. The kitchen, located near the house, can be placed on a large veranda adjacent to one of the entrances. A well-equipped barbecue area will eliminate the need to install a portable barbecue. Ornamental plants and shrubs are planted around the summer kitchen. If there is a need to shade structures, then all kinds of arches and supports are used. A pergola installed near the summer kitchen will provide the necessary shade on hot days and create a secluded corner for leisurely conversations and gatherings with friends.

Summer kitchen. A photo
In the process of creating an optimal working area, the main thing is not to overdo it with decorative elements. It is important to understand that, after all, the main purpose of the summer kitchen is cooking, therefore, if you want to cook on it every day, then one brazier will not work. You will also have to install an electric, gas or wood-burning stove. It will be difficult without other benefits of civilization, so the working area is supplemented with a sink, all kinds of cabinets and shelves.
What elements should a summer kitchen consist of?
If you properly equip the summer kitchen, then being in it in the summer will be a real pleasure. It is not hot to cook there, it is convenient to preserve, the floor in the house does not get dirty with dirty shoes, and it is completely pleasant to dine outdoors.
But, if you choose the wrong location, then instead of convenience, you will get an extra headache and unnecessary fuss: carrying dishes, cans over a long distance, running back and forth.

Therefore, let's immediately decide what must certainly be present in the summer kitchen:
- Cooking oven
- Brazier
- Dishwasher
- Working table for cooking
- Cupboards for dishes and jars
- Shelves or hanging drawers for dishes
- Dining table and chairs
These are all the main elements, without which it will not be very comfortable to use the room, and they should be in any case. And there are also auxiliary ones, without which it is quite possible to do, but if they are present, then it will definitely not be worse, only better.
- Cellar adjoining the summer kitchen
- small woodcutter
- Sofa
- TV set
- Swing

As you can see, if you add these modules, then the summer kitchen will be multifunctional, cozy and you can spend almost all day outdoors.
Where should the summer kitchen be located?
But not only the choice of elements depends on success. The main thing is the location! It used to be customary to build a summer kitchen as a separate house without heating, away from the main building.
Now it does not seem convenient anymore, since it is difficult to bring communications and the building itself does not look very harmonious in the middle of the yard.

The best solution is the location of the summer kitchen - adjacent to the main house, and in such a way that you can go into it from there. Or from the main door, or from the side entrance. Also good options were discussed in the article "".
Also, choose the right wall to which the summer kitchen will adjoin. If you attach it to the one where the main windows of the room are located, then the house will become dark and damp, from the fact that sunlight does not fall. It is better that it be a blank wall with a side exit.

If you want to equip a cellar adjacent to the summer kitchen, then do not forget an important thing: you cannot dig a large hole near the foundation of the house, since in this case the earth layer may subside and the building will roll. Therefore, you need to dig it at least 3.5 meters further from the foundation.
Another important point: what type of room you will have. An open area or a full extension in the form of a veranda. Let's take a closer look at this, because hasty savings at the planning stage can then turn into many years of annoyance and regrets.
Summer open kitchens
They have their advantages, the main of which is budget. In order to organize such a zone, a lot of expenses are not needed, there is no need to fill the foundation, put windows, erect walls. The only thing you need:
- Concreting of the area under the kitchen
- The erection of supporting pillars under a canopy
- Roof decking
- Construction of the oven and barbecue
- Organization of the working area and washing

That is, at least twice the consumption is reduced. But besides the budget, there is another plus here: the space is open, which is a pleasure.
True, only in good weather. But for bad weather there is a main kitchen in the house! And does it make sense to equip another one? Let's clear this up as well.
Summer kitchens
Why did summer kitchens used to be made separately from the house, in the form of separate houses? Mainly because stove heating was used and during the conservation season, during cooking, the walls of the summer kitchen were very hot. And if the main house were so fired up, then it would be simply impossible to sleep in it. To lay out outdoor stoves, like "Finnish", then they did not guess, apparently.
Also, the summer kitchen was used as a guest house, in case guests arrived. They put a sofa, a wardrobe, and also made a separate utility block for storing boxes, glass jars, nets for drying fruits, herbs and other equipment for harvesting, which was quite a lot.

And besides this, they made animal feed, stirred and crushed grain, beat butter, etc. Therefore, the premises had to be closed, so that in case of bad weather the mass of provisions would not be damaged.
Now, few people are engaged in raising livestock and the original purpose of the closed kitchen has lost its rationality. Yes, and a guest house is not always needed, since for these purposes you can use any extra room in the house.
So, now there is no particular need to build a capital structure, but making a summer kitchen completely open is also not an option. Best of all - the combined type and below you will find out why.
Combined summer kitchens
You can combine in different ways. You can make an area with a stove, a desktop and a small utility block indoors, and leave the dining table under a canopy, or vice versa. Some people really enjoy cooking outdoors.
But the best option is to make the hozblok in the form of a closed room adjacent to the terrace, and leave the stove, work table and dining table just under a canopy, but with a slight amendment: fix sliding shutters under the roof, which can be closed in case of bad weather. Or, immediately make glazed frames, some of them to move apart, forming an open area.

But the hozblok should be with walls, since during long rains the vegetables that are stored there can become damp. If you have a cellar instead of a hozblok, then even better!
What is the best way to make a roof?
Of course, it would be nice if the roof of the summer kitchen was combined with the main floor of the house. Especially if the summer kitchen is adjacent to it.

But to do this does not always work out for only one reason: now metal roofs, such as metal tiles, are not uncommon. And if on the main house they are insulated from below, sheathed with wood, which guarantees some sound insulation, then in the summer kitchen there is no need for such things.

And if the canopy is made of metal, then you simply cannot be there in the rainy season. The knock will be so strong, peculiar and unpleasant that all the charm of eating in the open air will be nullified and you will have to urgently retreat to the house.
Therefore, the main thing: choose a roof that does not knock even without additional sound insulation: slate, tiles, shingles.
What floor should be in the summer kitchen?
Do not forget that the summer kitchen is designed to make it comfortable for you to use it in the summer. And in the summer, as a rule, all owners of private houses spend a lot of time in the garden, and then, with dirty feet, go to the summer kitchen.

Therefore, there can be no talk of any wooden flooring, it is simply impractical. The best option is tile for the street. It can be soiled three times, and then easily washed even with a hose (provided, of course, that your area is open and without large sides).
Stove in the summer kitchen
There are many options here. The simplest of them is the installation of a conventional gas furnace and cylinder. But still, it is better to spend a little more effort initially and lay out a real, wood-burning stove. It is much more economical during the conservation season, while building it is not as difficult as homemade. And she looks much more comfortable, whatever one may say.

You can make a very budgetary "Finnish", or you can make a whole complex, including a barbecue, a place for cooking, a built-in cauldron, a place for firewood. Everything here depends on your imagination and financial limit.
A brick chimney, which, when building a home stove, is more expensive than the cooking surface itself, can be replaced in the summer version with an inexpensive galvanized pipe.
Cellar in the summer kitchen
Believe me, this is a very, very convenient solution! If you still do not have a cellar, then it is difficult to think of a better place for it.
And most importantly, do not save on its area inside and ease of descent. Dig a small hole, then to go down the wooden stairs, standing upright - stupid. Then you will regret your hasty decision ten times over.

It is better to make the cellar large, wide and with a gentle slope. Let it be initially more expensive and more difficult, but then it will delight you all your life.
The optimal depth of the cellar is 3 meters down. You should not do less, otherwise it will always be damp and there will not be a stable temperature.
Width - about three by three meters. For the descent - about 1.5 meters, while the entrance should be from above, in the form of a separate entrance. That is, a hole is dug, and walls are formed at the place of descent, which gradually come to naught.
Be sure to consider the location of groundwater on the site. If they are close, then the cellar is not worth digging at all, since at a shallow depth it makes no special sense.
Sink in the summer kitchen
Without her - nowhere! Running to the house or to the well is inconvenient. Try to install a double sink at once, since one compartment is never enough in the open air.

Also, be sure to put a small water heater above it. And even better, put a 100-liter tank on the roof of the building for heating by the sun, or bring the sink to the summer shower tank.
Work table in the summer kitchen
Here it is necessary to make not only a countertop, but also cabinets with shelves. Without them, it will be difficult to accommodate comfortably. Moreover, if you do not do this, then in case of bad weather or hail, you will have to immediately bring all the dishes and equipment into the house, which will cause a lot of trouble.

Also, if there are no shelves and cabinets, you will have to take the necessary cooking equipment out of the house all the time, and if there are convenient storage places, they can be there all season.
Dining area in the summer kitchen
One thing can be said here: always count on the maximum number of people who can accommodate at your table, and not only on weekdays, but also on holidays.
Don't make this place too narrow. The minimum width should be 3 meters, and the length is already at your discretion, but approximately, about the same 3 meters.
Here are examples of the successful arrangement of tables in the summer kitchen:

Swing in the summer kitchen
A very unusual solution, while adding comfort. In America, swings are usually hung on the terrace, but we can easily place them in the summer kitchen, especially if it is open. See how wonderful it looks in the interior:

They can be placed in any convenient corner of the summer kitchen. The main thing is that they do not interfere with sitting at the table and cooking.
Summer kitchen design in a private house
The most important thing, namely functionality - we discussed. Now let's talk about beauty, which is equally important. The design of a summer kitchen in a private house can be so interesting and unusual that it will make all passers-by stop and look at your building.

Here are examples of interesting summer kitchen options that you can take as a basis for planning:


In conclusion, I would like to say that a summer kitchen in a private house is a necessary thing, and if you have a question whether it is needed at all, then we can answer: it is absolutely necessary!
Cooking in the summer is quite difficult, as the temperature in the kitchen is several degrees higher than in the room. Owners of a private house or cottage can easily solve this problem by arranging summer kitchens. Cooking and preserving outdoors is convenient and easy. We will talk about the features of the construction of a summer kitchen in the country house further.
Do-it-yourself summer kitchen in the country: functional features and types
The summer kitchen is, first of all, a place for cooking, and not only in summer, but also in spring and autumn. Such premises are especially relevant in small suburban areas. The summer kitchen is a platform with a stove, stove, cabinets and furniture installed on it. Fresh air improves the comfort of using the cooking surfaces.

A summer kitchen is not a mandatory building, but in cramped country conditions it is necessary. In relation to the materials for the construction of the building, we distinguish several varieties of summer kitchens:
1. Structures made of wood - glued beams, logs or boards. Among the advantages, we note: environmental safety, attractive appearance, ease of processing, affordable cost. However, wood, before installation, is necessarily treated with antiseptic compounds.
2. Simple metal frame structures. They are easy to assemble and dismantle, easy to transport from place to place.
3. Budget options for summer kitchens with a combination of various materials. For the construction of such a kitchen, everything that is at hand is used, it can be boards and metal and even plastic bottles.
4. Summer kitchens made of bricks - they have a chic appearance, excellent refractory characteristics. Among the advantages we note - high structural strength, good protective characteristics, long service life. On the other hand, the construction of a brick summer kitchen will take a lot of time, physical and material effort.
Depending on the design features, summer kitchens are divided into rooms:
- open type;
- closed type.
The first option has the form of a platform on which all the necessary appliances and furniture are located. Sometimes such structures are supplemented with a roof to protect against moisture during rain.
The closed summer kitchen has walls and resembles a full-fledged, but most often separate cooking room.

Summer kitchen in the country: choosing a place for construction
The area for the summer kitchen can have a wide variety of shapes in the form of an oval, circle, rectangle, square or polygon. Therefore, before drafting a summer kitchen, decide on its location.
Pay attention to these characteristics:
- remoteness from the entrance of the house, garden, other buildings;
- the presence of sunlight on the site, it is possible to build a kitchen in the garden, but try to choose a place where at least half of the kitchen is heated by sunlight;
- choose a site with a limited wind load, otherwise, with a strong wind, garbage will get into the food.
In addition, study the terrain, determine the level of groundwater, the presence of vegetation, distance from neighbors and other individual factors.
Choose a place convenient for supplying communication systems. After all, the kitchen should have electricity, water. It is not recommended to build a kitchen next to a toilet, household yard or compost pit.
Do-it-yourself summer kitchen in the country photo:

The following is the process of making a summer kitchen project. It indicates the size, shape of the building, the type of materials from which the building will be built, the foundation, the material for finishing the roof, etc. According to the project, the amount of materials for work is calculated and their purchase is made. In addition, make sure that the design of the kitchen fits into the overall style of the house and the exterior as a whole. Summer kitchen should be in harmony with the environment. We recommend building it from the same materials as the main house.
Although it is possible to build a slab foundation, over the entire surface of the building. This option requires large material investments, but it has better performance characteristics.
If there is soil with a high level of heaving on the site, we recommend stopping at the screw foundation. For its construction, it is enough to purchase special piles, and the workflow takes no more than one day.

Summer kitchen construction technology in the country
We offer a variant of the construction of a summer kitchen with a brick base and a wooden frame. Work should begin with the foundation, since the upper part of the kitchen will be wooden and the building does not have an impressive weight, a shallow strip foundation is enough.
Pre-prepare the site for work, remove all debris and vegetation, level the surface. Next, using pegs and a rope, mark the installation of support structures.
Build a pit, the depth of which is determined by the weight of the summer kitchen and the type of soil on the site. Most often, a tape shallow foundation is laid at a depth of about 20-40 cm.
After digging a trench, lay a pillow at the bottom of the pit, first from sand, and then from crushed stone. Do not forget about waterproofing in the form of roofing material. This is followed by the process of mounting the formwork and installing reinforcement, if necessary.
Then prepare a high quality concrete mortar and pour it into the trench previously equipped with formwork. Do not forget about compacting concrete with a special vibrator or improvised means. Thus, the quality of the solution improves and there will be no air pores inside the foundation. The drying time of the foundation is at least 14 days, only after their expiration, work continues on the summer kitchen. We recommend covering the foundation with a film to prevent moisture from entering during rain.

If time costs are limited, choose a pile version of the foundation. There are special bored piles, the installation of which is carried out quickly enough. Initially, calculations are performed to determine the length of the piles and their diameter, and then the structures are mounted in the ground. For these purposes, specialized equipment or tools are not required. Two people are enough. Such a foundation does not need to be defended, compared to concrete, and work on the construction of a summer kitchen continues immediately after its construction.
The following is the process of creating a site in the summer kitchen. It will be equipped with a stove, furniture and other kitchen utensils. The main requirements for the site are its evenness, strength and construction on a small hill.
Choose refractory materials for site construction - concrete, paving or ceramic tiles. After the foundation has completely dried, equip the pit with a depth of about twenty centimeters. Pour sand into the pit, tamping it well and wetting it with water. Try to achieve maximum pressing of the sand.
If you chose paving slabs to create an even base, then lay it directly on a bed of sand. Please note that the tile should rise at least 5 cm above the ground. From this, and push off, constructing a sand cushion. It is possible to install a decorative stone on the site, in this case, we recommend using a cement mortar.
Summer kitchen in the country photo:
The next stage is the construction of a high-quality blind area. This element will protect the foundation and summer ground from moisture. Arrange a drainage system near the blind area. In addition, the blind area increases the decorativeness of the structure, framing it.
The next step is the laying of the walls. Beacons are pre-installed to obtain an even structure. Prepare a cement mortar, preferably using a concrete mixer. This device increases the quality of the resulting solution and reduces the time spent on its preparation. Perform laying in half a brick, with mandatory reinforcement. This is followed by the process of stitching and wiping the material. Wait a few days for the cement mortar to set.
The following is the process of mounting the frame part, made of wood. Please note that before starting work, the wood is treated with special antiseptic and fireproof compounds. The upper part of the summer kitchen consists of vertical pillars, along the perimeter of which a bar or beams is fixed. Make high-quality dressing of structures, it will improve the strength of the walls. Monitor the evenness of the installation of the bars, using the building level.
Build a summer kitchen in the country house photo:

After that, proceed to the construction of the roof in the summer kitchen. There are many options for constructing a roof - corrugated board, tiles, slate, soft tiles, etc. When choosing one or another option, start from the total weight of the building and the load on the foundation. In addition, we recommend choosing the same roofing material as on the main building.
Before starting installation work, install a crate or solid flooring, provide for a slope along which moisture will drain from the roof. For maximum protection of the summer kitchen from moisture, install a gutter system.
After finishing the roof, take care of the interior design of the room, namely:
- grout the seams between the tiles;
- check the quality of the brickwork;
- make the ceiling in the form of filing the roof;
- paint or varnish the wooden sections of the building.

For cooking, build an oven or install a stove. It is possible to supplement the summer kitchen with a barbecue or barbecue. Set a table, chairs, soft chairs for relaxation. Shelves with racks for dishes and kitchen utensils will help to complement the interior. Run electricity, install a sink for washing dishes.
Textile elements, beautiful towels, napkins, tablecloths, fresh flowers in flowerpots, various decorative elements will help to complement the design of the summer kitchen in the country.
Do-it-yourself wooden summer kitchens for summer cottages
We offer the option of making a summer kitchen from wood. In the process of work, prepare the tools in the form of:
- high-strength woodworking machine;
- chain saw for working with timber;
- electric jigsaw with high power;
- screwdriver;
- electric drills with a set of nozzles;
- belt type grinder;
- planer, circular saw;
- hacksaws;
- brushes.

The dimensions of the proposed kitchen are 300 by 400 cm. The main part of the building is made of timber. Each of their elements is pre-processed, planed and planed. After processing all parts, soak them with used oil. This process prevents the wood from rotting and protects the material from moisture. Handle the end sections especially carefully, as these parts are subject to the highest operational load. Choose light-colored oils so as not to spoil the appearance of the wood.
Such a structure does not need an expensive foundation, an ordinary concrete block, 15 cm deep into the ground, is enough. Pour sand around the blocks and compact it well. To connect the ends of the timber, choose the easiest half-tree method. Fix the parts with nails. Additionally, strengthen the internal joints with metal corners and long self-tapping screws. This method significantly increases the durability and strength of the structure.
Next, lay the floor, for this, use a standard board, the thickness of which is at least 35 mm. For the manufacture of the frame part, also use a bar. We recommend stopping at the gable version of the roof, for the manufacture of which wood is also used. The next step is to install the crate. Pre-lay waterproofing material with a slight overlap on the roof. Set the exterior trim to suit your individual preferences. For wall cladding, also use wooden boards. Pre-treat the wood with an antiseptic in several layers.

A summer kitchen in a country house with a barbecue requires additional processing with fireproof compounds. Since wood is a highly flammable material.
A summer kitchen with a veranda in the country house is an excellent solution not only for outdoor cooking, but also for receiving guests.
In the fresh air, not only the appetite is stronger, but food is digested much better. In warm weather, you do not want to sit indoors at all. Preservation for the winter is also easier to do outside. In the article we will tell you how to build a summer kitchen in a summer house with your own hands, we will demonstrate diagrams, drawings, photo and video instructions.
Choose a type
All types of summer kitchens can be classified into two categories:
- open;
- closed.

Closed kitchens are like a small house-like structure that often doesn't have much insulation. The advantage of this solution will be protection from insects, the best protection from the weather, as well as from the wind. An open kitchen option on one or more sides can be protected with a fabric, wood or other wall. The advantage of such a solution will be greater unity with nature. Among the open types of buildings, there are options:
- With barbecue. In this case, you have the advantage of cooking your favorite dish on an open fire. Barbecue will be available in any weather. If you additionally mount the oven, then you can please your friends with pizza.
- With gazebo or pergola. Nice to sit among the greenery. This is exactly the solution in which the entire structure will eventually be shrouded in grapes, ivy or other climbing plants.
- Canopy adjoining the house. The easiest way to build. Requires the least investment. But there is a downside. When cooking, all fumes and smoke will go towards the house. This can lead to damage to walls or other finishing material.
Stages of preparation

Once you have chosen one of the possible options, it's time to create a small project.
- We choose a location. It is good when it is possible to place the kitchen in a cozy garden, where there is a pleasant atmosphere of tranquility. At this stage, it is necessary to take into account the proximity of the location of various communications. They will definitely be needed. Electrical appliances will require wiring. When cooking, you can’t do without water and after it you need to put it somewhere. Do not place the building close to driveways and roads. Then your meal will not be spoiled by unpleasant odors. If there is a toilet outside, then it is better to leave it as far away as possible.
- We stop at the material for construction. If a closed kitchen is planned, then you can approach it as a frame building, in which case you will need wood. A good option would be a building made of foam blocks or bricks. The open one will most likely be made of wood, or one or two of its walls will be made of the material that was listed earlier.
- Decide on the roof. Soft tiles will look great on an open building, but this is a rather expensive solution, although it cannot be ruled out, because the roof area will be small. A good option would be metal tile or corrugated board. Perhaps, while waiting for your turn, you have sheets of slate or ondulin - they will also work.
- The project should also take into account what equipment is planned to be purchased for the summer kitchen.

Foundation
The summer kitchen is usually conceived as a lightweight structure. This means that the foundation can immediately act as a floor, and, perhaps, pouring is not required at all.
- First you need to clear the selected area of all debris and vegetation.
- A small layer of top soil is removed.
- One of the corners of the future building is indicated with a wooden peg or a metal rod. Next, three more elements are installed. To correctly position them, it is necessary to measure the diagonals for identity. A fishing line or strong twine is stretched between them, which will serve as a guide.

If the building will consist of a canopy, then after these steps you can proceed as follows:
- The entire perimeter of the marked area is dug to a depth of 30 cm.
- The bottom is leveled and compacted.
- Sand is poured inside with a layer of 10-15 cm. It is also leveled and well rammed.
- The remaining space is filled with screenings and the final leveling is performed.
- Further, on our “pie”, which has been prepared, paving or other tiles, which are intended for the street, are laid. This can be done on a dry cement mortar, which, after spilling with water, will fix the entire base well.
- Pits are dug at four corners, their depth should be at least 50 cm. Formwork is installed inside. A crate is made from the reinforcement, which will be the basis of the reinforced concrete structure. It is placed inside and filled with a solution. With the help of a vibrator, the entire mixture is rammed. While the concrete has not yet hardened, two metal plates are inserted into the middle, to which we can fix wooden poles that will support the walls and roof.

This version of the base will be relevant in the case when the soil is sufficiently dense. In cases where groundwater can come very close to the surface or displacements of the upper layer are noticed, a more stable foundation must be provided. Also, if you plan to build a stove or barbecue on such a foundation, then you will need to lay separate concrete supports for them.
In order to make a foundation slab, we will need to follow the first three steps from the previous instructions. Next, we take on the following:
- We prepare 8 pieces of reinforcing bars. Four of them should be 10 cm shorter than one of the sides of the future building, 4 others 10 cm shorter than the other. If the building is square, then they will all be the same size.
- We lay four of them in the form of our future structure and fix them together. Further, every 40 cm we tie longitudinal and transverse jumpers. In the same way we prepare the second grid. We connect the two gratings with jumpers to such a height that the future plate rises above the surface by at least 5 cm.
- We lower the entire structure into the middle of the dug hole, install the formwork and fill it with concrete. We ram with a vibrator. We level with slats and let it stand for several weeks.
- In fresh concrete around the perimeter, in increments of a meter, metal plates can be placed to the width of the future beam for the walls. Or it can be done only in the corners.

It is very important that the floor is above the ground. This will prevent rainwater from seeping in. It is also good to make a slight slope of the floor so that the precipitation that is carried by the wind can flow freely into the drain or simply through the door.

In the case when it is planned to build a closed kitchen made of brick or foam block, this version of the foundation may be enough. Also, for these needs, you can build a tape shallow or columnar foundation. In this case, such a large-scale excavation is not carried out.
- A trench is dug to a depth of 50 cm around the entire perimeter of the future kitchen. The width will depend on the thickness of the walls. In any case, the foundation should be 10–15 cm wider.
- A layer of sand is poured to the bottom, which is leveled and spilled with water.
- A metal base-lattice is made according to the principle, as in the previous instructions. She fits into the trench.
- Formwork is installed with the expectation that the future foundation rises 20–30 cm above the ground.
- Pour the cement mortar, ram and level it. Let stand 2-3 weeks.

The supply of all communications must be carried out in parallel with the laying of the foundation, so that later you do not have to hammer holes in it or dig under it. So that the pipes are not clogged with mortar, they must be closed in advance with a cloth and plastic oilcloth.
open kitchen

This option can be built most quickly. We have already laid the foundation and the anchorage for the supports. If you are planning for the kitchen to be closed on one or both sides with walls made of brick or other material, then the first step is to start building these partitions.
- At the corners of future walls, we dig into the ground a metal square pipe or a profile measuring 50 × 50 mm. Let's level it up. We do this so that the planks are close to the masonry. They will serve as our guide.
- We stretch the line between them. We raise it to the height of the first row of bricks to be laid. Let's level it up.
- We prepare a cement-sand mortar in a ratio of 1: 3. This will be sufficient for our purposes.
- We produce masonry, focusing on a stretched fishing line, and also periodically recheck ourselves with a level.
- As soon as the first row is completed, we raise the fishing line for the next and so on until the very end.
- In order to make the structure more stable, a reinforcing mesh can be laid in the seams.

If you do not plan on having walls of this nature, then the process will be much easier.
- To the metal plates that we laid during the manufacture of the foundation, we fasten the beam, which will serve as a support. When the whole structure is of great length, then it is necessary to foresee the need to install 3-4 pillars on one side. Their length should be equal to the height of our building, and the dimensions of the sides should be 15 × 15 cm or 15 × 10 cm.
- We expose them by level so that they are strictly vertical. The bars of one wall should be longer so that we can organize the roof slope.
- We immediately strengthen our columns with the help of the upper strapping. It can be made from the same logs. We fix it with metal corners.
- To give greater stability to the entire structure, you can install two jibs near each column. They can be fixed to the support with self-tapping screws, and to the base - with an anchor bolt.
- We mount beams for our future roof. In order for them to better hold in the places where they adjoin the harness, it is better to perform gashes. We fix with metal corners.
- We make a crate for flooring, as recommended by the manufacturer. We lay roofing material.
- To create more comfort, one side (or more) can be sewn up with a wooden clapboard or block house. On the other - to make a wooden lattice. You can equip supports for climbing green plants.
In the case when it is planned to build a pergola, nothing more needs to be done after laying the ceiling beams. They can be covered with stain or varnish. Further, the plants themselves will do their job, creating a shadow when they are fully grown.
closed kitchen

At the design stage, it may have been decided to build walls from foam blocks or bricks, then this can be done according to the same principle with the installation of vertical landmarks, which was mentioned above. The thickness of the walls may not be too large. In some cases, laying in half a brick is allowed. But always consider the weight of the future roof. In the future, the outside of the building can be sheathed with siding or a block house. For interior decoration, a block house, lining or other material that will be resistant to frost is also suitable, because it is unlikely that someone will constantly heat the room in winter.
A bar is laid on the walls, which will act as a Mauerlat. Its size can be 10 × 15 cm. It is fixed with anchor bolts or studs, which must be walled up during the construction of walls. Under it, it is imperative to lay waterproofing in the form of roofing material or bikrost. A truss system is installed on the logs. It can be for both a gable and a shed roof (for this option, it will be enough to make one wall higher than the other, then beams are simply installed between them). A crate is mounted on the beams and the roofing is laid. From the inside, the ceiling is hemmed.

You can go simpler and stop at the wireframe version. For it, we need bars of the same size as for the vertical posts from the instructions for the open kitchen. From them we make the foundation. We lay them around the perimeter of our foundation on two layers of roofing material or bicrost, which will serve as waterproofing. We make a dressing between them. To do this, on the edge of each log there is a recess half the depth and a width equal to the width of the log. Checking diagonals. We fix them together with self-tapping screws and internal metal corners. Next, we fix it to pre-prepared plates or anchors to the foundation.
We mount the corner support pillars from the same timber. In increments of 60 cm, we install additional vertical supports from a board measuring 10 × 5 cm. For greater rigidity, we fasten the jibs for each main support. We carry out the upper trim and install the truss system for the future roof. We do this by analogy with the option of an open kitchen.
finish line

Even if our kitchen is planned to have a barbecue or stove, this does not exclude the presence of a gas or electric stove, which is much more convenient to use. It is necessary to take care of the installation of a sink, a mixer, as well as a stand for dishes on which it will dry. It would be nice if there is a locker in which you can hide cutlery, as well as pots. You need to take care of the dining table, as well as comfortable furniture on which you can relax. For greater comfort, it is better to carry out the main and decorative lighting.
For an open kitchen project, it is best to ensure that all lighting fixtures are preferably IP68 rated. In this case, you do not have to worry about any elements being damaged by rainwater.
Don't approach your summer kitchen project casually. Let it in some sense be a design decision. After all, it will serve not only as a place for eating, but also as a recreation area with family and friends.
A comfortable stay in the country cannot do without a summer kitchen. The building is ideal only after determining its main functions. This is a vacation with friends or family, or maybe canning blanks for the winter. For how many people is the recreation area calculated. The projects are as follows: a separate building or an extension to the cottage. The financial side plays an important role in construction, as does an individual fantasy with golden hands. Summer kitchens in the photo:
It will be important to determine the type and type of heating: gas, stove, fireplace or electric; with plumbing and sewerage.
Types of outdoor summer kitchen
A variety of design options for summer country kitchens can be divided into two main groups: closed and open. The choice of one or another group depends on the individual approach to recreation, climatic conditions. These will be short trips to the country or for a longer time.

open kitchen
The feeling of spaciousness, freedom and unity with mother nature is achieved by the complete absence of any walls or partial ones. The location of the cottage in the southern zone with the appropriate climate allows the construction of an open-type kitchen overlooking the backyard.

Kitchen - extension to the main house
A simple and reliable option is to connect an unheated summer kitchen to the main building. In this case, the roof can be a simple canopy or other structure suitable for the season. Economical option for building a kitchen
In the spring and summer, an open kitchen in the fresh air is relevant. What could be better than having breakfast or dinner outdoors. Relevance decreases in winter. Cooking is not very comfortable in cold weather.

Kitchen - veranda
A harmonious combination of a summer kitchen on the veranda of the house will add sophistication to the holistic design of the cottage. Special attention, for this type of structure, is given to the foundation. It must correspond to the depth of the foundation under the house. Otherwise, in winter, the veranda will come off the main wall of the house. Further, the installation of the wall frame, decor, sheathing and roofing, preferably shed.
Kitchen - gazebo
The foundation for the kitchen - gazebos are suitable for tape type or columnar. Installation of corner frame racks can be brick, wood or stone. An excellent option is to sew up one of the openings between the racks for placing kitchen utensils.
The decor of gazebos can be not only aesthetic, but also multifunctional. The design of textile curtains, wood panels or climbing plants looks great. Removable and sliding panels are great for outdoor recreation.
In the kitchen - gazebo, it is possible to install a stove, fireplace, barbecue or barbecue, there will be no smoke.

Closed summer kitchens with walls and a roof
Weather conditions with frequent rains, winds, low air temperatures, early frosts provide for the construction of closed summer kitchens. This view is perfect for winter holiday lovers. The kitchen can stand alone or be attached to the main wall of the house. This is a full-fledged small house with independent heating and all comfortable living conditions. Often utility rooms are attached to such kitchens, for example, for storing blanks.
Buildings made of block or brick are used at any time of the year. It is also possible to build from plywood or lining. By combining building materials for a simple summer kitchen project, it is possible to create some of the most interesting and original ideas.
Summer kitchen with built-in fireplace
A multifunctional element of the summer kitchen is a fireplace installation, it can be used as an oven or a barbecue. Various options for installing kitchen fireplaces in the photo are shown below:
Summer kitchens with barbecue function
Outdoor type of summer kitchen with a large barbecue area. This is a great option for noisy and large companies.

Summer kitchens with barbecue grill
To prepare a classic barbecue, you need a special grill. To protect against all weather conditions, it is desirable to have a brazier under a roof.
Choosing a convenient place for the construction of a country summer kitchen
The comfort and process of building a country summer kitchen depends on the location. It is necessary to take into account some features:
Availability of communications. Accessible location of water, gas, electricity, sewerage.
Distance from main roads. As an exception to exhaust fumes, machine noise and dust.
Fire safety. Sufficient distance from flammable buildings.
The presence of landscaping. Creating shade and coolness indoors with the help of trees.
Distance from the main building - the house.
Construction sequence
1. Preparation
First, you should decide on the project for the construction of a country summer kitchen. Based on the type of materials chosen, the size and shape of the building, the type of the main base - the foundation - is selected. The most suitable columnar and tape.
The construction of a brick, block or other stone of a closed kitchen involves the choice of a strip foundation. Open kitchens or closed ones from beams can be built on the basis of a columnar foundation. They are cast from cement mortar or made from cinder blocks. Under a light canopy, the best option would be to concrete the site of the required size, with reinforcement with metal rods or mesh.
Excavation; it is necessary to dig a foundation, the depth of which is calculated depending on the materials used. The rest of the construction site needs to be leveled.
Pillow arrangement. Before pouring concrete, the surface must be sprinkled with sand and spilled, but not washed away with water.
Pouring the foundation, pillars or platform; During the supply of concrete, it is necessary to make a frame of reinforcement, placing it evenly over the pouring area.
floor arrangement; floors can be left earthen, but dampness, insects, dirt are possible. It is better to lay wooden floors, or pour concrete floors.
2. Building walls
The erection of walls depends on the chosen design of the kitchen. One way or another, it is necessary to install and secure the support pillars holding the canopy or roof. A cooking wall can be made from any material.
Working with artificial stone Based on the purpose of the building, a wall is placed in one brick. When operating in winter, you need to insulate the walls.
Work with wood. Fastening between structural elements with metal corners or self-tapping screws. Exterior sheathing is done with siding or board. Internal lining - clapboard, grooved board or plasterboard.
A flat shed roof will be the cheapest and easiest option. More attractive gable version of the roof. For year-round use, a thermal insulation pad made of basalt fiber foam or glass wool is required. To extend the life of the building, it is necessary to have a long visor so that the walls do not absorb moisture from rain or snow.
4. Interior decoration
Terrace board or ceramic tiles are great for flooring. Decking is painted with any shade of paint or varnished. To protect against the surrounding natural conditions, ceilings and walls can be covered with drying oil.
The interior decoration of the summer country kitchen comes from the general style of the whole country design.
Economical and popular today is the finish of the MDF panel. Affordable, durable and environmentally friendly material. Great for unheated summer kitchens. When heated, the material undergoes deformation. From budget materials - drywall, used for wallpaper, painting walls. It absorbs all excess moisture, this is also its main drawback.
Thin plastic boards or lining stand out from inexpensive materials. Waterproof and high quality. Natural stone or a combination of several types of finishes is also used.
Furniture in the country summer kitchen
No furniture in the kitchen anywhere. At a minimum, there should be a kitchen table, chairs, the number of which depends on the number of family members, a bedside table for cooking, racks for dishes.

1. Separation of the dining and cooking areas in the room. The relevance of the bar counter is not lost. You can delimit the space with the help of the correct supply of light, variations in the composition and color of the materials used.
2. The choice of furniture should be attributed to one design decision or brought to a competent combination. Preference should be given to not easily soiled materials, warm and harmonious colors.
3. Regular use of oven, grill or barbecue, electronic or gas burners for cooking. For safety reasons, a separate niche is made in the load-bearing wall.
5. Use of decorative items to create a cozy atmosphere in the room. Various souvenir plates, live and artificial flowers, paintings, armchair blankets.
A variety of ideas in the construction of a summer country kitchen, design, design - a huge space for imagination and creativity.