Stages of renovation in the apartment. The sequence of repairs in the apartment - tips for organizing work
In this section, you can get acquainted with the stages of the repair work. Photos of works and a detailed description of the main technical nuances are attached to each main stage. It should be noted that the first stage of any repair is its planning, either in the form of an independent project and the preparation of technical specifications, or in the form of a professional design project.
The sequence of stages indicated below is the most optimal in terms of quality and timing of the work performed. Many works, depending on the characteristics of the repair, can be carried out in parallel and, with proper organization of the process, significantly increase the speed of finishing the premises.
The REMCRAFT company offers a full range of construction and finishing services: turnkey cottage renovation, elite apartment renovation.
p A 04:54 / 13:38 Y O
Interior Design. What do you need to know?
Sergey Kodolov - 1 / 5
Interior design project
Preparation for repair begins a few months before the start of the work itself with the manufacture of the project. It may include: an apartment plan with the arrangement of furniture and lighting, selection of finishing materials, selection of furniture and accessories, visualizations, sketch or working drawings. A design project is carried out on average from one to three months. If the repair involves redevelopment, making openings in load-bearing walls, changing the location of plumbing and gas equipment, it will be necessary to make working drawings for all sections of the project, undergo a construction examination, coordinate the project with city services, and conclude an agreement with the management company. This may take another 2-3 months. Of course, if you want to save money, repairs are possible without a design project, but the risks you face may ultimately negate all the financial benefits of such a solution.


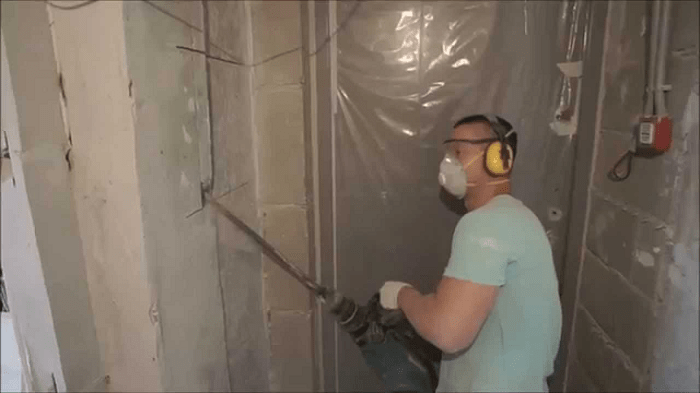
Dismantling works
Almost any repair begins with dismantling: old wallpaper, paintwork, floors, laminate are removed, unnecessary partitions are dismantled, tiles and old faience are removed. The main task of dismantling is to prepare the base (walls, ceiling, floor) for further finishing. The base must be dry, cleared of all building materials used previously. Often, poor-quality performance of these works leads to a decrease in the durability of the entire repair.


Partition device
Apartment partitions are built from foam blocks, bricks, tongue-and-groove blocks and drywall. Each of these materials has its pros and cons, in our opinion, the most optimal solution is the construction of partitions from foam blocks 10 cm thick, - with increased requirements for sound insulation of rooms, it is possible to build partitions from foam blocks 15 cm thick, this eats up additional area of the room, but gives the wall fundamentality and excellent soundproofing qualities. The foam block partition is attached only to the floor and side walls, there is a gap of 3 cm between the wall and the ceiling - this is necessary so that the overlap does not press on the partition during shrinkage of the house, this requirement is especially important in new buildings, because shrinkage within 2- 3 years can significantly spoil the repair. Mandatory conditions for the construction of partitions is the reinforcement of each 3-5 rows and binding to the walls.


Plaster work
The next stage of repair is plastering. Plaster work in apartments is carried out mainly with gypsum plasters. All walls are plastered to the level. We recommend plastering "in the corners" of some rooms - this is especially important for bathrooms and kitchens, it is also advisable to plaster in the corners of the room where tiles are planned on the floor, as it will immediately show all the wall divergences. The drying time of the plaster is highly dependent on the thickness of the layer and weather conditions. For example, with a layer thickness of 6 cm and an outdoor temperature of 25 degrees, the plaster will dry completely in 15-18 days. With the same layer thickness, but at a temperature of 15 degrees, the plaster will dry for at least 20 days.
An important technological aspect of plastering is the single-layer application. Gypsum plaster hardens quickly enough, but dries, as we wrote earlier, for at least two weeks. Often a 4-5 cm layer is divided into a "rough" layer and a "finish" layer, i.e. a 3 cm layer is applied, and then a second layer is applied to it after a few hours or days, as a result two different layers are obtained. This is fraught with the fact that the walls will eventually begin to "ring" when tapped, because the top layer has not gripped the bottom one strongly enough. Delaminations are also possible after the repair is completed, if, for example, neighbors start repairs later than you, vibrations from electrical work can cause complete peeling of the plaster in some places. The plaster should be applied in one layer and there should not be any stretching in a thin layer. If the layer of plaster is more than 5-6 cm, then single-layer plaster is practically impossible, in this case it is necessary to throw on an uneven (slapped, torn, notched) first layer and either almost immediately or after waiting for complete drying, apply a finishing layer of plaster. Alignment of ceilings with plaster is rarely performed. has a lot of technological limitations and high cost of work.


Installation of air conditioners
Installation of air conditioning systems is desirable to begin before the installation of all engineering systems. Before starting work, you must select the type of system (split system, multi-split system, ducted air conditioners) and the installation location of units and equipment. At this stage, rough installation of air conditioning piping, drainage systems, installation of external units is carried out, installation of internal units is carried out at the finishing stage. The main difficulty lies in laying the routes in such a way as to further minimize the risk of damage to the pipes, because, unlike electrical wiring, the routes of air conditioners do not have external references and their location can only be determined using a special device or a pre-compiled installation plan.


Installation of heating systems
Heating equipment and communications are laid and mounted after completion of plastering work. When carrying out repairs in an apartment, they are often limited to simply replacing heating batteries with modern models; it is also possible to replace all heating routes if it is made according to a collector scheme. It is recommended to install shut-off valves on the supply pipes, which will make it possible to regulate the heat transfer of the radiator. At the finishing stage, the batteries are temporarily removed. After the wallpaper is pasted or there will be a need for welding. Electric floor heating in the bathroom or kitchen can be installed at the stage of manufacturing the floor screed or laying tiles, it depends on the type of heating cable chosen.


Installation of water supply and sewerage systems
Installation of water supply systems is carried out in parallel with electrical work. At this stage, it is necessary to clearly define the arrangement of all plumbing fixtures in the bathrooms and kitchen. Next, you need to select all the elements of faience and provide their exact wiring diagrams so that the communication outlets for the mixers are flush with the wall and exactly match the wiring diagrams.
Gating, installation of water supply pipes, sewerage, assembly of a sanitary cabinet are carried out.


Electric installation work
After the plastering work is completed, the stage of electrical installation work begins. To perform electrical installation work, it is necessary to draw up a plan for the placement of sockets, switches and main consumers, then, based on these data, a design load calculation is compiled and a set of wiring installation works is carried out.
I would also like to explain why engineering work is done after plastering. The problem is that when carrying out work before plastering, the accuracy of installing socket boxes and outlets for mixers suffers greatly, since the geometry of the room, which is formed after plastering, is unknown. The work has to be torn to pieces, which affects the result not for the better. Moreover, very often, when carrying out plastering work after electricians, there are problems with damage to the electrical wiring laid on the floor. - for these reasons, we recommend doing the electrics after plastering.


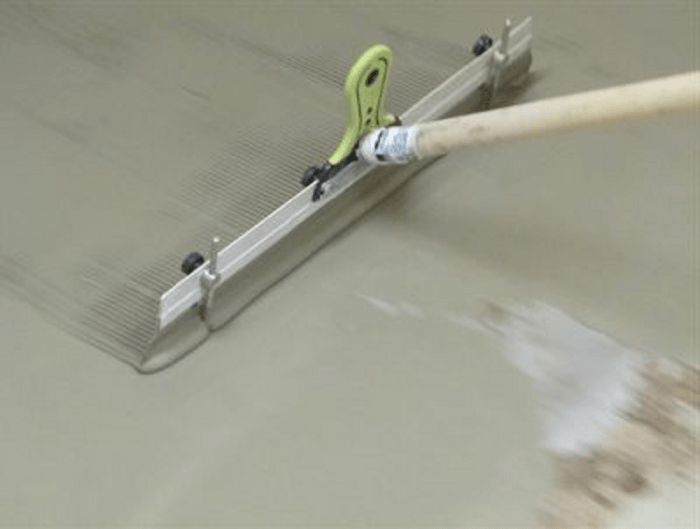
Floor screed device
Finishing cement-sand screeds and the bases of plank floors are performed immediately after the completion of plastering and installation of communications. The cement screed is made with a mixture of M300 with the addition of a plasticizer. When drying, the screed presses on the walls, which entails lifting the screed and peeling off, to avoid this, a sealant is laid around the perimeter of the walls, which creates a gap of at least 1 cm. The screed should not dry quickly, for this, after laying and grouting the mortar, windows in the apartment it is advisable to close it with a dark film, and shed the screed itself abundantly and cover it with a film, which will create a "greenhouse effect". Sand-cement screed, with a layer thickness of more than 8 cm, has a slight shrinkage. This suggests that after drying, the screed will have errors in the plane.
The time for complete drying of the screed is at least 20 days. If the screed is poured through the heating pipes of the underfloor heating for at least three weeks, the heating must not be turned on, it may be deformed. At the same time, at the time of pouring, the pipes must be filled with a coolant at a nominal operating pressure. To obtain an ideal foundation, self-leveling floors are made under the finishing floor.


Plasterboard work
Due to the high level of humidity after pouring the screed, plasterboard work is carried out with a short break, one to two weeks. We use only moisture-resistant drywall in our work, as it can withstand leaks and high humidity. When assembling structures, all the rules for mounting frames and sewing are observed. If the frame is assembled incorrectly, then no grids and fiberglass will save the structure from cracks. For the same reason, all structures are sewn up in two layers.
Our company performs drywall works of any complexity, while we do not deal with forms that would make it impossible to perform high-quality painting work. A lot of pictures with crazy shapes of ceilings and walls look great in the photo, but live this sight is often very sad.
In general, I should note that drywall is a very capricious material and the best solution would be to replace it with a fabric stretch ceiling.


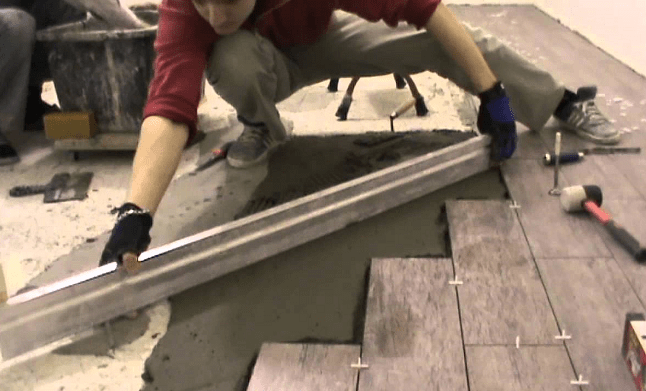
Tiled work
Finishing bathrooms is perhaps the most difficult stage of the entire renovation. Laying tiles is a time-consuming and rather lengthy process; for a good result, it requires the care and accuracy of the performer.
The final quality of laying is strongly influenced by the quality of the tile, unfortunately, it is possible to determine this only when the tile arrives at the facility, since the quality varies greatly from batch to batch and it is unrealistic to determine which tile will be delivered to you in the store. Unfortunately, for tiles, like nothing else, the rule applies: the more beautiful the tile, the more complex the layout, the more inserts, borders and decors, the worse the quality of installation. Pay attention to the size of the tile, for example a 20 cm by 20 cm tile will be significantly "flatter" than a 20 cm by 40 cm tile, that is, the larger and "longer" the tile, the worse its quality. In the process of work, we give more detailed recommendations on this issue.


Painting works
One of the key stages of the repair is painting work, which includes a whole range of different works: installing paint corners, priming walls and ceilings, sealing seams and gluing fiberglass on plasterboard structures, puttying and sanding walls for wallpaper, puttying and sanding walls and ceilings painting, wall and ceiling painting, wallpapering.
Technology and sequence of painting works on Plasterboard ceilings: - priming of gypsum board - installation of a paint corner - sealing of gypsum board joints - gluing fiberglass - priming fiberglass with glue - rough filling of the ceiling with Vetonit Lr in two layers - sanding of the rough layer - priming - finishing puttying 2 layers of Shitrok - finishing sanding the ceiling under a fluorescent lamp - priming the ceiling - painting the ceiling. When performing painting work, it is important to strictly observe the drying time of materials; violation of technology is fraught with delamination of materials from the base.
The house is completed. Members of the selection committee walk around the floors, apartments, and the owners of square meters are looking forward to how they will transport furniture, arrange a sofa with a TV. But a happy moment is separated by several months of a difficult, but so important process - repair, so where to start repairing a new building?
When can and what to start repairs?
It is important to understand that the owner of the apartment can start pouring the screed, decorating the walls when the house is put into operation, the acceptance certificate is signed. Spend time up to this point on design development, selection of building materials, placement of rooms, if the apartment provides for a “free layout”. Another important aspect is the selection of specialists. If wallpapering, plastering or puttying with little experience can be done independently, then the wiring, pouring the screed, installing suspended ceilings should be done by specialists.
Some developers offer buyers apartments with already completed “finishing”. But refuse such a service immediately. The screed will be minimal, the walls will be crooked, wallpaper and linoleum will be the cheapest. The color scheme with the buyer is almost never agreed upon. Consider this option only if absolutely necessary.
Many "experts" say that in a brick new building you should not immediately do a luxury renovation. Within 5-6-10 years the building needs to shrink. Large, small cracks may appear on the partitions. Gorgeous Venetian plaster and expensive wood paneling will fall into disrepair. For the first years, it is advised to choose a simpler version of finishing work.
In practice, the house must be settled before the keys are handed over to the tenants. If after 2-3 years cracks “flaunt” on the walls and ceiling, tiles fall off in the bathroom or in the kitchen, the floors “swell”, it’s time to think about violating construction technology and filing a lawsuit with the developer in court. The house can very quickly come into a state unsuitable for operation.
Where does the renovation start?
At the first stage, a thorough inspection of the obtained square meters is carried out. Windows and doors, screed (if it has already been completed), engineering communications wiring are checked. Then it is important to distribute in what sequence to perform. If there is not enough time and money to do everything at once, pay attention to the points:
- Windows, front door, ventilation. Developers save money by using economy options. At least change the lock on the door.
- Placement of interior partitions. Space zoning. If you are not satisfied with the layout proposed by the developer, you will have to demolish the existing walls (with the exception of capital ones), build new ones.
- Wiring, sockets, cables for installation of a heating boiler, air conditioners, washing machine. Pre-determine where the light sources, chandeliers, wall sconces, spotlights, sockets will be located.
- Laying of sewer, water pipes, installation of toilets, baths, showers, sinks.
- Checking radiators. It is possible that those mounted by the developer will have to be replaced. If the heating is individual, decide how to do the wiring, where to install radiators with central heating. At this stage, involve a specialist so as not to freeze in winter and not to think why gas bills reach astronomical amounts.
Together with an experienced builder, an experienced lawyer, check the condition of the received apartment, identify all the shortcomings and problem areas. Then, at least carefully re-read the clauses of the contract. It is likely that you will be able to receive some amount from the developer as compensation. Do not agree to the seller's offer to fix everything with your own hands. They won't do it better
.What to Consider When Planning a Renovation
As soon as a certificate confirming the right of ownership is received, property tax will begin to be charged on the apartment. The owner is already obliged to pay rent for the use of electricity, gas (if any), water. No one lives in the apartment yet, does not fully use any of the square meters, and bills are already appearing in the mailbox.
Approaches to the repair of an apartment in a new building
Specialists distinguish two types of repair: scheduled and quick.
Planned option
Good for those who finish the apartment for themselves, going to live here happily ever after. A work plan and budget is being prepared. All stages are signed with the necessary materials, deadlines. A team is selected, including the necessary specialists: plumbers, plasterers, painters, etc. The work is carried out systematically, the deadlines for screeding are kept (at least 28 days), puttying and plastering technologies are observed.
Flaws:
- the estimate in most cases is exceeded;
- the process runs the risk of becoming infinite. If the masters are not paid for the result, but for a time payment, they will not rush anywhere. At your own expense.
Scheduled repairs should be guided by those who have a place to live, who do not rent an apartment and do not count every ruble spent on finishing. Among the advantages of this option:
- lack of haste. There is an opportunity not to miss something important, significant in later life;
- careful planning. The wishes of all family members, children, parents are taken into account.
Quick repair from scratch
For a minimum time, the screed is poured, plumbing is installed. In one of the rooms, the walls and ceiling are being ennobled so that there is a place to live. Further, as the money comes in, all other premises are put in order.
This option is considered more economical. The apartment is used for its intended purpose. The term of repair depends only on the financial capabilities of the owner, his desire for a life in comfort. Disadvantage: ten years will pass in such a "temporary building" and a state of permanent decoration of the surrounding space.
How to start renovation in a new building
First, change the doors, or at least the locks. Hundreds of people looked at the apartment before you, someone “accidentally” could have duplicates. In order not to worry about the safety of property, start repairs from the front door.
At the next stage, invite an experienced electrician, preferably from a management company, install a switchboard. Otherwise, you will not be able to use either the hammer drill or the concrete mixer.
When laying electrical wiring, consider the following:
- in rooms with high humidity, special waterproof sleeves are used for laying wires and cables;
- for a washing machine, boiler, air conditioners, separate cables are laid, designed for current strength up to 25A;
- mandatory grounding, in particular for power cables.
After laying electrical wiring, do not forget about plumbing, sewerage. No one lives in the apartment yet, but water will also be needed for repair work. Install a toilet and at least one sink. Do not spend money immediately on exclusive options - limit yourself to the simplest ones for the duration of the repair. They will not be sorry if something heavy falls from above, cracks will appear. Use high-quality sewer and water pipes, in particular, if you plan to “embed” into a wall or floor.
Performing roughing operations
The developer can perform a rough screed and plastering of partitions. The next step is to clean up. But first remove all construction debris, concrete, plaster. Check if the walls are even. It is possible that you will have to scrape off or cut off excess material.
- close the holes between the plates, if any;
- bring out the interior partitions in the places of their permanent placement. This is not about light plasterboard structures, but about walls made of bricks or foam blocks. If there are already partitions, check for the presence / absence of cracks, through holes.
A reinforcing mesh is first laid on the floor. A sand-cement mixture is poured on top in the proportion of 1 part of cement x 2 parts of crushed stone of a fine fraction x 3 parts of quarry or river sand, carefully sifted. It is better to take drinking water, not tap water, so that the chemical composition of the concrete mixture does not change. The screed should not be too liquid.
Complete solidification and strength gain will occur after 28 days. Then SNiP allows you to start laying tiles, linoleum or laminate. Walking on a new screed is allowed after 4-5 days. It is not recommended to artificially accelerate the percentage of drying. Ideal drying conditions:
- humidity up to 70%;
- temperature not higher than 250C in the absence of drafts and direct sunlight.
- A standard cement screed can be replaced with a plaster screed, but not in the bathroom or kitchen. The screed will be ready for further work in a week, and walking on it is allowed after 4-5 hours.
Finishing work
While the screed dries and gains strength, finish the walls of the kitchen and bathroom. A good option is tile. If the skills of the work, it is best not to start studying and do not try to put their own hands. The specialist will make everything faster, more beautiful, and smoother.
For the living room and bedrooms, there is more choice of finishing materials: decorative plaster, standard wallpaper, liquid and paintable, decorative painting. If the walls are plastered in a draft version, alignment is carried out, a primer is applied.
Decorative ledges, openings in interior partitions, suspended ceilings are also made from it. For walls, choose a thickness of 12.5 mm, for a ceiling, 9 mm. The advantage of drywall is that you can hide wiring, engineering networks and communications behind it without chasing the walls. Don't forget spot lighting.
The joints of the ceiling and partitions, corner joints are masked by decorative cornices, plastic "stucco". If you want, you can order stretch ceilings, first completely prepare the walls for fine finishing.
Then proceed directly to the design. In order not to subsequently re-clean the floor from dust, debris, as soon as the screed gains its initial strength, cover it with cheap linoleum or plastic wrap.
Recent finishing work
The last step is to do:
- laying laminate, carpet and linoleum. If you have work experience or qualified assistants, you can save on hiring third-party staff. If not, you will study another time. Distortions, irregularities on the floor cannot be masked by anything. These are not walls where a stain on the wallpaper is covered with a picture;
- connection of lamps, chandeliers, sconces, installation of sockets, toilets, sinks, shower cabins, bathrooms.
A significant part of the repair in a new building can be done by hand. But separate stages (installation of electrical wiring, stretch ceilings, windows, doors, heating equipment) should be trusted only by professionals. This saves time, money and nerves.
How to start repairing an apartment in a new building (video)
The usual everyday business: the apartment clearly needs repair, but there is not enough money. How to make an inexpensive apartment renovation with your own hands? It seems to be the simplest, obvious way: surface cosmetic repairs. That is, plywood wallpaper, whitewashing the ceiling, painting, fixing the creaky floor; Possibly window replacement.
However, if you calculate the labor costs and consumption of materials, it turns out that by increasing labor costs by half, and spending money by a quarter, you can give the apartment a completely different look, and for a long time. How much you need to invest specifically depends on the prices in the region, but the general methods by which you can make an apartment cozy and elegant inexpensively are the same.
Saving money when repairing an apartment with your own hands is, like the Earth in ancient legends, on three whales and a slowly hurrying turtle under them:
- We are not afraid of work. Nothing comes from nothing. Either money or labor.
- Wherever possible, we do not change the capital, but the old one that has lost its appearance, but renew it.
- We attribute the maximum savings to where it will not affect the quality of work and will not be visible.
- We spread the costs of labor and money over time: having conceived repairs in the summer or autumn, we spend a year on preparation, and then we pile on and quickly do everything. To lay out 200-300 thousand rubles at once is a problem, but it is quite possible to break them up in parts for a year. In addition, there will be time to measure seven times - cut once.
Where it's hard to save
The only area where you have to invite a specialist is to remake and strengthen the electrical wiring if it is old and weak. Here, the only way to save money is to negotiate with the DEZ electrician. He will do the work in pieces, in his spare time, but the likelihood of hack work will be even less than that of “branded” specialists: after all, he will then serve all this.

It is better not to save on electrics and wiring, however, some points, such as installing sockets, can be done independently.
Tool
A good specialized tool makes the job much easier and cheaper. But it's hard to buy. Therefore, it is better to rent a tool as needed. In terms of costs, it will come out a little if you decide in advance on the design and draw up an approximate work plan for yourself.
Season
Plumbing
A sore point with independent cheap repairs is the replacement of plumbing. If it is still “alive”, only filthy, then it can be cleaned and painted. How to do this will be described below. But if there are chips and cracks, then, if you like it or not, you need to change it.
For such a case, here is some information for you: new settlers, especially in houses above the budget category, often start a major overhaul immediately upon entering, and excellent, completely new faience and cast-iron plumbing equipment ends up in a landfill. Landfill operators (simply - landfill scavengers) have long turned this circumstance into a profitable business.
They do not make direct contact by office phone with strangers, but it is quite possible to get through to them using word of mouth methods. The rate is from a third to a half of the factory price for a household item. And do not think that they will take you to the dump and show you where it lies. In the back room you will be offered a choice of clean, carefully washed products, which you can sit down on at least immediately.
Construction garbage
The next sore point is the removal of construction waste. The operation is not cheap, and requires paperwork. Exit: basement, barn, cottage or closet and a few bags of used plastic sackcloth, bought for a penny. Construction debris does not sour and does not rot, it can then be poured into a container in a garbage dump in a bucket. There is nothing illegal in this.
So, the main question that you have to answer if you are planning to renovate an apartment is where to start? This article is devoted to this issue and reveals it in full. We will help you build a plan for your repair, calculate all costs and find out in what order major or cosmetic repairs should be carried out.
Let's start with the fact that repairs are best started in late spring. It is already quite warm outside the window, the masters, if you want to call them, are not yet so busy. In contrast to the end of summer, because it was then that many repairmen began to "hands off". Let's take a closer look at the issue of apartment renovation together.
Getting ready for renovation
Imagine your apartment after renovation
If you have landed on our site, then you have planned a repair, the beginning will not be easy: you need to make sketches of how your house will look like after the repair is completed, where the furniture will be, what kind of chandelier will be in the hall or bedroom, where you will be or tiles, where they will not be at all, etc.
One of the ways that will help you decide on the location of furniture sounds like this: take a centimeter, measure all the corners of your apartment thoroughly and draw in a reduced size on a piece of drawing paper (do not forget about doors and windows). And then - on a separate sheet of your furniture, observing its approximate size and shape, using the same scale as in the case of an apartment. Then you cut out your “paper” furniture and move it around the paper sheet, thereby determining its location.
What are you planning to do in your apartment?
Continuing the topic of where to start the repair, I would like to advise you to clearly decide what exactly you would like to redo in your apartment: doors, re-paste wallpaper, carpet or linoleum, replace skirting boards, stick or toilet, etc. Do not forget to decide on the locations of future outlets.
Drawing up a budget for repairs
In order to avoid unexpected costs, you should clearly draw up an estimate of the cost of renovating your apartment.

And for this you need, as written above, to decide what exactly you will be repairing. So, let's say you want to wallpaper the hall, lay the bathroom, and also glue the tiles on the ceiling in the bedroom.
We pick up such a useful item as a tape measure, and begin to measure the area of the walls in the hall, the floor in the bathroom and the ceiling of the bedroom. Knowing the area and the approximate prices for 1 square meter of the required material, you can calculate how much money will need to be invested in apartment renovation. Do not forget that in order to glue the tiles you will need to use special glue. And if there is an uneven wall under your wallpaper, then you will also need putty (“primary”, “secondary”, etc.).
Do not forget that not all types of repair work you can. Some part of these works should be entrusted to professionals in their field. For example, it is unlikely that everyone knows how to evenly putty a wall or lay parquet on the floor. What about replacing windows and doors? Thus, find yourself people who will do this or that work, find out the price for it and add it to your cost estimate. Remember that repairs are done for a long time, so you need to save on it, but do not overdo it too much so as not to regret it later.
Preparing all instruments
This is also an important part of the preparation before repairing an apartment.

Depending on what you plan to do, you should prepare a toolkit. If you are going to glue wallpaper, and before that, level the walls, then do not forget to get some kind of even rail (there are, of course, more professional devices based on lasers), spatulas, and, in the end, a broom. Meaning, I think you understand.
Time to repair
As mentioned above, not only the time spent on repairs is important, but also the time of the year in which it is scheduled. The ideal option is considered to be spring, when the temperature outside is warm enough to ventilate the rooms, and the repair crews are not so overloaded. At the end of the summer, repairmen are in an emergency: it is very difficult to call them to the house, you have to wait for weeks, and the prices for work are too high.
Repair order
Having started the renovation of the entire apartment, it is worth considering carefully in which room it will be started, where it will be continued and where it will be completed.

Starting apartment renovation
Room preparation
Of course, having decided to repair one room, all issues related to the move will be immediately discarded. If you need to repair the entire apartment, then decide - either you live in this apartment, where you are going to make repairs all the time and move from room to room, or you move to your mother (sister, brother, etc.) and make repairs in all rooms in parallel, which, firstly, will save your time, and secondly, you will not have to rest “in the mud”.
Let's figure out why. Everything is very simple, if you have passed the first stage of preparation (you know what exactly you will do in the room, calculated your future expenses, prepared tools, bought materials), then further you will need to clear the room from everything that is in it. Take the furniture to the next room, remove all paintings, chandeliers, etc. Despite the fact that it will be very dirty in this room, it should be vacuumed (sweeped) and washed from dust before repair.
First of all - the most "dirty" work
As the name of the item suggests, the dirtiest jobs need to be done first. First of all, if you are going to change windows and doors, take care of them, including window slopes. The door and the windows themselves can not be installed, it is enough to put the frames and the door frame. Leave all other actions at the end of the repair.

In the case of a major overhaul, you should start stripping off the wallpaper, old parquet or linoleum, etc. When all this is done, start puttying and other work from the ceiling, then proceed to puttying the walls, and if no dirty work is planned on the floor ( let's say you have to lay linoleum), then you can paste wallpaper on the walls. At the very end, the baseboards should be hammered. Before filling the walls, we advise you to remember once again where exactly you will have sockets, whether there is an outlet for the Internet. You may need to run wires through the room that can be hidden within your walls. Of course, if the wire goes down, then it can be removed into the baseboard.
All walls, no matter how smooth they are, should be slightly leveled. Measure them with a corner (rail). If the irregularities are small, they are detected only with the help of a special device, then they are not catastrophic. Then just get plaster or putty. In the case when the walls have strong irregularities, recesses, then use a cement mixture.

Floor repair
Everything, the size of your budget - whether or not to make a new screed, or do without it, immediately laying a new coating in the form of linoleum, carpet or parquet. Here you make a decision, or resort to the service of masters.
Ceiling repair
The best that we can advise you is the installation of stretch ceilings. Lighting fixtures are built into them, you won’t have to hang any chandeliers!
Repair of windows and doors
The windows of the apartment should be plastic, with improved thermal insulation. All old windows should be replaced with new ones!

Kitchen or toilet renovation
Repair of the listed rooms is best to start with the replacement of plumbing! The old rusty pipes, although not on the outside, but on the inside, must be replaced with new plastic ones. The riser pipe should also be replaced. To do this, however, you will have to negotiate with your neighbors from above and below. Why should pipes be changed? Imagine that you have invested a lot of time and effort on repairs, spent a considerable amount of money, and the pipe burst and burst, flooding half the kitchen. It's a shame. But even the neighbors below will suffer and you will also have to pay for repairs.
Video on how to start repairing an apartment
Conclusion
We hope we managed to reveal the whole essence of the theme of the beginning of repairs in the apartment. Now you can easily cope with all the difficulties that await you in the process of apartment renovation. If you have any additional questions, before proceeding with the repair of the apartment, ask them below!
Almost always, new housing is purchased by a happy newcomer from a developer company without interior decoration and repairs, but with communications brought into the apartment. Firstly, such housing in a new building will cost less, and secondly, almost always the repair and arrangement of the apartment by the developer is carried out extremely carelessly, using cheap materials. Thirdly, there is a desire to perform some stages of apartment renovation with your own hands or the hands of good craftsmen.
How to start repairing an apartment in a new building
First you need to make an audit and inspection of the apartment, identify problem areas of walls, ceilings and floors. We proceed in the following order. We determine what needs repair and finishing in the first place. If there is not enough time and money for a complete apartment renovation, it is necessary to put in order first of all:
- Entrance door and windows, apartment ventilation;
- Perform a full and highest quality electrical wiring and wiring sockets in the apartment. This stage needs to be thought out as detailed as possible, to draw up a connection diagram and a circuit for laying wires into the walls;
- Connect water and collect sewage in the bathroom and toilet, install a toilet, washbasin and shower;
- If the time of the beginning of the repair of an apartment in a new building coincided with the heating season, be sure to check the degree of heating of the aluminum registers using a remote thermometer.
Advice! Before starting the repair, a list of claims for the presence of defects or defects must be presented to the representative of the seller. You may be able to get compensation for repairs in a new building. Do not settle for rework by the company.

In the process of carrying out the above preparatory work, it is possible to calculate the sequence of repairs in a new building.
What affects the sequence of repairs in an apartment in a new building
Much in the repair of housing in a new building depends on the availability of resources of time and money. Having bought a “bare” apartment and having issued the necessary documents for the right of ownership, you automatically begin to pay rent and brownies, for the use of the adjacent territory, for the removal of household waste and construction waste. After connecting electricity and water, a new apartment in a new building began to bring you a loss in the form of costs for its maintenance and decoration. The longer the repair time for an apartment in a new building, the more expensive it will cost you.
There are two main options for approaching the issue of finishing a new apartment in a new building:
- Planned renovation and finishing of the apartment. In this case, the owners draw up a detailed map and a schedule for the completion of finishing work, in which all the main types of finishing and installation of appliances are prescribed in stages. Such repairs, as a rule, are carried out from scratch to its completion by one team of craftsmen. The turnaround time for a repaired facility can take several weeks or months. The disadvantages of this approach include the ever-increasing price and cost of the work, sometimes exceeding the estimated costs by more than two times. As a result, if due to unforeseen circumstances there are not enough funds, the repair may be delayed for an indefinite period.
- Quick repair from scratch. In this case, all of the above stages of repair in a new building are carried out by hired craftsmen with direct quality control on your part. The apartment in a new building will be prepared for further finishing of the rooms within a week. In addition to communications, they finish and equip the smallest room of the apartment with laying temporary linoleum and wallpapering. There are no amenities in such a room yet, but it can be used as housing - a temporary hut and a warehouse for building materials. All other work is carried out as free funds and time become available.
The first option is well suited if the family has small children or elderly people who need to provide some comfort and convenience. The second option is considered more economical and faster, especially if, after finishing the kitchen, bathroom, toilet and one room, housing is rented out, with the remaining rooms of the new building being consistently brought to condition.
We carry out apartment renovations with our own hands and head
Among the most popular horror stories for new buildings are considered to be stories about the shrinkage of the walls of the house and its foundation. In reality, a similar process for a multi-storey building should be finally completed by the time the building is put into operation. This period averages no more than 18 months. If after 1.5 years cracks form in the corners, ceiling or at the joints and in the masonry of the walls, the tiles in the bathroom fall off, the doors are deformed with skewed doors, this means that the new building has certain problems with the stability of the foundation. It is worth waiting with repairs until the main thing is clarified - what is happening with the new building.
How to start renovation in a new building
Before starting work, first of all inspect the lock on the front door. The model and standard equipment of the door can be subject to separate agreement. Specify in the addendum to the contract which model of door and lock you need to install. If there is a need to take additional security measures, first of all change the lock supplied when the new building was handed over.

At the next stage, it is necessary to resolve the issue of installing a distribution electrical panel, connecting an electric meter. This will make it possible to start using power tools when repairing an apartment. To get rid of the need to use a large number of carriers and extension cords, plan the layout of the electrical wiring in the apartment. In doing so, the following should be taken into account:
- For the kitchen and bathroom, the wiring must be laid in sealed hoses, sleeves;
- Lay a separate residential wire in the bathroom to connect the boiler or washing machine. The cross section of the cable must be designed for a current of at least 25 A;
- An additional wire must be laid to the installation site of the air conditioner;
- In the bathroom, in the kitchen, in the hall, it is necessary to conduct a wire, which will be connected and used in the future when organizing additional grounding.
Advice! When laying wiring, use only copper cable without twists and soldering.

In addition to electricity, in order to create more or less normal conditions, it is necessary to connect hot and cold water meters and collect sewage in the bathroom and toilet. It is necessary to start work with the installation of a toilet bowl and a washbasin.

Given that good plumbing is expensive, for the first time you can install an inexpensive version of the toilet, assemble and connect plastic sewer pipes, a bellows and a washbasin. During the renovation of the apartment plumbing can be replaced at any time. Installing expensive plumbing increases the risk of damage to it during repairs; it must be installed at the final stage of repairing a new building.
For laying a plastic water pipe, using a perforator, we drill channels in the walls of the bathroom, toilet, kitchen with a depth of 2.5-3 cm. Next, you need to solder the water pipes and connect the leads to the drain tank and washbasin. Lastly, we will install and connect water meters for cold and hot water to the home plumbing.


Rough operations
Before starting work, it will be necessary to perform a large amount of cleaning up the remains of concrete, mortar. The main part will be for rough cleaning of walls, floors, ceilings, their chasing, leveling and cutting seams. Such work gives a large amount of dirt and dust, so it will be necessary to organize good ventilation and wet cleaning inside the new building.

A separate point is to highlight the preparation of floors in each of the rooms for fine finishing. During the repair in the apartment, it will be necessary to close up all the cracks, holes in the seams between the plates, in the floor, in the interior walls of the new building. The most difficult will be leveling the floor with a cement mortar screed and a reinforcing mesh. This procedure will need to be performed upon completion of the preparation of the walls and ceiling for fine finishing.
We will perform similar work in the kitchen, bathroom and toilet.
Carrying out finishing work
After rough cleaning, it will be necessary to prepare the walls in the kitchen and toilet for laying tiles on the walls and floor. Facing tiles can be laid with your own hands, but this is a troublesome business and requires a lot of time. Therefore, it is better to entrust the laying of tiles to craftsmen who specialize in this kind of finish. While the tiling work is underway, you can do the repairs yourself in one of the rooms of the apartment. The best option would be to lay decorative plaster or liquid wallpaper on the walls. If at the time of the start of the repair in the apartment of the new building, the double-glazed windows in the windows were in a satisfactory condition, then you can start applying plaster on the walls of the room immediately.
Upon completion of laying tiles on the floor and walls in the kitchen, bathroom and toilet, you need to lay inexpensive linoleum in the corridor connecting these three rooms and the room that has been renovated using decorative plaster. This will reduce the amount of dust raised and make it easier to clean the apartment.
The most important stages of the renovation of a new building
Before finishing the walls in the apartment, it is necessary to align, and in case of a defect, repair the interior doors. If your future plans include wallpapering, normally closing doors are simply necessary for high-quality wallpapering work. After the wall decoration is completed, we proceed to laying linoleum, laminate or carpet on the floor of the apartment. The most practical is considered to be a laminate for living rooms, for the corridor an office version of linoleum with increased abrasion resistance. This type of work does not require special qualifications and is easily done by hand during the renovation of a new building apartment.

Conclusion
The final stage of the repair is the connection of lamps and the installation of furniture in the apartment. Approximately 70% of the amount of work during repairs in a new building is quite affordable for do-it-yourself work. And only when performing special types of finishes - laying parquet, installing stretch ceilings, installing double-glazed windows or entrance doors in a new building, you will need the services of specialists.

