Easter bowl of abundance. A floating cup of coffee beans
Hello again dear blog readers. Today we will tell you how to create a do-it-yourself topiary cup of plenty. This is a wonderful souvenir that brings success and prosperity to the house. In another way, it can be called a "floating bowl" or a mug. And the most interesting thing is that it is quite simple to do it yourself.
So where do we start?
If you have an unused tea pair at home, they will become the basis of the topiary. It is better to take a cup of coffee, a small size. Another necessary item is a dinner fork. An aluminum fork is optimal, as it bends better. We will also need artificial flowers or fruits, a glue gun, scissors. For this craft, you can use free decor, to your taste.
Getting Started
First you need to bend the plug as shown in the photo.
This is easy to do manually. The main thing is not to bend it too much and find a balance point. Glue the bowl to the fork with a glue gun. Make sure everything is glued well and holds. Don't spare the rods! If your work falls apart later, it will be much more offensive.
Now you need to glue the second end of the fork to the saucer. This is the most important step. Apply it without gluing at first, in order to feel where is the very area in which our bowl keeps its balance. You may not find it the first time. Try! This work is also for beginners!
Having found the same area, glue the fork to the saucer. A lot of glue needs to be poured in order for the composition to hold.
Master needlewomen advise using Cold Welding glue instead of a thermal gun - the composition will hold much stronger.
Let the bowl dry a little and start decorating.
Decor
We cut the flowers from the branches.

If, after separation, the flower fell apart, you need to reassemble it, gluing each layer. We apply glue to the flower and glue it to the fork.
 The goal is to beautifully cover the fork with decor to create the impression of a flowing stream of flowers. We do everything carefully, do not allow glue to get on the front side of the flowers. More leaves can be glued on the back of the fork.

Optionally, we complement the decor with artificial fruits, berries, New Year's beads, moss or sisal (fiber from agave leaves) and other interesting little things.

Finishing touch
So, step by step, we explained to you how to create a floating bowl. If the color and pattern of the tea pair harmonizes with the decorations, that's great! If not, you can decorate the bowl itself with flowers on top or plant a butterfly or a bird there.

Ready topiary is better to put in the zone of prosperity according to Feng Shui - to the southwest. And you can please such a magical gift to loved ones. They will appreciate.
May the cup of abundance please you! See you soon!
March 6th, 2015  ale4ka

Do you want to please a loved one with an original gift or add bright notes to your interior? Then you will like the master class that I want to show you today. This wonderful composition will not leave anyone indifferent. If you want to please your loved ones and relatives, then of course you know that the most valuable gift is the one made by yourself.

There are several options for a flying mug, for example, coffee beans, coins or even sweets are used in the composition, but we will make a flower topiary with our own hands. Flowers visually give the design greater lightness, airiness and tenderness, so this option is more attractive to me.

Preparation for work
To make a flying cup topiary we need:

Frame manufacturing
The most difficult thing in making our flying mug is, of course, the frame that will be hidden under the flowers. To make it with our own hands, we need a wire that holds its shape well. We cut off two identical pieces of wire and fix them together in the middle with electrical tape. Don't wrap the wire all the way, as the hot glue works better with the wire and the tape or duct tape will peel off soon.
Now the places where we will glue the wire on the mug and saucer need to be rubbed with sandpaper.

We bend the wire and glue it first to the cup, then to the saucer. We use glue for this - “Moment extra strong”.

Pay attention to the height of your frame, it should not be too short or too long, the length should be approximately 1.5 times the length of the cup itself. Also, the mug should not go much beyond the saucer, otherwise your composition will be unstable.
To keep the frame well, let it dry thoroughly, for this you will have to wait for the mug and saucer to dry all night. In the morning you can return to work.

Flowers decoration
We select suitable leaves and flowers. My advice to you: choose the most beautiful, high-quality flowers, otherwise the product will not turn out the way you would like to see it.

We proceed to the most pleasant process - gluing flowers. We use a thermal gun for this.

It is better to start with large flowers, and after that use smaller flowers, leaves and petals. Glue the buds slightly tilted down so that our waterfall of flowers looks more natural.
Don't forget about the back side of the wire. We also carefully glue it with flowers.
Glue the flowers on the saucer. Try to glue them so that the appearance of the flowers flowing smoothly from the mug into the saucer is created.
Recently I caught myself thinking that there are already a lot small cups-pouring on wire I did, but I didn’t draw up a master class on them.
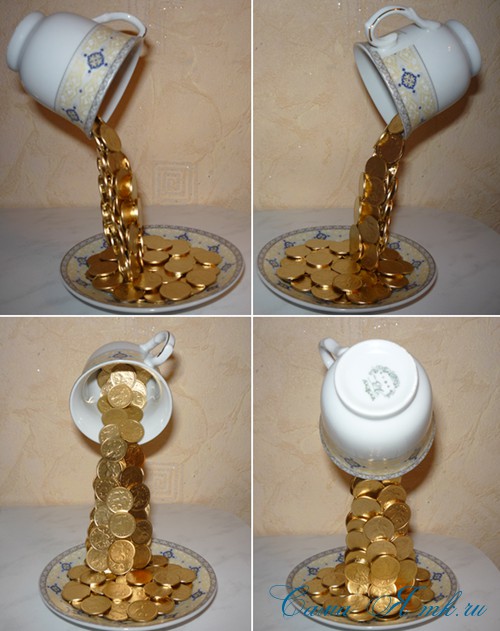
Spill cup or, as it is also called, floating cup, is widely used as a handmade gift, combining extraordinary beauty, originality and ease of manufacture. The most common "waterfalls" are made from coins, coffee beans, or artificial flowers.
We have already considered the coffee and floristic spill, but what about the coins.
For large tea pairs, it is more suitable, since a massive mug is better fixed there. And with a small (coffee) pair, it’s better to do the following way ...
And so, let's get started...
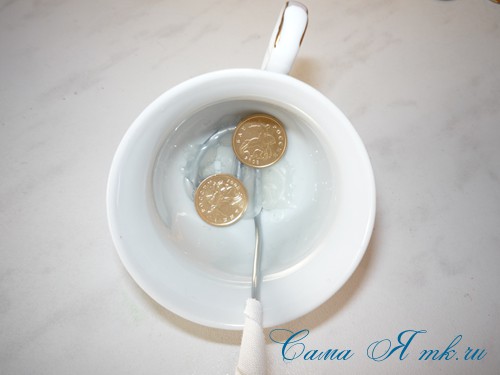
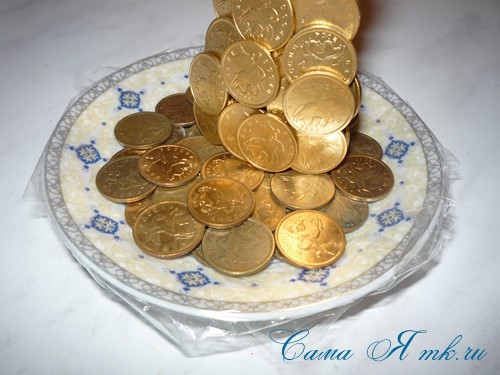
To make small mug-spill on wire we will need the following materials:
- coffee tea couple,
- strong wire (I have a piece of steel hanger),
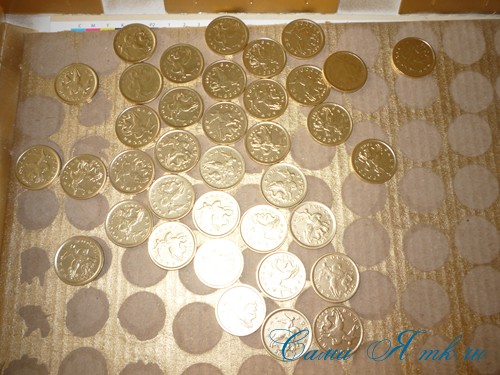
- coins of the same denomination, preferably ten kopecks (130-150 coins - depends on the length of the wire),
- band-aid,
- spray with quick-drying enamel - gold,
- hot glue gun,
- pliers, round nose pliers,
- scissors
- Scotch,
- food bag.
I must say right away that I show my method of making such spills. A lot of them have already been made, and I have already formed my own style, which, it seems to me, is the most successful: in which the craft turns out to be very beautiful, neat, without minor flaws - emerging glue, etc.
Someone paints everything with gold, including the tea pair itself, this is the easiest and fastest way. It seems to me that it is more interesting when the cup and saucer remain in their original color. You can immediately color all the coins, and then start gluing them. But, when we apply hot glue to the painted coin and stick it to the money waterfall, our prints may remain on the coin when heated, which then does not look very nice!
Of course, it's up to you! It all depends on several factors: how quickly you want to do the craft and what result you want to get.
So, my master class on spill on the wire…
In the meantime, the coins are drying, we will prepare a blank, which we will then paste over with coins.
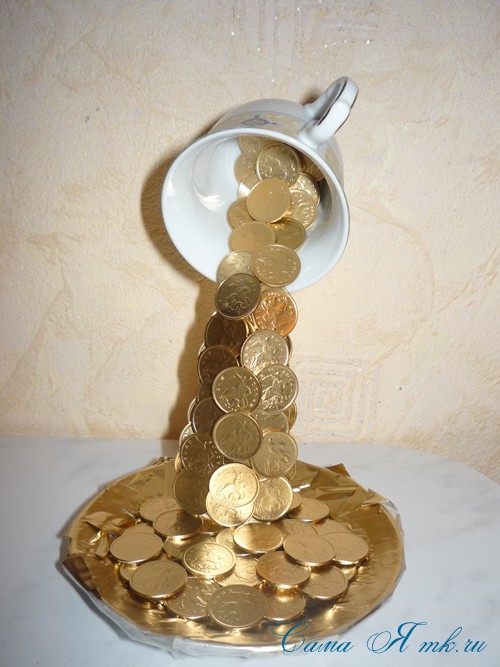
To begin with, we bend a piece of wire as follows (we make loops on both sides to fix them later on the bottom of the mug and on the saucer).

It’s not very clear, but when I show it on a mug, everything will fall into place. We glue the wire to the mug and cup with hot glue.
You can choose the angle of inclination as you like. Since there are coins in the saucer, the craft will turn out to be stable in any case. Just do not take a very long wire for a small cup. It will look awkward.


We close the wire on the cup with unpainted coins, glue them on hot glue, thereby additionally fixing the wire.

We wrap a free piece of wire with adhesive tape. You can make several layers from below.
But inside the mugs we will glue with already colored coins ... We will also additionally fix the wire on the mug with them.
Inside and a couple of rows protruding from the mug (on the front and back of the mug).
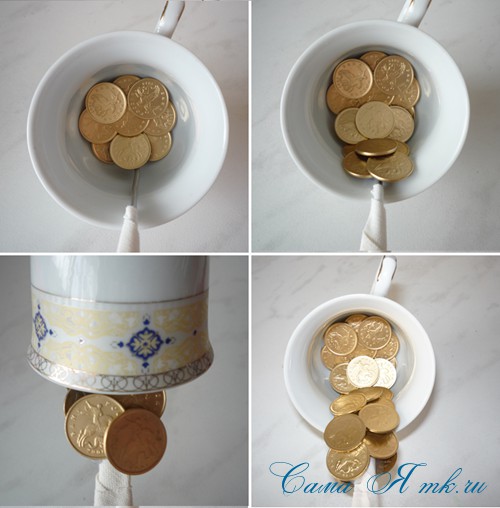
It’s more convenient for me to start from the bottom, so it’s easier to control the shape of the “money waterfall”.

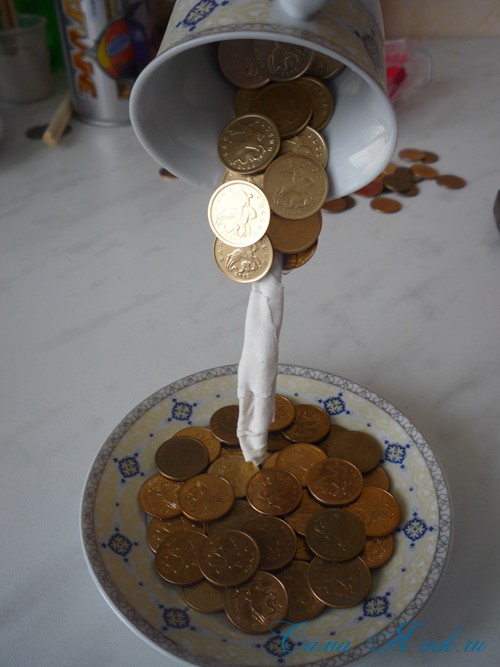
Our spill cup is ready to be stained.


We carefully wrap the mug with an ordinary food bag, tie it.

But over the saucer you will have to try, and cover the entire surface that we do not need to paint with small pieces of adhesive tape. This is, of course, time-consuming, but the result is worth it.
Like this…
Everyone is ready...

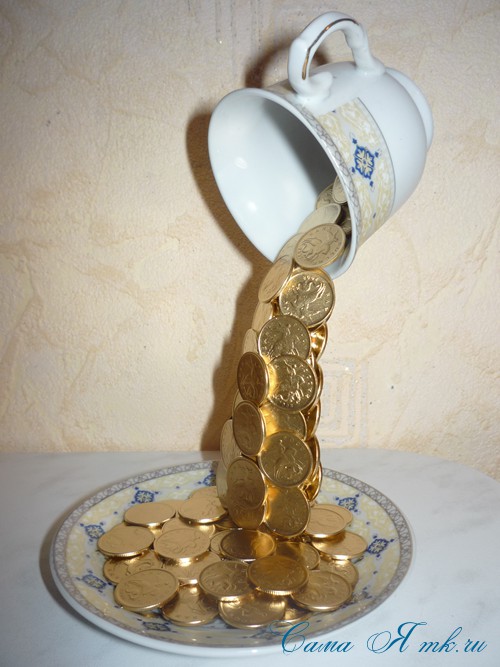
Now we paint over everything from the spray can with quick-drying gold-colored enamel.
Immediately carefully remove the bag from the mug, this is important until the paint begins to dry, otherwise an ugly mark will remain at the junction.
Remove the tape from the plate when the paint dries.


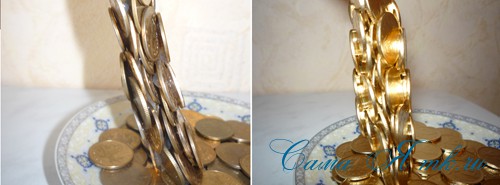
No matter how carefully you glue, the glue will still be visible if it is not painted over. For example, I can show the difference, so let's say "before" and "after". 🙂
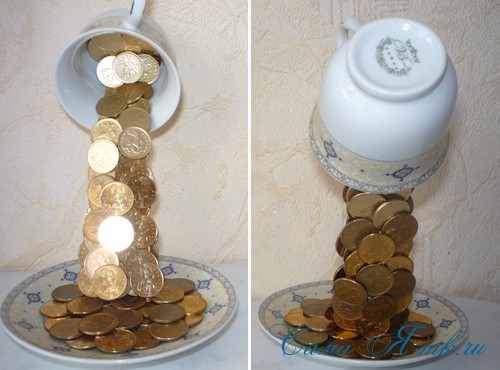
With a little work, an ordinary tea pair turned into a great gift.
Decorating…


Such pouring cup with a waterfall of coins, will be a wonderful gift. In addition to its attractive appearance, it is a very symbolic souvenir that contributes to the material well-being of its owner. It is very easy to make even for a beginner. The main thing is to dedicate a few hours of your time to this process.
Create with pleasure!
I was glad to help!
Floating Cup:
original do-it-yourself topiary
An exquisite handmade souvenir is able to enliven a strict office interior and decorate a living room - topiary is rightfully considered to be such a product. Previously, this was the name of the decorative haircut of tree and shrub crowns. Later, this direction was embodied in the manufacture of miniature "trees of happiness", decorated mainly with natural decor - dry flowers, feathers, stones, shells.

Now the topiary is very popular in the form of a bowl of abundance with a stream of coins, flowers, coffee beans and even jewelry pouring out of it. A floating cup as a symbol of abundance is not just an original Feng Shui craft, but also a great gift for a friend.

Topiary "flying cup": what can it be made from with your own hands?

The set of necessary materials always includes a tea or coffee pair - a cup and a saucer. They are connected into a single composition using a thick wire or an ordinary plug.
To make a topiary with your own hands, you will need a thermal gun with silicone rods, pliers, and scissors. To give the abundance flow a more natural shape, polyurethane foam is used. Styrofoam pads help to stick decorative elements on the saucer.
Experienced craftswomen advise using Cold Welding glue instead of a thermal gun - the design will be much stronger.
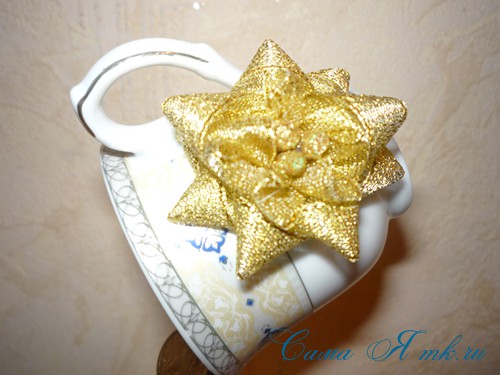
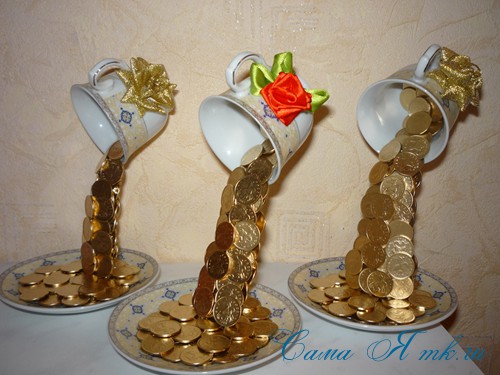
What the flying cup will “pour out” depends on the author’s idea. It can be artificial flowers and leaves, New Year's beads, moss or sisal (fiber from agave leaves) and other interesting little things.
You can imitate pouring coffee using coffee beans, cinnamon powder, or regular acrylic paint. If the floating cup is pasted over with lace or wrapped with rope twine, this will add zest to the product, give it a special stylistic flavor.
Topiary "Easter Cup of Plenty"

Topiary "Floating cup of coffee"

A symbol of abundance.

This topiary, indeed, is built very quickly and looks beautiful. The flow of abundance is decorated with artificial flowers to match the cup, golden New Year's beads. 
This topiary can be supplemented with an artificial butterfly, a beautiful rose, a delicate lily, a foamiran doll or a ladybug: all this splendor will look organic among flowers and an abundance of sparkling decorations.


Crafts in the style of a "frozen waterfall" serve as a magnificent decoration of the interior. An example is a do-it-yourself floating cup, the master classes in this article will introduce you in detail to all the stages of creating such an unusual thing.
Inexhaustible streams
From a floating cup, both an impromptu jet of water and streams of money, flowers and other objects, personifying prosperity, abundance, profit, can “pour”.
A waterfall looks the most natural, which is why many people prefer this “natural” look of a floating cup for decoration.
How to make an imitation of flowing water from a soaring cup, we will analyze using the example of the following master class.
Components:
- shells, pebbles, starfish and other marine decor items;
- artificial greenery - leaves, twigs;
- cup, saucer;
- glue "Titan";
- thermal gun and glue sticks;
- 1.5 l plastic bottle made of transparent or blue plastic;
- scissors.
Cut two long pieces out of the bottle with scissors as shown in the photo.

Bring each part in turn to the gas stove and hold it over it so that the plastic begins to deform and acquire a smooth tortuous shape. The top and bottom of the plastic pieces should be modeled in such a way that they are flat and fit well on the cup and saucer.

Glue the first blank carefully and thickly with “Titanium” and glue it so that it is one end inside the cup and the other in the saucer. Glue the second part according to the same principle with one end to the outer part of the cup, the other - to the saucer. With the help of some auxiliary supports, fix the structure until it dries completely.

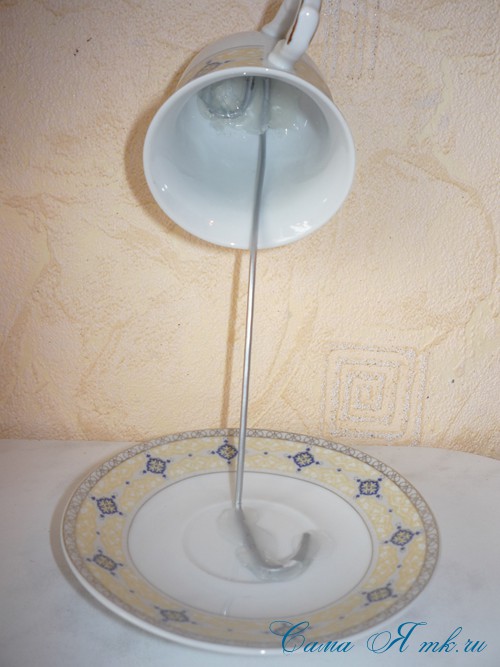
Then form "water". Slowly pour the titanium glue.
Note! If the glue drains too quickly, you will need to correct it from the bottom up with a wooden stick.
The glue will “cover” the plastic, and thanks to its transparent texture and bubbles, it will create an imitation of frozen water.

Decorate the saucer with the prepared natural material, laying out the pebbles and shells in a circle, gluing them either on the "Titan" or using a thermal gun. Decorate the cup with the same elements. Arrange the green branches evenly so that the whole composition looks harmonious.
If you are preparing a gift for Easter, then you can make a floating cup with eggs.


A step-by-step description of creating such a cup is in the master class below.
Cook:
- saucer and cup;
- fork (or wire);
- thermal gun;
- empty quail eggs, paints;
- easter chickens;
- artificial flowers;
- glue;
- adhesive plaster.
At the bottom of the saucer and on the other side of the cup where the jet will “drain”, glue strips of adhesive plaster so that the glue will take well later.


Bend the fork so that its edges fit well on the saucer and on the cup. Using a thermal gun, grease them well and fix them with stands so that the structure dries well.

Release the quail eggs from the contents by gently piercing them with a syringe.

Dry and paint them in the desired color.


Start gluing the eggs, filling the voids between them with flowers and willow branches or whatever you have. Move from bottom to top, forming a "flow".

You can glue lace ribbons, fluffy chickens, sisal into the composition.

During gluing, try to cover the entire surface of the "jet" so that there are no gaps.

The best finished Easter floating cup will look on a crocheted napkin.
Magic grains
When thinking about the decor of a kitchen or dining room, they prefer to use some elements related to cereals, nuts, sweets, spices. Therefore, to decorate the kitchen, floating cups look very harmonious with coffee. The appearance and aroma of coffee beans makes you want to pause, sit down and enjoy a delicious drink.

For lovers of a hot, invigorating drink, we suggest making a floating cup not in a classic form, but slightly unusual. We propose to make a “soaring” cezve with coffee flowing into a cup.

You will need:
- Turk;
- coffee cup and saucer;
- thick wire;
- chocolate-colored acrylic paint;
- acrylic clear varnish;
- thermal gun;
- coffee beans.
Not everyone is ready to sacrifice a new Turk for crafts, the old one will not have a decorative look, therefore, following the advice of experienced craftswomen, an imitation of Turks can be easily made from a cheap aluminum cup by attaching a small handle made from any available materials to it.

Apply hot glue to the Turk, while it is frozen, it is necessary to immerse the wire in it, after making a loop for stability.


Fix the wire and wait until it hardens. It is advisable to carefully pour a few grains into the still hot glue so that they are slightly immersed in the mass.
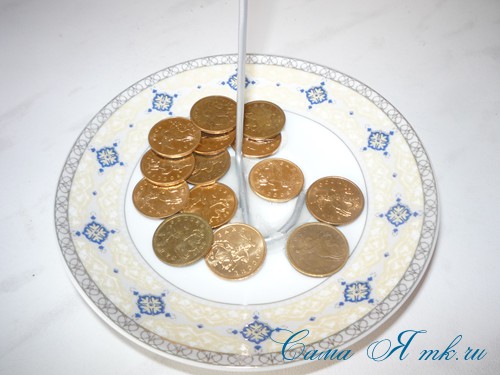
Pour hot glue into a cup and, immersing the second end of the wire there, fix it so that it also freezes.

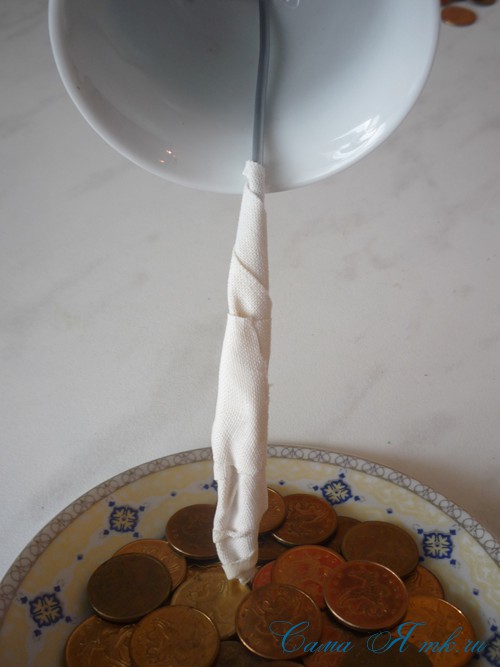
When the whole structure dries, wrap the wire with a napkin glued with PVA glue, immediately forming the shape of a jet.

Pour hot glue over the prepared surface from all sides, inserting evenly coffee beans into the still warm mass.

Glue that is not covered with grains must be painted with acrylic paint. If it is too thick, you can dilute it with acrylic varnish.

Carefully and painstakingly paint the jet from all sides. You should ideally get a thick stream, similar to hot chocolate or coffee mixed with coffee beans.

To make the whole structure monolithic, you need to glue a saucer to the bottom of the cup.

If you form the shape of the jet perfectly, as the master did in the photo, then the composition will come out magical and absolutely natural.
Such "endless streams" would be appropriate as a New Year's gift. The filler can be natural materials or coins.


Soaring cups with flowers are more suitable for spring holidays.


Video on the topic of the article
The video tutorials below will help you learn more about the technique of creating floating cups.

