DIY summer kitchen. Summer kitchen in the country
A simple summer kitchen option for a summer cottage is available for any budget and your skill level.
If you wish, the kitchen can be made completely closed, but then you can only use gas and electric ovens in it, and a brazier and a wood-fired barbecue can be placed next to the kitchen.

A simple summer kitchen with a barbecue and barbecue with your own hands.
This summer kitchen option is only used for cooking over an open fire. It includes a barbecue, work table and a canopy sink. The dining area and barbecue are located on the adjacent area.

For the construction of the summer kitchen, the ground was first leveled, a layer of gravel and sand was laid on it, and the pillars were concreted under the support pillars of the canopy.

At the next stage, we lay the tiles on the prepared site. In the area intended for the barbecue, there will be no tiles, it will be with sand, just decorate the edges of the site with curb tiles. Then we lay out the circular masonry under the brazier with refractory bricks.

We install the canopy: first, the support pillars, then we connect them with floor beams, the roof of the canopy slopes away from the site. We sheathe the frame of the summer kitchen with wooden planks.

We cover the brazier with decorative masonry made of natural stone.

We install a slate roof, sheathe the inside of the summer kitchen with a magnesite slab intended for outdoor use. Installing a work table, sink and barbecue.

Such a summer kitchen can be made by hand in just a couple of days off.
Summer kitchen with a bar.
The design of this summer kitchen included a shed for the summer kitchen itself and a pergola for the dining area. The summer kitchen includes an oven, barbecue and eventually a pizza oven. 
Using this kitchen as an example, you can see that a summer kitchen with your own hands can be built in several stages. At the first stage, everything is being built, except for the pizza oven, which so far is only in the plans, but there is no ability to build it and the means to hire a master to build it. It was postponed for the next year.

The order of work is standard - we level the site, concreting the pillars under the supports, laying a gravel-sand cushion on the site, and paving the site.

Because the summer kitchen is located in a quiet corner of the garden, then they decided not to close it on three sides, but to make only the rear blank wall. Simple laying of their cinder blocks forms the work surface. The table top was made of wooden beams.

The very process of building such a kitchen is not very laborious and any summer resident can afford such a summer kitchen project.
A simple summer kitchen near the house with your own hands.
Unlike summer residents, the owners of a private house have a serious plus - they do not need to go anywhere and the construction process can be more calm and measured. The construction of this kitchen began with the paving of this beautiful area in front of the house with natural stone combined with cobblestone. When the site was ready, it was decided that it could also be used for a summer kitchen next to the house.

First, the pillars were concreted under the canopy supports and installed. The entire kitchen will be made of concrete slabs and support platforms will also be concreted under them.

In order to make a concrete countertop, they made a formwork, covered it with foil, and put reinforcement. The places for the sink and barbecue were marked with containers of the corresponding sizes. After the concrete had hardened, the formwork was removed and the edges sanded.

We are erecting a working table for our summer kitchen from concrete blocks, bringing the water inlet to the place intended for the sink.

Our summer kitchen with our own hands is almost ready - a sink is installed, on the right side of the countertop there is a place for a barbecue, in the lower left part there is a place for a barbecue.

Additionally, a storage cabinet was built next to the summer kitchen.

This is where the pillows from the furniture will be stored, which will be in the dining area.

We covered the roof of the summer kitchen with transparent polycarbonate, finished the decorative fence around the kitchen to give the building a more finished look.

A simple and beautiful DIY kitchen can really be made inexpensively and easily.

But what a pleasure it is to enjoy your dinner outdoors in the garden!

Do-it-yourself summer kitchen next to the gazebo.
A small shed next to the main gazebo can be turned into a small summer kitchen.

Styled wooden furniture made from scrap materials will add a relaxed atmosphere of comfort to this corner of your garden.

If necessary, you can host a large enough company here - you just need to put up a large table.

So a simple canopy next to the gazebo can turn it into a dining area for a summer kitchen.

Summer kitchen with a do-it-yourself stove.
If you know how and love to cook in the oven, it is not necessary to follow the general fashion for barbecues and barbecues. Add an extension to your gazebo, make a stove in it - and you have a wonderful summer kitchen, not like the others.

By the way, grill and barbecue may well find their place in your summer kitchen.

This option is great for areas with cold summers, where while you are standing near the stove it is warm, but when you sit and dine, you want comfort, not refreshing coolness.
You already have a gazebo - it can be used as a dining room on cooler days. And for summer days, you can simply install a table between the house and the gazebo.

For the barbecue itself, an ordinary canopy tied to a gazebo and a small work table next to it for cooking will be enough for you.

So, if you are creative about what you already have, then it is not necessary to build a new free-standing structure for a summer kitchen. By smartly adding small elements, you can significantly increase the functionality of existing buildings.

A simple summer kitchen with your own hands can be built with a very modest budget, you just need to turn on your creativity and it can be built quickly and inexpensively.

If you have approached this process wisely, then you can always expand, complete and improve your summer kitchen.

Do you agree that a simple summer kitchen with our own hands is within the power of each of us?
In the warm season, it is much easier to create culinary masterpieces in the summer kitchen. In addition, a detached structure will allow you to avoid stuffiness and fumes that accompany frying, cooking and baking in the house. The open space will allow you to cook fish, meat and vegetables on charcoal, barbecue, grill marshmallows with children on the fire and many other things. To build such a kitchen, it is not at all necessary to call hired workers, because you can do everything yourself.

Peculiarities
The design of summer kitchens is open and closed. Both are popular with private home owners. In order to decide which model to build on your site, you need to study the pros and cons of both options. A closed summer kitchen is, in essence, a real home. It has a door, roof, walls, floor and ceiling. There are projects combined with a glazed veranda, a terrace, a cellar, even a bathhouse - there are many options, the limitation is only in the owner's imagination.

In most cases, for the construction of a summer kitchen, they choose lighter building materials and refuse to insulate the structure, because in the cold season they use the "winter" catering unit located in the house. But there may be more solid and durable structures made of bricks or foam blocks that can be insulated.
The advantages of the closed type are:
- protection from precipitation, winds, street dirt and insects with rodents;
- the safety of things inside;
- high degree of security.


There are also disadvantages:
- more costly and labor-intensive construction;
- additional design and calculations;
- the object must comply with building rules and regulations (a permit will be required to put it into operation), but if the rules were not followed, it will not be easy to register ownership of the structure.

It is impractical to build a closed kitchen in the country, which will be empty all winter. But in a country house where the family lives all year round, such structures are extremely in demand.
Open kitchens are structured like a gazebo. The base is made, as a rule, concrete or laid out with tiles. Support pillars are installed on it around the entire perimeter or two walls are erected, and instead of the other two, free space is left. There may be a canopy on top of the structure, or a light roof.

In an open kitchen, it is much easier and safer to install a brazier, barbecue or oven, because the likelihood of fire is much lower. Often, a summer kitchen is connected to a foundation site without walls and a roof.
The structure of such a plan has quite a few advantages:
- fast erection;
- minimum calculations and costs;
- budget project.


There are also disadvantages:
- does not save from winds, rains;
- does not protect well from insects;
- for the entire cold period of time, you need to clean everything in a closed room.

The summer catering unit can be connected to a residential building. It is most convenient for the border to pass from the side of the utility block. The connection can be established as a transition, as well as an ordinary extension with different outputs.
Seat selection
It is necessary to choose a place for a summer kitchen in a garden in such a way that it fits well into the overall landscape composition and does not disturb the location of the beds and flower beds. It is better if it is a free-standing structure in the shade not far from the house. Firstly, it is more convenient to bring all the necessary communications to it. Secondly, if the building is planned to be open (with a barbecue, barbecue and space for relaxation), then the refrigerator will have to be left in the house. Consequently, the products will need to be brought from there, to do it faster when the distance is not great.

It is safer to position the kitchen so that it is in the back of the lot, away from the road. It is equally important to ensure the drainage of melt water and sewage, therefore it is advisable to choose a place for the building with a slight slope.
You cannot build a summer kitchen near cesspools, septic tanks and toilets for obvious reasons. It is better to choose the leeward side for its construction, so that all kinds of smells do not bother guests and hosts, and the smoke from the barbecue does not go inside the room.
A very simple and convenient design of a summer kitchen is a construction of two solid wood or brick walls, along which there is a stove or stove, shelves, tables or a table. Instead of the other two walls, there is open space. This is a very practical and functional structure, and besides, it can be unusually beautiful, especially if you decorate an open space with trellises and let climbing plants along them.

It is not so expensive both in terms of money and materials, and in terms of construction time. When drawing up a construction plan, this will become an obvious fact. For such a structure, you need to choose a place in the shade, but not damp. A low-lying location is also not suitable, as it will attract the attention of insects.

If the summer kitchen is an extension to the house, it is very important that it is completely fireproof, especially if it is planned to install a stove or barbecue there. The fire source should be located as far away from the wall adjacent to the house as possible. As an extension, the summer kitchen is in most cases open. Otherwise, the house will have two rooms that are absolutely identical in functionality and purpose.

The decision to make the kitchen directly above the cellar can be very successful, because then it will be easy both to get food out of there, and to put various kinds of blanks there for storage.
Materials (edit)
Open-air summer kitchens are usually constructed from lighter materials and are not insulated.
- The foundation can be made of concrete or sand concrete, cinder block.
- On the base, you can lay boards or lay out tiles. After that, either pillars are installed from a profile pipe made of metal or other material chosen by the owner, or two walls are erected from brick or timber.
- Free space can be decorated with a lattice of boards, or you can leave it open.


The lightest frame-type structure for the construction of a closed kitchen will be installed on a columnar foundation. You can sheathe it with clapboard or OSB plates. Mini-bar cladding is also good. Despite the ease of erecting the frame, finishing can be done of almost any kind: under a bar, plaster, siding. If brick or concrete walls are to be erected, as well as walls made of foam blocks, stone or aerated concrete, it will be necessary to build an additional frame made of metal profiles or wooden slats.


Wooden structures are built from a bar, log or solid wood, but it is important to remember about the weak fire resistance of the material. The tree must be impregnated with special compounds from rotting and burning. Brick structures are more durable and fireproof. But they require significant financial and time costs for construction.

Polycarbonate structures are budget friendly and lightweight. This material transmits the rays of the sun, but has a layer that protects against ultraviolet radiation. It is reliable and durable.
Another inexpensive and lightweight construction material is SIP panels. It is extremely popular among the owners of summer cottages. Consists of chipboard or wooden board outside and polystyrene foam inside. To choose a material for construction, first of all, you need to decide what type of kitchen will be built, how functional it will be, whether the family lives permanently outside the city or comes from time to time. Once all the questions are answered, the choice will be easy.

External finishing can be made of the following materials:
- false panels;
- decorative plaster;
- brick;
- wooden boards or slats;
- tile;
- fake diamond.


This is not a complete list of what can be used to decorate a summer kitchen.
When choosing a material for interior decoration, you need to proceed from the purpose of the room. In addition to beauty, it should, if possible, resist the ingestion of odors and the formation of fatty deposits; it is good if it can be easily washed and cleaned. Ceramic tiles are most suitable and are ideal for decorating the work area.
If for some reason it is not possible to lay the tiles, there are many more options:
- wallpaper;
- drywall;
- painting walls is the easiest and most affordable way to refresh the kitchen;
- wood;
- plastic panels.


If the summer kitchen is built like a gazebo, that is, it has no walls, part of the space can be filled with a crate. It will be very decorated with climbing or creeping plants - grapes, bindweed. You can also hang thread or voile curtains in the openings - they add air and at the same time block the path of dust. During periods of insect activity, special hermetically sealed curtains will save from their invasion.

How to build a closed one?
It is not difficult to build a closed summer kitchen with your own hands. Especially if you choose a suitable lightweight material for this - polycarbonate, SIP panels or timber frame construction. If brick construction is planned, it will be much more difficult, since a more solid foundation is required. Also, it will take longer. It is important to remember that the walls of the future summer kitchen must withstand environmental influences. Therefore, if the climate of the area is rainy and windy, it is better to take care that the covered structure does not leak or leak from precipitation or a blizzard. If the winters are very cold, it is very important to properly insulate the kitchen.


The layout can be any - with a bath, a cellar, a veranda, with a stove or stove. The original solution would be to install a wood-burning fireplace with a hob in the kitchen, if you make it metal, it will be quite cheap. Also, a covered summer kitchen can stand on the same foundation with the house and have a common entrance with it. Or it can be connected to it by a passage or attached to the veranda, and then there will be two entrances. If you assemble the entire frame of the extension from a metal profile, then the walls can be glazed or double-glazed windows installed.

If electricity cannot be supplied to the structure, the problem will be solved by purchasing a diesel generator.
Building a closed kitchen is, in fact, building a house, so the same stages are characteristic of it:
- preparation and pouring of the foundation;
- summing up communications;
- walling;
- roof construction;
- facing if necessary;
- interior decoration.

Open construction
An open summer kitchen is even easier and faster to build than a closed one. There is no need for a particularly strong foundation; the floor can be laid as desired. Tiles are preferable for this type of structures, since they are less susceptible to wear and tear and negative effects. The sun shines on the open area, precipitation falls, dust, insects fly, and ceramic tile of all types of floor coverings is the most resistant to all these phenomena.
Summer kitchens in the country, projects of which are presented in our photo gallery, are as individual and diverse as the traditions of each individual family.
In appearance, they may differ from the buildings already existing in the country or harmoniously and complement them. And for the price - to demonstrate "chic and shine", to be quite a budget option or the golden mean.

Since you are interested in this topic, most likely you already have a rough idea of what a summer kitchen will look like in your country house. We will help you not to lose sight of important details, share interesting ideas, and a selection of photos will charge you with the necessary enthusiasm for their implementation.
Where to start working on your own project? To begin with, we would recommend defining a list of tasks that the summer kitchen will perform.
Summer kitchen functions
The size, type, layout, content of the summer kitchen in the country, and many other points depend on the purpose of this building.


After all, it is used for cooking, as well as for placing:
- dining room;
- recreation areas;
- areas for washing and storing dishes;
- guest;
- barbecue or barbecue areas;
- kitchen utensils that you do not use very often in your main house;
- dryers for clothes, linen, mushrooms, berries, fruits and herbs;
- gardening, fishing or hunting equipment.
A washing machine or dishwasher can be moved to a closed summer kitchen if there is no place for them in the house.


Given that not so many buildings will fit on a standard 6 acres, it would be rational find a use for the space above or below the kitchen.
The cellar is useful for storing twists and preserves, seeds, frost-resistant tubers, plant rhizomes and garden equipment. In the attic, you can arrange a place for drying fruits, mushrooms or fish.


It is better to think about a summer kitchen project even at the construction stage of the summer house itself (if possible). First of all, it is cost effective and reduces the cost of repairs.
The attic can always be completed, but with the cellar everything can be much more complicated. The insulated and waterproofed cellar is only useful for storing a variety of things, including firewood.
Choice of plate
Even in ancient times, the construction of a house began with a stove. Today this is not the case, because there are a lot of heating devices, and their use is often limited only to cooking.
The type of stove must be determined in advance - since it depends on what to carry out the gas pipes or cables.
Most often, an ordinary gas stove is placed in the country. According to the older generation, it is easier to cook on it and it costs less. If it is not possible to supply gas, you can use a propane cylinder or opt for an electric stove.


For barbecue and grill lovers there are portable kitchens that can be rearranged from open air under a canopy and vice versa.
Lovers of multifunctional items will appreciate heating and cooking ovens or oven complexes... After all, a Russian, Swedish or Dutch stove can be not only a fireplace and a means for cooking, but also an effective way to heat the adjacent rooms of the house - for example, a bath, a sauna or a shower.


By installing a metal tank near such a stove, you will provide the kitchen in the country with hot water (which is very convenient when washing dishes and cans).
If the acquisition of new equipment or the construction of complex structures is not included in your plans, and even more so when you strive for maximum closeness to nature and want to build a source of fire with your own hands - make a brazier.
- do not intend to purchase new equipment for summer cottages;
- do not plan to build complex structures;
- do not trust portable designs;
- if you want to arrange a place for a fire yourself -
Build a barbecue. This props, useful at the dacha, can be made with your own hands.


Country life is inconceivable without a barbecue, which you can easily do with your own hands. (the word “construction” appears elsewhere in the text).
To lay out an area in contact with fire, you need a refractory one - for example, fireclay brick, mortar or clay. The outer layer of the barbecue can be decorated with a river or facing stone.
An alternative to gas and electrics eco-fuel - wood - will definitely reduce your heating costs, especially if the forest is nearby. But, as in everything, there are also disadvantages here, because cooking with wood requires:
- regular felling and harvesting;
- storage;
- annual chimney cleaning.
Now let's move on to the next step: choose the type of building.
Closed summer kitchens
A closed, completely protected from the wind and other surprises of the weather, the summer kitchen will perfectly cope with the role of a guest house. And if you provide good heating, it will be adapted for living in the winter. Examples of indoor summer kitchens in the country are in the photo below.


A closed summer kitchen with a sofa and a dining area is a complete, durable home with obvious advantages. Neither rain, nor snow, nor mosquitoes will drive you out from the table, will not disrupt your plans, and even more so - will not spoil furniture and equipment. But for its construction, more materials are needed.
The walls are built of brick, stone or foam concrete, and the roof is made of tiles, slate or corrugated board. And for all this, you need a solid foundation with a depth of at least 50 cm.


A properly designed and built indoor kitchen will function for all 4 seasons, regardless of the climatic zone.
If the guest room is located in the main house or is absent altogether in your project, the size of the kitchen can be reduced. An area of 8-9 square meters is considered the necessary minimum for a kitchen-dining room, but who better than you know the exact figure.


Tip: in order not to choke on cooking on hot summer days, consider the possibility of turning a closed kitchen into a semi-open one by opening windows or additional doors.
Open summer kitchens
Buildings are considered open, in which the walls, and sometimes the roof, are completely or partially absent. These include gazebos, pavilions, awnings, patios, or pergolas.


This is a great opportunity to organize a kitchen with a barbecue or other source of fire. An open kitchen is inexpensive. It is quickly erected, does not require an exhaust hood, heating, a strong foundation and professional construction skills.
Having dug a pit 15-20 cm deep, you fill it up with sand or gravel, tamp it, and then put terrace boards, brick, stone or paving slabs - that's the foundation.


Important: the roof in an open structure should go beyond the structure - this way it will save you as much as possible from slanting rain.
The absence of windproof walls and the free circulation of air masses are both an advantage and a disadvantage of an open kitchen in the country. On the one hand, the wind saves from the heat and fancies the fire. But in the company of rain and cold, it makes your stay in nature uncomfortable, and open buildings - short-lived seasonal buildings.


Often, open-type kitchens are used to equip cozy outdoor dining areas... Partitions decorated with climbing garden plants or trees will act as walls.
Clematis, bindweed, grapes, kiwis, vines - choose plants so that they bloom alternately, and your kitchen is constantly changing in color. A beautiful and useful wall substitute for the dining room will be a mosquito net with a pattern, long curtains or roller blinds.
To get an idea of the variety of outdoor summer kitchens, take a look at these photos.


Combined
Semi-open summer kitchens combine the positive qualities of indoor and outdoor buildings. You are still in the fresh air, but not under all four winds.


One of the walls can adjoin a house or other building, allowing you to save on materials. Two stone walls make it possible to equip a corner kitchen, convenient from the point of view of ergonomics and placement of the dining room.
Combined kitchens are also called kitchens made of different materials - for example, stone or brick goes to the level of the windows, and above - beams, frame technologies or panels.


Having decided on the functions and choosing the degree of "closeness" of the planned building, we proceed to finding the best place for its location.
Optimal location
Finding the best location for a new building is perhaps one of the most difficult parts of a project. By placement, summer kitchens are divided into two types: free-standing structures and annexes to the main house.


But here's what you need to consider. On the one hand, the summer kitchen in the country house should be closer to the house, because it will be easier to bring communications. But then smoke and heat can enter the house, causing inconvenience. Therefore, it is important to find out in which direction the air masses are most often directed.
As with any place for preparing or eating food, the kitchen should be located away from the toilet, chicken coop, doghouse, roadway, compost pit, and other sources of unpleasant odors.


Cooking in the sun is an unpleasant activity, so the proximity of a dense tree crown will not hurt.
And, of course, everyone would like to enjoy the magnificent landscape, garden or vegetable garden, and not the wall of the neighboring house. At this point, a compromise is possible - a partition decorated with climbing plants, textiles, stained glass or decor, which will hide an unsightly look.
It must also be borne in mind that a deep foundation is required for a closed summer kitchen.
Economy options
Many people dream of a summer kitchen in the country, but often the prices for stone that are most suitable for its arrangement direct our enthusiasm to something else. But in vain ...


After all, the kitchen can be made from scrap materials, you just need to turn on your ingenuity. For example, old window frames will reduce the cost of building a closed kitchen.
True, this does not relieve you of the need to lay the foundation.
Alternatively, the summer kitchen can be made from a rail container. Probably, it will be much cheaper in comparison with construction to purchase a ready-made change house that does not need additional finishing.


But nevertheless, the project of a summer kitchen in the country, which falls under the category of economy class, most often implies an open-type construction. And since the concept of a "simple summer kitchen" is very individual and elastic, let's look at several different options.
1. A slab, sink and work surfaces united by the island, located on a common foundation under the open sky. Stone, plastic, stainless steel and thoughtful design will protect the island from the influence of moisture, but the awning installed next to you will save you and the prepared dishes.
2. Conversion of a gazebo, veranda or terrace into a summer kitchen.
3. Connecting two existing buildings with a common roof made of tarpaulin or lighter waterproof materials.
4. Stakes or metal supports with grapevine-braided walls and a thatched roof.
5. Arrangement of the summer kitchen against the wall of the fence: it remains to add an awning or a pitched roof.
6. An open or closed kitchen made of adobe - a mixture of earth, clay, hay and other materials at hand. True, adobe is suitable for buildings in hot, arid climates.
And here are some more examples of interesting projects in the end.


We hope our article has inspired you to create your dream summer kitchen!
For relaxation and the like. If you do not know how to build a summer kitchen with your own hands, then you should pay attention to studying the following material, which will familiarize you step by step with this difficult process. Before starting construction, let's highlight the advantages of a summer kitchen.
What is the purpose of the summer kitchen
The summer kitchen is the perfect helper for every housewife in the spring, summer and autumn seasons. In it, you can cook food, make twists, fry, boil. All couples will be outside your living space, which is a huge plus, for example, in the heat. The summer kitchen is a suitable area for relaxation, eating, installing some furniture, including a stove, shelving. Of course, this is an optional building, it does not have to be present at absolutely every summer cottage. But if you strive to create coziness and comfort, then her presence will be quite logical.
Types of summer kitchens and where is its best place
Depending on the material used, summer kitchens are divided into several types:
- Wooden summer kitchens. They are made of laminated veneer lumber, logs and the like.
- Summer kitchens made of metal. In this case, simple frame structures are used, which are very easy to assemble. Their advantage lies in the ability to move from one place to another.
- Budget summer kitchens. In this case, materials at hand are used, for example, wood or metal.
- Brick summer kitchens. They can also be combined with metal, wood.

Such a structure can be open or closed. If you plan to use it in the winter season, then glazing and insulation will be required. If not, then it will be enough to complete a simple construction without finishing finishing work.
As for the choice of the location of the summer kitchen, it is important to take into account some factors. For example, you should decide how much space it will take up. What shape will the building be: square, round, oval, rectangular or irregular. Already proceeding from this, you select a suitable place, while taking into account the following points:
- Remoteness from the utility yard, house, garden and other buildings.
- Warming up of the selected area. For example, a summer kitchen can be in the shade of a garden or, conversely, in an open space.
- The presence of drafts. This is important, since it is undesirable for a draft to constantly draw on the legs and back in the chosen place, rest in such conditions can provoke some diseases.

The study of the terrain will be no less important. For example, the presence of groundwater should be determined, namely how high they lie. The nature of the soil. Surrounding plants. It is very good if you transfer your entire idea to a piece of paper, thereby making a project for a future summer kitchen.
Brick summer kitchen construction
A summer kitchen, built of brick, will be a reliable structure that can be used even in the cold period. But in order for it to serve for a long time of the year, the first step is to take care of making a reliable foundation.

Foundation making. It should not be assumed that the foundation for a summer kitchen should be as strong as for a home. If the building will consist of brick walls, a wooden roof, then piles should not be driven in and the foundation should not be greatly deepened. Such a building will not exert much pressure on the ground, so a combined foundation can be made. If you chose a rectangular building shape, then six pillars will be enough, three on each side. If a wooden post and a brick are chosen as the pillars, then the trench will be made as follows:
- A trench is being dug under the masonry along the markings of the wall. Its depth will be 0.5 m, and its width is 0.4 m. As for the length, it must correspond to the dimensions of the future building.
- In the places where the support will be installed, a hole is dug with a depth of 0.7 m.The size of the hole can be 0.4 × 0.4 m.
At the next stage, the pillars are mounted in the dug hole. They should be aligned with the strip foundation, which must be connected to the posts. When the posts and tape are ready, you can start making the platform.

Manufacturing of the site. As for the site, it should be flat, since furniture, accessories, equipment and the like will be installed on it. For example, it can be made from paving slabs. To do this, remove the soil with a depth of 0.2 m inside the foundation. But this must be done only after the foundation is completely dry. Further, sand is evenly poured into the pit, which it is desirable to compact well. The backfill layer should be 70 mm. During the tamping process, the sand can be slightly moistened so that it settles as best as possible. When you have done all the preparatory work, you can start laying paving slabs.
Note! In order to speed up the process of laying tiles and not wait for the foundation to dry completely, you can build a blind area around the perimeter, which will keep the entire structure stationary and strong.
After laying the paving slabs, the upper edge should rise above ground level by an average of 50 mm.
Blind area manufacturing. Thanks to the blind area, the structure can acquire a certain decorative effect. Moreover, it will protect the foundation from excess moisture. To do this, along the perimeter of the summer kitchen, you should retreat 0.5-0.7 m from the wall. This distance is enough to make a blind area. Next, you make a wooden formwork. In this case, the blind area should have a slight slope from the foundation, such that the water falling on it flows freely and does not stagnate. The blind area is poured with concrete and leveled with a rule.

Masonry walls of the summer kitchen. When building a summer kitchen, half-brick masonry will be enough. Before starting work, you must first prepare a mortar and a brick, which can be folded directly on an already made site. In the process of work, the masonry must be regularly checked in level. If you plan to install a door frame or windows, then in the process of laying bricks, it will be necessary to install beams or lintels in specially designated places. When the walls are laid out, you can proceed to the next stage. Mauerlat is made from a wooden bar, it will tie the entire structure into a single whole and will serve as an excellent basis for installing the roof.

Roof installation. It is not recommended to choose a heavy and fragile material as a coating. You can, for example, use a corrugated sheet of metal. In any case, you must first make a roof frame and lathing. As for the type of roof, it can be, for example, single-slope or gable. However, there are no restrictions. The most important thing is to maintain the appropriate angle of inclination. You should use wooden beams and planks to make the lathing. The design features of the roof directly depend on the roofing material you choose.
Interior decoration of the summer kitchen. When all the major wall and roof installation work has been completed, you can start finishing work from the inside. There are no hard and fast rules on this issue either. For example, brickwork can be made for joining. If you wish, the walls can be plastered, and then putty. Check the condition of the paving slabs. Each joint must be filled with grout.
Conducting communications

Special attention must be paid to such an important process as the implementation of engineering networks. Their number will directly depend on how you want to use your summer kitchen. You may need to carry out the conduction of gas, electricity, sewage, water supply.
Note! Communications must be connected not at the end, but as the summer kitchen is being built. Some communications will be carried out under the foundation, others will not. For this reason, it is important to consider this stage of work and plan its sequence in the process of manufacturing a project.
So, we learned with you in what sequence the process of building a summer kitchen is going on. Of course, there are many other options for the technology of its construction. You should adhere to your own taste and wishes, and most importantly, financial capabilities.
Video
Construction of a frame summer kitchen:
Photo
We will send the material to you by e-mail
V It is inconvenient to cook in the house on a hot day: it is hot and stuffy. But it is at this time that the hostess spends more time at the stove, because in addition to the usual cooking, she also has to roll home canned food. An easy construction, a summer kitchen in the country will help to facilitate the task and turn duty into pleasure. Projects, photos and various design ideas for this cozy corner will help the home craftsman to make his dream a reality on his own.
For seasonal construction, a canopy and a concrete area are enough
It is not difficult to build a temporary dining room on your own, the main thing is to reasonably approach its location on the site and the choice of building materials.
Preparing a project
The first step is to study the site plan and determine the location for the optimal location of the building. This site must meet the following requirements:
- be close to the main house so that you can bring dishes and food;
- have convenient access routes so that there are no obstacles to moving from house to building;
- it is desirable to provide for the proximity of the site to the main communications: water, sewerage and electricity.
Useful information! An ideal option would be the presence of a natural or artificial reservoir near the building.

Having decided on the construction site, you need to measure its area. The size of the temporary structure is a separate issue. If it will additionally carry the function of a dining room, you will have to provide additional space for installing a table and placing chairs or benches. The presence of a stove or barbecue in the dining room also dictates the need to add square meters to separate the hot workshop from the dining group.
Even with a complete lack of artistic skills, it is easy to draw a plan for the future kitchen using a ruler and checkered paper. To scale, you need to depict all the main objects that will be located in the building: a sink, work surfaces, a stove or oven, a table. If the hostess has assistants, it is better to make the room elongated so that it is convenient for several chefs to work at once.

Seating at the dining table should be comfortable, chairs need enough room to move back.
Helpful advice! If the area of the site does not allow placing a temporary kitchen with a dining room, you can abandon this idea and move the dining group to or into the gazebo.
Open or closed summer kitchen in the country? Projects, photos, advantages and disadvantages
A light building can be with or without walls, have a roof or be located in the open air - it all depends on the wishes and imagination of the owner.

Important! It is better to refuse the option of an open-air kitchen in the conditions of Russian latitudes. Hot sun, rain and hail can bring unpleasant surprises.
The walls of the dacha dining room, in principle, are not needed. Its main task is to enable outdoor cooking, so a canopy and supports are sufficient. It is another matter if the building will be used in the autumn-winter period. In this case, walls and glazing will have to be provided for protection from bad weather and cold. Dignity open building:
- fresh air access;
- ease of movement;
- the ability to cook food not only on a stationary, but also on a portable grill;
- low construction costs.

There are also disadvantages:
- inconvenience of cooking and eating in windy weather and cool times of the day;
- availability of storage space for dishes and products for domestic and wild animals.
Closed building
Pros:
- the ability to use the kitchen in any weather;
- in a closed area, you can place equipment that is sensitive to atmospheric moisture.
Minuses:

Open summer kitchen in the country: projects, photos, materials
The open dining room option can be temporary or permanent. The temporary structure is more mobile, it can be placed every year in a new place and removed for the winter in the utility room. All equipment will also have to be dismantled each time and look for a place to store it.

Open and closed summer kitchens in the country: projects, photos - all these materials give a reason to roll up your sleeves. In such a building, a Russian stove, brazier or cauldron can be freely accommodated.

You can choose a wide variety of building materials for such a project:


- forged openwork elements are expensive, but will delight the eye for a long time.

Examples of closed structures
Glass and wood are the most popular materials for the construction of indoor summer kitchens in the country. Projects, photos of similar buildings created by professionals and amateurs are available to everyone. Combined with bricks that can be opened wide, a practical and durable solution. Such a structure will reliably protect from bad weather. It can be operated all year round.

For your information! You can fully appreciate the advantages of a closed country house with a barbecue or stove on New Year's holidays. A fabulous view of a snow-covered garden and a fire in the grill - what could be better for a Christmas evening?

Related article:
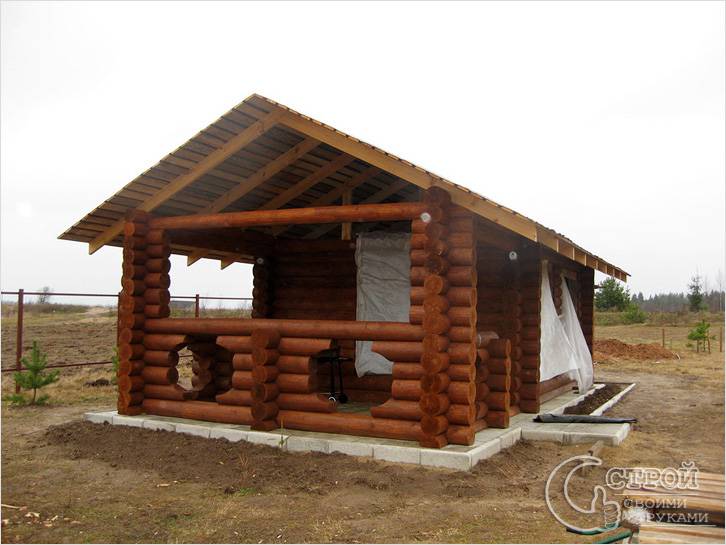
Log buildings have been hitting demand records over the past decade. The Slavic-style summer dining room, with a stove and matching furniture, will be a favorite place for parties with close friends.

The list of building materials for such projects is very wide: OSB slabs, lining, stone. Photos and projects of closed kitchens in the country show the imagination of home craftsmen. They offer to use improvised, waste material - glass containers, plastic bottles and even firewood.

Video: photo ideas for summer kitchens
Step-by-step construction of a summer kitchen in the country with your own hands
- Drawing preparation. You can do it yourself or take a ready-made one.

- Site preparation. The site is cleared of debris and vegetation, markings are made.

- Arrangement of the foundation. The base for the summer building must be in accordance with the project. For an open structure, it is enough to cover it with sand, reinforce it with a metal mesh and fill the area with concrete with a layer of 10 centimeters. Before pouring the base, the canopy posts are installed. A closed dining room made of brick or stone requires a bookmark. They are installed under a construction from a bar or log.

- Installation of the frame. For an open dining room or will require the installation of vertical supports. Their location depends on the project. The main thing is that the pillars are reliable enough and can withstand the weight of the roof and the wind load.

- Construction of walls. In versions of closed dining rooms, the walls are laid out from different materials. Without experience, it is better not to take on yourself. Laying timber and logs requires less construction skills, but it also has its own characteristics. If the seasonal building was bought as a finished product from the manufacturer, you can try to assemble it yourself. Even a novice master will master the frame walls.


- A stationary stove will require a solid foundation. The masonry is made of refractory bricks. To avoid accidental fire, the space around the barbecue is laid out with ceramic tiles. for the oven, it is better to order from the master. He will tell you what height the pipe needs to be installed for good traction.
Photo projects of a summer kitchen in the country with a barbecue grill:


In order for a seasonal building to become a favorite place for passing not only the hostess, but also all household members, it is important to adhere to the following recommendations:
What type of summer kitchen building to choose?
Do-it-yourself kitchen in the country, photo examples of which could be seen in this review - a reason for inspiration. It is not difficult to choose any format for yourself. A closed or open structure with a barbecue or cauldron will be both a place for cooking and a favorite corner of the garden for friends and family. You can build the dining room yourself or invite professional craftsmen. In the first case, you can save a lot, in the second, you can achieve a guaranteed result.

