Do-it-yourself voluminous cardboard clock. DIY New Year's watch
Marianna Nettina
Good day to the guests of my page!
In order to introduce older preschool children to clocks and teach them how to set the time, you need a model of a clock with arrows that can be rearranged.
For handouts or a didactic game, you can make your own model of a clock from cardboard and cocktail straws.
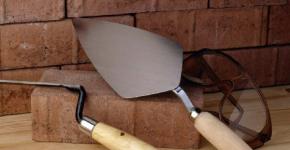
Prepare white cardboard, black cardboard, glue, tape, tube, matches, watch dial printed on a colored office piece of paper (downloaded from the Internet)

Cut out the dial and paste it on white cardboard, “laminated” with tape. Using an awl do hole for a cocktail straw in the center of the circle. Cut from black cardboard arrows short and long. Use a hole punch to pierce the holes.

A piece of straw (1 - 1.5 cm) insert into the center of the dial, insert the arrows. Using matches or a lighter, set the ends of the tubes on fire and press down. Same thing on the other side.

These watch can be used in a didactic game to reinforce parts of the day, to reinforce numbers.
Hour hand
Hour hand
Hour after hour goes by,
Without haste, without falling behind,
And he takes us with him.
Minute hand
Minute hand
You are the sentry sister.
Minute hand,
You are long and fast.
Counting down the minutes -
This is no joke!
Publications on the topic:
Defender of the Fatherland Day is coming soon and we are already thinking about what gifts to make for dads with their children. I propose to make a watch like this.
Material: 1. Cardboard 2. Colored paper in red and white. For the body we use red cardboard size A4. 3. Cotton wool 4. Paste.
How to make exercise your child's favorite habit How to make exercise a child’s favorite habit Exercise What is exercise for? - This is not a riddle at all - To develop strength And all day long.
Preparations for a home holiday go in three directions. Firstly, it is the creation and maintenance of a festive state, i.e. emotional.
Master class “Clocks”. You can make this clock with children in the preparatory group and use it to learn time. 1. Cut out the base for the template.
DIY watch for the New Year.
New Year is one of the holidays with a particularly warm and soulful atmosphere. And it is created from many small little things. A festive tree, colorful lights, beautifully wrapped gifts and, of course, various New Year decorations.
For those who want to create a festive and warm atmosphere with their own hands, we will tell you how to make a beautiful New Year's clock that can decorate any home. Beginning needlewomen can try to make a simple round clock from foam plastic, and those who have skills in this matter can try making a New Year's craft that looks more like a cuckoo house.
Stencil of a New Year's clock made of paper and a dial for a New Year's clock: print the template
Template #1 Template No. 2
  Template No. 3
 In principle, New Year's watches can have completely different shapes. If you wish, you can make them look like an ordinary round alarm clock or make a more massive product that can be placed on the wall.
But whatever form your craft takes, remember that in this case it is extremely important to pay attention to the decor. To make your watch really look like a New Year's decoration, be sure to decorate it with fir branches, cotton wool, shiny snowflakes and sequins.
As for the dial, it can be either simple or complex. If you don't want to bother, then just draw a circle, put numbers on it and attach it to the base. If your goal is a more original craft, then decorate it with an interesting thematic dial. You can see examples of holiday stencils for making New Year's watches a little higher.
How to make a beautiful New Year's watch out of a box?
If you want to make a New Year's craft as quickly as possible, then a ready-made box is exactly what you need. An ordinary rectangular box or, for example, a round cake box is perfect for these purposes. If you prefer this particular craft option, then you will only need to correctly fix the parts together and, of course, decorate them in an original way.
Watch from a cake box:


- First of all, wash the box and dry it thoroughly
- Next, take the paper of the color you need and cut out the numbers for the dial from it
- Gently coat them with glue and secure them to the top of the box
- While they dry, start decorating the inside of the craft.


- Place colorful rain, small Christmas tree decorations, or just cute animal figurines in it.


- Make plasticine blanks (they should be shaped like cones) and wrap them in foil
- Connect the two parts of the box together, fix the pine cones on them and additionally decorate the craft with rain
New Year's watch from a gift box:

- So, take a rectangular box and fix ribbons on its bottom, to which the cones will later be tied

- At the next stage, using a stencil, cut out the festive dial and also fix it on the workpiece


- Next, take two thin rectangular boxes and 2 pieces of triangular shaped cardboard and make a roof for your clock


- Decorate the craft at your discretion (you can use absolutely all the New Year’s tinsel or fir branches)
How to make a beautiful New Year's clock from cardboard?

 New Year's cardboard clock
 DIY decorations
 If you like to do everything with your own hands, then try making the very foundation yourself for New Year’s hours. Any box made of thick cardboard is ideal for these purposes. If you have never done it before, you can watch the master class posted a little higher. The picture shows a diagram, following which you can make a blank for an original craft without any problems.
But remember, even such a simple thing must be done as diligently as possible. This means that you cannot afford to cut out fold lines, as they say, by eye. If in the end you want to get the perfect blank, then you will first need to arm yourself with a ruler and a pencil, draw the cardboard correctly, and only then start cutting the lines.
When the box is ready, all you have to do is decorate it with New Year's tinsel. And don’t forget that first you definitely need to mark a festive dial on it. To make it clear to others that the craft was made in honor of the New Year, give preference to dials with Santa Claus, a Snowman, or simply beautiful snowflakes on them.
How to make a beautiful New Year's clock from candies?

 New Year's candy clock
 Recommendations for making a box
 If you want to make a New Year's watch from candies, then you will have to make a round box of the required size with your own hands. In order for your craft to turn out perfect, you will need to make sure that the side of the cardboard blank is the same length as the candies you have chosen.
- To begin, cover the cardboard blank with corrugated paper, foil or simply beautiful packaging. Try to fix it on the base as well as possible, because this will determine how well the candies will stick to it.
- Glue the dial to the top of the box and be sure to make arrows. They can be made from more contrasting paper or wooden blanks painted in the desired color.
- When all this is ready, you can start fixing the candy on the box. Try to lay them in such a way that there is no greater distance between them. If you have chosen candies with uneven edges, then fill in the resulting voids with rain.
- After all the candies have been glued, all you have to do is decorate your New Year's clock with additional holiday decor. At this stage, you can allow yourself to use all your imagination and, in addition to the standard New Year's decor, use, for example, beautiful buttons or original rivets.
How to make a beautiful New Year's clock from disks?

The easiest way to make a clock from a disk is to simply take it, secure it on a string, and then use a marker to draw a dial on it. As a result, you will get a simple craft that can be used to paint a Christmas tree.

If you want to surprise others with a more interesting decoration, then don’t be lazy and make a more complex figure from the disks. After they are well fixed to each other, all you have to do is decorate them accordingly and attach arrows to them.

Another good option is to cover the disc with a ready-made holiday dial. In order to make such a watch, you will need to print a stencil to the required scale, cut it out and carefully stick it on the disk. As soon as everything dries well, you can attach a rope by which the decoration will be hung, and place it in any place convenient for you.
How to make a beautiful New Year's clock from polystyrene foam?

 New Year's foam clock
 Clock cut out of foam plastic
  Figurines for decorating watches
 If you have been doing handicrafts for a long time, then you probably know that polystyrene foam is a very malleable material. If desired, you can make a very beautiful New Year's watch out of it. If you have time, you can cut out a round piece of the desired size from this material, and then treat it the same way as with a round box. You can cover it with decorative material and then decorate it to your liking.
Also, if desired, the foam plastic can be decorated with paints and then decorated with shiny tinsel. Well, those needlewomen who are not afraid of painstaking work can try cutting out clocks from foam plastic. And in order for your craft to turn out festive, you will need to give it an interesting shape or simply decorate it with New Year’s figures made from the same foam. You can see how all this can be brought to life in the pictures posted above.
How to make a beautiful New Year's clock from salt dough?

 Preparing for New Year's Eve
 New Year's clock made of salt dough
 If you like to do handicrafts with your children, then you will definitely enjoy making a New Year's clock from salt dough. There is nothing complicated in this process, as all you have to do is give the material the correct shape. But still remember that in order for your craft to turn out correctly, you need to approach the preparation of the dough as responsibly as possible.
You must achieve such a consistency that it does not crumble or stick to your hands. Some needlewomen advise beginners to add a little vegetable oil to the dough, citing the fact that it will be easy to roll out. But as practice shows, such dough ultimately dries very poorly and quickly cracks after drying.
In view of this, it will be better if you prepare the dough according to the following recipe:
- Flour - 500 g
- Salt - 250 g
- Water - 250 ml
Yes, and remember that the prepared dough cannot be left to lie for a very long time, as this will certainly affect the strength of the finished product. Therefore, it will be better if, after mixing, you immediately begin creating a festive masterpiece. There are two ways to make a New Year's clock. You can simply roll out the dough and then cut the clock into the shape you want.
You can also try laying out the craft from small parts and only then drying it in the oven. Remember that the dough must be dried, because this is the only way you can get a strong structure that will not be afraid of moisture. If you try to quickly bake your workpieces, they may not dry out inside and this will lead to the formation of cracks after drying.
DIY New Year's craft cuckoo clock: photo
New Year's cuckoo clocks are made according to the same principle as those crafts with which we have already introduced you. In view of this, first you will need to prepare thick cardboard, glue or tape, holiday decor and paints for painting, and you can safely begin creating a New Year's decoration.
So:

- First, cut out the blanks from which you will later make a house. When cutting, make sure that all parts are the correct size. If at least one of the blanks is smaller or larger than necessary, then in the end you will not be able to assemble the structure.

- Having cut out all the necessary blanks, begin to connect them together, first with glue, and then with tape. This will help ensure that the finished structure is as strong as possible.

- Having made the box, start making a blank that imitates a cuckoo's house. In this case, it is important to correctly calculate the size of the hole in which the bird will be visible. In order for her to look harmonious in it, it should be at least 1-2 cm taller and wider than she is.


- At the final stage, make a cuckoo (it can be made of paper or plasticine) and fix it in the opening. Connect all the parts of the clock together and decorate them the way you like. Idea No. 4

 Idea No. 5
 Video: Clock made from candies. What to give for the New Year?
We offer you step-by-step instructions on how to make a clock - a time organizer for a child. Such watches will help children navigate in a fun and easy way.
Do you think it would be nice to have a clock that, instead of time, shows what needs to be done? Children constantly ask when is lunch, a snack, or why they need to do it right now, so a watch with answers to all questions will come in handy for them. As the schedule changes, all the details can be re-wired.
Materials for making watches:
- Thick fabric
- Pen or marker with disappearing ink
- Hoop (wall clock size)
- Mechanism in a watch
- Pieces of fabric with Velcro
- Felt
- Embroidery threads
- Sewing machine
- Cardboard
- Hot glue gun
- Various templates
How to make a children's clock for organizing the day, step-by-step instructions:
1. For watches, it is best to use rough canvas. Draw the fabric inside the hoop into equal parts.

2. Measure 1-2 cm from the edge of the circle and sew a small piece of Velcro onto each of the lines.

3. Spray the fabric with water to make the lines disappear. If the ink does not wash out, you can gently rinse the fabric, then thread it into the hoop and pull it tight.

4. Cut a circle out of cardboard that will just fit inside the hoop. Turn the “clock” over to the front side and tuck the remaining fabric under the cardboard. Use a hot glue gun to secure.

5.
To prevent children from getting confused, you can remove the minute and second hands from the mechanism set. 
6. Make a large hole in the cardboard and fabric and attach the mechanism following the instructions on the package.

7. For each “hour”, cut out two felt circles. Sew and decorate one of the circles, and sew a piece of Velcro on the other.

8. Sew two circles from the wrong sides using a machine or by hand

Small beds mean it's time to get up and go to bed, day or night.

A very original solution would be a plate of oatmeal made from French knots and a shower with funny looped droplets.

.jpg)
A few more examples of how to decorate each of the symbols. As you can see, many details are made using French knots. 


Draw a circle, cut it out.


So I’m exhibiting MK myself. I hope everything will be clear to you. If not, then ask. Thanks to everyone who came in.
stranamasterov.ru
DIY watch – Year 2019
DIY cardboard clock for school
This activity is for children who already know numbers and count confidently. Now we are learning to determine the time and even lay it out from the numbers on a special scoreboard.
You can teach your child to tell time already in preschool age; The sooner he learns to do this, the easier it will become for his parents. In addition, test tasks on the ability to work with clocks are used as entrance tests in many high-status educational institutions.

DIY cardboard clock for school
Cardboard clocks are simply irreplaceable - for children, activities with them become much more understandable and visual. At the same time, it is absolutely not necessary to buy factory-made teaching aids and dummies of watches, since every parent can make a watch with their own hands for a child.
What is needed for this:
Using a compass we draw two circles with the same center - one larger, the other slightly smaller. On the inner circle we put sixty divisions at equal intervals and arrange the numbers according to the dial of a real watch. We write Arabic numbers; children learn to work with Roman numbers around the second grade of primary school.
Let's cut out our clocks. We make hands for them - as usual, a wide and short hour hand and a narrower and longer one for the minute hand. We attach them to the dial using a piece of empty rod, the edges of which are then melted in the fire of a burning match and flattened with a matchbox.

DIY cardboard clock for school 1
Ready! You can safely take such a hand-made cardboard clock to school when it’s time to polish your ability to tell time.
Well, if we want to teach the child before school, then for classes we will prepare an empty dial of an electronic watch (four empty square windows) and numbers for it. Images of a clock whose hands show a certain time are also useful.

DIY cardboard clock for school 2
We explain to the child the basics: which hand shows the hours, which one shows the minutes, how many divisions there are in total. And then we learn to determine by the location of the hands how many hours it is and how many minutes it is. If with a clock everything usually works out very easily, then with minutes many children get confused. Therefore, you can draw on the dial next to the designation of each hour the designation of the number of minutes (10, 15, 20, etc.).

DIY cardboard clock for school 3
We try to show the same time on our watch as in the pictures - we put the hands in the desired position, determine how many hours and minutes we have received.
When the basics are mastered, we move on to the next stage: we lay out the number of hours and minutes on the electronic dial, and the child shows them on his watch. This exercise is often used when applying to high-status schools.

DIY cardboard clock for school 4
And, of course, the final stage will be to practice the acquired knowledge on a real watch. Ask as often as possible what time it is, draw your child’s attention to the clock when you are going somewhere or planning to go somewhere after some time. So the baby will early learn not only to tell time, but also to feel and plan.
DIY watch
How to make a watch with your own hands? Cardboard clock for school.
Source: montessoriself.ru
Craft product Applique Homemade clock In 30 minutes + step-by-step MK Disposable plates


For this we will need: A disposable paper plate, scissors, a needle or awl, glue, white paper, plastic-coated wire. And colored cardboard.

Cut out the arrows to the size you need. Long and short. We connect them together, pierce them with a needle or awl.

This is what the arrows look like now.

We need a circle of paper to stick on our dial plate.
Take a plate of the required size, place it on white paper and trace it around the edges of the plate with a pencil.

Draw a circle, cut it out.

Apply glue to the circle. And stick the paper inside on the plate.

We take our arrows and place them in the middle of the plate to mark the middle. Tip: Let your little one spin the arrows in a circle while you hold them with a pencil. Then you can surprise the edges of the plate with the same diameter.

When we have marked the middle, we pierce it with a needle or awl.
We need a hole to attach our arrows.

I took a thicker rod and stuck it into the hole to widen the hole.

To keep our hands on the dial, we need wire. I wound it around a thick rod 3 times.

Then I stuck the wire into the arrow holes and into the hole in the center of the plate.

Turn the plate upside down. I bent the wire like this.

I cut out a small circle from paper and glued it to the top of the wire so that the ends of the wire would not stick out.

Now you can draw the numbers of the future hours.
The arrows will spin in a circle.

Here's the clock we made in 30 minutes. In the evening we were walking and my son saw a plastic toy watch in the sandbox. Some of the children probably abandoned or forgot. He really liked them. I promised him to make a watch as soon as we get back to mine. I had to get out. Thank God they made a watch for my son. My son really liked them and he played with them and called numbers in English. If you're interested, I can post the MK. I even filmed the whole process.
Craft product Applique Homemade clock In 30 minutes step by step MK Disposable plates
Here's the clock we made in 30 minutes. In the evening we were walking and my son saw a plastic toy watch in the sandbox. Some of the children probably abandoned or forgot. He really liked them. I promised him to make a watch as soon as we get back to mine. I had to get out. Thank God they made a watch for my son.
Source: stranamasterov.ru
DIY clock made from disk and paper

In teaching children, it is very important to teach them how to navigate in time. But this is not always easy for every child. To make the learning process entertaining and useful, you can make a real alarm clock. Make your own watch from a disk and paper using scrap materials. And if you engage in creativity with your child, the material will be absorbed without problems.
To make an alarm clock we will need the following materials:
- thick cardboard
- cardboard for creativity
- CD
- sheet of white paper
- heat gun (hot glue)
- bead
- gouache paints
- art or stationery knife
- pliers
- carnations for making jewelry or a piece of wire
DIY clock made from disk and paper, master class with photos and step-by-step description
Before we start making watches, we need to:
1 Print out the watch parts template and dial.

2 On a piece of cardboard (a cardboard box is best) we outline the part of the stand for the alarm clock.

We cut out the stand using an art or stationery knife. We carry out the cutting on a rubberized mat so as not to damage the working surface of the table.

Cut out the numbers for the dial.

We cut out the alarm clock horns from ordinary cardboard for creativity and paint them red with gouache paint.

Take a CD and hot glue four numbers in a red frame: three, six, nine and twelve.

Between them we place the numbers in a blue frame in order.

Using the template, we cut out the hands (minute and hour), as well as two circles. We color the minute hand white, the hour hand brown or black. We paint two circles yellow, and the clock stand brown on both sides.

Glue the alarm clock horns on top above the number twelve using hot glue.

Now let's deal with the switch mechanism. To do this, take two circles, a nail for creating jewelry and arrows, having previously made holes in the circles and arrows.

We pass a nail through the holes of the hands, the white minute should be located on top of the brown hour.


We insert the finished switch structure into the hole in the disk.

On the reverse side we string the second circle onto the nail.

We put a bead on top, and then bend the end of the nail with pliers.

The hands are ready to show the right time.

Now take the stand and bend it in half along the fold line.

We place our alarm clock in the cut holes.

The alarm clock is ready. Thanks to the rotating arrows, you can set any time, and also, easily teach your child to determine what time it is.

20 Here is a craft clock made from a disk and paper that we made with our own hands. It’s very easy to make it using our master class.
DIY clock made from disk and paper
DIY clock made from disk and paper for children, master class with photos and step-by-step description
Source: do-by-hands.ru
DIY watch - DIY craft
This is a very simple craft that a child from 3 years old can make with his own hands. The clock craft is very convenient to use to teach your child how to calculate time. The arrows can be moved to the desired position. Experimenting with real watches may result in them breaking... so you'll have to buy the watch again. And with such a craft, you don’t have to worry about anything! Even if a child breaks his crafted watch, it will not affect the family budget in any way. In addition, children will enjoy showing the time on a homemade clock!

What you will need to make a watch craft:
Pencils or markers.
A small bolt and nut.
Any additional decorations for future watches: glitter, shiny glue, stained glass paints, etc. depending on your imagination and desire.
How to make a craft clock


Color the dial as you wish. You can draw flowers or any patterns on it. An interesting option is to draw some kind of thematic image opposite each number. For example, at two o'clock you usually sit down to have lunch. Invite your child to draw a plate of food opposite the number “2”. At 9 o’clock the child goes to bed - let him draw a bed opposite the number “9” and so on. Such drawings will help the child better navigate time.
Clock - DIY craft
The clock craft is very convenient to use to teach your child how to calculate time. The arrows can be moved to the desired position.
Source: proigrushku.ru
2018-2018.ru
Clock - paper craft | DIY watch
How to make a watch for a child with your own hands? A mock-up clock (or a toy clock) will help teach your child to understand time, as well as to understand clocks with hands. We bring to your attention step-by-step instructions, following which you will quickly make such a layout with moving arrows.

Tip: If your child is over 6 years old, you can involve him in creating crafts - the very process of working on a clock will give him a lot of information about time and its division into hours, minutes and even seconds.
For this craft you will need:
Thick cardboard (you can take cardboard from a box or even the box itself - then cover it with colored paper, you will get a voluminous clock), colored cardboard, a screw with a small diameter washer (if there is no screw, take thread and a needle), scissors, pencils or felt-tip pens.

How to make a CLOCK craft - step-by-step instructions with pictures:
Step 1. Select cardboard for the dial, find a round object to trace around it.

Step 2. Glue the dial onto the cardboard base. Make a hole in the center. Mark the main divisions - 12, 3, 6 and 9 o'clock. Let these numbers stand out in color from all the others - this will help the child master concepts such as “half an hour” and “quarter”.

Step 3. Divide each segment into three equal parts - mark divisions for intermediate numbers.

Step 4. Cut out pieces from two colors of paper (as in the photo) that will cover the brown box cardboard.

Step 5. Cut out drop-shaped arrows of different sizes from cardboard of different colors. The thickening at the bottom will allow you to securely attach the hands to the base.

Step 6. Fasten the parts with a screw. If there is no screw, then sew all the parts with a needle and thread (make a knot on one side, and immediately tie the end of the thread on the other).
Advice: We covered all the parts with tape, which made the watch less fragile.
A clock for teaching a child time should be simple, there should be no unnecessary details. Therefore, resist the temptation to decorate your watch face with any stickers or designs. The arrows should move easily, the numbers should be large enough and recognizable. We specially made the clock on a rectangular cardboard base - firstly, this made it easier to cover the clock with tape, and secondly, in the “margins” you can make any notes that are important for the child with a felt-tip pen.
How to teach a child to understand a clock - read the article on how to help a child understand a clock with hands. The layout will be useful for your training!
All materials were created specifically for the 2mira.rf website. For personal use only!
www.xn--2-8sbxpv.xn--p1ai
how to make a clock out of cardboard
Clock - DIY craft
There are two options for the craft. The first option is the simplest - you will need a regular disposable paper plate. It will go to the dial. The plate will need to be painted, numbers drawn on it (or molded from plasticine and glued to the plate) and paper arrows attached using a nut and bolt.
This is what a paper plate clock looks like:

The second option is more complicated and takes longer to make, but it is more interesting!
What you will need to make a watch craft:
Colored cardboard.
Colored paper.
Pencils or markers.
A small bolt and nut.
Scissors.
Any additional decorations for future watches: glitter, shiny glue, stained glass paints, etc., depending on your imagination and desire.
How to make a craft - a clock


Print out the desired dial and hands template on colored cardboard or paper and cut them out.
Color the dial as you wish. You can draw flowers or any patterns on it. An interesting option is to draw some kind of thematic image opposite each number. For example, at two o'clock you usually sit down to have lunch. Invite your child to draw a plate of food opposite the number “2”. At 9 o’clock the child goes to bed - let him draw a bed opposite the number “9” and so on. Such drawings will help the child better navigate time.
Using scissors or an awl, make a hole in the middle of the dial and at the base of the hands.
Connect the hands with a bolt, insert it into the hole on the dial and secure it on the reverse side with a nut.
Tips for making craft clocks.
The clock face can be pasted onto a large rectangular sheet of paper or cardboard, where you and your child will prepare a schedule for the week or draw pictures.
You can also make a watch in the shape of a star or any other object: again, you will need to glue the dial onto a ready-made cardboard base in the shape of the desired object.
otvet.mail.ru
Unusual watch faces with your own hands
Clock-time-money.

The history of watches goes back thousands of years. First, solar ones appeared, then water, fire, and sand. .Finally, mechanical towers. Great scientists such as Galileo and Huygens had a hand and a hand in creating a time machine. Huge clock mechanisms decorated and decorate the towers of town halls, churches, and castles in many cities around the world. Then progress and technology began to reduce their size and cost. Clocks began to appear in the palaces of kings and nobility. Time passes and it improves its machine. And here are the clocks in the houses of the townspeople. Lovely little walkers that hypnotize with their pendulum and the imperceptible lowering of weights, and what a complete miracle, this is a popping up cuckoo.
Pocket watches, wrist watches, electronic watches, quartz atomic watches...watches on TVs, receivers, mobile phones, watches everywhere...but there’s not enough time :)
Why doesn't the cuckoo jump out of the mobile phone and cry peek-a-boo? Don’t worry, when 3D holographic monitors appear on mobile phones, people will remember this feature!
So, I suggest you make a watch - time is money, or rather, I suggest the design of the dial, because quartz watch movements have already been made by millions of Chinese comrades.
There are two options: either we remove the old, boring wall clock, remove the case and glass from the dial. Carefully remove the arrows. From thick cardboard or whatman paper we cut out a blank for the dial to the size of the case. We paint the cardboard in our favorite color (I painted it with an aerosol can). We glue the new dial. We rummage in our pockets in search of small change, oh, how good it is for numismatists, they can make watches - world money (from different times and peoples).
What time is it now?
Six tugriks,
It's time to milk the cow ;)
Glue the coins or a combination of coins in their proper places. Don't forget to install the arrows, the body - you're done! The second option is to disassemble, hack a suitable quartz table clock, remove the clock mechanism, take a gramophone record of your favorite size or CD.. Glue the mechanism, I recommend a glue gun. Glue a new dial blank (optional), insert the arrows (you may have to lengthen them), glue the coins, and you're done!
But now, dear brainiacs, the most important thing is that we don’t stop, we are looking for other ideas for designing watches. We refine a lot of ideas on the Internet, change them, make them original and send them here to the site. Here's a couple more options for a snack: a domino player's watch, a gambler's watch, or a chess player's watch.


About barais
mozgochiny.ru
How to make a clock out of cardboard: master class
It is not so easy to teach a child to understand time by a clock. But it needs to be done. To make it interesting for your child during such activities, make a visual aid with him - a clock made of cardboard. Invite your child to make arrows with his own hands and write numbers. Believe me, your child will enjoy playing with such an educational toy. The master class proposed in this article will tell you how to make a clock out of cardboard to teach children the concept of time. 
Materials and tools
To work on making a fake watch you will need:
- thick cardboard in three colors;
- a compass or two plates;
- scissors;
- pencil;
- bolt with nut;
- PVA glue;
- markers;
- decorative elements.
How to make a clock out of cardboard: process description
- On sheets of cardboard of different colors, use a compass to draw two circles (or circle two plates). The second part should be slightly smaller than the first. Cut them out and stick one on top of the other. Try to ensure that the centers of both circles coincide.
- Draw arrows of the desired shape on the cardboard and cut them out. If the cardboard is not very thick, then glue it together in half. It is important that this watch part is durable.
- Glue a round blank onto a whole sheet of rectangular cardboard. Place something flat and hard on it and leave it to dry. This is necessary so that the product does not deform from the moisture provided by the glue.
- Punch a hole in the center of the circle, and make the same holes on the arrows. Using a small bolt and nut, attach the arrows to the base of the product.
- Using markers, write the numbers 1 through 12 along the edge of the outer circle. In the future, when the child learns to understand time using these symbols, you can add values from 13 to 24 on the side.
- Decorate the product the way your little Know-It-All wishes. These can be stickers, drawings, applique.
 So now you know how to make a clock out of cardboard. This version of the product is perhaps the simplest and most affordable. With older children you can perform a different model.
An interesting idea: how to make a clock from cardboard, and not only from cardboard?
Your child will really like this fake watch with a real mechanism. He will be able to move the hands and set the time independently. To make such a product you will need the following materials:
- corrugated cardboard;
- clock mechanism with hands;
- plastic caps (from bottles, jars of vitamins, gouache paint boxes) - 12 pieces;
- glue gun;
- scissors;
- pencil.
Step-by-step instructions: how to make a clock out of cardboard
- Cut out a large circle from cardboard.
- Place the lids at approximately the same distance from each other and glue them using a heat gun.
- Punch a hole in the center of the product. This can be easily done with a pencil, since corrugated cardboard can be pierced without difficulty.
- Install the clock mechanism on the inside and fasten the hands on the outside.
- Write a number on each lid with a marker or stick it on paper.
 That's all. The clock is ready. If the mechanism is working, then such a dummy can even show the time correctly and serve not only as an educational toy, but also as an ordinary wall clock in a child’s room.
If you have children growing up in your house, be sure to take note of our master class “How to make a clock out of cardboard.” Kids will be more likely to enjoy playing with a home-made item rather than an industrial watch. Have fun and fruitful activities!
fb.ru
How to make a watch with your own hands
It's no secret that the easiest way to transform the interior of a room is by adding a stylish accessory. While puzzling over what it could be, think about the solution of how to make a watch with your own hands.
Why watches?
What to collect from?
Simple DIY watch master classes
Do-it-yourself old watches in a new way
DIY New Year's watch
Conclusion
Photo gallery - DIY watches
This piece of furniture will be appropriate in a room for any purpose. Moreover, you don’t need to be a genius to create it. Just a desire to work is quite enough, and we will try to suggest interesting master classes on assembling watches with your own hands and non-trivial ideas for their design.
Why watches?
Let's start with the fact that making watches with your own hands does not have to be working. They may be assigned a purely decorative role. But even in this incarnation they will not cease to be a mystical object, carrying the mysterious energy of the invisible all-pervading Time. It can fly or drag, make a person happy or sad, and constantly requires monitoring its progress. Isn’t this the best reason to make a watch with your own hands, not just a chronometer that monotonously counts down minutes, but a real highlight of the interior?
Decorative clocks will become the highlight of any interior
What to collect from?
“You can use a lot of different things and materials to make watches with your own hands”
Look at the photos of watches assembled by craftsmen with their own hands, and you will understand that you can really make an accessory out of anything you can get your hands on! Creative thought, especially when it has already been given a direction, will generate incredibly fruitful projects.
Someone will see the dial of a future masterpiece in the cover of a wooden cable reel, someone in an old record, and someone will even think of setting aside a wall surface for it.
Original clock from an old record
You can assemble a magnificent wall clock with your own hands from halves of a globe. Although such a project will require a lot of space, it will look amazing in the interior. Such chronometric compositions are very relevant for design trends with a geographical bias. You can make a geographical clock in decoupage style or use parts of ready-made globes. This accessory carries with it the spirit of wandering, so it can be safely added to the decor of tourist offices or used in the decoration of travelers’ homes.
Globe watches for design destinations with a geographic focus
To decorate the hall and hall, try creating a picture clock with your own hands. The dial subject can be either a portrait or an original printed fabric framed.
Painting clock in the living room interior
Among the photos of watches assembled with your own hands, the kitchen model of a chronometer, the basis of which was a tin can, is of interest. Here, such an abstract part of the watch as the mechanism spring is put on display.
It's fashionable to make a watch with your own hands from a tin can
A cardboard clock decorated to look like a chessboard is very suitable for an office and library.
In principle, you can use a lot of different things and materials to make watches with your own hands. You can use:
- paper;
- gramophone records;
- computer disks;
- tree cuts;
- dishes;
- glass, etc.
A clock made from a plate is ideal for kitchen decor
Whatever you decide on, the result will be worthy of attention in any case.
Simple DIY watch master classes
Model "Handicraft"
To create this watch you will need decorative buttons and a regular embroidery hoop. The dial will be fabric, the color and print of which matches the room design. In addition, prepare:
- tape;
- a piece of cardboard;
- internal mechanism from old walkers.
Now let's see how to make such a watch with your own hands.
The process is intuitive. We stretch the fabric onto the hoop, cut off the excess and sew buttons to the resulting base so that they imitate the location of the numbers on the dial.
Sew buttons onto fabric
Now we need to prepare the substrate. We will cut it out of cardboard for our clock. The part must have the diameter of the hoop and be inserted from the inside. Its strength is enough to hold the hands and the mechanism itself. For reliability, the insert can be glued to the fabric. All that remains is to attach a loop and hang the accessory on the wall.
Attach the clock mechanism
This technology is often used to assemble themed watches, for example, New Year's ones. To emphasize their connection to the event, it is enough to add adequate decor in the form of: serpentine, golden cones, improvised snowdrifts. It will be easy to change the topic if desired. The ability to change the design of the accessory will allow you to play with the perception of the environment of the entire surrounding space, which will greatly appeal to fans of frequent changes of scenery.
DIY watch made from a hoop
Paper clock
You can assemble wonderful colorful wall clocks with your own hands from magazine and newspaper sheets. Cooking:
- pencil;
- scissors;
- silk thread;
- transparent adhesive tape;
- igloo;
- cardboard;
- 24 magazine sheets of identical format;
- a pair of transparent plastic disks.
The latter can be found in CD packaging.
There are different master classes for making paper watches with your own hands, but in our case we will twist paper blanks. To do this, we wrap a magazine sheet around a pencil and get a tube. To ensure that the workpiece retains its shape, we fix the free edge with adhesive tape.
Roll up paper blanks
When all 24 parts are ready, each of them will need to be bent, thus separating 1/3 of the length.
We will sew the tubes along this fold, collecting them into a ring.
Gather the tubes into a ring
Carefully lay out the sewn paper watch blanks on the table and place a transparent disc on top. This must be done so that the central holes of the elements coincide.
Insert and assemble the clock mechanism
We insert and assemble the clock mechanism. On the back side we will hide it under a second plastic disk and a similar shaped cardboard base. Now screw on the arrows - and you're done!
Finished watches from magazines
Cardboard clock
You can make them simple, in a flat projection, or you can work a little and assemble a real imitation of walkers. This DIY watch craft is quickly assembled from boxes. The case will need a rectangular packaging box, perhaps even a shoe box. Everything here will depend on what size you plan to make the product.
Example of a clock from a cardboard box
The first thing we will do is attach two ribbons to the bottom of the box. Then we will hang cones on them. Assembling the clock from cardboard will continue to work on the dial. We cut it out using a stencil and attach it to the front side of the craft.
Now let's take care of the roof. We assemble its design from two thin boxes and two triangular pieces of cardboard.
Decoration ideas will come from photos of hand-made watches, which can be found in unlimited quantities on the Internet.
Bicycle wheel
A clock made of cardboard, a clock made of paper... What do you think of the idea of a clock made from a bicycle wheel? Since the base is quite large, you will need to find an appropriately sized clock mechanism that can rotate large hands. When working on a wall clock with our own hands, we will take ordinary school rulers. Let's give them the required length. We attach triangles to the ends, symbolizing an arrow. Moving elements should be clearly visible against the background of the disk, so if the design of the product allows, the arrows can be painted in a suitable color.
Attach the tin lid
There is one trick to creating such watches with your own hands. To balance the movement of the hands, a counterweight will need to be attached to the larger one. Its role is usually played by washers. This makes it easier to select an adequate mass.
DIY watch made from a bicycle wheel
Clock in decoupage style
Decoupage technique is more popular today than ever. It is used in the decoration of a wide variety of things. It allows you to create a real exclusive. In this way, you can restore an old watch in a new way or refinish one that is just about to be born.
Clock decor using decoupage technique
The technique of decoupaging a wall clock with your own hands is not too complicated. She is rather demanding in detail, so new handmade can be considered a completely acceptable hobby for beginning designers. In a similar way, you can decorate clocks made of cardboard, gramophone records, and wood. For pasting the base, you should choose a pattern that you personally like and does not dislike the interior style.
Clocks made using decoupage technique should be in harmony with the style of the interior
Do-it-yourself old watches in a new way
If we discard the decoupage technique, then we can restore watches that have lost their attractiveness or do not fit into the interior in a completely ordinary way, accessible to every needlewoman. Try dressing them up in fun knitted clothes.
Update your watch with knitted decor
An unusual solution will help you create a New Year's watch with your own hands. If in the ordinary everyday version the products are simply tied around the perimeter, then in honor of the celebration they are put on hats and scarves in the spirit of Santa Claus.
DIY New Year's watch
Preparing for this holiday is a separate topic. This is a whole section of master classes on creating watches with your own hands. And why all? Yes, because at this time a watch can be not only a home decoration, but also a wonderful gift for loved ones. Cheap? Yes! But exclusive and memorable!
Clock from disk
A stunning looking watch model will be made from the disc. Everything is standard here with regard to the mechanism fastening part. It is placed in the center, but the peripheral design can be the most enchanting. There you can glue snowflakes, make a snow frame, etc.
Don’t be lazy to make a clock for the Christmas tree with your own hands. Here you can do without any special frills and simply paint the disc with a marker.
DIY CD clock
If you want to try out your imagination, try imagining a clock made from disks in a more complex design. Glue them together or otherwise combine them into intricate compositions.
Styrofoam clock
Working with pliable material will be difficult even in the hands of beginners. Find clock crafts in the photo and try to assemble them with your own hands. Cut out the blank into the shape you like and cover it with fabric or paint it with paints. All that remains is to give the product a festive mood. Decorate it with shiny tinsel and other New Year's paraphernalia.
Even beginners can make a clock out of foam plastic.
Dough clock
It’s also not a very difficult way to make a New Year’s clock with your own hands. As you work, you will need to knead the salt dough and bake figures in the shape of Christmas trees, stars, and snowflakes from it. The main emphasis when conducting master classes on baking watches with your own hands is on kneading the dough, since the success of the enterprise as a whole depends on its quality.
Required ingredients for salt dough
After kneading 250 ml of water, 250 g of salt and 0.5 kg of flour, immediately begin to form a shaped base. For beginners, it is better to cut out clock crafts with your own hands from rolled out dough. Those who already have some experience can try assembling a watch case from small parts. Next, the workpiece is sent to dry in the oven. The work will be completed by painting and decorating the result.
DIY bright clock made from salt dough
Advice. Do not add vegetable oil to the dough, even in small quantities. Its elasticity may improve, but its quality will sharply decrease. Crafts made from it will crumble.
Food grade plastic watch
A wonderful DIY watch for the New Year can be assembled from a plastic box that served as packaging for a cake or other goodies. Place colored rain inside the box, maybe mixed with small toys. Cut out the numbers and hands for the dial from bright paper and stick them on the front side of the product. Fashion out of plasticine or cut out blanks for cones from foam plastic and wrap them in shiny foil. Hang the decor to the finished craft and additionally wrap its body with fluffy rain. DIY decorative New Year's wall clock is ready!
New Year's watch made of food plastic
How to decorate a New Year's watch?
“When making a New Year’s clock with your own hands, it would be nonsense to forget about coniferous branches”
In addition to all kinds of tinsel and toys, it is recommended to attach real cones, scatterings or bunches of berries, and bows to crafts. Imitations of snow are welcome. It can be drawn, sprayed with a toothbrush and paint, or applied with applique. Naturally, when making a New Year's clock with your own hands, it would be nonsense to forget about coniferous branches. However, live options are not always suitable. For example, they simply cannot stay on a paper watch due to their weight, so in such a situation you will have to use their artificial counterparts.
DIY New Year's watch
Conclusion
We can talk about how to make a watch with our own hands all day long. This is a direction so rich in ideas that it seems simply unrealistic to exhaust this well. Try to immerse yourself in the mysteries of creating a masterpiece at least once, and maybe this exciting activity will become your hobby.
Soap-based washing powder - Babyline washing powder Based on natural soap - “The search for the ideal powder with a SAFE composition continues. I won’t buy Babyline powder again! FULL COMPOSITION. Dedicated to mothers of allergy sufferers...And also photos BEFORE and AFTER washing and my personal rating of the safety of laundry detergents"
If you want to make something with your children from available materials, then cardboard is best for this. It is durable, cheap, and cuts well with scissors. You can always stick multi-colored sheets of paper on it and decorate the craft. And don’t let it seem to you that cardboard and paper look too simple and cheap, and the child will be dissatisfied. A child’s imagination allows him to be content with little, if it is something bright, colorful and easy to understand. Try watching some simple cartoon that the children are delighted with, but you find boring. Then you will understand that what seems primitive to an adult is a real magical world for children.
Details of the manufacture of children's watches
On the Hendik video channel, they filmed a video lesson on how to make a new clock out of cardboard, equipped with hands. We will need scissors, glue, cardboard and some kind of felt-tip pen. Let's take orange cardboard. Accordingly, you will get a watch like this.


Let's find an object with which you can trace a circle. On yellow paper you need a smaller circle. Now let's cut them out. Place the smaller circle on top of the larger one and glue it together.
Let's make the arrows gold. Minute and hour. Let's make holes in the center of the dial and the hands. Now let's draw numbers on the dial. For this we use a felt-tip pen. All that remains is to attach the arrows to the dial. Thanks to the cord, they can rotate, just like real ones.