Make a pattern for brickwork. Device for laying bricks: simple, reliable, convenient
What are there and how to make a device for bricklaying yourself
Brick is one of the most common building materials. Its high performance characteristics allow it to be used in a wide variety of areas, including the construction of fences and the construction of foundations for fences.
Despite the seemingly fairly simple work, there are certain technologies for laying bricks. Their choice depends on the purposes of construction and the quality of materials. To make the bricklaying process easier and technically correct, various devices are used.
Types of devices and their use
The following tools are usually used for masonry:
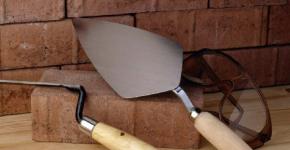
Trowel (trowel)
The most common and necessary tool. It is a smooth steel blade. It performs several functions: grouting joints, leveling concrete mortar, removing excess mortar. 
Plumb
This tool belongs to the category of measuring instruments. It is used to measure and check the angles that are formed during the masonry process. The angles must strictly correspond to the calculations. 
Cord
Designed for marking the height of masonry in preparation for work, as well as for checking the correctness of the work performed. 
Shovel bucket
Although this tool is widely used for mixing concrete, it is also used in masonry. With its help, the concrete mixture is applied to the brick. Especially necessary when working with large quantities of solution. 
Level
Also applies to measuring instruments. It consists of a durable housing, inside of which there are containers filled with non-freezing liquid. In addition, there are air balls inside. They allow you to accurately determine how smoothly the masonry is carried out, both in horizontal and vertical positions.
When installing a level on the masonry, if the work is done correctly, the balls are located exactly in the middle of the device. Otherwise, they show the level of tilt in one direction or another. 
Joining
The main tool for bricklaying, especially if the brick is used as a decorative element. It is used to process seams. They not only align, but also acquire the desired shape or pattern. Joints come in various shapes and sizes. 
Rule
Tool for monitoring work. It is an absolutely smooth strip, with which you can measure and check the surface, determine how evenly the installation occurs. Particularly widely used for checking external masonry. 
Pick hammer
In case of errors during laying or to achieve the required shape, this tool is used. It allows you to chop off unnecessary parts and give them the desired appearance. 
Order
It is attached to the first row of masonry and allows you to accurately measure the location of the bricks and their rows relative to each other. Often used to create a variety of patterns and designs on the outside of brickwork. In addition, the order is widely used to mark future window or door openings, design features of the building or structure being constructed. You can also use it to secure the cord and level the masonry. 
These are the basic masonry tools. With the development of production technologies, they are increasingly improved and automated to facilitate the work of the builder. However, you can make such a device yourself.
How to make a similar tool with your own hands
In order to make a device yourself, you need to decide for what purpose it is intended:
- Cord Attachment. Ordering is not always in the arsenal of the first available tools, but securing the cord is necessary. There is an option for fastening with nails, but for this you need to wait for the solution to dry completely. This is not very convenient.
In order to solve the problem, you can make a fairly simple tool yourself. A device in the shape of the letter “T” is cut out of a metal sheet. A cord is attached to it. Then the edges of the device are bent strictly according to the shape of the brickwork. Thus, even without the use of complex devices, the cord is securely attached to the masonry and does not disturb it. - Work at height. Situations often arise that require working with bricks at height. Construction companies use cranes for this. For work at home or in the garden, structures such as scaffolding can be useful. Making such a device is quite simple. Near a wall or fence, for which it is necessary to lay masonry at a height, 2 trestles of equal height are installed. Wooden boards are placed on them. The main thing when constructing such devices is to ensure their maximum stability.
- Laying bricks at the same height. If you don’t have a cord or level at hand, you can use the following simple device. M-shaped parts are cut from a steel sheet. Then a hole is drilled in the middle of each piece. Next, it is bent at an angle until the correct corners are obtained, and an elastic band is inserted into the hole. One corner is attached to the outside of the first brick in the row, the other on the outside of the last brick in the row. The elastic band is stretched, and a kind of level is obtained. It can be used both to check finished masonry and as a guide when performing work.
- Dosing the solution. Very often there is a need for an exact dosage of the solution; it is needed in cases where the thickness of the seams is calculated up to a millimeter. A trowel won't help here. But there is a device that you can make yourself. To do this, take a sheet of iron or steel of exactly the thickness needed for the seams. An oblong hole is cut in it, which corresponds to the width of the brick. It's quite simple to use. It is simply applied to the brickwork, using a shovel and a trowel, the mortar is applied, leveled, and the excess is removed. The result is an absolutely flat surface and the same thickness of the mortar throughout the entire masonry.
- Filling joints with concrete mortar. It is not always possible to accurately and quickly calculate the amount of mortar and fill the seam completely. Another device is designed for high-quality performance of such work. It can also be made from metal sheet. A rectangular sheet is cut out or taken, holes are cut in it, which are the same size as the brick. The device is leaned against the bricks, the seam is rubbed exactly over their area. Using this device, just like the previous one, you can control the thickness of even the side seams in hard-to-reach places.

Thus, there are a large number of tools that are made specifically for correct and quick masonry. If any of the main devices is missing, it can be successfully replaced with a home-made device.
Video about the tool for quick masonry
In the following video you can see the use of one of these devices:


This simple device for laying bricks, “BRICKY”, received the Oscar De L'Invention award for the best construction invention in 2011.
Of course, the tool is not suitable for large volumes, but for clean, unhurried and accurate work and for a novice mason it is a good thing. I think that for most of the participants in our channel it will not be difficult to make this instrument with their own hands.
Jig for perfectly smooth brickwork
In connection with the development of industry and the production of various building materials, so-called panels or other, lighter or cheaper material have recently been preferred to brick. It cannot be said that other materials are not able to outperform brick in terms of properties. This is probably where everything is heading. But the appearance of a brick or “stone” building is always appreciated. Especially if the hand of a real master mason is visible.

There is no need to do this
But like any other type of construction work, builders without experience also undertake the construction of a brick wall, which is called “for themselves.” Indeed, if you do everything carefully, then the difference (with small errors) between your masonry and the mason’s masonry will be especially visible only in the speed of work. However, it will constantly move closer to the standard.

It’s not a problem to find out how to tighten a string, mix a mortar or how much reinforcement you need. But how much mortar should be thrown under the brick so that you don’t have to add, rake or hit with a mallet, deforming the previous work, is a more serious question. Of course, with experience this will happen automatically, but what should a beginner do? There are two options: learn as everyone else has learned, or use an amazingly working device created just to solve this problem.

The jig or template for distributing cement mortar is made of durable plastic. It consists of a rectangular frame with provided cutouts and protrusions. In the process of work, you should install it on a laid row of bricks, pour the mortar into the recess and, leaning the trowel closely against the upper part of the jig, clean off its excess.

The result is an inter-brick layer of the same thickness along its entire length. Simply lay the brick flat on it and press down lightly. A similar device, only smaller in size, is also provided for applying cement mortar to the end part of the brick. Using such a template also allows the outer edge of the seam to be positioned at the same distance from the outside of the wall, which looks very nice.

The price of such pleasure is on average 1,500 rubles. Plus or minus half a thousand depending on the company, quality and completeness of the set
How to make smooth brickwork with beautiful brick joints?
Construction today is perhaps the most popular type of craft activity. Having mastered the construction profession, you will never be left without work. And if you become a master of your craft, then you will have no end to expensive “fat” customers.
Look carefully. The so-called guest workers, but in fact, former residents of the Soviet Union, all of them work as construction workers.
Do you think they earn little? If their earnings do not seem too large to us, then they themselves, on the contrary, consider their monetary reward worthy. And this is all because in their homeland, the amount of money they earn here is considered a fortune.
However, construction specialties are different. The most difficult to implement, accordingly, are also the highest paid.
The mason profession is one of the most difficult. No one can just pick up and start laying brickwork. To do this, you need to learn, both theoretically and gain practical experience from real masters of their craft, working alongside them and gradually performing, first simple operations, step by step moving on to more complex ones.
Only when you go through everything - from simple to complex - will you be trusted to lay brickwork. Brickwork of a multi-storey building is the pinnacle of any mason's skill.

Smooth brick joints are perhaps the most difficult element of brickwork. Always wondered how they are made? How do master masons manage to apply the mortar in an even layer and then lay bricks on it one by one?
He was building a brick garage on his property. I did the brickwork myself. Did this for the first time. It took a hundred sweats until I somehow got used to laying a more or less even wall. I’d rather not say anything at all about the brick joints on the walls of my garage, as you yourself understand, everything turned out crooked))
But don't be discouraged
Recently I found a special device for masons on the Internet. With its help, it is possible, even for the most inexperienced beginner, to make smooth brick-to-brick joints, both horizontal and vertical.
This miracle device is sold on a well-known foreign online store. Amazon. It's called there Bricky – Wall Building Tool.
Costs 39.99 euros. To be honest, the price is clearly too high!
Yes, we need it, it’s a device, and we don’t need to buy it. Just see how it's made and make your own, completely free - from ordinary corners!
The operating principle is simple
Install the device on the brickwork, fill its frame with mortar, level the mortar over the frame, and remove the excess. Remove the frame. Place a brick on a flat strip of mortar.
Do the same with a vertical seam.

Brick is often used to build the walls of a house. Carrying out brickwork requires you to have certain knowledge and skills. If you are doing this work for the first time, then to obtain high-quality masonry it is better to use auxiliary tools. Such devices will not only make your work easier and allow you to get a good result, but will also significantly speed up the process of building walls at home. In this case, you can use ready-made tools for the job or make special devices yourself. In our article we will tell you how to make such auxiliary products and how to use them correctly.
Common Helper Tools
Since the construction of brick houses has been practiced since ancient times, during this time people have come up with many devices to make the work of the person laying bricks easier. This not only makes the craftsman’s work easier, but also improves the quality of the masonry, and also shortens the time needed to construct the walls.
The most commonly used tools for laying bricks with your own hands are:
- The most common and also necessary tool is a trowel. This product is in the form of a smooth steel spatula. Using a trowel, the master levels the concrete mortar, rubs the seams, and removes excess construction mixture from the surface of the walls.
- A plumb line belongs to the category of measuring devices when making brickwork. Using this device, the verticality of the walls is checked, as well as the correctness of the corners. Depending on the length of the plumb line, control over the verticality of the walls can be exercised to a height of several floors.
- The cord is needed to mark the height of the masonry at the stage of preparation for masonry work. You can also use the cord to check whether the work is being done correctly. Typically, such a device is called a mooring, since the masonry being performed must be moored to a tensioned cord. In other words, the mooring cord is used to control the horizontalness and straightness of the masonry being performed.
- A shovel bucket is usually used for mixing mortar, but it is also needed during the masonry process. Using this device, cement mortar is applied to the stone being laid. This product is simply necessary when working with a significant amount of solution.
- Level . This device can also be classified as a measuring instrument. Using a level, you can control the evenness of the completed wall in the horizontal plane. This device consists of an elongated, durable body, inside of which there are containers with non-freezing liquid and an air bubble. Based on the location of the bubble in the container, conclusions are drawn about the horizontality of the masonry. That is, if the level is laid with the longitudinal side on the masonry, then the air bubble should be strictly in the middle of the container. This indicates that the masonry work was carried out correctly.
- A special device designed for decorative seams is called jointing. This product is used for laying facing bricks. Joining not only aligns the seams, but also gives them the desired shape. Depending on the masonry technology, jointing of different shapes and sizes can be used.
- The rule is a lath for laying bricks, which allows you to control the evenness of the facing masonry. Externally, it is an ordinary even and smooth plank, with the help of which the evenness of laying the outer side of the rows is controlled.
- A pick hammer is used to give the stone the required size and in case of errors during masonry. With this product you can chop off unnecessary parts of bricks or give the stone the desired shape.
- The order is a device that is attached to the first masonry row. With this product you can accurately measure the location of stones and entire rows relative to each other. Quite often, ordering is used when laying facing bricks with your own hands, since with its help you can create various designs and patterns on the outside of the masonry. Also, using ordering, you can mark the locations of window and door openings, as well as other structural elements of the building. Sometimes ordering is used to fix the cord and level the masonry.
Homemade device for obtaining even masonry

To improve the quality of masonry work and speed it up, you can make a special template for masonry. Externally, this product resembles a wide container without a bottom. Using this device, you can easily apply a perfectly even layer of solution. As a result, the masonry process itself will be much easier.
Important: since applying masonry mortar in an even layer of the required height is difficult not only for beginners, but also for experienced craftsmen, the template will greatly facilitate the work of any person.
The following characteristics of the masonry depend on the evenness of the mortar application:
- If you lay the stone on a very thin layer of mortar, the adhesion of the bricks will not be strong enough.
- A layer of masonry mortar that is too thick will lead to overuse and unsightly, uneven masonry.
- If the solution is applied in an uneven layer, the outer side of the masonry will look sloppy due to crooked rows.
You can avoid all these disadvantages of incorrectly applying the solution using a template. Externally, this is not just a container without a bottom, but a product with restrictions on the sides that allow it to be firmly held on the wall. The dimensions of the template can be very different and depend on the masonry being performed and the stones used.

The template is laid on top of a row of bricks. The solution can be placed into the elongated hole in the central part of the device. As a result, thanks to the restrictive parts of the template, the layer of solution comes out perfectly even in width and height. Moreover, the height of the seam will be strictly as specified by the dimensions of the template. After filling the niche with the solution, the template can be moved to a new location.
The template allows you to replace two tools used when making masonry mortar at once - a building level and a cord. In this case, during the construction of one building, several types of templates can be used:
- When making the main walls of a building, templates with specified basic wall parameters are used.
- To make the facing brick layer, a different template with the parameters of the facing stone is used.
Important: large construction companies usually use a whole set of factory templates made of metal, plastic or wood.
Making a template

This device for quick brick laying is easy to make with your own hands. Of course, you can buy the finished product in the store. Usually on it you can adjust all dimensions (seam height and width). But if you want to save money, you can make the template yourself.
First, you need to decide on the basic geometric dimensions of the masonry joint (width and height). Here a lot depends on the stone used. Depending on the masonry technology and the material used, the dimensions of the template niche are determined.
Attention: your template can be made not only for laying bricks, but also for making walls made of aerated concrete, slag concrete products and other piece wall materials.
To work you will need the following materials and tools:
- a plastic box of a suitable size or a sheet of chipboard (plywood) and slats of a suitable thickness;
- pencil, level and ruler;
- drill (manual or electric);
- fastening elements (screws, nuts, screws);
- steel corners;
- screwdriver;
- screwdriver;
- hammer.
If you manage to find a plastic box of a suitable size, then it is much easier to make a template from it. Moreover, the plastic is quite durable and light, which is important when performing masonry work. If you do not find a box, then you can construct a structure of the required size from sheets of chipboard or plywood and slats. First you need to make a regular box without a bottom, slightly larger than the width of the brickwork.
The entire structure includes the following components:
- Frame with two longitudinal wooden sides. The distance between these wooden planks should be equal to the thickness of the wall. Thanks to the protruding lower parts of the planks, it is convenient to align the stones when laying, since these planks overlap the bottom row. This makes it much easier to keep the wall vertical without a plumb line or level.
- Carrying handles. Handles make the tool easier to use.
- Cross members. They are usually made from strip steel. This element allows you to control the linearity of the masonry.

The second name for such a template is a dispenser, since it can be used to accurately dose the amount of solution applied. Above we described the device and principle of using a horizontal dispenser. It is suitable for making horizontal seams.
To form a correct and even vertical seam, a vertical dispenser is used. The principle of using an end dispenser is similar to using a horizontal template. The only difference is that due to the small amount of solution, it is applied using a hand trowel.

- When making a template, it is advisable to immediately lay down a seam thickness of 10 mm. One is ideal for laying walls of one or one and a half bricks.
- To ensure that a wooden or plastic template lasts as long as possible, its most worn surfaces can be protected with wear-resistant parquet varnish. The composition is applied in several layers on the surface of the dispenser.
- After completing the work, all tools must be regularly cleaned of the construction mixture, otherwise they will very quickly become unusable.
Important: the time or money you spend on making auxiliary tools is more than compensated by the quality and speed of masonry work.
When laying brick, it is very important to maintain the same thickness of the seam. Even the best mason can hardly cope with such a task without special tools. You can make your life and work easier with the help of such a device. It will allow you to make almost perfectly even masonry while maintaining all distances. Need I say that such a thing will significantly speed up the process?
Device design

The device consists of two horizontal strips measuring 11x25 mm, two horizontal strips measuring 19x40 mm, and four vertical strips measuring 19x40. The design also includes two 10mm diameter studs with wings, bolts and nuts.

They connect the vertical slats. To fasten some parts, 40 mm finishing nails are used, the ends of which are bitten off from the inside of the parts. Finally, there are two screws with heads with a diameter of 20 mm, with nuts and washers for them.

The total length of the structure is 850 mm. Horizontal planks are placed according to the letter “G” principle. The sections of the tool from the edge to the vertical bar are 130 mm long. The height of the planks above the entire structure is 100 mm. The entire structure should be varnished to protect it from moisture that may enter from the solution.
Principle of operation

The mortar is applied to the masonry, after which it is leveled to the level of the tool strips. After this the tool
stretches forward. The overhang from the vertical planks is needed in order to work on the edge of the wall.
Masonry is a complex and responsible job, without which the construction or major renovation of a house is rarely complete. The main difficulty lies in the need to accurately observe axial and interelement distances, which ultimately affects not only the appearance of the masonry, but also its performance characteristics.
Therefore, both amateurs and professional masons are increasingly making Brick laying equipment. This is not as difficult as it might seem at first glance, especially if you have a good theoretical basis.
Standard masonry tools
Bricklaying requires some experience, constant concentration, and, importantly, a lot of time related to auxiliary control and measurement work.
The use of special devices helps to facilitate the process. They can be purchased at construction stores, but this is, firstly, expensive, and secondly, it does not allow taking into account individual characteristics associated with the actual parameters of the brick and the structures created from it.
Read our article about the standard size of red brick.
All equipment used for manual masonry can be divided into three large groups: basic hand tools, control equipment and mechanized devices. The first group is fundamental. It includes:
- Trowel (trowel).
- Joining.
- Correct hammer (pick).
Performs two main functions: block trimming to give them the required size and shape, as well as to correct minor installation inaccuracies on uncured or semi-cured mortar without removing the brick, that is, by light tapping.
This is a small flat spatula with a handle to hold it that is used for applying the binder solution onto the surface and distribution over it, as well as trimming and removing excess solution.
Depending on the shape, trowels are divided into type KB (triangular), type KP (triangular with rounded corners at the base and a sharp top), and specialized, for example, trapezoidal or triangular with completely rounded corners.
It looks like a long narrow groove attached to the handle and serves for forming seams, control of their thickness, removal of residual excess solution. There are convex and concave joints. An important parameter that determines the performance characteristics of the tool is the groove profile.
The tool has two working surfaces: a wide one, with a cross-section in the shape of a square or circle, and a narrow one - a pick.
Testing equipment is required to ensure maximum masonry accuracy and includes the following main varieties:
- Building level.
- Plumb.
- Templates, rules – slats, squares and other products whose purpose is form compliance control(flatness, angles, roundings, etc.) to nominal values by comparison with the template.
- Mooring (control cord)- a dense inelastic thread that is stretched along the rows of masonry and is used as a guide - an indicator of linearity.
- Order.
- Mechanized devices.
A linear instrument in the body of which transparent ampoules are fixed, partially filled with liquid. When the level is located on the controlled surface, the liquid, under the influence of gravity, occupies a certain position in the ampoule, squeezing the air bubble into a position relative to the control lines, which allows one to roughly determine the slope angle.
Construction levels are classified according to the length, number and location of ampoules.
It is a conical or bullet-shaped weight attached to an inelastic thread. It allows you to control the verticality of structures by relative displacement from the point of fixation of the thread in the horizontal plane.
Plumb lines are classified by weight: weights from 200 to 400 grams are used at heights up to 3 meters, from 600 to 1000 grams– for measurements at a height of several floors.
Essentially, a large ruler, with the price of divisions corresponding to the nominal width of the row. For classic brick masonry with a thickness of 65 mm, the CD of the order is equal to 77 mm, taking into account the thickness of the seam.
The orders may or may not be fixed on the masonry. Devices that allow for fixed installation in corners usually have holes for securing moorings.
Don't confuse them with automated– this type of tool does not provide any drive elements or complex systems.
Its name only says about the ability to reduce the share of manual installation and control work by applying the following mechanisms:

Industrial mason kits
There are many ready-made mason kits available on the modern market, including all three main groups of tools. Domestic kits are most widespread "Brick" and their foreign analogues "Bricky". These sets include:
- cuvette for applying the solution;
- template for laying single bricks;
- template for one and a half;
- control corner;
- order;
- mooring;
- trowel.
Manufacturers position the product as amateur, that is, not requiring special construction skills. It is simple and intuitive to use, allowing you to get good results in the shortest possible time.
Most kits come with, among other things, not only paper instructions, but also video tutorial, which describes in detail the use of each tool.
What is included in the beginner mason's kit - watch the video:
A device you can make with your own hands (video)
How to make super gadget for laying bricks yourself, find out from the video:
Homemade masonry equipment involves the use of wooden beams and slats, plywood or chipboard, steel or aluminum profiles. The choice of material must be carried out taking into account the skills in its processing.
So, the structure can be assembled with bolts or screws literally in one evening, but it will most likely fail quite quickly. An aluminum profile can be fastened with rivets or bolts, but a steel profile will be more securely welded.
In addition, a durable plastic container of the required width can serve as a good raw material - its alteration will come down to removing part of the bottom and attaching stops.
Regardless of the material, structural units devices will be:
- A frame, the internal width of which must correspond to the width of the brick and fit snugly around its entire perimeter. The frame consists of longitudinal and transverse beams, which are rigid or sliding.
- Sides - limit the width and height if the frame beams are insufficiently thick or it is necessary to place additional elements.
- Stops - are attached to the frame and serve to fix the structure on the bottom row of bricks or side surfaces.
- Control, measuring and auxiliary elements are optional components that simplify the work with the device.
Making a device for laying bricks with your own hands will not require large financial investments, and will also allow take into account all individual nuances, which distinguishes it favorably from similar industrially produced goods.
Specifics of working with facing bricks
The main function of facing bricks is; it shapes the appearance of surfaces, gives them stylistic completeness, a more harmonious and aesthetic appearance.
 However, there is also the other side of the coin - due to the specific shape and texture, as well as the need to strictly adhere to geometric parameters, laying facing bricks creates additional difficulties compared to conventional brickwork. These include:
- the unsuitability of rough hand tools for working with some decorative surfaces;
- special requirements for the quality of control, measurement and adjustment work;
- often - changing the composition of the solution, using tinting and binding agents;
- specific technologies for working with narrow and thick types of facing bricks;
- difficulty of figured masonry.
Here the use of mechanized devices will be more relevant than ever.
However, the general design described in the previous section should be modified to take into account the thickness and shape of the cladding blocks.
For figured masonry a special, highly specialized class of devices is distinguished, the design of which is developed separately for each specific case and often includes hinge joints, stepper mechanisms and other complex components.