Corner shelf on the wall with their own hands. How to make angular shelves and assemble the module of them? Making a simple wooden shelf
In the interior of any room, whether it is a room, a kitchen or a bathroom, the angular attachments are very harmonious. This element of furniture in its simplicity plays both practical and aesthetic role. It can be used to arrange books in the living room, children's room or office, install in the kitchen, in order to place kitchen utensils, jars for bulk products or cute baubles, equip the bathroom comfortable places to accommodate personal hygiene and cosmetics in the bathroom.
Thanks to such a design, it is possible to rationally use space in rooms of a small area, as well as smooth the corners. Such shelves, not being the main elements of furniture, will focus on the interior design, effectively deculating it.
What materials do the corner shelves perform?
Now in stores there is a huge range of a variety of shelves, which makes it possible to perfectly pick them up for any interior of the room. Manufacturers offer products made from different materials, all kinds of designs, sizes and shapes. Despite this, many do not mind making the corner shelves on the wall alone.
But in any case, you should know what materials are the most suitable for the manufacture of such structures.
- Wooden array. This natural material has always been and will be very popular for the production of furniture, including shelves.
- and chipboard. They consist of secondary wood raw materials, in which formaldehyde is added, and are well suited for the manufacture of cabinet furniture and its accessories, both in factory and home. The surface of the finished products is then covered with a veneer or film.
- Metal. For the manufacture of shelves, different profiles are used, from which racks and transverse bearing elements are made. Different polymer coatings are used to protect against corrosion.
- Glass. For such shelves, impact-resistant glass is used, and carrier structures are performed from metal.
- Plastic. The angular shelves on the wall from this material are structures in which transverse elements and racks are made entirely of polymers.
Corner kitchen shelves
When designing a kitchen, such shelves are used not so much to decorate as for convenience. As a rule, they are placed above the working surface, taking into account the rules of ergonomics. What the hanging angular shelves on the wall look like, the photo will reveal in full.

They have a g-shaped shape and can only take an angle or continue along the length of the wall. Often, such an element placed in the corner, connect the suspension cabinets located on the adjacent walls. For small kitchens, they are an excellent alternative to bulk cabinets and are used to accommodate some types of products, kitchenware and other utensils.
They can be made of all the above materials, but more organically in the kitchen interior looks at the attached angle shelf on a tree wall, especially if the room is decorated in styles such as a classic, Provence or Country.
Corner shelves for the bathroom
It is no secret that most bathrooms have small sizes, and the issue of saving space is very acute. But in this room, it should be convenient to place a bath accessories, shampoos and shower gels, cosmetics and perfumes, as well as all sorts of washing and cleaning.

That is why different suspended structures are simply indispensable here. The optimal option is to hang the corner on the wall. They are perfectly combined with mirrors, look elegant and fit almost any design of the bathroom. And if you consider that the humidity in this room is always increased, then the best material for the shelves is not found.
Although no less relevant shelves from plastic. Their design consists of a rack, which is installed in the rear between the edge of the bath and the ceiling, and four shelves with perforation (for water flow). For convenience, the shelter is equipped with mounted soaps and hooks for the washcloths.
Also in the bathroom you can hang and the angular shelves on the wall of metal. Such structures are usually performed from stainless or chrome steel.
Book angular shelves
Shelves for books are present in each dwelling. On the one hand, they are very comfortable, and on the other hand complement the interior of the room. The design of these structures amazes with its diversity and originality.
The angular shelves on the wall in the room in both classical and in unconventional versions are made.
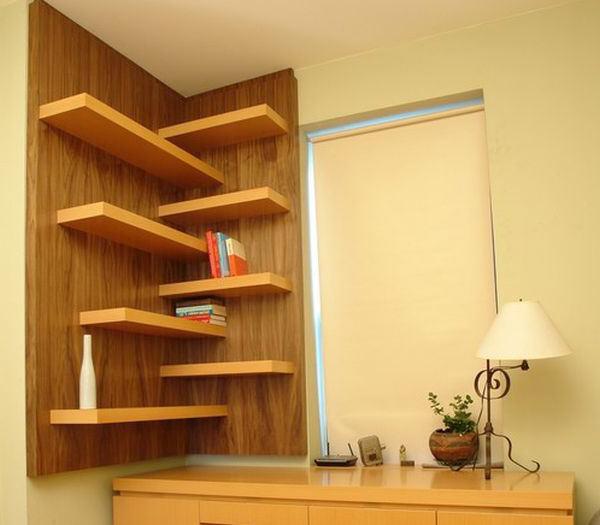
But even the classic may be somewhat unusual. It looks spectacularly a wooden shelf, the elements of which alternately fit to one side of the angle, then to the other. Planes for books have a rectangular shape, rounded on the corners, and are located at the same distances from each other.
The shelves are more monumentally look in the form of an openly each side of such a cabinet is divided into compartments of different widths in which the transverse shelves are at different distances. Such angular shelves on the wall, the photos of which are suggested below, have a small depth, while remaining very comfortable and spacious structures.
It is interesting to look such a kind of shelves for the children's room. They have a M-shaped shape with the same from the angle of the length of the transverse elements. But the highlights of them are that they can be placed both books and toys for which semicircular vertical compartments are provided at the ends of the shelves.
Greately popular now enjoy the original corner shelves on the wall in the style of minimalism. Perform them from wood. The base also has a M-shaped rather narrow shape, at the ends of which flights are installed as holders for books.
How to make angular shelves on your own?
Since the shelves are pretty simple design, many prefer to make them themselves. Advantages in this abound. First, it is possible to actually save, and secondly, to make your taste with the desired design, which perfectly fit into the desired angle. Yes, and special knowledge, skills and expensive equipment here will not need.
Corners can be performed from any material, as stated above. And deciding with it, you just need to find the necessary tools.
Glass angular shelves
If you decide to make the shelf of glass, you need to prepare the following set of tools:
- glass whose thickness is at least 7 mm;
- fasteners "Pelican" at the rate of 2 pcs. on 1 transverse element;
- drill;
- glass cutter;
- bulgarian with a circle for grinding;
- building level;
- file;
- pliers;
- rubber hammer;
- polishing paste;
- roulette, ruler, scissors;
- pencil (marker), cardboard for template.
Glass shelves manufacturing technology

The process of manufacturing such a shelf consists of several stages:
- Taking template. It is cut out of cardboard in full size, slightly twisted the angle of docking with the wall. This will give the opportunity to install the shelf to the wall in the future.
- Glass preparation. It is cleared of contamination using soda or detergent. Note that for further operation, the glass should have a room temperature.
- Making a transverse bearing element. Cut the smooth surface with the cloth, placed on it glass. Applying a template, glass cutter cut an element.
- Grinding edges. Fissure gloves and with a file moistened with kerosene (turpentar), cleaned the edges.
- Grinding edge. To do this, they use the grinder from the after that the edges of the brine with the felt circle, applying polishing paste.
- Installing the shelf on the wall. This requires the fastening "Pelican". First, on the wall there are places under the self-tapping screw, then drill the holes drill, score a dowel there, after which the mounts are installed and the glass shelves are fixed with special screws in them.
Wooden angular shelf
Such a shelf can also be made independently, having some carpentry skills. The best material for its manufacture will be chipboard, MDF or plywood.

The following tools will be needed for work:
- saw with small cloths;
- electric jigsaw;
- drill;
- hacksaw and knife;
- compass;
- glue "moment";
- reiki to enhance stiffness.
Wooden Shelf Production Technology
The angular shelf on the wall wooden is performed as follows:
- from the chipboard, the transverse element (shelf) - the circulation draws a circle, divide it into 4 parts and cut each knife or pubesy;
- on the rake-rack, there are places for each shelf and make grooves of the desired deepening, for this use saw and knife;
- on each shelf, the area is planned for drank near the corner base, corresponding to the size of the groove; used for this also saw and knife;
- after that, the shelves are grinding and checking into the entry into the groove;
- rack-rack with glue and tape are attached to the wall and leave for 1 hour for better grasp;
- then insert the shelves into the grooves without additional fixation.
Knowing all these subtleties, make the angular shelves on the wall of the tree are not so difficult. You will leave for a similar work for several hours. And a comfortable and beautiful shelf will serve you for many years.
Create comfort and comfort in your home is a very pleasant lesson. And if the interior applies objects made by their own hands, it brings some kind of warmth to the home environment. Fantasize, experiment, make the decor with your own hands - and you will bring joy to yourself and your loved ones.
Open angular shelves help to make a more functional residential and workspace, can serve as a spectacular part of the overall interior solution. To the question of how to make angular shelves, the corner rack is suitable on the basis of the available free space and the planned design.
Options for angular shelves and open racks with their own hands
The appearance of the furniture is largely determined by the materials used in the manufacture. An angular opening rack can be made of an array and chipboard, MDF and plywood, glass and metal. And in each embodiment, the same constructive solution will look different.
The rack of the angular open can radically change the appearance when changing the insignificant parts.

Also, combinations of various contrast colors can change the usual model beyond recognition.

How to make an angular rack outdoor step by step
First of all, it is necessary to determine the overall dimensions of the open rack. As a rule, all models have an extremely laconic design and easily fit into the designated space, supporting the overall interior solution.
Open shelves can be attached to the framework of the shelving, and directly on the wall. In the second case, to fix neatly and beautifully angular shelves on the wall with their own hands, you will need to purchase special holders for shelves - tucanis (pelicans) or consoles of various configurations.

Also an angular shelving with shelves can be outdoor and wall. In the first case, the design must provide a base box. Usually I do not make solid sidewalls to the floor - so that the plinth does not interfere with the product close to the wall. After all, it is not always possible to cut it, often inside the hollow plinth "hides" wiring.
Consider an example of calculating the detailing and drawing up the map of the corner rack of your own hands on the example of the first model.
Step 1. Watch the design on the scale, indicating the overall size and numbering of parts. Thunderstand how the parts will be connected. Since the rack will stand closely to the walls, it makes no sense to use hidden fasteners in the form of ducts and eccentric screeds. If the through holes on the lower shelf, in the field of fastening the base box are also "embarrassing", give up the erochins (confirm) in favor of the corners.

Step 2. We paint the corner rack with your own hands in the form of detail, make up Crazy cards. The calculation is given for a 16 mm thick chipboard. For materials of another thickness, the size of the shelves will be somewhat different.

Step 3. After cutting parts, decor radius, we ride the visible parts of the melamine edge or PVC.
Step 4. According to the specification of fastener marking, send parts for further assembly.

If you are all done correctly, the angular regiment will be gathered as a "constructor" as the usual serial product.
Photo
Corner shelves allow you to save space, so such a designer solution is a find for small areas. This element of furniture can be made independently, because this does not require special knowledge, expensive equipment and a large amount of time.
Drawing of the corner shelf.
Selection of material and shelf tools
The angular regiment can be made of various materials. Consumers often make a choice in favor of chipboard, MDF or plywood. Another option may be the bottomhole profiles, as well as glass.
The choice of tools depends on the material from which it is necessary to create the shelf with your own hands.
So, for wooden models it is worth it:
- lobzik electric;
- hacksaw;
- saw with small teeth;
- drill;
- glue;
- rake to create a circulation and a circular with a large radius;
- wooden rail for the basis of the design.

Scheme of a wooden angular wall shelf.
If the angular regiment is masked from the bottomhole profile, then it is necessary to purchase the following tools:
- drill;
- hacksaw;
- level;
- self-tapping screw;
- rake to enhance the rigidity of the edge;
- glue "moment";
- cable Channels.
The smallest number of tools is required when you need to make an angular glass shelf:
- a set of holders for glass shelves (there are already self-tapping screws and dowels);
- level;
- drill.
When all materials and tools for performing work are collected, you can start creating the shelves.
How to make an angular regiment?
Creating a shelf and its installation - the process is fast enough. Therefore, in a few hours (or less) you can easily transform the room that does not compare with the cost of time when you need to create a closet. Make the shelves correctly using step-by-step instructions.
Shelf of glass

Scheme of an angular glass shelf.
To make such a shelf, you need to perform the following actions:
- Cardboard creates the shelf template.
- Cutting and processing glass can be performed both at home and in a special workshop. But it was the pro will produce all work at a high level, and the consumer will have the opportunity to choose the most suitable material.
- The holders are purchased.
- Next, you need to wear a shelf on one of the holders, applied to the wall and with a pencil outline the upper limit of its fastening.
- The first holder is attached, for this, the auto-dowel and dowels are used.
- The glass is inserted into the first holder, fixes and put on the second. Using the level you need to align the shelf. Mark the pencil of drilling places.
- Fastening the second holder.
This is so simple way to make glass shelves at home.
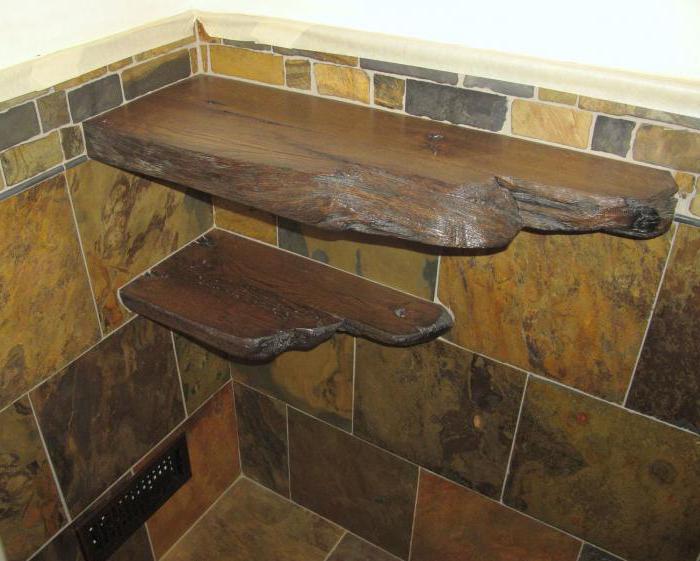
Stone Shelf
The shelf can be given any form, however, you should always remember the direct corner of the foundation that will be attached to the wall.

Corner shelf from the submap profile.
In order to build a shelf, follow the instructions:
- Material is placed.
- With the help of the knife cuts the shelf.
- Next, with the help of a special rail, which coincides with the profile in thickness and length, the framework is enhanced. To do this, it is necessary to put this material for the glue "moment" and consolidate it to the edge of the profile.
- Holes drilled in the already glued rail.
- Self-tapping screws are rushed into the wall under the already drilled in the shelf of the hole. During operation, the level is used.
- Open designs are hidden behind the cable channels chosen. They are planted for glue.
- The shelf is fixed on self-drawing.
You can change the color of this design using various adhesive films selected for the interior.
Thus, an ordinary profile will easily turn into marble.
Shelf of chipboard (plywood, MDF)
Fastening such shelves is made in several ways. The first is the nozzle on the longitudinal rack-foundation, the second - in fixation in the slots of the transverse basis.

Making shelves from chipboard.
The first way is good because there is no need to drill neither tile, no walls:
- The shelf is cut out of the chipboard. To do this, with the help of a circulation, you need to draw a circle, divide it into 4 parts and cut each electrolovka or hacksaw.
- On the rake-based marks the locations of the shelves and the size of the required groove. The billets are applied to the rake, and their width is fixed.
- Small-grained saws are made cuts to the depth of the middle of the rail, and an unnecessary element is extracted with a knife.
- On the shelf at the corner base, the site is scheduled to be cut off. By area, it is equal to the depth and width of the groove in the rail.
- Small-raised saws on drawn marking needs to be made and remove an unnecessary element.
- Next, the shelves are grinding, and the entry into the grooves is checked.
- With the help of glue, the rail must be fixed to the wall, fasten with scotch and leave at least an hour.
- The shelves are inserted into the already fixed rail without any other fixation.
Such a simple way can be made of racks for a living room, bathroom, kitchen, etc.
To make the shelf in the second way, it is necessary to manufacture the grooves first, and only then take for the main element:
- In two bars, the length of equal size of the sides of the shelves, with the help of a circular saw, the grooves the required width is generated.
- These elements are attached to the wall using self-tapping screws or dowels. It is necessary to ensure that their hats are completely recessed.
- The angle is carefully measured. Measures are transferred to the material where the shelf circuit is drawn.
- An element is pumped up using a jig or filling.
- For faces, a special tape is used.
- When the shelf is fully ready, it is inserted into the grooves.
Only a few hours, and the beautiful decor element is already in place!
Creating a shelf with your own hands, the master takes into account everything: their ideas, interior, features of the angle, where this subject will be.


One of the placements to decorate the room is the use of shelves. But they are not only an item for decoration. Much more often they are functional. Hang shelves on the wall, put on the floor, some suspended to the ceiling or beams. But what is best - they are easy to do themselves, with your own hands.
Types of shelves in the house
At the place of installation, shelves are wall, outdoor and suspended. If the floor shelf has a greater height - from the meter and above it is often called the rack. A few words about suspended: Usually these are decorative designs that hang on a pipe or specially driven bracket. This option is popular in those rooms where heating pipes are under the ceiling: they are asking for something to hang out something. On the pipe hang shelves in the kitchen and in the bathroom: it is convenient there.
They are made of wood, Fiberboard, there are glass shelves. As racks, the same materials are used, but they are made of metal, plastics and other completely incredible things - for example, pipes or bottles.
In residential rooms are not so important from what material the shelf is made. It is important that its design was in the same style with the interior. Even the functionality is not always important: some play an exclusively decorative role. On them if there is something one or two subjects. Their role is to give the interior of the housing of a special style and color.
Laconic style of apartment decoration and the same concise shelves of contrasting color. In this interior, they are the main element. Free space above the sofa is organically filled with shelves in the tone of the walls.
If we talk about the shelves in the technical premises - the kitchen and bathroom, in particular, then the requirements for practicality are also added to the considerations of aesthetics. Even decorative shelves in the kitchen should wash well. For shelves in the bathroom, the requirements are high: periodically there is very high humidity and requires materials that are transferred without any harm. They are not so much. This plastic and stainless steel. There are still shelves for the bathroom from MDF, but they are normally operated with good.
Shelves on the wall
In any room on the wall there are places that simply need to hang something. After all, most modern furniture takes only the bottom - sofas, tables, couches. The upper part remains empty and dissonance occurs: the overloaded bottom of the room and the semi-empty or completely empty top. Here these voids on the walls are organically filled with shelves.

Whole system, and the most "dead" space is used - angle
Structurally, most shelves consist of itself shelves and jumpers. But these components are combined into such a number of options that it is impossible to calculate. Simple design is good: you can make any shelves with your own hands. Moreover, these products may be the first to be manufactured things. It is really simple.
How and on what to fix
We are not in vain from fasteners. The design of the shelf on the wall depends largely on the type of fastening. Or maybe on the contrary. It depends on what to dance ...
Traditional loops

There is a traditional way - on the loop. It is suitable for wood and fiberboard, any other materials that have enough thickness to attach them. Screen soldered on the side parts. Then, between the centers of the hinge holes, the distance is measured, postponed on the wall (follow the horizontal). In the points noted, the holes under the dowel are drilled, a dowel is inserted and a dowel-nail with a small hat screws into it, which enters the loop or bracket (pin, slightly bent up). Then the shelf is hung on them.
Not all materials can be drilled. For example, glass shelves. They will not screw anything exactly. Mounts for glass shelves Special: They consist of two parts, between which the glass is inserted. Often there are elastic gaskets between the holders. In the lower fastener, there is usually a small clamping screw for fixing.
Fasteners for glass shelves
The most popular fastening for glass shelves is called Pelican - for a peculiar form. He himself looks good, there are in different colors. The thickness of the glass that it can hold is from 8 to 34 mm. You can insert not only glass into it, but any other material of such thickness. Just with glass it looks stylish.
Make glass shelves on the wall with it easily: buy mount, in the glass workshop, order the desired size and shape of a piece of glass with processed edges (or cut, if you know). The assembly itself remains:
- Attach "Pelicans" to the wall. Two dowels. The collapsible case - the decorative lining is removed, and there are two holes in the mounting plate. One in the housing is higher, the second is below. Passed, installed a decorative lining.
- Inserted glass.
- Swallowed screw. Everything.

There are other shapes like fasteners. The photo below is some of them.

Decorative brackets
Another type of fastening is brackets. They are reliable, some decorative, and so much that they themselves are decoration.

Secret installation - shelves without support
And the most amazing fixture for secret installation. It makes it possible to hide fasteners. In the end, the seat is cut off under the pin and the housing of the holder and the shelf just put on it.

As you can see, even a simple blackboard or a piece of glass on such mounts is not bad. But there is another sea of \u200b\u200bany ideas.
Bookshelves
Requirements for strength are presented to the bookpins: weight is kept significant. Therefore, the fastening and materials and design should be reliable. Traditionally, shelves for books are made of wood, laminated or veneered DVP. And then the Fiberboard with a long span (more than 90 cm) begins over the years.
Planning the shelves on the walls for books on its own sizes, keep in mind that the distance between the supports on should be more than 90 cm. Then even fully loaded it will not bend. And the species and varieties of the shelves are two: wall and outdoor. And those and others may be angular.
In the simplest case, this is the board, enshrined in one way. Some options, especially with proper feed, look very well.

And in the presence of fantasy, a few pavements turn into a very interesting thing that can even be the main element of the decor. Ideas for self-making are collected in the photo gallery.
And this is a serious way to expand the space due to the corners between the two windows nonlinearity - they are always interesting, and the books of different height can be put on such a shelf
Outdoor bookshelves can be loaded more seriously. There are other forms: there are racks to which shelves are attached. The highlight can be a broken or unusual shelf line as well as interesting racks.
It is rather a book rack or even a wardrobe, but the essence does not change - the original color and interesting small shelves in the central part and the structure looks interesting  Very interesting idea - nonlinear shelves and jumpers from thick glass
About the manufacture of fountains (and small indoor, and more solid for the country, native or garden plot) read.
Suspended
Not very numerous, but the original type. The most important thing is that you can do easily: a few dashes, four ropes or two belt and you can start working.
This is a difficult system of blocks ... and the shelves can be at any level two planks, four ropes and half an hour of time - everything is needed in order to make this shelf how to make a suspension shelf - graphic step-by-step instruction
In nursery
While the child is completely small, I want a functional shelves, but with children's drawings. But where are these? Make yourself. Any shelf of the configuration you like can be saved with wallpaper on a fliesline basis or dense wrapping paper (glued on the PVA). After drying, twice covered with water based lacquer. Such shelves can be washed, but what is the most interesting, the shelf can change together with the child. Move the old decor, glue new. The idea is simple, it works on "excellent."

For children, shelves are not very different in design. If we talk about outdoor or about racks, then they should be strong: given the fact that grown children will definitely want to climb them. Therefore, often even those shelves that stand on the floor are fixed in addition to the wall: so that they do not collapse and do not give young climbers. Based on these considerations, they are not made high: even if they fall - not scary.
The shelves in the children's room in color are more bright, they can be made in the form of letters, there may be boxes for toys in them: so it is easier to keep them in order. In general, the functionality and security should be combined.
 The system with drawers - cleaning will be a quick combination of open and closed shelves - convenient for preschool children
Shelves and shelves in the kitchen
Nor say, but in the kitchen, the main thing is functionality. Not so much free space even on the walls: the lockers occupy a large territory. Because one of the tasks - to use the free space to use the maximum. Interesting ideas are for small or even very small gaps between the wall and refrigerator or other household appliances. Strictly in size can be made on the wheels, which goes away and hides completely there. It is wide and narrow (see photo).

Such a retractable shelving shelf on wheels under different jars make it easy. All right at hand and does not interfere
There are still interesting ideas about saving space. If the washing or a hundred is standing near the window, you can take the sidewalls. There is an interesting suspension option - the grille on the chains to which all the utensils are cling. But such a regiment is possible if the desktop is not at the wall. Another option to save space - if the kitchen-dining room is zoned by the counter, you can also make a regiment, which will be partially suspended. One part of it rests on the wall, the second - on the counter or "hanging" on the ceiling.

Cave the whole wall above the work desk by lockers - not the best way out. They look too heavy. You can solve the problem at the expense of the glass door, but it is not all like it. Exit - to make open shelves between the cabinets. They will give more ease of the interior and the work zone will not be so pressing on the rest of the space.
Square and open shelves "make it easy" interior style is another - the idea of \u200b\u200bthe same closed and open shelves in one system - convenient and non-standard
Decorative and original
Often the shelves on the wall play an exceptionally decorative role. They are designed to attract attention and this goal is achieved by an unusual form contrasting with respect to the walls, color. You will not put a lot to her: one or two things, but how interesting they are.
Another option "square" shelves. Two identical sets connoined differently if traditional square shelves arrange on the edge of the curly frames, the style is completely different
Another interesting topic - glass shelves. Just one glass is not very interesting. Its combination with wood and steel is more attractive. The effects are sometimes unexpected. Glass is collected on the guides: the material is fragile and heavy, and it needs to be kept. It was under the power of steel.

In fact, these systems are designed to create interior stores, but also in the apartment in a modern style or look stylish.

To the style "Vintage" are also suitable
What only do the shelves do. Even of the pipes. Metal and plastic. Remaining samples from repair? Use it in business, and get the designer thing, which is interesting, collected from the rubble.
Such is the interesting variation of the bookshelf from pipes
In any room there is a free angle in which the shelf can be placed. It will not only become an element of design, but also create additional space for storing books, toys, small kitchen utensils, etc.
The appropriate option can be chosen in the store or order. But it is better not to spend, as it is not worse than the factory items to make the angular regiments.

Materials for the shelves
Before starting work, determine the material in accordance with the conditions and interior of the premises. Corner shelves are manufactured from the following materials:
- Tree array or boards. Trimming remaining after repair.
- Plate chipboard and MDF. Suitable pieces can be inexpensive in the market.
- Multilayer plywood.
- Glasses with a thickness of at least 5 mm.
- Plastic.
- Bottomhole profile.
- Metal.


The first 3 options are most popular, so to work with them the desired tool will be found at each home master.

However, there will be no difficulty with others if the performance of special operations (for example, a curly cutting of glass) Order in the workshop.

Shelves for the living room
Wall-mounted angular shelves for this room are usually made of wood or its substitutes (plywood, chipboard, MDF). On the material, the circulation is drawn the circle of the required size, then it is divided into 4 equal parts, which are cut off with hacksaw.

To obtain smooth edges, it is better to use an electrolovka. All 4 sectors can be used to create a multi-tiered shelf. You can simply unlock the angle of the desired size from the material, but then the front edge will not be semicircular.

To install in the angle, it is necessary to make rails with grooves. They are fixed on the wall with glue, dowels or self-tapping screws. Then the shelf is inserted into the grooves without additional mounting. Its edges are closed with a decorative ribbon.

The regiment of the rectangular shape in the form of a snake, whose tiers alternately are alternate on adjacent walls.


Kitchen Shelves
They are allowed to make from various materials, but traditionally chosen wood or fiberboard. Unlike the shelves for the living room, these have an extended rectangular shape with curly sidewalls, located at an angle on adjacent walls. The shape of the sidewall can be invent independently or look at the Internet.

The angular regiment in the kitchen with their own hands from the Fiberboard or MDF is made in the following sequence:
- After measuring the free space, the drawing is drawn up.
- The sidewalls are chopped by an electrolybic. Scoops are cleaned by sandpaper. Slices are covered with decorative ribbon.
- Then the horizontal rectangular crossbars are cut out, which will connect the sidewalls. The outer cuts are closed and falling with a ribbon.
- Before assembling in the sidewalls located closer to the corner, end-to-end slots are made to the size of the upper crossbars.
- On the sidewalls, in places of attachment with crossbars, you need to drill on a pair of holes for furniture screws.
- Prepared details are fastened with screws. Last but in the slot insert the upper crossbar, fastening it with screws on the outer sidewall.
- The finished bunk shelf is fixed on the wall using suspensions purchased in the store or on the market.


Shelf for iconostasis
According to traditions, such a single-tier shelf is placed in the eastern corner of the house. For its manufacture, an array of wood or a wide board is selected.

If the angular shelf for the icon does not decorate the carvings, then the process of its manufacture does not differ from the shelf for the living room. But in contrast to her on the front, eaves should be installed in the form of a narrow bar. It is often done figure.

The cornice to the shelf is fixed by ducts (wooden pins). The holes in the triangle of a depth of 2-3 cm are drilled under them. After installation, they must perform 1 cm. Drilling holes on the karnis, it is fixed on the wizards with glue.

Bathroom Corner Shelf
The bathroom is a room with high humidity, so the carbon regiment from the tree will not last long. But the glass and plastic will be just right.

When measurements need to be taken into account that the angle may not be direct. Therefore, the template should be made from cardboard and cut the shelf on it.

In the case of the use of glass, it is better to contact the workshop, where it will quickly cut out any form. For fastening the shelf, special holders are perfectly suitable, which are sold with dowels and self-drawing. They are fixed on the walls and insert the glass.


Shelf for books from metal
The original angular shelf of segments of water pipes can be made in the presence of minimal locksmith skills. In shape, it looks like a snake, whose bends are alternately enter the adjacent walls.

Fragments of the pipes of the desired length are connected by angular fittings and welded. In the absence of welding, the mount is carried out with the help of screws screwed into the junction of fittings with pipes. The finished design is painted and attached at the bottom and upper points to the dowel driven into the wall.

In the manufacture of angular shelves made of drywall and profile for the windowsill, they need them depending on the intended load to be enhanced with wooden slats, metal profile, corners. A self-adhesive film is used for finishing.

Framework is required for fastening. Options for designs and design can be invent independently. For inspiration it is useful to see the photo of the corner shelves made by their own hands on the Internet.

Stock Foto Beautiful corner shelf with her hands