How to make a house from vulture panels with your own hands. We build a house from vulture panels: construction technology, the pros and cons
Do it yourself building a house from SIW panels.
Here we give a summary of tips for building houses from sip panels of the general plan:
Foundation selection
In the vast majority of cases, two types of foundations - on screw piles and a shallow recessed tape - can completely solve the problem of reliable support of a Canadian house in the Moscow region.
If you make a concrete pile pile foundation (below the freezing depth) under a light Canadian house, healer soil, it is better according to TISE technology (with broadening of the lower part of piles) and with high grillage (with a gap between grillage and soil).
This is correct in theory. In practice, in the Moscow Region, under SIW, houses often make bored piles without broadening, and often the grillage is also supported on the ground (low grillage).
Problems happen, but in most cases light houses on such foundations are without problems. The fact is that a powerful reinforced concrete grillage not only prevents uneven subsidence of piles under the weight of the house, but also compensates for the uneven expulsion of piles by the lateral frost heave forces. In fact, we are dealing with a “floating” foundation of an unreasonably expensive and complex construction.
Why do such foundations? The answer is simple: “Customers like it.”
Customers like a lot of what is harmful. For example, it is beautiful when the foam protruding from the joints of the SIW panels is neatly cut.
But you cannot do this outside. Until the exterior decoration of the house has begun, the assembly foam is destroyed by ultraviolet radiation from the sun. Trimming only speeds up this process.
For the house of SIP panels, the best pile foundation is screw. The blades of a screw pile perform the same function as broadening the lower part of the columnar foundation, made according to the TISE technology: they reduce the pressure of the loaded pile on the soil and prevent it from being pulled out by frost heaving.
Thus, a screw pile, working as an anchor, provides a fixed fulcrum if the piles are screwed below the freezing depth into the bearing (!) Soil.
Due to the increased stiffness, SIP structures are not very sensitive to seasonal soil movements. For small country houses, the most inexpensive option is suitable - a foundation on posts.
As a rule, these are small concrete blocks installed on a sand bed (required at the corners of the house, joints of load-bearing walls and several intermediate ones).
Construction season
Construction using Canadian technology is possible at any time of the year. Great time for building is winter. Due to rains, the construction may take a little longer. We have to take measures so that the dirt does not fall on the construction site.
There may be problems with access to the site. According to the weather, summer is the most favorable season for DIY construction. But in the summer, its difficulties are due to the growing excitement in the construction market with understandable consequences.
What to build from SIP panels
Important question: what elements of the house to assemble from SIP? Exterior walls are always assembled from SIP panels. The walls are surprisingly warm and even.
Internal load-bearing walls are also desirable to assemble from SIP panels. The issue of partitions is secondary. Partitions can be assembled from anything and at the stage of finishing. Most often, partitions are assembled from SIP panels with a thickness of 124 mm.
The use of SIP panels for the assembly of zero and attic floors or roofs is justified by their high heat-insulating ability.
Overlapping from SIP does not require a subfloor device. Fine floor coverings (laminate, linoleum, carpet, etc.) are laid directly on the SIP floor.
Apply SIP to build interfloor overlapping is possible, but not entirely advisable due to low rates with respect to impact noise.
It is problematic to make a complicated roof from SIP panels. It is possible to assemble a roof of any complexity from SIP, but the reasonable question arises - why, if it is simpler than the proven classic rafter system with insulation?
Which beam is suitable for joining SIP panels
It is not recommended to use a bar from boards joined at the construction site for joining SIP panels because of the risk of cracks. A massive wooden beam of the required section in the markets can be found, if possible, only raw.
This requires clarification. The concepts dry or raw lumber (wood, board, etc.) is used only at the household level. In fact, all lumber contains moisture. Excessively moist wood has many disadvantages, one of which is shrinkage (change in linear dimensions).
Moisture in wood is present in 2 forms - free (capillary) filling the cell cavity and intercellular space (up to 70%), and related (hygroscopic)located in cell membranes (about 30%).
Delete free moisture (it is often called plant juice) occurs quite quickly and easily with atmospheric drying. Moreover without change linear dimensions and volume of wood. Only its density decreases. Very often “dry” is called a board, from which a significant part has left free moisture.
The problem is that the wood shrinks later, namely during evaporation related moisture! It is at this stage that the linear dimensions of wooden lumber are significantly reduced.
During forced chamber drying, dry-looking coniferous lumber dries up to 12% in the transverse direction to the fibers!
Due to the anisotropic structure of wood, removal related moisture is accompanied by cracking and warping. Therefore, truly dry lumber can also be distinguished from raw the presence of cracks.
To remove most of the bound moisture, forced (chamber) drying is necessary. Therefore dry edged there is no lumber in the markets. All that is sold is a cheese cutter - a freshly sawn forest that must be dried in a chamber.
Chamber drying lumber expensive. In addition, after drying to the required humidity, edged lumber loses the size of GOST.
Planing (calibration) eats up a few more millimeters of thickness and width, which finally makes such lumber unsuitable for joining SIW panels with a polystyrene foam thickness of 100 mm, 150 mm and 200 mm.
Massive timber with a thickness of 100x150 mm and 100x200 mm chamber drying is almost impossible to find. Massive timber requires particularly mild drying modes, i.e. special equipment.
Conventional drying chambers are designed for drying boards up to 50 mm thick for further planing in moldings or for the manufacture of glued beams, I-beams, furniture panels, etc.
And there is no acceptable alternative to a massive rectangular beam for joining SIP 174 or 224 mm in floors and roofs today. Wooden I-beams (I-Joist and others) with a height of 200 mm are rather weak for this purpose.
A massive beam of rectangular cross section 100x200mm in terms of rigidity and strength can replace a 300 mm I-beam, but you can not put it into a 224 mm SIP panel.
LVL and glued beams are a little expensive. For example, the retail price of glued beams 100x200 mm - 650 rubles. per metro (May 2013). This is more than 30 thousand rubles. per m3.
Overlap of SIP panels
Ceilings and roofs are places where, in terms of price, manufacturability and other parameters, insulated classic beam (rafter) structures compete with SIP designs. If the technical details are of little interest to you, proceed immediately to the next point.
Often, especially in small buildings, a zero-floor device and a SIP roof are the most optimal solution. But with large spans, traditional beams on wooden beams may be better than SIP floors.
The issue is not only in price. About the problem of the joining beam in the floors and roof, we wrote above in the previous paragraph. There are other reasons to consider when making a decision:
The SIP panel is by design a wall panel and is designed to carry large longitudinal loads. As an overlap, the SIP panel does not have special advantages, although it has good flexural strength.
Zero and floor floors of the house must not only withstand certain loads, but also be sufficiently rigid (not to bend much). Sex should not “walk” underfoot. Overlapping the required stiffness is easier to assemble from beams of suitable section.
SIP floor panels are often made narrower (usually twice - 625 mm). Dock panels on floor beams. This means that the main supporting element of the flooring of SIP panels is the same wooden beam. The stiffness of a beam is determined not so much by its cross-sectional area as by its height and shape. And the 200 mm that the “overlap” panel dictates is good for flights up to 4 meters.
If the spans are longer than the length of the SIP panel, then the strength of the overlap depends on the beams (in the places of the transverse joints of the panels all the load falls on the beams)! For this reason, when flying over 5 meters, it is better not to do the SIP overlap - the pitch of 625 mm of beams at their height of 200 mm is too large (according to SNiP, the permissible span for a beam of 200x100 mm with a step of 625 mm is less than 5 m).
If the floor beams are installed with a pitch of 625 mm, as in the SIP floor, the OSB-3 boards sewn onto the beams above and below and without glued polystyrene foam will work like the shelves of an I-beam! OSB-3 slabs for sheathing floor beams, unlike SIP, do not need to be sawn in strips of 625 mm wide. Installation screws will take half as much (saving time and effort).
Overlap everywhere should have the same thickness, and the spans it covers are most often different. Beams can be laid out in different directions and with different steps, thereby optimizing material consumption. Usually the largest spans are above the living room. There it is advisable to make the floor more rigid by reducing the step of the beams and (or) increasing the area of \u200b\u200btheir section.
In the manufacture of flooring from SIP, such an opportunity will most often not be. Overlapping will turn out somewhere rather weak, and somewhere - on the contrary. Cover flights over the bathroom, hallway, etc. beams of 200x100 mm with a pitch of 625 mm - this is a luxury.
Features of the construction of SIP panels
- If the structure has a large lateral load, then the SIP joints should lie on the support. It is undesirable to build a support inside the panel under the skin. In this situation, SIP does not work as a monolithic design! There are forces on the separation of the casing from polystyrene foam. If you jump onto the floor from SIP between the joining beams, then a large local transverse load can tear off the casing from the polystyrene foam.
- Moreover, OSB-3 has low transverse bending stiffness. Therefore, they lay OSB-3 as a floor covering or a continuous crate across beams (rafters), and not alongas it turns out in SIP structures of floors and roofs. Therefore, it is undesirable for a floor device to use SIP with a thin skin of 9-10 mm.
- Interfloor overlapping must be massive in order to protect well from impact noise. Only massive beams can provide this.
- It is not necessary to count that during the assembly of the house it will not rain heavily. Until the roof is finished, puddles form on the SIP floor, which, if not removed, can only evaporate, since all joints are tight. Therefore, you should prepare in advance for the elimination of the effects of precipitation. However, not everything is so scary: OSB-3 slabs are well resistant to moisture, and a short stay in water does not significantly affect them. Wooden floors on beams with insulation, flooring and hemming from the bottom can also be assembled in advance in the form of finished elements. But this is usually not done because of possible precipitation.
- It is not very rational to assemble a SIP roof under the roof, which does not require a continuous crate.
- In beamed ceilings, providing high thermal protection (sound insulation) is not a problem. The height of the cross-section of the floor beam is determined by the calculation of the floor for stiffness and is usually not less than 200 mm. Laying insulation between horizontal beams is incomparably easier than in the frame of the walls. There is no problem of insulation shrinkage in the ceilings. Therefore, beams and roof rafters are a serious alternative to SIP structures.
- A few words about the features of wooden frame (beam) structures. Not everything is perfect here either. Wood is a living material. This is its advantage and disadvantage at the same time. The tree smells nice, it's nice to touch. But whole pieces of wood are prone to deformation. The tree is afraid of drought and damp. It is prone to drying out and cracking. Due to the anisotropic structure of wood, deformation of lumber always occurs unevenly: individual beams are noticeably bent, twisted. This leads to deformation of the frame structure. Forced wood drying in chambers reduces this lack of wood. Another effective solution is the use of glued lumber. An example is glued beam, wooden I-beams with a wall made of OSB-3 (I-beam) or LVL beam (resembles plywood). The disadvantage of wooden I-beams (I-beam or Joist) is their low weight. For flooring, it is preferable to use massive beams.
- When constructing beam ceilings and frame partitions from ordinary lumber, you need to be prepared for the fact that part of the beams can "come out" of the plane (especially if tightened with flooring or cladding partitions). It will take a planer and patience. With the device overlapping from SIP, this problem does not occur.
- Less problems with using SIP panels for the device to overlap between the upper floor and the attic, if the latter will not be used as an attic. Often the attic floor is assembled from wall SIW panels.
- A roof for a Canadian house is always made in the case of a "cold" attic. If there is a warm room directly under the roof of a Canadian house (attic, second light), then SIP panels are often used for roof installation. With this design, we immediately get both a warm roof and a finished solid crate for soft tiles.
- Conventional 174 mm wall panels are often suitable for roof construction. They are quite warm and durable. Simple structural solutions (runs, based on the gables and the inner walls of the attic) make it possible to provide sufficient roof strength from SIP wall panels even with large slopes. In particular, wall SIP panels can be installed on the rafter system:
- Laying soft tiles and other roofing materials directly on the SIP panel without a ventilation duct (gap) contradicts the general principles of the roofing “pie”. Shingles close the steam outlet from the SIP structure to the outside. There is information on the Internet about the unpleasant consequences of such a constructive decision.
The photo shows that the main damage to the SIP casing occurred in the area of \u200b\u200bthe joints of the panels. The most likely reason is the penetration of steam under the waterproofing substrate of the soft tiles from the attic through low-quality joints of SIP panels. When installing a soft roof directly on the SIP surface joints must be insulated SIP panels from the premises. You can use duct tape:
This rule should also be followed for exterior wall decoration from SIP. If something that impedes the steam outlet is mounted directly on the SIP casing without a ventilation gap, the joints of the SIP panels should be well insulated from the premises. As said in the homeland of SIP technology, “That's why foam plus tape makes such a big difference to us.”
For the same reason, it is undesirable to insulate the SIP structures of the zero (lower) floor. from below from the underground side. This is often done with bituminous mastics, because "customers like it." This does not increase the service life of the floor. It is necessary to take care of good ventilation of the subfloor by arranging a sufficient number of vents in the basement!
With poor ventilation of the underground, bitumen mastic will hide from the eyes possible problems due to constant wetting with the OSB-3 casing, which will not allow taking the necessary measures to eliminate the causes in time. The same thing can happen as with OSB-3 under the bitumen roof in the photo above.
For external protection of building envelopes from moisture, special vapor-permeable membranes (wind protection) are used, which protect the structure from precipitation and wind, but do not impede the exit of steam from the structure to the outside.
About vapor barrier
This is not necessarily a film. Many finishing materials can perform the function of vapor barrier of the building envelope.
For example, an OSB-3 plate with a thickness of 12 mm prevents the diffusion of water vapor as a vapor barrier (Sd\u003e 2 m according to DIN 52615), therefore SIP panels do not need a vapor barrier.
Other examples are elastic plaster, laminate on a synthetic substrate, etc. Linoleum will protect the bottom floor from both steam and moisture.
The basic rule of building multilayer walling - vapor permeability of the wall should grow from the inner surface (warm room) to the outer (street). If you do the opposite, give a couple of warm rooms an easy entrance and make it difficult to exit, then in the building envelope it will remain, wetting and destroying building material.
- assemble external and load-bearing walls from SIP panels
- interior partitions as desired (frame partitions can also be installed at the finishing stage)
- assemble floor joists from beams
- make zero (lower) overlap from SIP 224 mm thick - you won’t regret it!
- if possible, assemble a simple roof over the attic from SIP, in other cases, make a roof
- attic flooring can be made of self-supporting insulated wires, it is also possible on beams.
If subsequently in some place of joints of SIP panels a place is found that is not filled with foam, there is no need to panic. The defect is easily fixed at any time. It is enough to make a small hole in the SIP panel skin and fill the voids with foam.
If the exterior decoration of the house is delayed, it is better to hide the exterior walls of the SIP of the house from exposure to ultraviolet radiation and slanting rains. Unprotected from sunlight, assembly foam quickly collapses, the wood dries out and cracks (especially on the sunny side). Because of this, with strong oblique rain, moisture can penetrate inside the structures.
To prevent this from happening, it is necessary to seal the formed gaps with a mounting bar. Increased attention should be paid to protecting the joints of walls with ceilings from rain. The easiest and most inexpensive way is to sheathe the walls on the outside with a membrane (wind protection), which does not allow moisture to enter the walls, but releases steam outside.
A few comments on the operation of the "newly built" house from SIP. For various reasons, a house’s construction may contain excess moisture. Most often it is bad weather. Assembling a house without rains is rarely possible.
Excessive moisture from the structure enters the air, therefore, in the initial stages of operation of the house, increased humidity in the rooms is possible. During this period, increased attention to ventilation of the house is necessary.
Insufficient ventilation can lead to problems, since humidity and heat are a fertile environment for blackness and even mildew to appear on the surface of a tree. Ventilation and treatment of problem areas with a protective compound effectively eliminates adverse effects. But it’s better not to allow them.
You need to be especially careful in the cold season. Despite the cold, at first the windows in all rooms need to be kept ajar. When heating is turned on in a clogged room, air humidity may increase so that the dew point is on the surface of the walls.
Adverse conditions for wooden structures can occur when heating only part of the rooms. Water vapor from warm rooms falls into cold ones and condenses on the walls there. Dampness is formed with all the ensuing consequences.
Welcome blog readers Traveler's diary. As I promised, we’re starting a report about building a house from SIP / SIP panels. We will tell and show first-hand what kind of technology it is, its pros and cons, how to assemble a house from SIP / SIP panels ... Well, of course, we will share whether it is possible to build an inexpensive house from SIP / SIP panels in just a month. We will try to keep within the construction of a two-story house with an area of \u200b\u200b180 square meters with a foundation, roof and windows in 2 million rubles... And in the next article we will leave a review about the company building our house, - THERMOVILLA (TERMOVILLA).
CONSTRUCTION IS COMPLETED!
And here finished projects at home from SIP / SIP panels we were not satisfied with any site. Something always turned out to be wrong: the area, layout, design, cost ... As a result, a schematic plan was drawn up independently and transferred to a construction company to develop an individual rather than a finished project.
The result was a project of a house measuring 10 by 9 meters with full two floors, a total area of \u200b\u200b180 square meters and a living space sufficient for a large family with three children. On the ground floor there is a boiler room, an entrance hall, a bathroom, a kitchen, a living room and a bedroom. On the second floor there is a hall, a bathroom and three bedrooms. Plus an attic room.
Before starting the construction of the house, electricity was supplied to the site, a building permit was obtained, a septic tank and a septic tank were half buried and trial screwing of piles was carried out ... Construction is scheduled for the period from early April to early May.
Well? We begin to build a house of SIP / SIP panels?
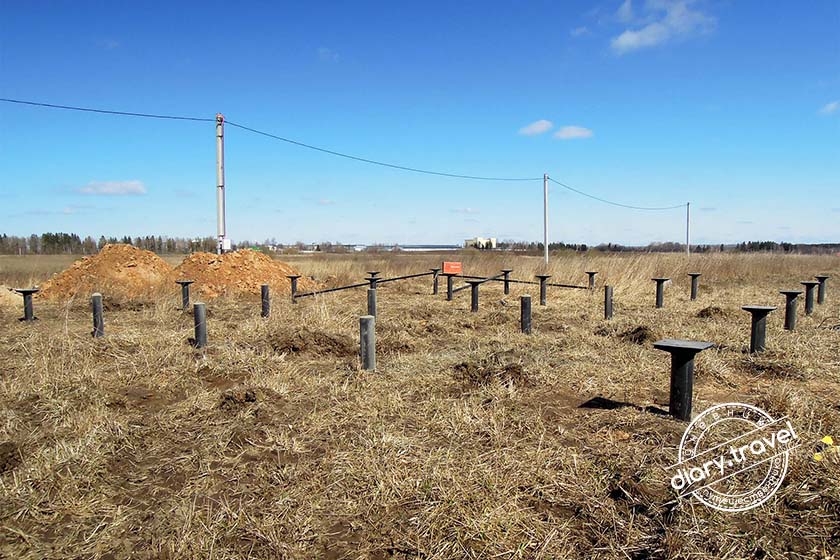
1 day. Pile foundation
A team arrived at the site with three-meter piles for the foundation and a small tractor for screwing these piles. Piles are treated with a special anti-corrosion compound. From morning to dinner, all 25 piles of the foundation were installed. Piles are trimmed to a level at a height of 40-70cm from the ground (depending on the unevenness of the site). A cement mortar was poured inside the piles, and on top were the head brackets, on which 200 mm of the foundation strapping boards would be fastened. Several piles above were additionally fastened together by metal corners welded to them.

A start.
2 day. Sand
In anticipation of materials and the main team, which will build a house of SIP / SIP panels, I took up sand. At the base of the piles, under the entire area of \u200b\u200bthe foundation, a geotextile was laid and a layer of sand was covered. There are several goals for these events: maintaining dryness under the foundation, preventing plant growth, protecting against mice and insects.

It took me a lot of time and energy alone. Finished by dinner.
3-4 day. Check in
In the morning, a change house rented for a month was brought and installed by KAMAZ-manipulator. A team of three arrived. Near the house equipped with "amenities")

In two days, two trucks of building materials were unloaded and placed on the site: lumber processed by the Senezh antiseptic and factory “house kit” made of SIP / SIP panels cut according to the construction project. From the highway to the site, materials were loaded onto the manipulator and fumbled on it, since there were no wagons to drive to the site.

After unloading building materials, preparations began for strapping the foundation with a beam. I dug a small trench for sewer pipes under the foundation, so that later I would not bother with the finished house ...
5 day. Foundation strapping
The foundation strapping consists in laying 200mm beams on the pile heads and laying of roofing material, aligning and fastening the bars between themselves and to the headband with huge self-tapping screws.

After tying the pile foundation, the "base" SIP / SIP panels of zero overlap with a thickness of 224 mm are processed from below with a mastic primer for waterproofing.

6-7 day. Zero floor assembly
For the sixth-seventh day, SIP / SIP panels of zero overlap (floor of the first floor) were laid. As I have already said, wooden bars are used to connect to each other, which are inserted into the grooves of the SIP / SIP panels on the mounting foam and fixed with self-tapping screws. The ends of all SIP / SIP panels along the perimeter were also closed with bars.

Guide rails are attached to the finished floor, which serve as the basis for the walls and partitions of the rooms on the first floor.
8-9 day. Ground floor assembly
It took two days for the team to build walls and partitions of SIP / SIP panels on the ground floor. External walls and almost all partitions (which are load-bearing walls) are made of SIP / SIP panels with a thickness of 174 mm. Some partitions that do not carry loads are made of 124 SIP / SIP panels.

By the evening of the ninth day it was possible to go through all the rooms on the first floor and peer through the ready-made window openings, but there was still sky above your head ...

10-12 day. Interfloor assembly
If rains happened before, but occasionally, now now, at the most inopportune moment, concrete enough heavy rains have been charged every day ... (((We are worried about the dampness that appeared in the house. Building materials are reliably covered, but it’s more difficult with the house ... The construction team is trying to cover the house with special “mats,” but it’s difficult to do this, especially with walls that are not overlapping.

Due to the rains, the installation of the floor was delayed for three whole days.

For interfloor overlapping, 224 mm thick SIP / SIP panels were used, as well as on zero overlap. This maximum thickness should ensure the rigidity of the floor, as well as acceptable sound insulation.

By the end of the third day of work, the overlap was completed. There was only a hole in the kitchen ceiling for the stairs to the second floor. Soon a temporary technical ladder should appear here. So now the house looks from above:

And it looked like our house under construction from SIP / SIP panels from the inside with an almost completed ceiling ... Watch the promised video:
YouTube video:
13-15 day. Second floor assembly
It rains, which slows down the construction ... We are waiting for the attic floor to thoroughly cover the house with film.

For three days, the brigade erected all the walls and partitions of the second floor. The son chose a bedroom for himself) And Lena, who came for the first time to the construction of our house, chose a bedroom for us )

The construction of the house from SIP / SIP panels is half completed and the structure begins to take the form of the house we designed. And this can not but rejoice)

In the coming days, the house should have an attic, stairs, roof, and windows. Very soon!
16-17 day. Attic floor assembly

The attic floor, which became the ceiling for the second floor, took two days.

Unlike the first and second floors, SIP / SIP panels with a thickness of 174 mm rather than 224 mm are used for attic flooring. This is enough for the attic.

It remains only to close the ends of the attic floor panels with a beam around the perimeter ... The construction of our house from SIP / SIP panels is nearing completion!
18 day. Stairs
It rains almost every day for a week and a half. This was a real test for our nerves, and for wet builders, and for OSB Egger sheets, of which SIP / SIP panels are made.
On this day, the rain began in the night and it continued without stopping all day ... In addition, there was no electricity until the evening. The hungry and wet builders had no choice but to drive away the water with a covered roof film, wipe the puddles in the house and collect the stairs ...

Temporary technical staircases turned out to be surprisingly high-quality and strong - both interfloor and entrance porch.

19-21 day. Attic

For three days, an attic appeared in our house from SIP / SIP panels.

Meyerlat, beams and rafters for the roof were installed, as well as pediments (triangular walls from the ends of the attic).

It remains to lay a vapor barrier, make a crate and cover the house with metal tiles. In addition, on the roof you need to install ventilation outlets, pipes, which should come any day ... But the metal entrance door and all 16 plastic windows have already arrived at the construction site.
22-23 day. Door and roof

In our house under construction from SIP / SIP panels there is now a metal entrance door!

And the house now has a metal roof!

With the advent of the May holidays, the sun came and the rains finally ended! For the first time we arrived at the site with the whole family and arranged the first barbecue on our site. This turn of events made our builders very happy: May skewers are good! Yes, and finish all the work with the advent of Easter - also right!
By the way, the name of the company building our house from SIP / SIP panels can already be read on the facade. It - .
24-25 day. Completion and windows
The last two days of building a house from SIP / SIP panels were spent on completing the installation of the roof, cleaning the house and territory, as well as installing windows.
The installation of ventilation outlets was postponed ... We were let down by the store - the ordered ventilation outlets (pipes) were brought in, and the passage openings were successfully forgotten at the company's warehouse. Company team THERMOVILLA completed the installation of the roof and began cleaning the house and territory.
We ordered plastic windows from a third-party company in order not to take them 400 km from Moscow. We settled on five-chamber profiles VEKA Softline with two-chamber double-glazed windows and external lamination. Installation of plastic windows was also handled by third-party masters.

What is the result? House of SIP / SIP panels from the companyit was built in 25 days and cost us less than 2 million rubles. This amount includes: project development, delivery of building materials, pile foundation, the box of the house (walls, partitions and all three floors are assembled from SIP / SIP panels), a metal roof, a metal entrance door, plastic windows and technical stairs with all construction and installation work.
The house was created on an individual project. The dimensions of the house are 9x10 meters. Two full floors and a "cold" attic. The area of \u200b\u200btwo floors is 180 sq.m. The total number of VEKA Softline plastic windows is 16. During the construction of the house, SIP / SIP panels from OSB-3 sheets of Egger and expanded polystyrene 25F were used.
Our house, assembled by construction technology from SIP / SIP panels, is ready. Ahead - exterior and interior decoration, as well as installation of communications ...
The construction of houses from sip panels has become widespread in Canada and Europe. Today this method enjoys well-deserved popularity in our country. Many companies provide these services, but, due to the ease of use, it is possible to build a house from vulture panels yourself, without involving qualified performers. If you follow simple technology, you can get a decent result in a short time.
SIP (Structural insulated panel): characteristics, advantages and disadvantages
Sip panels are three-layer sandwich panels. Between two layers of hard sheet material, there is a heat-insulating and sound-insulating layer. OSB boards are most often used as external layers, expanded polystyrene acts as a filler. More rarely, mineral wool is used for filling, since this significantly increases the weight and cost of the elements. Outside are treated with fire and antiseptic impregnations. Sip sandwiches produce various thicknesses - 124; 174 and 224 mm, depending on the destination. The main linear dimensions are 2500 * 1250 mm and 2800 * 1250 mm, although products of other sizes can be ordered. 
The popularity of this product is due to a large number of advantages:
- Factory readiness. When ordering prefabricated elements at the factory, the configuration is carried out in such a way as to take into account all the features of the project and minimize assembly errors. Also, many manufacturers complete products with a studded board, which ensures a reliable spike groove connection. In other cases, the complete set of timber is made at the place of assembly.
- Ease of use. The technology is so simple that you can assemble the building yourself. At the same time, the set of tools for work is minimal.
- Wide application. From SIP it is possible to build country cottages, office and storage facilities, garages and carry out installation of other buildings and structures.
- High heat and noise insulation. The presence of foam or mineral wool provides excellent thermophysical properties.
- Strength. Manufacturers give a guarantee of at least 50 years.
- Lightweight construction. Light weight allows the use of lightweight types of foundations.
- The speed of construction.
- Year-round seasonality. The absence of "wet" processes allows you to make installation yourself, regardless of weather conditions.
- Saving. Using this technology at all stages of construction from floor to roof allows you to reduce material costs.
- Reduction in cash heating costs.

The disadvantages include:
- Synthetic materials.
- Complete tightness of buildings. For the normal operation of such an object, a good forced ventilation system is required.
- Combustibility There is heated debate about this, although manufacturers promise a high class of fire safety.
You need to responsibly approach the choice of SIP, so that they meet all the specified requirements. The presence of impregnation for biological protection, fire and moisture resistant coatings, the thickness of the frame coating and the density of the insulating layer.
Preparatory stages of work
- Project selection. If the appearance of the building, its size, number of storeys and design depends only on the wishes of the customer, then the preparation of design documentation and the calculation of the number of sandwiches should be entrusted to professionals. This will avoid errors and save.
- Manufacturer's choice. It is preliminary worth exploring the supply market and choosing a company that is trusted and adheres to the manufacturing and assembly process.
- Purchase and delivery of the order.
The main construction works
Foundation
The most important step is the selection and proper construction of the foundation. The light weight of the structure will allow you to apply any type of base: tape shallow, monolithic or columnar type. Most often, screw piles are used, which can reduce the arrangement time to 2-3 days. This process is carried out as thoroughly as possible, avoiding errors and inaccuracies. The device of the pile foundation can be done with your own hands. The site is marked according to the project, starting from the corners. Between the corner pegs, the axial threads are pulled and the seats for piles are marked. The distance for neighboring supports is 2-2.5 m. After which the piles are twisted to the desired depth, below the freezing point of the soil for this climate zone.

With the help of the level, they find a single level for the entire frame. Alignment to the horizon can be performed by additional twisting or cutting off the excess. The twist-fitting method is not recommended, as this loosens the soil. After that, we connect the “heels” of the piles using a metal channel, lay a waterproofing layer, which we use roofing material, and from above we mount a strapping beam using bolted joints.
Flooring

From sip panels you can do it yourself to assemble a full floor. To do this, frame plates are laid over the area, having previously been treated with waterproofing mastic. A connecting beam is used as a lag. Polyurethane foam sealant is applied to all joints for better sealing. After that, to improve the strength, all joints are fastened with self-tapping screws in increments of 10-15 cm. Often, on top of the “pie”, a plank flooring is additionally mounted using self-tapping screws. In conclusion, a strapping device is implemented, along which the walls of the future dwelling will be directly assembled.
Raise the walls
Despite the apparent complexity, it is also quite possible to build walls with your own hands. We begin to collect the structure from the corner, for which we set the corner panels horizontally and vertically, using the building level for quality control. Further from the exposed corner multilayer plates we ourselves mount the next ones, heading in two directions to the next corners. We glue each connecting groove with mounting sealant. At the end of the construction of the walls of the first floor, we lay on the top a strapping board, which will serve as the basis for the interfloor overlap.
The device of the floors is carried out by analogy with the floor, performing step-by-step technology of laying the slabs. If necessary, reinforce the design with an additional beam. In ceilings, you must not forget the technological holes for ventilation ducts and other communications. Using the releases of the connecting board, you can form the basis for balconies, loggias, various decorative structures.
The fastening of the structural elements of the second floor are similar in execution with the device sip sandwiches at the first level.
When arranging a roof, for small volumes, you can do without installing a rafter system, since the panels have the necessary margin of safety. With this method, a significant amount of money is saved. With large areas of the roof, it is necessary to mount the rafters. But in this case, the savings are noticeable, because the use of additional waterproofing films and other coatings is excluded. On top, for ventilation, a rack battens are arranged and the roof is finally finished with any chosen material: metal tile, ondulin, etc. 
Finish
With proper work, we get smooth and even surfaces that can easily be finished with any material. For the interior, plasterboard is most often used, in bathrooms and in kitchens - ceramic tiles. Siding, decorative plasters are suitable for the street.
Thus, the widespread use of sip sandwiches for the construction of buildings is due to the undoubted advantages of the material, the ability to do the whole complex of work with your own hands, and also significant savings in the construction process and subsequent operation.
Sandwich panels were invented not so long ago, but very quickly occupied their niche in the construction field. Sip-panel houses are gaining more and more popularity, and there are a lot of reasons for this, starting with the fact that the material protects well from the cold, ending with an enormously short installation time. It is clear that everyone wants to quickly move to their own homes, but developers sometimes announce unreasonably high prices for their services. The way out of this situation begs itself - and why not build a house from vulture panels with your own hands?
What is sip panels: material characteristics
Sip panels, also known as sandwich panels, appeared in Europe about 50 years ago, but they entered the domestic market relatively recently. Their design is very simple: between two wooden plates there is a layer of expanded polystyrene. It plays the role of heat and sound insulation. The thickness of the "filling" varies depending on the purpose of the panels.
The main factors influencing the choice of panel thickness are the type of construction (summer or winter), the type of wall (external or internal) and the climatic conditions of the area. On both sides, the polystyrene foam is protected by OSB boards made of pressed wood chips.
The panels are attached to each other without gaps, which eliminates the occurrence of cold bridges and improves thermal insulation characteristics. Tight joints provide special grooves into which wooden keys are inserted. The panels have a standard width of 125 cm, 250 cm and 280 cm.
Advantages of sip panels
Frame houses from sip panels have gained popularity all over the world for a reason. This building material has many advantages and advantages over traditional products: bricks, reinforced concrete slabs, blocks, etc.
Unfortunately, it has not yet been possible to invent flawless building material that would not have a single drawback. Sip panels are not an exception, but its shortcomings can be attributed to the features of operation rather than serious mistakes.

Opponents of vulture panels (yes, there are some) argue that they are flammable and generally unsuitable for building houses. However, often fires occur inside, and there the panel walls are sheathed with non-combustible drywall, so the risk that such a building breaks out like a match is minimized.
There is also a legend that mice and other rodents like to settle in vulture panels, but no one has yet provided actual evidence for this. The issue of environmental friendliness is also especially acute, but it also comes to naught if we recall that many products (meat, fish, poultry, sweets) are often packed in polystyrene foam containers.
Some argue that the walls of the panels do not protect against noise, but if you take into account the fact that life in a private house excludes the existence of neighbors behind the walls, from below and above, then there is no place to take special noise from. In addition, exterior and interior finishes increase soundproof performance.

The only truly justified nuance of using sandwich panels is the arrangement of ventilation. Since the elements are fitted close to each other, completely blank walls are obtained that do not allow air to pass through. For this reason, at the stage of creating a project of houses from sip panels, they immediately take into account the laying of the ventilation system.
Foundation selection
As we have already said, panel houses do not need a massive, expensive foundation, but mistakes in organizing this issue are quite common. That's because it is necessary to take into account not only the small weight of the box at home, but also the properties of the soil, the level of groundwater and the climatic conditions in general.
The best options for foundations for houses made of sandwich panels are:
- screw pile;
- columnar;
- shallow ribbon;
- monolithic (reinforced concrete slab).
The main danger in the construction of such houses lies in the lateral tangential forces under construction - during the spring heaving of the soil, the foundation can simply come to the surface, and because of this, the house will tilt or crack. Whatever foundation you choose, its cost will be about 20% of all construction costs, which is a lot. But you should not save at this stage in any case, otherwise the subsequent repair and correction of errors will take even more money.
Screw piles
The overwhelming majority of experts agree that frame houses using Canadian technology are best built on a foundation of screw piles. This is a relatively new way of arranging the base, which is characterized by efficiency, simplicity and high speed of installation compared to others. Foundation of the foundation on screw piles is cheaper by 30-40% than any other, even taking into account the fact that you need to hire a team of professional builders.

A screw pile is a steel pipe to which a specially configured blade is welded. It has a high bearing capacity, because in the process of screwing into the soil the pile does not loosen the soil, but, on the contrary, compacts it with blades. It goes deeper into the level below the freezing of the ground, which by itself prevents deformation of the building from heaving.

The life of such a foundation can be calculated over centuries (usually the manufacturer gives 100 years). But the main advantage is the ventilated underground, which is very useful when using sip panels. In addition, if you ever want to make an extension to the house, you just need to install the right number of piles nearby, and the foundation will work as a unit, evenly distributing the total load.
Shallow foundation
This type of foundation for houses from vulture panels is used less often and mainly on non-porous and slightly porous soils. In other cases, he will "go" in the first spring. For arrangement, remove the fertile soil layer (about 30-40 cm), arrange the formwork with reinforcement and fill everything with cement mortar.
The shallow foundation will easily support the weight of the sip panels. To minimize the risk of deformation from uneven soil heaving, experts recommend arranging a gravel-sand cushion before pouring concrete.

To increase strength and durability, the foundation is reinforced with a reinforcing frame.

Concrete pouring should be done at one time, so for operational work you may need the help of 2-3 people. After pouring, the concrete should be treated with a vibrating plate or at least slammed with a stick in several places to prevent the formation of air voids.

The disadvantage of this method is the long drying period of concrete, which can last up to 4 weeks. Also, underground ventilation will not be as good as in the case of piles. For this, special holes are usually made. If you want to make an extension to the house in a few years, building a shallow foundation will be quite problematic and troublesome. The laying of all communications (electricity, sewage, water) must be arranged before pouring concrete, which is also not very convenient.
Monolithic foundation
If your site is located on a weak heaving soil, arrangement of a monolithic foundation will be the only right decision. It is a solid reinforced concrete slab that evenly distributes the load from the house to the ground and does not allow it to deform from seasonal movements.

The principle of erecting a slab foundation is quite simple: remove the fertile soil layer, make a drainage pillow of sand and gravel, fill everything with concrete and strengthen the screed with iron reinforcement.
The only drawback of this type of foundation is the high cost and difficulties with the construction of additional outbuildings in the future.
Column foundation
Such a foundation can be considered a “relative” of the pile, but the arrangement will take much more time and effort, although its cost is lower than that of a monolithic or tape. The column foundation is suitable for non-porous and slightly porous soils.
It consists of pillars located at the intersection points of the walls, at the corners of the future building, at the locations of massive load-bearing beams, piers, and at points with a heavy load (long walls, for example). The columnar base eliminates the possibility of arranging the basement, but gives additional ventilation to the subfloor, as is the case with piles.

The shape of the pillars can be any, but most often they are made round, because such structures are most easily placed in holes made by a hand drill. Different materials are also used: bricks, wood, concrete. Square pillars are made of brick, but they are inconvenient to place in depth. Therefore, the best option is the construction of round concrete pillars reinforced with reinforcement.
Important: the columnar foundation cannot be laid in areas with a high level of groundwater, since in this case the foundation on which the pillars will rest will be fragile and may be eroded by water.
Panel Mounting
We have often mentioned that sip panels are very light, so for installation you will not need large construction equipment. In fact, the work is very simple and quick, and if for the construction of the foundation it is better to enlist the support of specialists, then it is quite realistic to build a house from sip panels on your own.

Important: before proceeding with the installation, you should carefully calculate the house from the vulture panels to stock up with the necessary materials, including decoration, fasteners, arrangement of the roofing cake. The drawing should reflect the thickness of the bearing and interior walls, the laying of communications, the location of windows and doors.

How is the installation of houses from vulture panels:

Sip paneling
The construction of houses from vulture panels is pleasant not only with quick installation times and ease of erection - it is a real pleasure to decorate such structures! Since the surface of the panels is perfectly even and smooth, you do not have to spend money on plastering or screeding and leveling walls, floors and ceilings for hours to achieve the desired result for the finishing cladding. Consider how to refine a frame house from the outside and how to conduct interior decoration.
Inside decoration
Before proceeding to the interior decoration, it is necessary to seal the joints with a paint net, to grind and polish them. Since the panels are monolithic, immediately think about where the communications will be located and make holes for them. In the bathroom, the preparation takes place according to another scenario - the joints are closed not with a grid, but with a sealant based on silicone or acrylic. The panels on the floor should be completely covered and overlapped by about 20 cm on the walls so that if the water spills, the wall materials are not wet.

Materials for decorating a house from vulture panels can be used any. It is recommended that the walls be pre-sheathed with drywall. This is necessary not only for aesthetics (panels are already so smooth), but for enhancing the fire safety of a building (we wrote about this above).
Since the floors in such houses do not need to be leveled and insulated, it is possible to cover them with even the most fastidious coatings - laminate, tile, parquet. It is better to make bulk acrylic floors in the bathroom and in the kitchen to make additional waterproofing.
Outside decoration
Some owners prefer not to resort to the exterior decoration of houses from sandwich panels - they already look pretty pretty. But in order to protect the material from moisture, it is recommended to close it with something.
The most popular options for the exterior decoration of panel houses:

As described in detail in the video, houses from vulture panels are gaining more and more popularity every year. This is explained not so much by fashion as by tangible savings - housing is constantly becoming more expensive, apartments in cities are becoming more and more expensive, and it is becoming increasingly difficult to find your own housing.
Why spend crazy money on an apartment with a modest quadrature, noisy neighbors and a smoky track outside the window, when you can build your spacious and warm house from vulture panels much cheaper?
Sip panel houses: photos


Construction of a full-fledged house based on SIP panels
If you have been searching for the best opportunity to build a warm house for a long time without spending a fortune, consider the process of building a home ownership from SIP panels. Pricing for the purchase of materials for the construction of a “box” of 10 * 10 square meters, excluding finishing materials - about 17-20 thousand US dollars. At the same time, take into account the fact that additional insulation of the building in your case is not required.
SIP panel - characteristics and properties
Building houses from vulture panels began in the second half of the 20th century in Canada. Technological methods of such construction are very simple, the construction of buildings will require relatively small time costs a little time (two weeks). The time spent on construction depends on the selected project and its degree of complexity. Cheaper than this method can only be a frame-type house.
The house of vulture panels, based on its structure, has a sufficient level of strength. In English, the panels are referred to as SIP, which in essence is a building abbreviation: Structural Insulated Panel. The translation of this abbreviation has the following contents: “Structural Insulated Panel”. Based on this, the Russian variation of the abbreviated name of KTP. In reality, replacing the Latin alphabet with the Cyrillic alphabet is used. As a result, we have the name "SIP-panel."
This material is formed from a pair of OSB plates, between which there is a polystyrene foam layer. In the end, we have something like a sandwich. From here came another name for the plate material - the sandwich panel.

House of vulture panels
There are two ways to build a house from vulture panels:
With lining the frame base. In building a private house, you can take as a basis a timber bar, when building high-rise buildings, the frame is most often steel.
With this technology, the panels are connected using a bar of various diameters.
Frameless reception involves the connection of SIP using thermal keys - inserts from panels of small thickness.
In our country, the first option has gained the most popularity over the years. The wood frame is able to give the structure the strength of an additional order. The supporting function of sandwich panels, even without the use of a frame, is enough for the construction of one-two-story houses in the private sector. But the realization that the foundation of the house is a beam somehow calms the residents. Present in this technology is another advantage, namely maintainability. In case of difficulties, it is possible to dismantle damaged panels and replace them with new ones.

Sip panel houses for permanent residence
Advantages and disadvantages of SIP panels
Like every technology that is progressive for our environment, the construction of buildings from SIP panels has a whole range of opponents and adherents. Opponents consider the fundamental argument - the unnatural nature of the raw materials used, the likelihood of environmental pollution by harmful substances. Indeed, this material consists of OSB and ordinary foam. Polyfoam is a very standard material and is dangerous only when burning. OSB has been present on the market for a long time, it is produced from compressed chips of a large fraction. Resin formulations based on formaldehyde are added as binders. So actually it causes all complaints: formaldehyde is poison and its presence in the atmosphere can cause poisoning.
The percentage of formaldehyde presence is regulated by such a structure as SES (sanitary-epidemiological station), exceptionally safe materials must be put into production. So, if you want to build a house for their SIP panels, you should choose the manufacturer more often. The OSB boards from Egger, which is located in Germany, are recognized as the highest quality. Their formaldehyde emission is E1 (safe level).
Glunz Agepan panels are also a good option, but it is used very little in our country. If we are talking about Russian companies, we advise you to turn your eyes to the products of Kaleval.
The manufacturing process uses exclusively safe and reliable materials:
- OSB-3 Kalevala emission class E1;
- Glue - TOP-UR (Russia);
- Styrofoam –25C Knauf (RF).
Any part of the building is fitted to specific panels.

Why do many people choose SIP panels during construction?
Since such a house from vulture panels has a number of solid advantages:
Low weight of the structure, which means that you can save on foundation work. Pile foundations are suitable for these buildings.
Not high heat loss, lower heating costs. Expanded polystyrene is an excellent insulation, sandwiched on both sides by sheets. This fact makes the house very warm.
Low price per square meter.
Not a long production time. A box of a house on 2 floors can be piled up in a month.
The complete absence of any shrinkage. Only foundation has sediment.
Finishing can be done immediately after collection.
In general, all of the above circumstances forces people to make choices in the direction of houses from sandwich panels. They build houses both for permanent residence and seasonal. Based on this, even with a very limited budget, it is possible to build houses from vulture panels, moreover, successfully.

Do it yourself construction
We build a house from vulture panels with our own hands in the following ways there are two of them:
We purchase a house kit for a clearly specified project in the company that carries out this type of work, and we will assemble it ourselves. Not all companies can agree to this, but most have an installation service from the manufacturer.
Purchase plates. Cut to the size you need, and then buy the timber, all this is done independently. In this case, the responsibility for the level of quality lies only with you. If you have carpentry skills or you have relatives ready to tell, you can redo this option.
Let's talk briefly about what constitutes a home-set. This is nothing but finished, coupled with a wooden beam of the required size and fasteners necessary for construction. All building ingredients are numbered in a certain way. At the time of assembly, you are connecting blocks in a pre-approved order. The whole process is similar to standard construction from a constructor, only for real.
Domkomplekt is especially beneficial provided that all parts are accurately executed.

Construction of houses from vulture panels
Stages of construction work
To build a house from vulture panels, as in other things as usual, we begin with the selection of the type of foundation and its direct construction. The optimal foundation for houses made of vulture panels with moderate ease is considered to be a foundation developed from piles. It is he who is used in most examples of SIP technologies.

Sometimes it is not possible to build a pile foundation on a specific area due to:
- solid soils due to expensive drilling operations (rocks);
- on soils of unstable position with reduced resistance to load (peat bogs);
- in the presence of cavities.
How the foundation is arranged - you can proceed to the construction and assembly of panels.