How to build a sandbox with a lid with your own hands. Children's sandbox for giving do-it-yourself
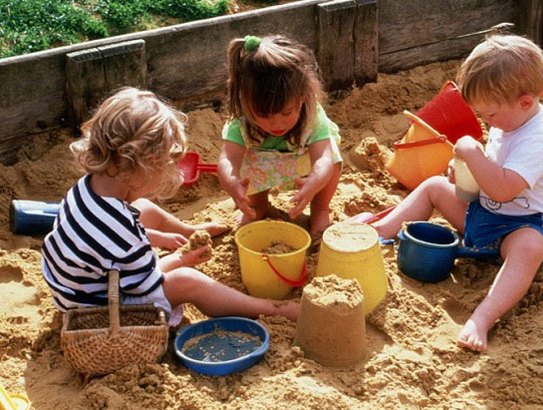
Even the simplest sandbox becomes a source of great joy for children. Here you can build castles, bake sand cakes and do another million interesting things. So there is no doubt that the idea of \u200b\u200bmaking a children's sandbox with your own hands will be enthusiastically welcomed by your children. In theory, the idea looks remarkably simple, but a few tips will definitely not hurt here.
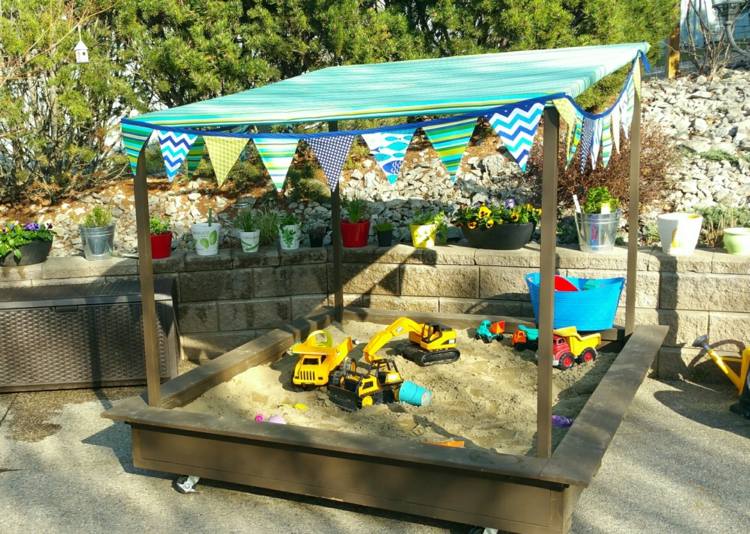
Of course, first of all, you need to determine the location of the future sandbox. In no case should you place it in the open sun. If you have no signs of a suitable shaded place under a tree, then you need to immediately tune in to the fact that the sandbox will need a canopy.
Children's sandbox under a canopy

Also, when choosing a place for the sandbox, you need to consider the age of the children. The younger they are, the better the sandbox should be viewed from different corners of the site.
DIY sandbox building materials

The easiest option for building a children's sandbox with your own hands is ready-made solutions sold in hardware stores. In this case, you will get a set of parts, already cut to the required sizes, which you only need to fasten together. But here it will already be difficult to realize your own ideas: to develop a model that meets your own needs will fail. You must also consider that for the sandbox you will need high-quality fine sand without impurities, which, like other bulk building materials, can be ordered from specialized companies.
Do-it-yourself sandbox made of wood

If you plan to build a wooden sandbox, use raw wood. Various chemicals quickly fall into the sand, which children sometimes taste. To prevent wood from decaying, use resistant species: larch, Douglas fir or robinia. It will cost more, but the sandbox will please you longer. But spruce and fir wood is also suitable for building sandboxes with your own hands.
Stone or concrete

Instead of wood, you can use paving stones. A stone has an undeniable advantage: a stone sandbox will last you forever, and neither humidity nor temperature changes will be frightening to it. In addition, a sandbox made of pavers is built quickly and easily. Do not forget to coat joints of individual stones with concrete for greater reliability.
Corner in the garden

You can even build a children's castle out of pavers. Choose an unused place in the garden and build relatively high walls of any shape. In the photo above - a huge sandbox castle, where your child can play enough.
Concrete blocks with flowers

Building a sandbox from concrete blocks is very convenient: just set the border out of blocks. But if suddenly the resulting sandbox seems gray and boring to you, then this is a great idea: plant flowers in the recesses in the blocks, introducing the children to socially useful work. And the task of watering the flowers and looking after them will help develop a sense of responsibility in the children.
Do-it-yourself sandbox made of tires

Here is another simple and low-cost idea: if you have an old big tire in mind, it's easy to make a sandbox out of it. For greater beauty, color it with the kids in their favorite color.
Should I dig in a sandbox?

You can build a sandbox right on the ground, or you can dig it in. Which option you choose depends on how much time you are willing to devote to building a sandbox. In any case, the buried sandbox has a more robust design.
Practical DIY sandbox ideas

It is very convenient when it is possible to cover the sandbox when not in use. Then the wind will not bring garbage into the sand, and animals will not be able to do their tricks in the sandbox. The lid can be designed so that when open it becomes a convenient little bench on which the child can relax in between games.

Here, however, such a problem arises that the lid will prevent rainwater from entering the sandbox, and it will not work to make cakes out of dry sand. Therefore, it is necessary to consider how it will be possible to wet the sand before the game.

The double-leaf lid for the sandbox has a great advantage: if desired, one of the wings can be left closed and used as a place to store any little things or a platform for the construction of Easter cakes.

If the sandbox does not have a lid, it will quickly fill up with water in any rain. The sand can dry by itself, but still before building a sandbox with your own hands, you should think about drainage. To do this, crushed stone can be placed at the bottom of the sandbox by covering it with a water-permeable fabric and fixing it to the frame of the sandbox. This measure will also help to avoid unexpected guests in the form of insects and worms.
Toy box

Do you like practical solutions? Then we have such an idea for you: place a place for storing toys near the sandbox. On the one hand, all the toys will always be at hand, and on the other hand, you will not need to remove sand that has crumbled from the bucket each time.
2 in 1: storage chest and backrest

By placing a stopper, you can turn the lid of the toy chest into the back of the bench. Indeed, even the most active children sometimes need a moment to relax.
Sandbox on wheels

If your garden is not so big, you can save space by attaching wheels to the sandbox, then you can rearrange the garden at any time. It is also advisable to take care of the drainage here, especially if the sandbox will most often be outdoors. As a bottom, it is best to use wooden boards, leaving spaces between them. And so that the sand does not “run away”, cover the day with a waterproof fabric.
Unusual sandbox

When we talk about the sandbox, we immediately imagine a wooden square filled with sand. But this does not mean at all that we should limit our imagination to this idea. Why not make the sandbox, for example, hexagonal? A fairly simple idea, but it gives the sandbox a completely different look.
Canvas cover can be a worthy replacement for the cover

It doesn't matter what shape you choose for your sandbox. But still it is important to take care of protecting the sand. If the construction of the lid seems to you an unnecessary waste of time, here is a simpler option: an ordinary tarpaulin that perfectly protects the sandbox and its contents from the wind, rain, and neighboring cats.
DIY sandbox in the form of a ship

In such a sandbox it will be possible not only to build castles, but also to play pirates. And the “sail” will additionally protect from the scorching sun. Original, isn't it?

Photo:ziegler-spielplatz.de, deavita.com
Summer came, the children grew up and the question arose of building or buying a children's sandbox. A quick analysis of the children's sandbox market was conducted. As a result, the following picture emerged: there are either plastic or wooden children's sandboxes.
For a less reasonable cost, you can purchase a sandbox with something resembling a plastic basin. The remaining models, in relation to which, at least, there was at least some desire to purchase, were very “surprised” by the cost. Ultimately, it was believed that something normal would not work at an affordable price. And it was decided to make a sandbox with their own hands, and wooden.
How to make a sandbox. Problems and questions
Since I did not make children's sandboxes before, a number of questions and additional requirements arose at the stage of project development. I will list the main ones.
- What size should a children's sandbox be?
- What height should a children's sandbox be?
- What is the thickness of the boards needed to build a sandbox?
- Do I need a cover for the sandbox?
- If necessary, what should it be?
- How to organize a place where you can "bake Easter cakes" (table, bench, etc.)?
- Where to install the sandbox?
- How to sift sand? And is it necessary to sift it at all?
- How many boards are needed? And which ones?
Having monitored the Internet, I did not find answers, mostly vague recommendations on how to make a sandbox with your own hands. Naturally, this did not satisfy me and I had to invent it. Unfortunately, I did not draw the drawings, but I will try to briefly describe the train of thought and the answers to the above questions.
Sizes of a children's sandbox

Having slightly compared the size of the child, the prospects for his growth and the appearance of the company (including a brother or sister) in the future, I came to the conclusion that the size and shape of the children's sandbox is enough, this square is approximately 1m to 1.5m. This size, on the one hand, will allow 2nd 3rd children to be directly in the sandbox at the same time, on the other hand, it can be installed anywhere without problems.
Then he began to think about how little scraps of boards would be left during construction. Not far from the dacha there is a base for sawing materials and the standard size of their boards is 0.12x6 m. The solution came by itself, the sizes of the children's sandbox should be 1.2x1.2 m. I will explain from a 6-meter-long board 5 boards of 1.2 meters each, i.e. half of the sandbox and no scraps.
Sandbox height
And so with the size of the children's sandbox decided, now the height. What height should a children's sandbox have?
- The height should be sufficient so that the sand fits in the sand so much that the child could not get to the ground.
- The child should calmly climb in and out without the help of adults.
Based on these two criteria, it was decided that the height of the sandbox should be no more than two boards, i.e. 24 cm. Such a sandbox will suit both a one and a half year old and three year old child. Moreover, the sand (in depth) in the children's sandbox should be about 10-12 cm, that is, about half of the sandbox.
The thickness of the boards for the children's sandbox
The thickness of the side walls was selected 32 mm. For two reasons. Firstly, boards of the specified thickness will provide sufficient strength and rigidity. Secondly, the likelihood of cracking boards during the assembly of the sandbox is significantly reduced, i.e. more convenient installation.
Sandbox Cover

Do I need a cover for the sandbox? I thought for a long time and decided that I needed it all the same. It is necessary for two reasons. Firstly, sand in a closed sandbox will remain dry, which is important for the health of the child. Secondly, the lid on the sandbox will protect from any foreign objects: leaves, apples falling from the tree, and of course from birds, cats and cats. I think it’s clear what I meant about cats.
But to make a cover for the sandbox in the form of a cover - I did not like this idea. This cover will be lying all the time, it will have to be removed to wear, in general, it is inconvenient. After looking at the pictures on the Internet, I found several options for the execution of the sandbox with a cover.
- The lid transforms into a shelf on which you can build cakes.
- The lid is transformed into a bench on which you can not only build Easter cakes, but also sit.
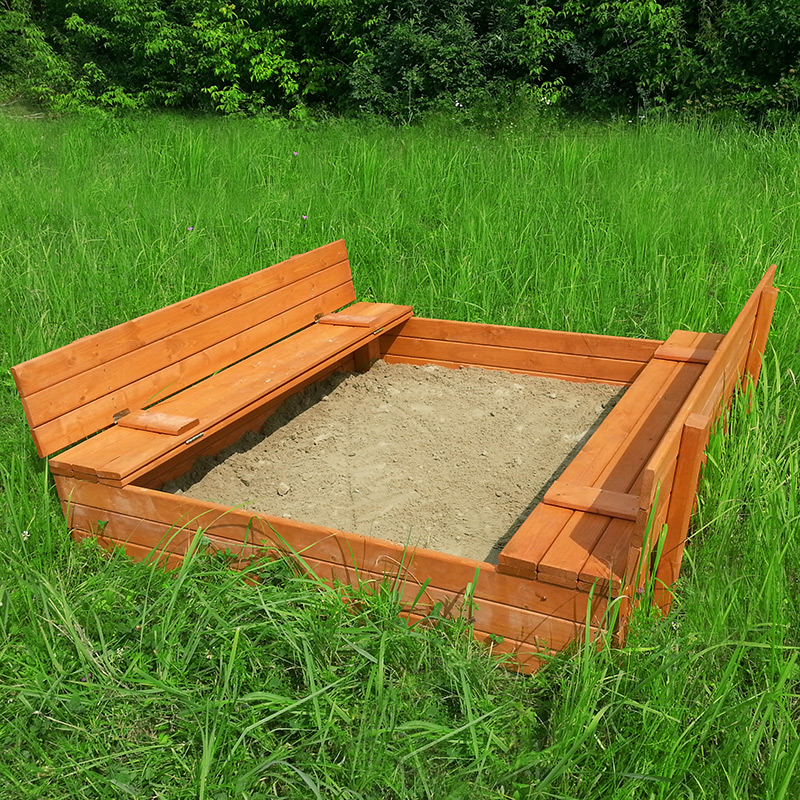
I liked the idea very much, and it was decided to build a children's sandbox with a lid transforming into a bench. And you can sit (not only for the child) and the surface for the “baking" of Easter cakes is good.
I decided to make a lid for a sandbox from a board of 20 mm. So it will turn out on the one hand strong enough, on the other light.
Children's sandboxes for giving - photo


The cost of building a sandbox is minimal, and it will bring great pleasure to children. Of course, you can buy a finished construction and just fill it with sand, but a self-made sandbox is much more interesting and convenient.


Seat selection
Before starting the construction of the sandbox, you need to find the most suitable place for it, because the comfort and safety of the baby depends on it. There are several rules for placing a sandbox:

To protect from the sun, you can place the sandbox under a small strong tree or build. But under the old trees this should not be done: at any time a heavy branch may fall from a tree to a child.
Prices for children's sandboxes
Children's sandboxes
Sandbox Building

If the place for the sandbox is selected, you can proceed to the main process. First you need to calculate the size of the structure, choose a form, properly prepare the foundation. The size of the sandbox depends on the age and number of children who will play in it. A plot of 1.5x1.5 m is quite enough for three kids 1-3 years old, it is recommended to make sandboxes 2x2 m for older children, and standard designs have dimensions 1.7x1.7 m.
Most often, the sandbox has a rectangular or square shape, but sometimes there are round and hexagonal designs. Here much depends on the imagination of the master and his skill; if experience in such matters is minimal, it is better to dwell on the standard square shape. As a building material, wood is used, namely pine boards.

Additionally required:
- shovel;
- roulette;
- pegs and rope;
- geotextiles;
- sand;
- tamper;
- timber 50x50 mm;
- hacksaw;
- antiseptic impregnation;
- liquid bitumen;
- grinder.
Step 1. Site preparation
The selected area is cleaned of stones, branches, weeds, level the surface. If the size of the sandbox is 1.5x1.5 m, then the cleared area should be 10-15 cm larger on each side - this is necessary for more accurate marking.
Step 2. Markup

Now you need 4 pegs, tape measure and a long rope. Visually determine the location of one of the corners of the structure, drive in a peg, draw two perpendicular lines from it, mark the location of the last corner. Between the pegs, pull the rope and check the length of the diagonals inside the markings. They must be exactly the same.
Step 3. Preparation of the base
Inside the fence, choose a soil layer to a depth of at least 20-25 cm. The walls of the pit must be leveled so that they are strictly vertical. When all the soil has been taken out, the bottom is trimmed and compacted. Sifted fine sand is poured on top with a layer of 5 cm, well tamped.
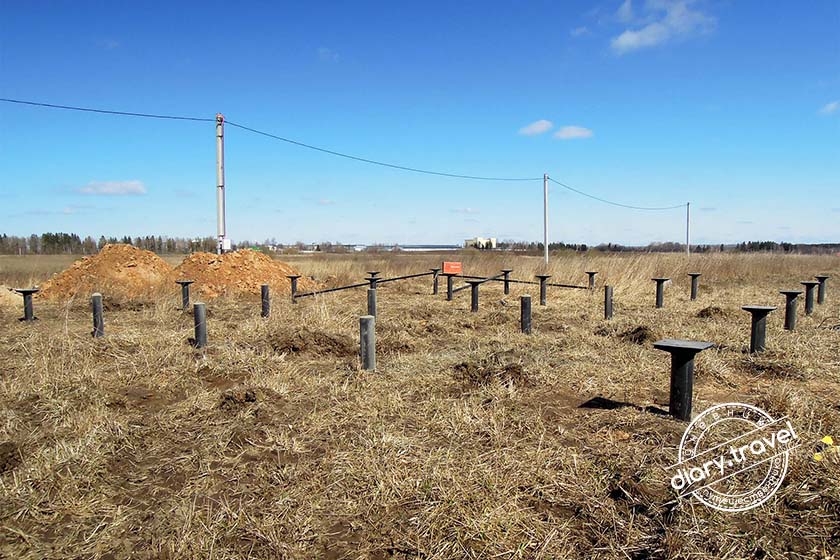
Step 4. Making the frame

The beam is sawn into pieces with a length of 45 cm, the lower ends are sharpened, sanded, treated with impregnation and coated with half bitumen with liquid. Now you need to install them at the corners of the perimeter and dig them into the soil by 15 cm. The next step is to fix the boards: they are knocked down in pairs and screwed to the bars with screws. You can do it in another way: first fully assemble the frame, and then install it above the foundation pit.


Boards can be taken narrow or wide, the main thing is that the wall width is at least 30 cm. Be sure to treat the surface of each board with a grinding nozzle on both sides, then impregnate and dry. After this, the boards are knocked into a square box and reinforced at the corners with bars, which on one side should protrude 15 cm beyond the perimeter of the box.


Step 5. Installation of the sides
For the convenience of the child, small sides should be made around the perimeter of the frame. To do this, take 4 boards with a width of 20 cm, grind them very high quality, cover with an antiseptic and cut the edges at an angle of 45 degrees. They lay the boards on top of the walls, align and align the joints, tightly screwed with screws. The self-tapping hats should be well drowned in a tree so that the child does not get hurt. Sometimes angular benches are made instead of sides: they take a board of small length, process it well, lay it on two adjacent walls, departing from the corner a few centimeters. After this, the board is nailed on both sides, and the edges protruding beyond the perimeter are cut off.
Step 6. Finishing the structure

Now the sandbox needs to be colored correctly. For this, paints of 2-4 colors are chosen, necessarily bright and contrasting. Beads or benches can not only be painted, but painted with ornaments, images of animals, flowers. As soon as the paint dries, the structure is filled with sand.
Prices for various types of building boards
Building boards
Making lids for the sandbox
An open sandbox clogs very quickly, so you have to periodically sift through the sand or even change it. To avoid such problems, it is recommended to install a wooden cover. Make it easy, and the result is not only good protection against debris, but also convenient shops. It is best to mount the cover before installing the frame in a permanent place.
To work, you will need:
- pine boards 25 mm thick;
- jigsaw;
- long loops;
- bolts with nuts;
- self-tapping screws;
- timber with a section of 30x50 mm;
- primer;
- paint;
- drill.
Step 1. Material Preparation
Boards are cut across the width of the sandbox, all surfaces and edges are treated with a grinding nozzle. After that they are primed, dried and coated with two coats of paint. The hinges must also be painted; otherwise, corrosion will appear after the first rain.
Step 2. Assembling the first half of the cover
 Assembly of the first half


On one side, two boards are screwed onto the sandbox frame with screws. Two more boards are connected by bars and attached using loops to the first. In this case, the bars should be at the bottom, and the hinges on top of the cover. Take two more boards and connect them with bars, the length of which exceeds the width of the shield. That is, on the one hand, the bars protrude by a third beyond the edge of the board. This shield is also connected to the previous one using loops, only this time the loops should be at the bottom and the bars at the top. The hinges are screwed to the tree with bolts, as the screws quickly loosen.

Step 3. Assembling the second half

This half can be done without a back, which slightly simplifies the process. On the free side of the frame, not 3, but 3 boards are stuffed, then a board of two boards is knocked down and fixed with loops, as in the previous case. So that the lid does not bend under the weight of children, it is strengthened in the middle with a bar. Now, when opened, the first half folds into a convenient bench with a back, and the second simply leans back half its width.


Frame installation
To install, you need an assistant: the structure is raised, turned over with protruding bars down and gently lowered into the pit. The edges of the frame should coincide with the edges of the pit. To keep the sandbox level, check the location of the walls at the building level. If necessary, remove excess soil or add more, aligning the frame horizontally. After that, they cover the bottom of the future sandbox so that its edges are 3-5 cm on the walls on each side. Dense material will protect sand from erosion, will not allow moisture to accumulate and will not allow insects and moles to crawl from below. Finally, the soil is compacted from the outside and a bed of gravel or sand is made.


The layer of sand for the game should be about 15 cm thick; it will take about a ton to fill a standard sandbox. It is recommended to choose river sand or quartz sand, which does not cake. Before filling it must be sieved through a fine sieve to remove debris, vegetable impurities, insects.

Canopy installation
Canopies for sandboxes can have a variety of forms and can be made of different materials. The most common option is a fungus. For its manufacture, a beam of 3 m in length and a section of 100x100 mm, boards and plywood will be required. Such a fungus is established at the stage of preparation of the base, since it needs to be dug in the center of the sandbox to a depth of 1 m.
The manufacturing process is very simple:
- the timber is polished, treated with an antiseptic;
- the lower part is coated with bitumen mastic to a height of not less than a meter;
- 4 triangles are knocked from the boards, sheathed with plywood;
- connect the triangles to each other and attach to the upper part of the timber using spacers;
- in the center of the pit they dig a hole 1 m deep;
- insert the beam, level it with a plumb;
- fill the pit with rubble and soil, ram.
There is another variant of the canopy: in the center of two opposite walls of the frame, vertical racks are bolted. Rack height 2 m; in the upper part of the support they are connected with a horizontal rail through which a rectangular piece of dense fabric or a special canopy is thrown. The ends of the canopy on each side are fixed with metal hooks to the walls of the sandbox.

The described options are the simplest and most popular, if desired, they can be supplemented at your discretion. The most important thing is that the design is as safe as possible, then the baby will be happy to play in it, and parents will be able to relax a bit.
Video - DIY Sandbox
It is very difficult to meet a child who would not like to mess in the sand. To give the kid the opportunity to enjoy his beloved business, caring parents in the country house or just in the yard of their house mount sandboxes. Ready-made structures can be found on sale without difficulty, but you will have to pay a completely non-childish cost. The best option is to make a sandbox with your own hands. In this case, all the needs and desires of your child will surely be taken into account, and the price will be several times less.
What can I make a sandbox from
The most popular material for arranging a children's sandbox with their own hands has always been considered a tree. For these purposes, boards, logs, beams or block house are well suited. They are the main materials for the production of sandboxes. In order for the final result to please its appearance, it is better to choose polished wood. It costs a little more, but the result is worth it. If the construction budget is small, you can save money and grind already existing material yourself.
You can also use moisture resistant plywood. But this type of building material is best used in extreme cases, since the presence of glue and formaldehyde in its composition does not very well affect human health. But it is worth noting that it is easiest to work with plywood. It is easily cut with a jigsaw, assembled with a screwdriver. And after assembly, it is enough to simply polish the ends of the structure, and paint the sides.

Wanting to make a sandbox with your own hands in the country, you can use any improvised material. For example, empty plastic water bottles may be used. To make a strong wall from them, the covers are screwed with screws into a wooden base, and then the bottle is screwed. Also, with the help of thick wire, additional strength is added to the walls of the sandbox. To do this, pierce the bottles through the top and bottom with a sharp wire. The ends of the wire are sure to twist well, and the dangerous ends are hidden.
The twist is located only on one side. When mounting the side of the sandbox, try to make it inaccessible to the child. The finished sand structure is mounted in a shallow ditch and sprinkled well with sand and soil, and then tamped very carefully. Sand plywood is laid at the bottom of the sandbox, and then it is filled with sand.

Another very popular material for making a children's sandbox with your own hands are tires from the car. They are great for such a thing. To quickly make a place for games with pitch at the tire, one side panel is removed. The result is quite high sides. Then you can go in two ways:
- close the hole with plywood and screw it to the second sidewall;
- cut off the second part and get just a side.
Attention ! Regardless of the choice, the sections must be protected. If the reinforcing fiber is plastic, then it is quite simple to sand it, but if it is made of metal, it must be covered with something.

The main stages of making a sandbox
In order to understand how to make a sandbox with your own hands, we will consider in detail the main stages of its construction. Regardless of the type of construction, all steps will be repeated.
Choose a location
The site for placing the structure is better to choose so that part of it is located in the sun, and part in the shade. If this is not possible, then the sandbox is best done in the sun and make a good awning. It is important to pay attention so that next to the place where children play, tall trees and bushes do not grow. Plants, of course, are provided by shade, but, firstly, branches sometimes fall from the trees, which can injure the child, and also constantly giving leaves in the autumn add work for adults.
Never make a sandbox in the scorching sun and in a place where there is no air movement. Avoid drafts. There is also another important factor to remember. Put the sandbox in a place that is very well visible from the window of the house, so you can be calm for the safety of the child.

Do the markup
If the structure is rectangular, then wooden pegs and threads stretched between them are used for marking. Stakes drive in, having measured, the necessary parameters. Traditionally, the size of children's sandboxes made by hand is 2 * 2m. Between the strings pull a rope, twine or metal cord. Check the angles. They should be exactly 90 ° C.
If the design provides for rounded edges or sides, then sand will help to make the right arc. It must be poured into a bag in which to make a small hole and so draw the desired shape.

Digging a pit
To do this, first remove the topsoil, and remove the soil. It is important to clean all roots, stones and other debris. The foundation pit for a children's sandbox needs to be made to a depth of about 30 cm. In the middle of a dug rectangle or square, make a hole smaller in size, but deeper. Pour crushed stone into it. So the system of drainage of melt or rain water is arranged.
Advice! If there is a slight slope from the edges of the sandbox, then the sand will always be dry.

Mount the base
We fill the bottom of the resulting pit with a small layer of sand, not more than 5 cm, after which we tamp well. Only then can the foundation be laid. The best option for these purposes is geotextiles. It is a special non-woven material, which is characterized by increased strength and durability. He does not allow grass to grow, and will not allow the combination of earth and sand. If, when laying, geotextiles are wrapped over the edges of the foundation pit, then it will still restrain the ground, preventing it from getting wet during heavy rain. In the case when geotextiles are not available, you can make the base of plywood or linoleum. Only then you need to make several holes in the material so that water does not accumulate at the bottom of the sandbox.

Building a seasonal sandbox
The seasonal sandbox is a box with sides. The height of the box is about three boards (depending on their width). The frame is assembled by attaching the boards with self-tapping screws to the vertical bars mounted at the corners of the perimeter of the sandbox. If the board has a width of about 10 cm, then two fastening points are required, in the case when the board has a width of 15 cm - 3 points. If the sidewall is made of a conventional edged board with a length of more than 1.8 m, then in the middle of the sidewall one more additional vertical element is attached.
Sandbox corners must be strengthened additionally. To do this, the corner posts are mounted outside, and the boards, which are the walls of the sandbox, are connected to each other in half a tree.

Mount the side
The sides of the sandbox are a frame made of boards. It serves for additional rigidity of the box, it may look like a seat or a shelf for toys. In order for the sides to connect reliably, they need to be cut at an angle of 45 ° C. It is very important to ensure that the angles coincide clearly.
Important ! The outer edge of the corner is very sharp and grassy. Children very often scratch him and get splinters. To avoid injuries, it is better to make the corners semicircular, for this you need to cut them, and grind all kinds of flaws and edges.
Carrying out installation, the sides are laid on a box and secured by corner and intermediate racks. It is not very reliable to fasten the sides to the edge of the box board. The underlay bar also does not save the situation, because the children love to hide toys under the side. The best method of attaching the sides of the sandbox is pieces of a plinth with a cross section of at least 4 cm. A cut of 30 cm in length will be quite enough for a meter of the side. Self-tapping screws are fastened in those places with a step of about 10 cm. Also, if the supports are mounted under the outer edge of the side, then its fasteners must be hidden.

We equip the roof
Since the sandbox is located in the open air, the roof is simply necessary for her. The traditional roof model is the mushroom. But everyone who has ever played in the sandbox understands that such a roof will hardly cover anyone. It is better to make a fungus separately, for quiet, calm games in the yard. But the sandbox is better to equip with a different kind of roof.

The best, simplest and most reliable roof option is a surface on four pillars. The only minus of such a roof is that for restless children it is very traumatic.
An equally good option for a sandbox roof is a surface on two pillars. They are attached to the sides of the box. If the roof is heavy or complex in construction, the posts are reinforced with struts.

The sandbox roof is best made soft, or stretch. The latter option is very profitable, as the cost of materials is minimized. Remember that no matter what you choose for the roof of the sandbox, the materials must be safe for life and health.
Advice! If polycarbonate remains from the construction of the greenhouse, gazebo or porch, then it may be the best option to cover the roof.

How to fill the sandbox
What sand is most suitable for children to play with it? White and small will not fit unambiguously. Such sand is poorly molded, dusty, reaches into the eyes and ears, and is also an allergen. Even adults, working with such sand, wear masks and respirators to protect themselves.
Also, white or gray quartz sand is not like. It does not dust, but also does not mold. But the delicate skin of the child, this sand injures very quickly. The fact is that quartz is a very hard mineral and its particles cannot be polished to full roundness.

Red or ravine sand. Of course, it sculpts well, but for children it is completely unsuitable. There is a lot of clay in such sand, in which bacteria and microorganisms multiply very quickly.
The best option for a children's sandbox is yellow sand of medium fraction. It is very well suited for good sculpting, and a special layer enveloping the grains of sand reliably protects the sand from the growth of bacteria.
If sand is reused up to 2-4 times, then special handling is necessary:
- In winter, sand must be stored properly. The best way would be to store in bags, in a dry, unheated room. If the sand is stored on the street, then it needs to be covered with a film.
- With the onset of heat, the sandbox is filled with sand. If the sand was in it all winter, then it must be aired and sieved.
- The sandbox is filled with 10 cm layers. Each sand layer is dried in the sun for at least twenty-four hours.

Game Zone Requirements
After the sandbox is made, you need to pay special attention to its strength and safety. Therefore, it is very important to qualitatively fix everything done and to grind all angles and roughnesses with a grinding machine.
After the sandbox is done, it is painted. On the one hand, a sandbox painted with bright colors is very attractive for children, on the other hand, a tree saturated with paints significantly increases the service life.
It seems that the baby was recently born, but time flies very quickly, and he has already begun to walk. This means that the baby needs to develop, play with other children. Great if parents have a summer cottage. You can build a sandbox on it. Children's sandbox helps in the development of imagination and memory. And inadvertently, when the baby will build a sand castle, parents can see that the child has a talent for creativity. Many positive qualities in this design. And it is built easily. You can ask your husband about it, he will do everything with his own hands.
To begin the construction of such a structure, first of all, you need to choose the terrain. And treat this with all responsibility.

Location selection
- The sandbox for children should be in the viewing area. Children should be under parental control. Therefore, it will be better to build it closer to home to look after the baby from the kitchen window.
- Sterility is the key to the health of the baby. Sand should not be clogged with foreign objects, such as foliage, bird droppings, branches and so on. It is advisable not to build children's sandboxes near trees and bushes. And if a dry tree is nearby, construction is completely prohibited.
- The main thing is to hide the structure from the dining heat. In order not to harm the child with the sun's rays, you need to position it so that the sun falls in the morning and in the evening. At these moments it is the safest. But if the sun does not fall into the sandbox at all, then in the spring and autumn it will be very damp. And this means that the baby will be able to get sick at any time.

Sizing and preparation for construction
The shape and size can be chosen at your discretion. But there are some standards for building: for kids from 2 to 5 years old, a sandbox of 1.7 by 1.7 meters is being built. What is needed for preparation? Pegs, marking tape and lace. With all this, you need to protect the terrain on which the building will be.
Further, 30 cm of the earth is removed, and a hole is made in the center with a depth of 65 cm and 45 cm in diameter. Then you need to fill it with rubble and tamp. Make a small slope to the center of the sandbox so that during rains, a puddle does not form. Before you go to work, you need to clean the leaves, garbage, and everything that interferes. Then do the markup.

Construction stages
To construct a sandbox, you need to perform several simple steps.
What is the basis?
At the bottom of the sandbox you can put a plastic film, paving slabs and ordinary plywood sheets. You can not lay the foundation, but then the dirt will fall into the sand. The advantage of the base is that it blocks the way for rodents to the sandbox.

What is needed for the sides?
Bars - 4 pcs., 5 by 5 by 45 cm. Boards - 4 pcs., 150? 30? 2.5, and boards for the construction of horizontal sides also 4 pcs. They will need to be well sanded. Then the boards are treated with drying oil. The bars are dug in 18 cm, and boards are nailed to them. Further, seats for babies are attached.

Do I need a cover?
A cover is not a mandatory design, but its presence is desirable. It will serve as protection against various debris and cats who love sand very much. Of course, you can tighten the sandbox with tarpaulin every night, but it is better to design a wooden one. You need to put together boards together, making a shield and nail vertically, at the corners of 4 columns.

Decor
At this stage, a lot of space for the imagination and creativity of parents. You can paint the building with bright colors, draw flowers or animals, a rainbow, figures from geometry and so on. All that can please the kids.

So you get a beautiful children's sandbox with a lid for a summer residence.

Filler
It remains to buy filler for the sandbox. Sand can be purchased at the store or use the sand from an ordinary river. Sand from the river will definitely need to be sifted. And if purchased, it is desirable that it be with additives that will scare away various rodents. The sand should be clean, as it directly comes in contact with the child.
There are many different ways to build sandboxes. Next, we consider a few of them.
Do-it-yourself classic sandbox
Everyone played in such sandboxes in childhood. Made, it is in the form of a wooden box with benches. Making such a sandbox with your own hands will not be difficult. But do not forget that it is being built for children. This means that the building must be safe so as not to harm the baby. The boards should be perfectly sanded. Manual methods will be hard to do. You will need a grinder with nozzles, she will quickly cope with the delivered slave. What's the plan next?

Stages
It is necessary to prepare materials. Cut the desired size of the board. Grind thoroughly and accurately. It must be remembered that for the construction of all sides, at least two wide boards will be needed. You can choose any height.

The next stage of work is to fasten the sides. Shortened boards will be needed. They are mounted vertically to long boards. Nails or screws for fastening shields.

When the sides are made, they will need to be joined in a solid square. For this, bars with one pointed end are screwed at the corners. Because the whole children’s sandbox will keep on these bars. The bars are driven deep into the ground.

"Attraction" for kids is ready. You can also attach something like benches, so that children can relax from the creation of art. Boards-benches need to be carefully sanded and varnished so that splinters are not pounded.

Additions
But this can not stop there. You can apply any drawings, make the sandbox bright and interesting for children. In addition, you can make a roof. It will serve as a protective shield against wandering animals who like to "play" in the sand. And help shelter her from the rain.
Making a roof is not so difficult. You need to use the principle by which the side is built. Do not forget that it will turn out to be difficult, and the man himself will not be able to lift and install it. Have to ask someone for help. And if there is nobody to ask for, then the roof can be made of two parts. And on each half to make a handle and loops. You can also put a castle that will save from uninvited visitors, at the time of the absence of the owners.
Old ramps
This is the easiest and fastest way to make a sandbox for children in the country. A ramp from a tractor or some other machine is laid in a certain place, covered with sand and ready. You can also paint. But this design is suitable only for young children. If the wheels of a passenger car are stuck in the country, they can also be used as a fence for sand.

Logs and stumps
This is also an easy option. Logs and stumps, standing digging into the ground, and it turns out a mini-attraction. Children will be pleased not only to make sand castles, but also to jump on these steps and run between them.

Original form
This is an unusual classic, and the combination of children's desires with the capabilities of parents. You can make a truck with a body in which there will be sand. A boat with a sail, which will be instead of the roof. Gazebo with benches and a table that will play the role of a sandbox. The choice of design is limited only by your capabilities and imagination.