How to make a tandoor in the country is a classic and budget option. The device and principle of operation of the tandoor, depending on the type Correct tandoor to make and
The tandoor is a jug-shaped Central Asian oven. It is not difficult to fold such a "brazier" with your own hands. A step-by-step description of the brick masonry process will be given below.
Today, city dwellers mainly use barbecue or grill for cooking. However, the tandoor, so widespread among the eastern peoples, is in no way inferior to modern devices.
Inside the oven, you can cook a variety of dishes: lavash, samsa, meat. Their exquisite taste is a compelling argument in its favor. A distinctive feature of the Asian oven is the vertical arrangement of products. Thanks to this device, the juice from the kebab soaks the meat, and does not drip into the fire. The result is a juicy dish with a rich flavor.
Operating principle
The work of a tandoor can be compared with the operation of a conventional boiler, in which heat is accumulated and stored.
In the tandoor, heat is accumulated by means of fireclay clay. After a firing process, this natural material acquires the characteristics of a ceramic.
First, firewood is laid out in the structure and a fire is made. The heat generated during combustion will remain inside the stove. When the wood burns out and the heat subsides a little, they begin to lay the dough and food. To keep warm, the oven is covered with a suitably sized lid.
Note: the internal temperature in the tandoor after warming up is kept at 250 degrees. This is the optimal value for preparing tasty and healthy food.
It is not difficult to fold a brick structure, because the masonry technology does not provide for the presence of special materials or tools. Everything you need for construction is sold in specialized stores. Full instructions and construction diagram are given below.
Advantages

- Due to its peculiar shape, the structure requires less fuel, which makes its construction economically viable.
- Simple and quick installation. You can do it yourself, without the involvement of specialists.
- As the main building materials, exclusively environmentally friendly materials are used that do not emit toxic substances when heated.
- The oven cooks the same dishes as on the grill or barbecue. In addition, you can bake delicious oriental dishes in it.
Masonry materials
 The construction of a tandoor involves the use of the following materials:
- Refractory fireclay bricks are needed for the construction of the walls. . Its amount is calculated from the wall thickness and dimensions of the furnace. The masonry will take about 700-1300 pieces.
- You can prepare the masonry mixture yourself. To do this, take clay and clean sand. If there is no desire to knead the solution and calculate the ratio of the components, you can purchase a ready-made mixture at any building supermarket.
- The constructed structure is coated with clay. If desired, use mosaic decor or natural stone. If cakes are prepared in the tandoor, it means that the inside also needs to be coated with fire-resistant clay.
- For the device of a reliable and durable foundation, cement reinforced with a bar is used.
- A mandatory attribute of the furnace is a blower, which is made of brick or a small piece of pipe with a cross section of at least 10 cm.
- In order for the circle with the top layer of masonry to be even, it is necessary to lay out a template of wooden blocks and boards.
To work you need the following tool:
- Bulgarian;
- spatula (width not less than 12 cm);
- a suitable container or bucket for mixing mortar (concrete, facing mixture);
- plastering rule;
- paint brush.
Preparatory stage
 Before proceeding with the construction of the tandoor, it is necessary to determine its location.
For safety reasons, the stove should not be located near buildings, trees and plantings.
It is desirable that the soil at the construction site is dry and the water table is low.
The selected place is leveled, then a layer of quartz sand 20 cm thick is poured. For a blower, a small depression is made from an asbestos-cement or metal pipe.
Foundation
 To prevent the masonry from collapsing under the influence of seasonal movements, it is necessary to establish a solid foundation.
It is made from a concrete slab or a cement mixture is poured into a prepared hole.
Competent approach and adherence to construction stages-the main criteria for the long-term operation of the product.
- First of all, markup is carried out, including designation of the dimensions of the future structure. If desired, fill in a special platform for a convenient approach to the oven.
- Grass and debris are removed from the site. If the area is flat, then sanding is sufficient. On loamy soil, a layer of soil is removed and sand is poured into the depression, which is spilled with water and carefully compacted.
- When the site is located on a hill, then the foundation can be made at the same level with the ground. It is advisable to raise a place with constant stagnation of water by 20 cm above the ground. In this situation, a special formwork made of wooden blocks is required.
- Further, a lattice of reinforcement is installed, with a cross section of at least 10 mm. The bar is knitted by means of a wire. The optimal distance between the rods is 15 cm.
- The formwork is poured with concrete and leveled with a board. It is important to use high-quality cement, since the structure of the furnace is quite massive and the base must withstand significant loads. Dry cement is sprinkled on top of the solution, which will give the foundation moisture resistance.
- In the central part of the foundation, a recess is made for the template. Then the structure is covered with plastic wrap and left to dry. As it dries, the concrete should be moistened. Construction begins after building strength. This period usually takes about 2 weeks.
Installation of the template and masonry
 The tandoor oven must have an even circumference.
To achieve the same radius when laying bricks, you need to use a template.
For its installation, drawings and preliminary calculations are used.
Note: the distance between the two elements of the template is calculated according to the height of one row of bricks.
The tandoor dish is laid out of refractory bricks, which are placed on the end part. Therefore, the height of one row, together with the cement seam, will be 26 cm. Therefore, it is better to lay out the height of the straight part of the stove from 2 rows.
To prevent the walls of the furnace from turning out to be curves, a right angle is left along the perimeter of the lower part of the structure. The second row exactly repeats the first, however, for strength, each brick moves exactly halfway. In the same row, a blower from a pipe is being made. Why two blocks are sawn in the center.
Next, bricks with a pipe are covered with cement. Further, the narrowing of the structure will begin, corresponding to the height of the two rows. To build a slope, the blocks are sawn with a grinder at a given angle.
Master's advice: when equipping a blower, instead of a pipe, you can use a brick, which is left unsecured.
In subsequent rows, the amount of material will decrease, respectively, the dressing will be equal to 1/3 of the brick. At the end of the work, the tandoor oven is dried. In the summer, for uniform drying of the mixture, the masonry is constantly moistened.
 To mask all the joints formed between the bricks, you need fireclay clay.
To prevent the bricks from being saturated with moisture from the liquid composition, they are moistened in advance. The mixture is kneaded from clay, quartz sand and salt. The proportions depend on the fat content of the natural material.
The mortar is applied to brick blocks from 3 sides - two side and one bottom. As soon as the first layer dries, the bricks begin to be coated with a reinforcing layer. The main thing is to remember that the structure must be protected from rain with plastic wrap.
To increase the strength of the tandoor, a reinforcing mesh made of metal is mounted on the clay layer, and a layer of concrete mixture is also applied. It is prepared from cement, sand and granite screenings. The consistency of the masonry mortar should resemble plasticine. For decorative decoration, a mosaic or natural stone is laid out on the outside of the stove.
The finished tandoor is dried for at least 2 weeks. After the first drying, the oven is heated. First, only paper is used, then sawdust and chips are added. Thus, the structure is dried every day for 2 weeks.
Burning
 After complete drying, the tandoor is fired. To do this, a fire should be built and maintained for several hours.
The first firing must be long. When the oven has cooled down, it should be checked.
If the structure rings on impact, then the homemade brick tandoor is ready. In the future, it is periodically cleaned of soot and ash.
Gadgets
 Several dishes can be cooked in the oven at the same time... For their placement, special devices are used.
For example, a metal portable rod on which skewers are fixed. Its dimensions should correspond to the diameter of the tandoor neck.
Another option is a cauldron lid. It is made from ordinary sheet iron. For cooking meat, vegetables and tortillas, holes are cut in the lid.
The tandoor is used not only as a barbecue or brazier, but also as a Russian oven. Vegetables are stewed in it, rich cabbage soup, meat stew are made.
Canopy
 The stationary tandoor is protected from precipitation by means of a canopy.
First, small depressions are dug from four sides into which metal pipes or wooden beams are installed. The depressions are covered with sand and poured with concrete mortar.
When it dries, sheets of corrugated board or slate are mounted on the device. The canopy can be anything, it all depends on imagination and possibilities. An interesting option can be seen in the photo.
A real brick tandoor is a functional oven that bakes vegetables and meat evenly. Such a device helps to save on electricity and gas consumption.
In addition, the oven is easy to operate and maintain. Its installation will not take much time, but it will allow you to enjoy aromatic dishes and delicious lavash.
Watch a video that shows in detail how to make a brick tandoor with your own hands:
MUST SEE EVERYONE!
The history of the appearance of the tandoor goes far into the past. Its appearance solved the main problem in food preparation - saving firewood and coal.
Modern tandoors can be stationary, portable, electric and gas.
If you study its manufacturing technology well, then at your summer cottage or on the territory of your own house, you can build it yourself, using various materials. A solid durable tandoor can be made of bricks, and a simple, portable one from a metal or plastic barrel.
In this article, I will consider in detail what types of tandoors are used at the present time and how they differ from each other.
The nature itself helped to solve the problem of cooking in the conditions of Central Asia: firstly, a very dry continental, one might say, “sunny” climate, and secondly, the abundance of natural material - loess (this is stone dust, literally crushed to the state of a powder), which possesses a number of unique properties:
- It is heat resistant, breathable and durable.
- Loess has a high heat capacity and heat transfer, which means that it heats up quickly and gives off heat for a long time.
- Loess is relatively easy to process, and when wet it can be sculpted almost like plasticine.
It was from this wonderful material that they began to make the first tandoors. A dry and hot climate contributed to the simplification of the manufacturing technology of these ovens.
![]()
The first simplest tandoors were earthen - a hole with a diameter of half a meter and a depth of about 35 cm was dug in the loess soil, and an air duct was arranged on the side. Then they began to dig holes in the form of a jug, which gave even more significant fuel savings - with this form, heat is concentrated in the center of the furnace chamber.
In Central Asia, kilns made of chamotte or kaolin clay, which are similar in properties to loess, have become widespread. Sand and chopped wool were added to the clay - as a result, the solution was very thick. A workpiece made from this solution was exposed to the sun for two weeks. Strong heat and very dry air actually created conditions for low-temperature roasting - this is how the famous Uzbek tandoors were created.
Tandoor has become widespread throughout the eastern region, because allowed to significantly save firewood, in addition, it was easy to manufacture.
In those distant times, 3 types of tandoor appeared.

The first is Asian, this is a large stationary, which was made from clay mixed with wool.
In shape, it resembled a barrel, outside such a tandoor was covered with a stone, and it stood on some kind of stone slab, less often it was half-lowered into the ground and also covered with stone.
This type had a number of advantages and disadvantages, along with the fact that such a tandoor kept heat for a long time, its disadvantage was its low resistance to temperature, because it was still made from ordinary clay, which, as you know, when heated to 600 degrees, simply melts and cracks, but he coped with his task.
A significant inconvenience was the fact that if the old tandoor broke, then the masonry had to be dismantled first, and after the installation of a new tandoor, reassembled.

The second species is Caucasian; it was distinguished from the first by the fact that it had the shape of a bell with a cut off top, it was simply buried in the ground.
Such a tandoor device made it easy to replace it in the event of a breakdown, in addition, wool was not required to bind the clay, which ultimately did not give an unpleasant odor as it burned out.

The third type was the portable tandoor, which became widespread in Greece and Japan.
It was shaped like an amphora or a cropped egg. It was made of chamotte clay, apparently that is why it did not become as widespread as the classic types of tandoor, because chamotte clay is not everywhere.
It differs from ordinary clay in the presence of additives, which makes it resistant to high temperatures, but like ordinary clay, it also cracks under the influence of temperature.
That is why such portable tandoors were necessarily bound with strips of metal, which did not allow the clay to crack further. Such a tandoor was convenient in that it was not tied to a place, it was still made massive enough to better preserve heat, but if it could always be rearranged to another place.
What is a tandoor and how to use it
Tandoor is a brazier stove with a special jug-shaped shape, which is intended for cooking.
Similar ovens appeared in Asia. The tandoors are most widespread in Armenia, Kazakhstan, Turkmenistan, Mongolia, Azerbaijan, Russia, Japan and Tajikistan.
According to their functional purpose, they are divided into devices designed for baking vegetables, meat and for baking bread. The tandoor can be stationary - dug in the ground or folded in the shape of a barrel made of refractory clay, or small, portable, used at home.
Up to forty different types of dishes can be cooked in the tandoor. You can bake fish, chicken, vegetables, meat, fruits in it. He can also easily cope with the preparation of a goose, shank or ham.
In India, "chikentanduri" is made: using a special technology, the chicken is cut into pieces, then sprinkled with salt and chili pepper, marinated for several hours in sauce and various spices and yogurt, and then cooked over high heat in a tandoor.

The modern tandoor is a versatile stove that looks like a huge outlandish oriental jug, which has a top lid and a hole in the bottom for kindling.
Its cost is not high, so anyone can buy an oriental stove for a country house or summer cottage.
Cooking in a tandoor is not difficult; first, you need to put coal or firewood in the oven for kindling. This can be done through a special hole or firewood can be laid through the top. After lighting the wood, you should wait until the oven warms up to the maximum temperature, and you can start cooking. Skewers with skewered pieces of meat are hung vertically in the tandoor, so they are fried evenly and quickly.
You can cook in it in any weather conditions. The picnic will not be spoiled even by rain, because the fire burns directly in the jug.
After the first ignition, it is necessary to gradually raise the temperature. Cooking in the tandoor is not so much due to the coals themselves, but due to the heat transfer from the walls of the jug.
This is the only way to ensure complete frying, to preserve the juiciness and aroma of the dishes. Due to the vertical position of the skewers in the tandoor, there is no need to turn them. So you will be able to communicate with guests, and not sit near the kebabs.
The principle of operation of the tandoor is that the clay from which they are made, within an hour and a half, is well warmed up with the employer of the firewood, which we burn in the middle of the stove.
The hearth in a tadir can reach up to half a meter, so it is advisable not to place it close to flammable materials.
After the firewood has burned down, we use the ash pan to take away the coal and the remnants of the burned firewood.
Having prepared the oven for cooking, we can check the readiness of the tandoor for use by throwing a small amount of flour on the side walls of the oven, if it burns, then the oven is too hot and the food may burn, if not, we can safely bake meat, fish and flour dishes ...
Having placed the dish in the middle of the oven, close it hermetically with a lid, and follow the preparation, as for the barbecue or barbecue.
If it cools down over time, then we can again put an ash pan with hot coal under the tandoor, which will increase the temperature inside the furnace.
Why is tandoor better than barbecue:
- The meat does not dry out, it turns out juicy.
- There is no need to make sure that the kebab is not burnt.
- You will receive the finished dish in 10 minutes.
Traditionally, the tandoor oven has the shape of a barrel or vase without a significant narrowing in the neck. The main material is ceramics and clay, the ceramic walls must keep the heat, the cracks are covered with clay and the ceramic base is coated.
The foundation for a stationary tandoor is an earthen embankment, and more often a brick one.
In some cases, everyone can build a tandoor with their own hands from bricks, provided that the quality of the clay from which the brick is made is high, otherwise it will quickly crack and the stove will fall apart.
In addition, a do-it-yourself tandoor is unlikely to have such qualities as made in compliance with all technologies and the selection of clay of the desired quality.
Tandoors differ in form and purpose. There is for baking bread, there is for frying meat and vegetables, and there are those in which delicious cakes and samsa are baked.

The tandoor is similar in shape to a large thick-walled earthenware vase with a side hole and wrought iron handles.
For greater strength and beauty, it is forged with metal hoops. It is installed on a special dais, also made of clay or brick, the structure is decorated with stucco, forging and national ornaments.
There are stationary tandoors, and there are also portable ones. They can be moved from place to place; for example, take with you to nature.
Depending on the choice of fuel, modern tandoors are divided into those traditionally heated with wood, gas or electricity. The camera should be as hot as possible.
The tandoor is heated with a blower with charcoal or wood, and to keep it cool, the hole is closed with a special lid. After warming up, soot is removed from the inside of the tandoor. The walls are moistened with water and salt so that the food does not stick, and after that the dish to be cooked is laid out.

The cakes are placed directly on the wall, and the meat is placed in the lid, vertically, on skewers.
At the walls of the tandoor, heat dissipation is very fast, so 10-15 minutes is enough for cooking vegetable dishes, chicken will take half an hour. And for the preparation of ruddy cakes, 4-5 minutes are enough.
The tandoor does not need to be fanned and sprayed in order to avoid burning, as on the grill. You can not follow him at all, but go about your business, knowing that he will not overheat.
It is very easy to care for the tandoor with the help of a scoop and a poker. The grate will also come in handy to improve traction.
It is advisable to store it in a closed place, and if the tandoor is located in a summer cottage, then it is sheltered from possible precipitation. Dampness and wet use can cause the clay to crack.
The heating of the stove is different depending on the season.
- In winter, you need to warm it up gradually. First, chips are burned, and after a while, when the walls warm up, they lay the rest of the firewood.
- In the summer, you can light the stove with all the wood at once. Birch, hornbeam or oak are most suitable for kindling, because they have a higher heat transfer coefficient.
Do not use fruit trees, as they have a specific smell when burned.
The duration of the kindling of the tandoor occurs in different ways, depending on the size and temperature of the environment. The larger the device itself, the longer it will take to warm it up. The lower the air temperature, the longer it will take.

Tandoor has several advantages:
- economical consumption of firewood and coal;
- optimal temperature inside;
- ease of use and maintenance.

Disadvantages of tandoor:
- lack of a chimney;
- the need to use fireproof gloves to avoid burns; soot deposits on the walls after the firewood has been fired;
- heavy weight that makes transportation difficult; one opening for firewood and food.
Important! It is prohibited to light up the tandoor in closed rooms.
The height of the flame above the tandoor during its ignition can reach one and a half meters or more. Do not pour water on a hot tandoor. The tandoor can crack due to the big difference and then give irreparable cracks.
Keep children away from the hot tandoor. The temperature inside the tandoor during its warming up can reach 480 ° C, which causes strong heating of its outer walls.
Varieties of tandoors
There are three types of ovens:
- terrestrial;
- pit;
- portable.
Generally speaking about such a stove, it looks like a ceramic hemisphere with a round hole. It is located on the upper side.
You can place such a stove in the yard, using a clay platform as the base or below ground level.

Recently, portable tandoors have become quite popular. Their manufacture began to be practiced relatively recently. According to the principle of work, they do not differ from traditional tandoors. We will talk about them in more detail later. High quality fireclay clay is used as the main material for the manufacture of portable tandoor.
It has the following properties:
- high heat capacity;
- significant heat transfer.
The lid, which covers the neck of the stove, consists of two levels. By its appearance, it is a structure of two parts: a lower large and an upper small.
Depending on the size of the furnace, the thickness of the walls can vary from 3 to 7 cm. To provide convenience for carrying the tandoor, its design has two forged metal handles located on the sides. To provide additional structural strength, it is tightened with vertical and horizontal metal strips.
The blower is located at the bottom of the structure. It is used for kindling a furnace and for extracting coal. It is used for vertical arrangement of skewers, which are fixed on special hooks.
The oven kit also includes the following accessories:
- Grill nets, wire racks and baking sheets.
- Skewer for vertical and horizontal loading.
- Special attachments for cooking poultry.
- Grips.
Clay mobile tandoor is small in size and is used for cooking kebabs, bread and other dishes in summer cottages.
Such a stove looks like a small barrel; it should be installed on a non-combustible surface in order to avoid fire.
You can cook in it whatever your heart desires. And the kebabs obtained in the tandoor will become your favorite dish.
Electric tandoor
An excellent option for home use, it is in no way inferior to a classic stove. Cooking bread, vegetables, meat, fish and mushrooms is now possible in a city apartment.
A portable electric tandoor for a summer residence is a kind of electric oven. The new models are equipped not only with a tenom, but also have a remote control, thanks to which it is possible to choose the most suitable cooking mode for any product. A description of such models can be seen on the video on the Internet.
This electric tandoor is suitable for flat cakes, samsa or kebabs. Its only drawback is the lack of a pleasant smoke aroma.
Electric tandoor is the most convenient for making flat cakes, because has a special shape - it expands immediately from the neck. The walls are less convex than those of its counterparts - it is convenient to sculpt and take out cakes.

An electric tandoor can be used even in an apartment. It is powered by an ordinary 220V outlet, the electricity consumption is small, so you can cook at least every day. Ideal for restaurants.
They appeared not so long ago, but have become a worthy alternative to the classic wood-fired tandoors. This model is made of chamotte clay, has thick walls, which are heated by an electric heating element.
The main advantage of this model is that it can be used even in an apartment.
There is no combustion process, therefore, there is no release of carbon dioxide. Heat is generated by electricity. Such a tandoor is especially easy to use in the kitchen of a restaurant, if the institution does not display the cooking process in the public domain.
It heats up quickly enough, in addition, the device allows you to maintain the required temperature for a long time, especially if you have to cook in it all day.
All electrical elements are reliably protected, so you can be sure of the quality of such a device. The electric tandoor cooks quickly enough, it is roomy, you can make several products at once.

Of course, this model has a lot of advantages:
- The high taste of food is combined with the harmless nature of cooking in tonir, the process excludes the formation of carcinogens that are detrimental to health.
- The oven allows you to expand the range of dishes served at public catering establishments, while the cooking period in the tandoor is within half an hour.
- A classic stove burns less wood than a brazier, and an electric tandoor greatly facilitates the operation.
- Electric toner allows you to enjoy the taste of your favorite dishes without country trips, at home in modern apartments.
- An electric oven does not require any special skills to operate.
- It is much more affordable in terms of price policy than the classic oven.
- The stove is made of environmentally friendly materials that do not emit harmful substances during operation.
Stationary tandoor

Such a stove can be installed in the country or your country house, is large enough and used for constant cooking.
The basis for it is a brick foundation. As in any tandoor, you can cook any dishes in such an oven, but with it, the volume of cooking significantly increases due to its greater capacity.
For such models, a pipe is required to supply air to the wood when the lid is closed.
The main disadvantage is the complexity of implementation on your own, since certain skills are required. The wrong choice of design or materials can lead to a short period of use - this is the wrong temperature regime leading to surface cracking. And this will undoubtedly affect the quality of the prepared food.
To make a real homemade Turkish tandoor, you need fireclay clay, sand and organic filler, which can be wool of sheep or camels, and understanding how to use it is also useful.
White clay is the best choice, as the product will be as durable as possible. But the secret is not only in clay, an important factor is the skill and skills of the stove-maker.
Horizontal tandoor
These models weigh about 80 kg and are mainly used for cooking fish, meat or vegetables on a baking sheet, and, of course, Uzbek flat cakes, which are seasoned with sesame seeds.
Such a clay stove should be installed on a base, the height of which will be 1 m, and the firebox should have the shape of a hemisphere or a chicken egg placed horizontally.
Before installation, a brick or stone base is prepared, as well as internal and external formwork. The formwork should be installed on the base and filled with adobe concrete.
After that, the structure should dry out, which will take 7-10 days. Then the kiln is fired. It is not necessary to equip such a product with a chimney.

The horizontal tandoor is used for baking lavash, tandoor flatbread.
First, the craftsmen make a clay jug with an average diameter of 1 meter and a length of 1.2 meters. Then he is given the necessary time to remove excess moisture from him and he gains strength.
At the place where the tandoor is installed, a platform is prepared in advance, which will later serve as a "stand". The platform must have the necessary strength to support the weight of the tandoor. It is installed in a lying position. After that, it is fixed, bricked and fired.
During the firing process, the clay is baked and gains strength. After passing the firing, the tandoor is ready to work. If he is in the room, then you need to take care of the hood in advance.
The horizontal tandoor can be easily used as an oven for making Italian pizza. The cooking process is carried out not on coals, but due to the powerful heat transfer of the walls, which will ensure the speed and uniformity of frying, preserve the juiciness of the original product.
Gas tandoor

These models have become widely used and are the best option for a cafe or restaurant.
This is a metal structure in the form of a cube with an earthen jug inside, into which the products are laid.
The main difference between such tandoors and ordinary tandoors is the ability to use it indoors. The only condition is good ventilation.
Gas models are equipped with a temperature regulator, and a tray and stones are used for even heating. There is also an ignition failure control, a removable cover and piezo ignition.
DIY tandoor technology
To create any kind of stationary tandoor (pit or ground), you will need a basic set of the following materials and tools:
- cement, refined clay, fine sand;
- refractory bricks and facing material (tiles, natural stone, etc.);
- metal grate (slotted) grate and masonry mesh;
- containers for mixing clay mass and cement-sand mortar;
- trowel, shovel, building level, grinder, buckets.
Depending on the selected tandoor option, you may need other tools.
Construction of an earthen (pit) tandoor
First you need to prepare the pit. For this, clay is thoroughly mixed with gravel or fine chamotte. The dimensions of the pit should vary between 50 cm (depth) and 35-40 cm (diameter). The quality of the clay should be of the highest elasticity. The clay has to withstand very high temperatures.
Clay bricks 30 cm thick are laid at the bottom. The walls are also lined with such bricks.
At the bottom, there are gaps for two holes. These holes will increase heat transfer and improve the quality of the furnace in the stove. This tandoor is considered the most ancient. It retains heat better and cooks food faster.

The Uzbek Yamnaya stove is assembled according to the following principle:
- Choosing a suitable place.
- Preparation of the pit for the tandoor - the depth is calculated based on the height of the furnace itself (usually 1.25 m) plus the thickness of the foundation (on average 17.0 cm). The foundation (bottom) is laid out from one layer of fireclay bricks.
- Laying the first row of refractory bricks with the obligatory formation of a gap to connect the air supply path.
- The device of the air pipe - to the prepared foundation, the end of the asbestos-cement pipe is placed in the left gap of the first row of bricks. All gaps between the bricks and the pipe are carefully covered with a cement-sand mixture. Of course, the pipe must be inclined (angle 45 degrees) so that its second end rises above the ground.
- Next, the construction of a furnace is carried out by analogy with an overground tandoor.
- From the inside, the masonry is covered with a thick, plastic clay mass.
- Outside, the bricks must be coated with a cement-sand mixture and the structure is left to dry.
- The finishing stage will be filling the free space on the sides of the stove with soil cleared of stones. The soil should be tamped tightly, and from above, the area around the neck, should be poured with concrete or made of paving slabs.
- Once all the fixing and insulating compounds are dry, you can start the process of baking the tandoor.
Construction of a land tandoor

The ground tandoor is more simple.
For him, you need a ready-made matrix of the furnace device, resembling a large egg.
This "egg" goes deep into the ground, leaving a strip of 4-10 cm on the surface of the neck.
An air duct is constructed under the "egg", coming out to the surface of the earth.
The ground tandoor can be positioned parallel to the ground. In this position, it is very similar to a traditional Russian stove, but without a chimney.
The construction of a vertical structure (height 1.27-1.35 m) consists of the following sequence of stages:
- Selection and preparation of a site for the construction of a tandoor - the site must be flat, solid and preferably with a canopy.
- Arrangement of a high-quality foundation that can withstand the weight of the furnace. It is necessary to dig a hole of sufficient size and depth in the ground.
- Place a "pillow" of sand and medium-grained rubble on the bottom of the recess, and then pour the concrete solution. As a rule, a concrete base is made with a thickness of 15.5-20.0 cm. If a foundation is made that exceeds the ground level, then you need to build an appropriate formwork from plywood strips or boards.
- Wait for the concrete to set. A fifteen-centimeter foundation in dry weather hardens after a couple of days.
- A regular circle with a diameter of 1.0 meter is outlined on the foundation site.
- A perfectly flat first row is laid out of refractory bricks, in which a "window" should be located for the intake of air necessary for the burning fuel.
- The next brick row is laid with a half shift (for greater strength and stability), along the entire circumference as a whole, without any gaps.
- The grate is placed on the created second brick row and the masonry continues. Up to approximately the eighth row, the construction of the structure is carried out strictly vertically.
- Subsequent rows are tucked neatly with a 0.5-centimeter shift inward, as it is necessary to form a domed taper.
- The brickwork ends at a height where the upper opening narrows to a 50.0 cm diameter (for a 1.0 meter base).
- After laying the brick (you can immediately), the body is coated from the inside with a clay mass, which is prepared immediately before application. The consistency of the clay composition should be similar to thick sour cream.
- Having finished uniform coating, it is necessary to leave the oven for passive drying.
- Upon completion of complete drying, fill the tandoor with a well-burning mixture (brushwood, dry straw and wood shavings) and set it on fire. This procedure will harden the clay coating and make the brazier oven completely ready for further use.
- After waiting for it to cool, you need to overlay the structure with a second (outer) layer of brick, observing the exact verticality.

To build a typical Asian stove on the site or in your own yard is not an easy task. Only if you follow the step-by-step instructions can you build a durable, reliable unit.
When the applied cement-sand mortar is firmly seized, the gap between the oven and the outer masonry is filled with a thick mixture of clay, sand, expanded clay and water. Here, instead of clay, you can use cement.
If your oven is already dry, then first you need to heat it with paper, thus increasing the firing temperature.
When the oven is ready, you can decorate the structure by coating it with clay. In the east, it is customary to decorate the tandoor with mosaics and ceramic tiles.
How to make a tandoor out of metal (metal barrel)
In order to arrange holidays of oriental cuisine at the dacha, it is not necessary to go to Samarkand for a real Uzbek stove. If authenticity is not important to you, a stationary tandoor can be made with your own hands - for example, from a metal barrel.
A homemade metal brazier is the easiest option. This will require an iron barrel with a volume of 200 liters, brick, kaolin clay.
The algorithm of actions is as follows:
- Cut off the top wall with a grinder and rinse the barrel thoroughly. This will be the frame for the brazier. It must be placed on a cement foundation so that the heat does not go into the ground.
- At the bottom, using the same grinder, make a hole for the blower. A brick, cut along a wedge, will serve as a cover.
- Line the inner walls with refractory bricks. If you are plagued by vague doubts that they will not be enough, it is better to spread it vertically. For bonding, use only clay or a special oven mixture, which can be purchased at a building materials store.
- Coat the finished tandoor on the outside and inside with clay, otherwise the food will have a metallic taste, and leave to dry for a few days.
- The cover can be made from a thick piece of plywood. It should close the brazier very tightly.
- Before firing, the barrel can be painted, overlaid with natural stone or decorative bricks. Pour sand or salt in the space between the wall and the barrel, this is necessary for better heat retention.
- Dried tandoor must be burned. For this, its walls are greased with cottonseed or other vegetable oil and sprinkled with water. The temperature is raised very slowly: first, they heat it with paper and only then put firewood and coal. Firing continues for 5-6 hours.

There is an easier way to make a tandoor from a metal barrel:
- Inside the barrel, clearly in the center, a piece of large-diameter iron pipe is installed.
- The space remaining between the walls of the barrel and the pipe must be filled with expanded clay, slag or broken refractory bricks.
- The disadvantage of this method of making a tandoor is that the temperature inside the barrel is much lower than when using a ceramic tandoor.
There is another easy way to make a stationary tandoor with your own hands.
- This will require a large terracotta pot and pipe. You can buy it at any building hypermarket.
- Dig a hole in the ground 50 cm deep and 35 cm in diameter. These are approximate dimensions, be guided by the parameters of the pot, it should rise 5-7 cm above ground level.
- Cut a hole in the bottom of the pot to match the diameter of the pipe. It is installed diagonally, so that one end comes up to the pot, and the other is outside. It will be blowing.
- Coat the inner walls with a thick layer of kaolin clay and leave to dry. Then you need to burn the stove.
- The lid is cut to the diameter of the pot from thick plywood. It should fit snugly around the edges.
And a few more important tips from experienced craftsmen.
- First, be sure to check the weather forecast before starting to build a tandoor. If the weather is dry and hot, making a tandoor from a barrel or pot will take you only 3-4 days. In the rain, nothing will come of it, just in vain you will translate materials and time.
- Secondly, the stove must dry under a canopy so that precipitation and direct sunlight do not fall on it, otherwise the walls will be covered with cracks.
- Thirdly, it is better to use apple and cherry firewood for burning, the smoke from them will be pleasant and fragrant. In no case take spruce firewood, then the stove will smell like resin.
Tandoor from a wooden or plastic barrel

The simplest do-it-yourself tandoor can be made on the basis of an ordinary barrel, and both wooden and plastic empty containers will do.
One of the most common among them is the construction of a tandoor using a wooden barrel.
Here you need a little skill in working with clay, but there will be no special difficulties in the assembly process. To make a tandoor from a barrel with your own hands, you first need to choose a suitable empty container. It should be small. It is desirable that her hoops are loosely fitted.
The inside of the barrel should be soaked in refined sunflower oil and then left overnight. Then you need to prepare a solution consisting of chamotte clay, sand and sheep's wool (1: 2: 0.05). Sheep wool is used for reinforcement. The solution should be thick.
Using the resulting solution, it is necessary to mold the tandoor body on the inner surface of the barrel. Then the solution should be smoothed and left to dry for a week. It is recommended to use incandescent lamps for drying.
After that, the hoops can be dismantled and the barrel can be disassembled. Then the product must be subjected to a secondary firing. On this, a do-it-yourself budget tandoor can be considered completely ready for use.

There is an even more budgetary option for building a tandoor with your own hands - you can take a plastic barrel as a basis.
To do this, you need a plastic container of a classic shape.
It must be filled with water, after which it will slightly increase in size.
The outer surface of the barrel should be coated with a solution prepared from chamotte clay and sand. It must be tamped, smoothed, until the contour of the furnace is formed.
After that, the product must be dried for a week. Then the water should be drained. The barrel will be smaller, so it can be easily removed from the new tandoor.
A cauldron for cooking pilaf and other dishes can be placed on top of the resulting oven, but for this it is necessary to adjust the crown to the volume of the cauldron and coat it with clay.
Equipment for the tandoor: the required minimum

The set of components is determined by three factors: what kind of tandoor you have, how often you use it and what you are going to cook on it. First you need to take care of safety: the oven itself and the cook.
Stand.
If you have a portable tandoor without legs, then you cannot put it directly on the ground - moisture will get to the bottom, and the brazier will split in half.
Tandoor cover.
When you are not using the stove, its walls must be protected from precipitation, humid air and dirt with a special water and dust-repellent cover.
There is also a thermal cover. It protects the oven from sudden temperature changes. In addition, you do not have to wait until the camping tandoor has completely cooled down: pack it and get on the road.
Thermal protection.
The operating temperature of the brazier is from 250 ° C to 400 ° C. Ordinary potholders and quilted mittens are useless here. You run the risk of severe burns if you cook without a thermal apron. Extra long tandoor gloves are made of heat-resistant material to protect your hands up to the elbows.
Now let's talk about cooking accessories.
The basic kit includes:
- skewer;
- a device for hanging them;
- herringbone (this is a frying pan with metal pins for stringing);
- multi-tiered lattice;
- whatnot.

Skewers and herringbone are intended for roasting pieces of meat, poultry and vegetables.
On the wire rack you can fry kebab with herbs and make a fish in a cheese coat. If you want to cook several dishes at once, use the wire rack: put vegetables at the bottom, and meat at the top, you will have lunch - you will lick your fingers.
If you are going to cook a lot and varied, then it is worth spending money on additional components for the tandoor, and then you can open a whole restaurant of Central Asian cuisine.
What you may need:
- large hook - for a lamb leg;
- special grill mesh - for fish;
- poultry attachment - if you like to bake whole chicken;
- kazan - for pilaf, shurpa, broth, fish soup, lagman, domlyama;
- cast-iron ducks, grill pans, poultry pots, stews, making sauces, vegetable caviar;
- ceramic circle for baking flat cakes, samsa, pizza, whitewash, pies;
- in addition, you need a stand for the lid, for a cauldron and other utensils, suitable in diameter, as well as a hanging tray for collecting fat.
A tandoor skewer with a holder is convenient in that you do not need to puzzle over how to hang it.
Chains are necessary for hanging cauldrons and pots.
The grates allow you to cook dishes that need to be placed horizontally in the oven.
Whatnots are indispensable if a large company has gathered. In 10 minutes, you can cook many servings or different dishes, for example, if some of the guests does not eat meat.
If you have golden hands, you have the necessary materials and tools, then most of the accessories for the brazier can be made by yourself.
Installing a tandoor: how to choose the right place
A stationary tandoor of regular sizes can weigh more than 300 kg, so it must be immediately put in the right place, then it will not be possible to move it.
Consider the following when choosing a location:
- The working temperature of the furnace is 400 ° C. Wooden buildings and trees should be at a distance of about 3 meters from the tandoor.
- It is desirable that the living quarters also be far enough away so that the smoke does not interfere. The only exceptions are earthen tandoors, smoke from them is discharged through a pipe.
- The eastern brazier does not "like" precipitation and sudden changes in temperature. Above it, you should immediately make a protective canopy.
- Ideally, if you can start arranging a recreation area with the installation of a tandoor. Then you can build a comfortable brick gazebo with a canopy, taking into account all safety rules.
The process of making bread (cakes) in a tandoor

Modern tandoors are made low - half human height, so that the baker is comfortable and safe to work.
Tandoor cakes are a Central Asian dish, but people of all nationalities love it, because this bread turns out to be soft, fluffy and tasty.
Bread baking and other food preparation does not take place on an open fire, but on hot walls inside the oven due to their high temperature and uniform heat transfer.
Before baking, a fire is made at the bottom of the tandoor. The ideal fuel is camel thorns and dry cotton stalks, which generate intense heat, but it can also be non-coniferous wood or coal. When the fire burns out, and the walls blaze with heat, they stop heating, and the coals are shoveled into the center of the tandoor, where they keep warm for a long time.
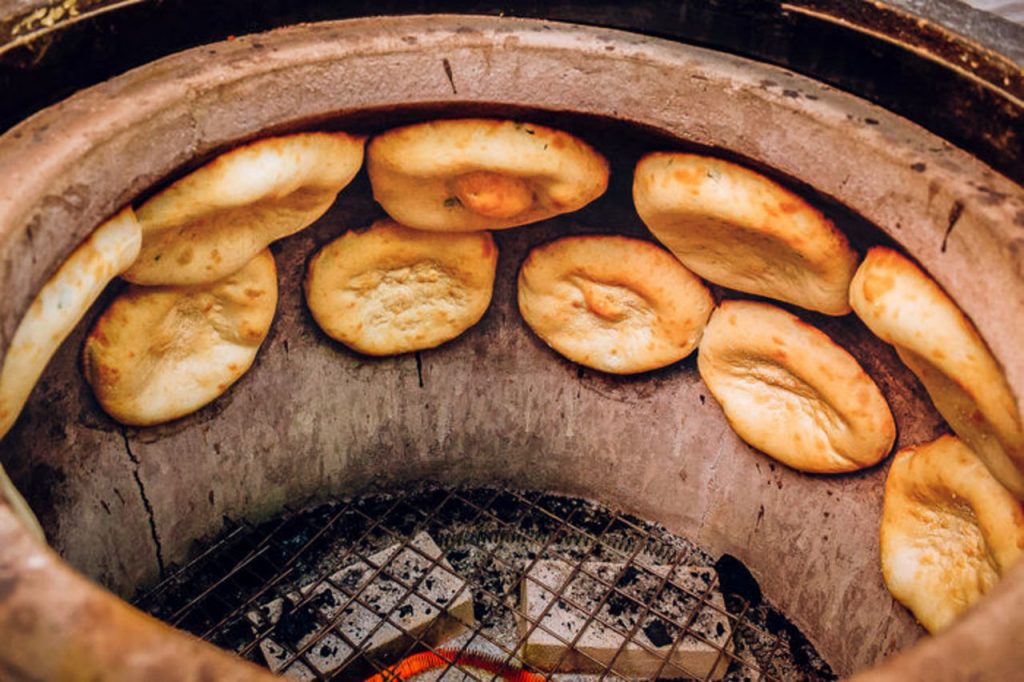
Pieces of dough are planted on the walls using a special pillow cut to the size of the cake. They do this with mittens up to the elbow so as not to burn their hands.
Experienced bakers throw dough on the walls without tools. You need to throw skillfully so that it flattens out, looks like a pancake and holds firmly on a vertical surface.
While the cakes are baking, they are sprinkled with water. The steam generated during this process participates in the cooking process, giving the products a shine and increasing their volume.
Gradually, the cakes are covered with a blush.
You have to be a great master in order not to miss the moment and take them out of the tandoor in time. This cannot be done with a bare hand because of the intense heat: the bread is taken out in a mitten using a special hook or ladle. And now a stack of ruddy cakes spreading a delicious aroma lies on the plate.
Inventory required for baking Tatar flatbreads:
- Basins for kneading dough (copper, enameled, pottery pouring).
- Sita - different types, for myka (rare, medium, frequent).
- Round board with a diameter of 30-35 cm for cutting flat cakes.
- Round board with a handle for cutting dough for all flour dishes 25 cm wide and 1 m long with a dummy leg.
- Long thin rolling pin.
- Chekich is a tool for drawing patterns on cakes. Chekich is made from a fruit tree, cut out with a cone or hemispherical with a handle.
- The base of the chekich is studded in rows with hatless nails.
- Engicha is a large mitten worn on the right hand up to the elbow when planting cakes and removing the finished product (if necessary). Engicha protects the hand from burns.
Tandoor - this word hurts the ear, betraying its foreign origin. Indeed, the tandoor is a stove that came to us from Asian countries. Its main purpose is to bake bread, however, no one bothers to use it for full-fledged cooking, especially since the dishes cooked in such an oven have a special, incomparable taste. That is why many are interested in how to make a tandoor oven with their own hands.
Let's take a closer look at the features of this Asian stove, and it has a lot of them:
- fuel, firewood are not needed - all that is required for work is a bunch of saxaul;
- despite the low fuel consumption, you can cook a lot of food on such a stove, this is due to its design.
See also: Brick oven for summer cottages)
In fact, all of its features are determined by the geographic factor - as already noted, such ovens were common in Asian countries. The tandoor oven was used by the Turkmen, Chinese, Japanese, Armenians, as well as the Uzbek tandoor oven - you must agree that a large piece of sushi was familiar with this unique technology, but why exactly there?
The fact is that all of the above states could not boast of surplus wood, therefore, unlike Russia, they had to look for another way, they needed an economical stove.
We understand the device and comprehend the principle of operation
Let's unveil the secret to this savings: How does a ceramic tandoor oven produce so much while consuming so little?
To do this, you will have to take a closer look at its design.
The body of the stove is a kind of clay cauldron, which is turned upside down, while the cauldron is equipped with a bottom and a hole at the top. However, in the lower part of the boiler there is also a small hole for blowing. Outside, the stove is lined with brick, between the brick and the walls of the tandoor, either sand, or clay, or salt is poured. An interesting construction, but it explains everything.
All materials used are natural heat accumulators, and the shape of the oven is ideal for maximum heat recovery. In short, everything here is tuned for maximum efficiency. First, the stove absorbs heat, and then begins to slowly release it, and it gives off most of it not to the outside world, but to itself. (See also: Sitemap)
Tandoor: traditional option
Let's look at how to make a tandoor oven in its traditional version, that is, in the form of thick ceramic dishes, which are also lined with bricks for thermal insulation and have holes only for direct use and blowing.
DIY tandoor
The height of such a furnace is no more than 1.5 meters, and the diameter in its central part is about 1 meter.

Stages of making a traditional tandoor oven:
- The first step is to prepare clay, carefully kneading it for this, and it is recommended to do this not with your hands, but with your feet.
After that, the clay should settle for at least a day, and the process is repeated again;
- The body of the furnace is made using tape molding, that is, relatively small rollers 60 cm thick are rolled from the prepared clay, with the help of which, tier by tier, the body of the tandoor is gradually formed. To give the required shape and adhesion, the rollers are slightly flattened and pinched.
- The finished vessel is left to dry in the sun, this process takes at least a month.
We didn't have so many points, but this does not mean that making the traditional version is easy - on the contrary, only a real master can cope with this task, and here's why:
- to properly prepare the clay, that is, to take into account all the nuances like its fat content is a very difficult task.
There is no room for error here. If we prepare a solution for a brick oven, then in the event of cracks, we can simply cover them up. Here, the whole stove consists of earthen mortar, and if you do not guess with it, the stove will simply fall apart;
- laying out the furnace body using rollers is a task for a professional, because the efficiency of the device depends on how carefully it is done.
Yes, a beginner will hardly be able to make the traditional version the first time, but this does not mean that one should give up on this.
There is an easier way to fold this Asian oven
Brick tandoor oven, preparation
Yes, you can independently assemble a tandoor stove, because the whole hitch is in the capricious materials of the traditional version, so we will fold such a stove from the materials we are used to, namely:
- bricks;
- sand;
- clay;
- cement;
- grate.
Agree, a Russian is more accustomed to working with these materials.
And the stove assembled from them has an important quality: in case of a mistake, we will always have the opportunity to fix it. The clay solution did not work out, did a crack start? It can be smeared over, while the stove does not risk falling apart into pieces.
So, let's get started, let's build a stove according to standard sizes:
- Height - 1292 mm, and diameter - 1 meter;
- The vertical part of the furnace boasts a height of 544 m, it is exactly 8 rows, after that there are 8 more rows of the dome.

Putting the oven
Now the foundation, no frills are required here: they dug it, poured it in with cement and it's done.
But where to start building? First of all, markup - draw a circle of the correct shape on the foundation, because first we will lay it out, only then we will take up the inner world of the tandoor.
- 1st row: the main thing is to remember about the blowing channel, the bricks in this row are stacked on spoons, while making sure that their inner side is in contact with each other.
- Rows 2-8: on the second row we block the blower channel, recall that in this oven this channel is very small, only 68 X 200 mm, and you don't need more.
A grate will also be installed on the 2nd row, this is the end of the variety, the remaining 8 rows are performed according to the same scheme, the main thing is not to forget about the coating and dressing. We continue this way until the end of the vertical part.
Assembling the dome:
- Rows 9-18: Row 9, the beginning of the dome - here it is necessary to calculate the offset correctly, so we need a trimming sander to continue working.
The task before us is this: we must, from a diameter of 1 meter, come to a diameter of 500 mm in just 8 rows, which means that on each row we must narrow our circumference by 31.25 mm on both sides. We finish laying the furnace body.
After the body is completed, it must be abundantly coated with clay on the outside and left to dry in the sun.
You will have to spend a couple of hours on everything. And only after that you can proceed to the most interesting thing - fill the cavity with brushwood to the very top, set it on fire and let it burn out - this will harden the clay and strengthen our tandoor. The inner part is complete, we move on to the outer lining.
The lining is carried out strictly vertically, while the walls of the lining must be in contact with the walls of the furnace.
And the resulting gaps must be carefully filled. This will allow our design to accumulate a large amount of heat, which will be enough for cooking, and at the same time, you will not have to spend much on fuel.
Now it remains to wait until the masonry is properly dry and you can take up the space above the vault, filling it with clay or sand.
Our tandoor is ready for use. Now nothing will prevent you from baking flat cakes in the tandoor and enjoying their unique taste, known all over the world.

Earthen tandoor, this is how bread is baked in Armenia
In addition to the options already considered, there is also a third modification of this unique stove, earthen.
That is, the stove is installed directly in the ground, this method was widely used in Armenia, moreover, not only was it cooked on such a tandoor, it was widely known in the medical environment as the best means for therapeutic warming.
Moreover, earlier, such a stove had a sacred meaning for people, representing our heavenly body. You can install such a tandoor yourself, it will take you only a little more time than the previous option.
- First of all, we need a foundation pit, both for the foundation and for the entire furnace as a whole, the entire vertical part should be hidden in the ground, that is, the first 8 rows, take this into account.
- Make the foundation, and then lay out the stove, exactly according to the same algorithm according to which the previous version was made.
As a reminder, the dome should be above the ground, and the rest should be below it.
- Lubricate the dome with clay, two times more abundant than in the previous modification, this is necessary for the durability of the device.
As you can see, the fundamental difference is only in the pit, but nevertheless, even the taste of food cooked on such a tandoor is different.
HomeSitemap
Diy Armenian tandoor made of bricks
Home DIY Tips

There are many different types of garden ovens for cooking.
How to make a tandoor in the country with your own hands: from brick, clay, etc.
Among them there are primordially Russian versions, but the construction that came to our country from Asia is especially interesting. This is a tandoor. Traditionally, such a furnace is made by hand. And today, a tandoor made of bricks with their own hands can be created on a personal plot by anyone.
Installation diagram

First you need to choose a suitable place. The tandoor can be a structure located above the ground, but sometimes it is also equipped directly in the ground.
The second option is convenient if the site does not differ in a large area. For its implementation, a pit is dug, to which an asbestos-cement pipe is supplied (it is necessary in order to provide an air flow to the tandoor, without which it is impossible to maintain a fire).
The bottom of the tandoor must be laid out with bricks.
One row of material, laid flat, is sufficient. The joints between the bricks are covered with clay. The asbestos-cement pipe is installed in the finished pit so that its lower edge is located 5 cm from the level of the bricks. The angle of inclination of the pipe is 45 degrees.
Then they move on to laying out bricks for arranging the walls of the furnace.
The brick is laid on the bottom. In this case, the solution does not need to be applied. The optimal inner diameter of the tandoor should be about 50 cm. The top row of masonry can be made a little wider for the convenience of using the stove. The depth of the pit should allow 3 rows of bricks to be laid. It makes no sense to make the tandoor deeper.
The space between the bricks is also filled with dry clay.
Preparing clay for coating the top row requires special attention. It is diluted with water in a container until it acquires a creamy consistency.
Then it must be filtered (fine plaster mesh is suitable for this). When the clay has settled, the water is drained and the resulting mass is coated on the inner surfaces of the bricks. Additionally, it is desirable to use a mesh for reinforcement.
All that remains is to equip the dome. Although the matter is not as simple as it might seem at first. Traditionally, a do-it-yourself brick tandoor is covered with a clay dome about 1 cm thick.It is laid out on a template, the size and shape of which corresponds to the equipped pit.
A large vase or basin will do. When the dome dries out, it is necessary to install it on the foundation pit and carefully warm up the finished tandoor for the first time.
Tandoor - DIY manufacturing sequence

Most people like to rest on a fresh vacation - in the forest, in the country, especially with family and close friends. Food cooked in the open air has a special appetite and is unusually tasty.
The most widespread device for outdoor recreation and cooking is the barbecue.
Cooking with it is easy. You can grill kebabs on skewers, steak on a wire rack and other variations of types of meat and fish.
Nevertheless, the use of the traditional stove of the nomads of the steppe - the tandoor - is increasingly common. Delicious food is produced in this amazing and simple hearth!
Tandoor - what is it?
Tandoor (sometimes the name tondur or dondur is used) is an invention of the Turkic people.
They are known for their ingenuity and nomadism from place to place. A tandoor is a small oven for cooking at home.

Its huge advantage is simplicity of manufacture.
Let's consider this process. The tandoor can be installed in any place where there is clay; sand is also required. According to ancient tradition, sheep's wool is added to the clay solution, but it is not the most important component, so you can do without it.
The main advantages of the tandoor
the ability to naturally accumulate the energy of the combusted fuel, and then gradually release it for a long time;
2. food using such an oven does not burn and does not come out soggy;
3.
the juiciness and natural properties of the cooked products are preserved as much as possible;
4. You can bake flour dishes, such as "tandoor" cakes or juicy samsa.
We start making tandoor ourselves
We need a wooden barrel, sand, clay, well, if you can get sheep's wool, then add it to the clay, you also need vegetable oil.
How to make a clay tandoor with your own hands
You can consider in detail the sequence of actions in stages:
1. It is necessary to fill a wooden barrel to the brim with water and leave until it swells completely. In a 1: 2 ratio of clay and sand, prepare a solution and mix well. Sheep wool is also added there, which is cut into pieces of 10 - 15 cm. Sometimes the walls of the tandoor are reinforced with straw, hay or reed, reeds, flax (this method is found in some descriptions of the traditions of making tandoor);

2.
Pour water from the already swollen barrel and saturate the inner walls of the barrel with vegetable oil. Next, she needs to dry out for about a day;
3. Apply the previously prepared clay solution also on the inner walls of the barrel with a layer 2-3 cm thick. Thoroughly compact and smooth On the one hand, narrow the neck of the barrel;

4.
To dry the tandoor, it is necessary to leave it in a dry, ventilated room for two weeks. In the process of drying the manufactured structure, the boards of which the barrel consisted will move away from the clay;

5. When the tandoor is completely free from the boards, place it on a layer of sand with the neck up.
We make a small fire inside and keep it for 6 cm. This process is necessary in order to pre-bake the prepared oven. After completing the procedure, cover the tandoor with a lid; there should be a hole in it for the smoke to escape. Then we kindle a fire in it again, only now, not a weak, but an intense fire.
6.
The tandoor should cool slowly. After cooling down, it is already possible to locate it in a certain place. You can insulate the stove with felt or cotton wool, and then overlay it with brick or stone, but this is no longer the main stage.

It is necessary to arrange a small blower in the lower part of the oven. It will then need to be closed with a lid made of non-combustible material. The cover must match the dimensions. You can also make a device to hang the skewer inside the tandoor.

Tips for using a DIY made tandoor:
- when the tandoor is hot, do not pour water, cracks may appear;
- at the first ignition, the temperature in it must be raised gradually;
- the same firewood is used as for the barbecue;
- it is necessary to heat it until the soot on the inner walls disappears;
- after complete combustion of firewood, cover the blower;
- now you can put the lid on the oven and the oven is ready for cooking.

The approximate cooking time for meat in a tandoor is 15-20 minutes, the fish will cook in 7-10 minutes, and vegetables are cooked very quickly for 2-3 minutes.
Make such an ancient device as a tandoor and see by your own experience how tasty and juicy food cooked in it will turn out!
If you want to make a tandoor with your own hands, we offer you an overview of making a tandoor from clay, collected from the experience of several craftsmen. In this section, you will learn how to make a tandoor (jug) from clay. The resulting product can be used both independently and for the construction of a more massive furnace.
Clay selection and mortar preparation
The Uzbeks and other Asian peoples, for whom the tandoor is the national oven, use local clay.
Kaolin clay is best suited for tandoor. It is light yellow or light gray in color.
Clay preparation
If the clay is not pure, with impurities, then it is soaked in a barrel.
Pour water in excess and place carefully. When the clay is saturated, heavy stones will settle down below, and grass and other debris will float up.
Making a tandoor, an egg-shaped clay jug
Garbage with water is drained, and the soaked clay is placed in a flat container.
Clean clay with water is allowed to stand for at least a day, maybe a week. No need to add sand! Knead and leave to ripen in the shade or in a cool room.
When the clay settles, water may remain on the surface and must be removed. The less water remains in the clay before sculpting, the fewer cracks in the product will be after drying. The clay becomes soft and pleasant to the touch.
Solution preparation
Some craftsmen add a little soda. About a tablespoon per 10 liters. Modern experts add liquid glass to this dough.
It gives plasticity, which reduces the chances of cracking during temperature extremes. It is non-toxic as it consists of silica sand, soda and water.
After the clay has been impregnated with water, wool is added to it. Goat, sheep or camel. If it is not possible to add wool, then it can be replaced with straw. Goat hair is preferred. She is straight, stiff and long. Sheep is also fine, but it is curly and therefore more difficult to work with.
For tandoor Ø80cm you need 1.5 - 2 kg of wool. And of course, knead everything into a homogeneous mass.
Six will improve the heat capacity and make the structure lighter.
In the process of burning the tandoor, the wool burns out, and small pores form in the walls of the furnace. These pores allow you to keep warm for a long time.
All this is thoroughly mixed and kneaded. Traditionally, this was done with feet. And modern craftsmen use a construction mixer. Stir until thick sour cream. Then it is crumpled several times until a mass is obtained from which you can sculpt. Kind of like plasticine or dough. Then you can sculpt the hearth.
Wall thickness and heat capacity of the tandoor
It does not hurt to pay a little attention to the massiveness of the tandoor.
Baking in it occurs during the cooling of the oven. When the wood is burnt out, cakes, meat, samsa and other dishes are loaded into it. Therefore, the amount of cooked food and dishes depends on how much the tandoor can give off heat. And this already depends on the volume of its body, that is, on the thickness of its walls and on the heating temperature.
If the tandoor is made portable, on wheels, or there is simply no additional external decoration planned, then it is better to make the walls of the tandoor thick enough.
And if the tandoor is planned to be stationary and will be additionally lined with, for example, brick, then the walls can be made of minimum thickness. Since the total mass of the finished oven will be significantly increased, and from an earthen vessel we need an egg-shaped tandoor and smooth walls.
Continuation: Methods of sculpting tandoors
The video demonstrates the manufacture of a tandoor. And also the preparation of cakes and samsa in the tandoor.
Brazier, barbecue, grill - you will not surprise anyone with these devices for cooking, because they are found in almost every summer cottage. Tandoor is an exotic oven for our country, in which it is a pleasure to cook delicious dishes. Making a tandoor with your own hands, drawings and photos, step-by-step instructions will help the summer resident to fold the stove and save the family budget.
How to make a tandoor with your own hands, video
Asian peoples have been preparing food in the tandoor for many centuries. It is designed for baking delicious breads, baked meats, fish, vegetables and more. The advantage of the oven is that all dishes are tasty, the food is fried evenly, remains juicy and retains all the useful properties. The tandoor has a simple design, so that any owner of a country house will fold it with his own hands.
After pouring the foundation, they begin laying refractory bricks
In simple terms, a tandoor is a brick-built oven in the form of a hollow vessel with a wide base and a narrowed neck. Through the hole at the top of the tandoor, firewood and food for cooking are put into the oven. There is a small window at the base that serves as a blower. A damper is also installed there, with which you can easily adjust the level of traction.
Tandoor is made of clay - a natural material that, when heated, does not emit any harmful substances. The disadvantage of clay is that it heats up and cools down quickly. To maintain the heat in the oven, it must be additionally insulated. Around the perimeter, the furnace is lined with refractory bricks so that the shape of a vessel rounded upwards is obtained. So that there is no air gap between the brickwork and the walls of the brazier, this space is covered with clay or sand.
We offer you to watch a video about the principle of the tandoor:
Thanks to the thick walls and special shape, the tandoor quickly gains temperature and the heat remains for several hours. Asian housewives have adapted to bake bread, bake meat and cook the first course at the same time.
When making tandoor, ancient craftsmen used special clay, which has high thermal insulation properties. To prevent the tandoor from cracking from the high temperature, natural wool was mixed into the clay. Modern tandoors are made a little differently, since all the ancient secrets remained unsolved and many details of the correct sculpting of the furnace are unknown.

Wooden template makes brick laying easier
There are various technologies for making tandoor. For example, you can buy a ceramic tandoor. It can be stationary or portable. It is very convenient to cook delicious dishes in it, since the special composition of ceramics also keeps heat well and the dishes remain fried and juicy. However, the disadvantage of ceramic tandoor is its high price.
The main material of a classic stove is white clay containing kaolin. The material has high refractory properties and poor ductility. These are the ideal characteristics of the material for making a high-quality tandoor. White clay is used to make porcelain, ceramics and refractory bricks. Dry ground kaolin can be purchased from wholesale and retail suppliers of building materials. The average price per ton is around $ 100. The main problem faced by the craftsmen who make the oven on their own is the cracking of the oven during prolonged drying. Therefore, only professionals take on the job.
We offer you to find out how to make a tandoor with your own hands according to a drawing from a stove brick. The step-by-step instruction includes the following steps:

Tandoor device
- Purchase of materials. The builder will need to buy refractory bricks, a special kiln mixture, concrete, white clay, sand, and fittings.
- Pouring the foundation. The pit is dug round, about 120 cm in diameter. The depth of the pit is about 20 cm. The first 10 cm are covered with sand. A mesh is made of reinforcement, which is installed on the supports, as shown in the photo. A concrete solution with a thickness of 10 cm is poured.
- Bricklaying. The diameter of the oven is traditionally equal to its height. If the width of the base is 100 cm, then the height should be the same, and the neck should be 3 times smaller. To lay out a brick in the shape of a furnace, you need to make a wooden template, as shown in the photo. When laying, a special refractory mixture is used, but it is important to leave a hole for installing the blower. 4 rows of bricks are laid according to the template. For greater strength, the first and second row can be pulled together with steel wire.
- Finishing work. The brickwork should be coated with a 5 cm layer of clay. Make the top edge oval. Craftsmen usually cover the tandoor with stone, ceramic tiles, or simply paint the outside with refractory paint.
- Burning. After the completion of all work, the tandoor is left to dry. At this time, the structure is covered with a film and protected from the sun and rain. After drying, the product is gradually warmed up by lighting a fire inside. Then allow the product to cool.
Video about the first burning of the tandoor:
To make the tandoor beautifully folded, it is recommended to build a template in advance. It is very convenient to use it. The base is installed in the center of the future stove and is displaced during masonry. The wooden template is made as follows:
- base height - 100 cm;
- the length of the lower bar is 30 cm, the middle one is 25 cm, the last one is 20 cm;
- plywood is attached to the crossbars, as shown in the photo.
The resulting pattern can be used when laying brick ovens. The rows will be equal and the work will be done quickly and easily.
Video about making a tandoor with your own hands from bricks:
Do-it-yourself tandoor, drawings and photos, step-by-step instructions for manufacturing a structure - this is what will allow even a novice builder to easily cope with the construction of a structure. Thanks to this, he will be able to save a lot of money and enjoy healthy food prepared in the bosom of nature.
Making mistakes and getting burned. What are the secrets of building a tandoor, how to choose the right type and what to take into account in order to get not black coals of meat, but a delicious cake and tender kebab.
What is tandoor
The homeland of the tandoor is most of the regions of Central Asia. In Tajikistan it is called tanur, in Uzbekistan tandoor, and in Turkmenistan it is called tonur. Tandoras in India and tonirs in Armenia are built on the same principle. However, no matter how you call this universal brazier stove, you will not see big differences in design.
It is a ceramic container of various sizes, with an opening on top or on the side. Fuel (coal, firewood, brushwood) is put inside a kind of clay jug, and heats it up so much that the thick walls of the stove keep the required temperature for a long time.
Types of tandoor
Since the appearance of the first tandoor, it has not undergone any significant changes. All the same, kaolin clay, camel or sheep wool, sand and bricks... It is these materials that are necessary for the construction of a real Central Asian tandoor. However, there is a division of the oven into types based on the location of its installation.
Land tandoor installed in the yard, on a clay platform. For bread, samsa, shashlik, tandoor set vertically, horizontal setting is applicable only for baking bread.
Yamny or earthen tandoor placed in a hole dug in the ground. Clay and fireclay are used in its construction. In ancient times, this type was often used for heating a room.
Portable tandoor Is a modern type of oven that has iron carry handles. Small in size, in the shape of a barrel with a lid, it successfully replaces the usual for us brazier .
Principle of operation
The Uzbek clay tandoor is a classic version of the furnace, similar to a clay pot, which was turned upside down and the bottom and throat were swapped. Using his example, we will consider the features of the device and the principle of operation of the tandoor.
A hole (blowing) is made in the lower part of the tandoor. Outside, the clay base is lined with bricks. Sand or salt is poured between the brick and the walls of the tandoor. Fuel (coal, firewood) is placed on the bottom of the boiler through the upper hole, and ash is removed through it. A grill is installed inside for cooking meat, fish or vegetables.
All materials from which the tandoor is made have a high ability to accumulate (accumulate) heat. When heated, the walls of the furnace retain a high temperature for a long time (from 250 to 400 degrees). After the tandoor has reached the required temperature, the walls are carefully wiped from soot and ash, and the famous Uzbek flatbreads are laid on them.
We have prepared for you step-by-step instructions for building a clay tandoor in the form in which it still faithfully serves many residents of these regions.
- The classic size of the tandoor is the height of 1-1.5 m, the diameter of the boiler body is 1 m, the diameter of the upper hole is 50-60 cm. To form a clay jug, kaolin clay is taken, which experienced craftsmen call "living". Brick is used for facing the oven. Therefore, you need to stock up on clay, bricks and some sheep or camel wool.
- The wool fibers are cut into pieces 10-15 mm long and mixed with clay. After kneading, the clay should acquire the consistency of sour cream.
- The resulting mixture is exposed in a dark place for a week to settle.
Attention! The finished solution must be checked periodically, remove excess water, but make sure that the mixture remains moist. If you dry it, the tandoor will crack.
- Usually, clay sheets with a thickness of 5 to 15 cm are molded from the settled mixture. It is difficult to form a tandoor from such sheets without a well-developed skill, so you need a barrel.
- To make a tandoor from a barrel with your own hands, loosen its hoops a little, fill it with water, and leave it to swell for 5 days. Then drain the water, let the barrel dry, and treat the walls from the inside with sunflower oil. Give it 12 hours to soak and the tandoor mold is ready.
Please note that both clay and barrel it is necessary to start preparing for construction at the same time.
- Now we roll sausages about 50 cm long and 6 cm in diameter from the finished clay. Roll each of them to a thickness of 2 cm, cut into ribbons and begin to lay out the inside of the barrel.

