Forms for garden paths with their own hands. Do-it-yourself garden path using molds: mold preparation, tile casting, laying and care
Garden paths are essential in any area. They protect beds and flower beds from ruin by inattentive households, allow you to go out into the garden even on a rainy day. Made in the same style with other structures, the paths will complement the landscape design of the site, help to correctly place accents. It is very important to carefully consider their creation, so that out of ignorance, a city path does not appear in the natural garden, more like a sidewalk. Also, a Japanese step-by-step path will look unnatural in an English park. A form for pouring garden paths will help you create a path in the desired style. How to do it, we'll talk today.
Indeed, in order to make a path in the garden, you can use ready-made tiles: look for a suitable one in a building materials store and order the right amount.
But the form for garden paths has its own advantages.
- Saving. It is enough to compare the price of the finished tile and the raw materials from which it is made, how to find out that it is more profitable to knead the mortar yourself and pour it into the mold. You don’t have to think about how to transport the finished tile, you don’t need to spend money on its delivery and loading and unloading.
- Uniqueness. The path created using the form will be unique: you need a width, length and a configuration that takes into account the scale and design of the specific area for which it is intended.
- Practicality and reliability. The tile can be made of any thickness and strength, which will make it possible to pave the car park and any other parts of the garden with it.
- Ease of application. Using the form of the desired configuration, you can create a path not in one tile, but in whole sections.
- Beauty. Forming your own tiles, you can decorate the finished product with pieces of porcelain stoneware or pebbles, make the path an element that further emphasizes the dignity of the garden.
Anyone for whom individuality is important in everything, who is not used to obeying standards and does not always follow the rules, will certainly make a choice in favor of self-production of elements of garden paths.
Options for designing garden paths are very diverse. A selection of design ideas + step-by-step master classes can be found in the material:

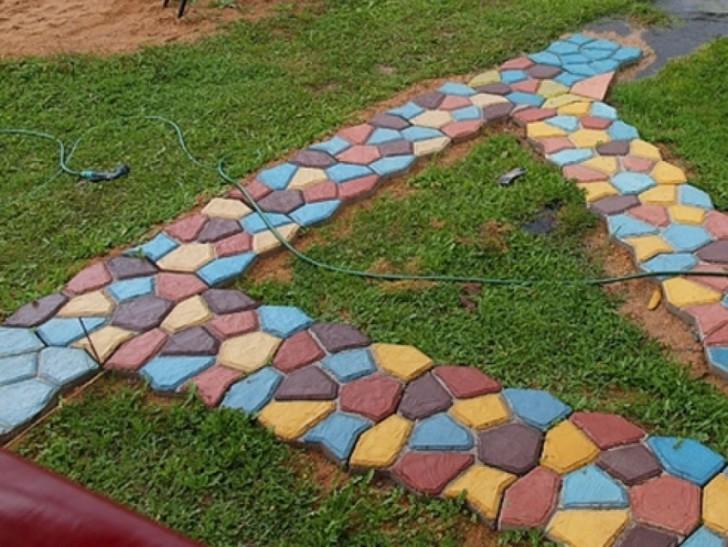
The path made with the help of a mold is economical, unique, practical, and the result of its application is pleasing to the eye.

Thanks to the shape, you can make tracks of different lengths, widths and configurations.

Non-standard tracks attract attention with their unusualness
Buy a ready-made form or make it yourself?
A self-made form for making garden paths may not give geometrically precise elements, but the result of its application will be the most natural and authorial. It is for individuality and originality that things made by hand are valued all over the world.
Who said that the hand made form will be worse than the store version? In addition, a prudent owner will always find something to spend the saved money on. It's time to apply ingenuity and consider two options for creating a do-it-yourself form for pouring tiles.
Homemade option # 1 - a form of wooden bars
Four wooden bars 50 x 50 mm can be fastened together to form a frame. Reliability of fixation will give grooves that are cut in pairs of opposite bars. You can use thin sheet steel in the form of brackets, which are attached with screws at the junction of the bars.
The role of the bottom of the form will be played by a sheet of iron or plywood. On the surface of the finished tile, these details will look interesting. When using a large mold, it is better to reinforce the tile with a metal mesh. The front surface of the product can be decorated with pieces of ceramics, crushed stone or pebbles.
The decorative material can simply be laid out on the bottom of the form, but it is more reliable to fix it with water-soluble glue on the surface of the paper, and then lay it on the bottom of the form with the paper down. Pour. The form is removed from the frozen tile, after which the paper is washed off with warm water. The surface of the product is iron.
Homemade option # 2 - sheet iron mold
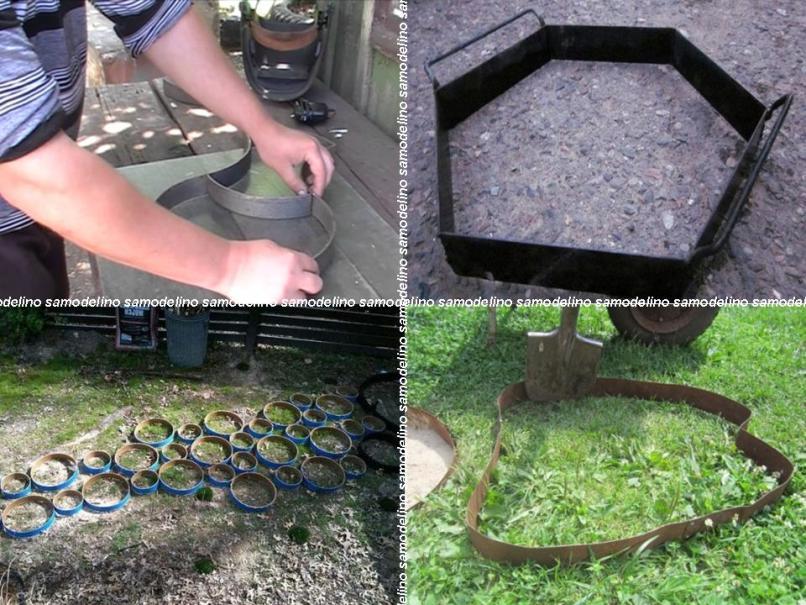
If the farm has an old wooden barrel tied with iron hoops, then they can be used to imitate natural stone. It is enough to bend the metal the way you want, and the shape for the track can be applied. This method is especially convenient if there are several hoops. With a shortage of hoops, they can be made from a sheet of galvanized iron. It is enough to cut strips of 5 cm each, and bend the ends with a hammer like a roofing seam. The form for the garden path with your own hands is ready.

Application of sheet iron mold:
a - monolithic concrete, b - decorative inclusions, c - hoop
A track using such forms does not need a special foundation. They can be created on any surface, as long as it is not too rocky or swampy. The form is laid out on the finished base and deepened with a hammer. The soil from the inner area of \u200b\u200beach hoop must be taken out to a depth of about 5 cm. The resulting recess and the inner surface of the hoop must be well moistened, then pour a little broken brick or rubble and pour the solution.
It is better to prepare a solution from 4 parts of sand and one part of cement. You can add fine gravel filler. It is important not to overdo it with water: the consistency should be slightly thicker than sour cream. It is better to give the tile a slight bulge so that water flows off it. The surface is carefully leveled with a trowel and ironed with a mixture of cement and any mineral dye.
The solution sets quickly enough - it will take only a few minutes. Now the hoop can be removed and reused until the entire track is ready. It will take 2-3 days for the track to dry completely. In case of extreme heat, so that the tile does not crack, it can be covered with a film.

Even the imitation of round stones looks attractive, and the addition of pigment creates an additional play of color.

Between the elements of the track, you can use sand or lawn grass

If the track is rebuilt, concrete discs will always find new uses.
By the way, even in the form of circles, the concrete path will look original. In case of redevelopment, the tiles can be removed from the ground and reused. The gaps between the tiles are sprinkled with sand, but lawn grass will also look good. And in the solution itself, you can add pigment or decorate the surface of the tiles, until it is frozen, with any pattern using a brush or spatula.
The most common borders
Special fences or curbs give the path a finished look. In addition, curbs successfully resist the growth of lawn grass, if this process is undesirable. The service life of the fenced path increases. It is important that the style of the border matches the appearance of the track itself.
The main types of borders:
- Plastic. Perfectly captures the contour of the track. The plastic curb for garden paths matches any type of coating, because it is almost invisible, which does not prevent it from being functional.
- Concrete. Used, for example, for a plot in a landscape style. It is made the most diverse, depending on the imagination of the designer. They are often surrounded by gravel paths.
- Wood. Perfect for rustic style. With prolonged use, such a border becomes not very presentable, but a cheap wooden border is made even from waste boards.
- Brick. It is used for country style or English garden. Such a border is able to beautifully frame areas made of paving stones or natural boulders.
Material on the construction of paving stone garden paths may also be useful:
Below are photo examples of each option.

The plastic border is invisible, but perfectly performs all its functions.

Concrete curb fits perfectly into the landscape style

Wood curbing needs maintenance to keep it looking its best.

A brick curb can decorate a path made of natural stone or paving stones.
A garden path made with soul will protect and zone the garden. It will help summer residents to walk freely in any weather. The path will even improve the microclimate of the site, heating up on sunny days.
Precast concrete walkways are strong, durable and economical. The technology of such a coating is simple and allows you to make a track without special preparation. Use your imagination when choosing the shape and color of concrete, and create your own garden path at a low cost.
materials
For the base for covering the track, you need:
- crushed stone with a particle size of 20-40 mm;
- sand;
- geotextile.
Concrete B15 (M200) is used to cover the track. To make it yourself, you must observe the following proportion of ingredients by volume:
- Cement M400 - 1 part.
- Crushed stone (gravel with a particle size of 20-40 mm) - 4 parts.
- Washed sand - 2 parts.

Sand should not contain impurities that reduce the strength of concrete (clay, silt, mica, dusty particles), more than 10% of the total weight, and coarse aggregate - no more than 2% of these impurities.
Based on the consumption of components per m 3 of concrete mix, it is possible to calculate the consumption of cement, crushed stone and sand for the entire track:
- Cement M400 - 280 kg.
- Sand - 686 kg.
- Crushed stone (gravel) - 1204 kg.
- Water - 175 liters.
If desired, a dye is added to the concrete mixture, then the boring gray color of the concrete turns into a play of colors on a green canvas garden lawn.

Tools
To build a garden path, you need the following tools:
- for marking the contour on the ground;
- for concreting forms;
- for filling seams.

Shape selection
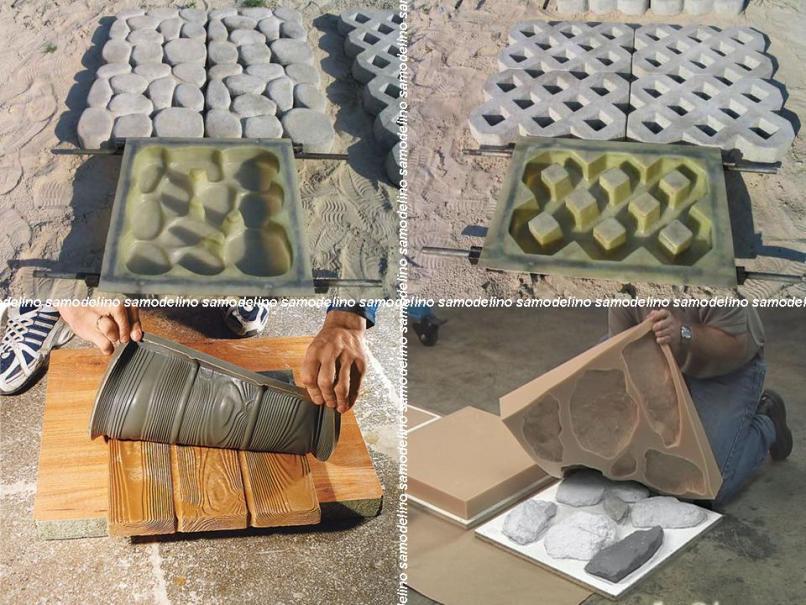
Prefabricated prefabricated molds
The form or actual formwork for future concrete tiles can be purchased ready-made, prefabricated. They are presented on the market in a wide range. Some of them imitate arbitrary forms of natural stone, others - paving slabs.


You can also make tiles using any high-sided baking dish.

DIY molds
Formwork for concrete tiles can be made from boards with a thickness of more than 19 mm. The height of the formwork is assumed to be 50 mm.

As a form, you can use a cut tire or a bar 50x50 mm. Wooden formwork elements are treated with an antiseptic. You can coat them with used engine oil.

Randomly bent steel strip is also often used as a formwork for the manufacture of artificial stone.
You can also make tiles with an individual design: “Do-it-yourself tiles for a garden path. Photo instruction".
Phased track device technology
According to the finished plan, a breakdown is first made on the site. The future canvas of the track is marked with pegs and a rope. Next, the excess soil is removed to a depth of 20-30 cm, taking into account the thickness of the base under the coating and the coating itself.

It is important to remove the plant layer to its full height. With a high height of the soil layer, the height of the base under the cover increases.
It should be noted that the surface of the track itself should be at least 5 cm above the ground surface of the site. This will prevent water from accumulating on the coating. For this, a slight slope is made on both sides.
The soil base is carefully compacted. It is better to lay geotextiles on the ground to prevent gravel from sinking into the ground and the possibility of plant germination. Next, a layer of gravel (10-15 cm) is laid, and then a layer of sand (5-10 cm). All layers must be compacted. Sand must be spilled with water.

At this stage, you need to check the level of the base, so that after laying the coating, you can reach the required mark of the track. The form is laid out on the finished sandy base, slightly embedding it in the sand. The required position of the formwork is corrected with a mallet.
The finished concrete mixture is carefully laid out in a mold, tamping with a narrow manual rammer. The top is aligned. Concrete does not take bending loads. To increase the service life of road slabs, it is possible to lay reinforcement trimmings or steel meshes during concreting.

When the concrete sets, the mold is carefully removed. Next, you need to iron the surface of the track. To do this, dilute cement milk (cement + water) to the state of liquid sour cream and cover the concrete surface with a thin layer. This will make the track more durable and give it a beautiful metallic color.

Important! During the hardening period, concrete needs care. In hot weather, 3 hours after laying, they begin to moisten it (7 days). In a cool (less than +5 ° C) - cover.
Before using the form again, it must be cleaned of concrete residues and dirt.
The seams between the tiles can be filled with cement-sand mortar, sand or earth, followed by seeding of lawn grass. With sand or earth, the seams are filled with a mop, after which they are spilled with water to seal.

It is possible to operate a concrete path after the concrete has gained 70% of its strength (two weeks), and preferably 100% of its strength (28 days).
Advantages and disadvantages of a concrete path
Advantages:
- Strength and durability are the most important advantages of such a path in the garden.
- Ease of manufacture makes it possible to make the most reliable road surface, as well as to give the surface any shape from improvised materials.
- Modern dyes allow, with high strength indicators of the material, to achieve an interesting aesthetic effect. You can create an imitation of natural stone or embody your own creative solution.
Flaws:
- The production time of the track is increased due to the time for concrete hardening. However, tiles can be made in advance. We told you how to do this in the article: "Making paving slabs with our own hands".
- A well-prepared substrate is essential for concrete placement.
- During the hardening process of concrete, it is necessary to take care of it under adverse weather conditions.
Concrete slabs for the path can be made in any shape, color, filled with decorative elements from natural stone, glass, metal, prints of your hands, feet, plant leaves, various patterns and ornaments.


Any work becomes a pleasure if there is creativity in it.
In the manufacture of cement paving slabs, you can do without specific equipment, and for paving garden paths with your own hands, it is not at all necessary to have professional skills.
The budget option for creating a garden path is based on simple technological solutions that provide a reasonable balance between savings and quality.
Form for the garden path. Where can I get casting molds?

Start cutting your garden path costs with tile molds. Instead of buying pre-made plastic molds, stock up on freezer-free containers that are made from non-crisp soft plastic and can withstand many molding cycles.
Paving elements made in such substrates do not differ much from the factory ones and are well suited for paving walkways in the garden.

For casting large concrete products, build wooden molds with a bottom or frames from bars, placed when working on a flat surface. Home-made slabs with a thickness of 80 mm or more, reinforced inside with wire, withstand significant loads and are suitable for constructing sites for barrels or covering car parking lots.

Make rounded shapes by cutting old buckets (pots, pallets, basins) into rings 35–60 mm wide. Elements of the original configuration emerge from narrow tin strips connected by a ring and arbitrarily bent. By laying tiles of different diameters, you will get an interesting path.

How to cast paving slabs
Before work, prepare the following equipment:
- Capacity for 20-40 liters.
- Measured bucket.
- Drill with a power of more than 700 watts.
- Mixer nozzle.
- Master OK.
- Jar and brush.
- Gloves.

Technical oil and a piece of polyethylene will come in handy. When buying cement for casting tiles with your own hands, take a high grade (400 or 500). Take sand cleaned of clay and vegetable inclusions, and use only clean water.
Operating procedure
After pouring one share of cement and three sand into the container, stir the contents. Adding a little water, continue to work with a mixer until a homogeneous porridge-like mass is obtained.

After keeping the solution for a few minutes, mix again. Check the consistency - the mixture should be plastic, not slipping from the trowel.

To make the product easier to remove, apply oil to the inner surfaces with a brush, carefully smearing the corners and protruding edges.

Fill the form with mortar two thirds, carefully compacting with a trowel.

Shake and shake the container to spread the mixture evenly. Try to completely get rid of air voids.

Fill the substrate with mortar to the top, compact again and shake. Smooth out the back of the tile, leaving a slight roughness for better grip when laying.

Once all forms are filled, place them in a shady, draft-free area and cover with plastic wrap.

At temperatures of 20 °C and above, the tiles can be opened the next day, keeping the containers still.

After two days, remove the castings by carefully inverting the molds and lightly pressing on the plastic bottom. Fold them in rows no more than 5 pieces high to dry.

Soak the homemade tile under a canopy for three weeks until the concrete mortar gains design strength.
How to lay cement tiles with your own hands
It is permissible to arrange a garden path intended only for pedestrian movement without serious preparation of the base if:
- In place of the path lies well-trodden soil, which has not been dug up or poured over in recent years.
- The surface level is suitable in height and is not flooded with water.
List of required equipment
- Construction cart.
- Bucket.
- Shovels.
- bubble level.
- Roulette.
- Pegs.
- Elastic twine.
- Hammers - rubber and locksmith.
- Scissors.
- Broom.
- A hose with a sprayer or a watering can.
- Bulgarian, stone disc.

Sand is required for the device of the leveling pad: one cart (approximately 6-7 buckets) per section of the track 2 m long and about 60 cm wide. The use of geotextiles will prevent possible washing out of the sand layer and reduce the germination of weeds, but even without it the path will be quite durable .
Sequence of laying tiles
Having estimated the contours of the path, remove the vegetation with a bayonet shovel, cutting the top layer of the earth.

Hammer in the pegs and stretch the string along the border of the path, placing it at a height of 60–80 cm and setting it in accordance with the planned slope.

Fill the recess with sand approximately 20–30 mm. Level the surface with a level, guided by the rope - create a more or less even surface without bumps and depressions.

Water the leveling layer with a watering can until puddles begin to form. Where necessary, add sand and pour again. Check the quality of the sand cushion by walking over the surface. Shallow imprints remain - the layer is well compacted.

Cut a piece of geotextile to size and line the bottom of the trench with it, leaving a small allowance on the sides.

Using sand sifted through a fine mesh, pour the mounting layer with a shovel.

Output the height of the tile - the distance from the sand substrate to the twine should correspond to the thickness of the paving stones. Pull out the sand with a level and rake the excess “on yourself”. Compact the sand formation with water, backfill the depressions if necessary.

Lay the first tile, leveling the string and sinking deep with a rubber mallet.

Add sand when smaller pavers need to be laid. Homemade cement castings often have non-standard sizes.

Lay the remaining tiles back to back, checking the evenness of the surface. Pour sand generously into the sides of the walkway and into the gaps.

Sweep the path with a broom, cleaning the surface of the paving stones and driving the excess into the voids. Do not step on the tile until the joints are completely filled.

Spray the laid pavement with a watering can, add sand to the gaps that appear and pour water again.

For each approach, prepare a strip about 2–2.5 m long. After filling the area with paving slabs, move on. Lay paving stones without gaps - over time, the concrete elements will disperse a little and 3-4 mm seams will appear, which are necessary for thermal expansion.
If all the requirements of the considered technological chain are met, the result will be a durable garden path.

How to care for a garden path
Monitor the condition of the laid paving slabs, clean them from leaves in a timely manner and prevent the path from being flooded with melt water.
In winter, remove freshly fallen snow, do not let it cake, otherwise, with the advent of thaws, ice will form on the surface, which is difficult to remove without damaging the concrete tile.

A clean, neat canvas of a path or gaps between the plates naturally overgrown with grass is a matter of taste.
Laying material that prevents the appearance of weeds does not completely solve the problem. Vegetation still appears, but it is smaller and easier to remove - just pull out the sprouts and replace the backfill.
Caring for a "wild" garden path is not difficult, and it is not necessary to perform the procedure every year. To return the path to its previous state, you will need:
- Bucket.
- Manual weed remover.
- Grass shears.
- Broom.
- Garden fan.

Walkway cleaning progress
Remove large weeds on the sides of the path with a rooter: stick the tool near the root, turn around the shoot and pull the plant out with your hand.

Pull the grass inside the canvas, after deeply cutting the rhizome with a knife.

Trim any excess plants along the path with garden shears.

Loosen the ground between the tiles with a knife to a depth of 2-3 cm.

Clean the joints with a plastic fan about half the thickness of the laid paving stone.

Walk along the path with a broom, sweeping away earthen grains.

That's all - your track is like new.
The pavement laid on the sand perfectly passes water, and a slight movement of the tiles is eliminated by re-laying the damaged area. Any garden path sags during operation, but the soft base allows you to fix defects quickly and with a minimum of effort.
Molded garden paths are an alternative to paving stones, natural stone, bricks and cast-in-situ concrete. For those who want to equip the paths in the country and cheaply and beautifully, this is the best option. With this choice, you will have to work hard with your own hands and spend some time.
Wonderful imitation of stone with the help of moldsFeatures of tracks made using a mold
It is most correct to use forms for laying footpaths, as they have a small thickness and limited strength. Each template is poured separately and the solution must set before the stencil is removed from it. All this takes a lot of time. At the same time, the use of matrices for making paths in the garden has several advantages:

Choose a matrix or make it yourself
 The easiest option is factory-made ready-made forms, samples of which are shown in the photo. First, they are inexpensive. Secondly, thin and smooth bridges of the mold have a variable cross section, which makes it possible to extract the matrix without destroying the concrete casting. The template is reusable. There are ready-made matrices made of plastic, silicone, rubber and metal.
If you want to make unusual garden paths, you can make molds for them with your own hands from wood, metal, silicone, and other improvised materials. In this case, it is possible to create several different stencils of the required dimensions, which will provide a diverse structure of the track.
Note that to speed up the paving of the coating, several forms will be required. In this case, you need to purchase enough templates, or make more with your own hands.
 You can buy silicone matrices or make your own.
 The most durable homemade form is obtained from silicone, but it will take a lot of work to create it:
- First you need to decide on the prototype. It will be right to pick up several different samples for a change.
- Formwork is made around the prototype to prevent silicone from leaking.
- The sample and formwork are covered with lithol so that later the finished matrix can be easily removed.
- Fill the mold space with silicone, removing air. The operation is performed with a brush and spatula treated with a detergent. The base of the mold must be at least 2 cm thick.
- After the silicone has completely cured, the mold is carefully removed. The hardening of the material will take from 2 to 4 weeks.
For many, it is much easier to make molds from metal:
- The basis will be a metal tape 1.5-3 mm thick. For a walking path, a width of 3-4 cm is sufficient, for a platform for a car, tiles 5-6 cm thick are required.
- The tape is bent in accordance with the required pattern and connected by welding or riveting.
- Welding points, protruding parts of rivets and burrs are cleaned so that the mold can be easily removed.
- It is convenient to use as a tape - rings cut from metal pipes and barrels. It is possible to use other improvised materials.
 Some examples of wood molds
 The easiest way is to make molds for tracks made of wood. Of course, such a matrix will last less than silicone or metal. In this case, sufficiently large gaps will be obtained between the coating elements, which can be planted with grass:
- it is best to choose larch slats 15-20mm thick and 60mm wide;
- individual structural elements are interconnected by self-tapping screws;
- uneven inner surfaces of the mold are cleaned with emery cloth;
- the matrix is treated with impregnation to protect against moisture and extend the service life;
- before use, the mold is coated with lithol.
The process of laying the track using the form

The process of pouring a garden path using a mold is quite simple. The matrix must not be removed before the cement has set.
In order not to stop the paving process, it is desirable to have several templates at once so that after filling the last form, the first one can already be used again.
Using the template, we make the track device according to the following scheme: 
Original forms for paths

A relatively easy way to spruce up a pavement is to add color to the concrete. Such a track will not lose color over time.
If you use acrylic paint, you can paint individual fragments of the coating in different colors. The dye is applied to a dry and clean surface in several layers with intermediate drying.

Another opportunity to decorate the path in the country is fragments of ceramic tiles. Pieces of tiles are pressed into the mortar until the mold is removed.
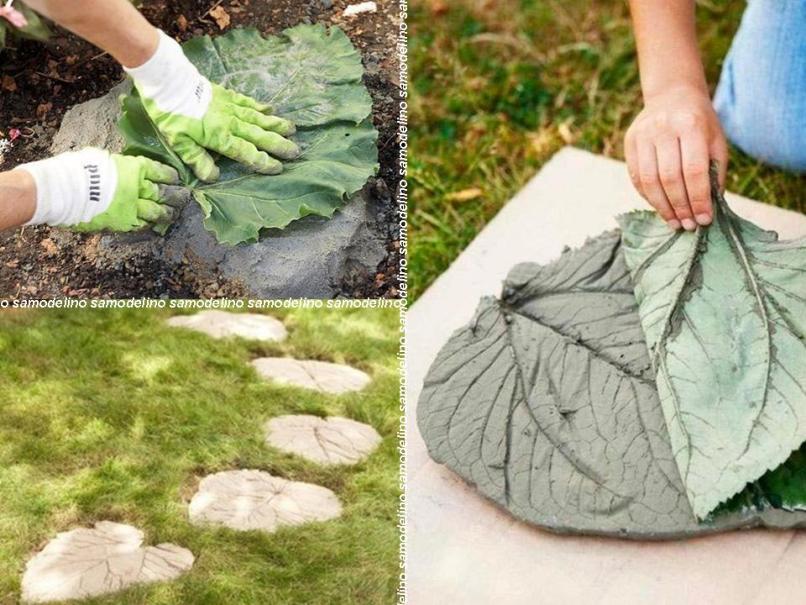
The original path in the country can be arranged using burdock leaves as a stencil. The leaves will be slightly different, which will ensure the individuality of each element.

Professional builders know that after casting concrete, a cat will miraculously pass through it, and there will be its tracks on the coating. You will not leave the cat any chance if you do it first. In this case, it is better to lubricate your hands with Vaseline. In this way, you can capture the image of any other objects. Whatever option you choose to make a track with the help of molds, it will be cute and practical.
We suggest watching a video on the relevant topic.
The form for making a garden path will allow you to acquire an interesting element of your backyard in a short time. Quite recently, plastic analogues appeared on the building materials market, which allow them to be used repeatedly, making smooth and practical paths. If you are unable to use ready-made paving slabs or clinker bricks, then purchasing such equipment can be a great solution.
Feedback on plastic molds
A mold for making a garden path will be an excellent helper for a home craftsman. However, before purchasing such equipment, it is imperative to learn about all its positive and negative sides. Among the latter, consumers highlight the fact that the structures in the end are not as strong as if vibrocasting or pressing technology was used. However, there are also positive aspects. And there are enough of them. One can single out, for example, the ease of manufacturing tracks, as well as the low cost. With the help of the described products and the mixture for pouring, tracks of any configuration and length can be obtained. The new shape for making a garden path is different from what consumers are used to seeing in everyday life.
Difference from traditional counterparts

When using traditional formwork, it would be necessary to pour and wait about two days until the mortar sets. Only after the demoulding was carried out. When using modern plastic products, filling is carried out on site, the whole process is carried out without stopping, which excludes the decommissioning of the corresponding equipment. Thus, only one formwork can be used. This is especially attractive to the private consumer. Before casting, it is necessary to prepare the base for the track.
Features of using modern forms

If you will use a mold for making a beautiful garden path, then you need to mark up in advance, and then remove the soil. If you have to work with a sandy or other solid base, then excavation can be omitted, in which case the filling is carried out from above. Initially, it is necessary to lay sand in the resulting trench, the layer thickness of which is 20 cm, and then crushed stone of 12 cm should go. Only then a leveling layer of sand is laid, the thickness of which is 5 cm. Each layer must be compacted. Such a foundation must undergo significant loads. Making a garden path with a plastic mold involves providing some slope that can guarantee the free convergence of rainfall.
Making a solution for pouring

The form for making the track will allow you to get a solid and reliable construction only if you make the mortar correctly. To do this, use cement and sand, which are mixed in a ratio of 1 to 3. When adding water, you should ensure that the consistency is not too thick, the mixture must be fluid so that the solution can fill all the cavities. Making garden paths using molds may involve the addition of reinforced fibers and water-repellent additives.
Additional Ingredients

Consumers note that the fibers give the structure strength, while the water-repellent components increase the life of the track. If you will be using a form for making a garden path, you must read the reviews in advance. In order to give the design decorative characteristics, pigments can be added to the solution. Due to the fact that the formwork for the tracks is made using a special plastic, which forms a smooth surface after hardening, it is not necessary to use lubricants, since the solution does not stick to the walls. This, according to home masters, is very convenient.
Features of use

If a mold for making a garden path with your own hands is used, then it is important to know not only about its quality characteristics, but also about the features of use. On the base, which must first be prepared and moistened, the product should be installed, and then you can start pouring the first section. Filling with a solution must be carried out with a spatula, which will allow the mixture to be well distributed. After the pouring is done, the mortar must be leveled using a spatula or any other tool with a flat and even working surface. Once the form is filled, it must be left for 15 minutes, then lifted up and placed side by side, this process will have to be repeated until the track has the desired length and width.

