Do-it-yourself retaining walls at the dacha. Gabion retaining wall
The retaining wall is designed to prevent the destruction of slopes and the washing away of fertile soil. In addition to its purely practical role, such a structure is widely used in landscape design to create a multi-level relief on a site, zoning a garden, and decorating flower beds.
There are many types of retaining walls made from different materials. Wood is considered one of the budget options. Construction of a wooden retaining wall is quite simple and does not require professional skills. You will need some basic woodworking skills and knowledge of basic tools.
How to choose a location for a wood retaining wall
In principle, any place is suitable, except those where it is very damp. Wood deteriorates very quickly in a humid environment. Wetlands, areas of spring flooding of rivers and streams, places of high groundwater - here it is better to choose stone or concrete rather than wood.
In addition, wooden retaining walls are not made on steep slopes, where the load on the wall can be large. Wood is not as durable a material as concrete.
Advantages and Disadvantages of a Wooden Retaining Wall
The main advantages of a wooden retaining wall include:
- Relative cheapness;
- decorative;
- Environmental friendliness;
- Ability to do all the work yourself;

What material should I use for a retaining wall?
Weird question. Of course, a tree! But it can be both logs and lumber. Most often, a solid wooden beam is used. It can be ordered at any hardware store. For low decorative walls, thick boards (at least 45mm) are also suitable.
The cost of materials can be minimized if you use trunks and thick branches of old trees cut down on the site. A retaining wall can be built from such material if short logs are installed vertically. Fruit tree trunks are never perfectly straight. But the height of a decorative retaining wall is usually no more than half a meter. Considering that part of the log will be buried in the soil, it is clear that sections of 40-90 cm in length will be required. By carefully examining the available waste, you can always select and prepare suitable fragments.
Horizontal laying or vertical?
The choice of installation method depends on several factors, the main ones being the length of the existing logs and whether the future wall should have roundings. If the logs or boards are long, then horizontal laying is preferable. Such a retaining wall is built much faster, it is stronger and, as a rule, more durable.

When planning a wall of complex shape, semicircular or zigzag, for example, choose a vertical installation. The same method is more suitable for construction from any waste of different lengths and thicknesses.
Protecting wood from destruction
The tree is susceptible to rotting. In addition, it is often damaged by various insects. In order to extend the life of a wooden retaining wall, the material should be treated with antiseptic agents, as well as the lower part should be burned or coated with hot bitumen or waste machine oil.
Creosote is often used to protect wood from rotting in the ground. It protects against rot and is also great for repelling insects. Copper or iron sulfate has proven itself to be excellent. Apart from this, there are many other modern chemicals used to impregnate poles.
How to build a wooden retaining wall with your own hands
Wooden retaining walls are usually low and are built without a foundation. Therefore, it is important to do the following:
- Thoroughly compact the soil and gravel backfill to avoid uneven deformation of the soil in the future;
- Constantly check with a level the accuracy of the beam installation horizontally and vertically;
- Fasten the bottom row of beams to the ground using reinforcing bars so that the wall does not slide down the slope;
- Secure the retaining wall with a hill or fill soil using an anchor - a T-shaped beam, so that it does not tilt or bend under the weight of the soil.
How to make a retaining wall from horizontal beams

Step 1. Site marking. This is done using a long cord and stakes. The cord indicates the height of the retaining wall along the entire perimeter. This is necessary for accurate calculation of materials and determination of horizontal and inclined sections.
Step 2. Preparing the trench. A trench 30 cm deep is dug along the entire perimeter of the retaining wall and the soil is compacted.
Step 3. Gravel backfill. A layer of gravel, crushed stone, and pebbles is poured into the trench to half its height (15 cm). Then the bedding is leveled and compacted.
Step 4. Laying the bottom beam. At a distance of 30 cm from the edge, a hole is drilled for the entire height of the beam to install the reinforcement bar. The beam is laid on the backfill so that the hole is closer to the edge of the wall.
Carefully check the level of the horizontal position of the timber along the length and width. Having achieved the desired position of the beam, reinforcement is driven into the drilled hole to fix the beam.
Step 5. Laying the first row. Continue laying the timber in the first row of the wall, carefully controlling the horizontality of each new segment. Secure with reinforcement as necessary. As a rule, it is enough to fix the beginning and end of a beam or log in this way. If there is a significant length, a large load on the wall, or unstable, loose soil, fastening is done more often.
The segments can be fixed with vertical posts made of timber, deeply (not less than the full height of the wall) buried in the soil. They are usually installed on the back side, which is covered with soil. Sometimes the posts are made on both sides.
Step 6. Laying the second row of the wall body. Each subsequent row is laid staggered so that the joints of the beams overlap. In the corners, the width of the overlap is determined by the dimensions of the beam, and along straight sections of the wall, the length of the segments is selected so that the overlap is at least 120 cm.
The upper and underlying beams are fastened with wood screws, which are screwed in with a screwdriver. The length of the screws is chosen so that it matches or is as close as possible to twice the height of the beam.
Step 7 Drainage device. Between the hill and the body of the wall I lay geotextiles so that the material covers the gravel backfill. The upper part of the geotextile is temporarily laid on the slope, fixed with stones or other objects. A perforated drainage pipe with a diameter of 10 cm is laid on a layer of gravel covered with geotextile to drain rainwater.
After laying the pipe along the entire perimeter of the trench behind the body, the walls are covered with a layer of gravel and wrapped in geotextiles. This protects the drainage pipe holes from becoming clogged with soil, therefore, you do not have to constantly monitor the condition of the drainage and clean clogged pipes.

Step 8 Third row laying. Carry out in the same way as the second row, making sure that the necessary overlap of the joints of the timber is ensured, and carefully treating the places of fresh cuts.
Step 9 Installation of T-shaped anchors. Such anchors are needed to ensure that the wall does not bend or tilt under the weight of the earth from the hill. For anchors you need to dig grooves in the slope. If the wall is made on level ground to artificially create a relief, then the anchors are laid directly on the ground. The anchor is knocked down from scraps of timber. Its length is usually about one and a half meters, and the short side is half a meter. Two holes are drilled along the short side for the reinforcement, in the same way as was done for the outer beams of the first row. The two parts of the beam are fastened together with self-tapping screws.
After the narrow end of the anchor is perfectly aligned with the third row of the wall, it is fastened to the lower level with two self-tapping screws. Then fix the anchor on the ground with two reinforcing bars.
Step 10 Laying subsequent rows of beams. Using the technology already described, the construction of the upper tiers of the wall is carried out. After reaching the desired height, soil is backfilled over the drainage layer between the wall and the hill, as well as trenches with anchors are backfilled. The soil is slightly compacted.
Step 12 Decorating a retaining wall. Upon completion of construction, the area in front of the supporting wall is usually covered with mulch from tree bark with a layer of 5-10 cm. The wall must stand for some time (several weeks) before plants are planted. Rain and sun will test the wall's strength, and the soil will settle. Plants are planted only when there is no doubt that nothing will have to be redone.
How to make a retaining wall from vertical beams
Retaining walls made from short vertical logs or scrap lumber are easy to construct and inexpensive. True, more time is spent on them.
Step 1. Preparing logs or beams. For the wall, even parts of the log are selected, the diameter of the trunks is usually up to 20 cm. Their size depends on the design of the retaining wall, but it is important to remember that the logs or beams must be buried in the soil by about half their length. There are two construction options:
- all the logs are buried halfway deep, the wall is reliable and strong, it looks like a dense row of posts driven into the ground;
- only some logs are deeply buried and reinforced (holding the entire wall), the rest end at the level of the gravel cushion (the design is like a wooden fence on “posts”); This option is only suitable for a low decorative wall.

The lower part of the beam or log (the one that will be driven into the ground) is treated to prevent rotting - you can use either special impregnations, machine oil, or heated bitumen.
Step 2. Site marking. It is done, as in the first version of horizontal laying, with the help of a long cord and stakes. The cord indicates the height of the retaining wall around the entire perimeter. With the vertical orientation of the bars, it is often not necessary to strictly maintain the horizontal. Columns of different heights sometimes look more picturesque.
Step 3. Preparing the trench. Along the entire perimeter of the retaining wall, a trench is dug 15-20 cm deeper than the planned height of the entire wall. If the wall rests on the supporting logs, then deeper holes are dug under them in the right places. The soil is compacted.
Step 4. Gravel backfill. A layer of gravel, gravel, pebbles (about 25 cm) is poured into the trench. Then the bedding is leveled and rammed.

Step 5. Installation of the end beam. The extreme beam is driven into the ground strictly vertically, the height of the future wall is controlled. It is reinforced with large pebbles, fragments of bricks, stones.
Step 6. Installation of the following bars or "columns". Each new beam is driven into the soil next to the previous one or at strictly calculated intervals (if these empty spaces are filled with short cuts). The correct installation along the vertical and along the height of the wall itself is controlled.
Step 6. Fastening the wall with horizontal strips. Horizontal strips are fastened with self-tapping screws at the bottom of the wall. Their thickness is chosen depending on the required strength of the retaining wall (usually 25-60mm). Sometimes, for reliability, 2 rows of such slats are made. If the wall has a complex configuration, then the slats are short. Planks give the structure rigidity. As a rule, they are installed on the side that will be covered with soil.
Step 7 Filling gaps with short pieces of timber(performed only for the second version of the wall). The short parts are aligned in height and fastened with self-tapping screws to the horizontal bars.
Step 8 Drainage device. It is done in the same way as with horizontal laying of timber.
Step 9 Installation of T-shaped anchors. This is rarely done, only if the wall must withstand heavy loads. Anchors are attached to horizontal bars, which in this case must be of sufficient thickness and strength.
Also useful to read

Retaining walls perform not only their intended purpose, preventing the destruction of the slope and washing out of the fertile layer.
Landscape designers use them to highlight various garden areas, create a multi-level relief with their help, and use them as decorative elements in flower beds.

Today, there are many different options for retaining walls, differing in the material used.

The simplest option, which does not require special skills and is inexpensive, is a wooden retaining wall.

What locations are suitable for wood retaining walls?
A wooden retaining wall can be installed anywhere, the main thing is that there is no dampness, because in damp places the wood quickly deteriorates. For wetlands it is better to use other materials.

If the slopes are very steep, it is preferable to make the retaining wall not from wood, but, for example, from stone or concrete due to their greater strength

Pros and cons of wooden retaining walls
The positive points include:
- low cost;
- beautiful appearance;
- environmental Safety;
- the ability to independently perform all work.

The downside is the relatively short period of use caused by wood rotting in warm and humid climates.

Choosing a material for wooden retaining walls
A retaining wall can be made from logs or lumber. The most popular are walls made of solid wooden beams, a large selection of which will be provided by every hardware store.

From boards more than 45 mm thick you can make decorative walls of small height.

Using old cut trees and various wood scraps will help you save money.

Choosing a installation method
There are two types of installation - horizontal and vertical.

The type of installation is determined by the length of the purchased material and the presence of roundings at the future wall.

Long logs allow the use of horizontal laying, which will reduce the construction period and increase the durability of the building.

For walls with a semicircular or zigzag shape, it is best to use a vertical type of installation, which allows you to use scraps of material of different lengths and thicknesses.


How to extend the life of wooden material
Due to rotting and harmful insects, the wooden material may become unusable, which will reduce the time of its use or make it impossible.

Antiseptic treatment of wood, as well as coating it in hot bitumen or used machine oil will help prevent this.

The use of creosote will save the wood from rotting and repel insects. You can impregnate the poles with various chemicals, for example, iron or copper sulfate.

Rules for self-construction of a retaining wall
- When constructing wooden walls, a foundation is not required.
- The first step is to compact the soil and add gravel to eliminate possible soil deformations that may occur in the future.
- At each stage we use a level to check that the material is laid correctly.
- To fasten the bottom row, we use reinforcing bars to prevent the wall from sliding down the slope.
- A T-shaped beam, called an anchor, will prevent the wall from tilting and deflecting under the weight of the soil.
- We make a retaining wall with horizontal laying.

To install a horizontal retaining wall you need to:

- Mark the area;
- Dig a trench thirty centimeters deep;
- Fill it with 15 cm of gravel or pebbles and compact it;
- Using reinforcement, lay the bottom beam;
- Lay the first row;
- Continue laying the timber in the second row of the wall;
- Use geotextiles to create drainage;
- Lay the third row;
- Install T-shaped anchors;
- Following the technology, lay the subsequent rows;
- After shrinking, decorate the wall.


Vertical retaining wall
If you want to make a retaining wall from vertical timber, then you need to:

Prepare the material you will use. Most often, logs with a diameter of no more than 20 cm are used. For increased strength, they are all buried at half their length.

- When building a decorative wall of small height, only part of the logs are buried deeply;
- Mark the area;
- Prepare a trench, the depth of which should be 20 cm greater than the planned height of the wall;
- Make a bed of gravel about 25 cm thick and compact it thoroughly;
- Install the end beam. He will be the standard;
- Subsequent beams are installed aligned with the last one;
- Use horizontal planks to fasten the wall, giving strength to the entire structure;
- Arrange drainage;
- Only in cases of high loads install T-shaped anchors.

In this article you learned about the construction of wooden retaining walls. We wish you success in applying the information received to create a unique design for your personal plot.

Photo of a wooden retaining wall


Having a site with a slope, and planning construction on it, it is necessary to keep the soil in the required position. To solve this problem there is a retaining wall. And before strengthening the slope, erecting this structure with your own hands, you should carefully study its characteristic features.
A retaining wall on a site with a slope was invented in order to prevent the movement of the soil mass when the angle of inclination of the slope is greater than the maximum possible for the construction of a natural slope.
So, retaining walls are divided into 2 large groups:
Massive. Their peculiarity lies in the fact that the soil is kept from collapsing due to the wall’s own weight, since this element is an integral single structure, clearly not being divided into a “foundation-wall”. This feature is expressed in the variety of cross-sectional shapes of retaining walls, the edges of which are either vertical or inclined, or even have the same direction. The types of sections are shown in the photo:

Cross-sectional views of massive retaining walls.
However, this type of retaining walls requires more labor and material resources for their construction. Therefore, it is advisable to build this type of structure where cheap materials are available or in abundance.
Materials from which it is possible to construct massive retaining walls include:
- Concrete, rubble concrete, reinforced concrete;
- Fake diamond;
- Stone from natural rocks.
Thin-walled. A characteristic feature of this design is that the “damping” of horizontal pressure occurs due to the soil located on the ledges of the base of the foundation, which performs the holding function together with the wall. This makes it possible to create fortifications that are more stable and less expensive. The most common option is a thin-walled corner-type retaining wall:
- With amplification:
- Buttresses. They are transverse ribs with a pitch of 2-3 m along the entire length of the wall. Works on compression. Used in high retaining walls, when it is desirable to reduce either the thickness of the wall or its reinforcement;
- Anchor rods. They work in tension. Used to create additional forces that will facilitate the work of the retaining wall;
- Console.

“Photo 2 (Corner type retaining wall)”
Its structural elements mainly consist of several parts: foundation and face slabs, buttress or flexible steel anchor, if any.
But the materials for corner-type walls do not differ in variety - they are reinforced concrete in 3 different designs:
- Made. Here, the foundation and front slabs are ready-made elements created in a factory;
- Prefabricated monolithic. In this version, the front slab is prefabricated, and the foundation slab is monolithic. It also happens that the width of the prefabricated foundation slab is not enough and then an additional anchor slab made monolithically is attached to it - this design also belongs to the prefabricated monolithic type;
- Monolithic. Both slabs are made of monolithic reinforced concrete.
Types of materials
When erecting a retaining wall, you should use only certain brands based on the strength of the material resources used:

Assignment of sizes
Having dealt with the structural part, the question arises of how to make a retaining wall.
If geological surveys on the slope have not been carried out, then designing a retaining wall is possible only if the following conditions are met:
- The height of soil support on the slope (H) is no more than 1.4 m;
- The depth of soil freezing is no deeper than 1.5 m.
- The presence of stable, non-heaving soils at the base;
- Groundwater level – no higher than -1500 mm;
If all points agree, you can begin to assign dimensions of thin-walled corner type wall:
Depth of foundation slab:
- For walls up to 3.6 m high - 600 mm;
- Height up to 6.3 m - 900 mm;
- Above - 1200 mm.
The width of the foundation base is selected in accordance with the tables or within the range (0.6-0.9)H:


Protrusion of the foundation slab beyond the front face of the front slab:
- For wall heights up to 3.6 m - 300 mm;
- Up to 6.3 m - 600 mm;
- Above - 900 mm;
Foundation plate thickness 200 - 600 mm;
The thickness of the front plate is at least 100 mm.
For massive walls:
- The depth of the foundation and the width of the foundation are identical to the thin-walled one;
- The thickness of the wall depends on the material. So, choosing a wall made of stone, the required thickness will be 600 mm, of concrete - 400 mm;
However, to confirm the designated dimensions of the retaining wall, it is still advisable to carry out verification calculations, otherwise the wall may not withstand the soil pressure and topple. To check the stability of the soil under the sole, you should use the formulas specified in paragraphs 5.1.17 - 5.1.19, and for calculations based on deformations - section 5.6.
Installation nuances
Reinforcement
The walls are reinforced with spatial reinforcement frames assembled from flat reinforcing meshes, the longitudinal rods of which have a diameter of 8-10 mm, and the transverse rods have a diameter of 8-14 mm. At intersections, the rods are welded together by resistance spot welding in all places or knitted with wire. The reinforcement diagram is shown in the photo.

Important! To achieve the integrity of the entire retaining wall, the face slabs are connected to each other by separate rods with a pitch of 500-600 mm, which are welded or tied to the transverse reinforcement of the distribution grids, forming a spatial frame.
Substrate preparation and expansion joints
If the base contains heaving soils and the depth of soil freezing is below the foundation level on the downstream side, then the weak soil is completely removed and replaced with a cushion of crushed stone or sand. However, there are differences in the structure of the bases and seams, depending on the design solution and the chosen material:
When assembled:
- The prefabricated foundation slab is mounted exclusively on a crushed stone base compacted into the ground. Its minimum thickness is taken to be 100 mm, and the width of the base must be such that it protrudes beyond the edges of the foundation slab by at least 150 mm on each side;
- Expansion joints (a structural cut in the elements of a structure that divides the structure into separate compartments) must be made along the entire length of the wall every 30 m. If the slabs are prefabricated and monolithic, then the spacing of the joints is 25 m.
With monolithic execution:
- The foundation slab must be installed on a leveling concrete preparation, which is 100 mm thick and protrudes beyond the foundation by at least 100 mm. For concrete preparation, concrete grade M50 is used;
- Expansion joints are made every 25 m when using reinforced concrete; in concrete structures that do not have structural reinforcement, every 10 m; and in the presence of structural reinforcement, the step will be 20 m;
Important! The expansion joints must be 30 mm wide. They are formed by introducing a tarred board into a constructive section. In addition, if the soil along the entire length of the wall is heterogeneous, then the expansion joints are organized in such a way that the base of the foundation rests within the same type of soil, while the spacing of the temperature-sediment joints is reduced.
Advice! In the longitudinal direction, build walls horizontally or with a slope not exceeding 0.02. If the slope is higher, then perform the longitudinal walls in steps. And in the transverse direction, the maximum slope can be 0.125 towards the backfill. The slope values are regulated by clause 5.1.3.
Drainage and backfill
To fulfill this nuance, it is necessary to make drainage holes with a diameter of 50 mm in increments of 3-6 m in the front elements of the retaining walls. And a drainage ditch must be organized behind the inner surface of the wall. The drainage collector is made of stone, crushed stone or gravel with a slope, the minimum value of which is 0.04, in the longitudinal direction.

Important! The back surface of the front slab and the entire foundation slab must be protected by waterproofing, which is carried out by coating with hot bitumen in 2 times.
The last step in the construction of a retaining wall is backfilling. But for it you need to use aquiferous soils, such as sandy or coarse soils. It is also possible to use clayey soils with low plasticity and low sand particle content, but then frost heaving will have to be prevented by laying a layer of coarse-grained non-heaving soil on the back side of the front slab to a thickness of 1000 mm. Backfilling is carried out layer by layer, compacting each layer until a compaction coefficient of 0.95 is achieved.
Thus, by designing a retaining wall on a slope according to approved government documents, the retaining wall will last for many years without toppling over. And a beautiful stepped area is pleasing to the eye.
Advice! If you need contractors, there is a very convenient service for selecting them. Just send in the form below a detailed description of the work that needs to be performed and you will receive proposals with prices from construction teams and companies by email. You can see reviews about each of them and photographs with examples of work. It's FREE and there's no obligation.
When a suburban area is located on a hill or near a steep bank of a reservoir, the device is a technical necessity.
Various building materials are used for its construction: natural stones, brick, concrete, wood.

When choosing them, it is important to take into account the architectural features of the country house and the general design of the surrounding landscape.
In landscape design, these structures perform the following tasks:
- Participate in the zoning of the territory;
- Decorative functions;
- Strengthen the soil;
- They create horizontal planes on which planting is possible.

Design features
Retaining walls can be an engineering or decorative structure.

In the first, they are installed to prevent landslides, preventing the soil mass from collapsing or sliding from the side of a hill, ravine or the shore of a reservoir. These are capital structures that require the involvement of specialists.
In the second case, they serve only an aesthetic function and are intended to be a decoration of the countryside exterior.
When choosing a material for a retaining wall, it is important to take into account its strength characteristics, hygroscopicity and the presence of pores. It is recommended to use natural stone as well - their surface has low water absorption and is durable in use. Concrete is also characterized by high strength, but is inferior to the above materials in terms of aesthetics. Although there are modern styles where concrete will look appropriate and harmonious.
Regardless of the purpose of the retaining partition in a certain landscape space, its design is the same for all options - this base and visible part.
From the outside, the vertical plane of the structure can be flat or have a slope, and on the back side it is adjacent to the soil surface.
Important! When starting to design a retaining wall, it is necessary to think about how water will be drained from the structure. The accumulation of moisture on the back side is inevitable.
Construction of a wooden retaining wall
The use of wood to create a retaining wall in a landscape involves the construction of a temporary or decorative structure that is extremely short-lived.


Important! When choosing logs for constructing a wooden retaining wall, you cannot save money. The material must be of high quality, without damage to the surface or signs of disease. Then it will serve longer.
- At the bottom of the trench, the depth of which is half the height of the wall being constructed, sand and rock are laid;
- Part of the wood that is to be immersed in the ground must be treated with bitumen-based mastic;
- To protect the outer part of the wood from mold and rot, it must be treated with antiseptic compounds;
- Logs are immersed in the ditch and connected to each other using metal spirals. Rock is placed in the lower part;
- Then a cement-sand mortar is poured into the ditch.
Important! The main enemy of wood is excessive humidity and dampness. Therefore, the combined drainage device must be installed on the rear side of the structure.

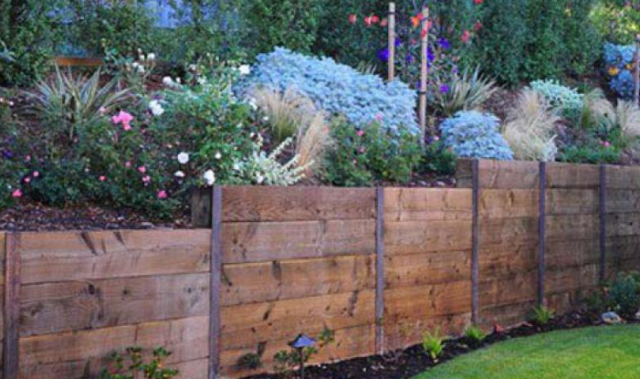

The variety of wooden materials allows you to vary the decorative effect. Of course, the most popular for creating retaining walls are timber and logs. But they can also be presented creatively:


Construction of a concrete retaining wall


Foam blocks
Thanks to the voids inside, they are a very convenient material for creating green walls.


The retaining wall must fit harmoniously into the landscape design - the materials, color and shape of the enclosing structures and the style of the house. Just below are four completely different retaining walls: 


The wall should not stand out against the general background and be dominant. A height of half a meter is enough for such a structure.
If the massiveness of the retaining wall structure is due to technical necessity, then its perception can be facilitated by a device ladders, niches or built-in benches. Such complexes require careful planning, but they look simply magical.


Original retaining wall with built-in bench: 
Plants will become a natural and harmonious decoration of a retaining wall made of natural stone. The construction of earthen pockets during laying allows you to subsequently plant flowers in them. Climbing plants from below and vines from above will add to the overall picture. 


Handmade decorations can look great too. For example, mosaic:


Photo gallery
25 more retaining wall options for inspiration, perhaps one of them will serve as a prototype for your own design:


For a landscape with a slope, it is most rational to terracing the area. Simply put, create a stepped relief, where each horizontal platform is supported by a retaining wall.
Those who have built a house with their own hands know that soil pressure acts on the foundation from the outside - the same story applies to retaining structures. In winter, the matter is complicated by heaving (expansion due to freezing of moisture droplets) of the soil. In order for the design of a retaining wall to be resistant to such impacts, there are several rules for its construction.
UNDERGROUND OR UNDERGROUND?

The location of retaining walls should be designed in such a way that soil is poured into them, and not removed.
- Firstly, the top layer of soil is more stable, and in the lower layers it will settle under the weight of the wall material.
- Secondly, the rear part of the retaining structure will be free to form a drainage system.
- Third, this is the least expensive option without the use of earthmoving equipment.
FOUNDATION CALCULATION. For retaining walls whose height does not exceed 30 cm, it makes no sense to build a foundation - you can limit yourself to crushed stone backfill buried in a trench (10-15 cm). In other cases, the depth of its occurrence and the width of the base directly depend on the height of the wall and the characteristics of the soil. In order not to complicate the calculations, we present the following constant values:
- Depth strip foundation on non-heaving soils for retaining walls from 30 to 80 cm is 30 cm; increasing the height from 80 to 150 cm entails deepening the foundation to 60 cm. On heaving soils, this value is compared with the depth of soil freezing.
- Foundation base width should exceed the width of the base of the wall by at least 15 -20 cm, this will ensure the stability of the entire structure during operation.
Anywaythe foundation is laid on a gravel cushion from 10 to 20 cm. The foundation absolutely must repeat curves walls.

The wall (body) itself will withstand certain loads during operation and may deform over time under soil pressure.
In order to prevent such a process, the body of the retaining wall, if its height exceeds 1.5 m, together with the foundation, is usually made with a slight slope towards the terrace.
The strength of the structure will increase significantly if the line of the wall on the plan has smooth bends (it will not be straight).
DRAINAGE. The key to the durability and stability of a retaining structure is the mandatory presence of a drainage system. Its components are:

- longitudinal drainage - gravel or sand backfill and a perforated drainage pipe laid at the base of the foundation on the back side of the wall;
- transverse drainage - a pipe laid across the body of the wall in order to divert runoff to the outside; the frequency of laying pipes depends on the height of the retaining wall (read further in the article).
Do not neglect this rule - and your work, as well as the invested funds, will not be in vain.
Without drainage on non-heaving In soils, only structures with low (up to 60 cm) “moving walls” can be made (dry masonry, log walls, ready-made modules, where water flows through drainage bedding and holes between the body elements. But even in this case, backfilling with gravel is mandatory The drainage system, together with the crushed stone cushion, is protected from soil penetration and the germination of herbaceous plant roots with geotextiles.
Armed with basic knowledge, you can begin to familiarize yourself with the types of retaining walls available for independent implementation.
STONE WALL
The most decorative and effective type of retaining structure is a wall made of natural stone (sandstone, dolmite). There are two methods of laying this natural material: dry and mortar.

For DRY MASONRY Only those types of stone are suitable that, when chipped or sawed, form relatively flat surfaces.
The strength of this structure is supported by its weight, the slope of the front wall and the necessarily uneven surface of the back.

The most massive stones are placed in its lower part, always in a checkerboard pattern, the voids are filled with small ones and sprinkled with a cement-sand mixture.
The slope of the front wall is about 6 0, the width of the wall at the top is at least 45 cm, but for different types of soil these indicators may fluctuate. On clay soils, the thickness of the base should be at least a quarter of the height of the body. For loose (sandy) and wet soils, this figure increases to half the height; accordingly, the width of the top of the wall also increases.

For walls of greater height or to save material, it is used RIGID CONSTRUCTION, fixed to cement-lime mortar.
To make the masonry more decorative, different-sized elements are used, including inclusions of individual large stones.

The slope of the outer plane of the wall is up to 12 0, provided that its height together with the foundation is more than 1.5 m. For lower heights, the retaining wall made of stone is made the same in width.
A drainage system must be provided in any case: backfilling with crushed stone must be combined with drainage, and it consists not only of a pipe laid at the base, but also of sections of plastic pipe embedded in the wall at a height of about 5 cm from the base perpendicular to the foundation line and with a small slope.
The frequency of laying transverse drainage is 1 m with a wall height of 1.5 m; the lower the height (thickness of the soil), the less often drainage is laid.
MONOLITHIC WALL

The advantage of monolithic retaining wall structures is that there is no need to deeply deepen the foundation - its base goes into the ground to a depth of 15-25 cm.
Among other things, you have an excellent opportunity to cover the wall with any type of facade tile. With a height of up to 1.5 m together with the foundation, the thickness of the monolithic retaining wall can be uniform. The gravel backfill is made no more than 10 cm and compacted thoroughly. The base of the foundation in this case is three times wider than the wall and extends away from the terrace, forming a letter L.

A large height requires the formation of a slope of the front wall up to 10 0. By the way, its appearance only improves from this, since the sun's rays slide along such a wall, hiding defects in the finishing. The width of the foundation base is three times the thickness of the wall in its upper part.
Transverse drainage (pipes across the body of the wall) is laid in the base, extending beyond the boundaries of the formwork with the same frequency as for a stone wall. As for the formwork, its installation begins from the back wall: first, stakes are driven in behind the foundation, leaving space for the formwork and going into the ground a third of the height (otherwise they will not withstand the pressure of the concrete), then the back wall is formed. The next step is the installation of the front wall: vertical pillars cannot be driven into the foundation, so the formwork, lined with roofing felt on the inside (to obtain a smooth surface), is fixed with oblique stops at several height levels.
There are two filling options for monolithic execution: REINFORCED CONCRETE and butoh concrete. For the first, a sufficient minimum wall thickness is 15 cm, for the second 25 cm. Two rows of metal mesh, scraps of reinforcement or pipes, fastened together with wire, are suitable as a reinforcing material. In order to avoid shifting of the outer formwork, pouring concrete (grade M-100) is carried out in stages.

Very convenient option PERMANENT FORMWORK– ready-made hollow blocks are laid on top of each other in a checkerboard pattern, reinforced with reinforcement and filled with concrete.
BUTO-CONCRETEa monolith is made using formwork in the following sequence:
- large stones are laid dry in the lower row,
- crushed stone is poured into the voids, transverse drainage is fixed between them,
- the row is poured, but the stones are not completely covered with concrete, leaving 3-4 cm for adhesion to the next row,
- then again a row of rubble, crushed stone backfill and pouring.
At one time, you can pour as much mortar as you have available, the main thing is that the top row of stones is laid out across the entire width of the wall, and the lower part of the rubble is recessed into concrete. When resuming work, the top of the masonry is moistened with water.
The concrete in the formwork “freezes” for at least 3 days, and the working load on the wall is allowed no earlier than after a month. The technological break can be filled with wall cladding. Drainage is done according to the general scheme, diverting water to a sump and then using it for irrigation.
WALL made of LOG

A log wall is a fairly economical option, but short-lived and is made with the expectation of renewal in 5-10 years.
The exception is larch, which only grows stronger when exposed to moisture. Although, in the areas of the steppe zone, it can hardly be called an economy option.

When choosing the size of logs, the following ratio is used: the length of the workpiece is one and a half times greater than the visible part (wall height), and the diameter is 10% of the length of the workpiece.
Let’s say the height of the retaining wall made of logs is 90 cm (higher is economically unjustified). Then it is necessary to select logs with a length of 135 cm (90 x 1.5) and a diameter of about 14 cm. The method of laying the wall is pile.
The first step is to dig a trench three times the width of the log along the line of laying the retaining wall. Its bottom is carefully compacted, a gravel cushion of 5-10 cm is laid and compacted again. The lower third of the workpieces is freed from bark and soaked in hot drying oil, bitumen or fired, the upper third is treated with a colorless antiseptic.
The trunks are placed in a strictly vertical position and covered with gravel from below. Fill with concrete grade M-100 and allow the solution to sit for at least a week.
Drainage is done according to the general scheme, with a low wall height - without a drainage pipe (the presence of gaps between the logs is sufficient).
BRICK WALL

For a brick retaining wall up to 1 m high, the option of spoon masonry using a cement-sand mortar one brick thick is suitable.
The second row is made with vertical gaps every fourth brick: just do not fill the side gaps with mortar - these are drainage holes.
If a retaining structure is made for the purpose of arranging earthen terraces, the thickness of the walls is increased to one and a half bricks.

As the cement is laid, until the cement hardens, joints are formed: it is better to make them convex or flush with the plane of the wall, but not buried (over time, the strength of the structure may be compromised).
Avoid straight and long brick walls: bends, curvilinearity and different levels make the retaining wall more stable.
The masonry uses both clinker and ordinary bricks made of baked clay. Voids in structural elements can be torn apart by moisture accumulated in them in winter - so use only solid masonry material. The presence of drainage holes does not replace the construction of a full-fledged drainage system behind a brick retaining wall - take care of drainage.
WALL made of HOLLOW BLOCKS and GABIONS

Ready-made modules will help speed up the installation of retaining walls.
Today, the choice among such products is not so great, but manufacturers offer interesting options: from permanent formwork, which can be decorated at your discretion, to shaped elements stacked on top of each other in a checkerboard pattern and gabions.
The cavities of the modules are filled with crushed stone or soil, turning them into containers for vertical gardening. From the same hollow blocks you can mount a monolith on the basis of permanent formwork, as read above (in the MONOLITHIC WALL section).