How to make a double spike on a circular saw. How to cut tenons on a circular saw with your own hands (tenon cutter)
The classic tenon joint still remains the main one in the manufacture of wooden doors and furniture. Of course, no one has made tenons by hand for a long time, working with a hacksaw - a reward and a chisel. Simpler and better quality parts are obtained after processing on machines. But this does not mean that such connections cannot be made at home, using the most popular tools.
A tenon joint involves hollowing out a socket on one part and sawing out a tenon on the other. About chiselling is a separate topic; one of the options is in the article.
The tenons can be main flat, insert flat, insert round (dowels, dowels). Manufacturing in the article.
Here we will limit ourselves to making the main flat tenon using a circular saw.
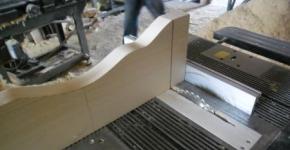
When making a wooden door frame, you need to make spikes on the horizontal bars. If a tenon cutting machine is not available, the tenons can be cut on any milling machine or circular saw. Only for the circular saw you will have to make a special stop so that the part is strictly vertical during processing.
First, we mark the part along the length with spikes. To do this, subtract two widths of the vertical bars from the width of the door and add two lengths of the tenon.
In this case, the length of the spikes is 60 mm. , maybe a little less or more, but this length is just right for the door.
With a door width of 700 mm. and blade width 110 mm. , the length of the jumper is 480 mm. . Plus two 60 mm spikes. , total length of the workpiece is 600 mm. .
The thickness may also vary, here the thickness of the parts is 40 mm. .
Spikes on the circular.
We mark and trim the part along a length of 600 mm. . Now we need a circular saw with variable height. The photo shows a regular inexpensive Corvette, but the model doesn't matter. We set the saw height to 12 mm. , and the guide ruler is 60 mm. , according to external divorce.

We saw through the part crosswise from all sides and from each end, so we get the shoulders of the tenon. By the way, this part of the work can be done with a hacksaw.
The most important thing is to accurately cut the tenons according to their thickness. I have a 15.5 mm slotting drill. , gives a socket 16 mm wide. , accordingly, we need spikes with a thickness of 16 mm. .
The router in the photo is homemade, a table with a vertical shaft, no carriage. Therefore, I cut out the tenons with a circular saw mounted on a router. The saw gives less load than cutters and parts can be processed by holding them with your hands. How to make a device for working with a hand-held circular saw.

What you should pay attention to is that it is desirable that the tenon goes against the stop.
In this case, everything is simple, the tenon rests on the shaft. The width of the saw to the shaft is approximately 58 mm. , which is just right for the job. If there is no stop, then saw through the tenon 3-5 mm short of the shoulders. , then cut with a chisel.

We set the saw at a height of 12 mm. along the upper wire and go through the first thorn, checking it against the socket. The spike should fit tightly into the socket, but be loosened by hand.

When the saw is accurately aligned, we run through all the tenons of the set, immediately sawing out the tenons in thickness and width. If necessary, the tenons are trimmed with a chisel, the planes are leveled, the ends and side edges are rounded. Round tenons - dowels - are also used to assemble joinery products. For hammering out nests at home, a homemade one may be useful.
Spikes with a hand router.
The assembly of tables, coffee tables, chairs, doors and sides of cabinets is also best done on spikes.

Furniture spikes can also be made using a hand router. First, we mark the part, taking into account the required length of the studs. Then we saw through the shoulders using a circular saw or a hacksaw. Place the part on the workbench and secure it with clamps.

At a short distance, but across the workpiece, we install a block of exactly the same thickness and tighten it with clamps to the work table in the same way.

We place a barrel end mill on a hand router, adjust the height and carefully mill the plane of the tenon. The main thing here is to adjust the router so that, after passing the tenon on both sides, you get the exact thickness of the tenon. And after adjustment, we run all the other parts of the same thickness.
(Visited 312 times, 1 visits today)
One day I needed to make many boxes of different sizes from plywood. As you know, plywood does not like fastening with self-tapping screws at the end and often splits as a result.
I had a tenon cutter for the router, but it had low productivity, and besides, when using low-quality plywood, the cutters quickly became dull.
And sharpening the cutter gradually changes its diameter, and it becomes impossible to use it on a tenon cutter. Therefore, the task was set to create a new, more powerful tool with the ability to cut tenons immediately in a stack of blanks to speed up the work.
To solve this problem, I used a stationary circular saw, for which I made a special device. I make the grooves with a block of disks, and the precision of movement is ensured by a pin, which has a fixed thread pitch. I'll tell you how I made this device.
Tenoner base
1. An old homemade saw stop was useful as the base of the tenon cutting device.
2. On the sides of the stop I installed vertical posts made of larch, which were additionally reinforced for rigidity with side pads. I pre-pressed bearings into the racks under the drive pin. I used a stud with an M14 thread and a pitch of 1.75 mm.
3. I move along the stud using a wooden block in which a long nut is hidden. Using a shorter nut may cause the block to skew during movement.
Support board
The box blanks in my design are attached with clamps to the support board. To make it last longer and not be wrinkled by clamps, I used a larch deck board to make it, which I leveled using a surface planer.
At first I planned to make the support a single board, but it would require a clamp at the bottom and, in addition, the bottom edge would be damaged by the saw when cutting the tenons. If I raised the backing board above the level of the tenons, then there would be a problem with chipping on the workpieces, especially those made of plywood. Therefore, I made the support board from two parts.
4. The lower, narrower and shorter part of the support board was rigidly attached to the stop of the tenoner base, and the upper part was left movable. It is moved using a wooden block with a nut and a pin along a groove in the bottom of the support board.
5. At the bottom I installed a replaceable anti-splinter lining made of MDF. I installed a side stop on the moving part of the support board - strictly perpendicular to both the board and the base plate. Then I attached a block to the edge of the base as an additional fastening and made a cut in the base to allow the disk to pass through.
6. For safety, I glued a protective block in the front part where the disk comes out. There is a space left on the sides of this block where handles will be installed to make it easier to move the tenon cutter along the runners of the saw table.
7. To control the position of the disk, I installed two pointers. The first shows when the support board is set to the “zero” position, that is, when the disk is in close contact with the side stop. The second helps to count revolutions when turning the hairpin. As a second counter, I used a wooden “barrel”, rigidly attached to a pin, onto which I marked marks in 1/4 turn increments.
8. To ensure faster operation, I used a “sandwich” of two identical disks and a spacer between them. There are special kits for setting the exact width of the groove, but they are expensive and I don’t have one. To get the gasket of the required thickness, I cut a duralumin washer with a thickness slightly less than required and adjusted it to the required dimensions using self-adhesive aluminum tape. I would like to note that it is better to use new identical disks. I had one new, and the second one was already a little used, as a result, when cutting, a small step appears at the base of the tenon.
9. After a lot of testing and tweaking, I got a “sandwich” with a cutting width of 5.25 mm, which corresponds to 3 turns of the pin (1.75 mm x 3 = 5.25 mm). This made it possible to make 5.25mm wide tenons by turning the pin 6 full turns between cuts. If it was necessary to make larger spikes, then the number of revolutions was proportionally increased.
10. The tenoner is ready for use.
Additional modification of the tenoner
At this point, the production of the tenon cutter could have been completed. However, after a short operation, several shortcomings were discovered in its operation.
Firstly, counting a large number of revolutions is not convenient - you can easily get lost. Secondly, if an incomplete rotation of the pin was required, then the calculation became even more difficult, and the accuracy decreased. Thirdly, since the gap between the pin and the moving support board did not allow the handle to rotate normally, it had to be moved as far to the right as possible, and this long part of the pin sticking out made the device not very convenient.
To correct these shortcomings, I decided to install a “gearbox” on a pin made of two gears located at right angles to each other. The size of the gears was chosen so that for one revolution of the drive gear the pin makes 3 revolutions. The most affordable option for me was to make the gears from wood, so I used 13mm birch plywood as the material.
11. I obtained the gear drawings using Matthias Wandel's gear generator, which can be found on his website. Next, I glued the printouts onto the plywood and cut out the gears with a band saw.
12. To ensure that the gears mesh well, their teeth were cut at an angle of 11 degrees. Moreover, different sides of the tooth were cut accordingly with an inclination in different directions. My band saw only allows the table to tilt in one direction, so I did not use the tilt of its table, but made an inclined base and attached it to the saw table with a clamp. I cut the left sides of the teeth first while tilting to the right, and then flipped the fence over and cut the right sides. I connected both cuts at the base with a hand jigsaw.
13.After that, I ground each tooth and drilled the central hole.
14. The gear works only with the upper parts of the teeth, so I did not carefully process their lower parts.
15. Installation of the “gearbox”. First, I cut off part of the right post with a hand saw and tried to install a furniture nut to secure the drive gear. However, this option turned out to be a failure. Due to the bearing installed in the strut, it was impossible to secure the nut tightly with long self-tapping screws, and the large lever of the drive gear led to strong beating. The idea of simply putting a large gear on a bolt was also bad: in order for the gear to rotate easily, a small amount of play was needed, and this also caused runout.
16. I had to press a bearing into the gear, and instead of a furniture nut, put a 3 mm thick metal plate with fasteners that extended beyond the bearing in the rack. To compensate for the thickness of the metal plate, I made a recess in the gear on the inside.
17. I installed a handle on the drive gear and numbered the teeth for convenience (a turn by one tooth is equal to 1/4 turn of the pin). At the bottom of the stand I made a counter risk for precise positioning. After that, I sawed off an extra piece of the stud on the right and covered the structure with wax for better glide and protection from moisture and dirt.
18. By turning the drive gear different numbers of revolutions, I get studs of different thicknesses and can even make them unequal.
How to make a tongue and groove connection?
Tenon and groove - what is it?
First of all, you need to define what a tenon and groove is. This is nothing more than a way of connecting parts.
It is used most often in carpentry, as well as in other types of production. There are many types of grooves and tenons, but we'll talk about that another time.
Properly executed tenons and grooves are sufficiently firmly connected to each other. This connection is considered one of the strongest.
Tongue and groove connection method

First you need to determine for what purpose this connection method is needed. If this is a table, then the jumpers in it are usually connected to the vertical legs.
Consequently, the wood fibers run vertically and horizontally. If this is a wall table or a bedside table with drawers, then the jumpers here will be located a little differently. They will be horizontal relative to the legs.
In any case, such a connection will be the most reliable. When making a large number of tongue-and-groove joints, special machines are used. If you need one or more tongue and groove joints, and there is no carpentry equipment at hand, then it would be advisable to do this manually. To do this you will need a set of carpentry tools, including:
- hacksaw;
- clamp - 2 pcs;
- measuring instrument;
- pencil for marking.
First we will make a spike for the future connection.
To do this, you need to take a bar and mark the dimensions of the future tenon on it.

First, mark the length of the spike. We do this on all surfaces of the workpiece.


After this, we place the workpiece on the table, place an even bar on it along the transverse line of the length of the tenon and secure it with a clamp. This is necessary in order to obtain a perfectly perpendicular cut.


We make cuts along the marked perimeter of the length of the tenon, rearranging the bar with the clamp.
We proceed to cutting out the cross section of the tenon.

Using a clamp, we secure the workpiece to the table in a vertical position.


To obtain a straight cut, we will use a pre-prepared T-shaped template. It is a plate of plywood with a strip attached to it, as in the photo. We attach the template to the workpiece with a clamp. Next, we make cuts on the wide sides of the tenon.


On the narrow sides of the section, if it is small, cuts can be made without using a T-shaped template. It is important to control the position of the hacksaw blade; it must be strictly parallel to the workpiece.

As a result, we obtain a high-quality spike according to the specified dimensions.
Let's move on to making the groove.

Again, we start with the markup. On the workpiece at the tenon-groove joint we mark the cross-sectional dimension of the tenon.


We fix the workpiece on the table with a clamp. If the workpiece is thin, then for ease of fastening we take several parts or a board of the appropriate size and fasten them with a clamp, as shown in the photo.

First, we cut a hole in width; to ensure perpendicularity, the chisel is placed at the corner.


We make a recess to a given size according to the tenon length mark, having previously applied it to the chisel tip.

After the specified depth is reached, we clean the groove and insert the part with a tenon.

The tongue-and-groove connection is ready.
How to make a tongue and groove connection correctly? A few more subtleties
Not being able to make a tongue-and-groove joint on a special machine, it can be done with high quality at home, using the method of Yu. A. Egorov.
To do this, you need to calculate the cutting width of the saw, which can be determined by the size of the teeth. You only need to make just a few cuts on any piece of wood.

Getting to work directly, we measure the thickness of the first part (the future tenon) and draw a line on the expected location of the groove on the second part.
Now we apply both parts to one another so that their ends coincide. Along the side edges, relative to each other, we shift them by the width of the cut.
We fix the parts in the workbench and make cuts evenly across the width. In the case of different thicknesses of parts, the thinner part contains deeper cuts and vice versa. We pay special attention to ensure that the cuts do not create cone-shaped tenons.
If the shift is less than the width of the cut, the parts will fit tightly. This will be important for any kind of furniture fastenings.

By making the shift greater than the width of the cut, the normal operation of detachable fasteners (on a pin) is ensured.
Observing the depth and length of the cuts, we make new ones in the middle of the tenons we don’t need. After this, we carefully remove the unsuitable spikes with a chisel, making grooves out of them, and clean them.
If the connection is supposed to be permanent, it is glued on and the entire product is sanded.
How to make a tenon and groove joint with a router
The tenon and groove connection, as we see, can be done manually. However, if there are a lot of tenon and groove joints, it is better to use a router. A router with a work table will be especially useful in such cases.
To facilitate the process of obtaining a hole in a workpiece for a tenon-groove connection using a milling cutter in large quantities, for example, making stools, you can make a jig.

Then making the grooves will take you just a few minutes.

To do this, initially limiters in the form of slats are installed on a sheet of plywood and holes are cut to the size of the required groove for the drawer and leg. Two slats are attached along the width of the router, limiting the transverse shift, the other two are set taking into account the length of the device and the size of the groove.


We attach two bars to the table, the dimensions corresponding to the workpiece, so that it can move freely along its length.


We set and secure the stop.

Then we fasten the device with self-tapping screws to the bars on the table.

We take equipment equipped with a straight cutter and set the milling depth. We do this using a ready-made sample.

We set the milling depth taking into account the thickness of the jig.

A prerequisite for milling is to secure the workpiece with a clamp, otherwise it may move under the force of the cutter.

Then we directly process the groove.

The groove hole is ready.
Let's move on to making the spike. In small-scale production, it is convenient to do this on a circular saw.


We begin making the tenon by measuring the groove. The depth of the groove will be the length of the tenon.


We set the length of the groove on the machine taking into account the width of the tool. We set the circular saw at the level of half the difference between the width of the workpiece and the length of the groove from the table surface. Then we make two cuts along the length of the tenon. It is better to make test cuts when setting up a circular saw on unnecessary pieces of wood, otherwise you can ruin a good part.


The preparatory work has been completed. Let's start cutting out the tenon directly.


To do this, we set the circular saw to the length of the tenon, and the size from the cutting tool to the stop is half the difference between the width of the workpiece and the length of the groove. We make two cuts along the width of the workpiece on opposite sides.


The next operation will be to change the size from the tool to the stop. In this case, the distance will be equal to half the difference between the height of the workpiece and the width of the groove. We make the remaining two cuts.


Now take a carpenter's knife and round off the corners of the tenon.


The final processing is carried out using sandpaper, for convenience attached to a block.

We check how the tenon fits into the groove. It should fit snugly and not wobble.
Thus, we looked at some types of tenons and grooves that you can make either yourself or by ordering from the factory.
Although recently metal guides and all kinds of new fasteners have come into fashion, the tongue-and-groove connection still deserves respect and is one of the most durable connections.
Using it not only in woodworking products, various enterprises began to produce higher quality goods.
You can also watch a video of making tenons on a tabletop circular saw
Selected for you: